steering INFINITI QX50 2021 Service Manual
[x] Cancel search | Manufacturer: INFINITI, Model Year: 2021, Model line: QX50, Model: INFINITI QX50 2021Pages: 542, PDF Size: 3.51 MB
Page 239 of 542
Press theto decrease the rear
temperature.
If front passengers touch the “
SYNC”
key on the CLIMATE screen, the rear tem-
perature settings will synchronize with the
driver’s and passenger’s side settings.
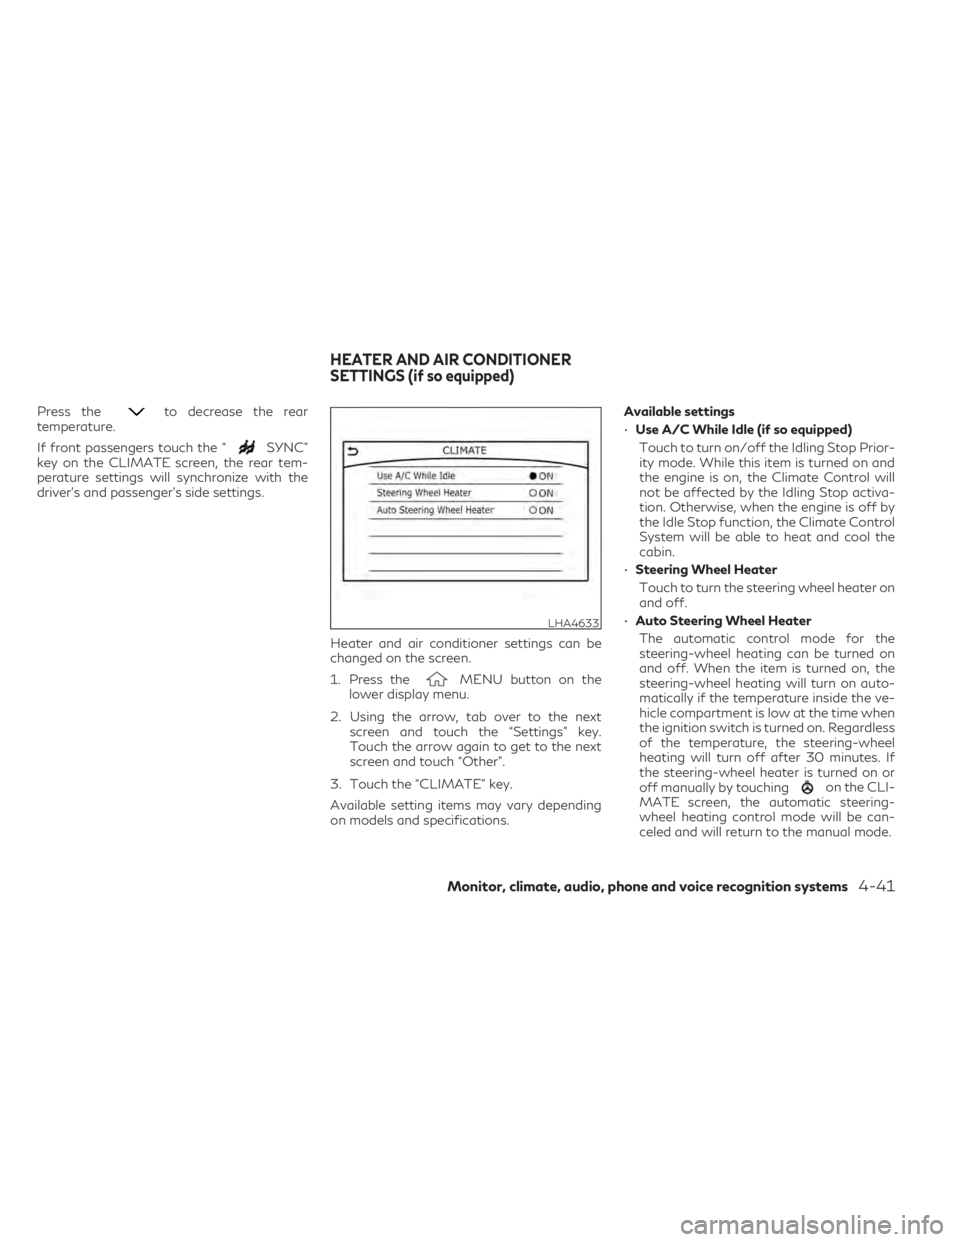
Heater and air conditioner settings can be
changed on the screen.
1. Press the
MENU button on the
lower display menu.
2. Using the arrow, tab over to the next screen and touch the “Settings” key.
Touch the arrow again to get to the next
screen and touch “Other”.
3. Touch the “CLIMATE” key.
Available setting items may vary depending
on models and specifications. Available settings
•
Use A/C While Idle (if so equipped)
Touch to turn on/off the Idling Stop Prior-
ity mode. While this item is turned on and
the engine is on, the Climate Control will
not be affected by the Idling Stop activa-
tion. Otherwise, when the engine is off by
the Idle Stop function, the Climate Control
System will be able to heat and cool the
cabin.
• Steering Wheel Heater
Touch to turn the steering wheel heater on
and off.
• Auto Steering Wheel Heater
The automatic control mode for the
steering-wheel heating can be turned on
and off. When the item is turned on, the
steering-wheel heating will turn on auto-
matically if the temperature inside the ve-
hicle compartment is low at the time when
the ignition switch is turned on. Regardless
of the temperature, the steering-wheel
heating will turn off after 30 minutes. If
the steering-wheel heater is turned on or
off manually by touching
on the CLI-
MATE screen, the automatic steering-
wheel heating control mode will be can-
celed and will return to the manual mode.
LHA4633
HEATER AND AIR CONDITIONER
SETTINGS (if so equipped)
Monitor, climate, audio, phone and voice recognition systems4-41
Page 240 of 542
–– If the surface temperature of thesteering-wheel is above the temperature
within which the system is designed to
operate, the system will not heat the
steering-wheel. This is not a malfunction. The air conditioner system in your INFINITI
vehicle is charged with a refrigerant designed
with the environment in mind.
This refrigerant does not harm the earth's
ozone layer.
Special charging equipment and lubricant is
required when servicing your INFINITI air
conditioner. Using improper refrigerants or
lubricants will cause severe damage to your
air conditioner system. For additional infor-
mation, see “Air conditioner system refriger-
ant and oil recommendations” (P. 10-7).
It is recommended that you visit an INFINITI
retailer for servicing your “environmentally
friendly” air conditioning system.
WARNING
The air conditioner system contains refrig-
erant under high pressure. To avoid per-
sonal injury, any air conditioner service
should be done only by an experienced
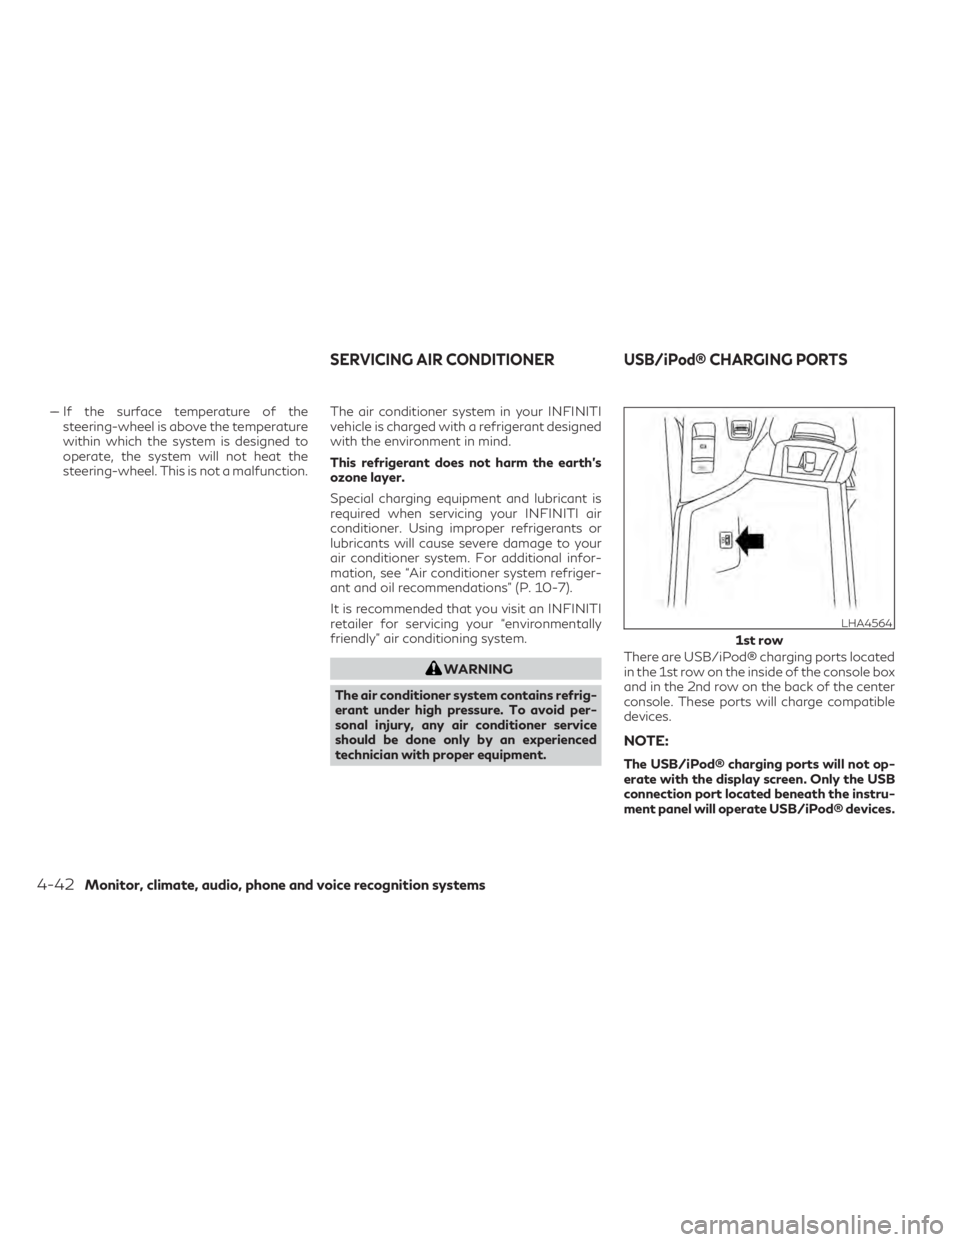
technician with proper equipment. There are USB/iPod® charging ports located
in the 1st row on the inside of the console box
and in the 2nd row on the back of the center
console. These ports will charge compatible
devices.
NOTE:
The USB/iPod® charging ports will not op-
erate with the display screen. Only the USB
connection port located beneath the instru-
ment panel will operate USB/iPod® devices.
LHA4564
1st row
SERVICING AIR CONDITIONER USB/iPod® CHARGING PORTS
4-42Monitor, climate, audio, phone and voice recognition systems
Page 243 of 542

System malfunction......................... 5-39
System maintenance ........................ 5-39
Lane Departure Prevention (LDP)
(if so equipped) ................................ 5-40
LDP system operation ....................... 5-41
How to enable/disable the LDP system ......5-42
LDP system limitations ......................5-42
System temporarily unavailable ..............5-44
System malfunction ......................... 5-44
System maintenance ........................ 5-45
Blind Spot Warning (BSW) .....................5-45
BSW system operation ......................5-47
How to enable/disable the BSW system .....5-48
BSW system limitations .....................5-49
BSW driving situations ......................5-50
System temporarily unavailable ..............5-52
System maintenance ........................ 5-53
Blind Spot Intervention® (BSI) (if so equipped) . . . 5-54 BSI system operation ....................... 5-56
How to enable/disable the BSI system .......5-58
BSI system limitations ....................... 5-58
BSI driving situations ........................ 5-60
System temporarily unavailable ..............5-65
System malfunction ......................... 5-65
System maintenance ........................ 5-65Rear Cross Traffic Alert (RCTA)
................5-67
RCTA system operation .....................5-68
How to enable/disable the RCTA system ....5-70
RCTA system limitations .....................5-71
System temporarily unavailable ..............5-73
System maintenance ........................ 5-74
Cruise control (if so equipped) ..................5-75
Precautions on cruise control ................5-75
Cruise control operations ....................5-76
ProPILOT Assist (if so equipped) ................5-77
ProPILOT Assist system operation ..........5-79
Turning
the conventional (fixed speed)
cruise control mode on ......................5-82
Operating ProPILOT Assist .................5-82
How to enable/disable the Steering
Assist ...................................... 5-86
Intelligent Cruise Control (ICC)
(for vehicles with ProPILOT Assist) ..........5-87
Steering Assist .............................. 5-97
Conventional (fixed speed) cruise control
mode ...................................... 5-103
Distance Control Assist (DCA) (if so equipped) . . 5-106 DCA system operation .....................5-108
How to enable/disable the DCA system ....5-111
DCA system limitations .....................5-112
Page 244 of 542
DCA driving situations.....................5-114
System temporarily unavailable .............5-115
System maintenance ....................... 5-117
Rear Automatic Braking (RAB) .................5-118
RAB system operation .....................5-119
Turning the RAB system on/off ............5-120
RAB system limitations .....................5-120
System malfunction ........................ 5-122
System maintenance ....................... 5-122
Forward Emergency Braking (FEB) with
Pedestrian Detection system ..................5-123
System operation .......................... 5-124
Turning the FEB with Pedestrian
Detection system on/off ...................5-126
FEB with Pedestrian Detection system
limitations ................................. 5-127
System temporarily unavailable .............5-130
System malfunction ........................ 5-131
System maintenance ....................... 5-132
Predictive Forward Collision Warning
(PFCW) ...................................... 5-133
PFCW system operation ...................5-135
Turning the PFCW system on/off ..........5-136
PFCW system limitations ...................5-137
System temporarily unavailable .............5-142 System malfunction
........................ 5-143
System maintenance ....................... 5-143
Break-in schedule ............................. 5-144
Fuel efficient driving tips ......................5-144
Increasing fuel economy .......................5-145
Intelligent All-Wheel Drive (AWD)
(if so equipped) ............................... 5-146
Parking/parking on hills .......................5-148
Power steering ............................... 5-149
Electric power steering type ................5-149
Direct Adaptive Steering® type .............5-150
Brake system ................................. 5-152
Brake precautions ..........................
5-152
Anti-lock
Braking System (ABS) .............5-152
Brake Assist ............................... 5-153
Vehicle Dynamic Control (VDC) system ........5-154
Brake force distribution ....................5-155
Chassis Control ............................... 5-156
Active Trace Control ....................... 5-156
Active Engine Brake ........................ 5-157
Active Ride Control ........................ 5-158
Hill start assist system ........................ 5-159
Front and rear sonar system (if so equipped) . . . 5-160 System operation .......................... 5-160
Page 248 of 542
Additional information:
• When replacing a wheel without the TPMSsuch as the spare tire, the TPMS does not
monitor the tire pressure of the spare tire.
• The TPMS will activate only when the ve- hicle is driven at speeds above 16 mph (25
km/h). Also, this system may not detect a
sudden drop in tire pressure (for example, a
flat tire while driving).
• The low tire pressure warning light does not automatically turn off when the tire
pressure is adjusted. After the tire is in-
flated to the recommended pressure, the
vehicle must be driven at speeds above 16
mph (25 km/h) to activate the TPMS and
turn off the low tire pressure warning light.
Use a tire pressure gauge to check the tire
pressure.
• The “Tire Pressure Low — Add Air” warning appears in the vehicle information display
when the low tire pressure warning light is
illuminated and low tire pressure is de-
tected. The “Tire Pressure Low - Add Air”
warning turns off when the low tire pres-
sure warning light turns off.
• The “Tire Pressure Low — Add Air” warning appears each time the ignition switch is in
the ON position as long as the low tire
pressure warning light remains illuminated. • The “Tire Pressure Low — Add Air” warning
does not appear if the low tire pressure
warning light illuminates to indicate a
TPMS malfunction.
• Tire pressure rises and falls depending on the heat caused by the vehicle’s operation
and the outside temperature. Do not re-
duce the tire pressure after driving because
the tire pressure rises after driving. Low
outside temperature can lower the tem-
perature of the air inside the tire which can
cause a lower tire inflation pressure. This
may cause the low tire pressure warning
light to illuminate. If the warning light illu-
minates, check the tire pressure for all four
tires.
• The Tire and Loading Information label is located in the driver's door opening.
• You can also check the pressure of all tires (except the spare tire) on the vehicle infor-
mation display screen. The order of the tire
pressure figures displayed on the screen
corresponds with the actual order of the
tire position.
For additional information, see “Low tire
pressure warning light” (P. 2-13) and “Tire
Pressure Low — Add Air” (P. 2-24).WARNING
• Radio waves could adversely affect elec-
tric medical equipment. Those who use a
pacemaker should contact the electric
medical equipment manufacturer for the
possible influences before use.
• If the low tire pressure warning light illu-
minates while driving, avoid sudden
steering maneuvers or abrupt braking,
reduce vehicle speed, pull off the road to
a safe location and stop the vehicle as
soon as possible. Driving with under-
inflated tires may permanently damage
the tires and increase the likelihood of
tire failure. Serious vehicle damage could
occur and may lead to an accident and
could result in serious personal injury.
Check the tire pressure for all four tires.
Adjust the tire pressure to the recom-
mended COLD tire pressure shown on
the Tire and Loading Information label to
turn the low tire pressure warning light
off. If you have a flat tire, replace it with
a replacement tire as soon as possible.
(For additional information, see “Flat
tire” (P. 6-3) for changing a flat tire.)
5-6Starting and driving
Page 251 of 542
Be attentive at all times, and avoid driving
when tired. Never drive when under the influ-
ence of alcohol or drugs (including prescrip-
tion or over-the-counter drugs which may
cause drowsiness). Always wear your seat
belt as outlined in the “Safety – Seats, seat
belts and supplemental restraint system” sec-
tion of this manual, and also instruct your
passengers to do so.
Seat belts help reduce the risk of injury in
collisions and rollovers.In a rollover crash, an
unbelted person is significantly more likely
to die than a person wearing a seat belt.
OFF-ROAD RECOVERY
While driving, the right side or left side wheels
may unintentionally leave the road surface. If
this occurs, maintain control of the vehicle by
following the procedure below. Please note
that this procedure is only a general guide.
The vehicle must be driven as appropriate
based on the conditions of the vehicle, road
and traffic.
1. Remain calm and do not overreact.
2. Do not apply the brakes.
3. Maintain a firm grip on the steering wheel with both hands and try to hold a straight
course. 4. When appropriate, slowly release the ac-
celerator pedal to gradually slow the
vehicle.
5. If there is nothing in the way, steer the vehicle to follow the road while vehicle
speed is reduced. Do not attempt to drive
the vehicle back onto the road surface
until vehicle speed is reduced.
6. When it is safe to do so, gradually turn the steering wheel until both tires return to
the road surface. When all tires are on the
road surface, steer the vehicle to stay in
the appropriate driving lane.
• If you decide that it is not safe to return the vehicle to the road surface based on
vehicle, road or traffic conditions,
gradually slow the vehicle to a stop in a
safe place off the road.
RAPID AIR PRESSURE LOSS
Rapid air pressure loss or a “blow-out” can
occur if the tire is punctured or is damaged
due to hitting a curb or pothole. Rapid air
pressure loss can also be caused by driving on
under-inflated tires.
Rapid air pressure loss can affect the han-
dling and stability of the vehicle, especially at
highway speeds. Help prevent rapid air pressure loss by main-
taining the correct air pressure and visually
inspecting the tires for wear and damage. For
additional information, see “Wheels and tires”
(P. 8-27). If a tire rapidly loses air pressure or
“blows-out” while driving, maintain control of
the vehicle by following the procedure below.
Please note that this procedure is only a gen-
eral guide. The vehicle must be driven as ap-
propriate based on the conditions of the ve-
hicle, road and traffic.
WARNING
The following actions can increase the
chance of losing control of the vehicle if
there is a sudden loss of tire air pressure.
Losing control of the vehicle may cause a
collision and result in personal injury.
• The vehicle generally moves or pulls in
the direction of the flat tire.
• Do not rapidly apply the brakes.
• Do not rapidly release the accelerator
pedal.
• Do not rapidly turn the steering wheel.
1. Remain calm and do not overreact.
2. Maintain a firm grip on the steering wheel with both hands and try to hold a straight
course.
Starting and driving5-9
Page 253 of 542
•Stay alert when driving to the top of a
hill. At the top there could be a drop-off
or other hazard that could cause an
accident.
• If your engine stalls or you cannot make
it to the top of a steep hill, never attempt
to turn around. Your vehicle could tip or
roll over. Always back straight down in R
(Reverse) gear and apply brakes to con-
trol your speed.
• Heavy braking going down a hill could
cause your brakes to overheat and fade,
resulting in loss of control and an acci-
dent. Apply brakes lightly and use a low
gear to control your speed.
• Unsecured cargo can be thrown around
when driving over rough terrain. Prop-
erly secure all cargo so it will not be
thrown forward and cause injury to you
or your passengers.
• Secure heavy loads in the cargo area as
far forward and as low as possible. Do
not equip the vehicle with tires larger
than specified in this manual. This could
cause your vehicle to roll over. •
Do not grip the inside or spokes of the
steering wheel when driving off-road.
The steering wheel could move suddenly
and injure your hands. Instead drive with
your fingers and thumbs on the outside
of the rim.
• Before operating the vehicle, ensure that
the driver and all passengers have their
seat belts fastened.
• Always drive with the floor mats in place
as the floor may become hot.
• Lower your speed when encountering
strong crosswinds. With a higher center
of gravity, your INFINITI is more af-
fected by strong side winds. Slower
speeds ensure better vehicle control.
• Do not drive beyond the performance ca-
pability of the tires, even with AWD
engaged.
• For AWD equipped vehicles, do not at-
tempt to raise two wheels off the ground
and shift the transmission to any drive or
reverse position with the engine running.
Doing so may result in drivetrain damage
or unexpected vehicle movement which
could result in serious vehicle damage or
personal injury. •
Do not attempt to test an AWD
equipped vehicle on a 2-wheel dyna-
mometer (such as the dynamometers
used by some states for emissions test-
ing) or similar equipment even if the
other two wheels are raised off the
ground. Make sure you inform test facil-
ity personnel that your vehicle is
equipped with AWD before it is placed
on a dynamometer. Using the wrong test
equipment may result in drivetrain dam-
age or unexpected vehicle movement
which could result in serious vehicle dam-
age or personal injury.
• When a wheel is off the ground due to an
unlevel surface, do not spin the wheel
excessively.
• Accelerating quickly, sharp steering ma-
neuvers or sudden braking may cause
loss of control.
• If at all possible, avoid sharp turning ma-
neuvers, particularly at high speeds.
Your INFINITI vehicle has a higher center
of gravity than a passenger car. The ve-
hicle is not designed for cornering at the
same speeds as passenger cars. Failure
to operate this vehicle correctly could re-
sult in loss of control and/or a rollover
accident.
Starting and driving5-11
Page 263 of 542

Manual shift mode
The transmission enters the manual shift
mode by moving the shift lever again to the D
(Drive) position when the vehicle is in the D
range.
You can select the manual shift range by
pulling the left side or right side paddle shifter
OAandOB. To cancel the manual shift mode,
move the shift lever to the D (Drive) position
again. The transmission returns to the auto-
matic drive mode.
When the shift lever is shifted from D (Drive)
to the manual shift mode with the vehicle stopped or while driving, the transmission
enters the manual shift mode. Shift ranges
can be selected manually. Shift ranges can
also be selected using the paddle shifters on
the steering wheel. When you pull the paddle
shifter while in the D (Drive) position, the
transmission will shift to the upper or lower
range temporarily. If the paddle shifters are
not used for about 5–10 seconds, the trans-
mission will automatically return to the D
(Drive) position. If you want to return to the D
(Drive) position manually, pull and hold either
paddle shifter for about 1.5 seconds.In the manual shift mode, the shift range is
displayed on the position indicator in the me-
ter. When moving the shift lever to the
manual shift mode, the position indicator dis-
plays 1 (1st) up to 8 (8th) depending on ve-
hicle speed.
Shift ranges up or down one by one as
follows:
1⇔
2⇔ 3⇔ 4⇔ 5⇔ 6⇔ 7⇔ 8
8 (8th)
Use this position for all normal forward driv-
ing at highway speeds.
7 (7th), 6 (6th) and 5 (5th)
Use this position when driving up long slopes,
or for engine braking when driving down long
slopes.
4 (4th), 3 (3rd) and 2 (2nd)
Use these positions for hill climbing or engine
braking on downhill grades.
1 (1st)
Use this position when climbing steep hills
slowly or when driving slowly, or for maxi-
mum engine braking on steep downhill
grades.
LSD2822
Manual shift gate
LSD2914
Paddle shifters
Starting and driving5-21
Page 271 of 542

STANDARD MODE
STANDARD mode is recommended for nor-
mal driving. Push the Drive Mode Selector
switch until “STANDARD” appears in the ve-
hicle information display. STANDARD mode
will also be displayed in the upper display.
SPORT MODE
The SPORT mode adjusts the engine and
transmission to enhance performance. Push
the Drive Mode Selector switch to the
SPORT position. “SPORT” appears in the ve-
hicle information display. SPORT mode will
also be displayed in the upper display.
NOTE:
In the SPORT mode, fuel economy may be
reduced.
PERSONAL MODE
PERSONAL mode is used for adjusting the
steering mode and drive modes. Turn the
PERSONAL mode off for normal driving.
Push the Drive Mode Selector switch until
“PERSONAL” appears in the vehicle informa-
tion display. PERSONAL mode will also be
displayed in the upper display. For additional
information, refer to the INFINITI InTouch™
Owner’s Manual.
How to set the PERSONAL mode
Perform the following steps to set the PER-
SONAL mode:
1. Press the MENU button
O1and select
“Drive Mode Selector” on the lower
display.
2. Select “Engine/Transmission,” “Steering,” “Active Trace Control” or “Active Engine
Brake” and select each item. (See “Engine/
Transmission,” “Steering,” “Active Trace
Control” or “Active Engine Brake” about
the feature of each item.) 3. Select “Back” or press the MENU button
to finish the PERSONAL mode setting.
Engine/Transmission:
“Engine/Transmission” can be set to “Stan-
dard,” “Sport” or “Eco.”
Steering (models with Direct Adaptive
Steering®):
Four combinations of steering mode and
steering response can be set.
Mode Response
Sport Dynamic+
Dynamic
Default
Standard Default
Steering (models without Direct Adaptive
Steering®):
“Steering” can be set to “Sport” or “Standard.”
Active Trace Control:
“Active Trace Control” can be set to ON (en-
abled) or OFF (disabled). For additional infor-
mation, see “Active Trace Control” (P. 5-156).
LSD2982
Starting and driving5-29
Page 277 of 542

WARNING
Failure to follow the warnings and instruc-
tions for proper use of the LDW system
could result in serious injury or death.
• This system is only a warning device to
inform the driver of a potential unin-
tended lane departure. It will not steer
the vehicle or prevent loss of control. It is
the driver’s responsibility to stay alert,
drive safely, keep the vehicle in the trav-
eling lane, and be in control of the vehicle
at all times. The LDW system will operate when the ve-
hicle is driven at speeds of approximately 37
mph (60 km/h) and above, and only when the
lane markings are clearly visible on the road.
The LDW system monitors the lane markers
on the traveling lane using the camera unit
O1
located above the inside mirror.
The LDW system warns the driver with an
indicator in the vehicle information display
and the steering wheel will vibrate, indicating
that the vehicle is beginning to leave the driv-
ing lane. For additional information, see
“LDW system operation” (P. 5-36).
LSD2823
LANE DEPARTURE WARNING (LDW)
Starting and driving5-35