ignition INFINITI QX50 2023 Repair Manual
[x] Cancel search | Manufacturer: INFINITI, Model Year: 2023, Model line: QX50, Model: INFINITI QX50 2023Pages: 548, PDF Size: 6.17 MB
Page 187 of 548
Laws in some local communities may restrict
or prohibit the use of Remote Engine Start, or
the amount of time a parked vehicle engine
may idle. For example, some laws require a
person using Remote Engine Start to have
the vehicle in view or may restrict idling time
except in freezing temperatures. Check local
regulations for any requirements.
Other conditions may affect the function of
the Remote Engine Start feature. For addi-
tional information, see “Conditions the Re-
mote Engine Start will not work” (P. 3-20).
Other conditions can affect the performance
of the Intelligent Key transmitter. For addi-
tional information, see “INFINITI Intelligent
Key” (P. 3-2).
REMOTE ENGINE START
OPERATING RANGE
WARNING
• To help avoid risk of injury or death
through unintended operation of the ve-
hicle and/or its systems, including en-
trapment in windows or inadvertent
door lock activation, do not leave chil-
dren, people who require the assistance
of others or pets unattended in your vehicle. Additionally, the temperature
inside a closed vehicle on a warm day can
quickly become high enough to cause a
significant risk of injury or death to
people and pets.
• Do not use Remote Engine Start in closed
spaces such as a garage. Do not breathe
exhaust gases; they contain colorless
and odorless carbon monoxide. Carbon
monoxide is dangerous. It can cause un-
consciousness or death.
CAUTION
When the Intelligent Key battery is dis-
charged or other strong radio wave
sources are present near the operating lo-
cation, the Intelligent Key operating range
becomes narrower, and the Intelligent Key
may not function properly.
The Remote Engine Start function can only
be used when the Intelligent Key is within the
specified operating range from the vehicle.
The Remote Engine Start operating range is
approximately 197 ft (60 m) from the vehicle.
REMOTE STARTING THE
VEHICLE
To use the Remote Engine Start feature per-
form the following:
1. Aim the Intelligent Key at the vehicle.
2. Press the
button to lock all doors.
3. Within 5 seconds press and hold the
button until the turn signal lights flash and
the tail lamps turn on. If the vehicle is not
within view press and hold the
but-
ton for at least 2 seconds.
The following events will occur when the en-
gine starts:
• The parking lights will turn on and remain on as long as the engine is running.
• The doors will be locked and the climate control system may come on.
• The engine will continue to run for 10 min- utes. Repeat the steps to extend the time
for an additional 10 minutes. For additional
information, see “Extending engine run
time” (P. 3-20).
Press and hold the brake pedal while switch-
ing the ignition to the ON position before
driving. For additional information, see “Driv-
ing the vehicle” (P. 5-18).
Pre-driving checks and adjustments3-19
Page 188 of 548
EXTENDING ENGINE RUN TIME
The Remote Engine Start feature can be ex-
tended one time by performing the steps listed
in “Remote starting the vehicle” (P. 3-19). Run
time will be calculated as follows:
• The first 10 minute run time will startwhen the Remote Engine Start function is
performed.
• The second 10 minutes will start immedi- ately when the Remote Engine Start func-
tion is performed again. For example, if the
engine has been running for 5 minutes, and
10 minutes are added, the engine will run
for a total of 15 minutes.
• Extending engine run time will bring you to the two Remote Engine Start limit.
A maximum of two Remote Engine Starts, or
a single start with an extension, are allowed
between ignition cycles.
The ignition switch must be cycled to the ON
position and then back to the OFF position
before the Remote Engine Start procedure
can be used again.
CANCELING A REMOTE ENGINE
START
To cancel a Remote Engine Start, perform
one of the following:
• Aim the Intelligent Key at the vehicle and press
until the parking lights turn off.
• Turn on the hazard warning flashers.
• Cycle the ignition switch on and then off.
• The extended engine run time has expired.
• The first 10 minute timer has expired.
• Opening the engine hood.
• Shifting the vehicle out of P (Park).
• The alarm sounds due to illegal entry into the vehicle.
• Pushing the ignition switch without the In- telligent Key in the vehicle.
• Not pressing the brake pedal while pressing the ignition switch with the Intelligent Key
in the vehicle.
CONDITIONS THE REMOTE
ENGINE START WILL NOT WORK
The Remote Engine Start will not operate if
any of the following conditions are present:
• The ignition switch is placed in the ONposition.
• The hood is not securely closed.
• The hazard indicator lights are on.
• The engine is still running. The engine must be completely stopped. Wait at least 6 sec-
onds if the engine goes from running to off.
This is not applicable when extending en-
gine run time.
• The
button is not pressed and held for
at least 2 seconds.
• The
button is not pressed and held
within 5 seconds of pressing the lock
button.
• The brake is pressed.
• The doors are not closed and locked.
• The liftgate is open.
• The I–Key System Error warning message appears in the vehicle information display.
• The alarm sounds due to illegal entry into the vehicle.
3-20Pre-driving checks and adjustments
Page 200 of 548
AUTOMATIC OPERATION (if so
equipped)
Tilt and telescopic operation
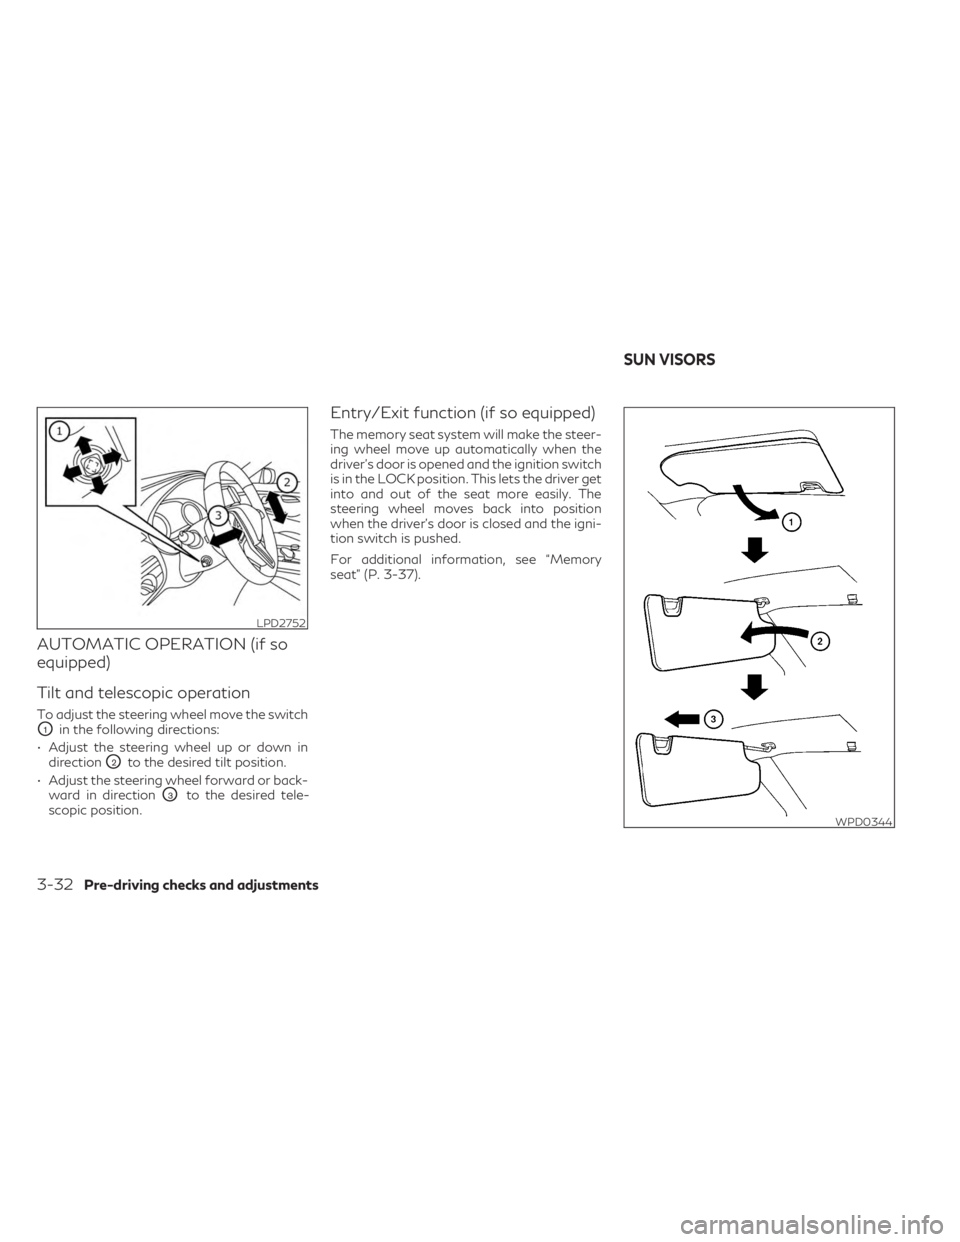
To adjust the steering wheel move the switch
O1in the following directions:
• Adjust the steering wheel up or down in direction
O2to the desired tilt position.
• Adjust the steering wheel forward or back- ward in direction
O3to the desired tele-
scopic position.
Entry/Exit function (if so equipped)
The memory seat system will make the steer-
ing wheel move up automatically when the
driver's door is opened and the ignition switch
is in the LOCK position. This lets the driver get
into and out of the seat more easily. The
steering wheel moves back into position
when the driver's door is closed and the igni-
tion switch is pushed.
For additional information, see “Memory
seat” (P. 3-37).
LPD2752
WPD0344
SUN VISORS
3-32Pre-driving checks and adjustments
Page 202 of 548
AUTOMATIC ANTI-GLARE
REARVIEW MIRROR
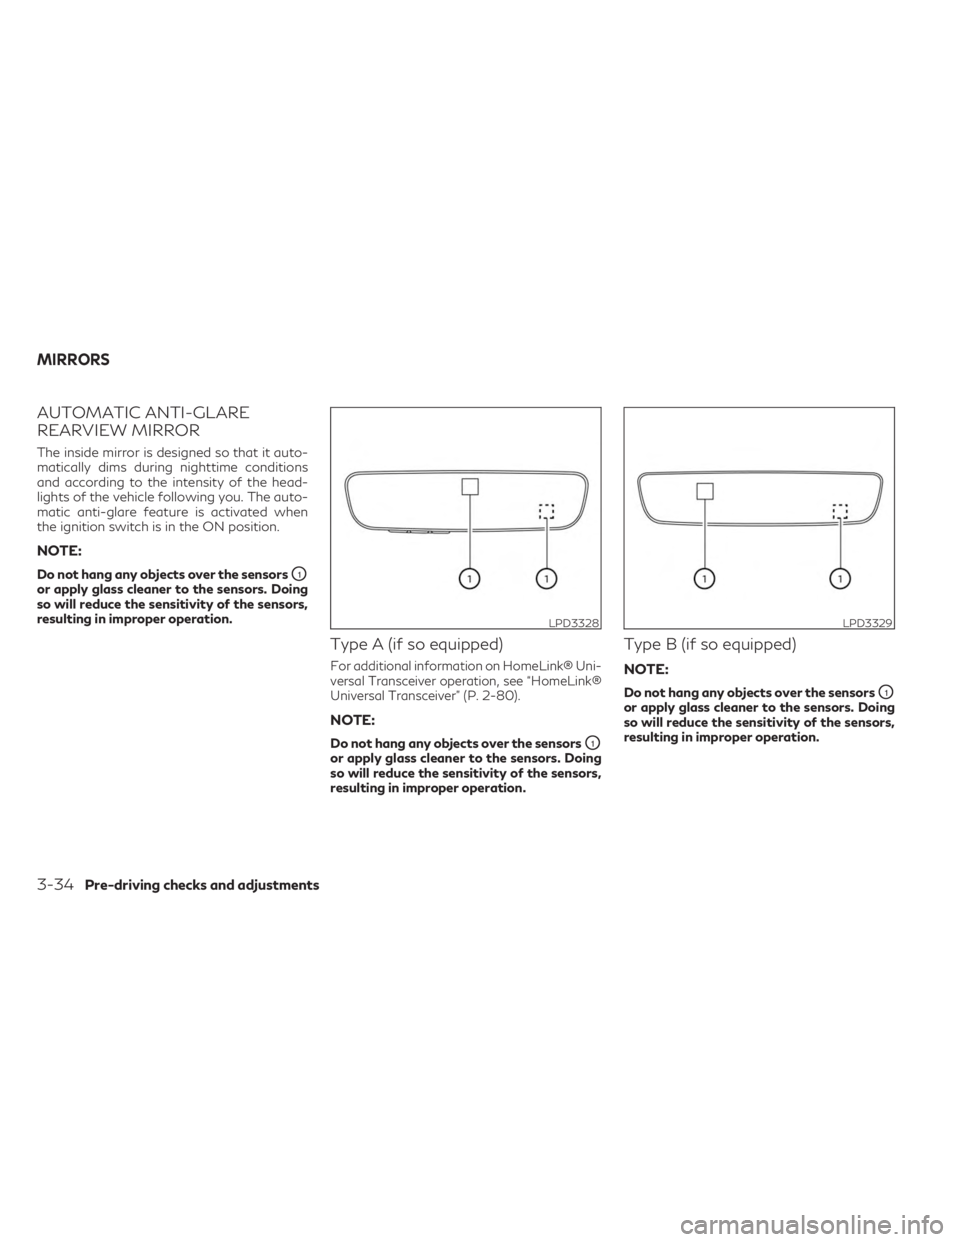
The inside mirror is designed so that it auto-
matically dims during nighttime conditions
and according to the intensity of the head-
lights of the vehicle following you. The auto-
matic anti-glare feature is activated when
the ignition switch is in the ON position.
NOTE:
Do not hang any objects over the sensorsO1
or apply glass cleaner to the sensors. Doing
so will reduce the sensitivity of the sensors,
resulting in improper operation.
Type A (if so equipped)
For additional information on HomeLink® Uni-
versal Transceiver operation, see “HomeLink®
Universal Transceiver” (P. 2-80).
NOTE:
Do not hang any objects over the sensorsO1
or apply glass cleaner to the sensors. Doing
so will reduce the sensitivity of the sensors,
resulting in improper operation.
Type B (if so equipped)
NOTE:
Do not hang any objects over the sensorsO1
or apply glass cleaner to the sensors. Doing
so will reduce the sensitivity of the sensors,
resulting in improper operation.
LPD3328LPD3329
MIRRORS
3-34Pre-driving checks and adjustments
Page 203 of 548

OUTSIDE MIRRORS
The outside mirror remote control will oper-
ate only when the ignition switch is in the ON
position.
Move the small switch
O1to select the left or
right mirror. Adjust each mirror to the desired
position using the large switch
O2. Move the
small switch
O1to the center (neutral)
position to prevent accidentally moving the
mirror.
WARNING
• Objects viewed in the outside mirror on
the passenger side are closer than they
appear. Be careful when moving to the
right. Using only this mirror could cause
an accident. Use the inside mirror or
glance over your shoulder to properly
judge distances to other objects.
• Do not adjust the mirrors while driving.
You could lose control of your vehicle and
cause an accident.
Manual folding outside mirrors
(if so equipped)
Pull the outside mirror toward the door to
fold it.
LPD3035LPD3034
Pre-driving checks and adjustments3-35
Page 204 of 548

Power folding outside mirrors (if so
equipped)
CAUTION
• Do not touch the mirrors while they are
moving. Your hand may be pinched, and
the mirror may malfunction.
• Do not drive with the mirrors stored. You
will be unable to see behind the vehicle.
Push the switch
O2to open or the switchO1
to close the mirrors. If one of the mirrors are manually operated or
bumped, the mirror body can become loose
at the pivot point. To correct electronic mirror
operation, cycle the mirrors by pushing the
switch
O1until completely closed, then push
the switch
O2until the mirrors are in the open
position.
Automatic folding outside mirrors
(if so equipped)
The outside mirrors fold automatically when
the vehicle is locked with the Intelligent Key
or by using the request switch. The outside
mirrors unfold automatically when the igni-
tion switch is placed in the ON position and
the power folding mirror switch is in position
O2.
Automatic anti-glare outside mirror
(if so equipped)
The outside mirror will automatically dim dur-
ing nighttime conditions to reduce the glare
from the headlights of trailing vehicles. The
automatic anti-glare feature operates only
when the ignition switch is placed in the ON
position. The automatic anti-glare feature will be on
when starting the vehicle. The indicator light
on the automatic anti-glare rearview mirror
will illuminate when the automatic anti-glare
feature is operating.
For additional information, see “Automatic
anti-glare rearview mirror” (P. 3-34).
Heated mirrors
The electric control type outside mirrors can
be heated to defrost, defog, or de-ice for
improved visibility. For additional informa-
tion, see “Rear window defroster, outside
mirror defroster (if so equipped), and wiper
deicer (if so equipped) switch” (P. 2-39).
Reverse tilt-down feature (if so
equipped)
The reverse tilt-down feature will turn both
outside mirror surfaces downward to provide
better rear visibility close to the vehicle when
the mirror control switch is in either the L or R
position.
The mirrors automatically return to their origi-
nal position when you shift out of R (Reverse).
LPD2303
3-36Pre-driving checks and adjustments
Page 205 of 548

The outside mirror surfaces will return to
their original position when one of the fol-
lowing conditions has occurred:
• The shift lever is moved to any positionother than R (Reverse).
• The outside mirror control switch is set to the neutral or center position.
• The ignition switch is placed in the OFF position.
NOTE:
If the outside mirror control switch is in the
center position, the mirror surface will NOT
turn downward when the shift lever is
moved to R (Reverse).
For additional information, see “Memory
seat” (P. 3-37). The memory seat system has two features:
• Memory storage function
• Entry/exit function
MEMORY STORAGE FUNCTION
Two positions for the driver's seat, steering
column (if so equipped), and outside mirrors
can be stored in the memory seat system.
Follow these procedures to set the memory
system.
NOTE:
The vehicle should be stopped while setting
the memory.
LPD2729
MEMORY SEAT (if so equipped)
Pre-driving checks and adjustments3-37
Page 206 of 548

1. Adjust the driver's seat, steering column(if so equipped), and outside mirrors to the
desired positions by manually operating
each adjusting switch. For additional in-
formation, see “Seats” (P. 1-2), “Steering
wheel” (P. 3-31) and “Outside mirrors”
(P. 3-35).
2. Push the SET switch and, within 5 sec- onds, push the memory switch (1 or 2).
The indicator light for the pushed memory
switch will come on and stay on for ap-
proximately 5 seconds.
The chime will sound when the memory is
stored.
NOTE:
If a new memory position is stored in the
same memory switch, the previous memory
position will be overwritten by the new
stored position.
Confirming memory storage
• Push the SET switch.
• If a memory position has been stored in the switch (1 or 2) then the indicator light for
the respective switch will stay on for ap-
proximately 5 seconds.
Linking log-in function to a stored
memory position
The log-in function can be linked to a stored
memory position with the following
procedure.
1. Place the ignition switch in the ON posi- tion while carrying the Intelligent Key that
was registered to the vehicle with a log-in
function.
NOTE:Make sure the Intelligent Keys are far apart.
Otherwise, the vehicle may detect the
wrong Intelligent Key.
2. Adjust the position of the driver’s seat, steering column (if so equipped) and out-
side mirrors. For additional information,
see “Seats” (P. 1-2), “Steering wheel”
(P. 3-31) and “Outside mirrors” (P. 3-35).
3. Place the ignition switch in the OFF position.
The next time you log in (selecting the user on
the display) after placing the ignition switch in
the ON position while carrying the Intelligent
Key, the system will automatically adjust to
the memorized driving position. For additional information, see “Log-in func-
tion” (P. 3-18) and the separate INFINITI In-
Touch™ Owner’s Manual.
ENTRY/EXIT FUNCTION
This system is designed so that the driver's
seat and steering column (if so equipped) will
automatically move when the vehicle is en-
gaged in the P (Park) position. This allows the
driver to easily get in and out of the driver’s
seat.
The driver’s seat will slide backward and the
steering column (if so equipped) will move up
when the ignition is switched to OFF and the
driver’s door is opened.
The driver’s seat and steering wheel will re-
turn to the previous position when the igni-
tion is switched to ON.
The entry/exit function can be adjusted or
canceled through the “Comfort & Conve-
nience” options of the “Settings” menu in the
lower touch-screen display by performing the
following:
• Switch the Lift Steering upon Exit from ON
to OFF.
• Switch the Slide Driver Seat Back on Exit from ON to OFF.
3-38Pre-driving checks and adjustments
Page 207 of 548

For additional information, refer to the sepa-
rate INFINITI InTouch® Owner’s Manual.
Restarting the entry/exit function
If the battery cable is disconnected, or if the
fuse opens, the stored memory positions will
be lost and some of the functions will be
restricted:
1. Drive the vehicle over 25 mph (40 km/h).
OR
2. Open and close the driver's door morethan two times with the ignition switch in
the OFF position.
The entry/exit function should now work
properly.
SETTING MEMORY FUNCTION
The position of the following settings can be
linked to the Intelligent Key and the memo-
rized settings can be available for each Intel-
ligent Key.
• Climate control system
• Navigation system
• Audio system To use the memory function, set the climate,
navigation and audio systems to the driver's
preferred settings. Lock the doors with the
Intelligent Key. Each Intelligent Key may be
set with the driver's individual preferences.
When a new Intelligent Key is used, “Connec-
tion with the key has been done” will be dis-
played on the vehicle information display and
the memorized settings are available.
To engage the memorized settings, perform
the following:
1. Carry the Intelligent Key that is linked to
the memorized settings.
2. Unlock the doors by pushing the driver’s door handle request switch or the
button on the Intelligent Key.
3. Place the ignition switch in the ON posi- tion. The settings linked to the Intelligent
Key will start.
For additional information on using the cli-
mate control system, see “Heater and air con-
ditioner (automatic)” (P. 4-35).
For additional information, see “Monitor, cli-
mate, audio, phone and voice recognition
systems” section of this manual or the sepa-
rate INFINITI InTouch® Owner’s Manual.
SYSTEM OPERATION
The memory seat system will not work or will
stop operating under the following conditions:
• When the vehicle speed is above 4 mph (7 km/h).
• When any of the memory switches are pushed while the memory seat system is
operating.
• When the switch for the driver’s seat and steering column (if so equipped) is pushed
while the memory seat system is operating.
• When the seat has already been moved to the memorized position.
• When no seat position is stored in the memory switch.
• When the shift position is moved from P (Park) to any other position.
The memory seat system can be adjusted and
canceled. It is recommended you visit an
INFINITI retailer for this service.
Pre-driving checks and adjustments3-39
Page 215 of 548
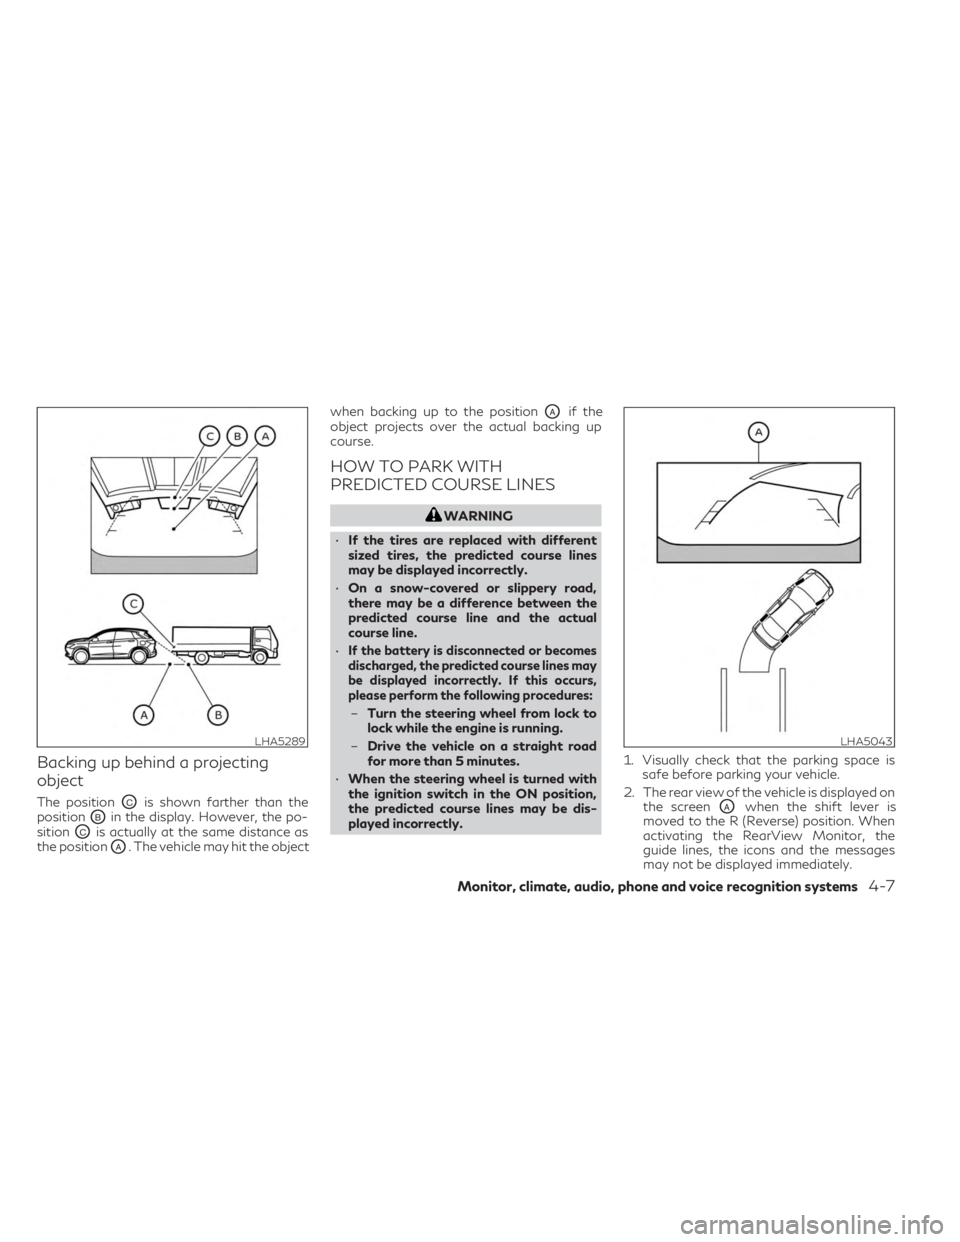
Backing up behind a projecting
object
The positionOCis shown farther than the
position
OBin the display. However, the po-
sition
OCis actually at the same distance as
the position
OA. The vehicle may hit the object when backing up to the position
OAif the
object projects over the actual backing up
course.
HOW TO PARK WITH
PREDICTED COURSE LINES
WARNING
• If the tires are replaced with different
sized tires, the predicted course lines
may be displayed incorrectly.
• On a snow-covered or slippery road,
there may be a difference between the
predicted course line and the actual
course line.
•
If the battery is disconnected or becomes
discharged, the predicted course lines may
be displayed incorrectly. If this occurs,
please perform the following procedures:
– Turn the steering wheel from lock to
lock while the engine is running.
– Drive the vehicle on a straight road
for more than 5 minutes.
• When the steering wheel is turned with
the ignition switch in the ON position,
the predicted course lines may be dis-
played incorrectly. 1. Visually check that the parking space is
safe before parking your vehicle.
2. The rear view of the vehicle is displayed on the screen
OAwhen the shift lever is
moved to the R (Reverse) position. When
activating the RearView Monitor, the
guide lines, the icons and the messages
may not be displayed immediately.
LHA5289LHA5043
Monitor, climate, audio, phone and voice recognition systems4-7