mirror INFINITI QX55 2023 Owner's Manual
[x] Cancel search | Manufacturer: INFINITI, Model Year: 2023, Model line: QX55, Model: INFINITI QX55 2023Pages: 526, PDF Size: 5.75 MB
Page 230 of 526

WARNING
• Failure to follow the warnings and in-
structions for proper use of the Moving
Object Detection system could result in
serious injury or death.
• The MOD system is not a substitute for
proper vehicle operation and is not de-
signed to prevent contact with objects
surrounding the vehicle. When maneu-
vering, always use the outside mirrors
and rearview mirror and turn and check
the surroundings to ensure it is safe to
maneuver.
• The system is deactivated at speeds
above 6 mph (10 km/h). It is reactivated
at lower speeds.
• The MOD system is not designed to de-
tect surrounding stationary objects.
The MOD system can inform the driver of
moving objects near the vehicle when back-
ing out of garages, maneuvering in parking
lots and in other such instances.
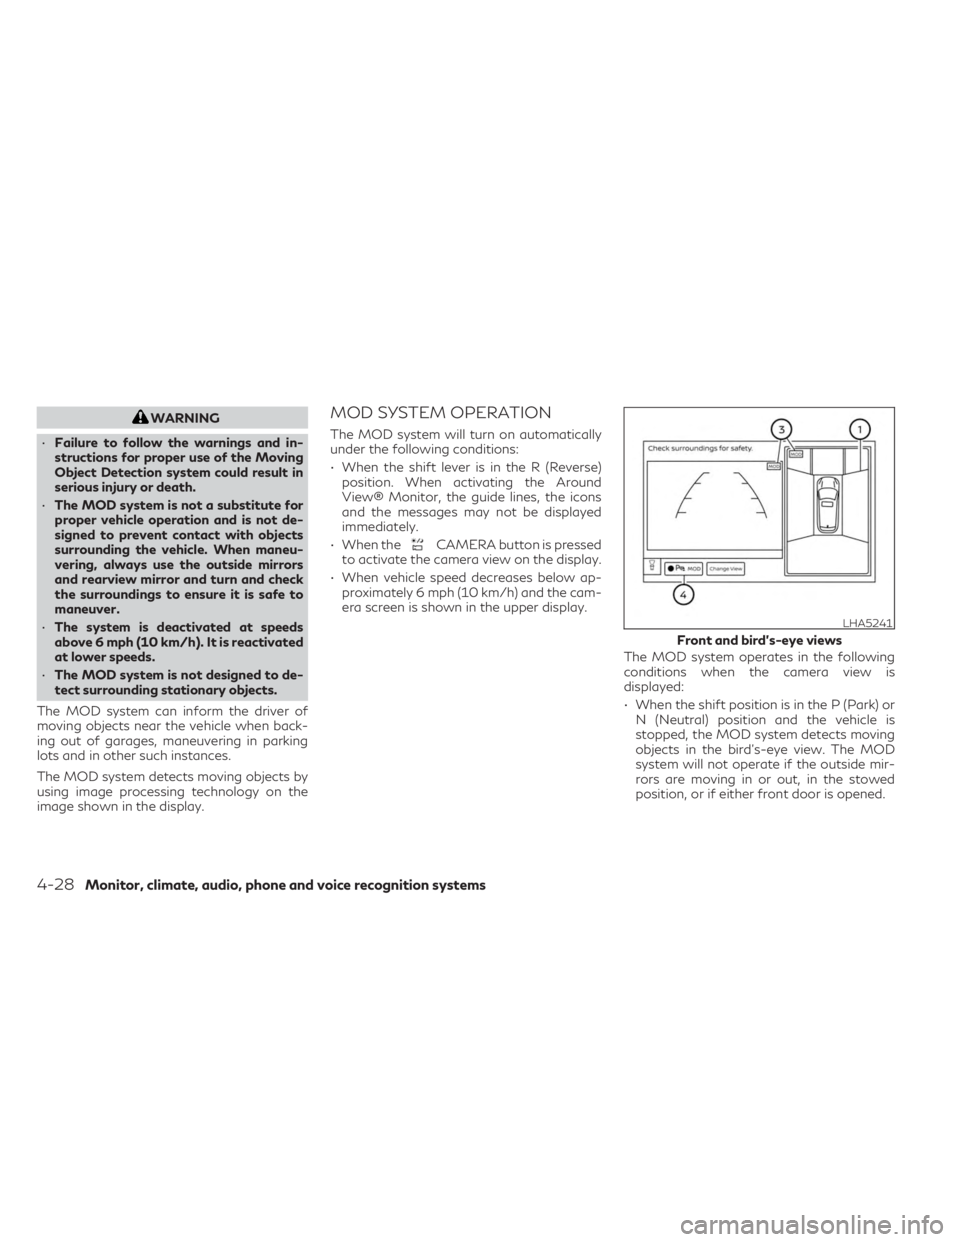
The MOD system detects moving objects by
using image processing technology on the
image shown in the display.MOD SYSTEM OPERATION
The MOD system will turn on automatically
under the following conditions:
• When the shift lever is in the R (Reverse) position. When activating the Around
View® Monitor, the guide lines, the icons
and the messages may not be displayed
immediately.
• When the
CAMERA button is pressed
to activate the camera view on the display.
• When vehicle speed decreases below ap- proximately 6 mph (10 km/h) and the cam-
era screen is shown in the upper display.
The MOD system operates in the following
conditions when the camera view is
displayed:
• When the shift position is in the P (Park) orN (Neutral) position and the vehicle is
stopped, the MOD system detects moving
objects in the bird’s-eye view. The MOD
system will not operate if the outside mir-
rors are moving in or out, in the stowed
position, or if either front door is opened.
LHA5241
Front and bird’s-eye views
4-28Monitor, climate, audio, phone and voice recognition systems
Page 232 of 526

A blue or green MOD iconO3is displayed in
the view where the MOD system is operative.
A gray MOD icon is displayed in the view
where the MOD system is not operative.
If the MOD system is turned off, the MOD
icon
O3is not displayed.
TURNING MOD ON AND OFF
1. Press the MENU button beneath the lower display.
2. Touch the “Settings” key
3. Touch the “Camera’ key then the “Cam- era” key again.
4. Touch “Moving Object Detection” on the menu screen to switch between on and
off.
You can also turn MOD on and off by touch-
ing the “
” keyO4on the upper display.
When MOD is on, the indicator will turn yel-
low. When MOD is off, the indicator will turn
black.
When the sonar or MOD system is com-
pletely turned off from the setting menu, the
“
” will turn black.
MOD SYSTEM LIMITATIONS
WARNING
Listed below are the system limitations for
MOD. Failure to operate the vehicle in ac-
cordance with these system limitations
could result in serious injury or death.
• Excessive noise (for example, audio sys-
tem volume or open vehicle window) will
interfere with the chime sound, and it
may not be heard.
• The MOD system performance will be
limited according to environmental con-
ditions and surrounding objects such as:
– When there is low contrast between
background and the moving objects.
– When there is a blinking source of
light.
– When strong light such as another
vehicle’s headlight or sunlight is
present.
– When camera orientation is not in its
usual position, such as when a mirror
is folded. –
When there is dirt, water drops or
snow on the camera lens.
– When the position of the moving ob-
jects in the display is not changed.
• The MOD system might detect flowing
water droplets on the camera lens, white
smoke from the muffler, moving shad-
ows, etc.
• The MOD system may not function
properly depending on the speed, direc-
tion, distance or shape of the moving
objects.
• If your vehicle sustains damage to the
parts where the camera is installed, leav-
ing it misaligned or bent, the sensing
zone may be altered and the MOD sys-
tem may not detect objects properly.
• When the temperature is extremely high
or low, the screen may not display ob-
jects clearly. This is not a malfunction.
4-30Monitor, climate, audio, phone and voice recognition systems
Page 235 of 526

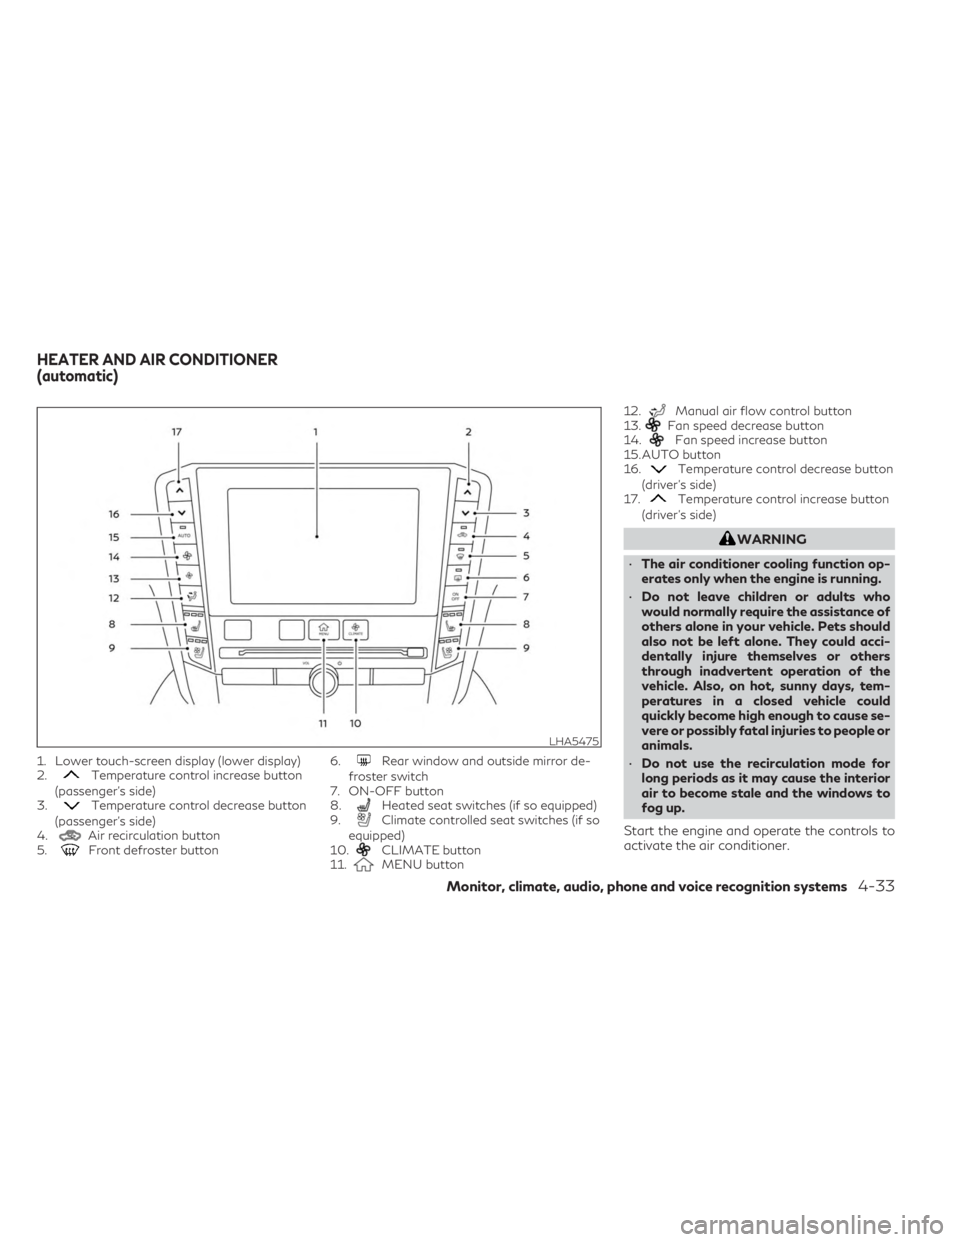
1. Lower touch-screen display (lower display)
2.Temperature control increase button
(passenger’s side)
3.
Temperature control decrease button
(passenger’s side)
4.
Air recirculation button
5.Front defroster button 6.
Rear window and outside mirror de-
froster switch
7. ON-OFF button
8.
Heated seat switches (if so equipped)
9.Climate controlled seat switches (if so
equipped)
10.
CLIMATE button
11.MENU button 12.
Manual air flow control button
13.Fan speed decrease button
14.Fan speed increase button
15. AUTO button
16.
Temperature control decrease button
(driver’s side)
17.
Temperature control increase button
(driver’s side)
WARNING
• The air conditioner cooling function op-
erates only when the engine is running.
• Do not leave children or adults who
would normally require the assistance of
others alone in your vehicle. Pets should
also not be left alone. They could acci-
dentally injure themselves or others
through inadvertent operation of the
vehicle. Also, on hot, sunny days, tem-
peratures in a closed vehicle could
quickly become high enough to cause se-
vere or possibly fatal injuries to people or
animals.
• Do not use the recirculation mode for
long periods as it may cause the interior
air to become stale and the windows to
fog up.
Start the engine and operate the controls to
activate the air conditioner.
LHA5475
HEATER AND AIR CONDITIONER
(automatic)
Monitor, climate, audio, phone and voice recognition systems4-33
Page 237 of 526

Voice Recognition logic (if so
equipped)
When the climate control system is on, the
fan speed may be automatically lowered so
that commands are more easily recognized.
Fan speed can be adjusted using the
fan
speed decrease andincrease buttons, if
desired.
MANUAL OPERATION
Fan speed control
Press thefan speed increase andfan speed decrease buttons to manually con-
trol the fan speed. Fan speed can also be
controlled by touching the “
”or“”
keys on the lower display.
Press the AUTO button to return to auto-
matic control of the fan speed.
Temperature control
Press thetemperature control
buttons up or down to set the desired
temperature.
The temperature can be set within the fol-
lowing range:
• For U.S.: 60 to 90°F (16 to 32°C)
• For Canada: 64 to 90°F (18 to 32°C)
Air recirculation
Press theair recirculation button to
recirculate interior air inside the vehicle. The
indicator light on the button will come
on.
The air recirculation cannot be activated
when the air conditioner is in the
front
defrosting mode.
When the outside temperature exceeds 70°F
(21°C), the air conditioning system may de-
fault to air recirculation mode automatically
to reduce overall power consumption. To exit
air recirculation mode, deselect the
air
recirculation button (indicator will turn off) to
enter fresh air mode.
Automatic intake air control
In the AUTO mode, the intake air will be
controlled automatically. To manually control
the intake air, press the
air recirculation
button. To return to the automatic control
mode, press and hold the
air recircula-
tion button for about 2 seconds. The indica-
tor light will flash twice, and then the intake
air will be controlled automatically.
Air flow control
Press thebutton to manually control air
flow. Pressing the button repeatedly will
cycle through the available modes and dis-
play the corresponding icon on the lower dis-
play. Air flow can also be controlled by touch-
ing the “
” key on the lower display:
— Air flows from center and side
vents.
— Air flows from center and sidevents and foot outlets.
— Air flows mainly from foot outlets.— Air flows from defroster and footoutlets.
To turn system off
Press the ON-OFF button.
CLIMATE button
Press theCLIMATE button to show the
CLIMATE screen on the lower display.
Rear window and outside mirror
defroster switch
For additional information, see “Rear window
defroster, outside mirror defroster, and wiper
deicer (if so equipped) switch” (P. 2-39).
Monitor, climate, audio, phone and voice recognition systems4-35
Page 262 of 526

INFINITI VEHICLE IMMOBILIZER
SYSTEM
The INFINITI Vehicle Immobilizer System will
not allow the engine to start without the use
of the registered key.
If the engine fails to start using the registered
key, it may be due to interference caused by
another registered key, an automated toll
road device or automated payment device on
the key ring. Restart the engine using the
following procedures:
1. Leave the ignition switch in the ON posi-tion for approximately 5 seconds.
2. Place the ignition switch in the OFF or LOCK position and wait approximately 5
seconds.
3. Repeat steps 1 and 2.
4. Restart the engine while holding the de- vice (which may have caused the interfer-
ence) separate from the registered key.
If the no start condition re-occurs, INFINITI
recommends placing the registered key on a
separate key ring to avoid interference from
other devices. • Make sure the area around the vehicle is
clear.
• Check fluid levels such as engine oil, cool- ant, brake fluid, and windshield-washer
fluid as frequently as possible, or at least
whenever you refuel.
• Check that all windows and lights are clean.
• Visually inspect tires for their appearance and condition. Also check tires for proper
inflation.
• Check that all doors are closed.
• Position seat and adjust head restraints/headrests.
• Adjust inside and outside mirrors.
• Fasten seat belts and ask all passengers to do likewise.
• Check the operation of warning lights when the ignition switch is placed in the ON
position. For additional information, see
“Warning lights, indicator lights and audible
reminders” (P. 2-9) 1. Apply the parking brake.
2. Press the Park button to place the vehicle
in P (Park) or move the shift lever to N
(Neutral). P (Park) is recommended.
The starter is designed not to operate if
the shift lever is in any of the driving
positions.
3. Push the ignition switch to the ON posi- tion. Depress the brake pedal and push
the ignition switch to start the engine.
To start the engine immediately, push and
release the ignition switch while depress-
ing the brake pedal with the ignition
switch in any position.
• If the engine is very hard to start in extremely cold weather or when re-
starting, depress the accelerator pedal a
little (approximately 1/3 to the floor)
and while holding, crank the engine. Re-
lease the accelerator pedal when the
engine starts.
• If the engine is very hard to start be- cause it is flooded, depress the accel-
erator pedal all the way to the floor and
hold it. Push the ignition switch to the
ON position to start cranking the en-
gine. After 5 or 6 seconds, stop cranking
by pushing the ignition switch to the
BEFORE STARTING THE ENGINE STARTING THE ENGINE
5-16Starting and driving
Page 277 of 526

Reset Drive Mode Settings to Default:
Touch to restore all the PERSONAL mode
settings to default. For additional informa-
tion, refer to the separate INFINITI InTouch™
Owner’s Manual.
ECO MODE
The ECO mode adjusts the engine and trans-
mission to enhance fuel economy.
NOTE:
Selecting this drive mode will not necessarily
improve fuel economy as many driving fac-
tors influence its effectiveness.
Operation
Push the Drive Mode Selector switch to the
ECO position. “ECO” appears in the vehicle
information display and the ECO drive indi-
cator light illuminates on the instrument
panel. ECO mode will also be displayed in the
upper display.
When the accelerator pedal is depressed
within the range of economy drive, the ECO
drive indicator light illuminates in green.
When the accelerator pedal is depressed
above the range of economy drive, the ECO
drive indicator light turns off.The ECO drive indicator light will not illumi-
nate in the following cases:
• When the shift lever is in the R (Reverse)
position.
• When the vehicle speed is below 3 mph (4.8 km/h) or over 90 mph (144 km/h).
• When the Intelligent Cruise Control system (if so equipped) is operated.
The TSR system provides the driver with in-
formation about the most recently detected
speed limit. The system captures the road
sign information with the multi-sensing front
camera unit
O1located on the windshield in
front of the inside rearview mirror and dis-
plays the detected signs in the vehicle infor-
mation display. For vehicles equipped with a
navigation system, the speed limit displayed
is based on a combination of navigation sys-
tem data and live camera recognition. TSR
information is always displayed at the top of
the vehicle information display, and option-
ally in the main central area of the display
screen.
LSD4091
TRAFFIC SIGN RECOGNITION (TSR)
(if so equipped)
Starting and driving5-31
Page 280 of 526

SYSTEM MAINTENANCE
The TSR system uses the same multi-sensing
front camera unit that is used by the Lane
Departure Warning (LDW) system, located in
front of the interior rearview mirror. For ad-
ditional information, see ”System mainte-
nance” (P. 5-38).
WARNING
Failure to follow the warnings and instruc-
tions for proper use of the LDW system
could result in serious injury or death.
• This system is only a warning device to
inform the driver of a potential unin-
tended lane departure. It will not steer
the vehicle or prevent loss of control. It is
the driver’s responsibility to stay alert,
drive safely, keep the vehicle in the trav-
eling lane, and be in control of the vehicle
at all times. The LDW system will operate when the ve-
hicle is driven at speeds of approximately 37
mph (60 km/h) and above, and only when the
lane markings are clearly visible on the road.
The LDW system monitors the lane markers
on the traveling lane using the camera unit
O1
located above the inside mirror.
The LDW system warns the driver with an
indicator in the vehicle information display
and the steering wheel will vibrate, indicating
that the vehicle is beginning to leave the driv-
ing lane. For additional information, see
“LDW system operation” (P. 5-35).
LSD4091
LANE DEPARTURE WARNING (LDW)
5-34Starting and driving
Page 284 of 526

The LDW system is not designed to warn
under the following conditions:
• When you operate the lane change signaland change traveling lanes in the direction
of the signal. (The LDW system will become
operable again approximately 2 seconds
after the lane change signal is turned off.)
• When the vehicle speed lowers to less than approximately 37 mph (60 km/h).
After the above conditions have finished and
the necessary operating conditions are satis-
fied, the LDW functions will resume.
SYSTEM MALFUNCTION
If the LDW system malfunctions, it will cancel
automatically and “Malfunction” will appear
in the vehicle information display. If “Mal-
function” appears in vehicle information dis-
play, pull off the road to a safe location and
stop the vehicle. Place the shift position in the
P (Park) position and ignition switch in the
OFF position and restart the engine. If “Mal-
function” continues to appear in vehicle infor-
mation display, have the system checked. It is
recommended that you visit an INFINITI re-
tailer for this service.SYSTEM MAINTENANCE
The lane camera unitO1for the LDW system
is located above the inside mirror. To keep the
proper operation of the LDW system and
prevent a system malfunction, be sure to ob-
serve the following:
• Always keep the windshield clean.
• Do not attach a sticker (including transpar- ent material) or install an accessory near
the camera unit. • Do not place reflective materials, such as
white paper or a mirror, on the instrument
panel. The reflection of sunlight may ad-
versely affect the camera unit’s capability
of detecting the lane markers.
• Do not strike or damage the areas around the camera unit. Do not touch the camera
lens or remove the screw located on the
camera unit. If the camera unit is damaged
due to an accident, it is recommended that
you visit an INFINITI retailer.
LSD3075
5-38Starting and driving
Page 285 of 526

WARNING
Failure to follow the warnings and instruc-
tions for proper use of the LDP system
could result in serious injury or death.
• The LDP system will not steer the vehicle
or prevent loss of control. It is the driv-
er’s responsibility to stay alert, drive
safely, keep the vehicle in the traveling
lane, and be in control of the vehicle at all
times. •
The LDP system is primarily intended for
use on well-developed freeways or high-
ways. It may not detect the lane markers
in certain road, weather, or driving
conditions.
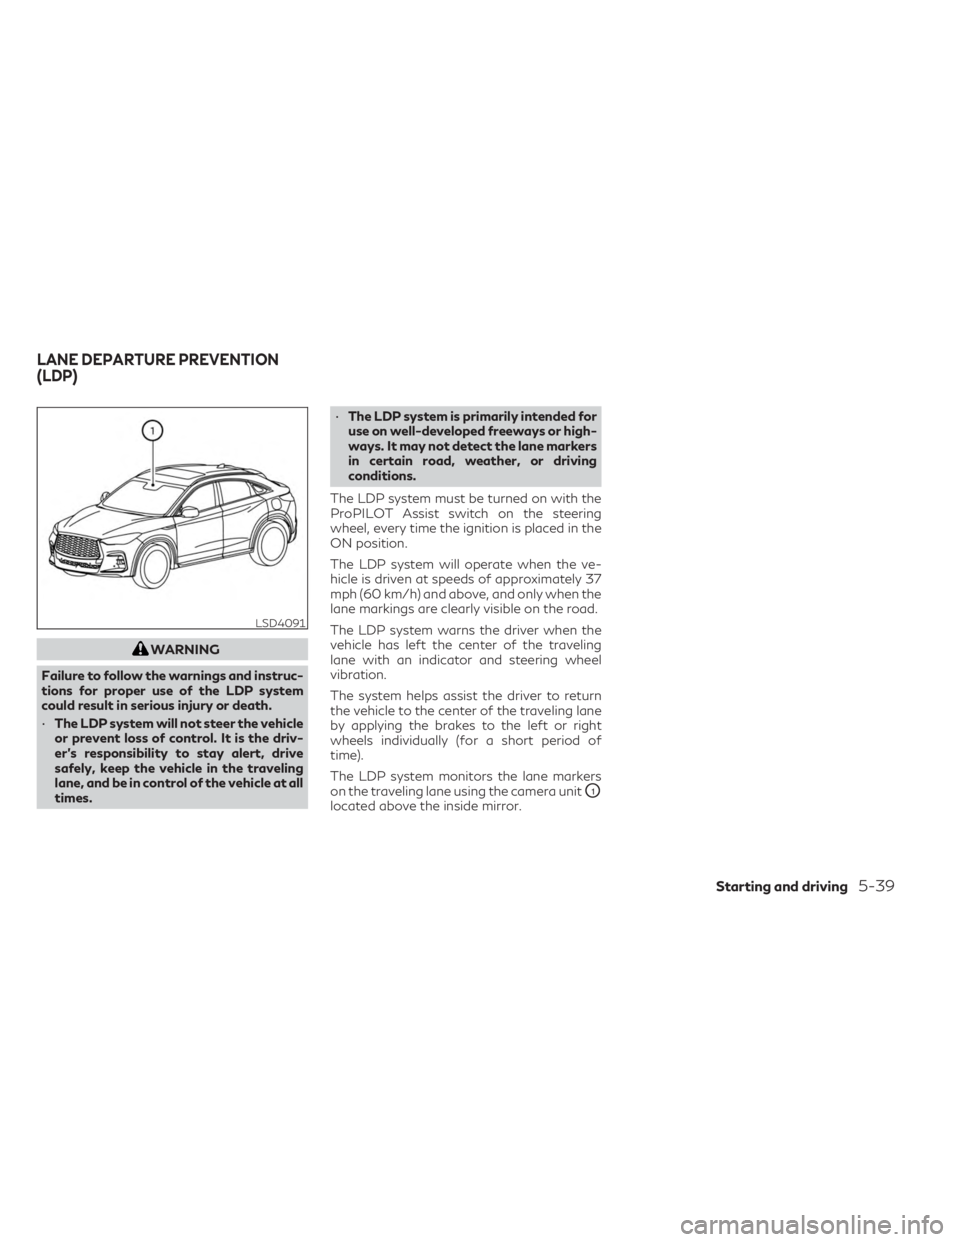
The LDP system must be turned on with the
ProPILOT Assist switch on the steering
wheel, every time the ignition is placed in the
ON position.
The LDP system will operate when the ve-
hicle is driven at speeds of approximately 37
mph (60 km/h) and above, and only when the
lane markings are clearly visible on the road.
The LDP system warns the driver when the
vehicle has left the center of the traveling
lane with an indicator and steering wheel
vibration.
The system helps assist the driver to return
the vehicle to the center of the traveling lane
by applying the brakes to the left or right
wheels individually (for a short period of
time).
The LDP system monitors the lane markers
on the traveling lane using the camera unit
O1
located above the inside mirror.
LSD4091
LANE DEPARTURE PREVENTION
(LDP)
Starting and driving5-39
Page 290 of 526

SYSTEM MALFUNCTION
If the LDP system malfunctions, it will cancel
automatically. The LDP indicator (orange)
will illuminate in the display. If the LDP indi-
cator (orange) illuminates in the display, pull
off the road to a safe location and stop the
vehicle. Turn the engine off and restart the
engine. If the LDP indicator (orange) contin-
ues to illuminate, have the LDP system
checked. It is recommended that you visit an
INFINITI retailer for this service.
SYSTEM MAINTENANCE
The lane camera unitO1for the LDP system
is located behind the inside mirror. To keep
the proper operation of the LDP system and
prevent a system malfunction, be sure to ob-
serve the following:
• Always keep the windshield clean.
• Do not attach a sticker (including transpar- ent material) or install an accessory near
the camera unit. • Do not place reflective materials, such as
white paper or a mirror, on the instrument
panel. The reflection of sunlight may ad-
versely affect the camera unit’s capability
of detecting the lane markers.
• Do not strike or damage the areas around the camera unit. Do not touch the camera
lens or remove the screw located on the
camera unit. If the camera unit is damaged
due to an accident, it is recommended that
you visit an INFINITI retailer.
LSD3075
5-44Starting and driving