Air INFINITI QX56 2004 Factory Service Manual
[x] Cancel search | Manufacturer: INFINITI, Model Year: 2004, Model line: QX56, Model: INFINITI QX56 2004Pages: 3371, PDF Size: 78.5 MB
Page 3006 of 3371

AUTOMATIC DRIVE POSITIONER
SE-57
C
D
E
F
G
H
J
K
L
MA
B
SE
Revision: August 20072004 QX56
2. CHECK RECLINING MOTOR SENSOR CIRCUIT HARNESS CONTINUITY
1. Disconnect driver seat control unit and reclining motor LH.
2. Check continuity between driver seat control unit connector P2
terminals 9, 31 and reclining motor LH connector P5 terminals 1,
2.
3. Check continuity between driver seat control unit connector P2
terminals 9, 31 and ground.
OK or NG
OK >> Replace reclining motor.
NG >> Repair or replace harness.
Lifting Sensor (Front) Circuit InspectionEIS002YS
1. CHECK FUNCTION
With CONSULT-II
Check operation with “LIFT FR PULSE” on the DATA MONITOR to make sure the pulse changes.
Without CONSULT-II
1. Turn ignition switch OFF.
2. Check signal between driver seat control unit connector and
ground, with oscilloscope.
OK or NG
OK >> Front lifting sensor is OK.
NG >> GO TO 2.9 (L/R) - 1 (L/R) : Continuity should exist.
31 (L/Y) - 2 (L/Y) : Continuity should exist.
9 (L/R) - Ground : Continuity should not exist.
31 (L/Y) - Ground : Continuity should not exist.
LIIA0707E
Monitor item [OPERATION or UNIT] Contents
LIFT FR PULSE —The front lifting position (pulse) judged
from the lifting sensor (front) is dis-
played
PIIA4558E
ConnectorTe r m i n a l s
(Wire color)
Condition Signal
(+) (–)
P2 25 (LG) GroundLifting
motor
(front)
operation
PIIA4561E
PIIA3278E
Page 3007 of 3371

SE-58
AUTOMATIC DRIVE POSITIONER
Revision: August 20072004 QX56
2. CHECK FRONT LIFTING MOTOR SENSOR CIRCUIT HARNESS CONTINUITY
1. Disconnect driver seat control unit and lifting motor (front).
2. Check continuity between driver seat control unit connector P2 terminals 16, 25, 31 and lifting motor
(front) connector P6 terminals 1, 2, 3.
3. Check continuity between driver seat control unit connector P2
terminals 16, 25, 31 and ground.
OK or NG
OK >> Replace lifting motor (front).
NG >> Repair or replace harness.
Lifting Sensor (Rear) Circuit InspectionEIS002YT
1. CHECK FUNCTION
With CONSULT-II
Check operation with “LIFT RR PULSE” on the DATA MONITOR to make sure pulse changes.
Without CONSULT-II
1. Turn ignition switch OFF.
2. Check signal between driver seat control unit connector and
ground, with oscilloscope.
OK or NG
OK >> Rear lifting sensor circuit is OK.
NG >> GO TO 2.16 (W) - 3 (W) : Continuity should exist.
25 (LG) - 2 (LG) : Continuity should exist.
31 (L/Y) - 1 (L/Y) : Continuity should exist.
16 (W) - Ground : Continuity should not exist.
25 (LG) - Ground : Continuity should not exist.
31 (L/Y) - Ground : Continuity should not exist.
LIIA0708E
Monitor item [OPERATION or UNIT]
LIFT RR PULSE —The rear lifting position (pulse) judged from
the lifting sensor (rear) is displayed.
PIIA4558E
ConnectorTe r m i n a l s
(Wire color)
Condition Signal
(+) (–)
P2 10 (W) GroundLifting
motor
(rear)
operation
PIIA4563E
PIIA3278E
Page 3008 of 3371

AUTOMATIC DRIVE POSITIONER
SE-59
C
D
E
F
G
H
J
K
L
MA
B
SE
Revision: August 20072004 QX56
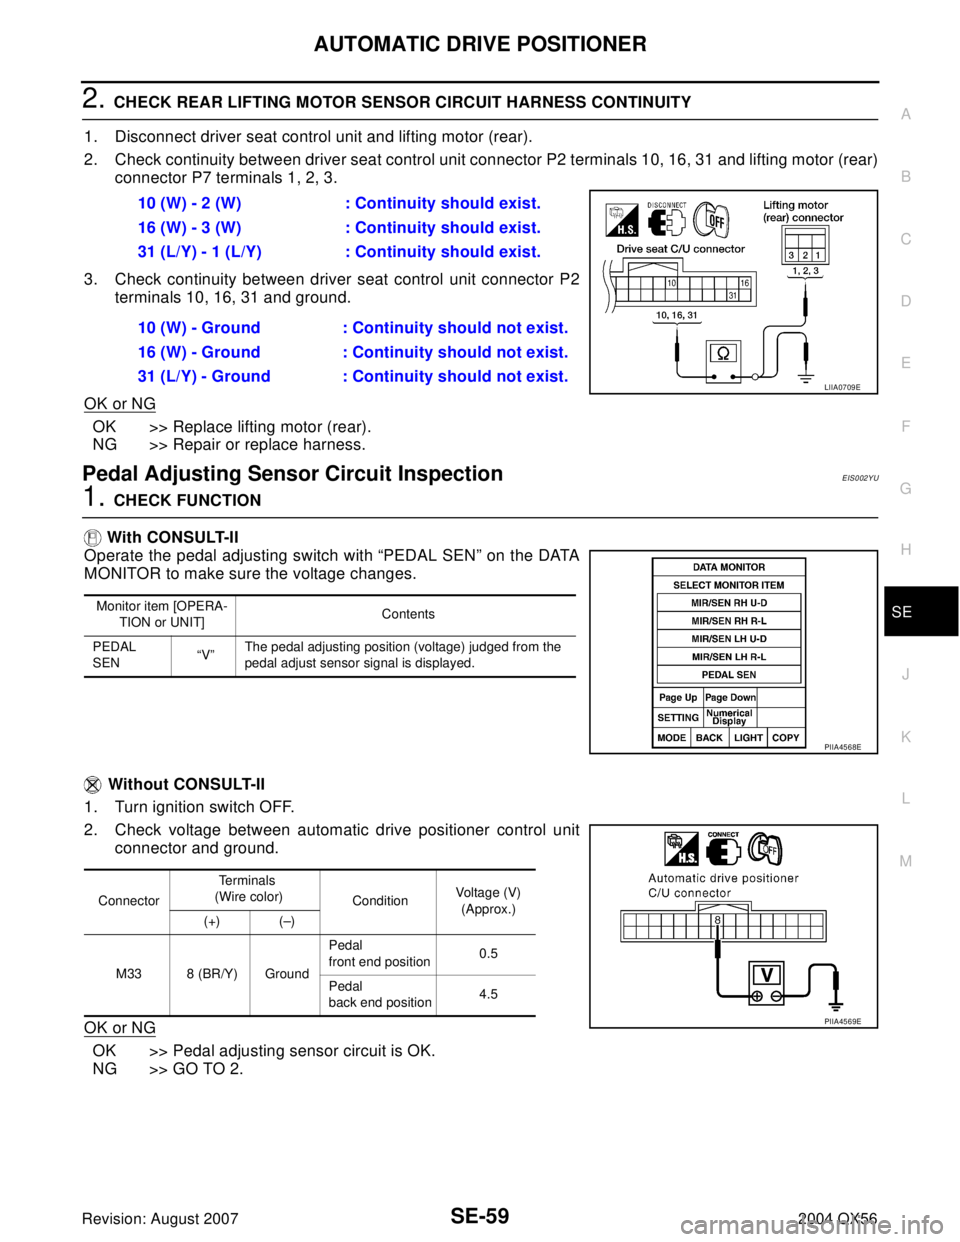
2. CHECK REAR LIFTING MOTOR SENSOR CIRCUIT HARNESS CONTINUITY
1. Disconnect driver seat control unit and lifting motor (rear).
2. Check continuity between driver seat control unit connector P2 terminals 10, 16, 31 and lifting motor (rear)
connector P7 terminals 1, 2, 3.
3. Check continuity between driver seat control unit connector P2
terminals 10, 16, 31 and ground.
OK or NG
OK >> Replace lifting motor (rear).
NG >> Repair or replace harness.
Pedal Adjusting Sensor Circuit InspectionEIS002YU
1. CHECK FUNCTION
With CONSULT-II
Operate the pedal adjusting switch with “PEDAL SEN” on the DATA
MONITOR to make sure the voltage changes.
Without CONSULT-II
1. Turn ignition switch OFF.
2. Check voltage between automatic drive positioner control unit
connector and ground.
OK or NG
OK >> Pedal adjusting sensor circuit is OK.
NG >> GO TO 2.10 (W) - 2 (W) : Continuity should exist.
16 (W) - 3 (W) : Continuity should exist.
31 (L/Y) - 1 (L/Y) : Continuity should exist.
10 (W) - Ground : Continuity should not exist.
16 (W) - Ground : Continuity should not exist.
31 (L/Y) - Ground : Continuity should not exist.
LIIA0709E
Monitor item [OPERA-
TION or UNIT]Contents
PEDAL
SEN“V”The pedal adjusting position (voltage) judged from the
pedal adjust sensor signal is displayed.
PIIA4568E
ConnectorTe r m i n a l s
(Wire color)
ConditionVoltage (V)
(Approx.)
(+) (–)
M33 8 (BR/Y) GroundPedal
front end position0.5
Pedal
back end position4.5
PIIA4569E
Page 3009 of 3371

SE-60
AUTOMATIC DRIVE POSITIONER
Revision: August 20072004 QX56
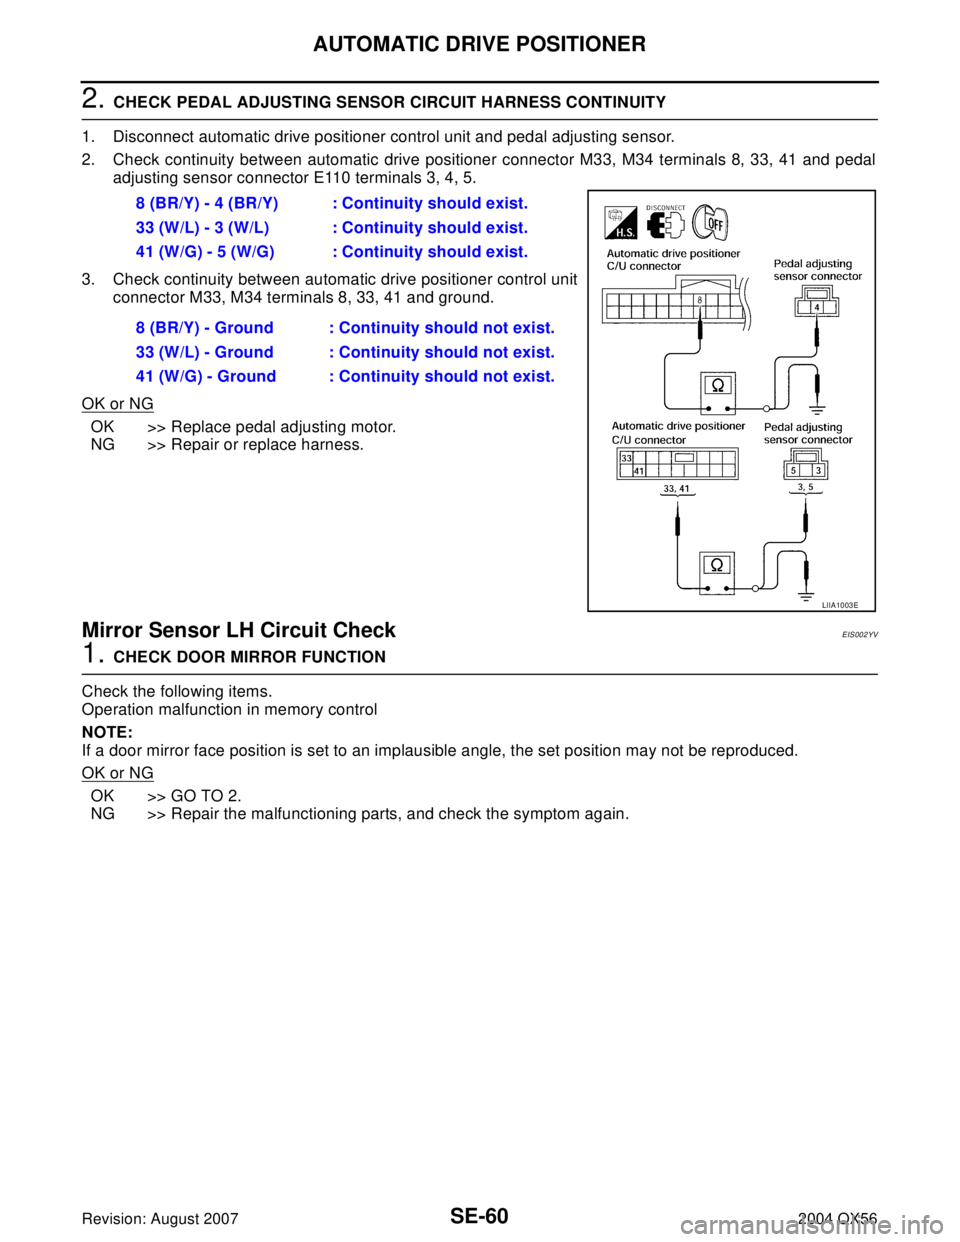
2. CHECK PEDAL ADJUSTING SENSOR CIRCUIT HARNESS CONTINUITY
1. Disconnect automatic drive positioner control unit and pedal adjusting sensor.
2. Check continuity between automatic drive positioner connector M33, M34 terminals 8, 33, 41 and pedal
adjusting sensor connector E110 terminals 3, 4, 5.
3. Check continuity between automatic drive positioner control unit
connector M33, M34 terminals 8, 33, 41 and ground.
OK or NG
OK >> Replace pedal adjusting motor.
NG >> Repair or replace harness.
Mirror Sensor LH Circuit Check EIS002YV
1. CHECK DOOR MIRROR FUNCTION
Check the following items.
Operation malfunction in memory control
NOTE:
If a door mirror face position is set to an implausible angle, the set position may not be reproduced.
OK or NG
OK >> GO TO 2.
NG >> Repair the malfunctioning parts, and check the symptom again.8 (BR/Y) - 4 (BR/Y) : Continuity should exist.
33 (W/L) - 3 (W/L) : Continuity should exist.
41 (W/G) - 5 (W/G) : Continuity should exist.
8 (BR/Y) - Ground : Continuity should not exist.
33 (W/L) - Ground : Continuity should not exist.
41 (W/G) - Ground : Continuity should not exist.
LIIA1003E
Page 3010 of 3371

AUTOMATIC DRIVE POSITIONER
SE-61
C
D
E
F
G
H
J
K
L
MA
B
SE
Revision: August 20072004 QX56
2. CHECK MIRROR SENSOR INSPECTION
With CONSULT–II
Check that “ON” is displayed on “MIR/SE LH R–L, MIR/SE LH U–
D" in the DATA MONITOR.
Without CONSULT–II
1. Turn ignition switch to ACC.
2. Check voltage between door mirror LH connector and ground.
OK or NG
OK >> Mirror sensor LH is OK.
NG >> GO TO 3.
3. CHECK HARNESS CONTINUITY 1
1. Disconnect automatic drive positioner control unit and door mirror LH.
2. Check continuity between automatic drive positioner control unit connector M34 terminals 33, 41 and door
mirror LH connector D4 terminals 5, 6.
3. Check continuity between automatic drive positioner control unit
connector M34 terminal 33, 41 and ground.
OK or NG
OK >> GO TO 4.
NG >> Repair or replace harness.
Monitor item [OPERATION or
UNIT]Contents
MIR/
SENLHR–L“V”Voltage output from door mirror LH sensor (LH/
RH) is displayed.
MIR/
SENLHU–D“V”Voltage output from door mirror LH sensor (UP/
DOWN) is displayed.
Con-
nectorTerminals (Wire color)
ConditionVoltage (V)
(Approx.)
(+) (–)
D47 (L/Y)
GroundMirror motor is
operated UP or
DOWN Changes between
3.4 (close to peak) –
0.6 (close to valley)
8 (G)Mirror motor is
operated LEFT or
RIGHTChanges between
3.4 (close to right edge) –
0.6 (close to left edge)
PIIA0197E
LIIA1482E
33 (W/L) - 5 (W/L) : Continuity should exist.
41 (W/G) - 6 (W/G) : Continuity should exist.
33 (W/L) - Ground : Continuity should not exist.
41 (W/G) - Ground : Continuity should not exist.
LIIA1483E
Page 3011 of 3371

SE-62
AUTOMATIC DRIVE POSITIONER
Revision: August 20072004 QX56
4. CHECK HARNESS CONTINUITY 2
1. Disconnect automatic drive positioner control unit and door mirror LH.
2. Check continuity between automatic drive positioner control unit connector M33 terminals 6, 22 and door
mirror LH connector D4 terminals 7, 8.
3. Check continuity between automatic drive positioner control unit
connector M33 terminals 6, 22 and ground.
OK or NG
OK >> Replace door mirror LH.
NG >> Repair or replace harness.
Mirror Sensor RH Circuit Check EIS002YW
1. CHECK DOOR MIRROR FUNCTION
Check the following items.
Operation malfunction in memory control
NOTE:
If a door mirror face position is set to an implausible angle, the set position may not be reproduced.
OK or NG
OK >> GO TO 2.
NG >> Repair the malfunctioning parts, and check the symptom again.
2. CHECK MIRROR SENSOR INSPECTION
With CONSULT–II
Check that “ON” is displayed on “MIR/SE RH R–L, MIR/SE RH U–
D" in the DATA MONITOR.
Without CONSULT–II
1. Turn ignition switch to ACC.
2. Check voltage between door mirror RH connector and ground.
OK or NG
OK >> Mirror sensor RH is OK.
NG >> GO TO 3.6 (L/Y) - 7 (L/Y) : Continuity should exist.
22 (G) - 8 (G) : Continuity should exist.
6 (L/Y) - Ground : Continuity should not exist.
22 (G) - Ground : Continuity should not exist.
LIIA1484E
Monitor item [OPERATION
or UNIT]Contents
MIR/
SENRHR–L“V”Voltage output from door mirror RH sensor (LH/
RH) is displayed.
MIR/
SENRHU–D“V”Voltage output from door mirror RH sensor (UP/
DOWN) is displayed.
Con-
nectorTerminals (Wire color)
ConditionVoltage(V)
(Approx.)
(+) (–)
D1077 (R/B)
GroundMirror motor is
operated UP or
DOWN Changes between
3.4 (close to peak) –
0.6 (close to valley)
8 (L/W)Mirror motor is
operated LEFT or
RIGHTChanges between
3.4 (close to left edge) –
0.6 (close to right edge)
PIIA0197E
LIIA1485E
Page 3012 of 3371

AUTOMATIC DRIVE POSITIONER
SE-63
C
D
E
F
G
H
J
K
L
MA
B
SE
Revision: August 20072004 QX56
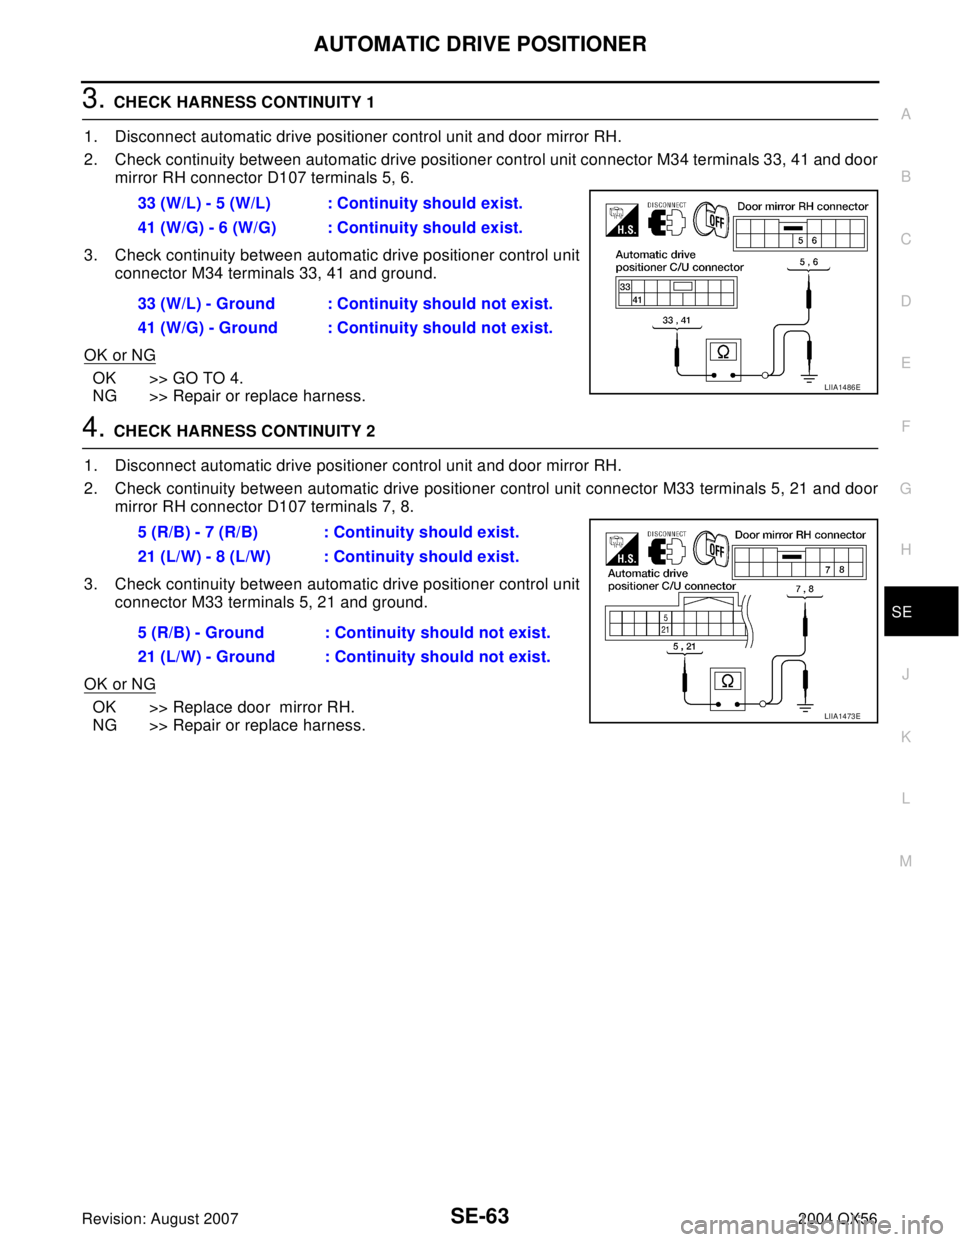
3. CHECK HARNESS CONTINUITY 1
1. Disconnect automatic drive positioner control unit and door mirror RH.
2. Check continuity between automatic drive positioner control unit connector M34 terminals 33, 41 and door
mirror RH connector D107 terminals 5, 6.
3. Check continuity between automatic drive positioner control unit
connector M34 terminals 33, 41 and ground.
OK or NG
OK >> GO TO 4.
NG >> Repair or replace harness.
4. CHECK HARNESS CONTINUITY 2
1. Disconnect automatic drive positioner control unit and door mirror RH.
2. Check continuity between automatic drive positioner control unit connector M33 terminals 5, 21 and door
mirror RH connector D107 terminals 7, 8.
3. Check continuity between automatic drive positioner control unit
connector M33 terminals 5, 21 and ground.
OK or NG
OK >> Replace door mirror RH.
NG >> Repair or replace harness.33 (W/L) - 5 (W/L) : Continuity should exist.
41 (W/G) - 6 (W/G) : Continuity should exist.
33 (W/L) - Ground : Continuity should not exist.
41 (W/G) - Ground : Continuity should not exist.
LIIA1486E
5 (R/B) - 7 (R/B) : Continuity should exist.
21 (L/W) - 8 (L/W) : Continuity should exist.
5 (R/B) - Ground : Continuity should not exist.
21 (L/W) - Ground : Continuity should not exist.
LIIA1473E
Page 3014 of 3371

AUTOMATIC DRIVE POSITIONER
SE-65
C
D
E
F
G
H
J
K
L
MA
B
SE
Revision: August 20072004 QX56
2. CHECK HARNESS CONTINUITY
1. Disconnect automatic drive positioner control unit and steering wheel tilt sensor connector.
2. Check continuity between automatic drive positioner connector M33, M34 terminals 7, 33, 41 and steering
wheel tilt sensor connector M69 terminals 2, 3, 4.
3. Check continuity between automatic drive positioner control unit
connectors M33, M34 terminals 7, 33, 41 and ground.
OK or NG
OK >> Replace steering wheel tilt motor.
NG >> Repair or replace harness.7 (Y/BR) - 3 (Y/BR) : Continuity should exist.
33 (W/L) - 2 (W/L) : Continuity should exist.
41 (W/G) - 4 (W/G) : Continuity should exist.
7 (Y/BR) - Ground : Continuity should not exist.
33 (W/L) - Ground : Continuity should not exist.
41 (W/G) - Ground : Continuity should not exist.
LIIA1432E
Page 3015 of 3371

SE-66
AUTOMATIC DRIVE POSITIONER
Revision: August 20072004 QX56
Sliding Switch Circuit InspectionEIS002YX
1. CHECK FUNCTION
With CONSULT-II
With “SLIDE SW-FR, SLIDE SW-RR” on the DATA MONITOR, oper-
ate the sliding switch to check ON/OFF operation.
Without CONSULT-II
1. Turn ignition switch OFF.
2. Check voltage between driver seat control unit connector and ground.
OK or NG
OK >> Sliding switch circuit is OK.
NG >> GO TO 2.
2. CHECK SLIDING SWITCH CIRCUIT HARNESS CONTINUITY
1. Disconnect driver seat control unit connector and power seat switch LH connector.
2. Check continuity between driver seat control unit connector P2
terminals 11, 26 and power seat switch LH connector P8 termi-
nals 1, 7.
3. Check continuity between driver seat control unit connector P2
terminals 11, 26 and ground.
OK or NG
OK >> GO TO 3.
NG >> Repair or replace harness.
Monitor item [OPER-
ATION or UNIT]Contents
SLIDE SW–
FR"ON/
OFF"ON / OFF status judged from the sliding switch (FR) sig-
nal is displayed.
SLIDE SW–
RR"ON/
OFF"ON / OFF status judged from the sliding switch (RR) sig-
nal is displayed.
PIIA0313E
ConnectorTe r m i n a l
(Wire color)
ConditionVoltage (V)
(Approx.)
(+) (–)
P211 (R/B)
GroundSliding switch ON
(BACKWARD oper-
ation)0
Other than above Battery voltage
26 (P/B)Sliding switch ON
(FORWARD opera-
tion)0
Other than above Battery voltage
PIIA4577E
11 (R/B) - 7 (R/B) : Continuity should exist.
26 (P/B) - 1 (P/B) : Continuity should exist.
11 (R/B) - Ground : Continuity should not exist.
26 (P/B) - Ground : Continuity should not exist.
LIIA1125E
Page 3017 of 3371

SE-68
AUTOMATIC DRIVE POSITIONER
Revision: August 20072004 QX56
2. CHECK RECLINING SWITCH CIRCUIT HARNESS CONTINUITY
1. Disconnect driver seat control unit and power seat switch LH.
2. Check continuity between driver seat control unit connector P2
terminals 12, 27 and power seat switch LH connector P8 termi-
nals 9, 10.
3. Check continuity between driver seat control unit connector P2
terminals 12, 27 and ground.
OK or NG
OK >> GO TO 3.
NG >> Repair or replace harness.
3. RECLINING SWITCH INSPECTION
Check continuity between power seat switch LH as follows.
OK or NG
OK >> Check the condition of the harness and connector.
NG >> Replace power seat switch LH.12 (O/B) - 9 (O/B) : Continuity should exist.
27 (G/B) - 10 (G/B) : Continuity should exist.
12 (O/B) - Ground : Continuity should not exist.
27 (G/B) - Ground : Continuity should not exist.
LIIA1127E
Terminal
Condition Continuity
(+) (–)
9
3Reclining switch ON (BACKWARD operation) Yes
Other than above No
10Reclining switch ON (FORWARD operation) Yes
Other than above No
LIIA1128E