light INFINITI QX56 2011 Factory Owner's Guide
[x] Cancel search | Manufacturer: INFINITI, Model Year: 2011, Model line: QX56, Model: INFINITI QX56 2011Pages: 5598, PDF Size: 94.53 MB
Page 457 of 5598

BCS
INSPECTION AND ADJUSTMENTBCS-69
< BASIC INSPECTION >
C
DE
F
G H
I
J
K L
B A
O P
N
CONFIGURATION (BCM)
: Configuration listINFOID:0000000006274828
Items and setting value that are written in BCM by t he write configuration can be checked by “READ CONFIG-
URATION” as shown in the following table.
SETTING ITEM NOTE
Items Setting value
HZRD (SHCK DTCT ULK) FUNC WITH — UNLOCK WITH SHOCK WITHOUT —
CAN CONNECTION UNIT MODE1 —
NISSAN/INFINITI SETTING INFINITI — AUTO LIGHT WITH —
RAIN SENSOR CONFIG WITH — THEFT ALM AREA MODE2 —
AT DOOR LK VHCL SPED SET MODE2 — TPMS TPMS SBF —
Revision: 2010 May2011 QX56
Page 468 of 5598

BCS-80
< SYMPTOM DIAGNOSIS >
COMBINATION SWITCH SYSTEM SYMPTOMS
SYMPTOM DIAGNOSIS
COMBINATION SWITCH SYSTEM SYMPTOMS
Symptom TableINFOID:0000000006274844
1. Perform “Data Monitor” of CONSULT-II I to check for any malfunctioning item.
2. Check the malfunction combinations.
Malfunction item: ×
3. Identify the malfunctioning part from the agreed combination and repair or replace the part.
Data monitor item
Malfunc-
tion com-
bination
FR WIPER HI
FR WIPER LOW
FR WASHER SW
FR WIPER INT
RR WIPER ON
RR WIPER INT
RR WASHER SW INT VOLUME
TURN SIGNAL R TURN SIGNAL L TAIL LAMP SW
HI BEAM SW
HEAD LAMP SW 1
HEAD LAMP SW 2 PASSING SW
AUTO LIGHT SW
FR FOG SW
×× ×× A
×× ×× B
×× × × C
×× × × D
×× × E
××× F
×××× G
×× ×H
×××× I
× ××× J
All Items K
If only one item is detected or the item is not applicable to the combinations A to K L
Malfunction
combination Malfunctioning part Repair or replace
A Combination switch OUTPUT 1 circuit
Inspect the combination switch output circuit applicable to the malfunction-
ing part. Refer to BCS-76, "
Diagnosis Procedure".
B Combination switch OUTPUT 2 circuit
C Combination switch OUTPUT 3 circuit
D Combination switch OUTPUT 4 circuit E Combination switch OUTPUT 5 circuitF Combination switch INPUT 1 circuit
Inspect the combination switch input circuit applicable to the malfunctioning
part. Refer to BCS-78, "
Diagnosis Procedure".
G Combination switch INPUT 2 circuit
H Combination switch INPUT 3 circuit I Combination switch INPUT 4 circuit
J Combination switch INPUT 5 circuit
K BCM Replace BCM. Refer to BCS-81, "
Removal and Installation".
L Combination switch Replace combination switch.
Revision: 2010 May2011 QX56
Page 474 of 5598
BR-4
< PRECAUTION >
PRECAUTIONS
5. When the repair work is completed, re-connect both battery cables. With the brake pedal released, turn
the push-button ignition switch from ACC position to ON position, then to LOCK position. (The steering
wheel will lock when the push-button igniti on switch is turned to LOCK position.)
6. Perform self-diagnosis check of all control units using CONSULT-III.
Precaution for Procedure without Cowl Top CoverINFOID:0000000006228173
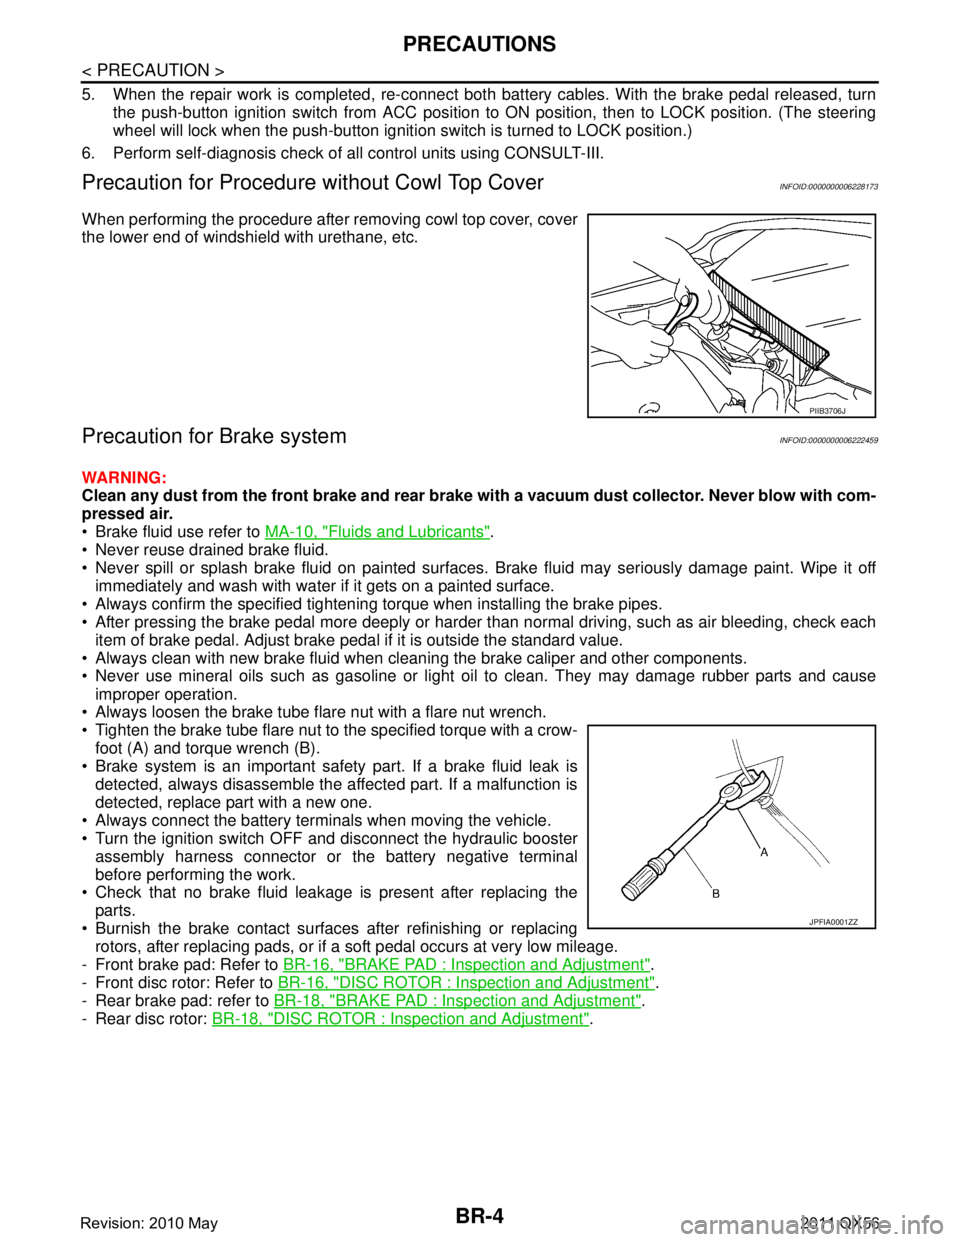
When performing the procedure after removing cowl top cover, cover
the lower end of windshield with urethane, etc.
Precaution for Brake systemINFOID:0000000006222459
WARNING:
Clean any dust from the front brake and rear brake wi th a vacuum dust collector. Never blow with com-
pressed air.
Brake fluid use refer to MA-10, "
Fluids and Lubricants".
Never reuse drained brake fluid.
Never spill or splash brake fluid on painted surfaces. Brake fluid may seriously damage paint. Wipe it off
immediately and wash with water if it gets on a painted surface.
Always confirm the specified tightening torque when installing the brake pipes.
After pressing the brake pedal more deeply or harder t han normal driving, such as air bleeding, check each
item of brake pedal. Adjust brake pedal if it is outside the standard value.
Always clean with new brake fluid when cleaning the brake caliper and other components.
Never use mineral oils such as gasoline or light oil to clean. They may damage rubber parts and cause
improper operation.
Always loosen the brake tube flar e nut with a flare nut wrench.
Tighten the brake tube flare nut to the specified torque with a crow-
foot (A) and torque wrench (B).
Brake system is an important safety part. If a brake fluid leak is detected, always disassemble the affected part. If a malfunction is
detected, replace part with a new one.
Always connect the battery terminals when moving the vehicle.
Turn the ignition switch OFF and disconnect the hydraulic booster assembly harness connector or the battery negative terminal
before performing the work.
Check that no brake fluid leakage is present after replacing the
parts.
Burnish the brake contact surfaces after refinishing or replacing rotors, after replacing pads, or if a soft pedal occurs at very low mileage.
- Front brake pad: Refer to BR-16, "
BRAKE PAD : Inspection and Adjustment".
- Front disc rotor: Refer to BR-16, "
DISC ROTOR : Inspection and Adjustment".
- Rear brake pad: refer to BR-18, "
BRAKE PAD : Inspection and Adjustment".
- Rear disc rotor: BR-18, "
DISC ROTOR : Inspection and Adjustment".
PIIB3706J
JPFIA0001ZZ
Revision: 2010 May2011 QX56
Page 478 of 5598
BR-8
< PERIODIC MAINTENANCE >
BRAKE PEDAL
Brake Pedal Height
1. Remove instrument lower panel LH. Refer to IP-14, "Removal and Installation".
2. Disconnect the stop lamp switch harness c onnector and the brake switch harness connector.
3. Loosen the stop lamp switch and brake switch by turning it 45 ° counterclockwise.
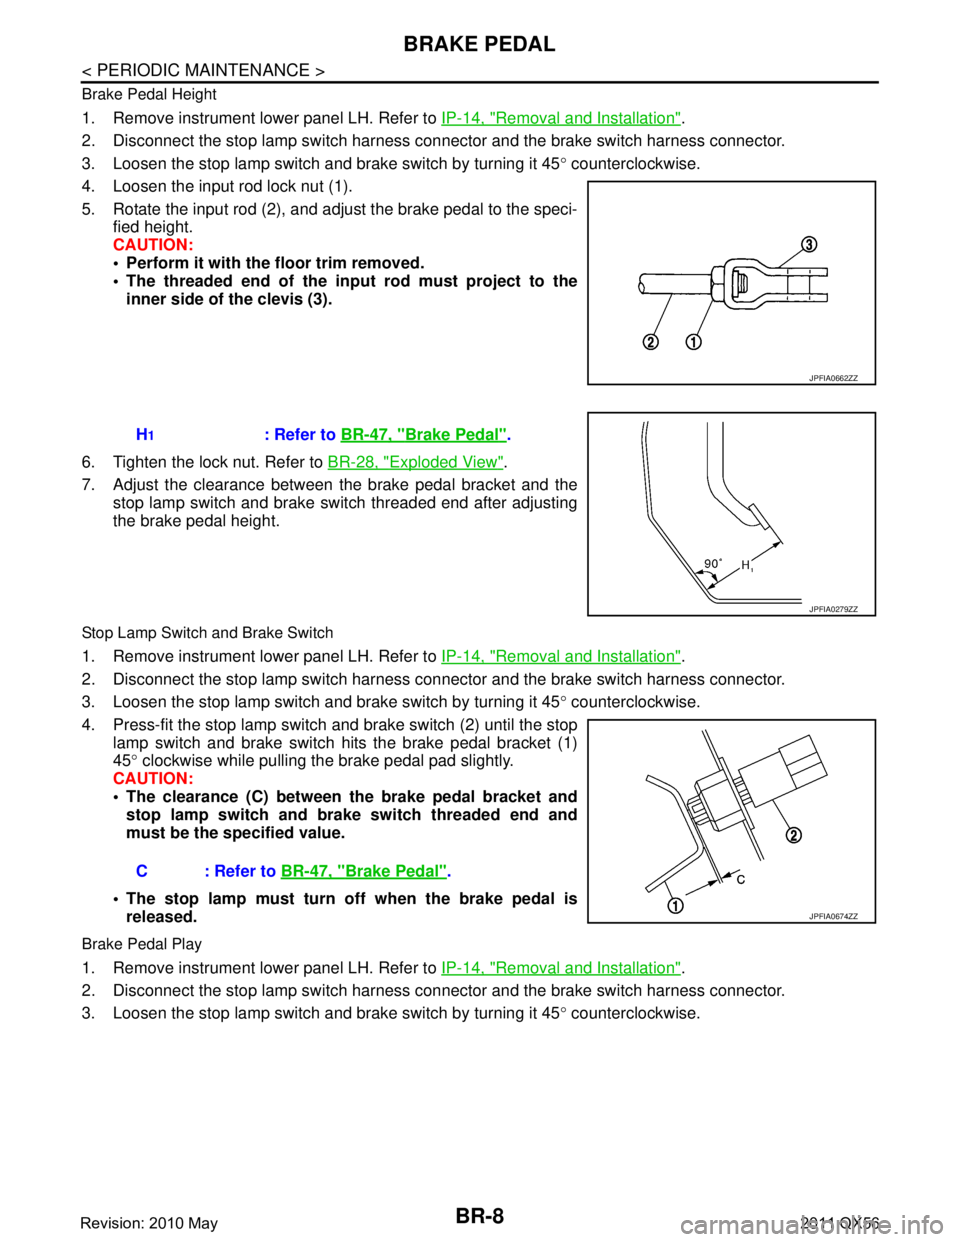
4. Loosen the input rod lock nut (1).
5. Rotate the input rod (2), and adjust the brake pedal to the speci- fied height.
CAUTION:
Perform it with the floor trim removed.
The threaded end of the in put rod must project to the
inner side of the clevis (3).
6. Tighten the lock nut. Refer to BR-28, "
Exploded View".
7. Adjust the clearance between the brake pedal bracket and the stop lamp switch and brake switch threaded end after adjusting
the brake pedal height.
Stop Lamp Switch and Brake Switch
1. Remove instrument lower panel LH. Refer to IP-14, "Removal and Installation".
2. Disconnect the stop lamp switch harness c onnector and the brake switch harness connector.
3. Loosen the stop lamp switch and brake switch by turning it 45 ° counterclockwise.
4. Press-fit the stop lamp switch and brake switch (2) until the stop
lamp switch and brake switch hits the brake pedal bracket (1)
45 ° clockwise while pulling the brake pedal pad slightly.
CAUTION:
The clearance (C) between the brake pedal bracket and
stop lamp switch and brake switch threaded end and
must be the specified value.
The stop lamp must turn off when the brake pedal is released.
Brake Pedal Play
1. Remove instrument lower panel LH. Refer to IP-14, "Removal and Installation".
2. Disconnect the stop lamp switch harness c onnector and the brake switch harness connector.
3. Loosen the stop lamp switch and brake switch by turning it 45 ° counterclockwise.
JPFIA0662ZZ
H1: Refer to BR-47, "Brake Pedal".
JPFIA0279ZZ
C : Refer to BR-47, "Brake Pedal".
JPFIA0674ZZ
Revision: 2010 May2011 QX56
Page 479 of 5598
BRAKE PEDALBR-9
< PERIODIC MAINTENANCE >
C
DE
G H
I
J
K L
M A
B
BR
N
O P
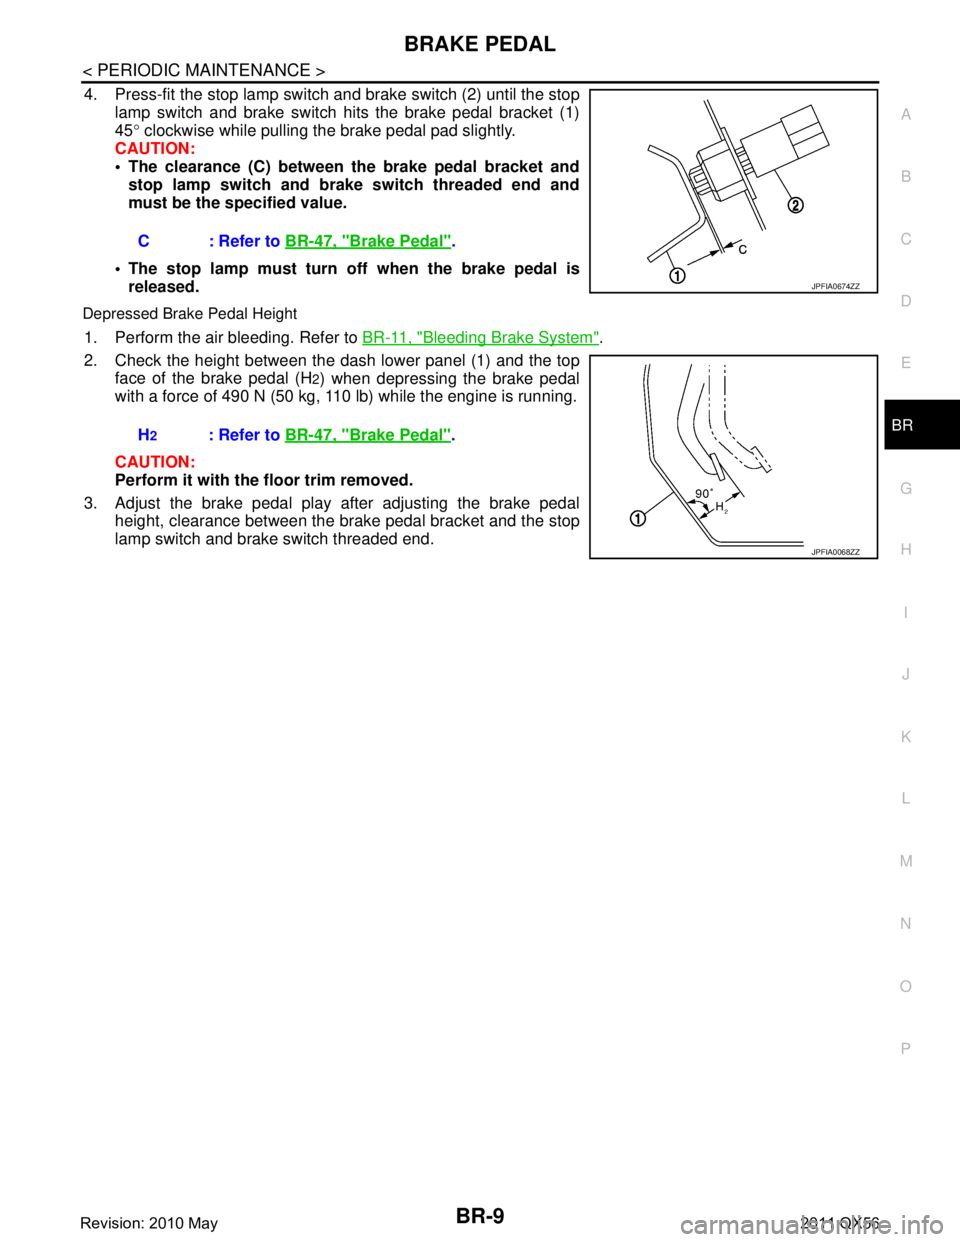
4. Press-fit the stop lamp switch and brake switch (2) until the stop
lamp switch and brake switch hits the brake pedal bracket (1)
45 ° clockwise while pulling the brake pedal pad slightly.
CAUTION:
The clearance (C) between the brake pedal bracket and stop lamp switch and brake switch threaded end and
must be the specified value.
The stop lamp must turn off when the brake pedal is released.
Depressed Brake Pedal Height
1. Perform the air bleeding. Refer to BR-11, "Bleeding Brake System".
2. Check the height between the dash lower panel (1) and the top face of the brake pedal (H
2) when depressing the brake pedal
with a force of 490 N (50 kg, 110 lb) while the engine is running.
CAUTION:
Perform it with the floor trim removed.
3. Adjust the brake pedal play after adjusting the brake pedal height, clearance between the brake pedal bracket and the stop
lamp switch and brake switch threaded end.C : Refer to
BR-47, "
Brake Pedal".
JPFIA0674ZZ
H2: Refer to BR-47, "Brake Pedal".
JPFIA0068ZZ
Revision: 2010 May2011 QX56
Page 482 of 5598

BR-12
< PERIODIC MAINTENANCE >
BRAKE FLUID
warning lamp, ABS warning lamp, and brake warning lamp turn OFF. After these steps, erase self-
diagnosis results for “ABS” with CONSULT-III.
- DTC other than “C118E” is detected: Refer to BRC-51, "
DTC Index".
NOTE:
When the ignition switch is ON, the brake warning la mp may turns ON even when the parking brake pedal is
released with the brake fluid within the specified level. This indicates the decrease in accumulator fluid pres-
sure.
MOTOR/ACCUMULATOR ASSEMBLY
CAUTION:
If the brake fluid adheres to the brake caliper assembly and disc rotor, quickly wipe it off.
Never spill or splash brake fluid on painted surfaces. Brake fluid may seriously damage paint. Wipe it
off immediately and wash with wate r if it gets on a painted surface.
Never operate the brake pedal with the reservoir cap removed. Failure to do this may cause the scat-
tering of brake fluid.
Never operate the brake pedal excessively during the work procedure.
Monitor the fluid level in the reservoir tank while performing the air bleeding.
Bleed air in the following order: motor/accumulator assembly → front right brake → front left brake
→ rear left brake → and rear right brake.
1. Turn the ignition switch OFF.
2. Depress the brake pedal 20 times or more.
3. Check that there is no foreign material in the reservoir tank, and refill with new brake fluid. CAUTION:
Never reuse drained brake fluid.
Never allow oils other than brake fluid to enter the reservoir tank.
4. Turn the ignition switch ON. NOTE:
The motor is activated and automatically stops.
5. Turn the ignition switch OFF.
6. Depress the brake pedal 20 times or more. NOTE:
The pressure loss in the accumulator results in a large brake pedal stroke. In addition to this, the brake
pedal depression becomes lighter in initial stage.
7. Repeat steps 4 to 6 for 5 times.
8. Turn the ignition switch ON to check that the time between motor activation and automatic stop is less
than 18 seconds. If the time is 18 seconds or more, repeat from Step 4 to 8.
FRONT BRAKE
CAUTION:
If the brake fluid adheres to the brake caliper assembly and disc rotor, quickly wipe it off.
Never spill or splash brake fluid on painted surfaces. Brake fluid may seriously damage paint. Wipe it
off immediately and wash with wate r if it gets on a painted surface.
Never operate the brake pedal with the reservoir cap removed. Failure to do this may cause the scat- tering of brake fluid.
Never operate the brake pedal excessively during the work procedure.
Monitor the fluid level in the reservoir tank while performing the air bleeding.
Bleed air in the following order: motor/accumulator assembly → front right brake → front left brake
→ rear left brake → and rear right brake.
1. Turn the ignition switch OFF.
2. Depress the brake pedal 20 times or more. NOTE:
The pressure loss in the accumulator results in a large brake pedal stroke. In addition to this, the brake
pedal depression becomes lighter in initial stage.
3. Check that there is no foreign material in the reservoir tank, and refill with new brake fluid. CAUTION:
Never reuse drained brake fluid.
Never allow oils other than brake fluid to enter the reservoir tank.
4. Turn the ignition switch ON.
Revision: 2010 May2011 QX56
Page 483 of 5598
BRAKE FLUIDBR-13
< PERIODIC MAINTENANCE >
C
DE
G H
I
J
K L
M A
B
BR
N
O P
5. Connect a vinyl tube to the bleed valve.
6. Depress the brake pedal and loosen the bleeder valve.
7. Repeat steps 1 to 6 until all of the air is out of the brake line and tighten the air bleeder to the specified
torque with the brake pedal depressed. Refer to BR-36, "
BRAKE CALIPER ASSEMBLY : Exploded View".
8. Check that no drag feel is present for the front disc brake. Refer to BR-39, "
BRAKE CALIPER ASSEMBLY
: Inspection".
9. Check each item of brake pedal. Adjust it if t he measurement value is not the standard. Refer to BR-7,
"Inspection and Adjustment".
REAR BRAKE
CAUTION:
If the brake fluid adheres to the brake caliper assembly and disc rotor, quickly wipe it off.
Never spill or splash brake fluid on painted surfaces. Brake fluid may seriously damage paint. Wipe it
off immediately and wash with wate r if it gets on a painted surface.
Never operate the brake pedal with the reservoir cap removed. Failure to do this may cause the scat-
tering of brake fluid.
Never operate the brake pedal excessively during the work procedure.
Monitor the fluid level in the reservoir tank while performing the air bleeding.
Bleed air in the following order: motor/accumulator assembly → front right brake → front left brake
→ rear left brake → and rear right brake.
1. Turn the ignition switch OFF.
2. Depress the brake pedal 20 times or more. NOTE:
The pressure loss in the accumulator results in a large brake pedal stroke. In addition to this, the brake
pedal depression becomes lighter in initial stage.
3. Check that there is no foreign material in t he reservoir tank, and refill with new brake fluid.
CAUTION:
Never reuse drained brake fluid.
Never allow oils other than brake fl uid to enter the reservoir tank.
4. Turn the ignition switch ON.
5. Connect a vinyl tube to the bleed valve.
6. Depress the brake pedal and loosen the bleeder valve.
7. Depress and hold the brake pedal depression to disc harge 100 cc of brake fluid before tightening the air
bleeder to the specified torque. Refer to BR-42, "
BRAKE CALIPER ASSEMBLY : Exploded View".
NOTE:
Since brake fluid is conveyed by the motor, the brake pedal is not necessarily depressed.
8. Release the brake pedal.
9. Repeat steps 1 to 8 until all of the air is out of the brake line and tighten the air bleeder to the specified
torque with the brake pedal depressed. Refer to BR-42, "
BRAKE CALIPER ASSEMBLY : Exploded View".
10. Check that no drag feel is present for the rear disc brake. Refer to BR-45, "
BRAKE CALIPER ASSEMBLY
: Inspection".
11. Check each item of brake pedal. Adjust it if t he measurement value is not the standard. Refer to BR-7,
"Inspection and Adjustment".
BRAKE FLUID LEVEL ADJUSTMENT AFTER AIR BLEEDING
1. Turn the ignition switch OFF.
2. Depress the brake pedal 20 times or more.
NOTE:
The pressure loss in the accumulator results in a large brake pedal stroke. In addition to this, the brake
pedal depression becomes lighter in initial stage.
Revision: 2010 May2011 QX56
Page 485 of 5598

HYDRAULIC BOOSTER ASSEMBLYBR-15
< PERIODIC MAINTENANCE >
C
DE
G H
I
J
K L
M A
B
BR
N
O P
HYDRAULIC BOOSTER ASSEMBLY
InspectionINFOID:0000000006222467
OPERATION CHECK
1. Turn the ignition switch OFF.
2. Depress the brake pedal 20 times or more. NOTE:
The pressure loss in the accumulator results in a large brake pedal stroke. In addition to this, the brake
pedal depression becomes lighter in initial stage.
3. Check that the fluid level in the reservoir tank is MAX line.
4. Position the selector lever in P range to release the parking brake.
5. Turn the ignition switch ON to check the time between motor activation and motor stop.
6. After the motor is stopped, check that the ABS warning lamp and the VDC warning lamp in the combina- tion meter are OFF when the engine is started.
7. Stop the engine (ignition switch OFF).
8. Turn the ignition switch ON and depress the brake pedal 4 to 5 times to check the time between motor activation and motor stop.
9. Turn the ignition switch OFF. Turn the ignition switch ON again. Check that the VDC warning lamp turns ON when the brake pedal is depressed 15 to 20 times.
10. Check that the VDC warning lamp turns ON when the brake pedal is depressed 15 to 20 times after the lapse of 120 seconds or more after the ignition switch is turned ON again.
11. Perform the self-diagnosis for “ABS” with CONSULT-III and erase self-diagnosis results.
FUNCTION CHECK
1. Turn the ignition switch OFF.
2. Depress the brake pedal 20 times or more.
NOTE:
The pressure loss in the accumulator results in a large brake pedal stroke. In addition to this, the brake
pedal depression becomes lighter in initial stage.
3. Turn the ignition switch ON with the brake pedal depr essed to check that the clearance between the brake
pedal and the dash lower panel decreases. Motor operating time : 18 seconds or less
Motor operating time : 2
− 11 seconds
Revision: 2010 May2011 QX56
Page 500 of 5598

BR-30
< REMOVAL AND INSTALLATION >
HYDRAULIC BOOSTER ASSEMBLY
7. Remove snap pin (1) and clevis pin (2) from clevis.
8. Remove nuts on hydraulic booster assembly and brake pedalassembly.
CAUTION:
Hold the hydraulic booster assembly so as to avoid drop-
ping out.
9. Remove hydraulic booster assembly. CAUTION:
Always hold (A) when removi ng the hydraulic booster
assembly.
Never deform or bend the brake tubes when removing the hydraulic booster assembly.
Always use a cushion or an equivalent to place the hydraulic booster assembly. Failure to do this may cause
uneven loads or impact and result in a malfunction.
10. After replacing hydraulic booster assembly, always follow the accumulator disposal procedure to discard the hydraulic booster
assembly. Refer to BR-33, "
Disposal".
INSTALLATION
Note the following, and install in the reverse order of removal.
Perform adjustment before installation. Refer to BR-32, "
Inspection and Adjustment".
Never reuse a hydraulic booster assembly after an e xcessive impact. (Slight impulse caused during installa-
tion work is acceptable.)
Never turn the ignition switch ON before the completion of the installation procedure.
Be careful not to damage hydraulic booster assembly stud bolt threads. If hydraulic booster assembly is
tilted during installation, the dash panel may damage the threads.
Always hold (A) when removing the hydraulic booster assembly.
Never deform or bend the brake tubes when installing the hydraulic booster assembly.
Always use a new gasket between the hydraulic booster assembly, spacer and the dash panel.
Replace the clevis pin if it is damaged. Refer to BR-21, "
Inspection
and Adjustment".
Perform the air bleeding. Refer to BR-11, "
Bleeding Brake Sys-
tem".
Perform the brake pedal adjustment after installing the brake pedal assembly and hydraulic booster assembly. Refer to BR-7, "
Inspec-
tion and Adjustment".
Perform inspection after installation. Refer to BR-32, "
Inspection and Adjustment".
Disassembly and AssemblyINFOID:0000000006222485
DISASSEMBLY
CAUTION:
Disassemble the hydraulic booster assembly when necessary.
1. Remove gaskets and spacer from hydraulic booster assembly.
JPFIA0019ZZ
JPFIA0749ZZ
JPFIA0749ZZ
Revision: 2010 May2011 QX56
Page 502 of 5598
BR-32
< REMOVAL AND INSTALLATION >
HYDRAULIC BOOSTER ASSEMBLY
Apply new brake fluid to grommet of between reservoir tank and grommet and ABS actuator and electric unit
(control unit).
Inspection and AdjustmentINFOID:0000000006222486
ADJUSTMENT BEFORE INSTALLATION
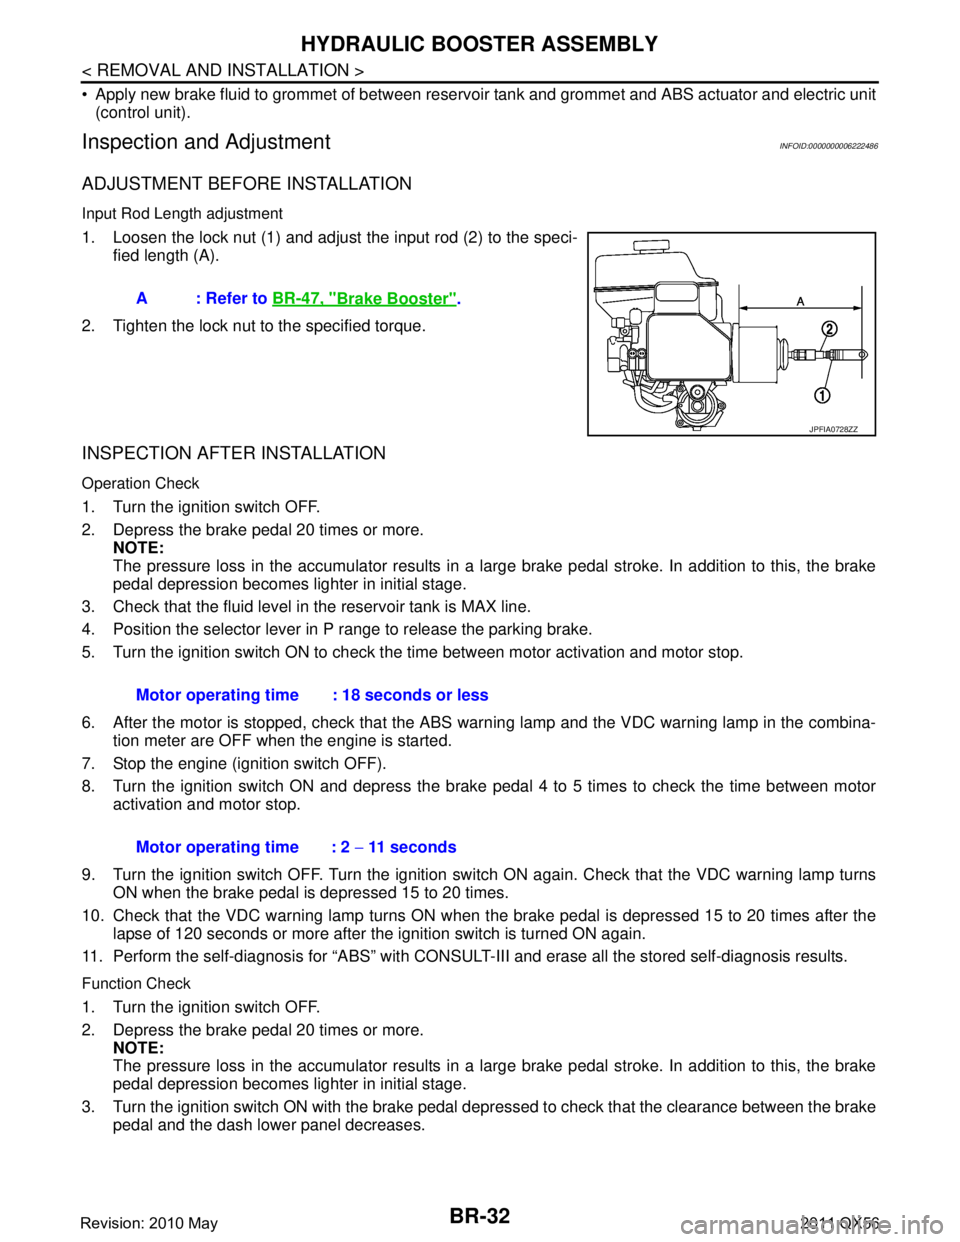
Input Rod Length adjustment
1. Loosen the lock nut (1) and adjust the input rod (2) to the speci-
fied length (A).
2. Tighten the lock nut to the specified torque.
INSPECTION AFTER INSTALLATION
Operation Check
1. Turn the ignition switch OFF.
2. Depress the brake pedal 20 times or more. NOTE:
The pressure loss in the accumulator results in a large brake pedal stroke. In addition to this, the brake
pedal depression becomes lighter in initial stage.
3. Check that the fluid level in the reservoir tank is MAX line.
4. Position the selector lever in P range to release the parking brake.
5. Turn the ignition switch ON to check the time between motor activation and motor stop.
6. After the motor is stopped, check that the ABS warn ing lamp and the VDC warning lamp in the combina-
tion meter are OFF when the engine is started.
7. Stop the engine (ignition switch OFF).
8. Turn the ignition switch ON and depress the brake pedal 4 to 5 times to check the time between motor activation and motor stop.
9. Turn the ignition switch OFF. Turn the ignition swit ch ON again. Check that the VDC warning lamp turns
ON when the brake pedal is depressed 15 to 20 times.
10. Check that the VDC warning lamp turns ON when the brake pedal is depressed 15 to 20 times after the lapse of 120 seconds or more after the ignition switch is turned ON again.
11. Perform the self-diagnosis for “ABS” with CONSULT- III and erase all the stored self-diagnosis results.
Function Check
1. Turn the ignition switch OFF.
2. Depress the brake pedal 20 times or more.
NOTE:
The pressure loss in the accumulator results in a large brake pedal stroke. In addition to this, the brake
pedal depression becomes lighter in initial stage.
3. Turn the ignition switch ON with the brake pedal depr essed to check that the clearance between the brake
pedal and the dash lower panel decreases. A : Refer to
BR-47, "
Brake Booster".
JPFIA0728ZZ
Motor operating time : 18 seconds or less
Motor operating time : 2 − 11 seconds
Revision: 2010 May2011 QX56