sat nav INFINITI QX60 2014 Owner's Manual
[x] Cancel search | Manufacturer: INFINITI, Model Year: 2014, Model line: QX60, Model: INFINITI QX60 2014Pages: 547, PDF Size: 7.39 MB
Page 192 of 547
Radio........................................4-54
FM radio reception . ...........................4-54
AM radio reception . ...........................4-54
Satellite radio reception (if so equipped).........4-55
Audio operation precautions....................4-55
FM/AM/SAT radio with compact disc (CD)
player (if so equipped).........................4-70
Digital Versatile Disc (DVD) Player
Operation (models with Navigation System)......4-79
USB interface.................................4-82
iPod®* player operation........................4-87
Bluetooth® streaming audio (if so equipped).....4-91
CD care and cleaning..........................4-94
Steering wheel switch for audio control..........4-94
Antenna......................................4-96
Dual head restraint/headrest DVD system
(if so equipped)..................................4-96
System components...........................4-97
Before operating dual head restraint/
headrest DVD system.........................4-102
Playing a digital versatile disc (DVD)............4-103
Operating tips................................4-107
Care and maintenance........................4-108
Car phone or CB radio . ..........................4-109Bluetooth® Hands-Free Phone System without
Navigation System (if so equipped)................4-109
Regulatory Information........................4-111
Using the system.............................4-111
Control buttons..............................4-113
Getting started...............................4-114
List of voice commands.......................4-115
Voice Adaptation (VA) mode...................4-120
Manual control...............................4-121
Troubleshooting guide........................4-122
Bluetooth® Hands-Free Phone System with
Navigation System (if so equipped)................4-123
Regulatory Information........................4-125
Voice commands.............................
4-125
Connecting procedure........................4-126
Vehicle Phonebook...........................4-127
Handset phonebook..........................4-128
Making a call.................................4-129
Receiving a call..............................4-130
During a call.................................4-130
Ending a call.................................4-131
Phone settings...............................4-131
Bluetooth settings............................4-132
Page 245 of 547

SATELLITE RADIO RECEPTION (if so
equipped)
When the satellite radio is used for the first time
or the battery has been replaced, the satellite
radio may not work properly. This is not a mal-
function. Wait more than 10 minutes with satellite
radio ON and the vehicle outside of any metal or
large building for satellite radio to receive all of
the necessary data.
The satellite radio mode will be skipped unless an
optional satellite receiver and antenna are in-
stalled and a SiriusXM Satellite Radio service
subscription is active. Satellite radio is not avail-
able in Alaska, Hawaii and Guam.
Satellite radio performance may be affected if
cargo carried on the roof blocks the satellite radio
signal.
If possible, do not put cargo over the satellite
antenna.
A build up of ice on the satellite radio antenna can
affect satellite radio performance. Remove the
ice to restore satellite radio reception.
XM® is a registered trademark of SiriusXM Sat-
ellite Radio, Inc.
AUDIO OPERATION PRECAUTIONSCompact disc (CD) player (models
without Navigation System)
CAUTION
●Do not force a compact disc into the CD
insert slot. This could damage the CD
and/or CD changer/player.
●Trying to load a CD with the CD door
closed could damage the CD and/or CD
changer.
●Only one CD can be loaded into the CD
player at a time.
●Only use high quality 4.7 in (12 cm)
round discs that have the “COMPACT
disc DIGITAL AUDIO” logo on the disc
or packaging.
●During cold weather or rainy days, the
player may malfunction due to the hu-
midity. If this occurs, remove the CD
and dehumidify or ventilate the player
completely.
●The player may skip while driving on
rough roads.
LHA0099
Monitor, climate, audio, phone and voice recognition systems4-55
Page 263 of 547
iPod®/USB→CD→iPod®/USB
●Models with Navigation System
iPod®/USB→CD/DVD→Bluetooth® Audio→
iPod®/USB
Linking Intelligent Key (models with Navi-
gation System):
The audio settings can be memorized for each
Intelligent Key. For more details, see “Setting
memory function” in the “Predriving checks and
adjustments” section.
FM/AM/SAT radio operation
FM/AM band select:
Pressing the FM·AM button will change the band
as follows:
AM→FM1→FM2→AM
When the FM·AM button is pressed while the
ignition switch is in the ACC or ON position, the
radio will come on at the station last played.
The last station played will also come on when
the VOL/ON·OFF control knob is pressed ON.
If a compact disc is playing when the FM·AM
button is pressed, the compact disc will auto-
matically be turned off and the last radio station
played will come on.The FM stereo indicator STEREO will illuminate
during FM stereo reception. When the stereo
broadcast signal is weak, the radio will automati-
cally change from stereo to monaural reception.
XM band select:
Pressing the XM button will change the band as
follows:
XM1*→XM2*→XM3*→XM1
When the XM button is pressed while the ignition
switch is in the ACC or ON position, the radio will
come on at the station last played.
The last station played will also come on when
the VOL/ON·OFF control knob is pressed ON.
*When the XM button is pressed, the satellite
radio reception will not be available unless an
optional satellite receiver and antenna are in-
stalled and a SiriusXM Satellite Radio service
subscription is active. Satellite radio is not avail-
able in Alaska, Hawaii and Guam.
If a compact disc is playing when the XM button
is pressed, the compact disc will automatically be
turned off and the last radio station played will
come on.
TUNE/FOLDER (Tuning) knob:
To manually tune the radio, turn the
TUNE/FOLDER knob to the right or left.
SEEK•CAT/TRACK tuning
button:
For AM or FM:
Press the SEEK•CAT/TRACK button
orto tune from high to low or low to high
frequencies and stop at the next broadcasting
station.
For XM:
Press the SEEK•CAT/TRACK button
orto go to the first channel of the previous
or next category.
During satellite radio reception, the following no-
tices will be displayed under certain conditions.
●NO SIGNAL (No signal is received while the
SAT tuner is connected)
●OFF AIR (Broadcasting signed off)
●CHECK ANTENNA (Antenna connection
error)
●LOADING (When the initial setting is per-
formed)
●UPDATING (When the satellite radio sub-
scription is not active)
Monitor, climate, audio, phone and voice recognition systems4-73
Page 264 of 547
SCAN tuning:
Press the SCAN button to stop at each broad-
casting station for 5 seconds. Pressing the
SCAN button again during this five second pe-
riod will stop scan tuning and the radio will remain
tuned to that station. If the SCAN button is not
pressed within 5 seconds, scan tuning moves to
the next station.
1 to 6 Station memory operations:
Six stations can be set for the AM band. Twelve
stations can be set for the FM band (6 for FM1, 6
for FM2) . Eighteen channels can be set for the
satellite radio (6 for XM1, 6 for XM2, 6 for XM3) .
1. Choose the radio band AM, FM1 or FM2
using the FM·AM select button, or choose
the satellite band XM1, XM2 or XM3 using
the XM button.
2. Tune to the desired station using manual,
SEEK or SCAN tuning. Press and hold any
of the desired station memory buttons (1 –
6) until the preset number is updated on the
display and the sound is briefly muted.
3. The channel indicator will then come on and
the sound will resume. Programming is now
complete.
4. Other buttons can be set in the same man-
ner.If the battery cable is disconnected, or if the fuse
opens, the radio memory will be canceled. In that
case, reset the desired stations.
List (AM and FM)
Select the “List” key using the INFINITI controller
or touchscreen to see a list of the presets in the
AM, FM1 or FM2 preset banks.
Text (SiriusXM Satellite Radio) (models
without Navigation System):
Select the “Text” key with the INFINITI controller
and then press the ENTER button while the sat-
ellite radio is being played to display the text
information listed below:
●CH Name
●Category
●Name
●Title
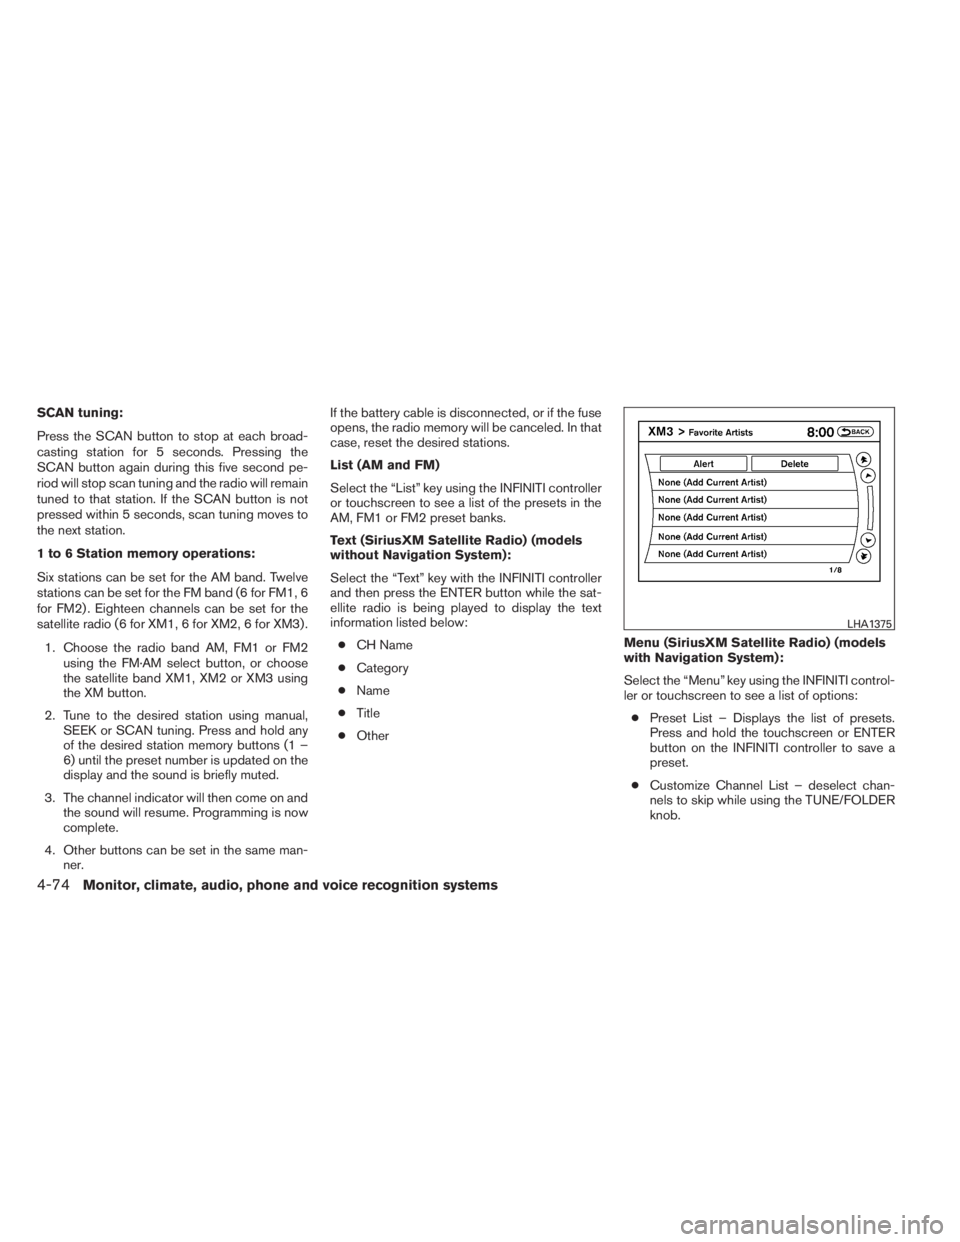
●OtherMenu (SiriusXM Satellite Radio) (models
with Navigation System):
Select the “Menu” key using the INFINITI control-
ler or touchscreen to see a list of options:
●Preset List – Displays the list of presets.
Press and hold the touchscreen or ENTER
button on the INFINITI controller to save a
preset.
●Customize Channel List – deselect chan-
nels to skip while using the TUNE/FOLDER
knob.
LHA1375
4-74Monitor, climate, audio, phone and voice recognition systems
Page 269 of 547
Additional features
For more information about the iPod® player
available with this system, see “iPod® player
operation” in this section.
For more information about the USB interface
available with this system, see “USB interface” in
this section.
For more information about the Bluetooth®
streaming audio feature available with this sys-
tem, see “Bluetooth® streaming audio” in this
section.
DIGITAL VERSATILE DISC (DVD)
PLAYER OPERATION (models with
Navigation System)
Precautions
Start the engine when using the DVD entertain-
ment system.
Movies will not be shown on the front display
while the vehicle is in any drive position to reduce
driver distraction. Audio is available when a movie
is played. To view movies on the front display,
stop the vehicle in a safe location, move the shift
lever to the P (Park) position and apply the park-
ing brake.
WARNING
●The driver must not attempt to operate
the DVD system or wear the head-
phones while the vehicle is in motion so
that full attention may be given to ve-
hicle operation.
●Do not attempt to modify the system to
display a movie on the front screen
while the vehicle is being driven. Doing
so may distract the driver and may
cause a collision and serious personal
injury or death.
CAUTION
●Only operate the DVD while the vehicle
engine is running. Operating the DVD
for extended periods of time with the
engine OFF can discharge the vehicle
battery.
●Do not allow the system to get wet.
Excessive moisture such as spilled liq-
uids may cause the system to
malfunction.
●While playing VIDEO-CD media, this
DVD player does not guarantee com-
plete functionality of all VIDEO-CD
formats.
Display settings
To adjust the front display mode, press the SET-
TING button while the DVD is playing. Select the
“Others” key with the INFINITI controller or with
the touchscreen, then select the “Display” key.
To adjust the display ON/OFF, brightness, tint,
color and contrast, select the “Display Adjust-
ment” key with the INFINITI controller or with the
touchscreen and then select the key of the set-
ting you wish to adjust. After the desired changes
have been made, press the BACK button to save
the settings.
Monitor, climate, audio, phone and voice recognition systems4-79
Page 285 of 547
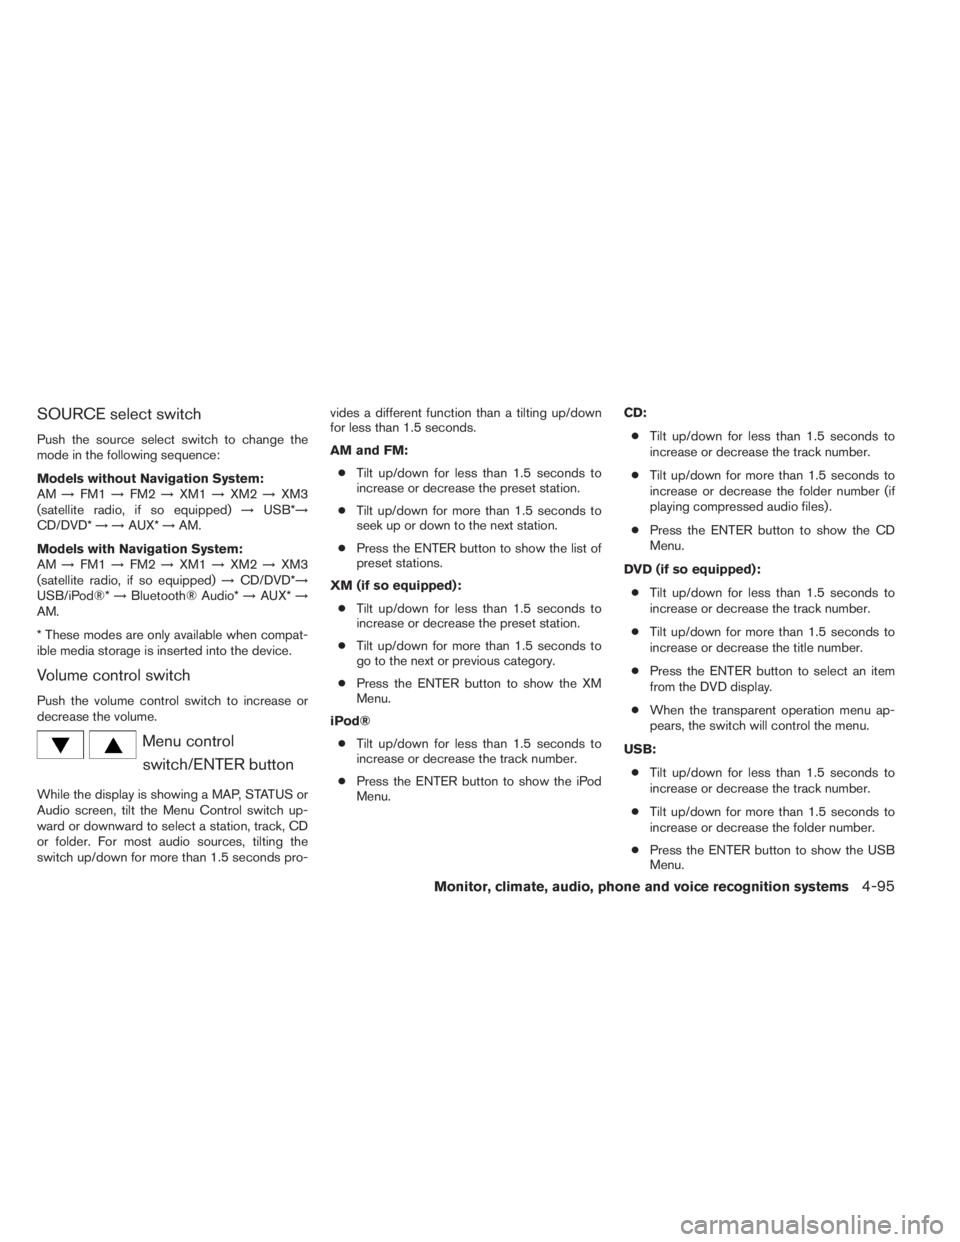
SOURCE select switch
Push the source select switch to change the
mode in the following sequence:
Models without Navigation System:
AM→FM1→FM2→XM1→XM2→XM3
(satellite radio, if so equipped)→USB*→
CD/DVD*→→AUX*→AM.
Models with Navigation System:
AM→FM1→FM2→XM1→XM2→XM3
(satellite radio, if so equipped)→CD/DVD*→
USB/iPod®*→Bluetooth® Audio*→AUX*→
AM.
* These modes are only available when compat-
ible media storage is inserted into the device.
Volume control switch
Push the volume control switch to increase or
decrease the volume.
Menu control
switch/ENTER button
While the display is showing a MAP, STATUS or
Audio screen, tilt the Menu Control switch up-
ward or downward to select a station, track, CD
or folder. For most audio sources, tilting the
switch up/down for more than 1.5 seconds pro-vides a different function than a tilting up/down
for less than 1.5 seconds.
AM and FM:
●Tilt up/down for less than 1.5 seconds to
increase or decrease the preset station.
●Tilt up/down for more than 1.5 seconds to
seek up or down to the next station.
●Press the ENTER button to show the list of
preset stations.
XM (if so equipped):
●Tilt up/down for less than 1.5 seconds to
increase or decrease the preset station.
●Tilt up/down for more than 1.5 seconds to
go to the next or previous category.
●Press the ENTER button to show the XM
Menu.
iPod®
●Tilt up/down for less than 1.5 seconds to
increase or decrease the track number.
●Press the ENTER button to show the iPod
Menu.CD:
●Tilt up/down for less than 1.5 seconds to
increase or decrease the track number.
●Tilt up/down for more than 1.5 seconds to
increase or decrease the folder number (if
playing compressed audio files) .
●Press the ENTER button to show the CD
Menu.
DVD (if so equipped):
●Tilt up/down for less than 1.5 seconds to
increase or decrease the track number.
●Tilt up/down for more than 1.5 seconds to
increase or decrease the title number.
●Press the ENTER button to select an item
from the DVD display.
●When the transparent operation menu ap-
pears, the switch will control the menu.
USB:
●Tilt up/down for less than 1.5 seconds to
increase or decrease the track number.
●Tilt up/down for more than 1.5 seconds to
increase or decrease the folder number.
●Press the ENTER button to show the USB
Menu.
Monitor, climate, audio, phone and voice recognition systems4-95
Page 327 of 547
USING THE SYSTEM
Initialization
When the ignition switch is placed in the ON
position, INFINITI Voice Recognition is initialized,
which takes a few seconds. When completed,
the system is ready to accept voice commands. If
the
switch is pressed before the initializa-
tion completes, voice commands will not be ac-
cepted. Please wait until the INFINITI Voice Rec-
ognition initialization is completed.
BEFORE STARTING
To get the best recognition performance from
Voice Recognition, observe the following:
●The interior of the vehicle should be as quiet
as possible. Close the windows to eliminate
the surrounding noises (traffic noise and vi-
bration sounds, etc.) , which may prevent the
system from correctly recognizing the voice
commands.
●Wait until the tone sounds before speaking a
command.
●Speak in a natural conversational voice with-
out pausing between words.
●If the air conditioner is set to “Auto”, the fan
speed is automatically lowered so that your
commands can be recognized more easily.
GIVING VOICE COMMANDS
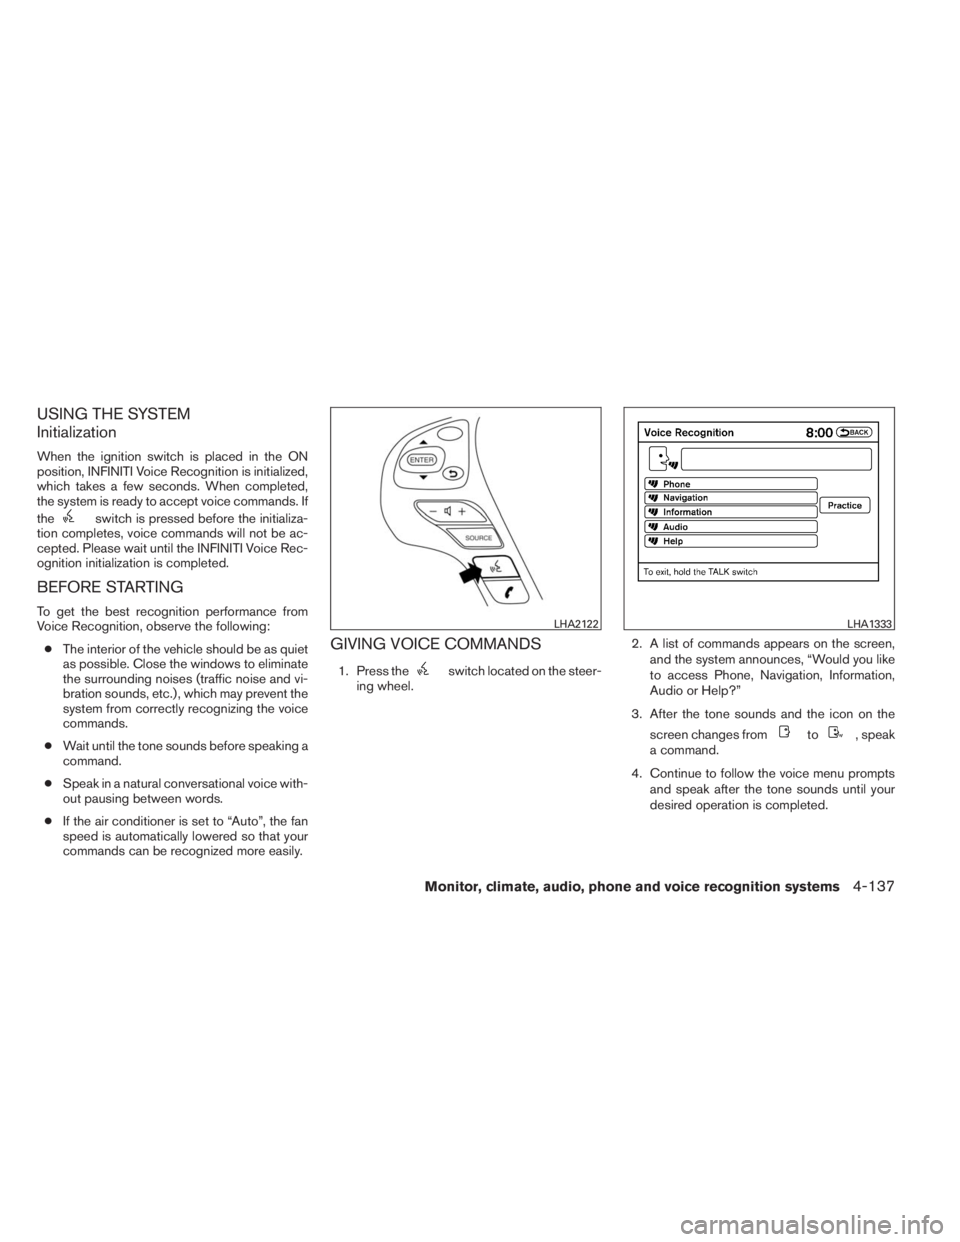
1. Press theswitch located on the steer-
ing wheel.2. A list of commands appears on the screen,
and the system announces, “Would you like
to access Phone, Navigation, Information,
Audio or Help?”
3. After the tone sounds and the icon on the
screen changes from
to, speak
a command.
4. Continue to follow the voice menu prompts
and speak after the tone sounds until your
desired operation is completed.
LHA2122LHA1333
Monitor, climate, audio, phone and voice recognition systems4-137
Page 335 of 547
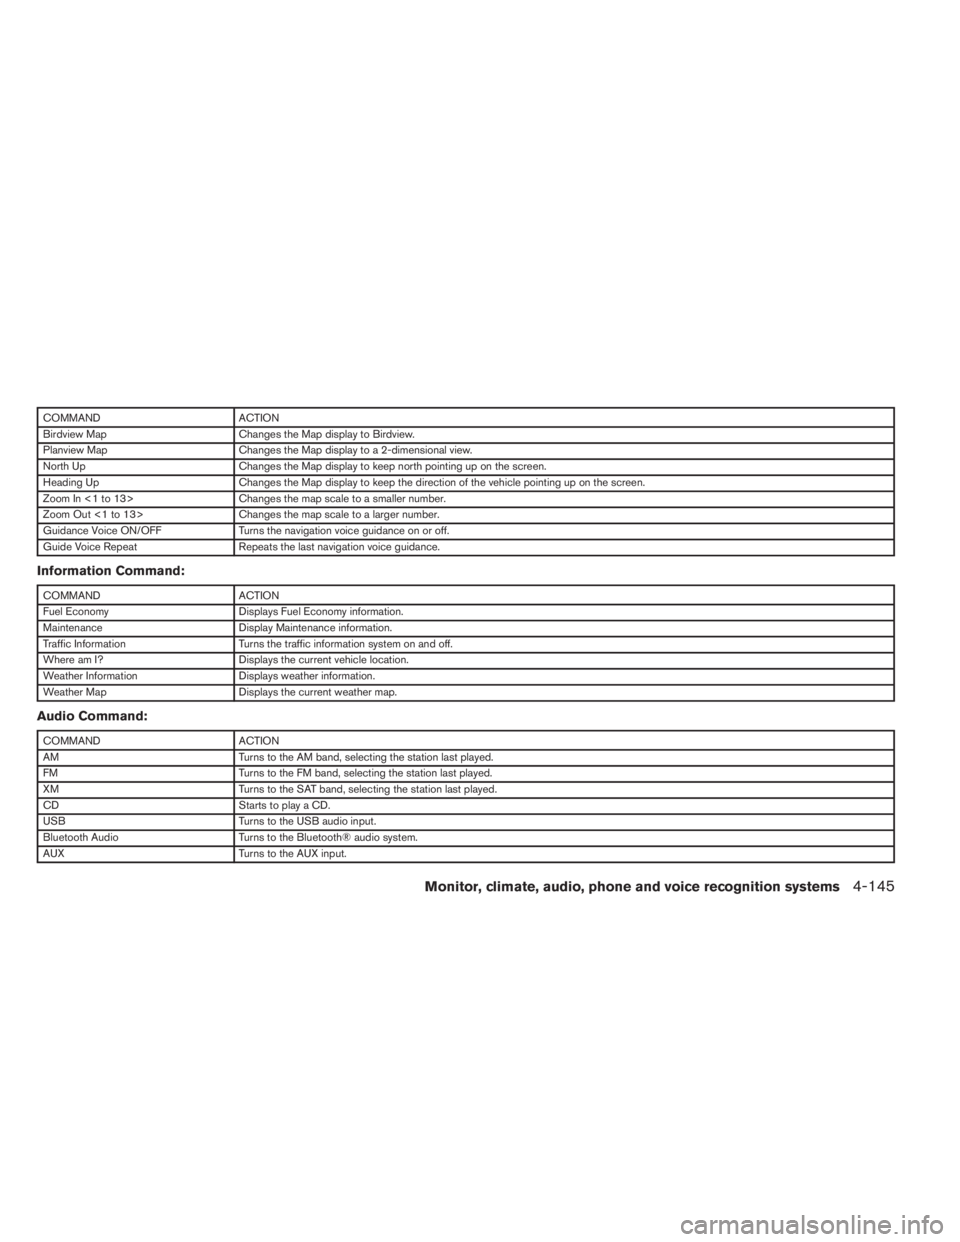
COMMAND ACTION
Birdview Map Changes the Map display to Birdview.
Planview Map Changes the Map display to a 2-dimensional view.
North Up Changes the Map display to keep north pointing up on the screen.
Heading Up Changes the Map display to keep the direction of the vehicle pointing up on the screen.
Zoom In <1 to 13> Changes the map scale to a smaller number.
Zoom Out <1 to 13> Changes the map scale to a larger number.
Guidance Voice ON/OFF Turns the navigation voice guidance on or off.
Guide Voice Repeat Repeats the last navigation voice guidance.
Information Command:
COMMAND ACTION
Fuel Economy Displays Fuel Economy information.
Maintenance Display Maintenance information.
Traffic Information Turns the traffic information system on and off.
Where am I? Displays the current vehicle location.
Weather Information Displays weather information.
Weather Map Displays the current weather map.
Audio Command:
COMMAND ACTION
AM Turns to the AM band, selecting the station last played.
FM Turns to the FM band, selecting the station last played.
XM Turns to the SAT band, selecting the station last played.
CD Starts to play a CD.
USB Turns to the USB audio input.
Bluetooth Audio Turns to the Bluetooth® audio system.
AUX Turns to the AUX input.
Monitor, climate, audio, phone and voice recognition systems4-145
Page 371 of 547

2. Select “Driver Aids”, and press the ENTER
button.
3. To set the LDP system to on or off, use
the
buttons to navigate in the menu
and use the ENTER button to select or
change an item:
●Select “Lane” and press the ENTER but-
ton.
– To turn on the warning, use the ENTER
button to check box for Warning (LDW)”
– To turn on the assistance system, use the
ENTER button to check box for “Assis-
tance (LDP)”
Automatic deactivation
Condition A:
The warning and assist functions of the LDP
system are not designed to work under the fol-
lowing conditions:
●When you operate the lane change signal
and change the traveling lanes in the direc-
tion of the signal. (The LDP system will be
deactivated for approximately 2 seconds af-
ter the lane change signal is turned off.)
●When the vehicle speed lowers to less than
approximately 45 MPH (70 km/h).After the above conditions have finished and the
necessary operating conditions are satisfied, the
warning and assist functions will resume.
Condition B:
The assist function of the LDP system is not
designed to work under the following conditions
(warning is still functional):
●When the brake pedal is depressed.
●When the steering wheel is turned as far as
necessary for the vehicle to change lanes.
●When the accelerator pedal is applied dur-
ing LDP system operation.
●When the Intelligent Cruise Control (ICC)
approach warning occurs.
●When the hazard warning flashers are oper-
ated.
●When driving on a curve at high speed.
After the above conditions have finished and the
necessary operating conditions are satisfied, the
LDP system application of the brakes will resume.
Condition C:
If the following messages appear in the vehicle
information display, a chime will sound and the
LDP system will be turned off automatically.●“Unavailable Road is slippery”:
When the VDC system (except TCS func-
tion) or ABS operates.
●“Unavailable VDC OFF”:
When the VDC system is turned off.
●“Unavailable Snow mode active”:
When the drive mode select switch is turned
to the SNOW mode.
Action to take:
When the above conditions no longer exist, turn
off the LDP system. Push the dynamic driver
assistance switch again to turn the LDP system
back on.
Temporary disabled status at high tem-
perature:
If the vehicle is parked in direct sunlight under
high temperature conditions (over approximately
104°F (40°C)) and then the LDP system is turned
on, the LDP system may be deactivated auto-
matically and the following message will appear
on the vehicle information display.
“Unavailable High Cabin Temp. ”
When the interior temperature is reduced, the
system will resume operating automatically.
Starting and driving5-31
Page 540 of 547
Continuously Variable Transmission
(CVT) fluid..................8-11
Driving with Continuously Variable
Transmission (CVT).............5-17
Control panel buttons..............4-11
Brightness/contrast button......4-10,4-21
Enterbutton...............4-4,4-11
Without navigation system..........4-4
Controls
Audiocontrols(steeringwheel).......4-94
Heater and air conditioner controls.....4-48
Coolant
Capacities and recommended
fuel/lubricants.................9-2
Changing engine coolant...........8-8
Checking engine coolant level........8-8
Engine coolant temperature gauge.....2-5
Corrosionprotection ...............7-6
Cruisecontrol..................5-51
Cupholders...................2-45
D
Daytime running light system (Canada only) . .2-33
Defroster switch
Rear window and outside mirror defroster
switch.....................2-30
Digital Versatile Disc (DVD) player.......4-79
Dimensionsandweights.............9-8
Dimmer switch for instrument panel......2-34
Display controls
(seecontrolpanelbuttons) ........4-4,4-11
Door locks.....................3-4
Drive belt.....................8-16
Drive positioner, Automatic...........3-31Driving
Cold weather driving............5-100
Driving with Continuously Variable
Transmission (CVT).............5-17
Precautions when starting and driving....5-4
E
Economy - fuel..................5-90
Emission control information label.......9-10
Emission control system warranty.......9-29
Engine
Before starting the engine..........5-16
Block heater................5-101
Capacities and recommended
fuel/lubricants.................9-2
Changingenginecoolant...........8-8
Changingengineoil.............8-10
Changing engine oil filter..........8-11
Checking engine coolant level........8-8
Checking engine oil level...........8-9
Engine compartment check locations....8-6
Engine coolant temperature gauge.....2-5
Engine cooling system............8-7
Engineoil ...................8-9
Engine oil and oil filter recommendation . . .9-5
Engine oil viscosity..............9-5
Engine serial number............9-10
Engine specifications.............9-7
Starting the engine.............5-16
Enterbutton.................4-4,4-11
Eventdatarecorders ..............9-31
Exhaust gas (Carbon monoxide).........5-4
Extended storage switch............8-23
Eyeglass case..................2-44F
Flashers (See hazard warning flasher switch) . .6-2
Flat tire.......................6-3
Floor mat positioning aid.............7-5
Fluid
Brake fluid..................8-12
Capacities and recommended
fuel/lubricants.................9-2
Continuously Variable Transmission
(CVT) fluid..................8-11
Engine coolant.................8-7
Engine oil
...................8-9
Power steering fluid.............8-12
Windshield-washer fluid...........8-13
F.M.V.S.S. certification label...........9-10
Foglightswitch .................2-34
Front air bag system
(See supplemental restraint system)......1-61
Front seats.....................1-2
Fuel
Capacities and recommended
fuel/lubricants.................9-2
Fuel economy................5-90
Fuel-filler door and cap...........3-24
Fuelgauge...................2-6
Fuel octane rating...............9-4
Fuel recommendation.............9-3
Loose fuel cap warning...........2-24
Fuses.......................8-21
Fusiblelinks ...................8-21
10-2