air condition INFINITI QX60 HYBRID 2016 Owner's Guide
[x] Cancel search | Manufacturer: INFINITI, Model Year: 2016, Model line: QX60 HYBRID, Model: INFINITI QX60 HYBRID 2016Pages: 651, PDF Size: 13.31 MB
Page 193 of 651
WARNING
●Radio waves could adversely affect
electric medical equipment. Those who
use a pacemaker should contact the
electric medical equipment manufac-
turer for the possible influences before
use.
● The Intelligent Key transmits radio
waves when the buttons are pressed.
The FAA advises the radio waves may
affect aircraft navigation and communi-
cation systems. Do not operate the In-
telligent Key while on an airplane. Make
sure the buttons are not operated unin-
tentionally when the unit is stored for a
flight.
The Intelligent Key system can operate all the
door locks using the remote control function or
pushing the request switch on the vehicle without
taking the key out from a pocket or purse. The
operating environment and/or conditions may af-
fect the Intelligent Key system operation.
Be sure to read the following before using the
Intelligent Key system.
CAUTION
● Be sure to carry the Intelligent Key with
you when operating the vehicle.
● Never leave the Intelligent Key in the
vehicle when you leave the vehicle.
The Intelligent Key is always communicating with
the vehicle as it receives radio waves. The Intel-
ligent Key system transmits weak radio waves.
Environmental conditions may interfere with the
operation of the Intelligent Key system under the
following operating conditions: ● When operating near a location where
strong radio waves are transmitted, such as
a TV tower, power station and broadcasting
station.
● When in possession of wireless equipment,
such as a cellular telephone, transceiver or a
CB radio.
● When the Intelligent Key is in contact with or
covered by metallic materials.
● When any type of radio wave remote control
is used nearby.
● When the Intelligent Key is placed near an
electric appliance such as a personal com-
puter. ●
When the vehicle is parked near a parking
meter.
In such cases, correct the operating conditions
before using the Intelligent Key function or use
the mechanical key.
Although the life of the battery varies depending
on the operating conditions, the battery’s life is
approximately two years. If the battery is dis-
charged, replace it with a new one.
When the Intelligent Key battery is low, an indi-
cator illuminates in the vehicle information dis-
play. For additional information, refer to “Vehicle
information display” in the “Instruments and con-
trols” section of this manual.
Since the Intelligent Key is continuously receiving
radio waves, if the key is left near equipment
which transmits strong radio waves, such as sig-
nals from a TV and personal computer, the bat-
tery life may become shorter.
For additional information, refer to “Battery re-
placement” in the “Maintenance and do-it-
yourself” section of this manual.
As many as four Intelligent Keys can be regis-
tered and used with one vehicle. For information
about the purchase and use of additional Intelli-
gent Keys, it is recommended that you visit an
INFINITI retailer.
INFINITI INTELLIGENT KEY SYSTEM
Pre-driving checks and adjustments3-7
Page 222 of 651
Restarting the entry/exit function
If the battery cable is disconnected, or if the fuse
opens, the stored memory positions will be lost
and some of the functions will be restricted:1. Drive the vehicle over 25 mph (40 km/h).
OR 2. Open and close the driver’s door more than two times with the ignition switch in the OFF
position.
The entry/exit function should now work properly.
SETTING MEMORY FUNCTION
The position of the following settings can be
linked to the Intelligent Key and the memorized
settings can be available for each Intelligent Key. ● Climate control system
● Navigation system (if so equipped)
● Audio system
To use the memory function, set the climate,
navigation and audio systems to the driver’s pre-
ferred settings. Lock the doors with the Intelligent
Key. Each Intelligent Key may be set with the
driver’s individual preferences. When a new In-
telligent Key is used, “Connection with the key
has been done” will be displayed on the screen
and the memorized settings are available. To engage the memorized settings, perform the
following:
1. Carry the Intelligent Key that is linked to the memorized settings.
2. Unlock the doors by pushing the driver’s door handle request switch or the
UNLOCK
button on the Intelligent
Key.
3. Place the ignition switch in the ON position. The settings linked to the Intelligent Key will
start.
For additional information on using the Climate
control system, refer to “Heater and air condi-
tioner (automatic)” in the “Monitor, climate, audio,
phone and voice recognition systems” section of
this manual.
For additional information on using the Naviga-
tion System, refer to the separate Navigation
System Owner’s Manual.
For additional information on using the Audio
system, refer to “Audio system” in the “Monitor,
climate, audio, phone and voice recognition sys-
tems” section of this manual.
SYSTEM OPERATION
The automatic drive positioner system will not
work or will stop operating under the following
conditions:
● When the vehicle speed is above 4 mph
(7 km/h).
● When any of the memory switches are
pushed while the automatic drive positioner
is operating.
● When the adjusting switch for the driver’s
seat is turned on while the automatic drive
positioner is operating.
● When the seat has already been moved to
the memorized position.
● When no seat position is stored in the
memory switch.
● When the shift lever is moved from P (Park)
to any other position.
3-36Pre-driving checks and adjustments
Page 224 of 651
System maintenance........................... 4-47
Vents ........................................... 4-48
Heater and air conditioner (automatic) ..............4-49
Automatic operation ........................... 4-50
Manual operation .............................. 4-50
Operating tips ................................. 4-51
CLIMATE setting screen ........................ 4-52
Rear automatic air conditioning system. . .........4-54
Servicing air conditioner ........................... 4-57
Audio system .................................... 4-57
Radio ........................................ 4-57
FM radio reception ............................ 4-57
AM radio reception ............................ 4-58
Satellite radio reception ........................ 4-58
Audio operation precautions ....................4-58
FM/AM/SAT radio with compact disc (CD)
player ........................................ 4-72
Digital Versatile Disc (DVD) Player
Operation (models with Navigation System)
(if so equipped) ............................... 4-80
USB (Universal Serial Bus) Connection Port
(models without Navigation System)
(if so equipped) ............................... 4-83USB (Universal Serial Bus) Connection Port
(models with Navigation System)
(if so equipped)
............................... 4-85
iPod®* player operation without Navigation
System (if so equipped) ........................ 4-88
iPod®* player operation with Navigation
System (if so equipped) ........................ 4-90
Bluetooth® streaming audio (if so equipped) .....4-94
CD care and cleaning .......................... 4-97
Steering wheel switch for audio control ..........4-98
Antenna ...................................... 4-99
INFINITI Mobile Entertainment System (MES)
(if so equipped) .................................. 4-99
System components .......................... 4-100
Before operating dual head restraint/
headrest DVD system ......................... 4-105
Playing a DVD (Digital Versatile Disc) ...........4-106
Operating tips ................................ 4-110
Care and maintenance ........................ 4-111
Car phone or CB radio ........................... 4-111
Bluetooth® Hands-Free Phone
System without
Navigation System (if so equipped) ................4-112
Regulatory Information ........................ 4-113
Page 226 of 651
WARNING
●Positioning of the heating or air condi-
tioning controls and display controls
should not be done while driving in or-
der that full attention may be given to
the driving operation.
● Do not disassemble or modify this sys-
tem. If you do, it may result in accidents,
fire, or electrical shock.
● Do not use this system if you notice any
abnormality, such as a frozen screen or
lack of sound. Continued use of the
system may result in accident, fire or
electric shock.
● In case you notice any foreign object in
the system hardware, spill liquid on it,
or notice smoke or smell coming from it,
stop using the system immediately. Ig-
noring such conditions may lead to ac-
cidents, fire or electrical shock. It is rec-
ommended that you visit an INFINITI
retailer for servicing.
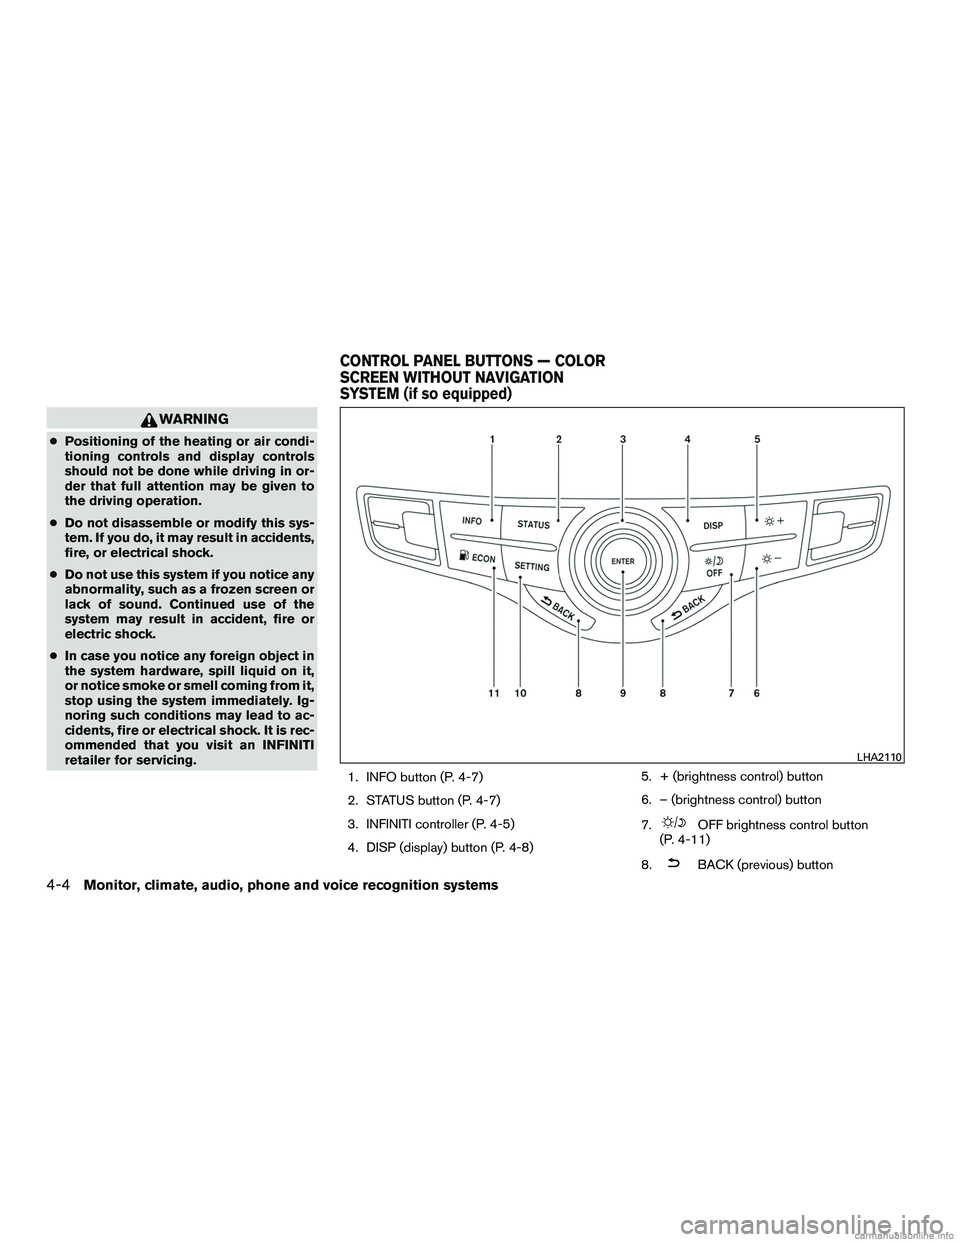
1. INFO button (P. 4-7)
2. STATUS button (P. 4-7)
3. INFINITI controller (P. 4-5)
4. DISP (display) button (P. 4-8) 5. + (brightness control) button
6. – (brightness control) button
7.
OFF brightness control button
(P. 4-11)
8.
BACK (previous) button
LHA2110
CONTROL PANEL BUTTONS — COLOR
SCREEN WITHOUT NAVIGATION
SYSTEM (if so equipped)
4-4Monitor, climate, audio, phone and voice recognition systems
Page 230 of 651
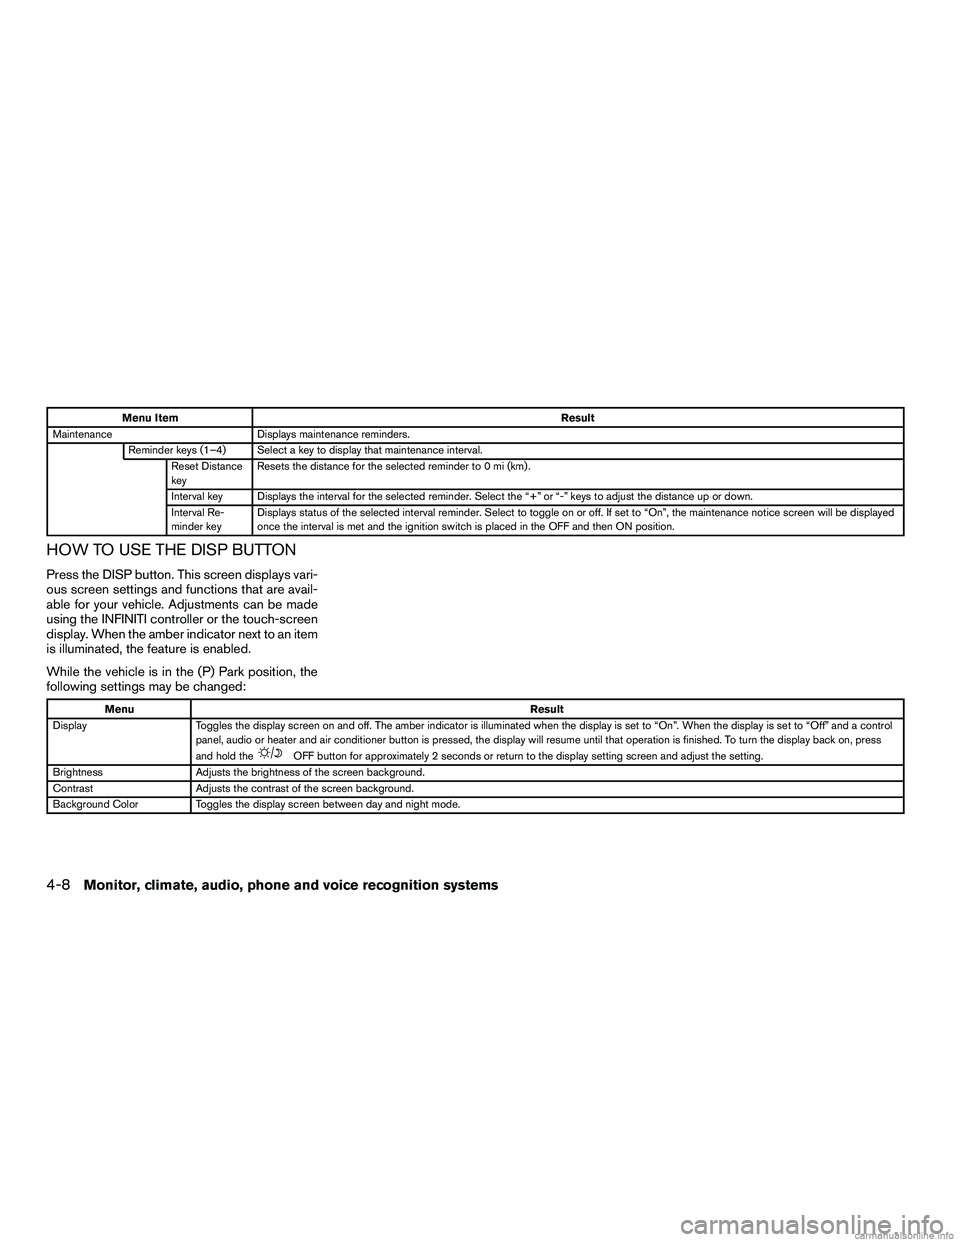
Menu ItemResult
Maintenance Displays maintenance reminders.
Reminder keys (1–4) Select a key to display that maintenance interval. Reset Distance
key Resets the distance for the selected reminder to 0 mi (km) .
Interval key Displays the interval for the selected reminder. Select the “+” or “-” keys to adjust the distance up or down.
Interval Re-
minder key Displays status of the selected interval reminder. Select to toggle on or off. If set to “On”, the maintenance notice screen will be displayed
once the interval is met and the ignition switch is placed in the OFF and then ON position.
HOW TO USE THE DISP BUTTON
Press the DISP button. This screen displays vari-
ous screen settings and functions that are avail-
able for your vehicle. Adjustments can be made
using the INFINITI controller or the touch-screen
display. When the amber indicator next to an item
is illuminated, the feature is enabled.
While the vehicle is in the (P) Park position, the
following settings may be changed:
Menu
Result
Display Toggles the display screen on and off. The amber indicator is illuminated when the display is set to “On”. When the display is set to “Off” and a control
panel, audio or heater and air conditioner button is pressed, the display will resume until that operation is finished. To turn the display back on, press
and hold the
OFF button for approximately 2 seconds or return to the display setting screen and adjust the setting.
Brightness Adjusts the brightness of the screen background.
Contrast Adjusts the contrast of the screen background.
Background Color Toggles the display screen between day and night mode.
4-8Monitor, climate, audio, phone and voice recognition systems
Page 232 of 651
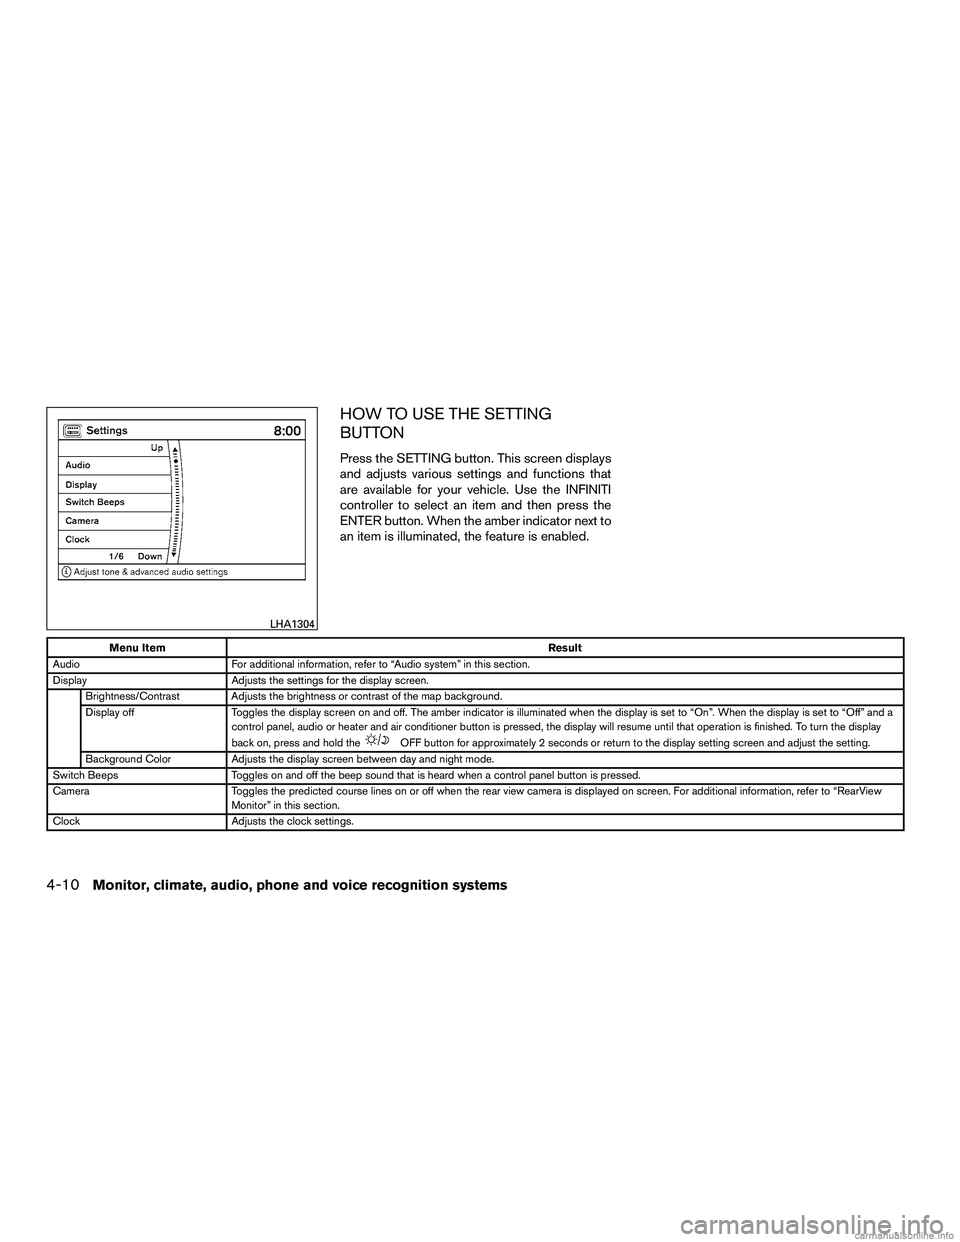
HOW TO USE THE SETTING
BUTTON
Press the SETTING button. This screen displays
and adjusts various settings and functions that
are available for your vehicle. Use the INFINITI
controller to select an item and then press the
ENTER button. When the amber indicator next to
an item is illuminated, the feature is enabled.
Menu ItemResult
Audio For additional information, refer to “Audio system” in this section.
Display Adjusts the settings for the display screen.
Brightness/Contrast Adjusts the brightness or contrast of the map background.
Display off Toggles the display screen on and off. The amber indicator is illuminated when the display is set to “On”. When the display is set to “Off” and a
control panel, audio or heater and air conditioner button is pressed, the display will resume until that operation is finished. To turn the display
back on, press and hold the
OFF button for approximately 2 seconds or return to the display setting screen and adjust the setting.
Background Color Adjusts the display screen between day and night mode.
Switch Beeps Toggles on and off the beep sound that is heard when a control panel button is pressed.
Camera Toggles the predicted course lines on or off when the rear view camera is displayed on screen. For additional information, refer to “RearView
Monitor” in this section.
Clock Adjusts the clock settings.
LHA1304
4-10Monitor, climate, audio, phone and voice recognition systems
Page 242 of 651

Menu ItemResult
Display Control Select the “ON” key for either the left or right display to alternately enable or disable the display fo the left or right rear passengers. If the display
is enabled, select the key (DVD, USB, front AUX or rear AUX) that you wish to have displayed on the corresponding screen. The front AUX set-
ting is for devices plugged into the AUX jacks in the center console. The rear AUX setting is for the devices plugged into the AUX jacks on the
back of the center console.
Auto Display Toggles ON or OFF the Auto Display option. When Auto Display is ON, the rear displays will automatically turn on when a movie is played from a
DVD or USB device.
Rear Speaker Toggles ON or OFF the Rear Speaker volume.
ECO DRIVE (if so equipped) To adjust the ECO pedal driver’s assist, select the “Standard”, “Soft” or “OFF” key and adjust it with the INFINITI controller. For additional infor- mation about ECO DRIVE system, refer to “ECO pedal system” in the “Starting and driving” section of this manual.
Others Select the “Others” key using the INFINITI controller. The voice recognition, language and units setting screen will be displayed.
Clock Press the SETTING button, the select the “Clock” key using the INFINITI controller to adjust the clock settings.
On-screen Clock When this item is enabled (indicator light illuminated) , a clock is always displayed in the upper right corner of the screen. This clock will indicate the time almost exactly because it is always adjusted by the GPS system.
Clock Format
(24h) When this item is enabled (indicator light illuminated) , the clock format will change from the default 12–hour display to a 24–hour display.
Offset (hour) Adjust the time by increasing or decreasing the hours.
Offset (minute) Adjust the time by increasing or decreasing the minutes.
Daylight Savings
Time When this item is enabled (indicator light illuminated) , daylight savings time is on. To turn off the daylight savings time, touch the “ON” key; the
amber indicator light will go out.
Time Zone Adjust the time zone. Choose a time from the available list on the display.
Display Adjustment To adjust the display settings, select the “Display Adjustment” key. The following settings are available: Brightness/
Contrast Adjusts the brightness or contrast of the map background.
Display off Toggles the display screen on and off. The amber indicator is illuminated when the display is set to “On”. When the display is set to “Off” and a control panel, audio or heater and air conditioner button is pressed, the display will resume until that operation is finished. To turn the display back
on, press and hold the
OFF button for approximately 2 seconds or return to the display setting screen and adjust the setting.
Background
Color Adjusts the display screen between day and night mode.
4-20Monitor, climate, audio, phone and voice recognition systems
Page 271 of 651
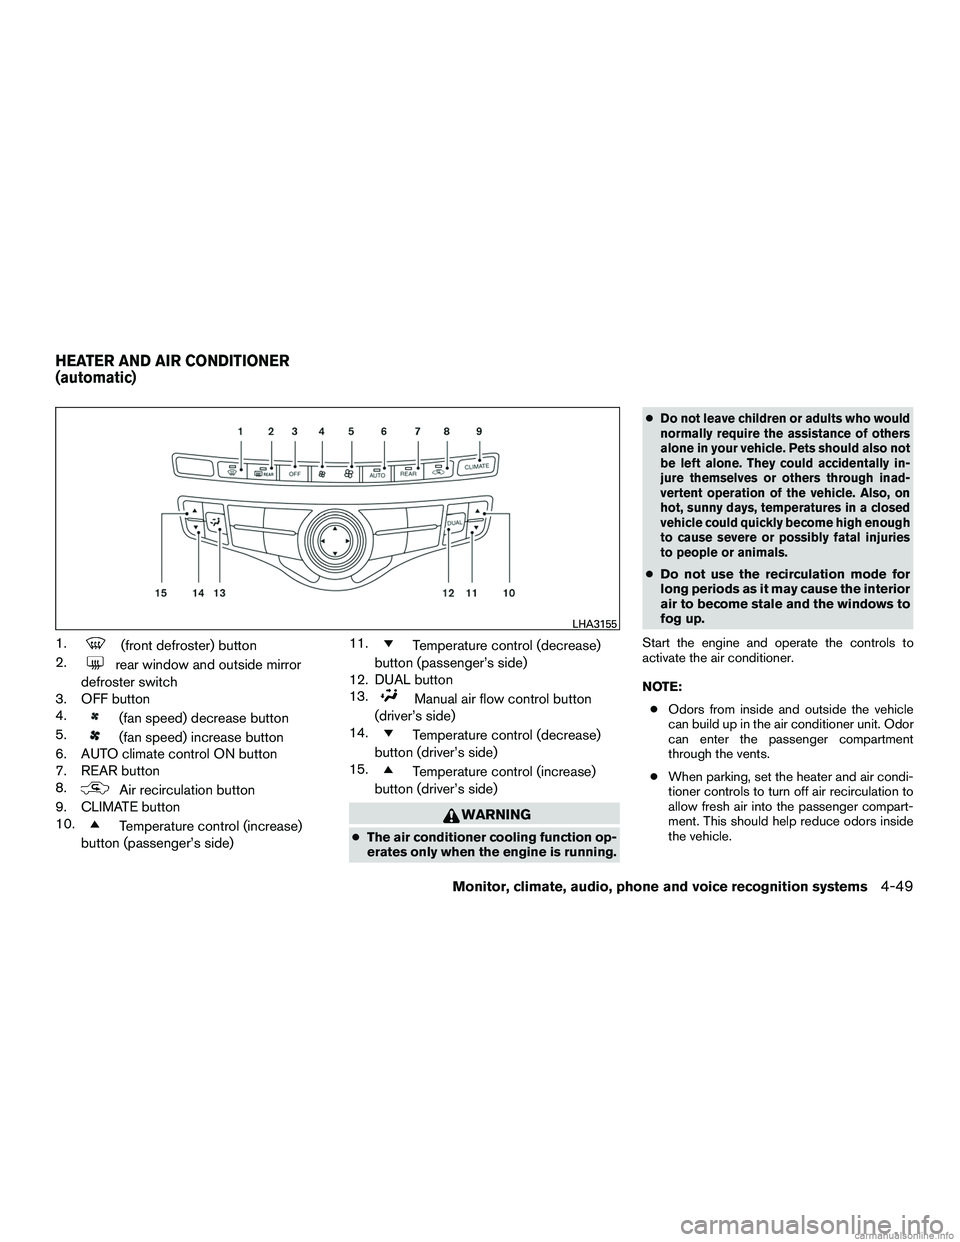
1.(front defroster) button
2.
rear window and outside mirror
defroster switch
3. OFF button
4.
(fan speed) decrease button
5.
(fan speed) increase button
6. AUTO climate control ON button
7. REAR button
8.
Air recirculation button
9. CLIMATE button
10.
Temperature control (increase)
button (passenger’s side) 11.
Temperature control (decrease)
button (passenger’s side)
12. DUAL button
13.
Manual air flow control button
(driver’s side)
14.
Temperature control (decrease)
button (driver’s side)
15.
Temperature control (increase)
button (driver’s side)
WARNING
● The air conditioner cooling function op-
erates only when the engine is running. ●
Do not leave children or adults who would
normally require the assistance of others
alone in your vehicle. Pets should also not
be left alone. They could accidentally in-
jure themselves or others through inad-
vertent operation of the vehicle. Also, on
hot, sunny days, temperatures in a closed
vehicle could quickly become high enough
to cause severe or possibly fatal injuries
to people or animals.
●
Do not use the recirculation mode for
long periods as it may cause the interior
air to become stale and the windows to
fog up.
Start the engine and operate the controls to
activate the air conditioner.
NOTE: ● Odors from inside and outside the vehicle
can build up in the air conditioner unit. Odor
can enter the passenger compartment
through the vents.
● When parking, set the heater and air condi-
tioner controls to turn off air recirculation to
allow fresh air into the passenger compart-
ment. This should help reduce odors inside
the vehicle.
LHA3155
HEATER AND AIR CONDITIONER
(automatic)
Monitor, climate, audio, phone and voice recognition systems4-49
Page 272 of 651
AUTOMATIC OPERATION
Cooling and/or dehumidified heating
(AUTO)
This mode may be used all year round as the
system automatically works to keep a constant
temperature. Air flow distribution, intake air con-
trol, and fan speed are also controlled automati-
cally.1. Press the AUTO button on. (The indicator on the button will illuminate and AUTO will be
displayed.)
2. Operate the driver’s side temperature con- trol buttons.
● Adjust the temperature display to about
75°F (24°C) for normal operation.
● The temperature of the passenger compart-
ment will be maintained automatically. Air
flow distribution, intake air control, and fan
speed are also controlled automatically.
● A visible mist may be seen coming from the
ventilators in hot, humid conditions as the air
is cooled rapidly. This does not indicate a
malfunction.
Dehumidified defrosting or defogging
1. Press thefront defroster button on.
(The indicator light on the button will come
on.)
2. Operate the temperature control buttons to set the desired temperature.
● To quickly remove ice from the outside of the
windows, use the
fan speed control
buttons to set the fan speed to maximum.
● As soon as possible after the windshield is
clean, press the AUTO button to return to
the automatic mode.
● When the
front defroster button is
pressed, the air conditioner will automati-
cally be turned on at outside temperatures
above 36°F (2°C) . The air recirculate mode
automatically turns off, allowing outside air
to be drawn into the passenger compart-
ment to further improve the defogging per-
formance.
Voice Recognition logic (if so
equipped)
When the climate control system is on, the front
and rear fan speeds may be automatically low-
ered so that commands are more easily recog-
nized. Fan speed can be adjusted using the fan
speed decrease and increase buttons, if desired.
Remote start logic (if so equipped)
Vehicles equipped with automatic climate con-
trols and remote start function may go into auto-
matic heating or cooling mode when remote start
is activated depending on outside and cabin tem-
peratures. During this period, the climate control
display and buttons will be inoperable until igni-
tion switch is turned on.
MANUAL OPERATION
Fan speed control
Press thefan speed control buttons to
manually control the fan speed.
Press the AUTO button to return to automatic
control of the fan speed.
Temperature control
Press the temperature control buttons up or
down to set the desired temperature.
The temperature can be set within the following
range:
● For U.S.: 60 to 90ºF (16 to 32ºC)
● For Canada: 64 to 90ºF (18 to 32ºC)
4-50Monitor, climate, audio, phone and voice recognition systems
Page 273 of 651
Air recirculation
Press theair recirculation button to recir-
culate interior air inside the vehicle. The
indicator light on the button will come on.
The air recirculation cannot be activated when
the air conditioner is in the
front defrosting
mode.
Automatic intake air control
In the AUTO mode, the intake air will be con-
trolled automatically. To manually control the in-
take air, press the
air recirculation button.
To return to the automatic control mode, press
and hold the
air recirculation button for
about 2 seconds. The indicator light will flash
twice, and then the intake air will be controlled
automatically.
Air flow control
Press thebutton to manually control air
flow. Pressing the button repeatedly will cycle
through the available modes and display the cor-
responding icon on the center display:
— Air flows from center and side
vents.
— Air flows from center and sidevents and foot outlets.
— Air flows mainly from foot outlets.
— Air flows from defroster and footoutlets.
— Air flows from defroster outlets.
To turn system off
Press the OFF button.
Rear window and outside mirror
defroster switch
For additional information, refer to “Rear window
and outside mirror defroster switch” in the “In-
struments and controls” section of this manual.
OPERATING TIPS
●When the engine coolant temperature and
outside air temperature are low, the air flow
from the foot outlets may not operate for a
maximum of 150 seconds. However, this is
not a malfunction. After the coolant tempera-
ture warms up, air flow from the foot outlets
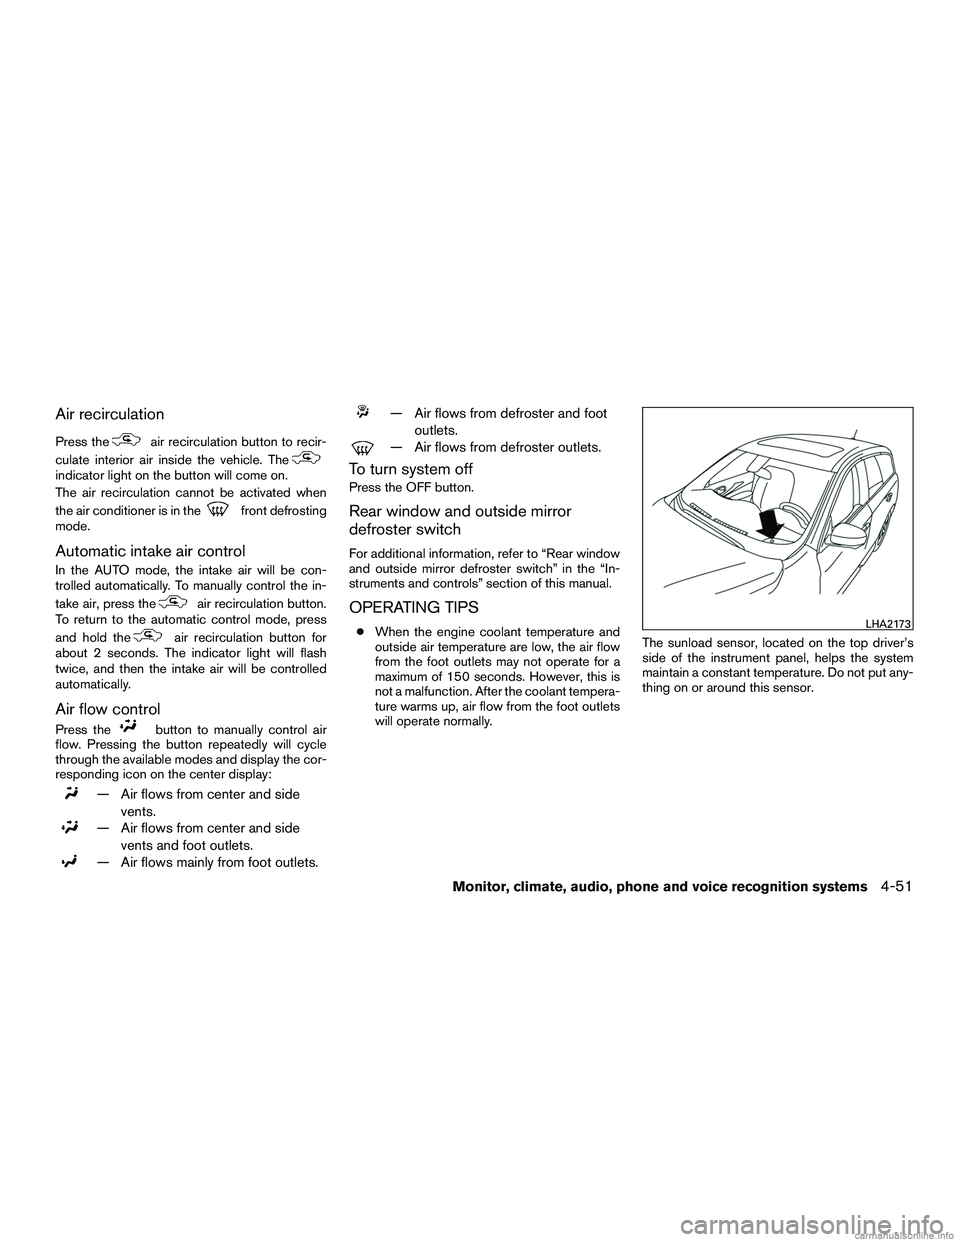
will operate normally. The sunload sensor, located on the top driver’s
side of the instrument panel, helps the system
maintain a constant temperature. Do not put any-
thing on or around this sensor.LHA2173
Monitor, climate, audio, phone and voice recognition systems4-51