rear view mirror INFINITI QX70 2014 Owner's Manual
[x] Cancel search | Manufacturer: INFINITI, Model Year: 2014, Model line: QX70, Model: INFINITI QX70 2014Pages: 530, PDF Size: 2.48 MB
Page 12 of 530

JVC0315X
1. Coat hooks (P.2-55)
2. Rear personal light (P.2-65)
3. Power window controls (P.2-60)
4. Automatic drive positioner switch (ifso equipped) (P.3-32)
5. Sun visors (P.3-28) 6. Moonroof switch (P.2-62)
7. Map light (P.2-64)
8. Sunglasses holder (P.2-52)
9. Inside rearview mirror (P.3-29)
—HomeLink
®(P.2-67)
— Compass (if so equipped) (P.2-10) 10. Cargo cover (if so equipped) (P.2-57)
11. Rear cup holders (P.2-51)
12. Console box
—Power outlet (P.2-50)
— USB memory operation (P.4-77) or
iPod
®player operation (P.4-86)
13. Front cup holders (P.2-51)
Illustrated table of contents0-5
PASSENGER COMPARTMENT
Page 114 of 530
.Never leave the light switch on when the
engine is not running for extended
periods of time even if the headlights
turn off automatically.
SIC2275
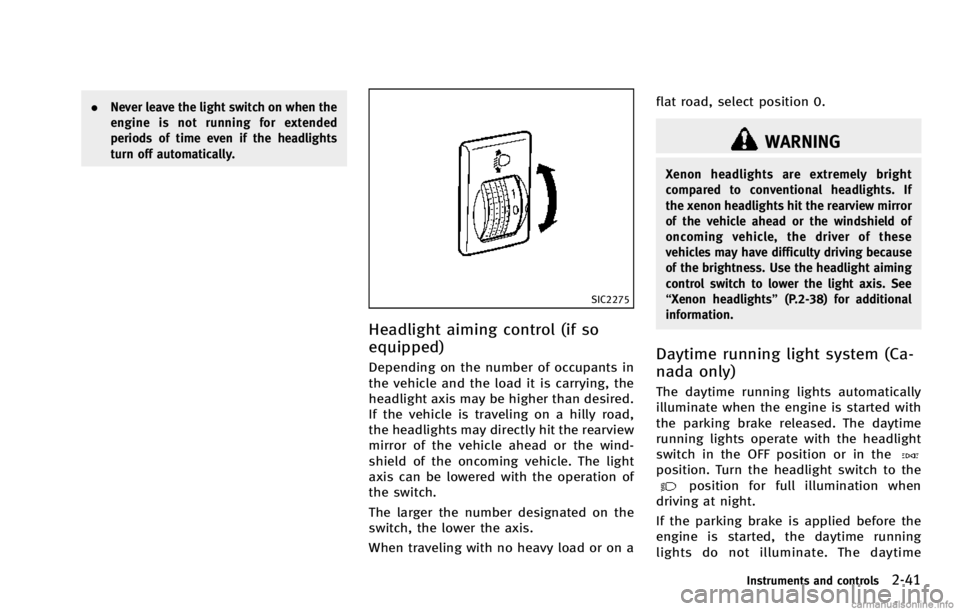
Headlight aiming control (if so
equipped)
Depending on the number of occupants in
the vehicle and the load it is carrying, the
headlight axis may be higher than desired.
If the vehicle is traveling on a hilly road,
the headlights may directly hit the rearview
mirror of the vehicle ahead or the wind-
shield of the oncoming vehicle. The light
axis can be lowered with the operation of
the switch.
The larger the number designated on the
switch, the lower the axis.
When traveling with no heavy load or on a flat road, select position 0.
WARNING
Xenon headlights are extremely bright
compared to conventional headlights. If
the xenon headlights hit the rearview mirror
of the vehicle ahead or the windshield of
oncoming vehicle, the driver of these
vehicles may have difficulty driving because
of the brightness. Use the headlight aiming
control switch to lower the light axis. See
“Xenon headlights”
(P.2-38) for additional
information.
Daytime running light system (Ca-
nada only)
The daytime running lights automatically
illuminate when the engine is started with
the parking brake released. The daytime
running lights operate with the headlight
switch in the OFF position or in the
position. Turn the headlight switch to theposition for full illumination when
driving at night.
If the parking brake is applied before the
engine is started, the daytime running
lights do not illuminate. The daytime
Instruments and controls2-41
Page 174 of 530

SPA2447
INSIDE MIRROR
Adjust the height and the angle of the
inside mirror to the desired position.
SPA2422A
Type A
SPA2450
Type B
Automatic anti-glare type
The inside mirror is designed so that it
automatically changes reflection according
to the intensity of the headlights of the
following vehicle.
The anti-glare system will be automatically
turned on when the ignition switch is
pushed to the ON position.
When the anti-glare system is turned on,
the indicator light
*Awill illuminate and
excessive glare from the headlights of the
vehicle behind you will be reduced.
Type A: Push the
switch*Bto make the
inside rearview mirror operate normally
and the indicator light will turn off. Push
the
switch again to turn the system on.
Type B: Push the “*”switch
*Cto make
the inside rearview mirror operate nor-
mally. The indicator light will turn off. Push
the “I”switch
*Dto turn the system on.
Do not allow any object to cover the
sensors
*Eor apply glass cleaner on
them. Doing so will reduce the sensitivity
of the sensor, resulting in improper
operation.
For the compass (if so equipped) opera-
tion, see “Compass” (P.2-10).
Pre-driving checks and adjustments3-29
MIRRORS
Page 175 of 530

3-30Pre-driving checks and adjustments
For the HomeLink®Universal Transceiver
operation, see “HomeLink®Universal
Transceiver” (P.2-67).
SPA2214
OUTSIDE MIRRORS
WARNING
Objects viewed in the outside mirror on the
passenger side are closer than they appear.
Be careful when moving to the right. Using
only this mirror could cause an accident.
Use the inside mirror or glance over your
shoulder to properly judge distances to
other objects.
Adjusting outside mirrors
The outside mirror control switch is located
at the lower part of the instrument panel.
The outside mirror will operate only when
the ignition switch is in the ACC or ON
position.
Move the switch right
*1or left*2to
select the right or left side mirror, then
adjust
*3using the control switch.
Defrosting outside mirrors
The outside mirrors will be heated when
the rear window defroster switch is oper-
ated. (See “Rear window and outside
mirror defroster switch” (P.2-37).)
Page 176 of 530

SPA1732A
Foldable outside mirrors
CAUTION
.Do not touch the mirrors while they are
moving. Your hand may be pinched, and
the mirror may malfunction.
. Do not drive with the mirrors stored. You
will be unable to see behind the vehicle.
. If the mirrors were folded or unfolded by
hand, there is a chance that the mirror
will move forward or backward during
driving. If the mirrors were folded or
unfolded by hand, be sure to adjust them again electrically before driving.
The outside rearview mirror remote control
operates when the ignition switch is in the
“ACC”
or“ON” position.
To fold the outside rearview mirrors, push
the outside rearview mirror folding switch
to the “CLOSE” position
*1. To unfold,
push to the “OPEN”position
*2.
If mirrors are manually operated or
bumped, the mirror body can become
loose at the pivot point. To correct electro-
nic mirror operation, cycle mirrors by
pushing the "CLOSE" switch until closed,
the push "OPEN" until mirror is in the open
position.
Reverse tilt-down feature (if so
equipped)
When backing up the vehicle, the right or
left outside mirror will turn downward
automatically to provide better rear visibi-
lity.
1. Push the ignition switch to the ON position.
2. Move the shift lever to the R (Reverse) position. 3. Select the right or left side mirror by
operating the outside mirror control
switch.
4. The selected outside mirror surface moves downward.
When one of the following conditions has
occurred, the selected outside mirror sur-
face will return to its original position.
. The shift lever is moved to any position
other than R (Reverse).
. The outside mirror control switch is set
to the center position.
. The ignition switch is pushed to the OFF
position.
Pre-driving checks and adjustments3-31
Page 205 of 530
4-24Monitor, climate, audio, phone and voice recognition systems
—Maximum Resolution: 2048 61536
pixels
— Maximum Size: 2-MB
— Colors: 32768 (15-bit)
— Maximum File Name lengths: 253-
Bytes
— Maximum Folders: 500
— Maximum Images per Folder: 1024
. If an electronic device (such as a digital
camera) is directly connected to the
vehicle using a USB cable, no image
will be displayed on the screen.
. If the file name is too long, some file
names may not be entirely displayed.
. When the total number of characters in
the file name exceeds 100 or if 1 file
name in a directory exceeds 100
characters, all files will show a shor-
tened 8-character version. The image
will still be displayed when selected. The system is designed as an aid to the
driver in situations such as slot parking or
parallel parking.
When the shift lever is shifted into the R
(Reverse) position, the monitor display
shows the view to the rear of the vehicle.
WARNING
.
The RearView Monitor is a convenience
but it is not a substitute to check behind
the vehicle when backing up.
. The driver is always responsible for
safety during parking and other maneu-
vers.
. Objects viewed in the RearView Monitor
differ from actual distance because a
wide-angle lens is used.
. Objects in the RearView Monitor will
appear visually opposite like ones
viewed in the inside and outside mirrors.
. Make sure that the lift gate is securely
closed when backing up.
. Underneath the bumper and the corner
areas of the bumper cannot be viewed on
the rearview monitor because of its
monitoring range limitation. .
Do not put anything on the rearview
camera. The rearview camera is installed
above the license plate.
. When washing the vehicle with high-
pressure water, be sure not to spray it
around the camera. Otherwise, water
may enter the camera unit causing water
condensation on the lens, a malfunction,
fire or an electric shock.
. Do not strike the camera. It is a precision
instrument. Otherwise, it may malfunc-
tion or cause damage resulting in a fire
or an electric shock.
CAUTION
Do not scratch the camera lens when
cleaning dirt or snow from the front of the
camera.
REARVIEW MONITOR (models without
navigation system)
Page 206 of 530
SAA1896
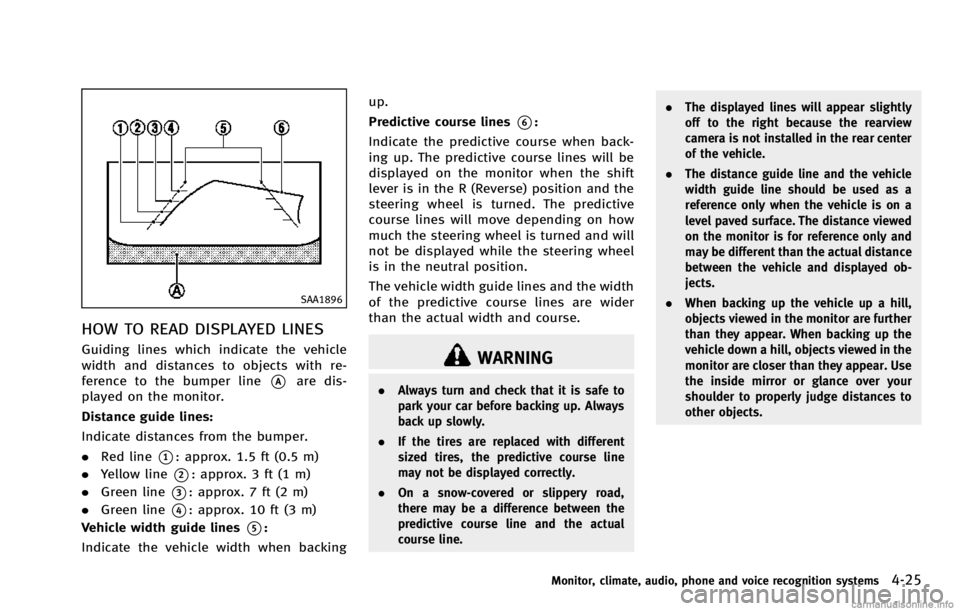
HOW TO READ DISPLAYED LINES
Guiding lines which indicate the vehicle
width and distances to objects with re-
ference to the bumper line
*Aare dis-
played on the monitor.
Distance guide lines:
Indicate distances from the bumper.
. Red line
*1: approx. 1.5 ft (0.5 m)
. Yellow line
*2: approx. 3 ft (1 m)
. Green line
*3: approx. 7 ft (2 m)
. Green line
*4: approx. 10 ft (3 m)
Vehicle width guide lines
*5:
Indicate the vehicle width when backing up.
Predictive course lines
*6:
Indicate the predictive course when back-
ing up. The predictive course lines will be
displayed on the monitor when the shift
lever is in the R (Reverse) position and the
steering wheel is turned. The predictive
course lines will move depending on how
much the steering wheel is turned and will
not be displayed while the steering wheel
is in the neutral position.
The vehicle width guide lines and the width
of the predictive course lines are wider
than the actual width and course.
WARNING
. Always turn and check that it is safe to
park your car before backing up. Always
back up slowly.
. If the tires are replaced with different
sized tires, the predictive course line
may not be displayed correctly.
. On a snow-covered or slippery road,
there may be a difference between the
predictive course line and the actual
course line. .
The displayed lines will appear slightly
off to the right because the rearview
camera is not installed in the rear center
of the vehicle.
. The distance guide line and the vehicle
width guide line should be used as a
reference only when the vehicle is on a
level paved surface. The distance viewed
on the monitor is for reference only and
may be different than the actual distance
between the vehicle and displayed ob-
jects.
. When backing up the vehicle up a hill,
objects viewed in the monitor are further
than they appear. When backing up the
vehicle down a hill, objects viewed in the
monitor are closer than they appear. Use
the inside mirror or glance over your
shoulder to properly judge distances to
other objects.
Monitor, climate, audio, phone and voice recognition systems4-25
Page 212 of 530
When you push theCAMERAbutton or shift
the shift lever into the R (Reverse) position
while the ignition switch is in the ON
position, the Around View Monitor oper-
ates. The monitor displays various views of
the position of the vehicle.
Available views:
. Bird-Eye View
The surrounding view of the vehicle.
. Front-Side View
The view around and ahead of the front
passenger’s side wheel.
. Front View
An approximately 150-degree view of
the front of the vehicle.
. Front-Wide View
An approximately 180-degree view of
the front of the vehicle.
. RearView
An approximately 150-degree view of
the rear of the vehicle.
. Rear-Wide View
An approximately 180-degree view of
the rear of the vehicle.
The system is designed as an aid to the
driver in situations such as slot parking or
parallel parking.
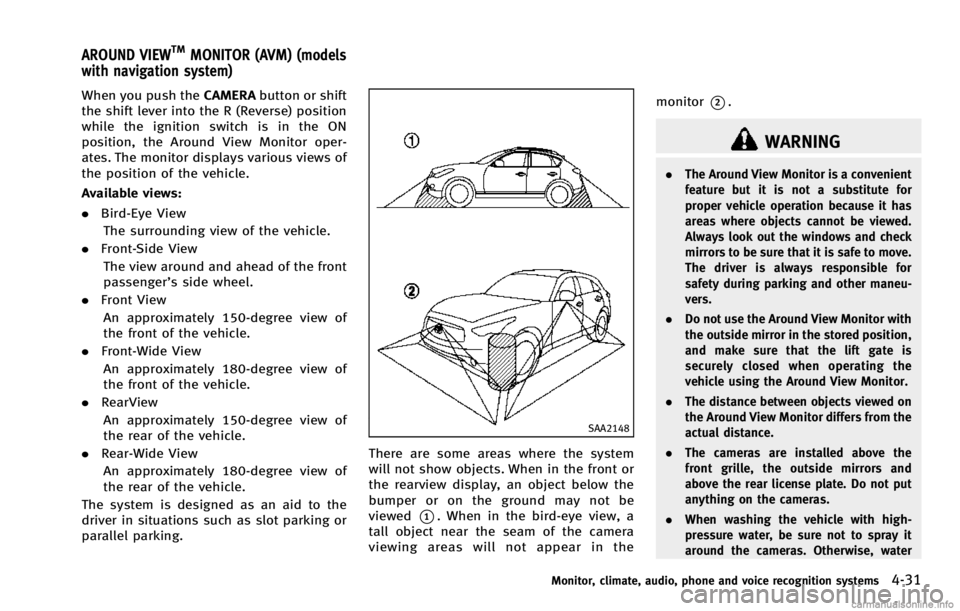
SAA2148
There are some areas where the system
will not show objects. When in the front or
the rearview display, an object below the
bumper or on the ground may not be
viewed
*1. When in the bird-eye view, a
tall object near the seam of the camera
viewing areas will not appear in the monitor
*2.
WARNING
.
The Around View Monitor is a convenient
feature but it is not a substitute for
proper vehicle operation because it has
areas where objects cannot be viewed.
Always look out the windows and check
mirrors to be sure that it is safe to move.
The driver is always responsible for
safety during parking and other maneu-
vers.
. Do not use the Around View Monitor with
the outside mirror in the stored position,
and make sure that the lift gate is
securely closed when operating the
vehicle using the Around View Monitor.
. The distance between objects viewed on
the Around View Monitor differs from the
actual distance.
. The cameras are installed above the
front grille, the outside mirrors and
above the rear license plate. Do not put
anything on the cameras.
. When washing the vehicle with high-
pressure water, be sure not to spray it
around the cameras. Otherwise, water
Monitor, climate, audio, phone and voice recognition systems4-31
AROUND VIEWTMMONITOR (AVM) (models
with navigation system)
Page 215 of 530
4-34Monitor, climate, audio, phone and voice recognition systems
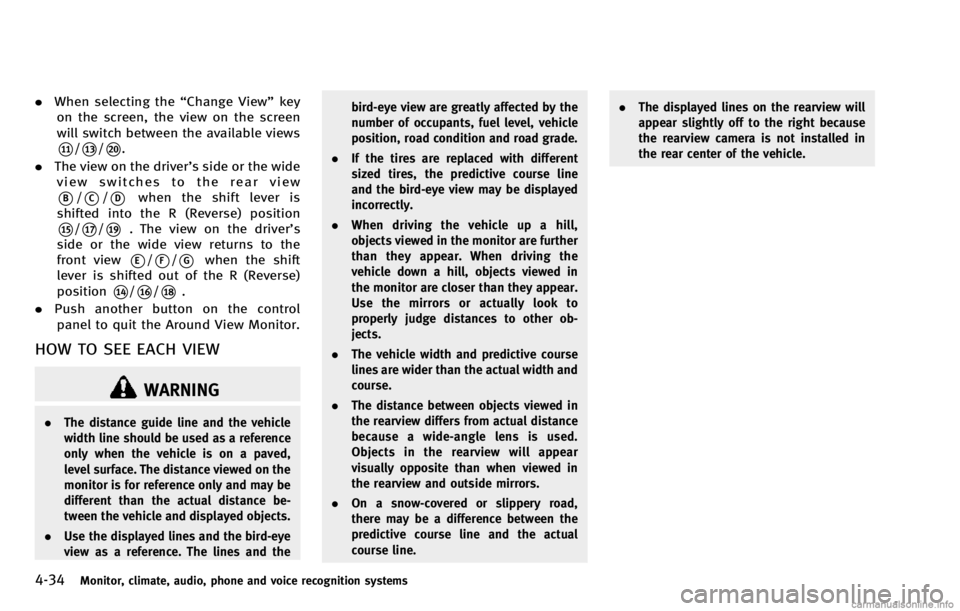
.When selecting the “Change View”key
on the screen, the view on the screen
will switch between the available views
*11/*13/*20.
. The view on the driver’s side or the wide
view switches to the rear view
*B/*C/*Dwhen the shift lever is
shifted into the R (Reverse) position
*15/*17/*19. The view on the driver’s
side or the wide view returns to the
front view
*E/*F/*Gwhen the shift
lever is shifted out of the R (Reverse)
position
*14/*16/*18.
. Push another button on the control
panel to quit the Around View Monitor.
HOW TO SEE EACH VIEW
WARNING
. The distance guide line and the vehicle
width line should be used as a reference
only when the vehicle is on a paved,
level surface. The distance viewed on the
monitor is for reference only and may be
different than the actual distance be-
tween the vehicle and displayed objects.
. Use the displayed lines and the bird-eye
view as a reference. The lines and the bird-eye view are greatly affected by the
number of occupants, fuel level, vehicle
position, road condition and road grade.
. If the tires are replaced with different
sized tires, the predictive course line
and the bird-eye view may be displayed
incorrectly.
. When driving the vehicle up a hill,
objects viewed in the monitor are further
than they appear. When driving the
vehicle down a hill, objects viewed in
the monitor are closer than they appear.
Use the mirrors or actually look to
properly judge distances to other ob-
jects.
. The vehicle width and predictive course
lines are wider than the actual width and
course.
. The distance between objects viewed in
the rearview differs from actual distance
because a wide-angle lens is used.
Objects in the rearview will appear
visually opposite than when viewed in
the rearview and outside mirrors.
. On a snow-covered or slippery road,
there may be a difference between the
predictive course line and the actual
course line. .
The displayed lines on the rearview will
appear slightly off to the right because
the rearview camera is not installed in
the rear center of the vehicle.
Page 216 of 530
SAA1840
Front view
SAA1896
Rear view
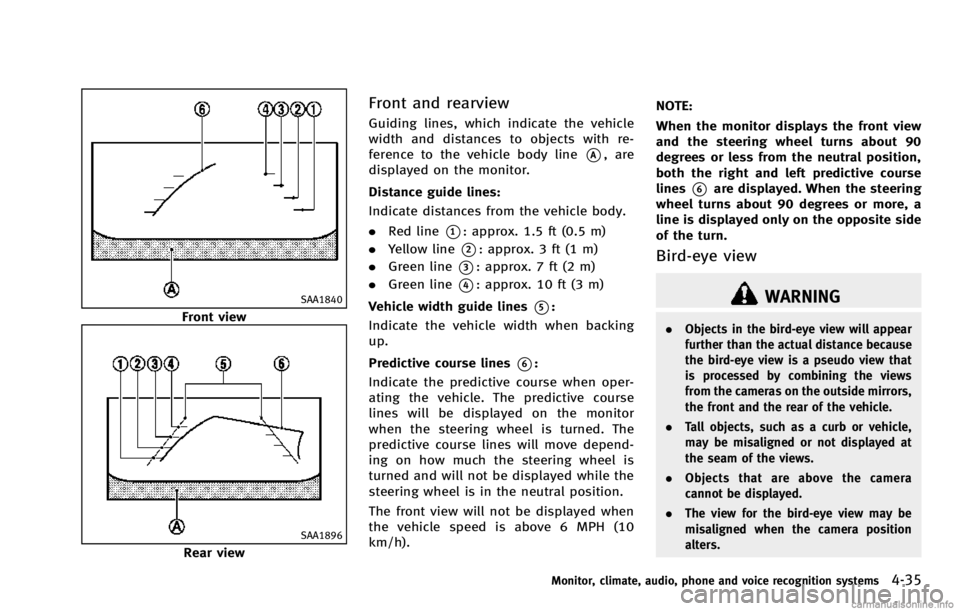
Front and rearview
Guiding lines, which indicate the vehicle
width and distances to objects with re-
ference to the vehicle body line
*A, are
displayed on the monitor.
Distance guide lines:
Indicate distances from the vehicle body.
. Red line
*1: approx. 1.5 ft (0.5 m)
. Yellow line
*2: approx. 3 ft (1 m)
. Green line
*3: approx. 7 ft (2 m)
. Green line
*4: approx. 10 ft (3 m)
Vehicle width guide lines
*5:
Indicate the vehicle width when backing
up.
Predictive course lines
*6:
Indicate the predictive course when oper-
ating the vehicle. The predictive course
lines will be displayed on the monitor
when the steering wheel is turned. The
predictive course lines will move depend-
ing on how much the steering wheel is
turned and will not be displayed while the
steering wheel is in the neutral position.
The front view will not be displayed when
the vehicle speed is above 6 MPH (10
km/h). NOTE:
When the monitor displays the front view
and the steering wheel turns about 90
degrees or less from the neutral position,
both the right and left predictive course
lines
*6are displayed. When the steering
wheel turns about 90 degrees or more, a
line is displayed only on the opposite side
of the turn.
Bird-eye view
WARNING
. Objects in the bird-eye view will appear
further than the actual distance because
the bird-eye view is a pseudo view that
is processed by combining the views
from the cameras on the outside mirrors,
the front and the rear of the vehicle.
. Tall objects, such as a curb or vehicle,
may be misaligned or not displayed at
the seam of the views.
. Objects that are above the camera
cannot be displayed.
. The view for the bird-eye view may be
misaligned when the camera position
alters.
Monitor, climate, audio, phone and voice recognition systems4-35