instrument panel INFINITI QX70 2017 Quick Reference Guide
[x] Cancel search | Manufacturer: INFINITI, Model Year: 2017, Model line: QX70, Model: INFINITI QX70 2017Pages: 32, PDF Size: 1.64 MB
Page 2 of 32
*See your Owner’s Manual for information.
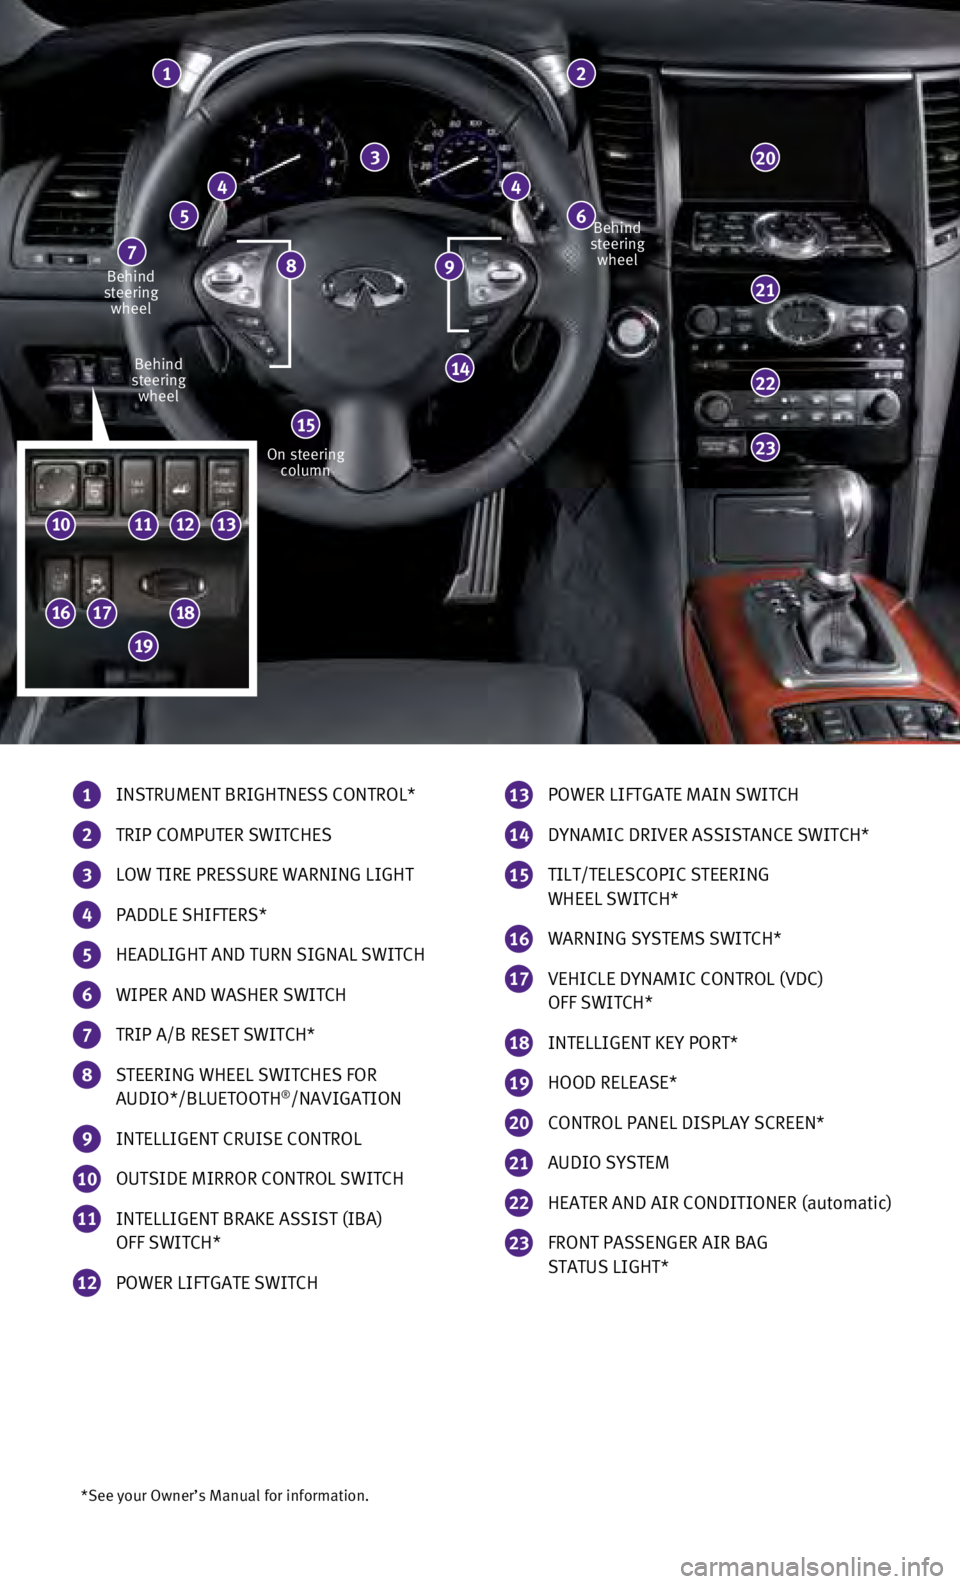
1 INSTRUMENT BRIGHTNESS CONTROL*
2 TRIP COMPUTER SWITCHES
3 LOW TIRE PRESSURE WARNING LIGHT
4 PADDLE SHIFTERS*
5 HEADLIGHT AND TURN SIGNAL SWITCH
6 WIPER AND WASHER SWITCH
7 TRIP A/B RESET SWITCH*
8 STEERING WHEEL SWITCHES FOR
AUDIO*/BLUETOOTH®/NAVIGATION
9 INTELLIGENT CRUISE CONTROL
10 OUTSIDE MIRROR CONTROL SWITCH
11 INTELLIGENT BRAKE ASSIST (IBA) OFF SWITCH*
12 POWER LIFTGATE SWITCH
1
44
65
7
22
23
20
14
2
3
21
13 POWER LIFTGATE MAIN SWITCH
14 DYNAMIC DRIVER ASSISTANCE SWITCH*
15 TILT/TELESCOPIC STEERING WHEEL SWITCH*
16 WARNING SYSTEMS SWITCH*
17 VEHICLE DYNAMIC CONTROL (VDC) OFF SWITCH*
18 INTELLIGENT KEY PORT*
19 HOOD RELEASE*
20 CONTROL PANEL DISPLAY SCREEN*
21 AUDIO SYSTEM
22 HEATER AND AIR CONDITIONER (automatic)
23 FRONT PASSENGER AIR BAG STATUS LIGHT*
9Behind
steering wheel
Behind
steering wheel Behind
steering wheel
15
8
19
10
1617
111213
18
On steering column
Page 7 of 32
5
Fuel-filler Door
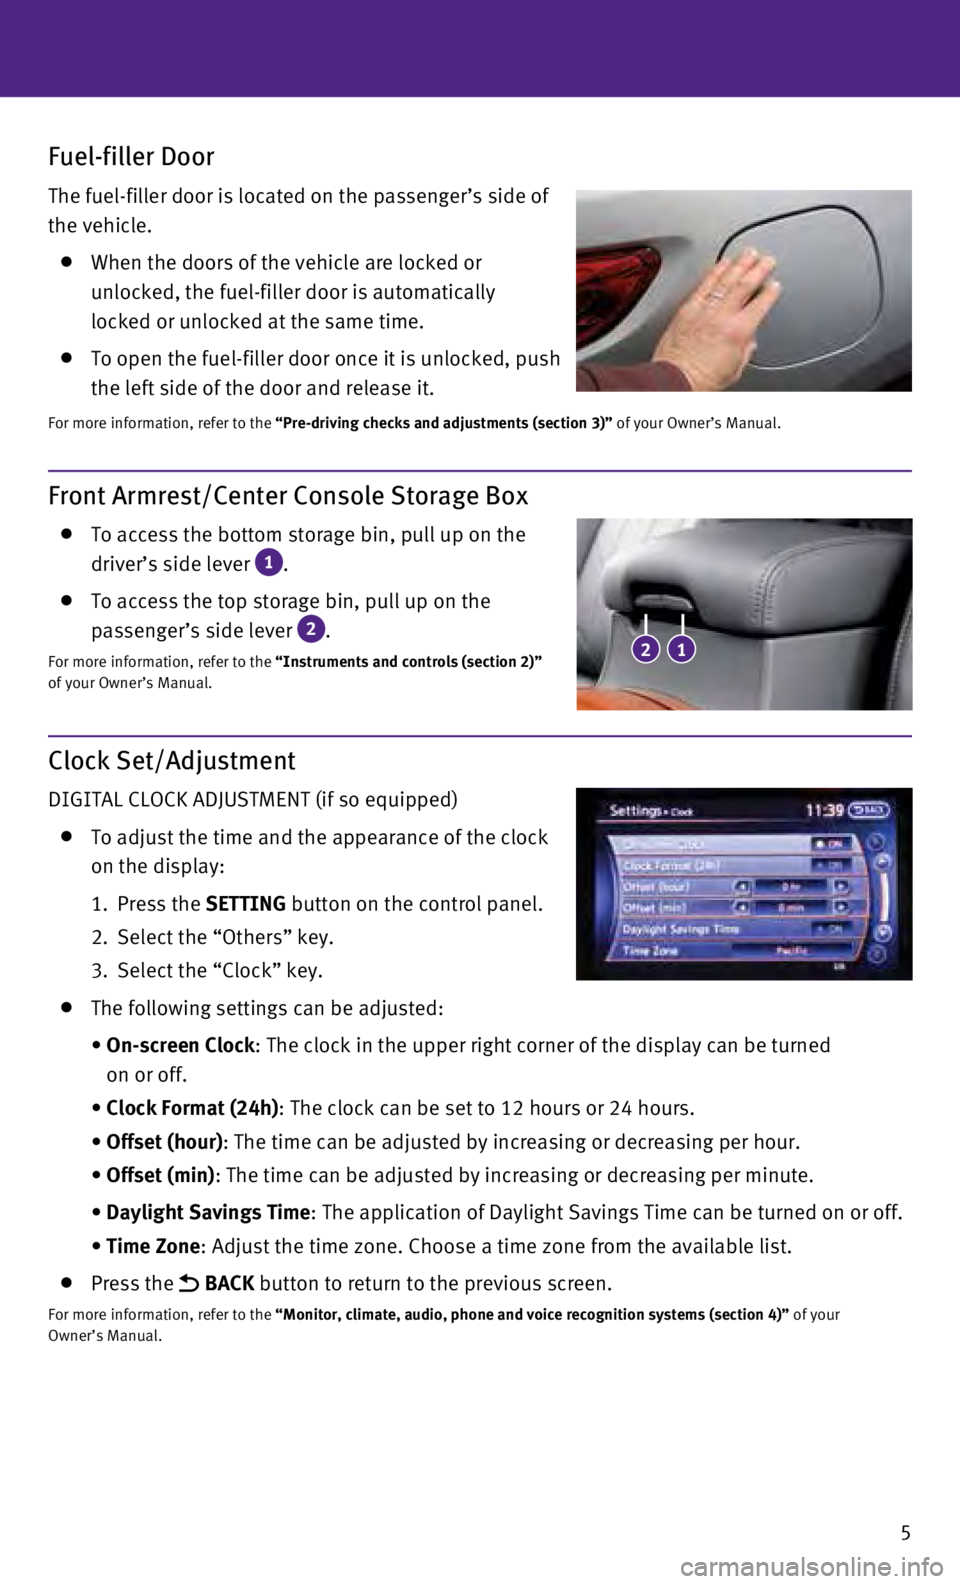
The fuel-filler door is located on the passenger’s side of
the vehicle.
When the doors of the vehicle are locked or
unlocked, the fuel-filler door is automatically
locked or unlocked at the same time.
To open the fuel-filler door once it is unlocked, push
the left side of the door and release it.
For more information, refer to the “Pre-driving checks and adjustments (section 3)” of your Owner’s Manual.
Clock Set/Adjustment
DIGITAL CLOCK ADJUSTMENT (if so equipped)
To adjust the time and the appearance of the clock
on the display:
1.
Press the SETTING button on the control panel.
2.
Select the “Others” key.
3.
Select the “Clock” key.
The following settings can be adjusted:
•
On-screen Clock: The clock in the upper right corner of the display can be turned
on or off.
• Clock Format (24h)
: The clock can be set to 12 hours or 24 hours.
•
Offset (hour): The time can be adjusted by increasing or decreasing per hour.
•
Offset (min)
: The time can be adjusted by increasing or decreasing per minute.
•
Daylight Savings Time
: The application of Daylight Savings Time can be turned on or off.
• Time Zone
: Adjust the time zone. Choose a time zone from the available list.
Press the BACK button to return to the previous screen.
For more information, refer to the “Monitor, climate, audio, phone and voice recognition systems (secti\
on 4)” of your
Owner’s Manual.
Front Armrest/Center Console Storage Box
To access the bottom storage bin, pull up on the
driver’s side lever
1.
To access the top storage bin, pull up on the
passenger’s side lever
2.
For more information, refer to the “Instruments and controls (section 2)”
of your Owner’s Manual.21
Page 9 of 32
7
Power Seat Adjustments
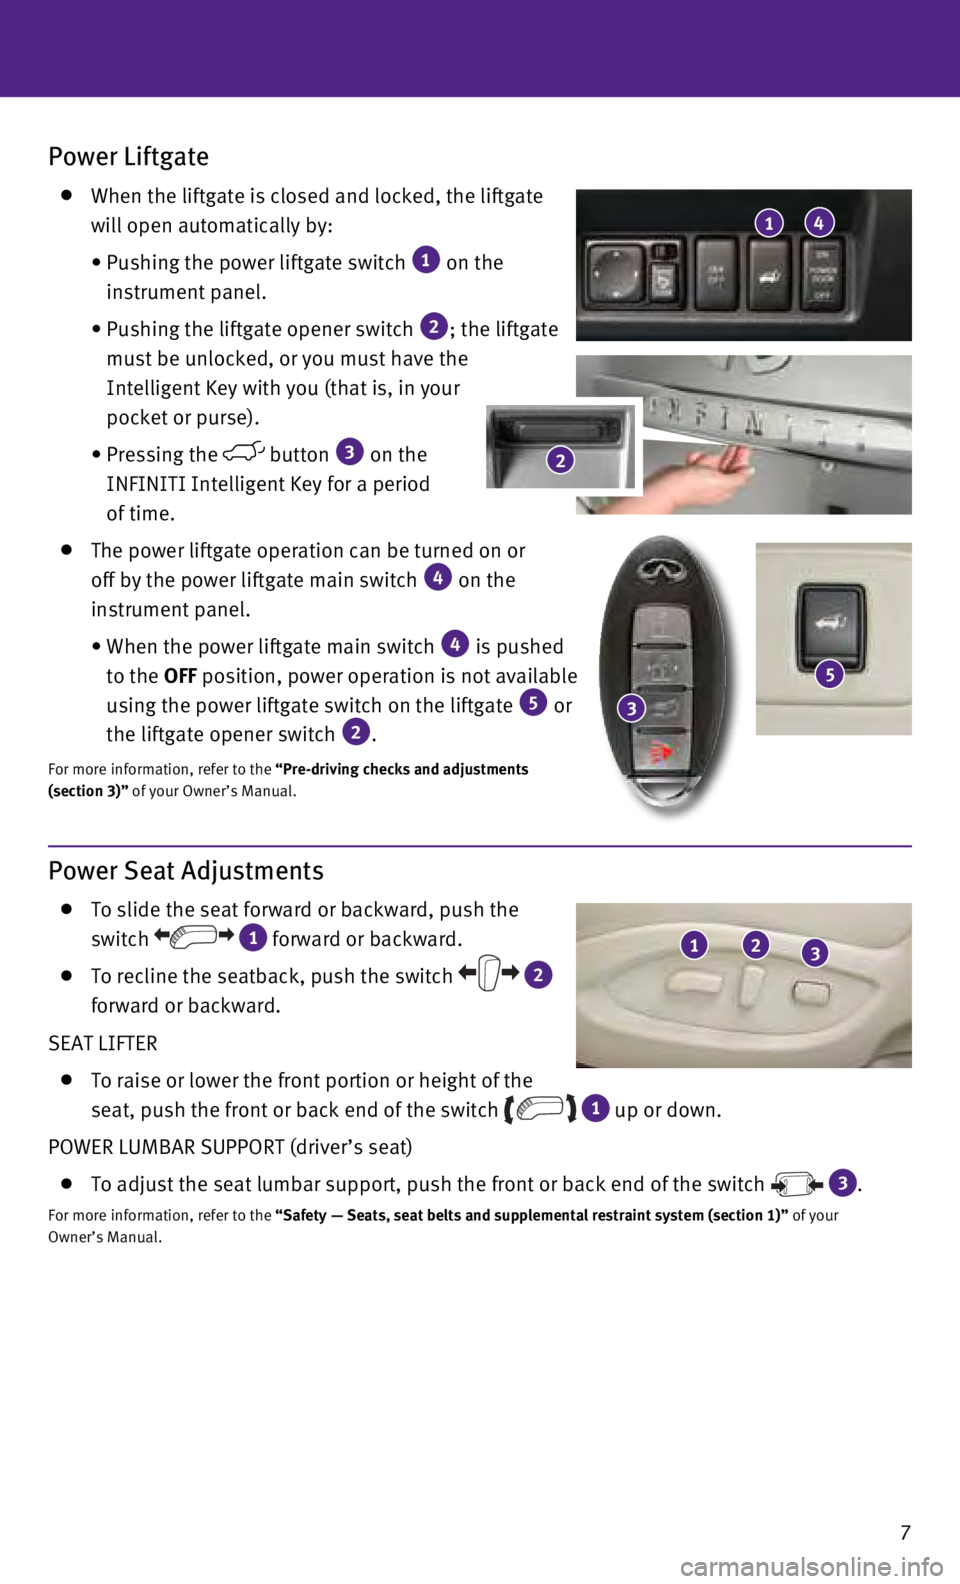
To slide the seat forward or backward, push the
switch
1 forward or backward.
To recline the seatback, push the switch 2
forward or backward.
SEAT LIFTER
To raise or lower the front portion or height of the
seat, push the front or back end of the switch
1 up or down.
POWER LUMBAR SUPPORT (driver’s seat)
To adjust the seat lumbar support, push the front or back end of the swi\
tch 3.
For more information, refer to the “Safety — Seats, seat belts and supplemental restraint system (se\
ction 1)” of your
Owner’s Manual.
123
Power Liftgate
When the liftgate is closed and locked, the liftgate
will open automatically by:
•
Pushing the power liftgate switch 1 on the
instrument panel.
•
Pushing the liftgate opener switch 2; the liftgate
must be unlocked, or you must have the
Intelligent Key with you (that is, in your
pocket or purse).
•
Pressing the
button 3 on the
INFINITI Intelligent Key for a period
of time.
The power liftgate operation can be turned on or
off by the power liftgate main switch
4 on the
instrument panel.
•
When the power liftgate main switch 4 is pushed
to the OFF position, power operation is not available
using the power liftgate switch on the liftgate
5 or
the liftgate opener switch 2.
For more information, refer to the “Pre-driving checks and adjustments
(section 3)” of your Owner’s Manual.
1
2
3
4
5
Page 11 of 32
9
Headlight Control Switch
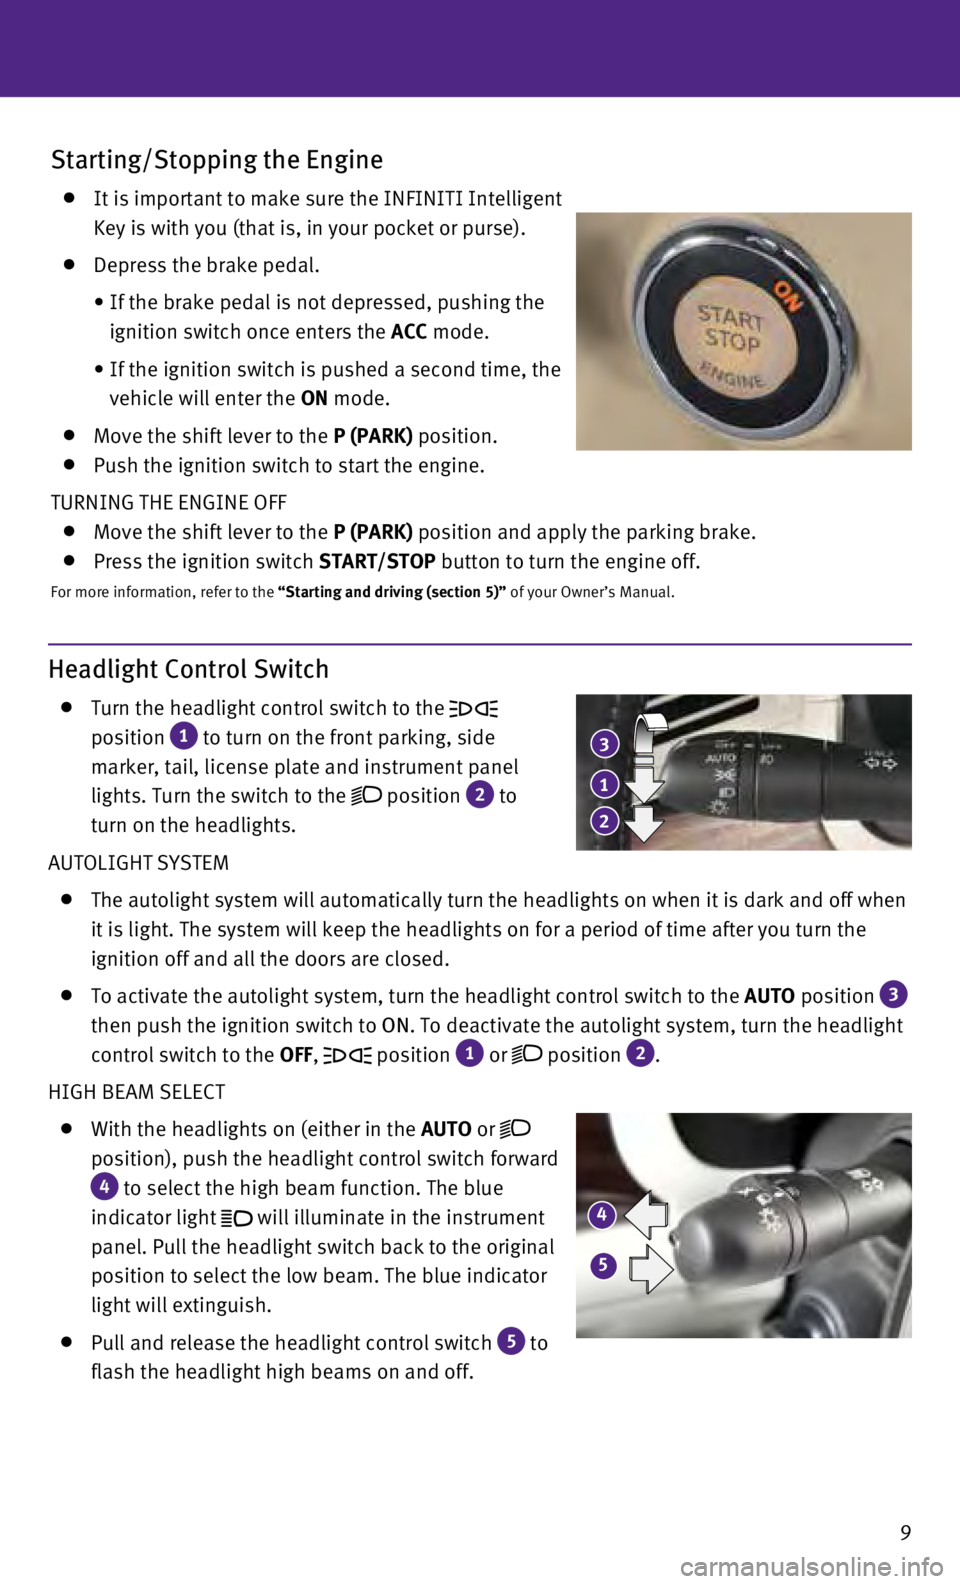
Turn the headlight control switch to the
position
1 to turn on the front parking, side
marker, tail, license plate and instrument panel
lights. Turn the switch to the
position 2 to
turn on the headlights.
AUTOLIGHT SYSTEM
The autolight system will automatically turn the headlights on when it i\
s dark and off when
it is light. The system will keep the headlights on for a period of time\
after you turn the
ignition off and all the doors are closed.
To activate the autolight system, turn the headlight control switch to t\
he AUTO position 3
then push the ignition switch to ON. To deactivate the autolight system, turn the headlight
control switch to the OFF,
position 1 or position 2.
HIGH BEAM SELECT
With the headlights on (either in the AUTO or
position), push the headlight control switch forward
4 to select the high beam function. The blue
indicator light
will illuminate in the instrument
panel. Pull the headlight switch back to the original
position to select the low beam. The blue indicator
light will extinguish.
Pull and release the headlight control switch 5 to
flash the headlight high beams on and off.
Starting/Stopping the Engine
It is important to make sure the INFINITI Intelligent
Key is with you (that is, in your pocket or purse).
Depress the brake pedal.
•
If the brake pedal is not depressed, pushing the
ignition switch once enters the ACC mode.
•
If the ignition switch is pushed a second time, the
vehicle will enter the ON mode.
Move the shift lever to the P (PARK) position.
Push the ignition switch to start the engine.
TURNING THE ENGINE OFF
Move the shift lever to the P (PARK) position and apply the parking brake.
Press the ignition switch START/STOP button to turn the engine off.
For more information, refer to the “Starting and driving (section 5)” of your Owner’s Manual.
1
23
4
5
Page 16 of 32

14
USB (Universal Serial Bus) Connection Port and iPod® Interface
The USB port 1 is located in the center console
under the armrest.
When a compatible USB memory device or iPod®
is plugged into the USB port, compatible audio and
video files stored on the device can be played
through the vehicle’s audio system and front display.
For more information, refer to the “Monitor, climate, audio, phone
and voice recognition systems (section 4)” of your Owner’s Manual.
Conventional (Fixed Speed) Cruise Control
The cruise control system enables you to set a
constant cruising speed once the vehicle has
reached 25 mph (40 km/h).
The system will automatically maintain the set
speed until you tap the brake pedal, accelerate,
cancel or turn the system off.
To activate the cruise control, push the CRUISE
ON/OFF switch
1. The CRUISE indicator light in
the instrument panel will illuminate.
To set a cruising speed, accelerate the vehicle to
the desired speed, push the COAST/SET switch
2
and release. The SET indicator light in the instrument panel will illuminate. Take your foot\
off the accelerator pedal. Your vehicle will maintain the set speed.
To reset at a faster cruising speed, push and hold the ACCEL/RES switch 3. When the
vehicle attains the desired speed, release the switch.
To reset at a slower cruising speed, push and hold the COAST/SET switch 2. Release the
switch when the vehicle slows to the desired speed.
To cancel the preset speed, tap the brake pedal or push the CANCEL switch 4.
To turn off cruise control, push the CRUISE ON/OFF switch 1. Both the CRUISE indicator
light and the SET indicator light in the instrument panel will extinguish.
For more information, refer to the “Starting and driving (section 5)” of your Owner’s Manual.
1
2
34
1
first drive features
Page 17 of 32

15
Intelligent Cruise Control (ICC) (if so equipped)
VEHICLE-TO-VEHICLE DISTANCE CONTROL MODE
To set Vehicle-To-Vehicle Distance Control mode,
press the CRUISE ON/OFF button
1 for less than
1.5 seconds. The CRUISE indicator light
2
will illuminate.
Accelerate to the desired speed.
Push the COAST/SET switch 3 and release it.
Cruise control will be set to the desired speed.
Press the distance button 4 repeatedly to change
the set distance between long, middle and short.
When a vehicle is not detected ahead of you in
the lane, the set distance and set vehicle speed
indicator lights will illuminate
5 in set mode.
When a vehicle is detected ahead of you in the lane,
the vehicle ahead detection, set distance and set
vehicle speed indicator lights will illuminate
6 in
set mode.
To reset at a faster cruising speed, push and hold
the ACCEL/RES switch
7. When the vehicle attains
the desired speed, release the switch.
To reset at a slower cruising speed, push and hold
the COAST/SET switch
3. Release the switch when
the vehicle slows to the desired speed.
To cancel the preset speed, push the CANCEL switch 8 or tap the brake pedal. The set
vehicle speed indicator 5 will extinguish.
To turn off cruise control, press the
CRUISE ON/OFF button 1.
The CRUISE indicator
light
2 in the instrument panel will extinguish.
To set the conventional (fixed speed) cruise control mode:
While cruise control is off, press and hold the CRUISE ON/OFF button 1 for more than
1.5 seconds. The CRUISE indicator light will illuminate.
Accelerate to the desired speed.
Push the COAST/SET switch 3 and release it. The SET indicator light will illuminate.
Cruise control should be set to the desired speed.
To switch between the two cruise control modes:
When one of the two cruise control modes is in use, you must turn the sy\
stem off and then
turn it on again to select the other cruise control mode.
For more information, refer to the “Starting and driving (section 5)” of your Owner’s Manual.
87
3
4
1
25
6
Page 18 of 32

16
Power Outlets
The power outlets are used for powering electrical
accessories such as cellular phones. They are
rated at 12V, 120W (10A) maximum.
Power outlets are located on the instrument panel
1,
inside the center console 2,
on the rear of the
front console
3 and in the cargo area 4.
To use a power outlet, open the cap.
For more information, refer to the “Starting and driving (section 5)” of your
Owner’s Manual.
1
2
3
4
first drive features
Page 24 of 32
22
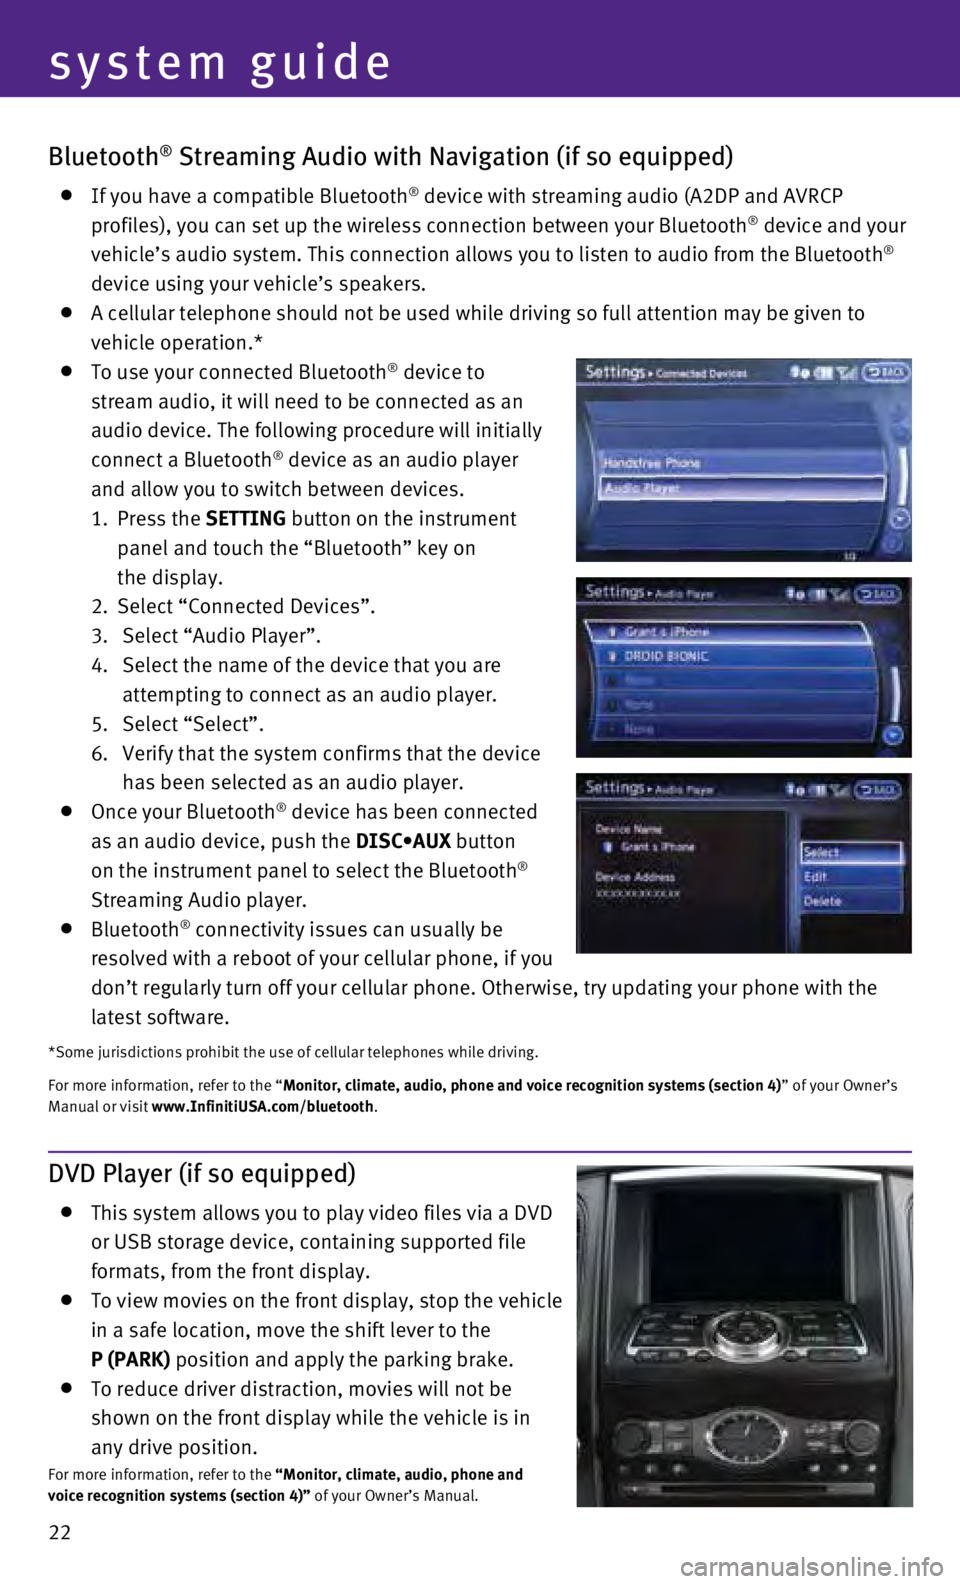
Bluetooth® Streaming Audio with Navigation (if so equipped)
If you have a compatible Bluetooth® device with streaming audio (A2DP and AVRCP
profiles), you can set up the wireless connection between your Bluetoot\
h® device and your
vehicle’s audio system. This connection allows you to listen to audio\
from the Bluetooth®
device using your vehicle’s speakers.
A cellular telephone should not be used while driving so full attention \
may be given to
vehicle operation.*
To use your connected Bluetooth® device to
stream audio, it will need to be connected as an
audio device. The following procedure will initially
connect a Bluetooth
® device as an audio player
and allow you to switch between devices.
1.
Press the SETTING button on the instrument
panel and touch the “Bluetooth” key on
the display.
2.
Select “Connected Devices”.
3.
Select “Audio Player”.
4.
Select the name of the device that you are
attempting to connect as an audio player.
5.
Select “Select”.
6.
Verify that the system confirms that the device
has been selected as an audio player.
Once your Bluetooth® device has been connected
as an audio device, push the DISC•AUX button
on the instrument panel to select the Bluetooth
®
Streaming Audio player.
Bluetooth® connectivity issues can usually be
resolved with a reboot of your cellular phone, if you
don’t regularly turn off your cellular phone. Otherwise, try updating\
your phone with the
latest software.
*Some jurisdictions prohibit the use of cellular telephones while drivin\
g.
For more information, refer to the “Monitor, climate, audio, phone and voice recognition systems (section 4\
) ” of your Owner’s
Manual or visit www.InfinitiUSA.com/bluetooth.
system guide
DVD Player (if so equipped)
This system allows you to play video files via a DVD
or USB storage device, containing supported file
formats, from the front display.
To view movies on the front display, stop the vehicle
in a safe location, move the shift lever to the
P (PARK) position and apply the parking brake.
To reduce driver distraction, movies will not be
shown on the front display while the vehicle is in
any drive position.
For more information, refer to the “Monitor, climate, audio, phone and
voice recognition systems (section 4)” of your Owner’s Manual.