light INFINITI QX80 2014 Workshop Manual
[x] Cancel search | Manufacturer: INFINITI, Model Year: 2014, Model line: QX80, Model: INFINITI QX80 2014Pages: 578, PDF Size: 2.8 MB
Page 133 of 578

2-40Instruments and controls
SIC3269
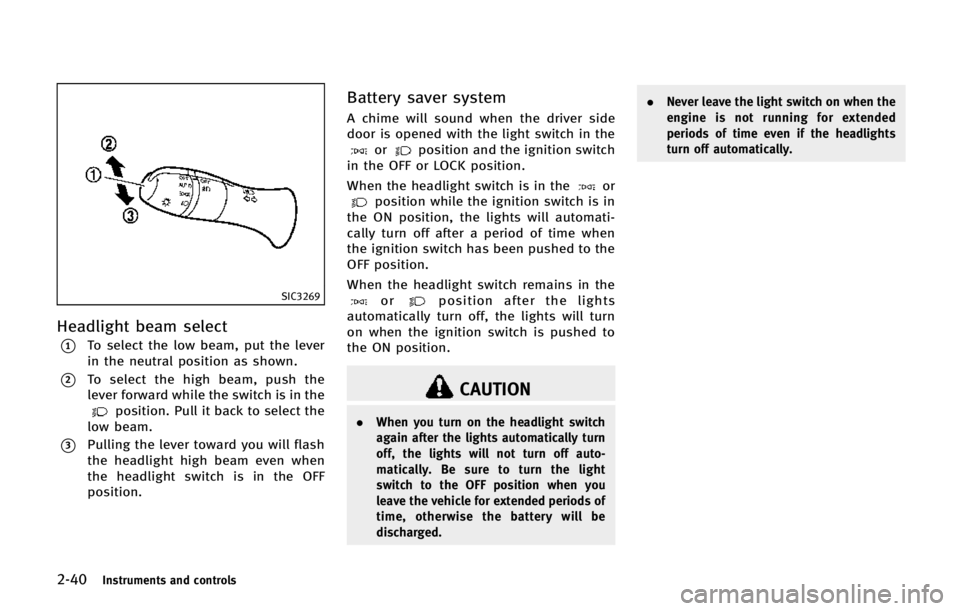
Headlight beam select
*1To select the low beam, put the lever
in the neutral position as shown.
*2To select the high beam, push the
lever forward while the switch is in the
position. Pull it back to select the
low beam.
*3Pulling the lever toward you will flash
the headlight high beam even when
the headlight switch is in the OFF
position.
Battery saver system
A chime will sound when the driver side
door is opened with the light switch in the
orposition and the ignition switch
in the OFF or LOCK position.
When the headlight switch is in the
orposition while the ignition switch is in
the ON position, the lights will automati-
cally turn off after a period of time when
the ignition switch has been pushed to the
OFF position.
When the headlight switch remains in the
orposition after the lights
automatically turn off, the lights will turn
on when the ignition switch is pushed to
the ON position.
CAUTION
. When you turn on the headlight switch
again after the lights automatically turn
off, the lights will not turn off auto-
matically. Be sure to turn the light
switch to the OFF position when you
leave the vehicle for extended periods of
time, otherwise the battery will be
discharged. .
Never leave the light switch on when the
engine is not running for extended
periods of time even if the headlights
turn off automatically.
Page 134 of 578

SIC2275
Headlight aiming control (if so
equipped)
Depending on the number of occupants in
the vehicle and the load it is carrying, the
headlight axis may be higher than desired.
If the vehicle is traveling on a hilly road,
the headlights may directly hit the rearview
mirror of the vehicle ahead or the wind-
shield of the oncoming vehicle. The light
axis can be lowered with the operation of
the switch.
The larger the number designated on the
switch, the lower the axis.
When traveling with no heavy load or on aflat road, select position 0.
WARNING
Xenon headlights are extremely bright
compared to conventional headlights. If
the xenon headlights hit the rearview mirror
of the vehicle ahead or the windshield of
oncoming vehicle, the driver of these
vehicles may have difficulty driving because
of the brightness. Use the headlight aiming
control switch to lower the light axis. See
“Xenon headlights”
earlier in this section
for additional information.
Daytime running light system (Ca-
nada only)
The daytime running lights automatically
illuminate when the engine is started with
the parking brake released. The daytime
running lights operate with the headlight
switch in the OFF position or in the
position. Turn the headlight switch to theposition for full illumination when
driving at night.
If the parking brake is applied before the
engine is started, the daytime running
lights do not illuminate. The daytime running lights illuminate once the parking
brake is released. The daytime running
lights will remain on until the ignition
switch is pushed to the OFF position.
WARNING
When the daytime running light system is
active, tail lights on your vehicle are not on.
It is necessary at dusk to turn on your
headlights. Failure to do so could cause an
accident injuring yourself and others.
Adaptive Front lighting System
(AFS) (if so equipped)
The Adaptive Front lighting System (AFS)
will automatically adjust the headlights
(low beam) toward the turning direction to
improve the driver’s view. When the head-
light switch is ON and the driver operates
the steering wheel in a turn, the AFS
system will be activated.
The AFS will operate:
.
Right-side headlight
— When the headlight switch is ON
— When the shift lever is in any
position other than P (Park) or R
Instruments and controls2-41
Page 135 of 578

2-42Instruments and controls
(Reverse)
— When the steering wheel is turned
clockwise
. Left-side headlight
— When the headlight switch is ON
— When the shift lever is in any
position other than P (Park) or R
(Reverse)
— When the vehicle is driven at a
speed above 16 MPH (25km/h).
However, when the vehicle’s speed
decreases below 3 MPH (5 km/h) it
will stop.
— When the steering wheel is turned
counterclockwise
AFS will also adjust the headlight to a
proper axis automatically, depending on
the number of occupants in the vehicle, the
load the vehicle is carrying and the road
conditions.
If the AFS OFF indicator light blinks after
the ignition switch has been pushed to the
ON position, this may indicate that the AFS
is not functioning properly. Have the
system checked by an INFINITI retailer.
When the engine is started, the headlights
will vibrate to check the system condition.
This is not a malfunction.HEADLIGHT WASHER (if so
equipped)
The headlight washer operates when the
headlight is on and the ignition switch is in
the ON position.
Pull the windshield washer switch toward
you. The headlight washer operates with
the windshield washer operation. This
operation activates once each time either
the ignition switch or the headlight switch
is turned off and on.
After the first operation, the headlight
washer operates once at every fifth opera-
tion of the windshield washer.
CAUTION
. Do not operate the washer continuously
for longer than 30 seconds.
. Do not operate the headlight washer if
the window washer fluid reservoir is
empty.
SIC3270
Page 136 of 578

SIC4378
INSTRUMENT BRIGHTNESS CON-
TROL
The instrument brightness control switch
can be operated when the ignition switch
is in the ON position. When the switch is
operated, the dot matrix liquid crystal
display switches to the brightness adjust-
ment mode.
Push the upper switch
*Ato brighten the
instrument panel lights. The bar
*1moves
to the + side. When reaching the maximum
brightness, “MAX”appears on the display
*2.
Push the lower switch
*Bto dim the instrument panel lights. The bar
*1moves
to the −side. When reaching the minimum
brightness, “MIN”appears on the display
*3. However, “MIN” does not appear
during the nighttime.
The dot matrix liquid crystal display
returns to the normal display under the
following conditions:
. when the instrument brightness control
switch is not operated for more than 5
seconds.
. when the
orswitch on the right
side of the combination meter panel is
pushed.SIC3271
TURN SIGNAL SWITCH
*1Turn signal
Move the lever up or down to signal the
turning direction. When the turn is com-
pleted, the turn signals cancel automati-
cally.
*2Lane change signal
To indicate a lane change, move the lever
up or down to the point where lights begin
flashing.
If the lever is moved back right after
moving up or down, the light will flash 3
times (if so equipped).
Instruments and controls2-43
Page 137 of 578

2-44Instruments and controls
SIC3272
FOG LIGHT SWITCH
To turn the fog lights on, turn the headlight
switch to theposition, then turn the
switch to theposition. To turn them
off, turn the switch to the OFF position.
The headlights must be on for the fog
lights to operate.
When the headlight switch is in the AUTO
position, turning the fog light switch to the
position will turn on the headlights,
fog lights and the other lights while the
ignition switch is in the ON position or the
engine is running (if so equipped).
SIC4401
The heated steering wheel system is
designed to operate only when the surface
temperature of the steering wheel is below
688F (208C).
Push the heated steering wheel switch to
warm the steering wheel after the engine
starts. The indicator light
*1on the switch
will illuminate.
If the surface temperature of the steering
wheel is below 688F (208C), the system will
heat the steering wheel and cycle off and
on to maintain a temperature above 688F
(208C). The indicator light will remain on as
long as the system is on. Push the switch again to turn the heated
steering wheel system off manually. The
indicator light will turn off.
NOTE:
If the surface temperature of the steering
wheel is above 688
F (208C) when the
switch is turned on, the system will not
heat the steering wheel. This is not a
malfunction.
HEATED STEERING WHEEL
Page 139 of 578

2-46Instruments and controls
SIC2770
FRONT
The front seats can be warmed by built-in
heaters. The switches located on the
instrument panel can be operated inde-
pendently of each other.
1. Start the engine.
2. Select heat range.
.For high heat, push the HI (High)side of the switch
*1..For low heat, push the LO (Low) sideof the switch
*2..The indicator light*3will illuminate
when the heater is on. 3. To turn off the heater, push the
“HI”or
“LO ”side (whichever is selected) of the
switch. Make sure the indicator light
turns off.
SIC2770
REAR
The 2nd row outboard seats are warmed by
built-in heaters. The switches located on
the back side of the center console can be
operated independently of each other.
1. Start the engine.
2. Select heat range.
*1For high heat, push the HI (High)
side of the switch.
*2For low heat, push the LO (Low) side
of the switch.
The indicator light in the switch
*3will
illuminate when the heater is on.
Page 140 of 578

3. To turn off the heater, return the switchto the level position. Make sure the
indicator light goes off.
The heater is controlled by a thermo-
stat, automatically turning the heater
on and off. The indicator light will
remain on as long as the switch is on.
When the vehicle’s interior is warmed,
or before you leave the vehicle, be sure
to turn off the switch.
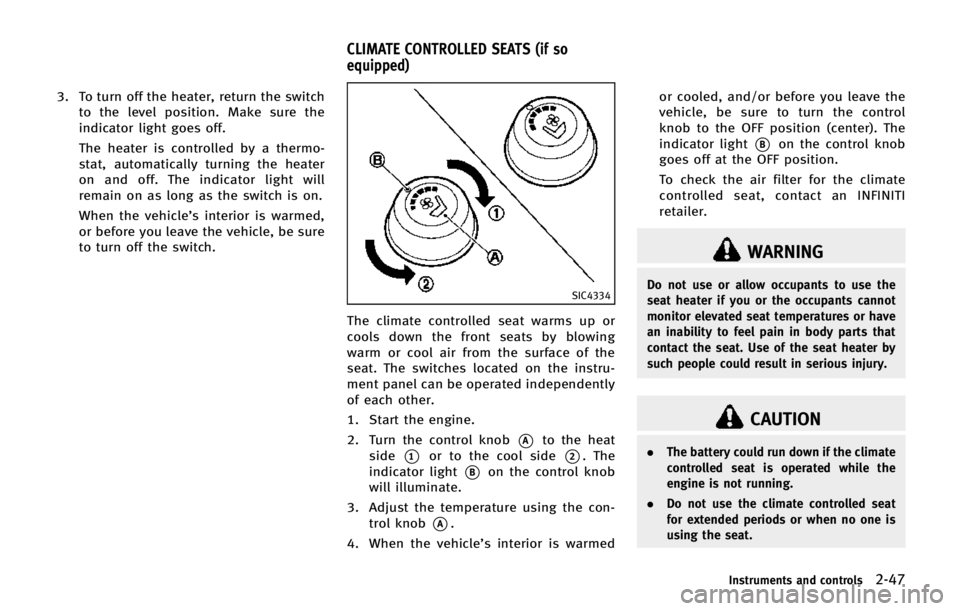
SIC4334
The climate controlled seat warms up or
cools down the front seats by blowing
warm or cool air from the surface of the
seat. The switches located on the instru-
ment panel can be operated independently
of each other.
1. Start the engine.
2. Turn the control knob
*Ato the heat
side
*1or to the cool side*2. The
indicator light
*Bon the control knob
will illuminate.
3. Adjust the temperature using the con- trol knob
*A.
4. When the vehicle’s interior is warmed or cooled, and/or before you leave the
vehicle, be sure to turn the control
knob to the OFF position (center). The
indicator light
*Bon the control knob
goes off at the OFF position.
To check the air filter for the climate
controlled seat, contact an INFINITI
retailer.
WARNING
Do not use or allow occupants to use the
seat heater if you or the occupants cannot
monitor elevated seat temperatures or have
an inability to feel pain in body parts that
contact the seat. Use of the seat heater by
such people could result in serious injury.
CAUTION
. The battery could run down if the climate
controlled seat is operated while the
engine is not running.
. Do not use the climate controlled seat
for extended periods or when no one is
using the seat.
Instruments and controls2-47
CLIMATE CONTROLLED SEATS (if so
equipped)
Page 141 of 578

2-48Instruments and controls
.Do not put anything on the seat which
insulates heat, such as a blanket,
cushion, seat cover, etc. Otherwise, the
seat may become overheated.
. Do not place anything hard or heavy on
the seat or pierce it with a pin or similar
object. This may result in damage to the
climate controlled seat.
. Any liquid spilled on the seat should be
removed immediately with a dry cloth.
. The climate controlled seat has an air
filter. Do not operate climate controlled
seat without an air filter. This may result
in damage to the system.
. When cleaning the seat, never use
gasoline, thinner, or any similar materi-
als.
. If any malfunctions are found or the
climate controlled seat does not operate,
turn the switch off and have the system
checked by an INFINITI retailer.
SSD0956
The warning systems switch is used to turn
on and off the warning systems (Forward
Collision Warning (FCW), Lane Departure
Warning (LDW) and Blind Spot Warning
(BSW) systems) that are activated using
the settings menu on the center display.
When the warning systems switch is turned
off, the indicator
*1on the switch is off.
The indicator will also be off if all of the
warning systems are deactivated using the
settings menu.
The FCW system will sound a warning
chime and the vehicle ahead detection
indicator light blinks to alert the driver if
the vehicle is traveling close to the vehicle ahead. (See
“Forward Collision Warning
(FCW) system” in the“5. Starting and
driving” section.)
The LDW system will sound a warning
chime and blink the lane departure warn-
ing light (orange) to alert the driver if the
vehicle is traveling close to either the left
or the right of a traveling lane with
detectable lane markers. (See “Lane De-
parture Warning (LDW)/Prevention (LDP)
system ”in the “5. Starting and driving”
section.)
The BSW system will turn on the BSW
indicator lights, located next to the outside
mirrors, if the radar sensors detect a
vehicle in the detection zone. If the turn
signal is activated in the direction of the
detected vehicle, a chime sounds twice and
the BSW indicator light will flash. (See
“Blind Spot Warning/Blind Spot Interven-
tion
TM/Back-up Collision Intervention sys-
tems” in the “5. Starting and driving”
section.)
WARNING SYSTEMS SWITCH (if so
equipped)
Page 142 of 578

SIC4454
For driving or starting the vehicle on snowy
roads or slippery areas, push on the SNOW
mode switch. The SNOW mode indicator
light will illuminate. When the SNOW mode
is activated, engine output is controlled to
avoid wheel spin.
Push off the SNOW mode for normal
driving.
SIC4474
TOW MODE should be used when pulling a
heavy trailer or hauling a heavy load.
Driving the vehicle in TOW MODE with no
trailer/load or light trailer/light load will
not cause any damage. However, fuel
economy may be reduced, and the trans-
mission/engine driving characteristics may
feel unusual.
Push the TOW MODE switch to activate
TOW MODE. The indicator light on the TOW
MODE switch illuminates when TOW MODE
is selected. Push the TOW MODE switch
again to turn TOW MODE OFF.
TOW MODE is automatically canceled when
the ignition switch is placed in the OFFposition.
Instruments and controls2-49
SNOW MODE SWITCH
TOW MODE SWITCH
Page 145 of 578

2-52Instruments and controls
CAUTION
.Use power outlet with the engine run-
ning to avoid discharging the vehicle
battery.
. Avoid using power outlet when the air
conditioner, headlights or rear window
defroster is on.
. Before inserting or disconnecting a plug,
be sure the electrical accessory being
used is turned OFF.
. When not in use, be sure to close the
cap. Do not allow water or any liquid to
contact the outlet.
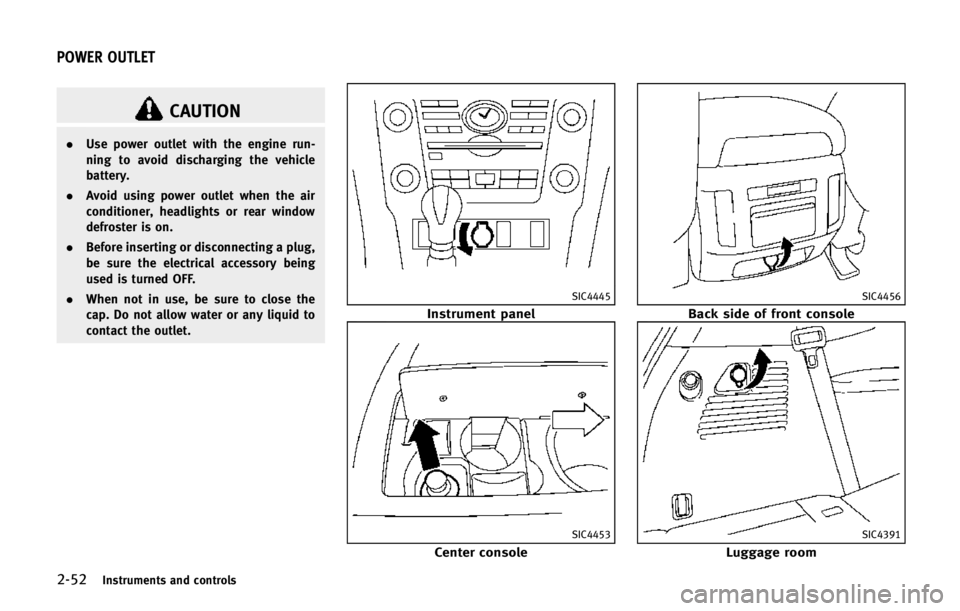
SIC4445
Instrument panel
SIC4453
Center console
SIC4456
Back side of front console
SIC4391
Luggage room
POWER OUTLET