navigation system INFINITI QX80 2014 Owner's Manual
[x] Cancel search | Manufacturer: INFINITI, Model Year: 2014, Model line: QX80, Model: INFINITI QX80 2014Pages: 578, PDF Size: 2.8 MB
Page 13 of 578

0-6Illustrated table of contents
JVC0410X
1. Cargo light (P.2-68)
2. Cup holders (3rd row seat) (P.2-55)
3. Rear ventilators (P.4-38)
4. Coat hooks (P.2-59)
5. Rear personal lights (P.2-66)
6. Tray (P.2-58)—
USB memory operation* (P.4-67)
— iPod®player operation* (P.4-76)
7. Door armrest —Power window controls (P.2-61)
— Power door lock switch (P.3-5)
— Outside rearview mirror remote control switch (P.3-30)
8. Automatic drive positioner switch (P.3-33)
9. Sun visors (P.3-29)
10. SOS call switch* (Refer to the sepa- rate Navigation System Owner’s Man-
ual.)
11. Moonroof switch (P.2-63)
12. Map lights (P.2-66)
13. Sunglasses holder (P.2-56)
14. Inside rearview mirror (P.3-30) —HomeLink
®universal transceiver
(P.2-68)
15. Cargo area —Power outlet (P.2-52)
— Cargo floor box (P.2-60)
— Luggage hooks (P.2-59)
— Jacking tools (P.6-5)
16. Rear console box (P.2-58)
—Cup holders (2nd row seat)*
(P.2-54)
— Pocket* (P.2-58)
17. Cup holders (2nd row seat)* (P.2-54)
18. Dual head restraint DVD system* (P.4-83)
PASSENGER COMPARTMENT
Page 17 of 578

0-10Illustrated table of contents
SSI0733
1. Side ventilator (P.4-38)
2. Meters and gauges (P.2-6)
3. Hazard warning flasher switch (P.6-2)
4. Center ventilator (P.4-38)
5. Center multi-function control panel(P.4-3) —
Vehicle information and setting
buttons (P.4-7)
6. Center display —Around View Monitor (P.4-21)
— Navigation system**
— DVD player operation (P.4-64) 7. Clock (P.2-51)
8. Defroster switch (P.2-37)
9. Front passenger supplemental air bag
(P.1-55)
10. Fuse box (P.8-24)
11. Parking brake (P.5-21)
12. Hood release handle (P.3-20)
13. Steering wheel —Horn (P.2-45)
— Driver supplemental air bag
(P.1-55)
— Power steering system (P.5-110)
14. Push-button ignition switch (P.5-11)
15. Climate controlled seat switch* (P.2-47)/Heated seat switch* (P.2-45)
16. Remote tip-up 2nd row seat switch* (P.1-9)
17. Heated steering wheel switch (P.2-44)
18. Power outlet (P.2-52)
19. Front passenger air bag status light (P.1-63)
20. Cup holder (P.2-54)
21. Automatic climate control system (P.4-39)
22. Audio system (P.4-47)
23. Glove box (P.2-57)
*: if so equipped
INSTRUMENT PANEL
Page 18 of 578

**: Refer to the separate Navigation
System Owner’s Manual.
SIC4450
1. Tachometer (P.2-8)
2. Warning/Indicator lights (P.2-11)
3. Speedometer (P.2-7)
4. Engine coolant temperature gauge(P.2-8)
5. Voltmeter (P.2-10) 6. Dot matrix liquid crystal display/
Odometer/twin trip odometer
(P.2-22)
7. Engine oil pressure gauge (P.2-9)
8. Fuel gauge (P.2-9)
Illustrated table of contents0-11
METERS AND GAUGES
Page 98 of 578

SSI0733
1. Side ventilator
2. Meters and gauges
3. Hazard indicator flasher switch
4. Center ventilator
5. Center multi-function control panel—Vehicle information and setting buttons
6. Center display —Around View Monitor
— Navigation system**
— DVD player operation 7. Clock
8. Defroster switch
9. Front passenger supplemental air bag
10. Fuse box
11. Parking brake
12. Hood release handle
13. Steering wheel
—Horn
— Driver supplemental air bag
— Power steering system
14. Push-button ignition switch
15. Climate controlled seat switch*/ Heated seat switch*
16. Remote tip-up 2nd row seat switch*
17. Heated steering wheel switch
18. Power outlet
19. Front passenger air bag status light
20. Cup holder
21. Automatic air conditioning system
22. Audio system
23. Glove box
*: if so equipped
**: Refer to the separate Navigation
System Owner’s Manual.
Instruments and controls2-5
INSTRUMENT PANEL
Page 172 of 578

WARNING
.Radio waves could adversely affect
electric medical equipment. Those who
use a pacemaker should contact the
electric medical equipment manufacturer
for the possible influences before use.
. The Intelligent Key transmits radio
waves when the buttons are pushed.
The FAA advises that the radio waves
may affect aircraft navigation and com-
munication systems. Do not operate the
Intelligent Key while on an airplane.
Make sure the buttons are not operated
unintentionally when the unit is stored
during a flight.
The Intelligent Key system can operate all
the door locks using the remote controller
function or pushing the request switch on
the vehicle without taking the key out from
a pocket or purse. The operating environ-
ment and/or conditions may affect the
Intelligent Key system operation.
Be sure to read the following before using
the Intelligent Key system.
CAUTION
.Be sure to carry the Intelligent Key with
you when operating the vehicle.
. Never leave the Intelligent Key in the
vehicle when you leave the vehicle.
The Intelligent Key is always communicat-
ing with the vehicle as it receives radio
waves. The Intelligent Key system trans-
mits weak radio waves. Environmental
conditions may interfere with the operation
of the Intelligent Key system under the
following operating conditions.
.When operating near a location where
strong radio waves are transmitted,
such as a TV tower, power station and
broadcasting station.
. When in possession of wireless equip-
ment, such as a cellular telephone,
transceiver, and CB radio.
. When the Intelligent Key is in contact
with or covered by metallic materials.
. When any type of radio wave remote
control is used nearby.
. When the Intelligent Key is placed near
an electric appliance such as a perso- nal computer.
. When the vehicle is parked near a
parking meter.
In such cases, correct the operating condi-
tions before using the Intelligent Key
function or use the mechanical key.
Although the life of the battery varies
depending on the operating conditions,
the battery’s life is approximately 2 years.
If the battery is discharged, replace it with
a new one.
Since the Intelligent Key is continuously
receiving radio waves, if the key is left near
equipment which transmits strong radio
waves, such as signals from a TV and
personal computer, the battery life may
become shorter.
For information regarding replacement of a
battery, see “Intelligent Key battery repla-
cement” in the“8. Maintenance and do-it-
yourself” section.
As many as 4 Intelligent Keys can be
registered and used with one vehicle. For
information about the purchase and use of
additional Intelligent Keys, contact an
INFINITI retailer.
Pre-driving checks and adjustments3-7
INTELLIGENT KEY SYSTEM
Page 180 of 578

WARNING
The Intelligent Key transmits radio waves
when the buttons are pushed. The FAA
advises that radio waves may affect aircraft
navigation and communication systems. Do
not operate the Intelligent Key while on an
airplane. Make sure the buttons are not
operated unintentionally when the unit is
stored for a flight.
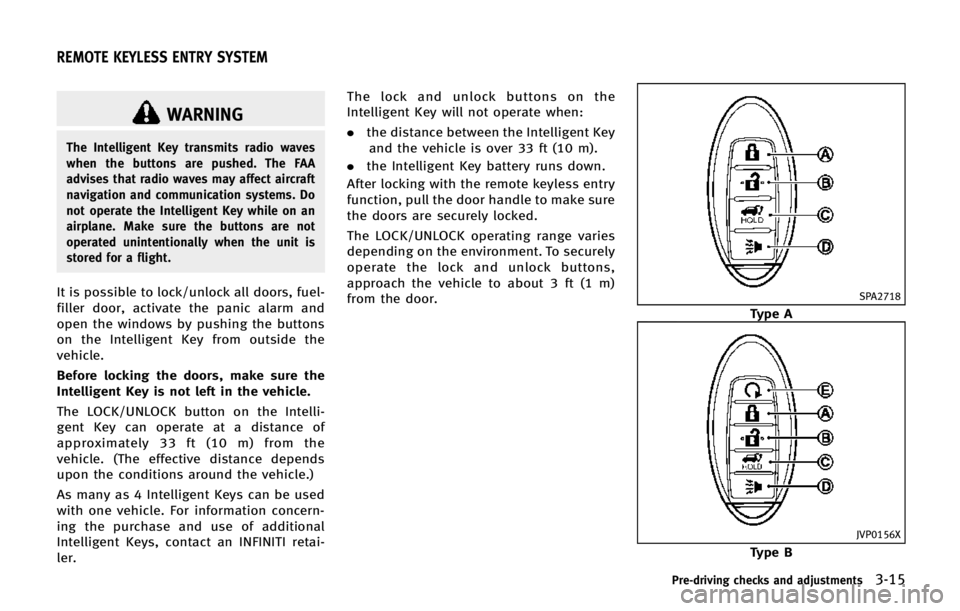
It is possible to lock/unlock all doors, fuel-
filler door, activate the panic alarm and
open the windows by pushing the buttons
on the Intelligent Key from outside the
vehicle.
Before locking the doors, make sure the
Intelligent Key is not left in the vehicle.
The LOCK/UNLOCK button on the Intelli-
gent Key can operate at a distance of
approximately 33 ft (10 m) from the
vehicle. (The effective distance depends
upon the conditions around the vehicle.)
As many as 4 Intelligent Keys can be used
with one vehicle. For information concern-
ing the purchase and use of additional
Intelligent Keys, contact an INFINITI retai-
ler.The lock and unlock buttons on the
Intelligent Key will not operate when:
.
the distance between the Intelligent Key
and the vehicle is over 33 ft (10 m).
. the Intelligent Key battery runs down.
After locking with the remote keyless entry
function, pull the door handle to make sure
the doors are securely locked.
The LOCK/UNLOCK operating range varies
depending on the environment. To securely
operate the lock and unlock buttons,
approach the vehicle to about 3 ft (1 m)
from the door.SPA2718
Type A
JVP0156X
Type B
Pre-driving checks and adjustments3-15
REMOTE KEYLESS ENTRY SYSTEM
Page 200 of 578

The driver’s seat, steering column and
outside mirrors will move to the mem-
orized position or to the exit position
when the entry/exit function is set to
active with the indicator light flashing,
and then the light will stay on for
approximately 5 seconds.
SETTING MEMORY FUNCTION
The status of the following settings can be
linked to the Intelligent Key and the
memorized settings can be available for
each Intelligent Key.
.Air conditioner system
. Navigation system
. Audio system
To use the memory function, lock the doors
with the Intelligent Key that is linked to the
settings.
To enable the memorized settings:
1. Carry the Intelligent Key that is linked to the settings, and unlock the doors by
pushing the driver’s door handle re-
quest switch or “UNLOCK”
button
on the Intelligent Key.
2. Push the ignition switch to the “ON”
position. “Connection with the key has
been done” will be displayed on the screen and the memorized settings are
available (only when a new Intelligent
Key is used).
SYSTEM OPERATION
The automatic drive positioner system will
not work or will stop operating under the
following conditions:
.
When the vehicle speed is above 4 MPH
(7 km/h).
. When the adjusting switch for the
driver’s seat and steering column is
turned on while the automatic drive
positioner is operating.
. When the memory switch 1 or 2 is not
pushed for at least 1 second.
. When the seat, steering column and
outside mirrors have already been
moved to the memorized position.
. When no position is stored in the
memory switch.
. When the engine is started while
moving the automatic drive positioner.
. When the AT shift lever is moved from
the P (Park) position to any other
position. (However, it will not be
canceled if the switch is pushed while
the seat and steering column are
returning to the previous positions (entry/exit function).)
. When the driver’s door remains open
for more than 45 seconds and the
ignition switch is not in the ON posi-
tion.
Pre-driving checks and adjustments3-35
Page 204 of 578

WARNING
.Do not disassemble or modify this
system. If you do, it may result in
accidents, fire, or electric shock.
. Do not use this system if you notice any
abnormality, such as a frozen screen or
lack of sound. Continued use of the
system may result in accident, fire or
electric shock.
. In case you notice any foreign object in
the system hardware, spill liquid on it,
or notice smoke or smell coming from it,
stop using the system immediately and
contact your nearest INFINITI retailer.
Ignoring such conditions may lead to
accidents, fire, or electric shock.
. Park the vehicle in a safe location and
apply the parking brake to view the
images on the front center display
screen.
Do not attempt to operate the system in
extreme temperature conditions [below
−48F( −208C) and above 1588F (708C)].
Operating this system under these condi-
tions may result in system malfunctions.
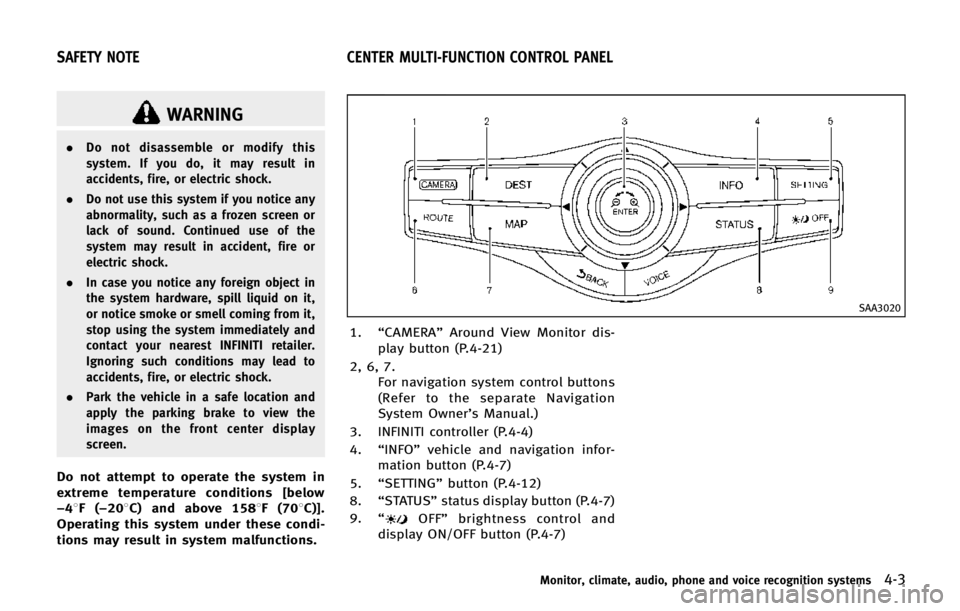
SAA3020
1. “CAMERA” Around View Monitor dis-
play button (P.4-21)
2, 6, 7. For navigation system control buttons
(Refer to the separate Navigation
System Owner’s Manual.)
3. INFINITI controller (P.4-4)
4. “INFO” vehicle and navigation infor-
mation button (P.4-7)
5. “SETTING” button (P.4-12)
8. “STATUS” status display button (P.4-7)
9. “
OFF” brightness control and
display ON/OFF button (P.4-7)
Monitor, climate, audio, phone and voice recognition systems4-3
SAFETY NOTE CENTER MULTI-FUNCTION CONTROL PANEL
Page 205 of 578

4-4Monitor, climate, audio, phone and voice recognition systems
SAA3025
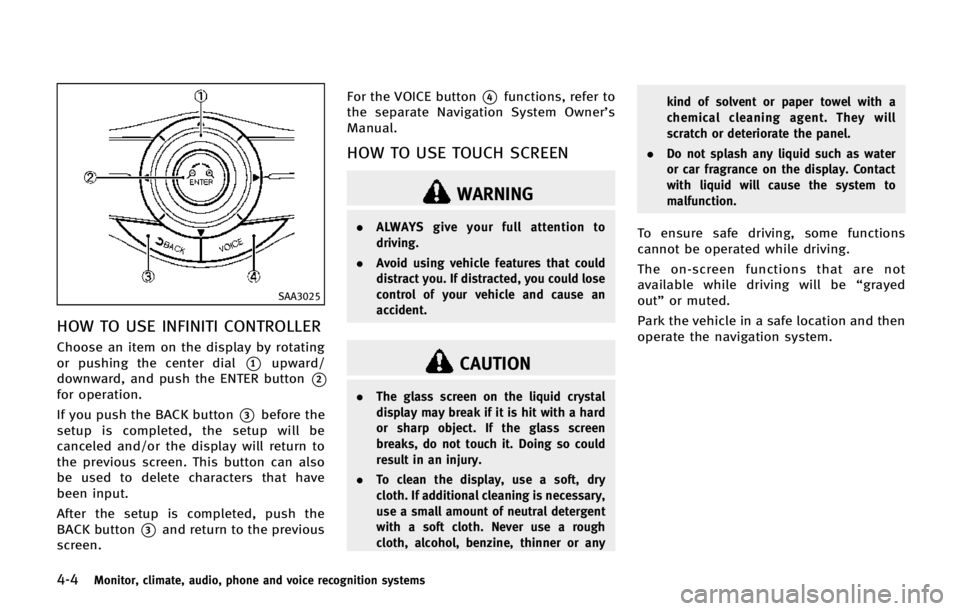
HOW TO USE INFINITI CONTROLLER
Choose an item on the display by rotating
or pushing the center dial
*1upward/
downward, and push the ENTER button
*2
for operation.
If you push the BACK button
*3before the
setup is completed, the setup will be
canceled and/or the display will return to
the previous screen. This button can also
be used to delete characters that have
been input.
After the setup is completed, push the
BACK button
*3and return to the previous
screen. For the VOICE button
*4functions, refer to
the separate Navigation System Owner’s
Manual.
HOW TO USE TOUCH SCREEN
WARNING
. ALWAYS give your full attention to
driving.
. Avoid using vehicle features that could
distract you. If distracted, you could lose
control of your vehicle and cause an
accident.
CAUTION
.The glass screen on the liquid crystal
display may break if it is hit with a hard
or sharp object. If the glass screen
breaks, do not touch it. Doing so could
result in an injury.
. To clean the display, use a soft, dry
cloth. If additional cleaning is necessary,
use a small amount of neutral detergent
with a soft cloth. Never use a rough
cloth, alcohol, benzine, thinner or any kind of solvent or paper towel with a
chemical cleaning agent. They will
scratch or deteriorate the panel.
. Do not splash any liquid such as water
or car fragrance on the display. Contact
with liquid will cause the system to
malfunction.
To ensure safe driving, some functions
cannot be operated while driving.
The on-screen functions that are not
available while driving will be “grayed
out” or muted.
Park the vehicle in a safe location and then
operate the navigation system.
Page 207 of 578

4-6Monitor, climate, audio, phone and voice recognition systems
.Delete:
Deletes the last character that has been
input with one touch. Push and hold
the button to delete all of the char-
acters.
. OK:
Completes character inputs.
Touch screen maintenance
If you clean the display screen, use a dry,
soft cloth. If additional cleaning is neces-
sary, use a small amount of neutral
detergent with a soft cloth. Never spray
the screen with water or detergent. Dam-
pen the cloth first, and then wipe the
screen.
SAA3275
MENU OPTIONS
The start menu can be displayed using the
menu control switch on the steering-wheel-
mounted controls.
1. While the MAP or STATUS screen is displayed, push and hold the menu
control switch until the “Menu Options”
screen appears.
2. Highlight the preferred item by tilting the menu control switch up or down,
and then push the menu control switch
to select it.
SAA2476
Available items
Destination/Route:
These items are for the navigation system.
See the separate Navigation System Own-
er’s Manual for details.
Info:
Displays the information screen. It is the
same screen that appears when you push
the INFO button.
Settings:
Displays the settings screen. It is the same
screen that appears when you push the
SETTING button.