CD player INFINITI QX80 2014 User Guide
[x] Cancel search | Manufacturer: INFINITI, Model Year: 2014, Model line: QX80, Model: INFINITI QX80 2014Pages: 578, PDF Size: 2.8 MB
Page 258 of 578
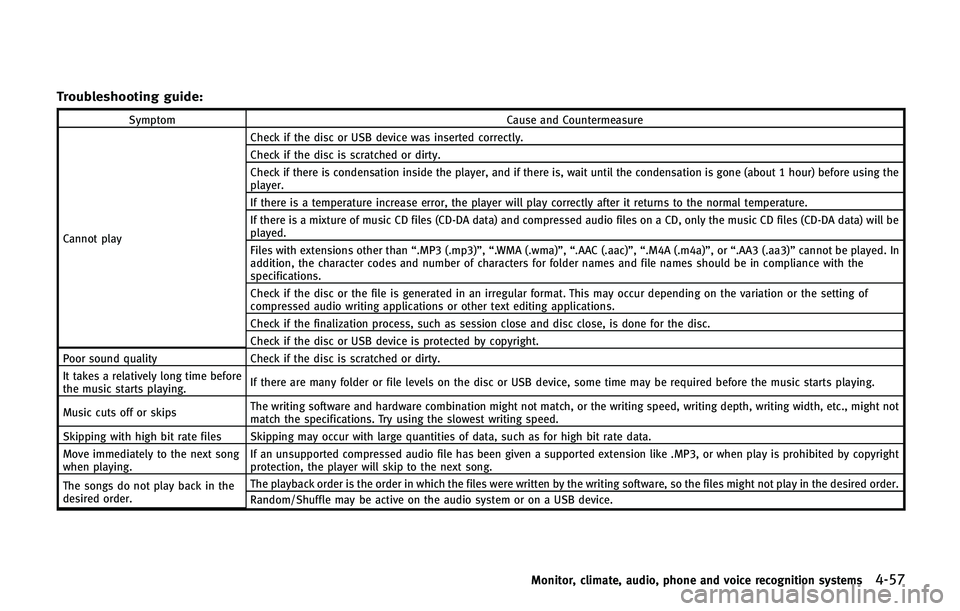
Troubleshooting guide:
SymptomCause and Countermeasure
Cannot play Check if the disc or USB device was inserted correctly.
Check if the disc is scratched or dirty.
Check if there is condensation inside the player, and if there is, wait until the condensation is gone (about 1 hour) before using the
player.
If there is a temperature increase error, the player will play correctly after it returns to the normal temperature.
If there is a mixture of music CD files (CD-DA data) and compressed audio files on a CD, only the music CD files (CD-DA data) will be
played.
Files with extensions other than
“.MP3 (.mp3)”,“.WMA (.wma)”, “.AAC (.aac)”,“.M4A (.m4a)”,or “.AA3 (.aa3)”cannot be played. In
addition, the character codes and number of characters for folder names and file names should be in compliance with the
specifications.
Check if the disc or the file is generated in an irregular format. This may occur depending on the variation or the setting of
compressed audio writing applications or other text editing applications.
Check if the finalization process, such as session close and disc close, is done for the disc.
Check if the disc or USB device is protected by copyright.
Poor sound quality Check if the disc is scratched or dirty.
It takes a relatively long time before
the music starts playing. If there are many folder or file levels on the disc or USB device, some time may be required before the music starts playing.
Music cuts off or skips The writing software and hardware combination might not match, or the writing speed, writing depth, writing width, etc., might not
match the specifications. Try using the slowest writing speed.
Skipping with high bit rate files Skipping may occur with large quantities of data, such as for high bit rate data.
Move immediately to the next song
when playing. If an unsupported compressed audio file has been given a supported extension like .MP3, or when play is prohibited by copyright
protection, the player will skip to the next song.
The songs do not play back in the
desired order. The playback order is the order in which the files were written by the writing software, so the files might not play in the desired order.
Random/Shuffle may be active on the audio system or on a USB device.
Monitor, climate, audio, phone and voice recognition systems4-57
Page 261 of 578
4-60Monitor, climate, audio, phone and voice recognition systems
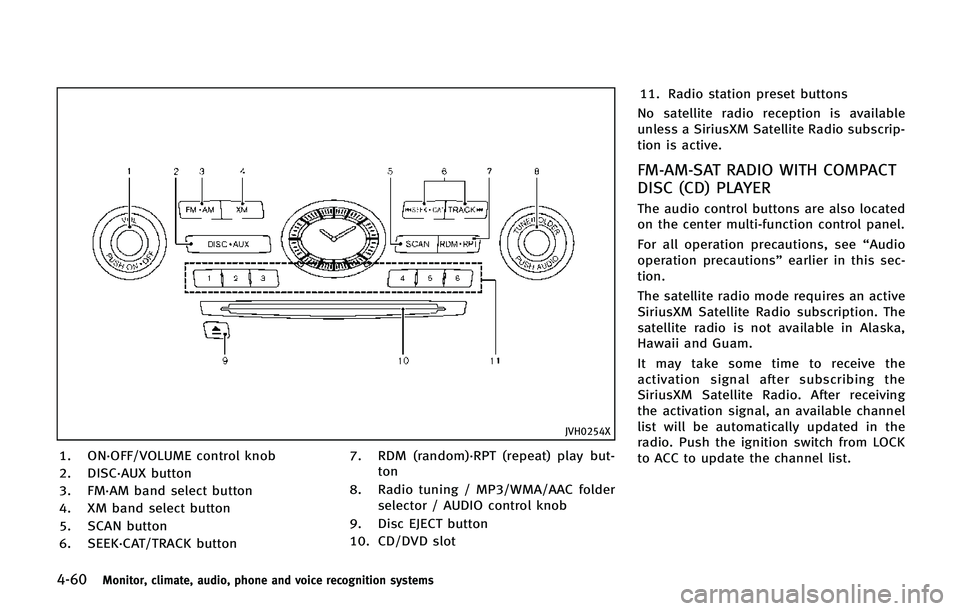
JVH0254X
1. ON·OFF/VOLUME control knob
2. DISC·AUX button
3. FM·AM band select button
4. XM band select button
5. SCAN button
6. SEEK·CAT/TRACK button7. RDM (random)·RPT (repeat) play but-
ton
8. Radio tuning / MP3/WMA/AAC folder selector / AUDIO control knob
9. Disc EJECT button
10. CD/DVD slot 11. Radio station preset buttons
No satellite radio reception is available
unless a SiriusXM Satellite Radio subscrip-
tion is active.
FM-AM-SAT RADIO WITH COMPACT
DISC (CD) PLAYER
The audio control buttons are also located
on the center multi-function control panel.
For all operation precautions, see “Audio
operation precautions” earlier in this sec-
tion.
The satellite radio mode requires an active
SiriusXM Satellite Radio subscription. The
satellite radio is not available in Alaska,
Hawaii and Guam.
It may take some time to receive the
activation signal after subscribing the
SiriusXM Satellite Radio. After receiving
the activation signal, an available channel
list will be automatically updated in the
radio. Push the ignition switch from LOCK
to ACC to update the channel list.
Page 264 of 578
Selecting a category will go to the first
channel in that category as defined by
SiriusXM Satellite Radio.
. Direct Tune
Inputs the channel number by using a
keypad.
Compact Disc (CD) player operation
Push the ignition switch to the ACC or ON
position and insert the Compact Disc (CD)
into the slot with the label side facing up.
The CD will be guided automatically into
the slot and start playing.
After loading the CD, the number of tracks
on the CD and the play time will appear on
the display.
If the radio is already operating, it will
automatically turn off and the CD will play.
If the system has been turned off while the
CD was playing, pushing the ON·OFF
button will start the CD.
PLAY:
When the DISC·AUX (CD play) button is
pushed with the system off and the CD
loaded, the system will turn on and the CD
will start to play.
When the DISC·AUX button is pushed with the CD loaded and the radio playing, the
radio will automatically be turned off and
the CD will start to play.
Menu:
When the “Menu”key on the display is
selected while the CD is being played, the
menu screen will be displayed. The follow-
ing menu options are available.
. Folder List (for CD with compressed
audio files)
Displays the folder list.
. Track List
Displays the track list.
. Play Mode
Select a play mode from the following
items.
— Normal
— 1 Folder Repeat (for CD with com-
pressed audio files)
— 1 Track Repeat
— 1 Disc Random
— 1 Folder Random (for CD with
compressed audio files)
Next/Previous Track and Fast
Forward/Rewind:
When the
orbutton is pushed for more than 1.5 seconds while the CD is
being played, the CD will play while fast
forwarding or rewinding. When the button
is released, the CD will return to normal
play speed.
When the
orbutton is pushed for
less than 1.5 seconds while the CD is being
played, the next track or the beginning of
the current track on the CD will be played.
When the rewind button is pushed for less
than 1.5 seconds within 3 seconds after
the current track starts playing, the pre-
vious track will be played.
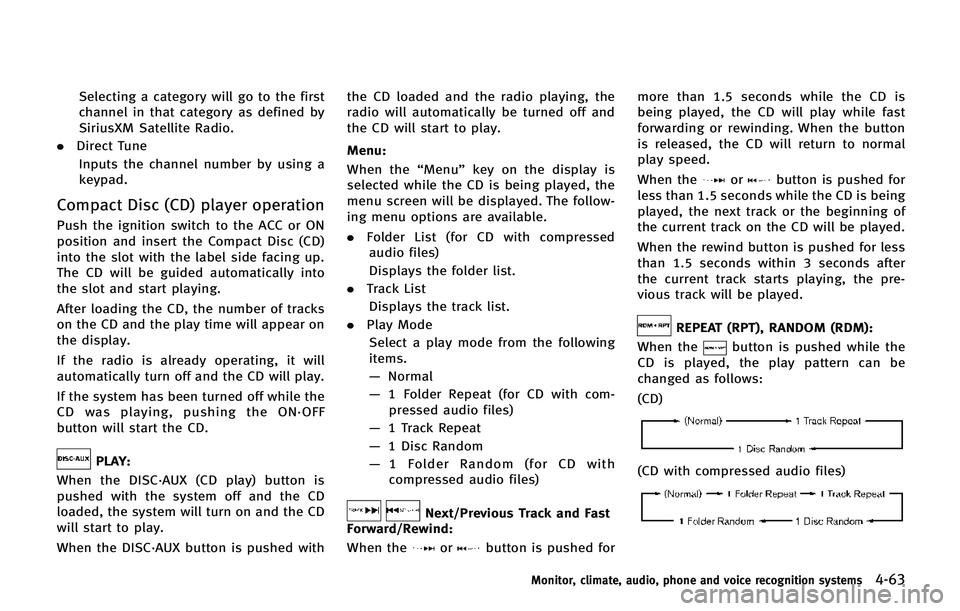
REPEAT (RPT), RANDOM (RDM):
When the
button is pushed while the
CD is played, the play pattern can be
changed as follows:
(CD)
(CD with compressed audio files)
Monitor, climate, audio, phone and voice recognition systems4-63
Page 265 of 578
4-64Monitor, climate, audio, phone and voice recognition systems
CD EJECT:
When the Disc EJECT button is pushed with
the CD loaded, the CD will be ejected.
When this button is pushed while the CD is
being played, the CD will be ejected.
If the CD comes out and is not removed, it
will be pulled back into the slot to protect
it.
DVD (Digital Versatile Disc) PLAYER
OPERATION
Precautions
Start the engine when using the DVD
entertainment system.
Movies will not be shown on the front
display while the vehicle is in any drive
position to reduce driver distraction. Audio
is available when a movie is played. To
view movies in the front display, stop the
vehicle in a safe location, move the shift
lever to the P (Park) position and apply the
parking brake.
WARNING
. The driver must not attempt to operate
the DVD system or wear the headphones while the vehicle is in motion so that full
attention may be given to vehicle opera-
tion.
. Do not attempt to modify the system to
display a movie on the front screen while
the vehicle is being driven. Doing so may
distract the driver and may cause a
collision and serious personal injury or
death.
CAUTION
.Only operate the DVD while the vehicle
engine is running. Operating the DVD for
extended periods of time with the
engine OFF can discharge the vehicle
battery.
. Do not allow the system to get wet.
Excessive moisture such as spilled
liquids may cause the system to mal-
function.
. While playing VIDEO-CD media, this DVD
player does not guarantee complete
functionality of all VIDEO-CD formats.
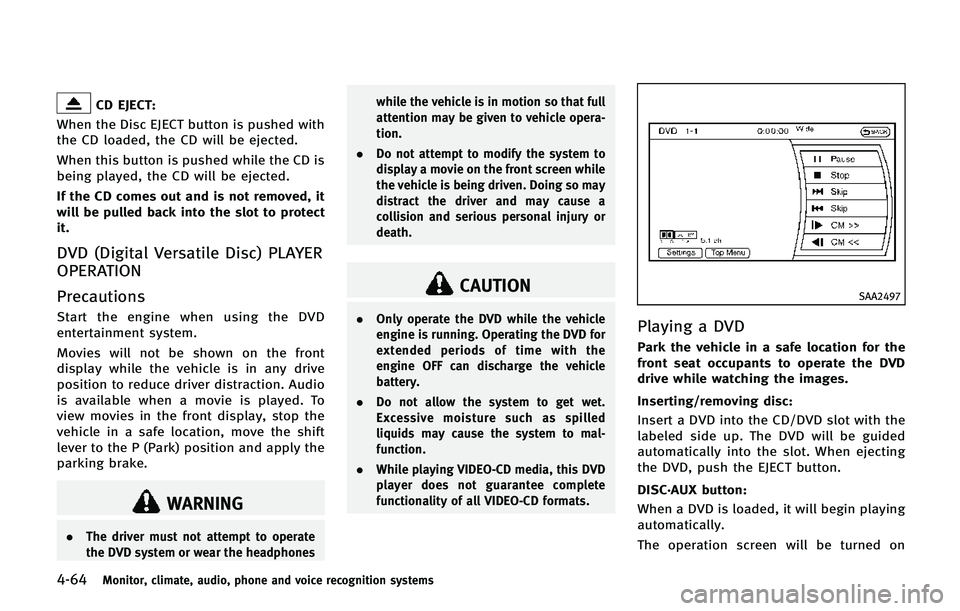
SAA2497
Playing a DVD
Park the vehicle in a safe location for the
front seat occupants to operate the DVD
drive while watching the images.
Inserting/removing disc:
Insert a DVD into the CD/DVD slot with the
labeled side up. The DVD will be guided
automatically into the slot. When ejecting
the DVD, push the EJECT button.
DISC·AUX button:
When a DVD is loaded, it will begin playing
automatically.
The operation screen will be turned on
Page 277 of 578
4-76Monitor, climate, audio, phone and voice recognition systems
Connected Devices:
Registered devices are shown on the list.
Select a Bluetooth device from the list, the
following options will be available.
.Select
Select “Select” to connect the selected
device to the vehicle. If there is a
different device currently connected,
the selected device will replace the
current device.
. Edit
Rename the selected Bluetooth device
using the keypad displayed on the
screen. (See “How to use touch screen”
earlier in this section.)
. Delete
Delete the selected Bluetooth device.
Edit Bluetooth Info:
Change the name broadcasted by this
system over Bluetooth. Change the PIN
code that is entered when connecting a
hands free device to this system.
Replace Connected Phone:
Replace the Bluetooth connection with a
connected Bluetooth cellular phone. For
details about Hands-Free Phone System,
see “Bluetooth
®Hands-Free Phone Sys- tem”
later in this section.
SAA3261
iPod®PLAYER OPERATION
Connecting iPod
®
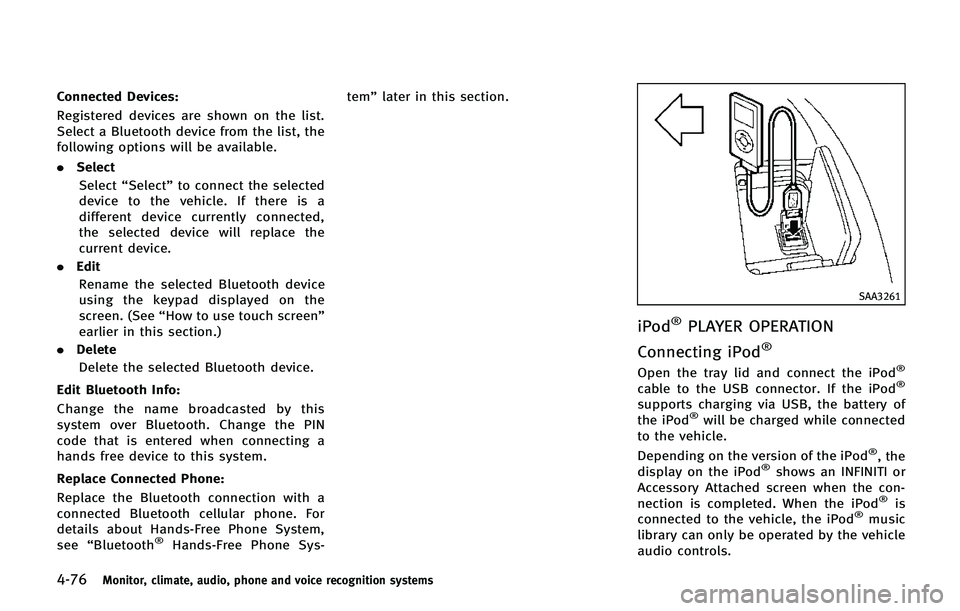
Open the tray lid and connect the iPod®
cable to the USB connector. If the iPod®
supports charging via USB, the battery of
the iPod®will be charged while connected
to the vehicle.
Depending on the version of the iPod
®, the
display on the iPod®shows an INFINITI or
Accessory Attached screen when the con-
nection is completed. When the iPod
®is
connected to the vehicle, the iPod®music
library can only be operated by the vehicle
audio controls.
Page 279 of 578
4-78Monitor, climate, audio, phone and voice recognition systems
.Now Playing
. Playlists
. Artists
. Albums
. Songs
. Podcasts
. Genres
. Composers
. Audiobooks
. Shuffle Songs
The following touch-panel buttons shown
on the screen are also available:
.
: returns to the previous screen.
.
: plays/pauses the music selected.
Next/Previous Track and Fast
Forward/Rewind:
When the
orbutton is pushed for
more than 1.5 seconds while the iPod®is
playing, the iPod®will play while fast
forwarding or rewinding. When the button
is released, the iPod
®will return to the
normal play speed.
When the
orbutton is pushed for
less than 1.5 seconds while the iPod®is
playing, the next track or the beginning of
the current track on the iPod
®will be played.
When the rewind button is pushed for less
than 1.5 seconds within 3 seconds after
the current track starts playing, the pre-
vious track will be played.
The INFINITI controller can also be used to
select tracks when the iPod
®is playing.
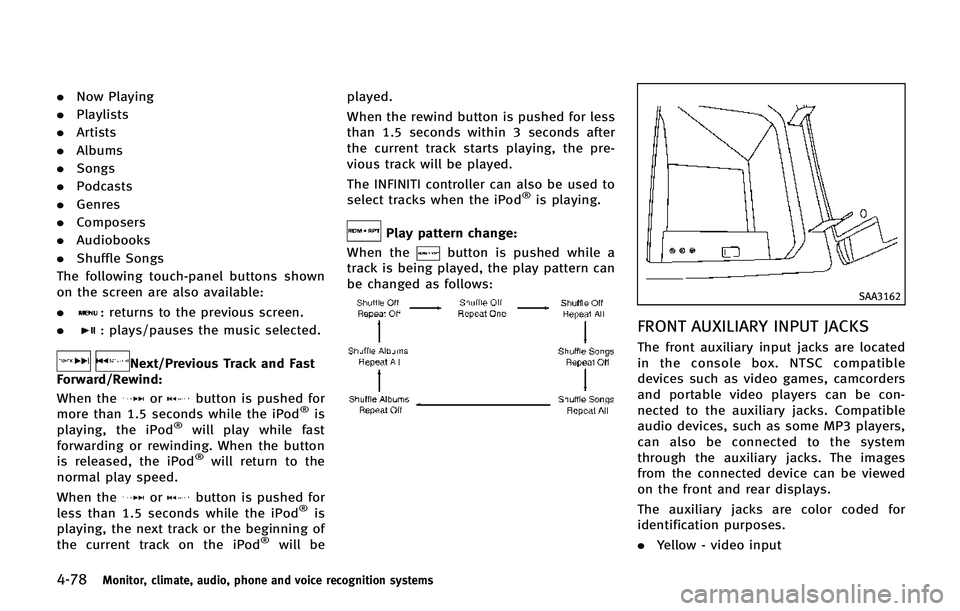
Play pattern change:
When the
button is pushed while a
track is being played, the play pattern can
be changed as follows:
SAA3162
FRONT AUXILIARY INPUT JACKS
The front auxiliary input jacks are located
in the console box. NTSC compatible
devices such as video games, camcorders
and portable video players can be con-
nected to the auxiliary jacks. Compatible
audio devices, such as some MP3 players,
can also be connected to the system
through the auxiliary jacks. The images
from the connected device can be viewed
on the front and rear displays.
The auxiliary jacks are color coded for
identification purposes.
. Yellow - video input
Page 284 of 578
If your vehicle is equipped with the Dual
Head Restraint DVD System, you can enjoy
playing video files via a DVD, CD or USB
memory that provides images and sound
both from the front and rear display
screens.
You can also enjoy compatible auxiliary
devices such as video games, camcorders
or portable video players through the
auxiliary jacks.
The front and right/left rear displays can
show different sources individually. The
maximum of 3 sources, such as an iPod
®,
DVD and auxiliary device, can be enjoyed
at the same time.
WARNING
The driver must not attempt to operate the
Dual Head Restraint DVD System while
driving so full attention may be given to
vehicle operation.
Park the vehicle in a safe location and apply
the parking brake to view the images on the
front center display screen using the DVD
player.
CAUTION
. Do not attempt to use the system in
extremely high or low temperature con-
dition [below −48F( −208 C) or above
1588F (708C)].
. To avoid draining the vehicle battery, do
not operate the system for more than 15
minutes without starting the engine.
The front display is designed not to show
the images while driving, as the driver’s
attention must be given to vehicle opera-
tion for safety. Sounds are available. To
show the images in the front display, stop
the vehicle in a safe location, move the
shift lever to the P (Park) position and
apply the parking brake.
SYSTEM COMPONENTS
Rear displays
CAUTION
.The glass screen on the liquid crystal
display may break if hit with a hard or
sharp object. If the glass breaks, do not
touch the liquid crystalline material. In
case of contact with skin, wash immedi-
ately with soap and water.
. Use soft, damp cloth when cleaning the
Dual Head Restraint DVD System compo-
nents. Do not use solvents or cleaning
solutions.
Monitor, climate, audio, phone and voice recognition systems4-83
DUAL HEAD RESTRAINT DVD SYSTEM (if so
equipped)
Page 292 of 578
3. Close the lid securely..If you will not be using the remotecontroller for long periods of time,
remove the batteries.
.Replacement of the batteries is
needed when the remote controller
only functions at extremely close
distances to the Dual Head Restraint
DVD System or when it does not
function at all.
FCC Notice:
Changes or modifications not expressly
approved by the party responsible for
compliance could void the user’s authority
to operate the equipment. This device
complies with Part 15 of the FCC Rules
and RSS-210 of Industry Canada. Opera-
tion is subject to the following two
conditions: (1) This device may not cause
harmful interference, and (2) this device
must accept any interference received,
including interference that may cause
undesired operation of the device.
BEFORE OPERATING DUAL HEAD
RESTRAINT DVD SYSTEM
Precautions
Start the engine when using the Dual Head
Restraint DVD System.
WARNING
The driver must not attempt to operate the
Dual Head Restraint DVD System or wear the
headphones while the vehicle is in motion
so that full attention may be given to vehicle
operation.
CAUTION
. Only operate the Dual Head Restraint
DVD System while the vehicle engine is
running. Operating the Dual Head Re-
straint DVD System for extended periods
of time with the engine OFF can dis-
charge the vehicle battery.
. Do not allow the system to get wet.
Excessive moisture such as spilled
liquids may cause the system to mal-
function. .
While playing VIDEO-CD media, this DVD
player does not guarantee complete
functionality of all VIDEO-CD formats.
Parental level (parental control)
Video data with the parental control setting
can be played with this system. Please use
your own judgement to set the parental
control with the system.
Disc selection
You can play the following disc formats
with the DVD player:
.DVD-VIDEO
. VIDEO-CD
. DTS-CD
Use DVDs with the region code “ALL”or the
code applicable to your country. (The
region code is displayed as a small symbol
printed on the top of the DVD.) This
vehicle-installed DVD player can only play
DVDs with an applicable region code.
Available sources
The following sources are available to play
on each display:
Monitor, climate, audio, phone and voice recognition systems4-91
Page 293 of 578
4-92Monitor, climate, audio, phone and voice recognition systems
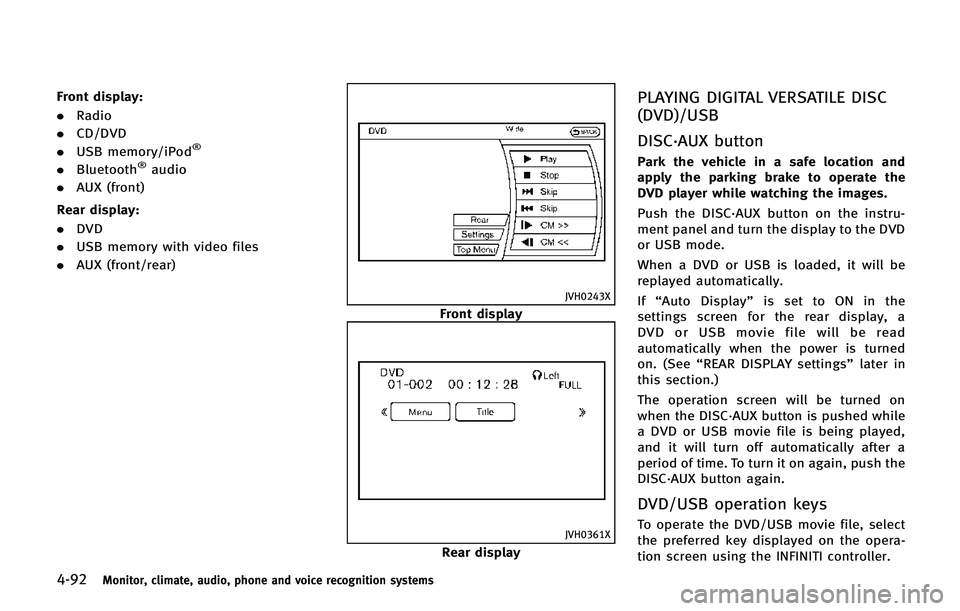
Front display:
.Radio
. CD/DVD
. USB memory/iPod
®
.Bluetooth®audio
. AUX (front)
Rear display:
. DVD
. USB memory with video files
. AUX (front/rear)
JVH0243X
Front display
JVH0361X
Rear display
PLAYING DIGITAL VERSATILE DISC
(DVD)/USB
DISC·AUX button
Park the vehicle in a safe location and
apply the parking brake to operate the
DVD player while watching the images.
Push the DISC·AUX button on the instru-
ment panel and turn the display to the DVD
or USB mode.
When a DVD or USB is loaded, it will be
replayed automatically.
If“Auto Display” is set to ON in the
settings screen for the rear display, a
DVD or USB movie file will be read
automatically when the power is turned
on. (See “REAR DISPLAY settings” later in
this section.)
The operation screen will be turned on
when the DISC·AUX button is pushed while
a DVD or USB movie file is being played,
and it will turn off automatically after a
period of time. To turn it on again, push the
DISC·AUX button again.
DVD/USB operation keys
To operate the DVD/USB movie file, select
the preferred key displayed on the opera-
tion screen using the INFINITI controller.
Page 298 of 578
AUX Volume Setting:
This is only active when in the Rear AUX
mode. To set the AUX volume, select from
“HIGH”,“LOW”or “MIDDLE” .
OPERATING TIPS
.The images from a device that is
connected to the rear auxiliary input
jacks cannot be viewed on the front
displays.
. It is not possible to display different
video files, such as DVD or video files in
the USB memory, on the front and rear
displays at the same time.
. It is not possible to play an audio file
and a video file in the same USB
memory at the same time.
Multiple source display
It is possible to play different sources on
each display. The following example shows
how to operate multiple sources.
It is also possible to set in the front
display. For more details, see “REAR DIS-
PLAY settings” earlier in this section.
1. Display a video file in the front display by selecting the DVD mode.
2. Set the rear display select switch on the remote controller to the L side and push the POWER button. The left rear
display will turn on and the DVD screen
will be displayed.
(If
“Auto Display” is set to ON, the
display will turn on automatically.)
3. Set the rear display select switch on the remote controller to the R side and
push the POWER button. The right rear
display will turn on and the DVD screen
will be displayed.
(If“Auto Display” is set to ON, the
display will turn on automatically.)
4. Switch the source on the front display to an audio source. The sound from the
speakers switches according to the
front display. The rear display con-
tinues to display the DVD.
5. Turn on a pair of headphones and listen to the DVD on the rear displays using
the headphones.
6. Connect an auxiliary device to the AUX jack, set the rear display select switch
to the L or R side and push the SOURCE
button to select “Rear AUX” . The
selected side of the rear display will
switch to the AUX mode. The other rear
display will continue to display the
DVD. 7. Turn on the other pair of headphones. If
the sound from the headphones is not
from the AUX jacks, switch the channel
with the channel select switch on the
headphones.
CARE AND MAINTENANCE
Use a lightly dampened, lint free cloth to
clean the surfaces of your Dual Head
Restraint DVD System (DVD player face,
screen, remote controller, etc.).
CAUTION
. Do not use any solvents or cleaning
solutions when cleaning the video sys-
tem.
. Do not use excessive force on the
monitor screen.
. Avoid touching or scratching the monitor
screen as it may become dirty or
damaged.
. Do not attempt to operate the system in
extreme temperature conditions [below
−48F( −208C) and above 1588F (708C)].
. Do not attempt to operate the system in
extreme humidity conditions (less than
10% or more than 75%).
Monitor, climate, audio, phone and voice recognition systems4-97