buttons INFINITI QX80 2014 User Guide
[x] Cancel search | Manufacturer: INFINITI, Model Year: 2014, Model line: QX80, Model: INFINITI QX80 2014Pages: 578, PDF Size: 2.8 MB
Page 203 of 578
Care and maintenance................................... 4-97
Car phone or CB radio ....................................... 4-98
Bluetooth
®Hands-Free Phone System ............... 4-98
Regulatory information ................................ 4-100
Voice commands ......................................... 4-100
Control buttons ........................................... 4-100
Connecting procedure.................................. 4-101
Phone selection........................................... 4-101
Quick Dial ................................................... 4-101
Making a call .............................................. 4-104 Receiving a call.......................................... 4-105
During a call .............................................. 4-106
Phone setting ............................................ 4-106
Troubleshooting guide ............................... 4-108
INFINITI Voice Recognition system ................... 4-109 INFINITI Voice Recognition
Standard Mode .......................................... 4-109
Using the system ....................................... 4-112
INFINITI Voice Recognition Alternate
Command Mode......................................... 4-125
Using the system ....................................... 4-134
Troubleshooting guide ............................... 4-140
Page 204 of 578
WARNING
.Do not disassemble or modify this
system. If you do, it may result in
accidents, fire, or electric shock.
. Do not use this system if you notice any
abnormality, such as a frozen screen or
lack of sound. Continued use of the
system may result in accident, fire or
electric shock.
. In case you notice any foreign object in
the system hardware, spill liquid on it,
or notice smoke or smell coming from it,
stop using the system immediately and
contact your nearest INFINITI retailer.
Ignoring such conditions may lead to
accidents, fire, or electric shock.
. Park the vehicle in a safe location and
apply the parking brake to view the
images on the front center display
screen.
Do not attempt to operate the system in
extreme temperature conditions [below
−48F( −208C) and above 1588F (708C)].
Operating this system under these condi-
tions may result in system malfunctions.
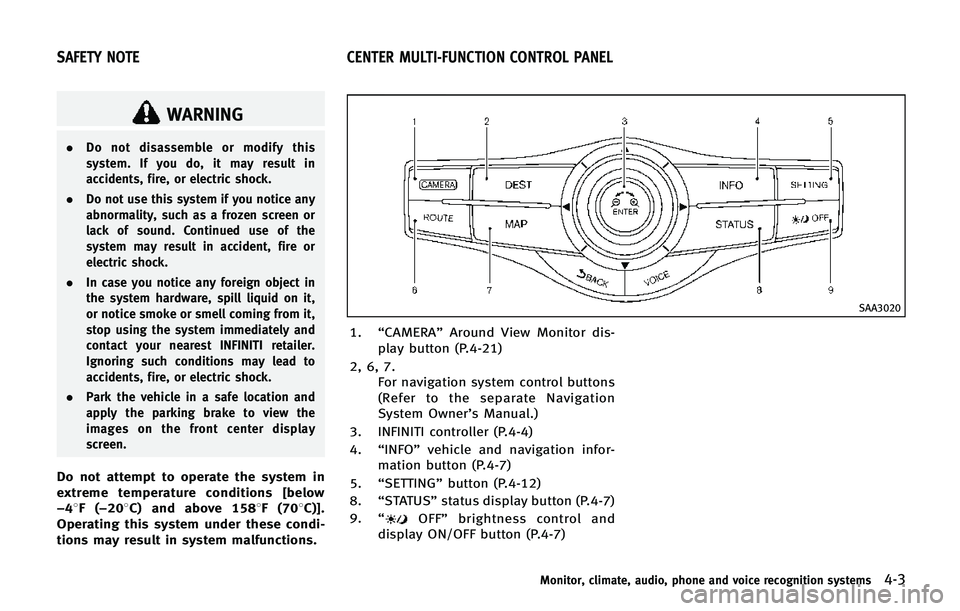
SAA3020
1. “CAMERA” Around View Monitor dis-
play button (P.4-21)
2, 6, 7. For navigation system control buttons
(Refer to the separate Navigation
System Owner’s Manual.)
3. INFINITI controller (P.4-4)
4. “INFO” vehicle and navigation infor-
mation button (P.4-7)
5. “SETTING” button (P.4-12)
8. “STATUS” status display button (P.4-7)
9. “
OFF” brightness control and
display ON/OFF button (P.4-7)
Monitor, climate, audio, phone and voice recognition systems4-3
SAFETY NOTE CENTER MULTI-FUNCTION CONTROL PANEL
Page 243 of 578
4-42Monitor, climate, audio, phone and voice recognition systems
Manual operation
Fan speed control:
Push the fan speed increase“
”or
decrease “”buttons to manually con-
trol the fan speed.
Push the “AUTO” button to return to
automatic control of the fan speed.
Temperature control:
Turn the temperature control dial to set the
desired temperature.
. The temperature can be set within the
following range.
— For U.S.: 60 to 908F
— For Canada: 18 to 328C
Air flow control:
Pushing the “MODE” manual air flow
control button selects the air outlet to:
: Air flows from center and side ventilators.
: Air flows from center and side ventilators and foot outlets.
: Air flows mainly from foot outlets.
: Air flows from defroster and foot outlets.
Air recirculation:
Push the intake air control button to
recirculate interior air inside the vehicle.
The indicator light on the “
”button will illuminate.
The air recirculation mode cannot be
activated when the air conditioner is in
the front defrosting mode
“
”.
Outside air circulation:
Push the intake air control button to draw
outside air into the passenger compart-
ment. The indicator light on the “
”
button will turn off and “”(if so
equipped) will illuminate.
Automatic intake air control:
In the AUTO mode, the intake air will be
controlled automatically.
. Without Advanced Climate Control Sys-
tem:
— When the outside air circulation
mode is on, push and hold the
“
” intake air control button.
— When the air recirculation mode is
on, push and hold the “
”air
recirculation button.
When setting the automatic control
mode, both indicator lights will blink
twice indicating that the system is in
the automatic control mode.
. With Advanced Climate Control System:
To return to the automatic control mode, push the
“
”auto-recircula-
tion button. The indicator light on the
“
” auto-recirculation button will
illuminate.
Turning the system off
Push the OFF button.
Upper vent system
When the upper vent “”button is
pushed, the air flow against the driver’s
or passenger’s upper body becomes gen-
tle. The indicator light on the button will
illuminate.
In this mode, air from the upper ventilator
flows in order to control the cabin tem-
perature without blowing air directly on the
occupants.
Push the upper vent “
”button when
you want the air conditioner to work
quickly.
To turn the system off, push the upper vent
“
” button to turn the indicator light off.
Advanced Climate Control System
(if so equipped)
The Advanced Climate Control System
keeps the air inside of the vehicle clean,
using the ion control and the automatic air
Page 247 of 578
4-46Monitor, climate, audio, phone and voice recognition systems
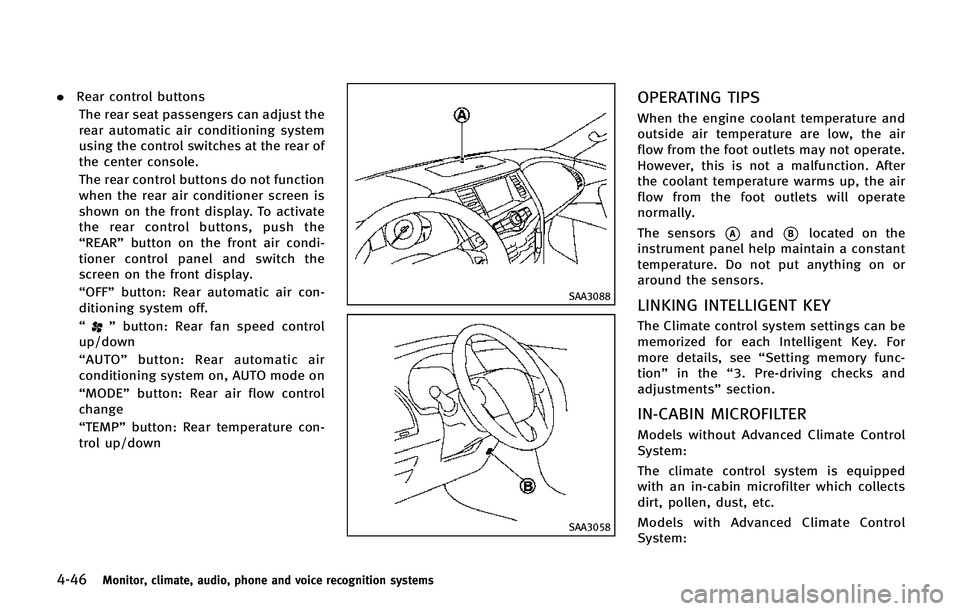
.Rear control buttons
The rear seat passengers can adjust the
rear automatic air conditioning system
using the control switches at the rear of
the center console.
The rear control buttons do not function
when the rear air conditioner screen is
shown on the front display. To activate
the rear control buttons, push the
“REAR” button on the front air condi-
tioner control panel and switch the
screen on the front display.
“OFF” button: Rear automatic air con-
ditioning system off.
“
” button: Rear fan speed control
up/down
“ AUTO” button: Rear automatic air
conditioning system on, AUTO mode on
“MODE” button: Rear air flow control
change
“TEMP” button: Rear temperature con-
trol up/down
SAA3088
SAA3058
OPERATING TIPS
When the engine coolant temperature and
outside air temperature are low, the air
flow from the foot outlets may not operate.
However, this is not a malfunction. After
the coolant temperature warms up, the air
flow from the foot outlets will operate
normally.
The sensors
*Aand*Blocated on the
instrument panel help maintain a constant
temperature. Do not put anything on or
around the sensors.
LINKING INTELLIGENT KEY
The Climate control system settings can be
memorized for each Intelligent Key. For
more details, see “Setting memory func-
tion” in the “3. Pre-driving checks and
adjustments” section.
IN-CABIN MICROFILTER
Models without Advanced Climate Control
System:
The climate control system is equipped
with an in-cabin microfilter which collects
dirt, pollen, dust, etc.
Models with Advanced Climate Control
System:
Page 261 of 578
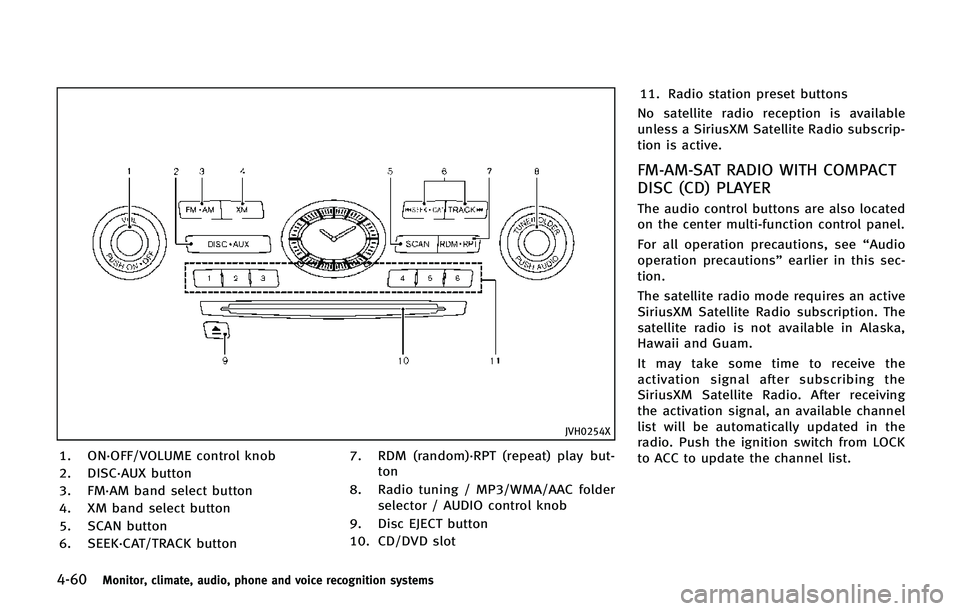
4-60Monitor, climate, audio, phone and voice recognition systems
JVH0254X
1. ON·OFF/VOLUME control knob
2. DISC·AUX button
3. FM·AM band select button
4. XM band select button
5. SCAN button
6. SEEK·CAT/TRACK button7. RDM (random)·RPT (repeat) play but-
ton
8. Radio tuning / MP3/WMA/AAC folder selector / AUDIO control knob
9. Disc EJECT button
10. CD/DVD slot 11. Radio station preset buttons
No satellite radio reception is available
unless a SiriusXM Satellite Radio subscrip-
tion is active.
FM-AM-SAT RADIO WITH COMPACT
DISC (CD) PLAYER
The audio control buttons are also located
on the center multi-function control panel.
For all operation precautions, see “Audio
operation precautions” earlier in this sec-
tion.
The satellite radio mode requires an active
SiriusXM Satellite Radio subscription. The
satellite radio is not available in Alaska,
Hawaii and Guam.
It may take some time to receive the
activation signal after subscribing the
SiriusXM Satellite Radio. After receiving
the activation signal, an available channel
list will be automatically updated in the
radio. Push the ignition switch from LOCK
to ACC to update the channel list.
Page 263 of 578
4-62Monitor, climate, audio, phone and voice recognition systems
SEEK tuning:
. For AM and FM radio
Push the SEEK·CAT or TRACK button
orto tune from low to high or high
to low frequencies and to stop at the
next broadcasting station.
. For SiriusXM Satellite Radio
Push the SEEK·CAT or TRACK button
orto tune to the first channel of the
next or previous category.
During satellite radio reception, the follow-
ing notices will be displayed under certain
conditions.
. NO SIGNAL (No signal is received while
the SAT tuner is connected.)
. OFF AIR (Broadcasting signed off)
. CHECK ANTENNA (Antenna connection
error)
. LOADING (When the initial setting is
performed)
. UPDATING (When the satellite radio
subscription is not active)
. INVALID CH (Invalid channel is re-
ceived.)
SCAN tuning:
Push the SCAN tuning button to tune from low to high frequencies and stop at each
broadcasting station/channel for 5 sec-
onds. Pushing the button again during this
10 seconds period will stop SCAN tuning
and the radio will remain tuned to that
station/channel.
If the SCAN tuning button is not pushed
within 5 seconds, SCAN tuning moves to
the next station/channel.
*1to*6Station memory operations:
12 stations/channels can be set for the FM
band (6 each for FM1 and FM2), 18 for
SiriusXM Satellite Radio (6 each for XM1,
XM2 and XM3) and 6 stations can be set
for the AM band.
1. Choose the radio band using the radio band select button.
2. Tune to the desired station/channel using the SEEK·CAT, TRACK, SCAN
button or the radio TUNE knob.
3. Push and hold the desired station preset button
*1to*6until the radio
mutes.
4. The station indicator will then come on and the sound will resume. Memorizing
is now complete.
5. Other buttons can be set in the same manner.
If the battery cable is disconnected, or if
the fuse opens, the radio memory will be
erased. In that case, reset the desired
stations/channels.
Menu (SiriusXM Satellite Radio):
When the “Menu”key on the display is
selected while the SiriusXM Satellite Radio
is being played, the menu list will be
displayed.
The following items are available.
. Preset List
Displays the preset channel list. If 1 of
the 6 preset stations listed is touched
and held, the current station will be
stored as the new preset.
. Customize Channel List
Selects specific channels to skip while
using the TUNE, SEEK·CAT or Menu-
Categories feature.
. Favorite Artists & Songs
Stores the current artist or song that is
being played. Touch the “Alert”key to
be reminded when the stored artist or
song is playing on a station while
listening to SiriusXM Satellite Radio.
. Categories
Page 279 of 578
4-78Monitor, climate, audio, phone and voice recognition systems
.Now Playing
. Playlists
. Artists
. Albums
. Songs
. Podcasts
. Genres
. Composers
. Audiobooks
. Shuffle Songs
The following touch-panel buttons shown
on the screen are also available:
.
: returns to the previous screen.
.
: plays/pauses the music selected.
Next/Previous Track and Fast
Forward/Rewind:
When the
orbutton is pushed for
more than 1.5 seconds while the iPod®is
playing, the iPod®will play while fast
forwarding or rewinding. When the button
is released, the iPod
®will return to the
normal play speed.
When the
orbutton is pushed for
less than 1.5 seconds while the iPod®is
playing, the next track or the beginning of
the current track on the iPod
®will be played.
When the rewind button is pushed for less
than 1.5 seconds within 3 seconds after
the current track starts playing, the pre-
vious track will be played.
The INFINITI controller can also be used to
select tracks when the iPod
®is playing.
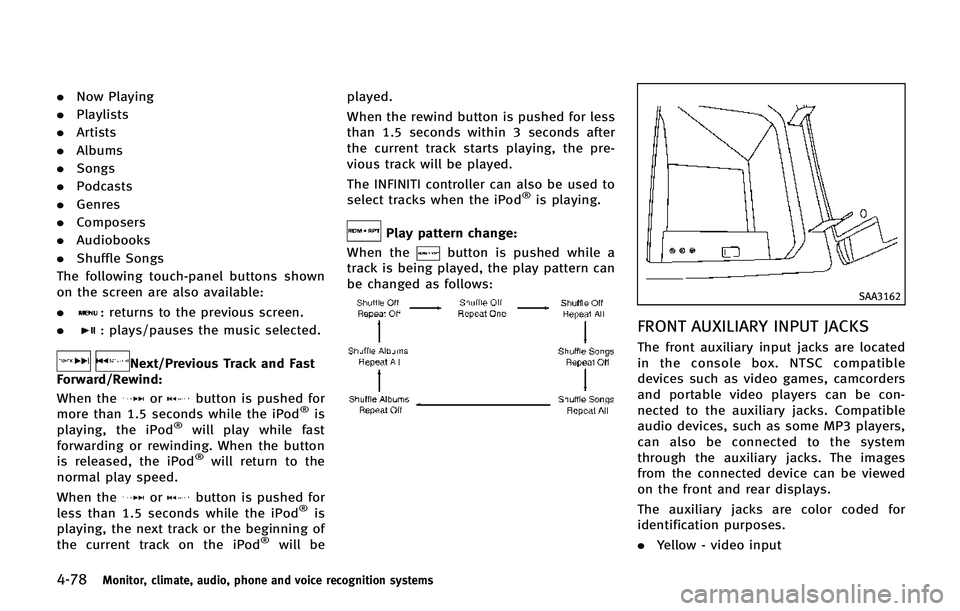
Play pattern change:
When the
button is pushed while a
track is being played, the play pattern can
be changed as follows:
SAA3162
FRONT AUXILIARY INPUT JACKS
The front auxiliary input jacks are located
in the console box. NTSC compatible
devices such as video games, camcorders
and portable video players can be con-
nected to the auxiliary jacks. Compatible
audio devices, such as some MP3 players,
can also be connected to the system
through the auxiliary jacks. The images
from the connected device can be viewed
on the front and rear displays.
The auxiliary jacks are color coded for
identification purposes.
. Yellow - video input
Page 297 of 578
4-96Monitor, climate, audio, phone and voice recognition systems
screen.
ENTER button:
Push the ENTER button to confirm the
setting for the selected item.
SETUP button:
Push the SETUP button to display the rear
seat display settings. (See“Rear display
settings” later in this section.)
BACK button:
Push to go back to the previous screen or
cancel the selection.
Volume:
To adjust the speaker volume push
oron the volume control button.
This button is used to control the volume
from the vehicle speakers. To adjust the
volume of the headphones, use the volume
knob that is attached to the headphones.
Keypad:
: PLAY/PAUSE button
: STOP button
: FORWARD button
: REWIND button
: FORWARD button for commercial skip (for DVD-VIDEO and DVD-VR)
: REWIND button for commercial skip (forDVD-VIDEO and DVD-VR)
Key illumination button:
If the key illumination button is pushed,
the buttons on the remote controller will be
lit up.
Rear display settings
Display mode adjustment of the rear seat
displays can be performed while a DVD or
USB movie is being played. Set the rear
display select switch on the remote con-
troller to either L or R according to the
display you want to set, and then push the
SETUP button. It is not possible to make
display mode adjustments to the left and
right displays at the same time.
Aspect:
Select the display size from “FULL” ,
“NORMAL”, “CINEMA”or“WIDE”.
Picture Mode:
Select the Picture Mode from “NORMAL”,
“DYNAMIC”, “CINEMA”,“GAME”.
To adjust the display brightness automati-
cally, select the “Brightness”key and then
select from “DARKER” ,“NORMAL” or
“ BRIGHTER” . When adjusting manually,
select “OFF”and push ENTER button on the remote controller.
To adjust tint, color or contrast, select a
key using the select button (
or),
push ENTER on the remote controller.
Push the BACK button on the remote
controller to apply the settings and return
to the previous display.
To return the adjustment levels to the
default value, select “Execute” next to
“ Initialization” push the select button
(
,) on the remote controller and
push the ENTER button. The “Execute”key
is deactivated when the picture mode
settings are already in the default value.
Color System:
To choose the color system, select from
“NTSC”, “PAL”,“PAL-60”, “PAL-M”,“PAL-N ”
or “AUTO” .
3D Y/C filter:
Set to ON/OFF push the select button
(
or) and push ENTER button on
the remote controller. When turned on,
small characters and an outline of the
shapes will be displayed more clearly than
when turned off.
Page 301 of 578
4-100Monitor, climate, audio, phone and voice recognition systems
.Keep the interior of the vehicle as quiet
as possible to hear the caller ’s voice
clearly as well as to minimize its
echoes.
. If reception between callers is unclear,
adjusting the incoming or outgoing call
volume may improve the clarity.
REGULATORY INFORMATION
FCC Regulatory information
. CAUTION: To maintain compliance with
FCC’s RF exposure guidelines, use only
the supplied antenna. Unauthorized
antenna, modification, or attachments
could damage the transmitter and may
violate FCC regulations.
. Operation is subject to the following
two conditions:
1. this device may not cause interference and
2. this device must accept any interfer- ence, including interference that may
cause undesired operation of the de-
vice
IC Regulatory information
.Operation is subject to the following
two conditions: (1) this device may not
cause interference, and (2) this device must accept any interference, including
interference that may cause undesired
operation of the device.
. This Class B digital apparatus meets all
requirements of the Canadian Interfer-
ence-Causing Equipment Regulations.
Bluetooth trademark:
Bluetooth®is a trademark
owned by Bluetooth SIG, Inc.,
and licensed to Clarion Co., Ltd.
VOICE COMMANDS
You can use voice commands to operate
various Bluetooth®Hands-Free Phone Sys-
tem features using the INFINITI Voice
Recognition system.
For more details, see “INFINITI Voice
Recognition system” later in this section;
page 4-109.SAA3163
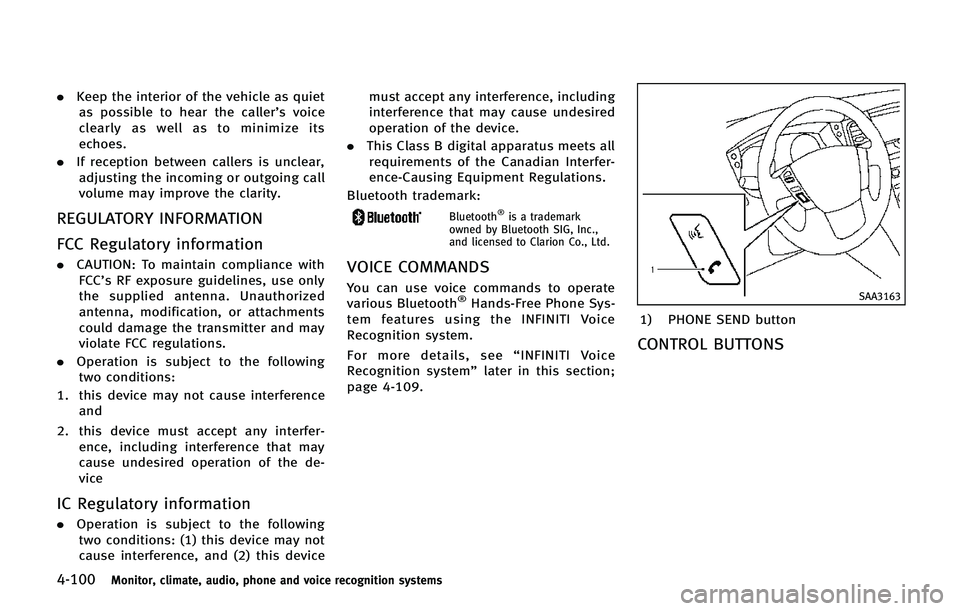
1) PHONE SEND button
CONTROL BUTTONS
Page 314 of 578
SAA3164
Giving voice commands
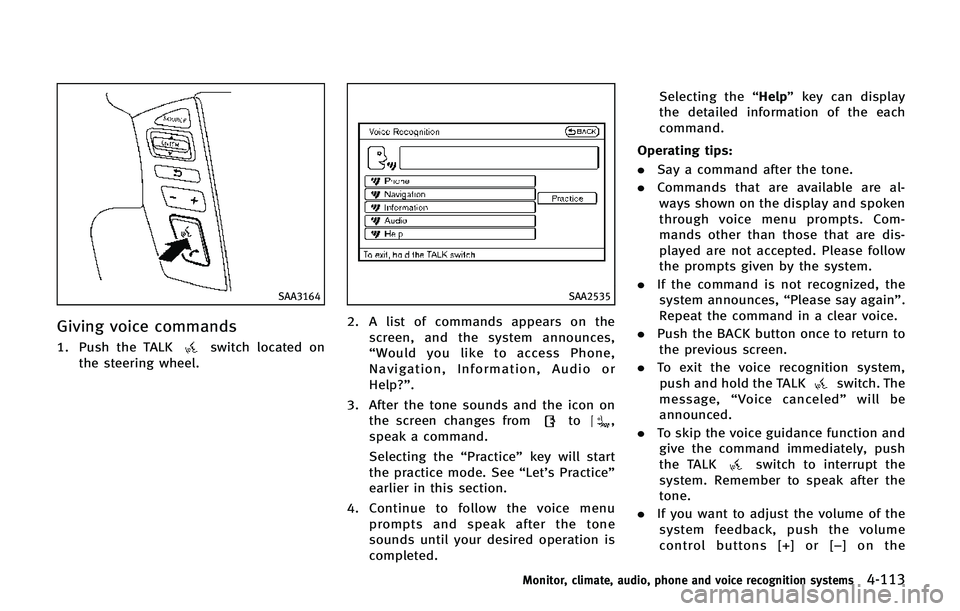
1. Push the TALKswitch located on
the steering wheel.
SAA2535
2. A list of commands appears on the
screen, and the system announces,
“Would you like to access Phone,
Navigation, Information, Audio or
Help?”.
3. After the tone sounds and the icon on the screen changes from
to,
speak a command.
Selecting the “Practice”key will start
the practice mode. See “Let’s Practice”
earlier in this section.
4. Continue to follow the voice menu prompts and speak after the tone
sounds until your desired operation is
completed. Selecting the
“Help”key can display
the detailed information of the each
command.
Operating tips:
. Say a command after the tone.
. Commands that are available are al-
ways shown on the display and spoken
through voice menu prompts. Com-
mands other than those that are dis-
played are not accepted. Please follow
the prompts given by the system.
. If the command is not recognized, the
system announces, “Please say again”.
Repeat the command in a clear voice.
. Push the BACK button once to return to
the previous screen.
. To exit the voice recognition system,
push and hold the TALK
switch. The
message, “Voice canceled” will be
announced.
. To skip the voice guidance function and
give the command immediately, push
the TALK
switch to interrupt the
system. Remember to speak after the
tone.
. If you want to adjust the volume of the
system feedback, push the volume
control buttons [+] or [− ] on the
Monitor, climate, audio, phone and voice recognition systems4-113