brake INFINITI QX80 2014 Owner's Manual
[x] Cancel search | Manufacturer: INFINITI, Model Year: 2014, Model line: QX80, Model: INFINITI QX80 2014Pages: 578, PDF Size: 2.8 MB
Page 182 of 578

The power lift gate buttoncannot be
operated when the ignition switch is in the
ON position.
Using panic alarm
If you are near your vehicle and feel
threatened, you may activate the alarm to
call attention as follows:
1. Push the PANIC
button*Don the
Intelligent Key for more than 1 second.
2. The theft warning alarm and headlights will stay on for 25 seconds.
3. The panic alarm stops when:
.It has run for 25 seconds, or.Any of the buttons on the Intelligent Key are pushed. (Note: Panic button
or power lift gate button should be
pushed for more than 1 second.)
Remote engine start (if so
equipped)
The remote engine startbutton*Eis
on the Intelligent Key if the vehicle has
remote engine start function. This function
allows the engine to start from outside the
vehicle.
Some systems, such as the air conditioner
system, will turn on during a remote start,
if the system was on the last time the ignition switch was turned off.
Laws in some local communities may
restrict the use of remote starters. For
example, some laws require a person using
remote start to have the vehicle in view.
Check local regulations for any require-
ments.
Other conditions may affect the remote
engine start function. See
“Conditions the
remote engine start will not work” later in
this section.
Other conditions can affect the perfor-
mance of the Intelligent Key transmitter.
See “Intelligent Key system” earlier in this
section.
Remote engine start operating range:
The remote engine start function can only
be used when the Intelligent Key is within
the specified operating range from the
vehicle.
When the Intelligent Key battery is dis-
charged or strong radio waves are present
near the operating location, the Intelligent
Key operating range becomes narrower,
and the Intelligent Key may not function
properly.
The remote engine start operating range is
approximately 197 ft (60 m) from the vehicle.
Operating a remote engine start:
To use the remote start function to start the
engine, perform the following:
1. Aim the Intelligent Key at the vehicle.
2. Push the LOCK
button to lock all
doors.
3. Within 5 seconds push and hold the remote engine start
button until
the turn signal lights illuminate. If the
vehicle is not within view, push and
hold the remote engine start
button for about 2 seconds.
The following events will occur when the
engine starts:
. The front parking lights will turn on and
remain on as long as the engine is
running.
. The doors will be locked and the air
conditioner system may turn on.
. The engine will continue to run for
about 10 minutes. Repeat the steps to
extend the time for an additional 10
minutes. See “Extending engine run
time” later in this section.
Depress the brake pedal and place the
ignition switch in the ON position before
Pre-driving checks and adjustments3-17
Page 183 of 578

3-18Pre-driving checks and adjustments
driving. For further instructions, see“Driv-
ing the vehicle” in the“5. Starting and
driving” section.
Extending engine run time:
The remote engine start function can be
extended one time by performing the steps
listed in “Operating a remote engine start”
earlier in this section. Run time will be
calculated as follows:
. The first 10 minute run time will start
when the remote engine start function
is performed.
. The second 10 minutes will start
immediately when the remote engine
start function is performed. For exam-
ple, if the engine has been running for
5 minutes, and 10 minutes are added,
the engine will run for a total of 15
minutes.
A maximum of two remote starts, or a
single start with an extension, are allowed
between ignition cycles.
The ignition switch must be cycled to the
ON position and then back to the OFF
position before the remote engine start
procedure can be used again. Canceling a remote engine start:
To cancel a remote start, perform one of
the following:
. Aim the Intelligent Key at the vehicle
and push and hold remote engine start
button*Euntil the front parking
lights turn off.
. Turn on the hazard indicator flashers.
. Cycle the ignition switch ON and then
OFF.
Conditions the remote engine start will not
work:
The remote engine start will not operate if
any of the following conditions are present:
. The ignition switch is placed in the ON
position.
. The hood is not securely closed.
. The hazard indicator flashers are on.
. The Intelligent Key warning light re-
mains on in the vehicle information
display.
. An Intelligent Key is left inside the
vehicle.
. The theft alarm sounds due to illegal
entry into the vehicle.
. The ignition switch is pushed without
an Intelligent Key in the vehicle. .
The ignition switch is pushed with an
Intelligent Key in the vehicle but the
brake pedal is not depressed.
. Two remote engine starts, or a single
remote start with an extension, have
already been used.
. The shift lever is not in the P (Park)
position.
The remote engine start may display an
indicator in the vehicle information dis-
play. For an explanation of the indicator,
see “Operational indicators” in the“2.
Instruments and controls” section.
Setting hazard indicator and horn
mode
This vehicle is set in hazard indicator and
horn mode when you first receive the
vehicle.
In hazard indicator and horn mode, when
the LOCK
button is pushed, the hazard
indicator flashes twice and the horn chirps
once. When the UNLOCK
button is
pushed, the hazard indicator flashes once.
If horns are not necessary, the system can
be switched to the hazard indicator mode.
In hazard indicator mode, when the LOCK
button is pushed, the hazard indicator
Page 204 of 578
WARNING
.Do not disassemble or modify this
system. If you do, it may result in
accidents, fire, or electric shock.
. Do not use this system if you notice any
abnormality, such as a frozen screen or
lack of sound. Continued use of the
system may result in accident, fire or
electric shock.
. In case you notice any foreign object in
the system hardware, spill liquid on it,
or notice smoke or smell coming from it,
stop using the system immediately and
contact your nearest INFINITI retailer.
Ignoring such conditions may lead to
accidents, fire, or electric shock.
. Park the vehicle in a safe location and
apply the parking brake to view the
images on the front center display
screen.
Do not attempt to operate the system in
extreme temperature conditions [below
−48F( −208C) and above 1588F (708C)].
Operating this system under these condi-
tions may result in system malfunctions.
SAA3020
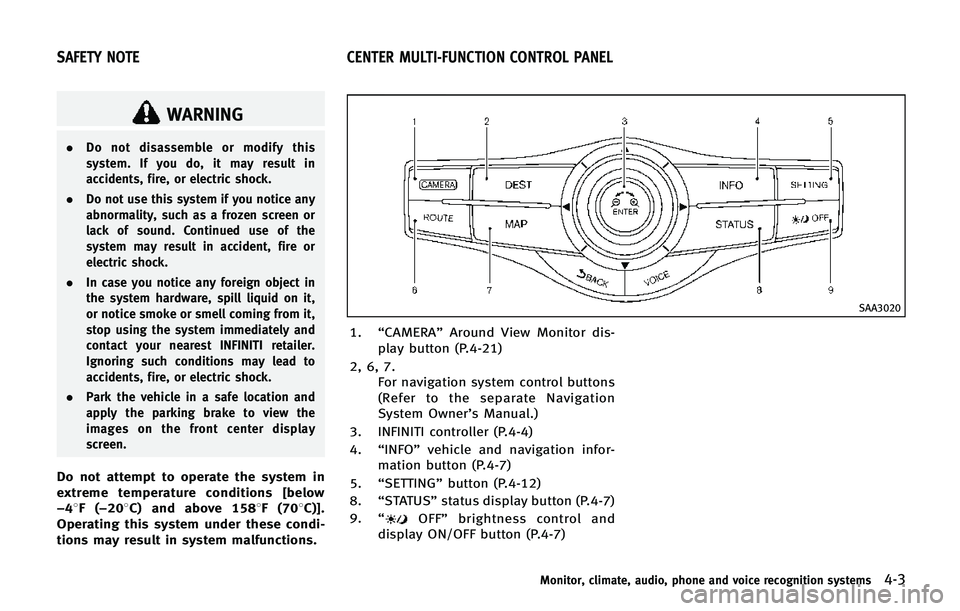
1. “CAMERA” Around View Monitor dis-
play button (P.4-21)
2, 6, 7. For navigation system control buttons
(Refer to the separate Navigation
System Owner’s Manual.)
3. INFINITI controller (P.4-4)
4. “INFO” vehicle and navigation infor-
mation button (P.4-7)
5. “SETTING” button (P.4-12)
8. “STATUS” status display button (P.4-7)
9. “
OFF” brightness control and
display ON/OFF button (P.4-7)
Monitor, climate, audio, phone and voice recognition systems4-3
SAFETY NOTE CENTER MULTI-FUNCTION CONTROL PANEL
Page 218 of 578
Light Sensitivity:
Adjust the sensitivity of the automatic
headlights higher (right) or lower (left).
Light Off Delay:
Choose the duration of the automatic
headlight off timer from 0, 30, 45, 60, 90,
120, 150 and 180 second periods.
Selective Door Unlock:
When this item is turned to ON, only the
driver’s door is unlocked first after the door
unlock operation. When the door handle
request switch on the driver’s or front
passenger’s side door is pushed to be
unlocked, only the corresponding door is
unlocked first. All the doors can be
unlocked if the door unlock operation is
performed again within 60 seconds.
When this item is turned to OFF, all the
doors will be unlocked after the door
unlock operation is performed once.
Intelligent Key Lock/Unlock:
When this item is turned to ON, door lock/
unlock function by pushing the door
handle request switch will be activated.
Lift Steering Wheel on Exit:
When this item is turned to ON, the
steering wheel moves upward for easy exitif the ignition switch is in the LOCK
position and the driver’s door is opened.
After getting into the vehicle and pushing
the ignition switch to the ACC position, the
steering wheel moves to the previous
position.
Slide Driver Seat Back on Exit:
When this item is turned to ON, the driver’s
seat moves backward for easy exit if the
ignition switch is in the OFF position and
the driver’s door is opened. After getting
into the vehicle and pushing the ignition
switch to the ACC position, the driver’s seat
moves to the previous position.
Return All Settings to Default:
Select this item and then select “YES”to
return all settings to the default.
SAA2487
Clock settings
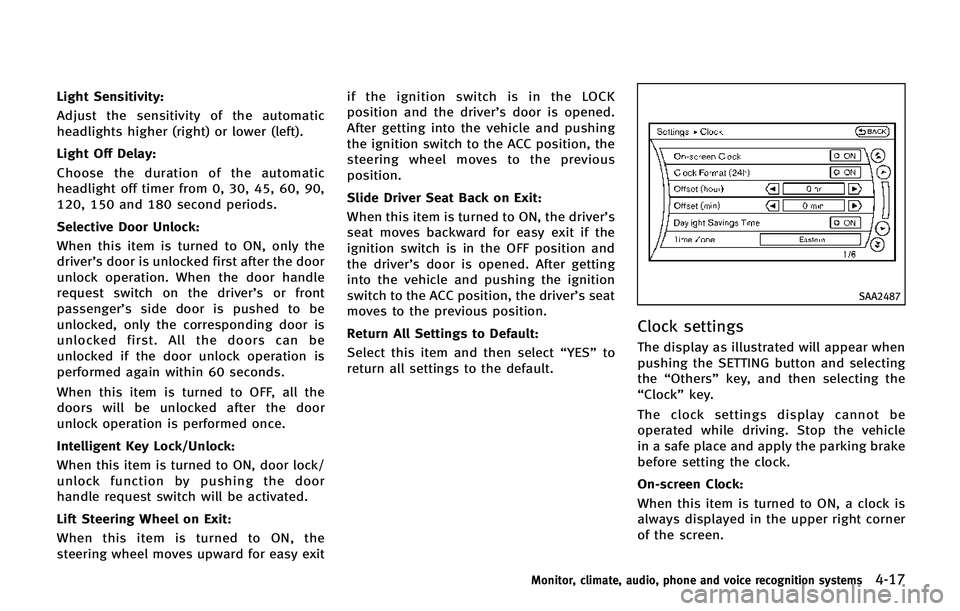
The display as illustrated will appear when
pushing the SETTING button and selecting
the “Others” key, and then selecting the
“Clock” key.
The clock settings display cannot be
operated while driving. Stop the vehicle
in a safe place and apply the parking brake
before setting the clock.
On-screen Clock:
When this item is turned to ON, a clock is
always displayed in the upper right corner
of the screen.
Monitor, climate, audio, phone and voice recognition systems4-17
Page 220 of 578
CAMERA settings
The“CAMERA” screen will appear when
pushing the SETTING button, selecting the
“Camera” key with the INFINITI controller
and pushing the ENTER button.
For the details about the camera system
operation, see “Around View
TMMonitor
settings” later in this section.
SAA2491
Image Viewer
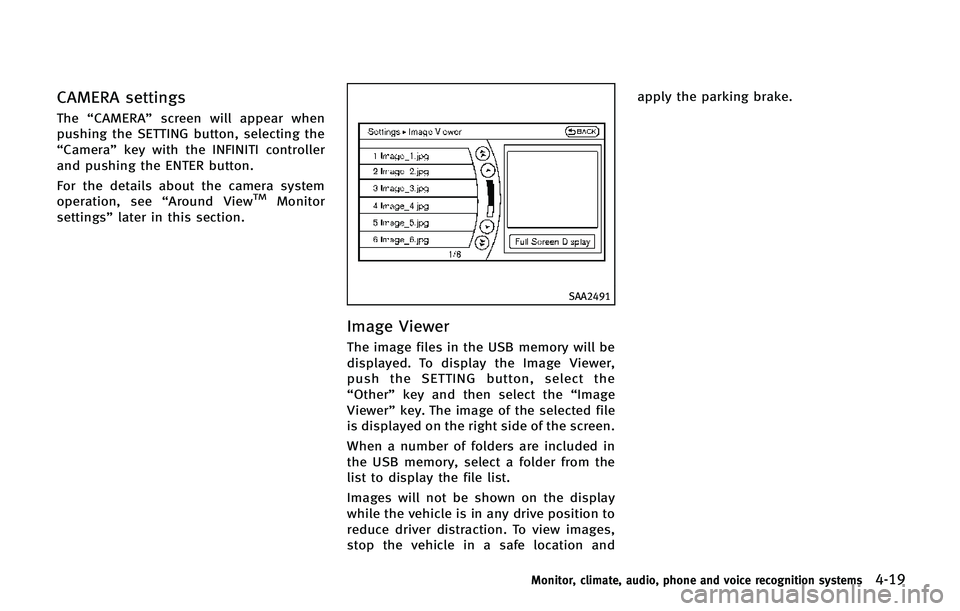
The image files in the USB memory will be
displayed. To display the Image Viewer,
push the SETTING button, select the
“Other”key and then select the “Image
Viewer” key. The image of the selected file
is displayed on the right side of the screen.
When a number of folders are included in
the USB memory, select a folder from the
list to display the file list.
Images will not be shown on the display
while the vehicle is in any drive position to
reduce driver distraction. To view images,
stop the vehicle in a safe location and apply the parking brake.
Monitor, climate, audio, phone and voice recognition systems4-19
Page 231 of 578

4-30Monitor, climate, audio, phone and voice recognition systems
SAA1923
Moving near a projecting object
The predictive course lines*Ado not
touch the object in the display. However,
the vehicle may hit the object if it projects
over the actual moving course.
SAA3046
Moving closer to a projecting object
The position*Cis shown further than the
position
*Bin the display. However, the
position
*Cis actually at the same
distance as the position
*A. The vehicle
may hit the object when moving toward the
position
*Aif the object projects over the actual moving course.
CAMERA AIDING CORNER SONAR
FUNCTION
The parking sonar sounds a tone to inform
the driver of obstacles near the bumper.
WARNING
.
The sonar is a convenience feature. It is
not a substitute for proper parking.
. The driver is always responsible for
safety during parking and other maneu-
vers.
. Always look around and check that it is
safe to move before parking.
. Read and understand the limitations of
the sonar as contained in this section.
. The colors of the sonar indicators and
the distance guide lines in the front, rear
and rear-wide views indicate different
distances to the object.
. Inclement weather or Ultrasonic sources
such as an automatic car wash, a truck’s
compressed-air brakes or a pneumatic
drill may affect the function of the
system; this may include reduced per-
formance or a false activation.
Page 236 of 578

Do not adjust the Brightness, Tint, Color,
Contrast and Black Level of the Around
View Monitor while the vehicle is moving.
Make sure the parking brake is firmly
applied.
JVH0323M
AROUND VIEWTMMONITOR SET-
TINGS
To set up the Around View Monitor to your
preferred settings, push the SETTING but-
ton, select the “Other”key and then select
the “Camera ”key.
Predictive Course Lines:
When this item is turned to ON, the
predictive course line is displayed in the
front and the rear view and bird-eye view.
Camera View Priority:
The view shown on the screen at the
beginning of around view monitor opera-
tion can be selected in order of priority. Non-viewable Area Reminder:
With this item turned to ON, the non-
viewable area is highlighted in yellow for
several seconds after the bird-eye view is
displayed. It will be shown only the first
time after the ignition switch is in the
“ON”
position.
Buzzer Volume:
Adjust the volume of the buzzer.
Corner Sonar Sensitivity:
Adjust the sensitivity level of the corner
sonar higher (right) or lower (left).
Monitor, climate, audio, phone and voice recognition systems4-35
Page 265 of 578
4-64Monitor, climate, audio, phone and voice recognition systems
CD EJECT:
When the Disc EJECT button is pushed with
the CD loaded, the CD will be ejected.
When this button is pushed while the CD is
being played, the CD will be ejected.
If the CD comes out and is not removed, it
will be pulled back into the slot to protect
it.
DVD (Digital Versatile Disc) PLAYER
OPERATION
Precautions
Start the engine when using the DVD
entertainment system.
Movies will not be shown on the front
display while the vehicle is in any drive
position to reduce driver distraction. Audio
is available when a movie is played. To
view movies in the front display, stop the
vehicle in a safe location, move the shift
lever to the P (Park) position and apply the
parking brake.
WARNING
. The driver must not attempt to operate
the DVD system or wear the headphones while the vehicle is in motion so that full
attention may be given to vehicle opera-
tion.
. Do not attempt to modify the system to
display a movie on the front screen while
the vehicle is being driven. Doing so may
distract the driver and may cause a
collision and serious personal injury or
death.
CAUTION
.Only operate the DVD while the vehicle
engine is running. Operating the DVD for
extended periods of time with the
engine OFF can discharge the vehicle
battery.
. Do not allow the system to get wet.
Excessive moisture such as spilled
liquids may cause the system to mal-
function.
. While playing VIDEO-CD media, this DVD
player does not guarantee complete
functionality of all VIDEO-CD formats.
SAA2497
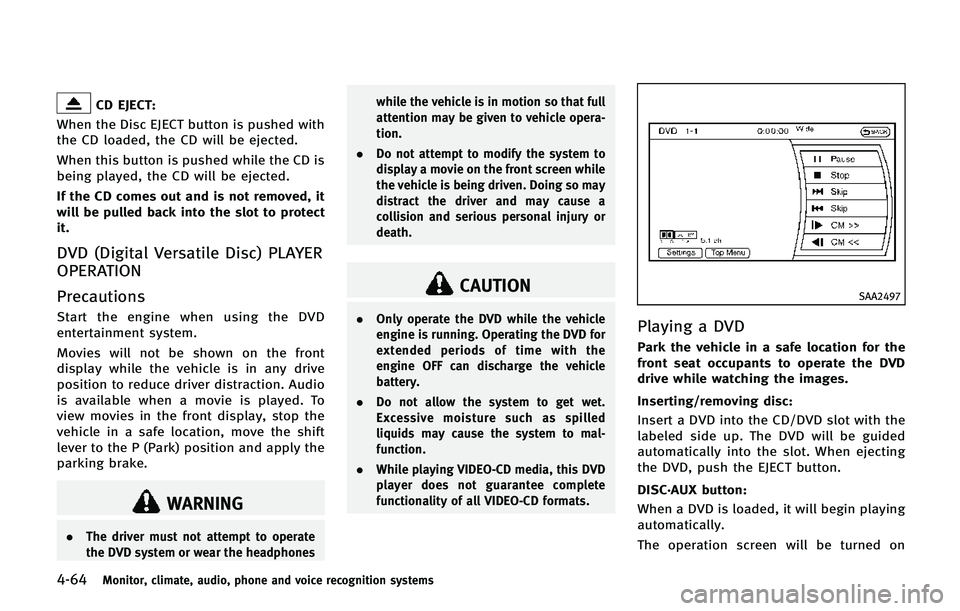
Playing a DVD
Park the vehicle in a safe location for the
front seat occupants to operate the DVD
drive while watching the images.
Inserting/removing disc:
Insert a DVD into the CD/DVD slot with the
labeled side up. The DVD will be guided
automatically into the slot. When ejecting
the DVD, push the EJECT button.
DISC·AUX button:
When a DVD is loaded, it will begin playing
automatically.
The operation screen will be turned on
Page 280 of 578

.White - left channel audio input
. Red - right channel audio input
Before connecting a device to a jack, turn
off the power of the portable device.
With a compatible device connected to the
jacks, push the DISC·AUX button repeat-
edly until the display switches to the AUX
mode. The output from the device will be
played through the monitor and audio
system.
SAA2597
How to use AUX button
Images being played can be switched to
the center display if a device is connected
to the front auxiliary input jacks in the
console box.
Push the
button on the instrument
panel to perform switching. The above
display will appear when the “Menu”key
is selected using the INFINITI controller.
AUX video will not be displayed on the
front display unless the parking brake is
set.
. Models with Dual head restraint DVD
system To display the front AUX images on the
rear displays, push the SOURCE button
on the remote controller for the Dual
Head Restraint DVD System. (See
“Dual
head restraint DVD system” later in this
section.)
Monitor, climate, audio, phone and voice recognition systems4-79
Page 284 of 578
If your vehicle is equipped with the Dual
Head Restraint DVD System, you can enjoy
playing video files via a DVD, CD or USB
memory that provides images and sound
both from the front and rear display
screens.
You can also enjoy compatible auxiliary
devices such as video games, camcorders
or portable video players through the
auxiliary jacks.
The front and right/left rear displays can
show different sources individually. The
maximum of 3 sources, such as an iPod
®,
DVD and auxiliary device, can be enjoyed
at the same time.
WARNING
The driver must not attempt to operate the
Dual Head Restraint DVD System while
driving so full attention may be given to
vehicle operation.
Park the vehicle in a safe location and apply
the parking brake to view the images on the
front center display screen using the DVD
player.
CAUTION
. Do not attempt to use the system in
extremely high or low temperature con-
dition [below −48F( −208 C) or above
1588F (708C)].
. To avoid draining the vehicle battery, do
not operate the system for more than 15
minutes without starting the engine.
The front display is designed not to show
the images while driving, as the driver’s
attention must be given to vehicle opera-
tion for safety. Sounds are available. To
show the images in the front display, stop
the vehicle in a safe location, move the
shift lever to the P (Park) position and
apply the parking brake.
SYSTEM COMPONENTS
Rear displays
CAUTION
.The glass screen on the liquid crystal
display may break if hit with a hard or
sharp object. If the glass breaks, do not
touch the liquid crystalline material. In
case of contact with skin, wash immedi-
ately with soap and water.
. Use soft, damp cloth when cleaning the
Dual Head Restraint DVD System compo-
nents. Do not use solvents or cleaning
solutions.
Monitor, climate, audio, phone and voice recognition systems4-83
DUAL HEAD RESTRAINT DVD SYSTEM (if so
equipped)