USB INFINITI QX80 2017 Quick Reference Guide
[x] Cancel search | Manufacturer: INFINITI, Model Year: 2017, Model line: QX80, Model: INFINITI QX80 2017Pages: 20, PDF Size: 1.85 MB
Page 3 of 20

Additional information about your vehicle is also available in your Owne\
r’s Manual, Navigation System Owner’s Manual and at www.InfinitiUSA.com.
Table of Contents
• A cellular telephone should not
be used for any purpose while
driving so full attention may be
given to vehicle operation.
•
Always wear your seat belt.
• Supplemental air bags do not
replace proper seat belt usage. •
Children 12 and under
should always ride in the
rear seat properly secured
in child restraints or seat
belts according to their age
and weight.
• Do not drink and drive. For more information, refer to the “Safety — Seats, seat
belts and supplemental restraint system (section 1)”, the
“Monitor, climate, audio, phone and voice recognition
systems (section 4)” and the “Starting and driving
(section 5)” of your Owner’s Manual.
PLEASE SEE YOUR OWNER’S MANUAL FOR IMPORTANT SAFETY INFORMATION AND S\
YSTEM OPERATION LIMITATIONS.
Cockpit Overview ........................................................................\
......
1
Instrument Panel ........................................................................\
...... 3
Meters and Gauges ........................................................................\
... 5
Cruise Control (if so equipped) ......................................................... 7
Wiper and Washer Switch ................................................................. 8
Exterior Light Operation .................................................................... 9
Parking Brake ........................................................................\
........... 9
USB Connection Port........................................................................\
.9
Dual Head Restraint DVD System (if so equipped)
........................... 10
Navigation System ........................................................................\
.. 11Clock Set/Adjustment
....................................................................
12
Voice Recognition ........................................................................\
.. 12
Connecting your Cellular Phone or Device via Bluetooth® ............... 13
Bluetooth® Streaming Audio .......................................................... 13
Sun Visors ........................................................................\
............. 14
Head Restraint Adjustment ............................................................ 14
Seat Adjustments ........................................................................\
.. 15
Windows ........................................................................\
............... 15
Fuel-filler Door ........................................................................\
....... 16
Door Handle Lock/Unlock Features ................................................ 16
Page 12 of 20

9
6
7
Exterior Light Operation
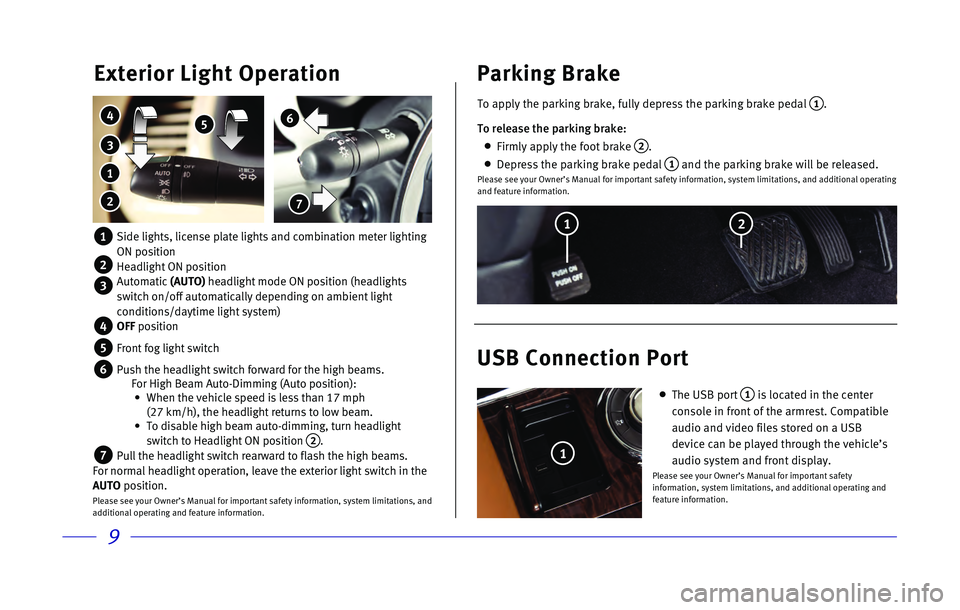
3
4 5
1
2
1 Side lights, license plate lights and combination meter lighting
ON position
2 Headlight ON position
3 Automatic (AUTO) headlight mode ON position (headlights
switch on/off automatically depending on ambient light
conditions/daytime light system)
4 OFF position
5 Front fog light switch
6 Push the headlight switch forward for the high beams. For High Beam Auto-Dimming (Auto position):
• When the vehicle speed is less than 17 mph
(27 km/h), the headlight returns to low beam.
• To disable high beam auto-dimming, turn headlight
switch to Headlight ON position 2.
7 Pull the headlight switch rearward to flash the high beams.
For normal headlight operation, leave the exterior light switch in the
AUTO position.
Please see your Owner’s Manual for important safety information, system limitations, and
additional operating and feature information.
To apply the parking brake, fully depress the parking brake pedal 1.
To release the parking brake:
Firmly apply the foot brake 2.
Depress the parking brake pedal 1 and the parking brake will be released.Please see your Owner’s Manual for important safety information, syst\
em limitations, and additional operating
and feature information.
Parking Brake
USB Connection Port
The USB port 1 is located in the center
console in front of the armrest. Compatible
audio and video files stored on a USB
device can be played through the vehicle’s
audio system and front display.
Please see your Owner’s Manual for important safety
information, system limitations, and additional operating and
feature information.
2
1
1
Page 13 of 20

10
Dual Head Restraint DVD System (if so equipped)
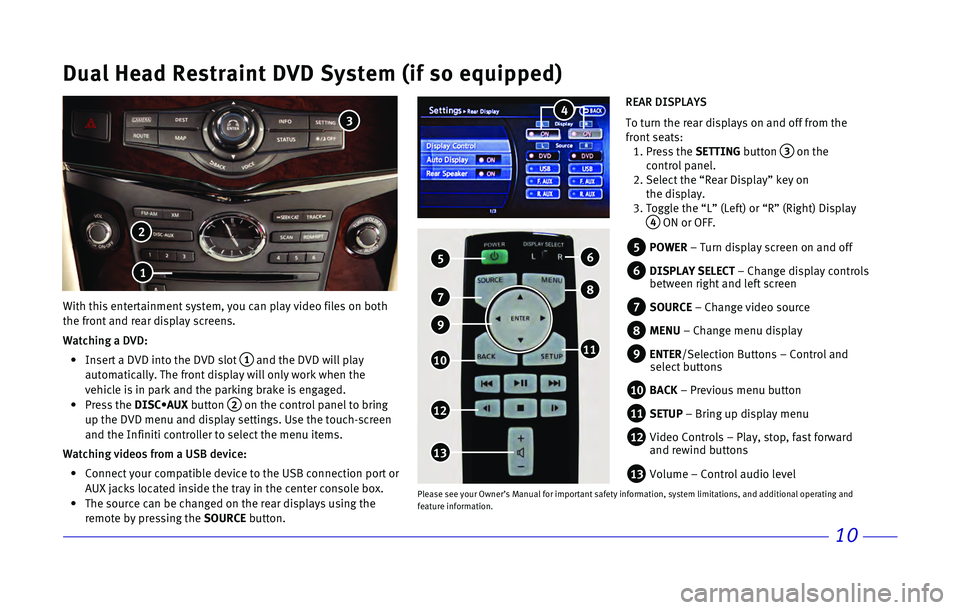
With this entertainment system, you can play video files on both
the front and rear display screens.
Watching a DVD:
• Insert a DVD into the DVD slot 1 and the DVD will play
automatically. The front display will only work when the
vehicle is in park and the parking brake is engaged.
• Press the DISC•AUX button 2 on the control panel to bring
up the DVD menu and display settings. Use the touch-screen
and the Infiniti controller to select the menu items.
Watching videos from a USB device:
• Connect your compatible device to the USB connection port or
AUX jacks located inside the tray in the center console box.
• The source can be changed on the rear displays using the
remote by pressing the SOURCE button.
5 POWER – Turn display screen on and off
6 DISPLAY SELECT – Change display controls
between right and left screen
7 SOURCE – Change video source
8 MENU – Change menu display
9 ENTER/Selection Buttons – Control and
select buttons
10 BACK – Previous menu button
11 SETUP – Bring up display menu
12 Video Controls – Play, stop, fast forward
and rewind buttons
13 Volume – Control audio level
5
12
7
10
13
REAR DISPLAYS
To turn the rear displays on and off from the
front seats:
1. Press the SETTING button 3 on the
control panel.
2. Select the “Rear Display” key on
the display.
3. Toggle the “L” (Left) or “R” (Right) Display
4 ON or OFF.
2
3
1
8
6
11
Please see your Owner’s Manual for important safety information, syst\
em limitations, and additional operating and
feature information.
9
4