light INFINITI QX80 2018 Infiniti Connection
[x] Cancel search | Manufacturer: INFINITI, Model Year: 2018, Model line: QX80, Model: INFINITI QX80 2018Pages: 284, PDF Size: 1.34 MB
Page 153 of 284

.Park the vehicle in a safe location and
set the parking brake before operat-
ing SOS call switch.
. Only use this service in case of an
emergency. There may be a penalty
for inappropriate use of the service.
. Radio waves could adversely affect
electric medical equipment. Indivi-
duals who use a pacemaker should
contact the device manufacturer re-
garding any possible effects before
using the system.
. The TCU (Telematics Control Unit)
antenna is installed inside the upper
central part of the instrument panel.
An occupant should not get any closer
to the antenna than specified by the
pacemaker manufacturer. The radio
waves from the TCU antenna may
adversely affect the operation of the
pacemaker while using the Infiniti
InTouch
TMServices.
Making an emergency call
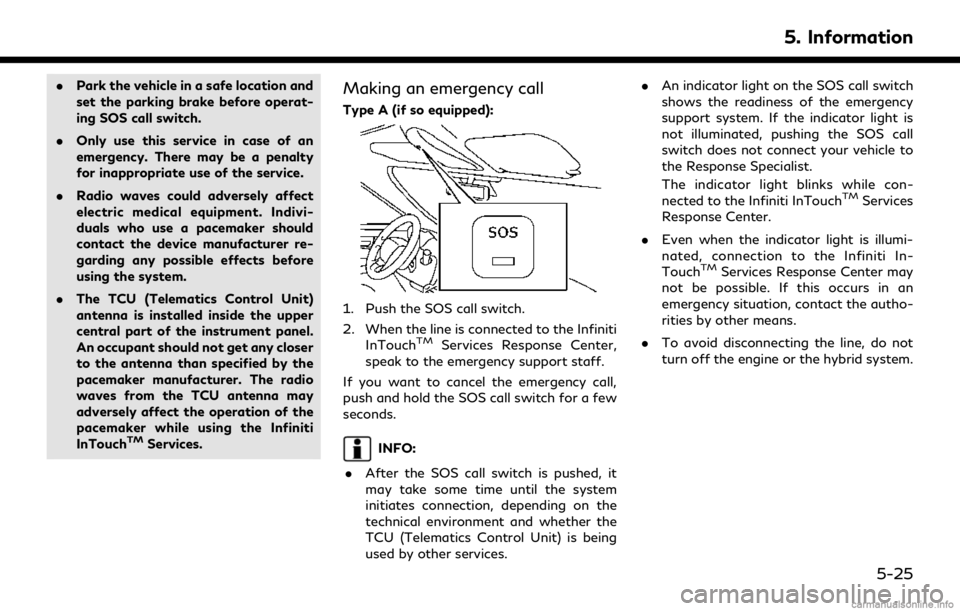
Type A (if so equipped):
1. Push the SOS call switch.
2. When the line is connected to the Infiniti
InTouch
TMServices Response Center,
speak to the emergency support staff.
If you want to cancel the emergency call,
push and hold the SOS call switch for a few
seconds.
INFO:
. After the SOS call switch is pushed, it
may take some time until the system
initiates connection, depending on the
technical environment and whether the
TCU (Telematics Control Unit) is being
used by other services. .
An indicator light on the SOS call switch
shows the readiness of the emergency
support system. If the indicator light is
not illuminated, pushing the SOS call
switch does not connect your vehicle to
the Response Specialist.
The indicator light blinks while con-
nected to the Infiniti InTouch
TMServices
Response Center.
. Even when the indicator light is illumi-
nated, connection to the Infiniti In-
Touch
TMServices Response Center may
not be possible. If this occurs in an
emergency situation, contact the autho-
rities by other means.
. To avoid disconnecting the line, do not
turn off the engine or the hybrid system.
5. Information
5-25
Page 174 of 284
![INFINITI QX80 2018 Infiniti Connection 6. Navigation (if so equipped)
Menu itemAction
[Map Prefer-
ences] [Map View]
[North Up] Select one of the map views to be applied to the map
screen.
[Heading Up]
[Birdview (3D)]
[Long Range Heading U INFINITI QX80 2018 Infiniti Connection 6. Navigation (if so equipped)
Menu itemAction
[Map Prefer-
ences] [Map View]
[North Up] Select one of the map views to be applied to the map
screen.
[Heading Up]
[Birdview (3D)]
[Long Range Heading U](/img/42/35074/w960_35074-173.png)
6. Navigation (if so equipped)
Menu itemAction
[Map Prefer-
ences] [Map View]
[North Up] Select one of the map views to be applied to the map
screen.
[Heading Up]
[Birdview (3D)]
[Long Range Heading Up] The position of the vehicle icon can be changed to view a
wider area in the traveling direction. The vehicle icon is
located slightly lower than the center of the screen.
Long Range Map View is available only when the map
view is “Heading Up”.
[Map Color] Select a preferred map color.
[Map Text Size] [Large] Sets the font size.
[Medium]
[Small]
[Birdview Angle] Adjusts the Birdview
TMangle.
[Auto North Up] Sets the top of the map to remain oriented to the north.
[Show FWY Exit] Sets the display of the freeway exit information icon on/
off.
[Automatic Display in Fwy Mode] The turn list can be set to on or off to be displayed
automatically while driving on a freeway.
[Names Displayed on Map] [Place Names] Allows place names to be displayed on the map screen.
[POI Names] Allows facilities names to be displayed on the map screen.
[Road Names] Allows road names to be displayed on the map screen.
6-12
Page 175 of 284
![INFINITI QX80 2018 Infiniti Connection Menu itemAction
[Map Prefer-
ences] [Left Split Map Settings] [Left Side Map Orientation] The map view for the left side of split screen can be
selected from North Up or Heading Up.
[Long-Range Drivin INFINITI QX80 2018 Infiniti Connection Menu itemAction
[Map Prefer-
ences] [Left Split Map Settings] [Left Side Map Orientation] The map view for the left side of split screen can be
selected from North Up or Heading Up.
[Long-Range Drivin](/img/42/35074/w960_35074-174.png)
Menu itemAction
[Map Prefer-
ences] [Left Split Map Settings] [Left Side Map Orientation] The map view for the left side of split screen can be
selected from North Up or Heading Up.
[Long-Range Driving Direction] Allows the map view for the left side of the split screen to change the position of the vehicle icon so that a wider
area in the traveling direction can be viewed. The vehicle
icon is located slightly lower than the center of the screen.
6. Navigation (if so equipped)
6-13
Page 176 of 284

6. Navigation (if so equipped)
SETTING INFORMATION ON
MAP
Some information on the map can be
displayed or hidden.
Displaying facility icons
The facility icons can be displayed or hidden
by type.
1. Display the Settings menu screen.
“Displaying operation screen”
(page 2-14)
2. Touch [Navigation].
3. Touch [POI Icons Displayed on Map].
4. Touch the preferred icon. The indicator of the selected icon illuminates.
Available setting icon
.
: Restaurant
.
: Gas Station
.
: Hotel
.
: ATM
.
: Rest Area
INFO:
. The map icons are not displayed on the
map screen when the map scale is set to
0.1 mile (500 m) or higher in the 2D and
Birdview™ map.
. If brand icons are registered in the map
data, they will be displayed on the map
instead of the general map icons listed.
Displaying map scrolling informa-
tion
Information about the location, on which the
center of the cross pointer is placed by
scrolling on the map, can be set to be
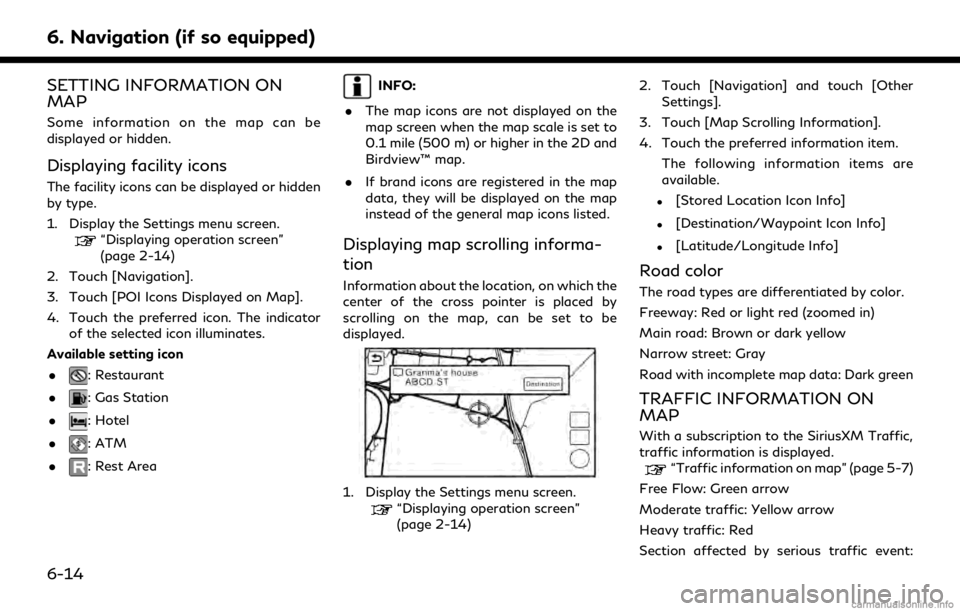
displayed.
1. Display the Settings menu screen.“Displaying operation screen”
(page 2-14) 2. Touch [Navigation] and touch [Other
Settings].
3. Touch [Map Scrolling Information].
4. Touch the preferred information item. The following information items are
available.
.[Stored Location Icon Info]
.[Destination/Waypoint Icon Info]
.[Latitude/Longitude Info]
Road color
The road types are differentiated by color.
Freeway: Red or light red (zoomed in)
Main road: Brown or dark yellow
Narrow street: Gray
Road with incomplete map data: Dark green
TRAFFIC INFORMATION ON
MAP
With a subscription to the SiriusXM Traffic,
traffic information is displayed.
“Traffic information on map” (page 5-7)
Free Flow: Green arrow
Moderate traffic: Yellow arrow
Heavy traffic: Red
Section affected by serious traffic event:
6-14
Page 195 of 284

other road lanes.
. The system will only announce street
names when the system language is set
to English. Street names are not an-
nounced when the system is set to
French or Spanish.
. When approaching a guide point (inter-
section or corner), destination, etc. dur-
ing route guidance, voice guidance
announces the remaining distance and/
or turning direction.
Repeating voice guidance:
This function is available throughout route
guidance, from the time after the route
calculation is completed until the vehicle
arrives at the destination.
Push
INFO:
. If
Page 234 of 284

7. Voice Recognition
INFINITI VOICE RECOGNITION
SYSTEM
USING VOICE RECOGNITION
SYSTEM
Initialization
When the ignition switch is placed in the
ACC or ON position, Voice Recognition is
initialized. When completed, the system is
ready to accept voice commands. If <
>on
the steering wheel is pushed before the
initialization completes, the display will show
a message to wait until the system has been
ready.
BEFORE STARTING
To get the best recognition performance
from Voice Recognition, observe the follow-
ing items.
. The interior of the vehicle should be as
quiet as possible. Close the windows to
eliminate the surrounding noises (traffic
noise, vibration sounds, etc.), which may
prevent the system from correctly re-
cognizing the voice commands.
. Wait until the tone sounds before speak-
ing a command. .
Speak in a natural conversational voice
without pausing between words.
GIVING VOICE COMMANDS
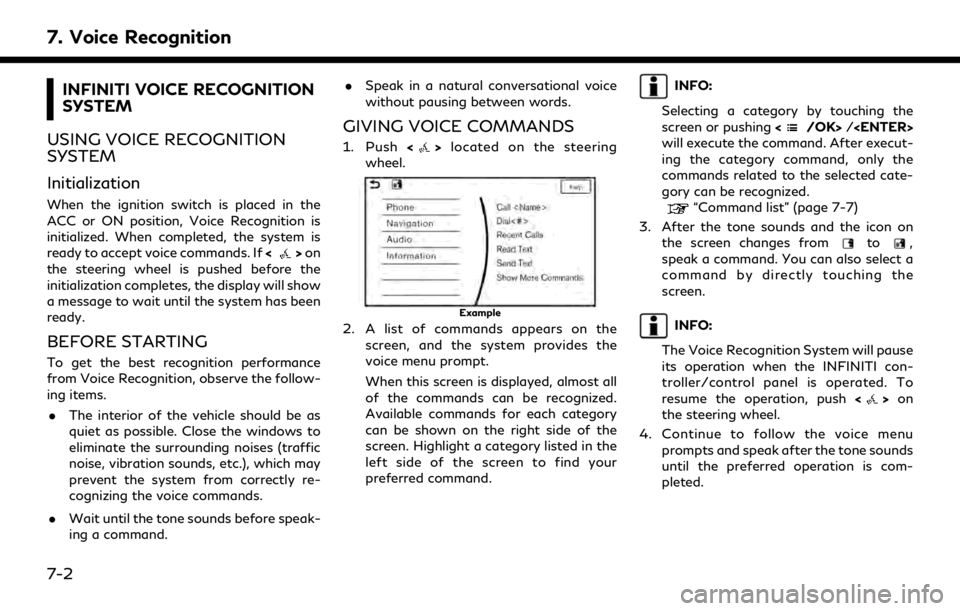
1. Push <>located on the steering
wheel.
Example
2. A list of commands appears on the screen, and the system provides the
voice menu prompt.
When this screen is displayed, almost all
of the commands can be recognized.
Available commands for each category
can be shown on the right side of the
screen. Highlight a category listed in the
left side of the screen to find your
preferred command.
INFO:
Selecting a category by touching the
screen or pushing <
/OK>/
will execute the command. After execut-
ing the category command, only the
commands related to the selected cate-
gory can be recognized.
“Command list” (page 7-7)
3. After the tone sounds and the icon on the screen changes from
to,
speak a command. You can also select a
command by directly touching the
screen.
INFO:
The Voice Recognition System will pause
its operation when the INFINITI con-
troller/control panel is operated. To
resume the operation, push <
>on
the steering wheel.
4. Continue to follow the voice menu prompts and speak after the tone sounds
until the preferred operation is com-
pleted.
7-2
Page 246 of 284

7. Voice Recognition
VOICE RECOGNITION SETTINGS
The Voice Recognition functions can be set.
1. Display the Settings menu screen.
“Displaying operation screen”
(page 2-14)
2. Touch [Voice Recognition].
3. Touch the item you would like to set.
Available settings
. [Minimize Voice Feedback]:
Sets the Minimize Voice Feedback func-
tion ON (short feedback) or OFF (long
feedback).
. [Audio Device Setting]:
Select an audio device to be operated via
the Voice Recognition System from the
audio devices connected to the USB
connectors. A device with an indicator
light illuminated can be operated with
the Voice Recognition System.
7-14
Page 249 of 284

SYSTEM UNIT
LIQUID CRYSTAL DISPLAY
Symptom Possible cause Possible solution
The screen is too dark. The cabin temperature is too low.Wait until the cabin temperature becomes
moderate.
Screen brightness is set to the maximum dark-
ness. Adjust the brightness setting of the screen.
“Screen settings” (page 2-26)
The screen is too bright. Screen brightness is set to the maximum brightness.Adjust the brightness setting of the screen.
“Screen settings” (page 2-26)
A small black spot or a small bright spot appears
on the screen. This is a typical phenomenon for liquid crystal
display.This is not a malfunction.
A dot or stripe pattern appears on the screen. Electromagnetic waves that are generated from neon billboards, high voltage electric power
cables, ham radios or other radio devices
equipped to other vehicles may adversely affect
the screen.This is not a malfunction.
Image lag appears on the screen. This is a typical phenomenon for liquid crystal
display. This is not a malfunction.
Image motion displayed on the screen is slow. The cabin temperature is below 32°F (0°C ). Wait until the in-cabin temperature rises to above 32°F (0°C ).
When looking at the screen from an angle, the
screen lightens or darkens. This is a typical phenomenon for liquid crystal
display.Adjust the brightness setting of the screen.
“Screen settings” (page 2-26)
8. Troubleshooting guide
8-3
Page 253 of 284

Functional
SymptomPossible cause Possible solution
Keep losing my local stations. The digital coverage is slightly less than the
analog signal coverage. Verify correct operation on another station. This
is expected behavior.
Shadowing (urban / terrain) can cause reduced
digital coverage. Verify correct operation on another station.
Some data fields are blank. Text information is sent at the broadcaster’s
discretion. Verify correct operation on another station.
Report station issues.
Text information is truncated / appears to be
more available. The display is limited to a fixed number of
characters and more data is being sent than can
be shown.This is intended behavior.
AM reception deteriorates at night. AM stations are required to lower their power at
night. This is not a malfunction.
8. Troubleshooting guide
8-7
Page 266 of 284

8. Troubleshooting guide
VEHICLE ICON
SymptomPossible cause Possible solution
Names of roads and locations differ
between Plan View and Birdview™. This is because the quantity of the displayed information is
reduced so that the screen does not become too cluttered.
There is also a chance that names of the roads or locations
may be displayed multiple times, and the names appearing
on the screen may be different because of a processing
procedure. This is not a malfunction.
The vehicle icon is not displayed in the
correct position. The vehicle was transported after the ignition switch was
pushed off, for example, by a ferry or car transporter. Drive the vehicle for a period of time on a road
where GPS signals can be received.
The position and direction of the vehicle icon may be
incorrect depending on the driving environments and the
levels of positioning accuracy of the navigation system. This is not a malfunction. Drive the vehicle for
a period of time to automatically correct the
position and direction of the vehicle icon.
“Current vehicle location” (page 6-59)
When the vehicle is traveling on a new
road, the vehicle icon is located on
another road nearby. Because the new road is not stored in the map data, the
system automatically places the vehicle icon on the nearest
road available. Updated road information will be included in
the next version of the map data.
The screen does not switch to the
nighttime screen even after turning on
the headlights. The daytime screen was set the last time the headlights
were turned on.
Set the screen to the nighttime screen mode
using
when turning on the headlights.
“Screen settings” (page 2-26)
The map does not scroll even when the
vehicle is moving. The current location map screen is not displayed. Push
The vehicle icon is not displayed. The current location map screen is not displayed. Push
8-20