warning lights INFINITI QX80 2019 User Guide
[x] Cancel search | Manufacturer: INFINITI, Model Year: 2019, Model line: QX80, Model: INFINITI QX80 2019Pages: 524, PDF Size: 2.44 MB
Page 113 of 524

Vehicle Dynamic Control
(VDC) off indicator light
When the ignition switch is in the ON
position, the Vehicle Dynamic Control
(VDC) off indicator light illuminates and then
turns off.
The light comes on when the vehicle dynamic
control off switch is pushed to OFF. This
indicates that the vehicle dynamic control
system is not operating.
When the 4L position is selected with the
Four-Wheel Drive (4WD) shift switch, the
VDC system is disabled and the VDC off
indicator light illuminates. (4WD models)
For additional information, see “Vehicle
Dynamic Control (VDC) system” (P.5-133).
AUDIBLE REMINDERS
Key reminder chime
A chime will sound if the driver side door is
opened while the ignition switch is pushed to
the ACC position. Make sure the ignition
switch is pushed to the OFF position, and
take the Intelligent Key with you when
leaving the vehicle.
Light reminder chime
A chime will sound when the driver side door
is opened with the light switch in theorposition and the ignition switch in the
ACC, OFF or LOCK position.
Turn the light switch off when you leave the
vehicle.
Parking brake reminder chime
The chime will sound if the vehicle is driven
at more than 4 MPH (7 km/h) with the
parking brake applied. Stop the vehicle and
release the parking brake.
Brake pad wear warning
The disc brake pads have audible wear
warnings. When a brake pad requires repla-
cement, it will make a high pitched scraping
sound when the vehicle is in motion. This
scraping sound will first occur only when the
brake pedal is depressed. After more wear of
the brake pad, the sound will always be
heard even if the brake pedal is not
depressed. Have the brakes checked as soon
as possible if the warning sound is heard.
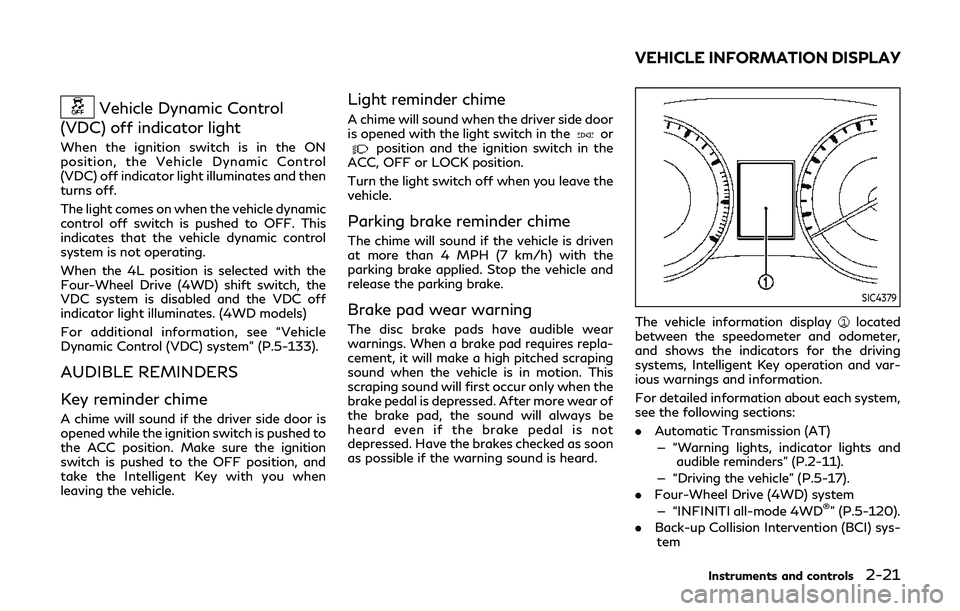
SIC4379
The vehicle information displaylocated
between the speedometer and odometer,
and shows the indicators for the driving
systems, Intelligent Key operation and var-
ious warnings and information.
For detailed information about each system,
see the following sections:
. Automatic Transmission (AT)
— “Warning lights, indicator lights and audible reminders” (P.2-11).
— “Driving the vehicle” (P.5-17).
. Four-Wheel Drive (4WD) system
— “INFINITI all-mode 4WD
®” (P.5-120).
. Back-up Collision Intervention (BCI) sys-
tem
Instruments and controls2-21
VEHICLE INFORMATION DISPLAY
Page 117 of 524

9. Low fuel warning
This warning appears when the fuel level in
the tank is getting low. Refuel as soon as it is
convenient, preferably before the fuel gauge
reaches the 0 (Empty) position.
There is a small reserve of fuel remaining in
the tank when the fuel gauge reaches the 0
(Empty) position.
10. Low washer fluid warning
This warning appears when the washer tank
fluid is at a low level. Add washer fluid as
necessary. (See “Window washer fluid” (P.8-
10).)
11. Door/liftgate open warning
(ignition switch is in the ON posi-
tion)
This warning appears if any of the doors
and/or the liftgate are open or not closed
securely. The vehicle icon indicates which
door or the liftgate is open on the display.
12. Loose fuel cap warning
This warning appears when the fuel-filler
cap is not tightened correctly after the
vehicle has been refueled. (See “Fuel-filler
cap” (P.3-27).)
13. Check tire pressure warning
This warning appears when the low tire
pressure warning light in the meter illumi-
nates and low tire pressure is detected. The
warning appears each time the ignition
switch is placed in the ON position as long
as the low tire pressure warning light
remains illuminated. If this warning appears,
stop the vehicle and adjust the tire pressure
to the recommended COLD tire pressure
shown on the Tire and Loading Information
label. (See “Low tire pressure warning light”
(P.2-15) and “Tire Pressure Monitoring
System (TPMS)” (P.5-5).)
14. Extended storage fuse warning
(if so equipped)
This warning may appear if the extended
storage fuse switch is not pushed in
(switched on). When this warning appears,
push in (switch on) the extended storage
fuse switch to turn off the warning. For
more information, see “Extended storage
fuse switch” (P.8-20).
15. Back-up Collision Intervention
(BCI) not available warning (if so
equipped)
This warning appears when the Back-up
Collision Intervention (BCI) system is tem-porarily not available.
For more details, see “Back-up Collision
Intervention (BCI)” (P.5-55).
16. Back-up Collision Intervention
(BCI) malfunction warning (if so
equipped)
This warning appears when the Back-up
Collision Intervention (BCI) system is not
functioning properly.
For more details, see “Back-up Collision
Intervention (BCI)” (P.5-55).
17. Headlight warning
This warning appears if the LED headlights
are malfunctioning. It is recommended you
have the system checked by an INFINITI
retailer.
18. Front radar obstruction warning
This warning appears when the sensor area
of the front bumper is covered with dirt or is
obstructed, making it impossible to detect a
vehicle ahead.
The following systems will be automatically
canceled.
.
Intelligent Cruise Control (ICC) system (if
so equipped)
. Distance Control Assist (DCA) system (if
so equipped)
Instruments and controls2-25
Page 131 of 524

High beam assist
The high beam assist system will operate
when the vehicle is driven at speeds of
approximately 22 MPH (35 km/h) and
above. If an oncoming vehicle or leading
vehicle appears in front of your vehicle when
the headlight high beam is on, the headlight
will be switched to the low beam automa-
tically.
Precautions on high beam assist:
WARNING
.The high beam assist system is a
convenience but it is not a substitute
for safe driving operation. The driver
should remain alert at all times,
ensure safe driving practices and
switch the high beams and low beam
manually when necessary.
. The high beam or low beam may not
switch automatically under the fol-
lowing conditions. Switch the high
beam and low beam manually.
— During bad weather (rain, fog, snow, wind, etc.).
— When a light source similar to a headlight or tail light is in the
vicinity of the vehicle. — When the headlights of the on-
coming vehicle or the leading
vehicle are turned off, when the
color of the light is affected due to
foreign materials on the lights, or
when the light beam is out of
position.
— When there is a sudden, contin- uous change in brightness.
— When driving on a road that passes over rolling hills, or a road
that has level differences.
— When driving on a road with many curves.
— When a sign or mirror-like sur- face is reflecting intense light
towards the front of the vehicle.
— When the container, etc. being towed by a leading vehicle is
reflecting intense light.
— When a headlight on your vehicle is damaged or dirty.
— When the vehicle is leaning at an angle due to a punctured tire,
being towed, etc.
. The timing of switching the low beam
and high beam may change under the
following situations. — The brightness of the headlights
of the oncoming vehicle or leading
vehicle.
— The movement and direction of the oncoming vehicle and the
leading vehicle.
— When only one light on the on- coming vehicle or the leading
vehicle is illuminated.
— When the oncoming vehicle or the leading vehicle is a two-wheeled
vehicle.
— Road conditions (incline, curve, the road surface, etc.).
— The number of passengers and the amount of luggage.
Instruments and controls2-39
Page 134 of 524

2-42Instruments and controls
Daytime running light system
The daytime running lights automatically
illuminate when the engine is started with
the parking brake released. The daytime
running lights operate with the headlight
switch in the OFF position or in the
position. Turn the headlight switch to theposition for full illumination when driv-
ing at night.
If the parking brake is applied before the
engine is started, the daytime running lights
do not illuminate. The daytime running lights
illuminate once the parking brake is released.
The daytime running lights will remain on
until the ignition switch is pushed to the OFF
position.
WARNING
When the daytime running light system
is active, tail lights on your vehicle are
not on. It is necessary at dusk to turn on
your headlights. Failure to do so could
cause an accident injuring yourself and
others.
Adaptive Front lighting System
(AFS) (if so equipped)
The Adaptive Front lighting System (AFS) will automatically adjust the headlights (low
beam) toward the turning direction to
improve the driver’s view. When the head-
light switch is ON and the driver operates
the steering wheel in a turn, the AFS system
will be activated.
The AFS will operate:
.
when the headlight switch is ON.
. when the shift lever is in any position
other than P (Park) or R (Reverse).
. when the vehicle is driven at above 3
MPH (5 km/h) for the left-side head-
light. Note that the right-side low beam
headlight will swivel but the left-side
headlight will not swivel when the vehicle
is below 3 MPH (5 km/h) and the
steering wheel is turned.
AFS will also adjust the headlight to a proper
axis automatically, depending on the number
of occupants in the vehicle, the load the
vehicle is carrying and the road conditions.
If the AFS OFF indicator light blinks after
the ignition switch has been pushed to the
ON position, this may indicate that the AFS
is not functioning properly. Have the system
checked. It is recommended you visit an
INFINITI retailer for this service. When the
engine is started, the headlights will vibrate
to check the system condition. This is not a
malfunction.
HEADLIGHT WASHER (if so
equipped)
The headlight washer operates when the
headlight is on and the ignition switch is in
the ON position.
Pull the windshield washer switch toward
you. The headlight washer operates with the
windshield washer operation. This operation
activates once each time either the ignition
switch or the headlight switch is turned off
and on.
After the first operation, the headlight
washer operates once at every fifth opera-
tion of the windshield washer.
CAUTION
. Do not operate the washer continu-
ously for longer than 30 seconds.
. Do not operate the headlight washer
if the window washer fluid reservoir
is empty.
Page 141 of 524

SSD0956
The warning systems switch is used to turn
on and off the warning systems (Lane
Departure Warning (LDW) and Blind Spot
Warning (BSW) systems) that are activated
using the settings menu on the center
display.
When the warning systems switch is turned
off, the indicator
on the switch is off. The
indicator will also be off if all of the warning
systems are deactivated using the settings
menu.
The LDW system will sound a warning chime
and blink the Lane Departure Warning
(LDW) indicator light (orange) to alert the
driver if the vehicle is traveling close to either
the left or the right of a traveling lane with detectable lane markers. (See “Lane Depar-
ture Warning (LDW)/Lane Departure Pre-
vention (LDP) ” (P.5-22).)
The BSW system will turn on the side
indicator lights, located next to the outside
mirrors, if the radar sensors detect a vehicle
in the detection zone. If the turn signal is
activated in the direction of the detected
vehicle, a chime sounds twice and the side
indicator light will flash. (See “Blind Spot
Warning (BSW)” (P.5-32).)
SIC4454
For driving or starting the vehicle on snowy
roads or slippery areas, push on the SNOW
mode switch. The SNOW mode indicator
light will illuminate. When the SNOW mode
is activated, engine output is controlled to
avoid wheel spin.
Push off the SNOW mode for normal
driving.
Instruments and controls2-49
WARNING SYSTEMS SWITCH (if
so equipped)
SNOW MODE SWITCH
Page 187 of 524

button.
Window cannot be closed using the Intelli-
gent Key.
The door windows can be opened or closed
by turning the mechanical key in a door lock.
(See “Doors” (P.3-4).)
Opening/closing liftgate
1. Push the power liftgate buttonfor more than 1 second.
2. The liftgate will automatically open.
The hazard indicator flashes 4 times and the
outside chime sounds for approximately 3
seconds.
To close the liftgate, push the power liftgate
button
for more than 1 second.
The liftgate will automatically close.
If the button
is pushed while the
liftgate is being opened or closed, the
liftgate will reverse.
Using panic alarm
If you are near your vehicle and feel
threatened, you may activate the alarm to
call attention as follows:
1. Push the PANIC
buttonon the
Intelligent Key for more than 1 second.
2. The theft warning alarm and headlights will stay on for 25 seconds. 3. The panic alarm stops when:
.It has run for 25 seconds, or.Any of the buttons on the Intelligent
Key are pushed. (Note: Panic button
or power liftgate button should be
pushed for more than 1 second.)
Remote engine start (if so equipped)
The remote engine startbuttonis on
the Intelligent Key if the vehicle has remote
engine start function. This function allows
the engine to start from outside the vehicle.
See “Remote engine start” (P.3-19).
Setting hazard indicator and horn
mode
This vehicle is set in hazard indicator and
horn mode when you first receive the vehicle.
In hazard indicator and horn mode, when the
LOCK
button is pushed, the hazard
indicator flashes twice and the horn chirps
once. When the UNLOCK
button is
pushed, the hazard indicator flashes once.
If horns are not necessary, the system can be
switched to the hazard indicator mode.
In hazard indicator mode, when the LOCK
button is pushed, the hazard indicator
flashes twice. When the UNLOCK
button is pushed, neither the hazard indica-
tor nor the horn operates.
Pre-driving checks and adjustments3-17
Page 189 of 524

WARNING
To avoid risk of injury or death, do not
use the remote engine start function
when the vehicle is in an enclosed area
such as a garage.
JVP0445X
The remote engine startbutton is on the
Intelligent Key if the vehicle has remote
engine start function. This function allows
the engine to start from outside the vehicle.
Some systems, such as the air conditioner
system, will turn on during a remote engine
start, if the system was on the last time the
ignition switch was turned off.
Laws in some local communities may restrict
the use of remote engine starters. For
example, some laws require a person using
remote engine start to have the vehicle in
view. Check local regulations for any re-
quirements.
Other conditions may affect the remote
engine start function. See “Conditions the remote engine start will not work” (P.3-20).
Other conditions can affect the performance
of the Intelligent Key transmitter. See “In-
telligent Key system” (P.3-7) for additional
information.
REMOTE ENGINE START OPER-
ATING RANGE
The remote engine start function can only be
used when the Intelligent Key is within the
specified operating range from the vehicle.
When the Intelligent Key battery is dis-
charged or other strong radio wave sources
are present near the operating location, the
Intelligent Key operating range becomes
narrower, and the Intelligent Key may not
function properly.
The remote engine start operating range is
approximately 197 ft (60 m) from the
vehicle.
REMOTE STARTING THE ENGINE
To use the remote engine start function to
start the engine, perform the following:
1. Aim the Intelligent Key at the vehicle.
2. Push the “LOCK”
button to lock all
doors.
3. Within 5 seconds push and hold the remote engine start
button until
the turn signal lights flash and the tail
Pre-driving checks and adjustments3-19
REMOTE ENGINE START (if so equipped)
Page 201 of 524

SPA2450-A
Automatic anti-glare type (if so
equipped)
The inside mirror is designed so that it
automatically changes reflection according
to the intensity of the headlights of the
following vehicle.
The anti-glare system will be automatically
turned on when the ignition switch is pushed
to the ON position.
When the anti-glare system is turned on, the
indicator light
will illuminate and excessive
glare from the headlights of the vehicle
behind you will be reduced.
Push the “*” switch
to make the inside
rearview mirror operate normally. The in- dicator light will turn off. Push the “I” switch
to turn the system on.
Do not allow any object to cover the sensors
or apply glass cleaner on them. Doing so
will reduce the sensitivity of the sensor,
resulting in improper operation.
For the HomeLink
®Universal Transceiver
operation, see “HomeLink®Universal Trans-
ceiver (Type A)” (P.2-69).
Smart Rearview Mirror (if so
equipped)
WARNING
. Failure to follow the warnings and
instructions for proper use of the
Smart Rearview Mirror could result
in serious injury or death.
— The Smart Rearview Mirror is a convenience feature but it is not a
substitute for proper vehicle op-
eration. The system has areas
where objects cannot be viewed.
Check the blind spot of the Smart
Rearview Mirror before vehicle
operation. The driver is always
responsible for safe driving.
— Do not disassemble or modify the Smart Rearview Mirror, the cam- era unit or wirings. If you do, it
may result in accidents or fire. In
case you notice smoke or smell
coming from the Smart Rearview
Mirror, stop using the system
immediately. It is recommended
that you see an INFINITI retailer
for servicing.
— Do not operate the Smart Rear- view Mirror while driving. Doing
so can be a distraction and it could
lose control of your vehicle and
cause an accident or serious in-
jury.
— Do not gaze into the Smart Rear- view Mirror display during driv-
ing. It may cause a distraction and
it could lose control of your vehi-
cle and cause an accident or
serious injury.
— Do not put a cigarette or flames to the Smart Rearview Mirror, the
camera unit or wirings. It may
cause a fire.
. Be sure to adjust the Smart Rearview
Mirror before driving. Switch the
system to the conventional rearview
mirror mode and be properly seated
on the driver’s seat. Then adjust the
mirror so as to see the rear window
Pre-driving checks and adjustments3-31
Page 263 of 524

SSD1021
When the ignition switch is pushed without
depressing the brake pedal, the ignition
switch position will change as follows:
.Push center once to change to ACC.
. Push center two times to change to ON.
. Push center three times to change to
OFF. (No position illuminates.)
. Push center four times to return to ACC.
. Open or close any door to return to
LOCK during the OFF position.
The ignition lock is designed so that the
ignition switch position cannot be switched
to LOCK until the shift lever is moved to the
P (Park) position. When the ignition switch cannot be pushed
toward the LOCK position, proceed as
follows:
1. Move the shift lever into the P (Park)
position.
2. Push the ignition switch to the OFF position. The ignition switch position
indicator will not illuminate.
3. Open the door. The ignition switch will change to the LOCK position.
The shift lever can be moved from the P
(Park) position if the ignition switch is in the
ON position and the brake pedal is de-
pressed.
If the battery of the vehicle is discharged,
the push-button ignition switch cannot be
turned from the LOCK position.
Some indicators and warnings for operation
are displayed on the vehicle information
display between the speedometer and tach-
ometer. (See “Vehicle information display”
(P.2-21).)
PUSH-BUTTON IGNITION
SWITCH POSITIONS
LOCK (Normal parking position)
The ignition switch can only be locked in this
position.
The ignition switch will be unlocked when it
is pushed to the ACC position while carrying
the Intelligent Key.
ACC (Accessories)
This position activates electrical accessories
such as the radio, when the engine is not
running.
ACC has a battery saver feature that will
turn the ignition switch to the OFF position
after a period of time under the following
conditions:
. all doors are closed.
. shift lever is in P (Park).
. turn signal/hazard indicator lights are
not flashing.
The battery saver feature will be cancelled if
any of the following occur:
. any door is opened.
. shift lever is moved out of P (Park).
. ignition switch changes position.
Starting and driving5-13
Page 265 of 524

the brake pedal within 10 seconds after
the chime sounds. The engine will start.
After step 3 is performed, when the ignition
switch is pushed without depressing the
brake pedal, the ignition switch position will
change to ACC.
NOTE:
. When the ignition switch is pushed to
the ACC or ON position or the engine is
started by the above procedures, the
Intelligent Key battery discharge indi-
cator appears on the vehicle information
display even if the Intelligent Key is
inside the vehicle. This is not a malfunc-
tion. To turn off the Intelligent Key
battery discharge indicator, touch the
ignition switch with the Intelligent Key
again.
. If the Intelligent Key battery discharge
indicator appears, replace the battery as
soon as possible. (See “Battery” (P.8-
11).) .
Make sure the area around the vehicle is
clear.
. Check fluid levels such as engine oil,
coolant, brake fluid and window washer
fluid as frequently as possible, or at least
whenever you refuel.
. Check that all windows and lights are
clean.
. Visually inspect tires for their appearance
and condition. Also check tires for proper
inflation.
. Lock all doors.
. Position seat and adjust head restraints/
headrests.
. Adjust inside and outside mirrors.
. Fasten seat belts and ask all passengers
to do likewise.
. Check the operation of warning lights
when the ignition switch is pushed to the
ON position. (See “Warning lights, in-
dicator lights and audible reminders”
(P.2-11).) 1. Apply the parking brake.
2. Move the shift lever to the P (Park) or N
(Neutral) position. (P is recommended.)
The starter is designed not to operate
unless the shift lever is in either of the
above positions.
3. Push the ignition switch to the ON position. Firmly depress the brake pedal
and push the ignition switch to start the
engine.
To start the engine immediately, push
and release the ignition switch while
depressing the brake pedal with the
ignition switch in any position.
.If the engine is very hard to start inextremely cold weather or when re-
starting, depress the accelerator ped-
al a little (approximately 1/3 to the
floor) and while holding, crank the
engine. Release the accelerator pedal
when the engine starts.
.If the engine is very hard to start
because it is flooded, depress the
accelerator pedal all the way to the
floor and hold it. Push the ignition
switch to the ON position to start
cranking the engine. After 5 or 6
seconds, stop cranking by pushing
the ignition switch to OFF. After
cranking the engine, release the accel-
erator pedal. Crank the engine with
Starting and driving5-15
BEFORE STARTING THE ENGINE STARTING THE ENGINE