light INFINITI QX80 2020 Owner's Manual
[x] Cancel search | Manufacturer: INFINITI, Model Year: 2020, Model line: QX80, Model: INFINITI QX80 2020Pages: 516, PDF Size: 1.89 MB
Page 222 of 516
4-6Monitor, climate, audio, phone and voice recognition systems
course linesare displayed. When the
steering wheel turns about 90 degrees or
more, a line is displayed only on the
opposite side of the turn.
WAE0245X
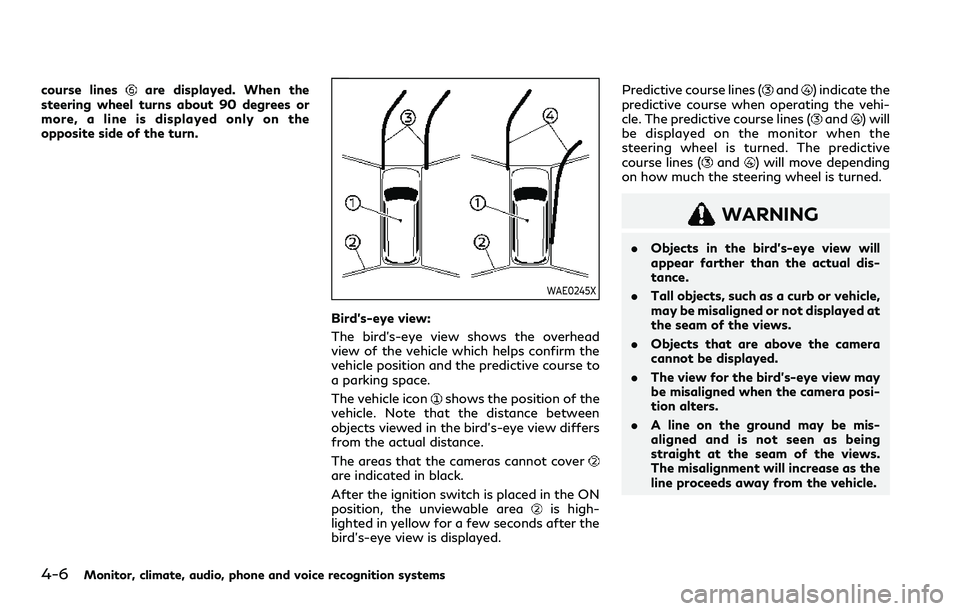
Bird’s-eye view:
The bird’s-eye view shows the overhead
view of the vehicle which helps confirm the
vehicle position and the predictive course to
a parking space.
The vehicle icon
shows the position of the
vehicle. Note that the distance between
objects viewed in the bird’s-eye view differs
from the actual distance.
The areas that the cameras cannot cover
are indicated in black.
After the ignition switch is placed in the ON
position, the unviewable area
is high-
lighted in yellow for a few seconds after the
bird’s-eye view is displayed. Predictive course lines (
and) indicate the
predictive course when operating the vehi-
cle. The predictive course lines (
and) will
be displayed on the monitor when the
steering wheel is turned. The predictive
course lines (
and) will move depending
on how much the steering wheel is turned.
WARNING
. Objects in the bird’s-eye view will
appear farther than the actual dis-
tance.
. Tall objects, such as a curb or vehicle,
may be misaligned or not displayed at
the seam of the views.
. Objects that are above the camera
cannot be displayed.
. The view for the bird’s-eye view may
be misaligned when the camera posi-
tion alters.
. A line on the ground may be mis-
aligned and is not seen as being
straight at the seam of the views.
The misalignment will increase as the
line proceeds away from the vehicle.
Page 223 of 516
JVH1141X
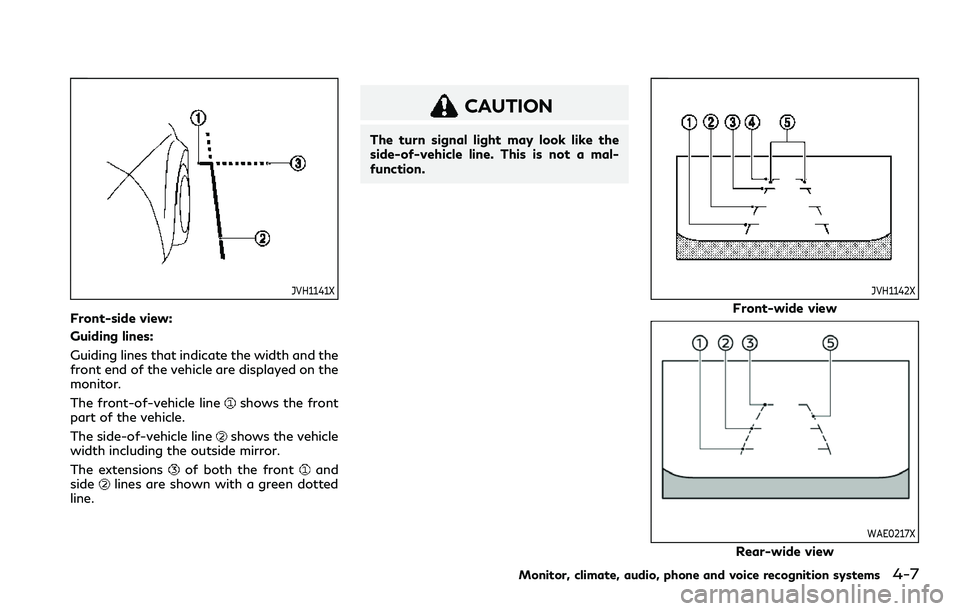
Front-side view:
Guiding lines:
Guiding lines that indicate the width and the
front end of the vehicle are displayed on the
monitor.
The front-of-vehicle line
shows the front
part of the vehicle.
The side-of-vehicle line
shows the vehicle
width including the outside mirror.
The extensions
of both the frontand
sidelines are shown with a green dotted
line.
CAUTION
The turn signal light may look like the
side-of-vehicle line. This is not a mal-
function.
JVH1142X
Front-wide view
WAE0217X
Rear-wide view
Monitor, climate, audio, phone and voice recognition systems4-7
Page 228 of 516
4-12Monitor, climate, audio, phone and voice recognition systems
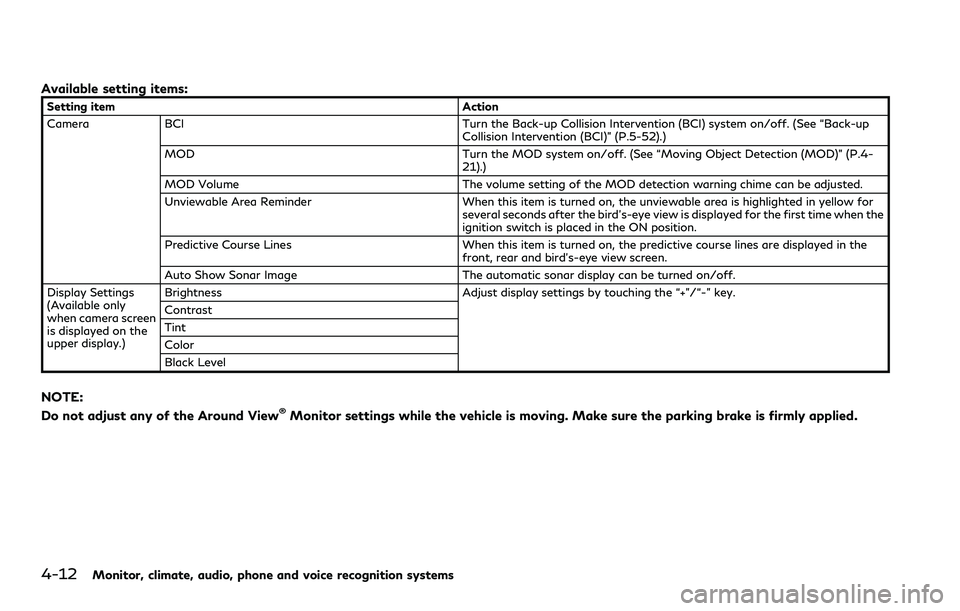
Available setting items:
Setting itemAction
Camera BCI Turn the Back-up Collision Intervention (BCI) system on/off. (See “Back-up
Collision Intervention (BCI)” (P.5-52).)
MOD Turn the MOD system on/off. (See “Moving Object Detection (MOD)” (P.4-
21).)
MOD Volume The volume setting of the MOD detection warning chime can be adjusted.
Unviewable Area Reminder When this item is turned on, the unviewable area is highlighted in yellow for
several seconds after the bird’s-eye view is displayed for the first time when the
ignition switch is placed in the ON position.
Predictive Course Lines When this item is turned on, the predictive course lines are displayed in the
front, rear and bird’s-eye view screen.
Auto Show Sonar Image The automatic sonar display can be turned on/off.
Display Settings
(Available only
when camera screen
is displayed on the
upper display.) Brightness
Adjust display settings by touching the “+”/“-” key.
Contrast
Tint
Color
Black Level
NOTE:
Do not adjust any of the Around View®Monitor settings while the vehicle is moving. Make sure the parking brake is firmly applied.
Page 230 of 516
4-14Monitor, climate, audio, phone and voice recognition systems
The following are operating limitations and
do not represent a system malfunction:
.The screen displayed on the Around
View
®Monitor will automatically return
to the previous screen 3 minutes after
the CAMERA button has been pushed
while the shift lever is in a position other
than the R (Reverse) position.
. There may be a delay when switching
between views.
. When the temperature is extremely high
or low, the screen may not display
objects clearly.
. When strong light is directly shines on the
camera, objects may not be displayed
clearly.
. The screen may flicker under fluorescent
light.
. The colors of objects on the Around
View
®Monitor may differ somewhat
from the actual color of objects.
. Objects on the monitor may not be clear
and the color of the object may differ in a
dark environment.
. There may be differences in sharpness
between each camera view of the bird’s-
eye view.
. When activating the Around View
®
Monitor, the icons and the messages
may not be displayed for a while. .
If dirt, rain or snow accumulates on the
camera, the Around View
®Monitor may
not display objects clearly. Clean the
camera.
. Do not use wax on the camera lens. Wipe
off any wax with a clean cloth that has
been dampened with a diluted mild
cleaning agent, then wipe with a dry
cloth.
WAE0247X
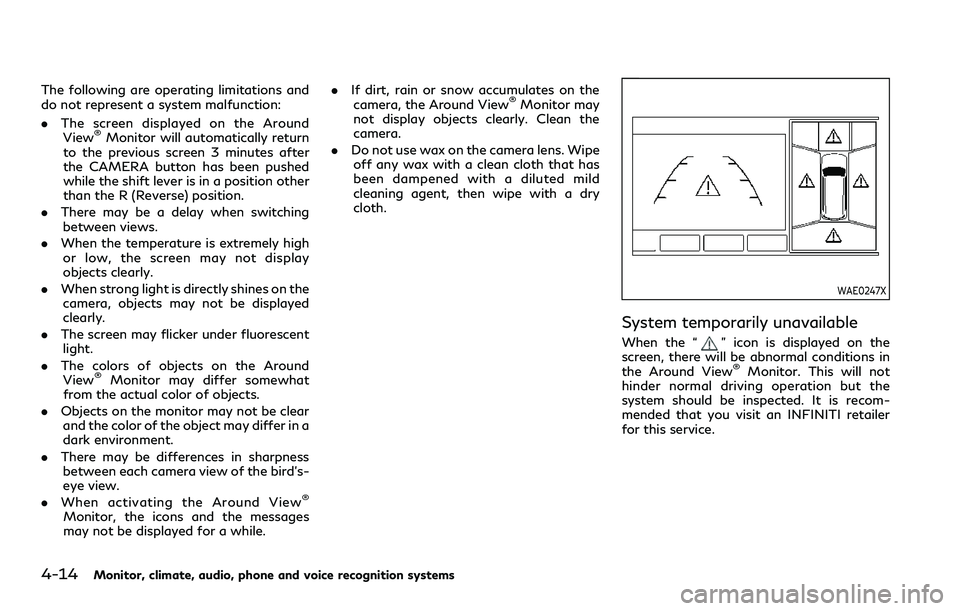
System temporarily unavailable
When the “” icon is displayed on the
screen, there will be abnormal conditions in
the Around View
®Monitor. This will not
hinder normal driving operation but the
system should be inspected. It is recom-
mended that you visit an INFINITI retailer
for this service.
Page 233 of 516

SONAR SYSTEM OPERATION
The system gives the tone for front objects
when the shift lever is in the D (Drive)
position and both front and rear objects
when the shift lever is in the R (Reverse)
position.
When the camera image is shown on the
upper display, the system shows the sonar
indicator regardless of the shift lever posi-
tion.
The system is deactivated at speeds above 6
MPH (10 km/h). It is reactivated at lower
speeds.
The colors of the sonar indicators and the
distance guide lines in the front, front-wide,
rear and rear-wide views indicate different
distances to the object.
When the objects are detected, the indicator
(green) appears and blinks and the tone
sounds intermittently. When the vehicle
moves closer to the object, the color of the
indicator turns yellow and the rate of the
blinking and the rate of the tone increase.
When the vehicle is very close to the object,
the indicator stops blinking and turns red,
and the tone sounds continuously.
The intermittent tone will stop after 3
seconds when an object is detected by only
the sonar and the distance does not change.
The tone will stop when the object is nolonger near the vehicle.
WAE0250X
TURNING ON AND OFF THE SO-
NAR FUNCTION
When the “Sonar/MOD” keyis touched,
the indicator lighton the key will turn off
and the sonar will turn off temporarily. The
Moving Object Detection (MOD) system will
also be turned off at the same time. See
“Moving Object Detection (MOD)” (P.4-21).
When the “Sonar/MOD” key
is touched
again, the indicator lightwill turn on and
the sonar will turn back on.
In the cases below, the sonar will be turned
back on automatically:
. When the shift lever is in the R (Reverse)
position.
Monitor, climate, audio, phone and voice recognition systems4-17
Page 240 of 516
4-24Monitor, climate, audio, phone and voice recognition systems
MOD function settings
The MOD function settings can be changed
using the following procedures.
1. Push the MENU button.
2. Touch the “Settings” key on the lowerdisplay.
3. Touch the “Camera” key.
4. Touch the “Camera” key.
Available setting items:
MOD:
When this item is turned on, the MOD
system is activated. When this item is turned
off (indicator turns off), the MOD system is
deactivated.
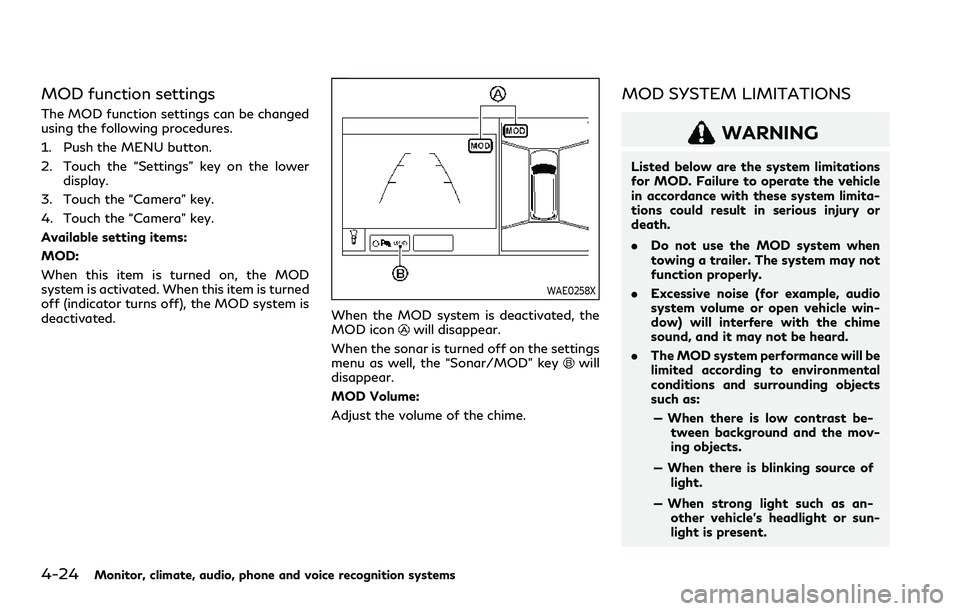
WAE0258X
When the MOD system is deactivated, the
MOD iconwill disappear.
When the sonar is turned off on the settings
menu as well, the “Sonar/MOD” key
will
disappear.
MOD Volume:
Adjust the volume of the chime.
MOD SYSTEM LIMITATIONS
WARNING
Listed below are the system limitations
for MOD. Failure to operate the vehicle
in accordance with these system limita-
tions could result in serious injury or
death.
. Do not use the MOD system when
towing a trailer. The system may not
function properly.
. Excessive noise (for example, audio
system volume or open vehicle win-
dow) will interfere with the chime
sound, and it may not be heard.
. The MOD system performance will be
limited according to environmental
conditions and surrounding objects
such as:
— When there is low contrast be- tween background and the mov-
ing objects.
— When there is blinking source of light.
— When strong light such as an- other vehicle’s headlight or sun-
light is present.
Page 244 of 516
4-28Monitor, climate, audio, phone and voice recognition systems
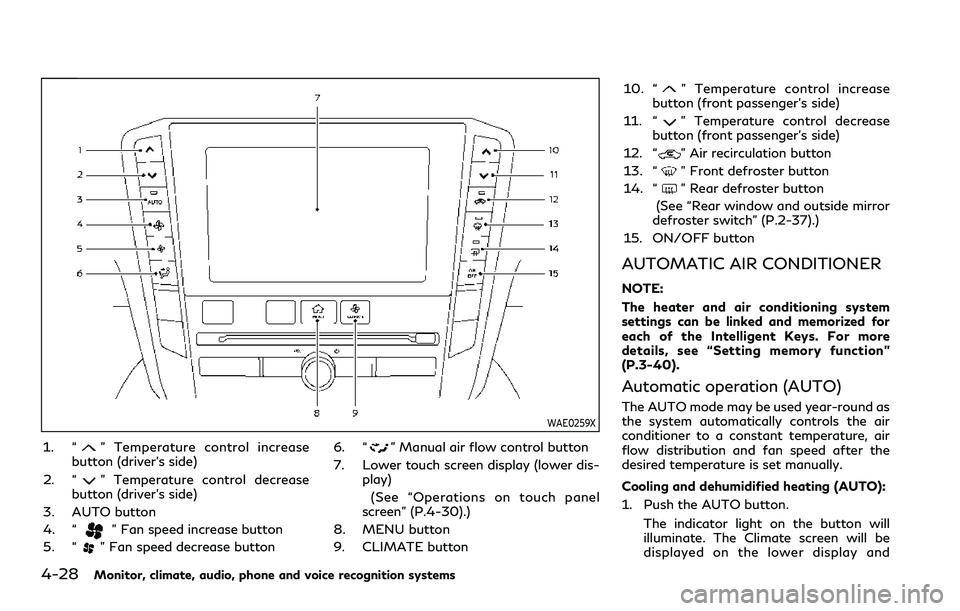
WAE0259X
1. “” Temperature control increase
button (driver’s side)
2. “
” Temperature control decrease
button (driver’s side)
3. AUTO button
4. “
” Fan speed increase button
5. “
” Fan speed decrease button 6. “
” Manual air flow control button
7. Lower touch screen display (lower dis- play)
(See “Operations on touch panel
screen” (P.4-30).)
8. MENU button
9. CLIMATE button 10. “
” Temperature control increase
button (front passenger’s side)
11. “
” Temperature control decrease
button (front passenger’s side)
12. “
” Air recirculation button
13. “
” Front defroster button
14. “
” Rear defroster button
(See “Rear window and outside mirror
defroster switch” (P.2-37).)
15. ON/OFF button
AUTOMATIC AIR CONDITIONER
NOTE:
The heater and air conditioning system
settings can be linked and memorized for
each of the Intelligent Keys. For more
details, see “Setting memory function”
(P.3-40).
Automatic operation (AUTO)
The AUTO mode may be used year-round as
the system automatically controls the air
conditioner to a constant temperature, air
flow distribution and fan speed after the
desired temperature is set manually.
Cooling and dehumidified heating (AUTO):
1. Push the AUTO button.
The indicator light on the button will
illuminate. The Climate screen will be
displayed on the lower display and
Page 245 of 516

“AUTO” will appear on the Climate
screen.
2. Push the temperature control buttons (driver’s side) to set the preferred tem-
perature.
.When the DUAL mode is turned on,you can individually set temperatures
for the driver’s side and front passen-
ger’s side, using the temperature
control buttons on the corresponding
side. (To turn on the DUAL mode,
touch the "DUAL" key.)
.The temperature of the passengercompartment will be maintained
automatically. Air flow distribution
and fan speed will also be controlled
automatically.
A visible mist may be seen coming from the
ventilators in hot, humid conditions as the air
is cooled rapidly. This does not indicate a
malfunction.
Heating (A/C off):
The air conditioner does not activate in this
mode. Use this mode when you only need to
heat.
1. Push the CLIMATE button. The Climate screen will be displayed on
the lower display.
2. Touch the "A/C" key. The "A/C" indica- tor will turn off. See “Operations on touch panel screen” (P.4-30).
3. Push the temperature control buttons (driver’s side) to set the preferred tem-
perature.
.When the DUAL mode is turned on,you can individually set temperatures
for the driver’s side and front passen-
ger’s side, using the temperature
control buttons on the corresponding
side. (To turn on the DUAL mode,
touch the "DUAL" key.)
.The temperature of the passengercompartment will be maintained
automatically. Air flow distribution
and fan speed will also be controlled
automatically.
NOTE:
. Do not set the temperature lower than
the outside air temperature. Otherwise
the system may not work properly.
. This mode is not recommended if the
windows fog up.
Dehumidified defrosting/defogging:
1. Push the “
” front defroster button.
The indicator light on the button will
illuminate.
2. Push the temperature control buttons on the driver’s side to set the preferred
temperature. NOTE:
.
To quickly remove ice from the outside
of the windows, push the “
” fan
speed increase button and set it to the
maximum position.
. As soon as possible after the windshield
is cleaned, push the AUTO button to
return to the AUTO mode.
. When the “
” front defroster button
is pushed, the air conditioner will auto-
matically be turned on at outside tem-
peratures above 23°F (-5°C) to defog
the windshield, and the air recirculate
mode will automatically be turned off.
The outside air circulation mode will be
selected to improve the defrosting per-
formance.
Manual operation
The manual mode can be used to control the
heater and air conditioner to your desired
settings.
Fan speed control:
Push the “
” fan speed increase button
to increase the fan speed.
Push the “
” fan speed decrease button to
decrease the fan speed.
Push the AUTO button to change the fan
speed to the automatic mode.
Monitor, climate, audio, phone and voice recognition systems4-29
Page 246 of 516

4-30Monitor, climate, audio, phone and voice recognition systems
Air flow control:
Push the “
” manual air flow control
button to change the air flow mode.
: Air flows from the center and side
ventilators.
: Air flows from the center and sideventilators, and foot outlets.
: Air flows mainly from the foot outlets.
: Air flows from the defroster and footoutlets.
Temperature control:
Push the “
” temperature control increase
button or the “” temperature control
decrease button to set the desired tempera-
ture.
When the DUAL mode is on, you can
individually set temperatures for the driver’s
side and front passenger’s side.
Air intake control:
. Push the “
” air recirculation button to
recirculate interior air inside the vehicle.
The indicator light on the “
” air
recirculation button will illuminate.
. Push the “
” air recirculation button
twice to draw outside air into the
passenger compartment. The indicator
light on the “
” air recirculation button
will turn off. .
To control the air intake automatically,
push and hold the “
” air recirculation
button. The indicator light will blink, and
then the air intake will switch to auto-
matic control.
The air intake mode can also be con-
trolled automatically by touching the
"Auto Recirc" key (if so equipped). The
indicator light on the "Auto Recirc" key
will illuminate. (See “Advanced Climate
Control System” (P.4-31).)
Turning the system off
Push the ON/OFF button.
Operations on touch panel screen
Heater and air conditioner can be operated
on the touch panel screen. Push the CLI-
MATE button and switch the lower display
to the Climate screen.
For details of the touch panel operation on
the lower display, see the separate INFINITI
InTouch
TMOwner’s Manual.
WAE0263X
Example
The following control keys are available.
(Availability of the item depends on the
model and specifications.)
Available items:
. “
”
Touch to change the air flow mode.
. “-
”/“+”
Touch to change the fan speed.
. “Rear CLIMATE”
Touch to display the Rear climate screen.
(See “Touch panel operation” (P.4-33).)
. “DUAL”
Touch to turn the DUAL mode on/off.
(See “DUAL mode setting” (P.4-31).)
Page 247 of 516

.“A/C”
Touch to turn the air conditioner on/off.
(See “Automatic operation (AUTO)”
(P.4-28).)
. “Auto Recirc” (if so equipped)
Touch to turn the auto-recirculation
mode on/off. (See “Advanced Climate
Control System” (P.4-31).)
. “Upper Vent”
Touch to turn the upper vent system on/
off. (See “Upper vent system ” (P.4-31).)
DUAL mode setting
Touch the "DUAL" key on the Climate screen
to turn on/off the DUAL mode. When the
DUAL mode is set, the temperature for the
driver seat and the front passenger seat can
be adjusted independently. When the DUAL
mode is on, the indicator light is on and
“DUAL” appears.
Upper vent system
When the “Upper Vent” key on the Climate
screen is touched, the air flow against the
driver’s or passenger’s upper body becomes
gentle. The indicator light on the key will
illuminate.
In this mode, air from the upper ventilator
flows in order to control the cabin tempera-
ture without blowing air directly on the
occupants. The upper vent system is useful when you
want the air conditioner to work quickly.
To turn the system off, touch the “Upper
Vent” key to turn the indicator light off.
Advanced Climate Control System
(if so equipped)
The Advanced Climate Control System
keeps the air inside of the vehicle clean,
using the automatic air circulation control
with the exhaust gas/outside odor detection
sensor and with ion control.
WAE0260X
“Auto Recirc” key:
Touch to turn on the automatic air
recirculation mode.
Plasmacluster®icon:
Indicates the Plasmacluster®ion emis-
sion status.
Automatic air recirculation control with the
exhaust gas/outside odor detection sensor:
The Advanced Climate Control system
comes with an exhaust gas detection/out-
side odor sensor. When the automatic air
circulation control is activated, the sensor
detects odors outside the vehicle such as
pulp or chemicals, and exhaust gas such as
gasoline or diesel. When such odors or gases
are detected, the display and the system
Monitor, climate, audio, phone and voice recognition systems4-31