audio INFINITI QX80 2020 Owner's Manual
[x] Cancel search | Manufacturer: INFINITI, Model Year: 2020, Model line: QX80, Model: INFINITI QX80 2020Pages: 516, PDF Size: 1.89 MB
Page 7 of 516

Illustrated table of contents0
Safety — seats, seat belts and supplemental restraint
system1
Instruments and controls
Pre-driving checks and adjustments
Monitor, climate, audio, phone and voice recognition
systems
Starting and driving
In case of emergency
Appearance and care
Do-it-yourself
Maintenance and schedules
Technical and consumer information
2
3
4
5
6
7
8
9
10
Table of
Contents
11Index
Page 16 of 516

0-8Illustrated table of contents
WAA0132X
1. Power liftgate switch (if so equipped)(P.3-21)
2. Heated steering wheel switch (P.2-45)
3. Instrument brightness control switch (P.2-44) 4. TRIP/RESET switch for twin trip od-
ometer (P.2-7)
5. Headlight, fog light and turn signal switch
— Headlight (P.2-38)
— Turn signal (P.2-44) — Fog light (P.2-45)
6. Steering-wheel-mounted controls (left side)
— Audio control steering switch (See
INFINITI InTouch
TMOwner’s Manual.)
— Hands-Free Phone System switch
(See INFINITI InTouch
TMOwner’s
Manual.)
— Trip computer switch (P.2-29)
7. Wiper and washer switch (P.2-34)
8. Steering-wheel-mounted controls (right side)
— Cruise control system (if so
equipped) (P.5-60)
— Intelligent Cruise Control (ICC) sys-
tem (if so equipped) (P.5-62)
9. Dynamic driver assistance switch (if so equipped)
— Lane Departure Prevention (LDP)
system (if so equipped) (P.5-22)
— Distance Control Assist (DCA) sys-
tem (if so equipped) (P.5-82)
— Blind Spot Intervention
®(BSI) sys-
tem (if so equipped) (P.5-40)
10. Shift lever (P.5-17)
11. INFINITI controller (See INFINITI In- Touch
TMOwner’s Manual.)
COCKPIT
Page 18 of 516

0-10Illustrated table of contents
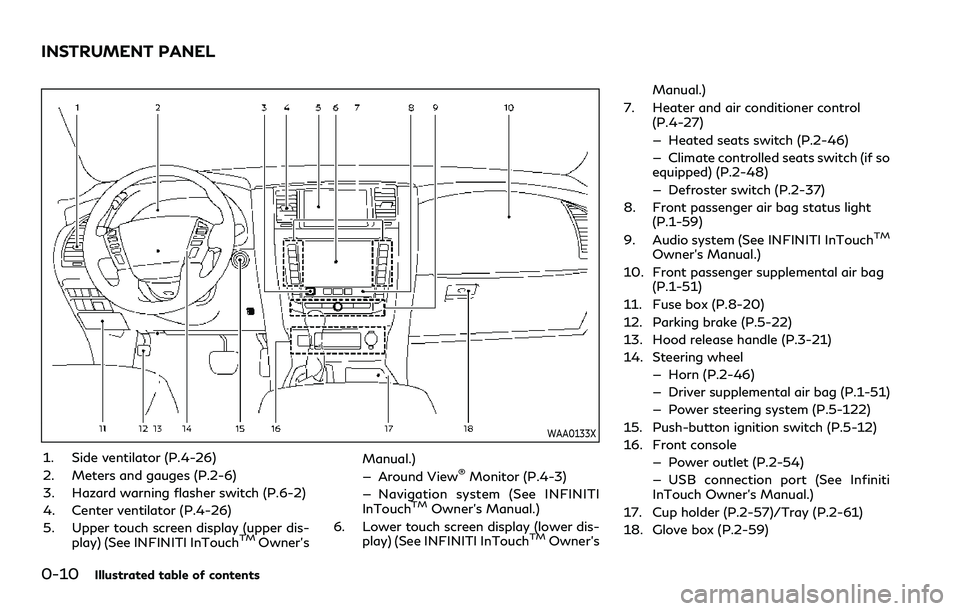
WAA0133X
1. Side ventilator (P.4-26)
2. Meters and gauges (P.2-6)
3. Hazard warning flasher switch (P.6-2)
4. Center ventilator (P.4-26)
5. Upper touch screen display (upper dis-play) (See INFINITI InTouch
TMOwner’s Manual.)
— Around View
®Monitor (P.4-3)
— Navigation system (See INFINITI
InTouch
TMOwner’s Manual.)
6. Lower touch screen display (lower dis- play) (See INFINITI InTouch
TMOwner’s Manual.)
7. Heater and air conditioner control (P.4-27)
— Heated seats switch (P.2-46)
— Climate controlled seats switch (if so
equipped) (P.2-48)
— Defroster switch (P.2-37)
8. Front passenger air bag status light (P.1-59)
9. Audio system (See INFINITI InTouch
TM
Owner’s Manual.)
10. Front passenger supplemental air bag (P.1-51)
11. Fuse box (P.8-20)
12. Parking brake (P.5-22)
13. Hood release handle (P.3-21)
14. Steering wheel — Horn (P.2-46)
— Driver supplemental air bag (P.1-51)
— Power steering system (P.5-122)
15. Push-button ignition switch (P.5-12)
16. Front console — Power outlet (P.2-54)
— USB connection port (See Infiniti
InTouch Owner’s Manual.)
17. Cup holder (P.2-57)/Tray (P.2-61)
18. Glove box (P.2-59)
INSTRUMENT PANEL
Page 33 of 516

killed.
. Do not allow people to ride in any
area of your vehicle that is not
equipped with seats and seat belts.
Be sure everyone in your vehicle is in
a seat and using a seat belt properly.
. Do not fold down the rear seats when
occupants are in the rear seat area or
any cargo is on the rear seats.
. Head restraints should be adjusted
properly as they may provide signifi-
cant protection against injury in an
accident. Always replace and adjust
them properly if they have been
removed for any reason.
. If the head restraints are removed for
any reason, they should be securely
stored to prevent them from causing
injury to passengers or damage to the
vehicle in case of sudden braking or
an accident.
. When returning the seatbacks to the
upright position, be certain they are
completely secured in the latched
position. If they are not completely
secured, passengers may be injured in
an accident or sudden stop.
. Properly secure all cargo to help
prevent it from sliding or shifting.
Do not place cargo higher than the seatbacks. In a sudden stop or colli-
sion, unsecured cargo could cause
personal injury.
. When folding the bench seat seat-
back down for maximum storage,
make sure the seat base is in the
latched position by rocking the seat
base. If the seat base is not properly
secured, cargo stored on top of a
folded seatback may become a pro-
jectile causing personal injury or
vehicle damage.
CAUTION
.When folding the 2nd row seat for
maximum cargo hauling, be sure that
cargo does not contact the center
console of the captain’s seat (if so
equipped) to avoid possible damage
to the console.
. When folding or returning the seat(s)
to the upright position, to avoid
injury to yourself and others:
— Make sure that the seat path is clear before moving the seat.
— Be careful not to allow hands or feet to get caught or pinched in
the seat.
SSS1119
Stowing 2nd and 3rd row seats
To stow 2nd and 3rd row seats for maximum
cargo capacity:
Manual Operation:
1. Pull lever located on the 2nd row seat.
The seatback folds down and the seat
base will tip forward. See “Entry to 3rd
row seat” (P.1-6).
Power Operation:
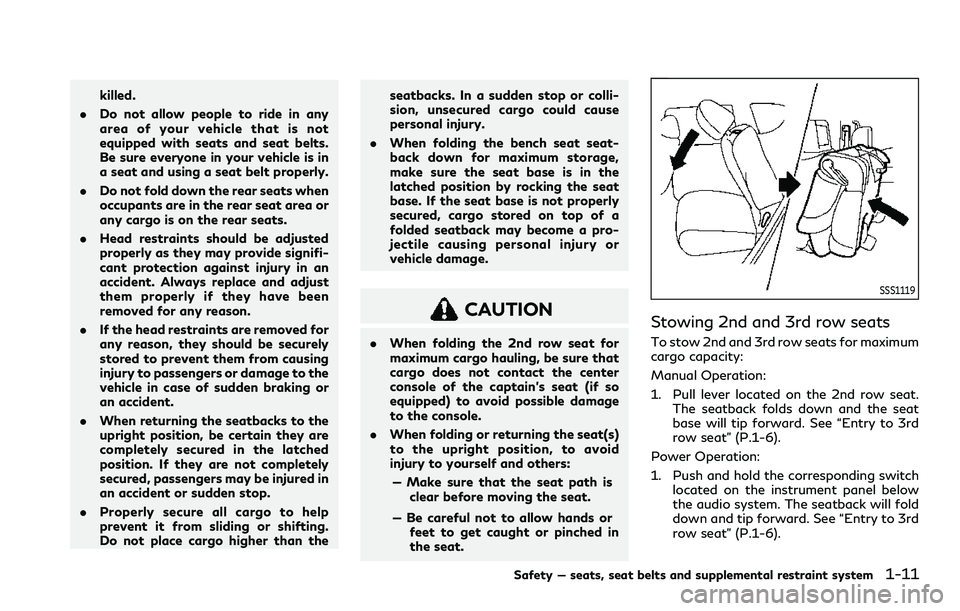
1. Push and hold the corresponding switch located on the instrument panel below
the audio system. The seatback will fold
down and tip forward. See “Entry to 3rd
row seat” (P.1-6).
Safety — seats, seat belts and supplemental restraint system1-11
Page 95 of 516

WAA0132X
1. Power liftgate switch (if so equipped)
2. Heated steering wheel switch
3. Instrument brightness control switch
4. TRIP/RESET switch for twin trip od-ometer 5. Headlight, fog light and turn signal
switch
— Headlight
— Turn signal
— Fog light 6. Steering-wheel-mounted controls (left
side)
— Audio control steering switch
— Hands-Free Phone System switch
— Trip computer switch
7. Wiper and washer switch
8. Steering-wheel-mounted controls (right side)
— Cruise control system (if so
equipped)
— Intelligent Cruise Control (ICC) sys-
tem (if so equipped)
9. Dynamic driver assistance switch (if so equipped)
— Lane Departure Prevention (LDP)
system (if so equipped)
— Distance Control Assist (DCA) sys-
tem (if so equipped)
— Blind Spot Intervention
®(BSI) sys-
tem (if so equipped)
10. Shift lever
11. INFINITI controller
12. Four-Wheel Drive (4WD) shift switch (if so equipped)/SNOW mode switch/
TOW mode switch/Vehicle Dynamic
Control (VDC) OFF switch
13. Headlight aiming control (if so equipped)
14. Power liftgate main switch
Instruments and controls2-3
COCKPIT
Page 97 of 516

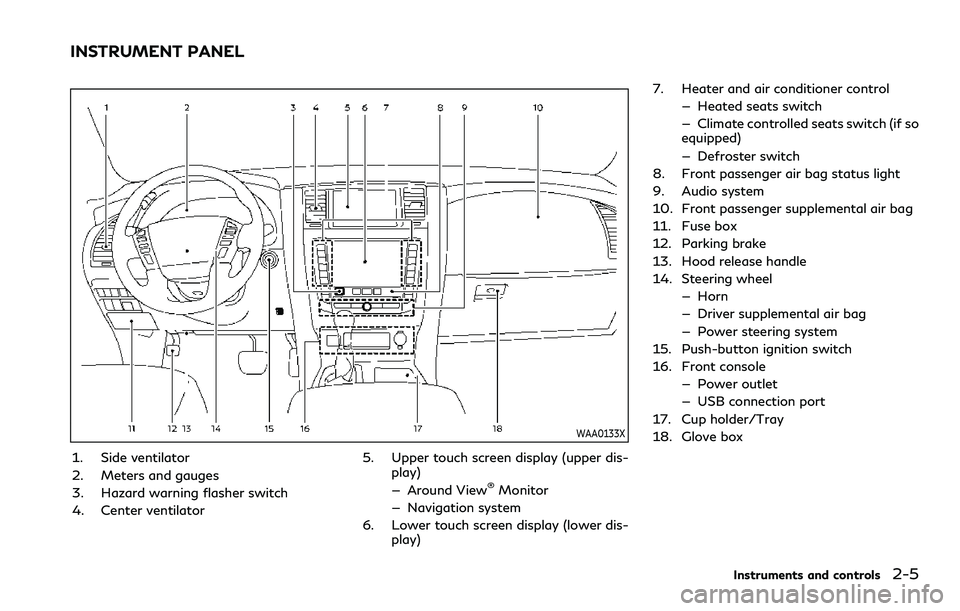
WAA0133X
1. Side ventilator
2. Meters and gauges
3. Hazard warning flasher switch
4. Center ventilator5. Upper touch screen display (upper dis-
play)
— Around View
®Monitor
— Navigation system
6. Lower touch screen display (lower dis- play) 7. Heater and air conditioner control
— Heated seats switch
— Climate controlled seats switch (if so
equipped)
— Defroster switch
8. Front passenger air bag status light
9. Audio system
10. Front passenger supplemental air bag
11. Fuse box
12. Parking brake
13. Hood release handle
14. Steering wheel — Horn
— Driver supplemental air bag
— Power steering system
15. Push-button ignition switch
16. Front console — Power outlet
— USB connection port
17. Cup holder/Tray
18. Glove box
Instruments and controls2-5
INSTRUMENT PANEL
Page 121 of 516

WAC0142X
TRIP COMPUTER
The trip computer switch is located on the
left side of the steering wheel. To operate
the trip computer, push the switch.
Each time the left or right side of the
switch is pushed, the display will change.
The display item for trip computer is chan-
ged on the lower display. For details, see the
INFINITI InTouch
TMOwner’s Manual.
1. Home
The Home mode shows the following in-
formation.
.Vehicle speed .
Navigation (if so equipped)
. Audio
2. Audio
The audio mode shows the status of audio
information.
For more details, see the INFINITI In-
Touch
TMOwner’s Manual.
3. Compass
This display indicates the heading direction
of the vehicle.
4. Navigation
When the route guidance is set in the
navigation system, this item shows the
navigation route information.
For more details, see the INFINITI In-
Touch
TMOwner’s Manual.
5. Vehicle speed (MPH or km/h)
The vehicle speed mode shows the current
vehicle speed and the average vehicle speed
since the last reset.
Resetting is done by pushing the left or right
side of the
switch for longer than 1
second.
Average vehicle speed:
The average vehicle speed display is updated
every 30 seconds. The first 30 seconds after a reset, the display shows “———”.
6. Elapsed time and trip odometer
(mile or km)
Elapsed time:
The elapsed time mode shows the time since
the last reset. The displayed time can be
reset by pushing the left or right side of the
switch for longer than 1 second. (The
trip odometer is also reset at the same time.)
Trip odometer:
The trip odometer mode shows the total
distance the vehicle has been driven since
the last reset. Resetting is done by pushing
the left or right side of the
switch for
longer than 1 second. (The elapsed time is
also reset at the same time.)
7. Current fuel consumption and
average fuel consumption (MPG, l
(liter)/100 km or km/l)
Current fuel consumption:
The current fuel consumption mode shows
the current fuel consumption.
Average fuel consumption:
The average fuel consumption mode shows
the average fuel consumption since the last
reset. Resetting is done by pushing the left
or right side of the
switch for longer
Instruments and controls2-29
Page 124 of 516

2-32Instruments and controls
SIC2133
Your vehicle has two types of security
systems, as follows:
.Vehicle security system
. INFINITI Vehicle Immobilizer System
The security condition will be shown by the
security indicator light.
VEHICLE SECURITY SYSTEM
The vehicle security system provides visual
and audio alarm signals if someone opens
the doors, hood, or liftgate when the system
is armed. It is not, however, a motion
detection type system that activates when
a vehicle is moved or when a vibration
occurs.
The system helps deter vehicle theft but
cannot prevent it, nor can it prevent the
theft of interior or exterior vehicle compo-
nents in all situations. Always secure your
vehicle even if parking for a brief period.
Never leave your Intelligent Key(s) in the
vehicle, and always lock it when unattended.
Be aware of your surroundings, and park in
secure, well-lit areas whenever possible.
Many devices offering additional protection,
such as component locks, identification
markers, and tracking systems, are available
at auto supply stores and specialty shops.
Your INFINITI retailer may also offer such
equipment. Check with your insurance com-
pany to see if you may be eligible for
discounts for various theft protection fea-
tures.
SIC2045
How to arm the vehicle security
system
1. Close all windows.
The system can be armed even if the
windows are open.
2. Push the ignition switch to the OFF position.
3. Remove the Intelligent Key from the vehicle.
4. Close all doors, hood and liftgate. Lock all doors. The doors can be locked with
the Intelligent Key, door handle request
switch, power door lock switch or me-
chanical key.
SECURITY SYSTEMS
Page 182 of 516

3-8Pre-driving checks and adjustments
water or salt water. This could affect
the system function.
. Do not drop the Intelligent Key.
. Do not strike the Intelligent Key
sharply against another object.
. Do not change or modify the Intelli-
gent Key.
. Wetting may damage the Intelligent
Key. If the Intelligent Key gets wet,
immediately wipe until it is comple-
tely dry.
. If the outside temperature is below
14°F (−10°C), the battery of the
Intelligent Key may not function
properly.
. Do not place the Intelligent Key for
an extended period in an area where
temperatures exceed 140°F (60°C).
. Do not attach the Intelligent Key
with a key holder that contains a
magnet.
. Do not place the Intelligent Key near
equipment that produces a magnetic
field, such as a TV, audio equipment
and personal computers.
If an Intelligent Key is lost or stolen, INFINITI
recommends erasing the ID code of that
Intelligent Key from the vehicle. This may
prevent the unauthorized use of the Intelli- gent Key to operate the vehicle. For infor-
mation regarding the erasing procedure, it is
recommended that you contact an INFINITI
retailer.
Page 214 of 516

3-40Pre-driving checks and adjustments
3. Push the SET switch and, within 5seconds, push the memory switch (1 or
2) fully for at least 1 second.
The indicator light for the pushed mem-
ory switch will stay on for approximately
5 seconds after pushing the switch.
When the memory is stored in the
memory switch (1 or 2), a buzzer will
sound.
If memory is stored in the same memory
switch, the previous memory will be
deleted.
Linking Intelligent Key to a stored
memory position
The Intelligent Key can be linked to a stored
memory position with the following proce-
dure.
1. Follow the steps for storing a memoryposition.
2. While the indicator light for the memory switch being set is illuminated for 5
seconds, push the
button on the
Intelligent Key. If the indicator light
blinks, the Intelligent Key is linked to
that memory setting.
Push the ignition switch to the OFF position,
and then push the
button on the
Intelligent Key. The driver’s seat, steering
wheel and outside mirrors will move to the memorized position.
Confirming memory storage
.
Push the ignition switch to the ON
position and push the SET switch. If the
main memory has not been stored, the
indicator light will come on for approxi-
mately 0.5 second. When the memory
has stored in position, the indicator light
will stay on for approximately 5 seconds.
. If the battery cable is disconnected, or if
the fuse opens, the memory will be
canceled. In this case, reset the desired
position using the previous procedure.
. If optional Intelligent Keys are added to
your vehicle, the memory storage proce-
dure to switch 1 or 2 and linking
Intelligent Key procedure to a stored
memory position should be performed
again for each Intelligent Key. For addi-
tional Intelligent Key information, see
“Keys” (P.3-2).
Selecting the memorized position
1. Move the shift lever to the P (Park) position.
2. Use one of the following methods to move the driver’s seat, the outside
mirrors and the steering wheel.
.Push the memory switch (1 or 2) fully
for at least 1 second. The driver’s seat, steering column and
outside mirrors will move to the memor-
ized position or to the exit position when
the entry/exit function is set to active
with the indicator light flashing, and then
the light will stay on for approximately 5
seconds.
SETTING MEMORY FUNCTION
The status of the following settings can be
linked to the Intelligent Key and the memor-
ized settings can be available for each
Intelligent Key.
.
Air conditioner system
. Navigation system
. Audio system
To use the memory function, lock the doors
with the Intelligent Key that is linked to the
settings.
To enable the memorized settings:
1. Carry the Intelligent Key that is linked to the settings, and unlock the doors by
pushing the driver’s door handle request
switch or “UNLOCK”
button on the
Intelligent Key.
2. Place the ignition switch in the ON position. The memorized settings are
available.