USB port INFINITI QX80 2022 User Guide
[x] Cancel search | Manufacturer: INFINITI, Model Year: 2022, Model line: QX80, Model: INFINITI QX80 2022Pages: 192, PDF Size: 0.74 MB
Page 55 of 192
ing the button will display the audio adjust-
ment bar. Each time the button is pushed,
the menu will shift to the available setting
items.
Turn the button to adjust the level of the
selected setting item.
INFO:
This function may not be available when a
menu is highlighted on the screen.
USB MEMORY DEVICE CARE
AND CLEANING
USB MEMORY DEVICE
. Never touch the terminal portion of the
USB memory device.
. Do not place heavy objects on the USB
memory device.
. Do not store the USB memory device in
highly humid locations.
. Do not expose the USB memory device
to direct sunlight.
. Do not spill any liquids on the USB
memory device.
Refer to the USB memory device Owner’s
Manual for the details.
3. Audio system
3-19
Page 87 of 192
Apple CarPlay®
WARNING
.Stop your vehicle in a safe location
and apply the parking brake before
connecting your iPhone® to the ve-
hicle or operating your connected
iPhone® for setup.
. If you are unable to devote full
attention to vehicle operation while
using Apple CarPlay®, pull off the
road to a safe location and stop your
vehicle.
You can use Apple CarPlay® by connecting a
compatible iPhone® to your vehicle via a
USB cable or wirelessly (if so equipped).
With Apple CarPlay®, your in-vehicle sys-
tem can be used as a display and a controller
for some of the iPhone® functions. Apple
CarPlay® features Siri® which enables op-
erations via voice controls. Visit Apple.com
for information about the functions that are
available and details about Apple’s privacy
policy.
Certain vehicle information (e.g. location and
speed) may be shared with your device while Apple CarPlay® is in use. Carrier charges
may apply to use Apple CarPlay®.
COMPATIBILITY
Refer to the Apple website for compatible
devices.
INFO:
. For best results, always update your
device to the latest software version.
. Apple CarPlay® will take the place of
your Bluetooth® audio and Bluetooth®
Hands-Free Phone functionality.
. Phone menu and access to the con-
nected phone through Voice Recognition
System will be disabled while Apple
CarPlay® is connected. To access your
phone, use the Siri® function or select
the phone icon in the Apple CarPlay® top
menu screen.
. Models with navigation system:
When setting a route on the navigation
system, if you set a destination with
Apple CarPlay®, the route setting of the
navigation system will be cancelled.
CONNECTING iPhone®
This system supports wireless Apple Car-
Play® (if so equipped). To connect Apple
CarPlay® wirelessly, the Bluetooth® and
Wi-Fi network (if so equipped) must be
available with the in-vehicle system before
operation.
“Setting devices” (page 2-17)
“Wi-Fi setting” (page 2-19)
INFO:
Depending on the device and firmware
version of the iPhone®, wireless Apple Car-
Play® (if so equipped) cannot be used.
Always update your device to the latest
software version.
Connecting with the USB cable
INFO:
To connect your iPhone® with the in-vehicle
system, it is recommended to use the Apple
Lightning
TMcable (Mfi certified) that was
provided with your iPhone®.
1. Connect the iPhone® to the USB con- nection port.
“USB (Universal Serial Bus) connec-
tion ports” (page 2-8)
5. Information
5-17
Page 92 of 192
5. Information
.The Phone menu and access to the
connected phone through the Voice
Recognition System will be disabled
while Android Auto is connected. To
access your phone, use the Google
Assistant function or select the phone
icon in the Android Auto top menu
screen.
INITIAL Android Auto SETTINGS
Before using Android Auto, the Android
Auto App must be downloaded on your
Android phone.
Download the Android Auto App from the
Google Play store on your Android phone.
It may be necessary to operate the Android
phone when connected first.
Depending on the selection, such as ap-
proval, some of the features of Android Auto
are not available.
Android Auto OPERATION
Unlock your phone’s screen before connect-
ing your Android phone.
1. Connect your Android phone to the USB
connection port.
“USB (Universal Serial Bus) connec-
tion ports” (page 2-8)
2. Depending on the setting, a Startup Information screen will appear. Touch
[Yes] to use Android Auto.
INFO:
.If you do not wish to display theStartup Information screen each time
you activate Android Auto, turn on
[Don’t Ask Anymore] on the Startup
Information screen. The Startup In-
formation screen will not be displayed
from the next Android Auto activa-
tion. The Startup Information screen
can be set to appear again in the
Android Auto setting menu.
“Android Auto settings”
(page 5-24)
.If your Android phone is connected to the in-vehicle system via Bluetooth®,
your phone’s Bluetooth® will be
turned on automatically when An- droid Auto is activated. Keep the
Bluetooth® turned on to use the
phone functions.
.Some functions of Android Auto are
not available if the Bluetooth® is not
connected.
3. The Android Auto top menu screen will appear. The Android phone functions
displayed on the screen should now be
operable using the in-vehicle system.
INFO:
. While Android Auto is activated on the
Android phone, the phone operations,
such as making or receiving calls, can
only be done with Android Auto.
. Depending on the device, an Android
phone requires MTP mode to be selected
in the USB transfer setting.
. After exiting the Android Auto screen,
return to the Android Auto screen by
taking one of the following actions.
— Touch [
] on the Launch Bar.
— Touch [Smartphone Connection] on the information screen, and then touch
[Android Auto].
5-22
Page 141 of 192
vice areas.
— This system makes no distinction be- tween limited traffic control and total
control (blockage). It may show an
indirect route even if the road is
usable.
— Even if the ferry preference is set to OFF, a route that uses a ferry line
may be suggested.
HOW TO UPDATE MAP DATA
WARNING
TO AVOID RISK OF DEATH OR SER-
IOUS PERSONAL INJURY WHEN UP-
DATING THE MAP SOFTWARE:
If you choose to park the vehicle within
range of a Wi-Fi connection (if so
equipped) or a TCU (Telematics Control
Unit), park the vehicle in a secure, safe
well-ventilated location that is open to
the air. During the update process, if you
choose to park your vehicle, it should be
kept in a well-ventilated area to avoid
exposure to carbon monoxide. Do not
breathe exhaust gases; they contain
colorless and odorless carbon monoxide.
Carbon monoxide is dangerous. It can cause unconsciousness or death.
1.
Apply the parking brake.
2. Remain with the vehicle while the
update is in process.
3. Do not allow children, pets or people
who may need assistance to remain in
the vehicle while the software is
updating.
NOTE:
The vehicle is not required to be parked
during the map update process.
Map data can be updated via USB, Wi-Fi (if
so equipped) or a TCU (Telematics Control
Unit).
Updating with USB memory
The navigation map data can be updated
with the latest information by downloading
a new map database to a USB memory
device and installing it in the vehicle.
For map update, use the USB memory with
the following specifications:
Supported media: USB2.0
Supported file system: FAT32 1. Push
Page 142 of 192
![INFINITI QX80 2022 User Guide 6. Navigation (if so equipped)
10. Push<MENU> on the INFINITI controller
or touch [MENU] on the Launch Bar.
11. Touch [Info] on the Launch Bar and then touch [System Information].
12. Touch [Map Updat INFINITI QX80 2022 User Guide 6. Navigation (if so equipped)
10. Push<MENU> on the INFINITI controller
or touch [MENU] on the Launch Bar.
11. Touch [Info] on the Launch Bar and then touch [System Information].
12. Touch [Map Updat](/img/42/41149/w960_41149-141.png)
6. Navigation (if so equipped)
10. Push
Page 160 of 192
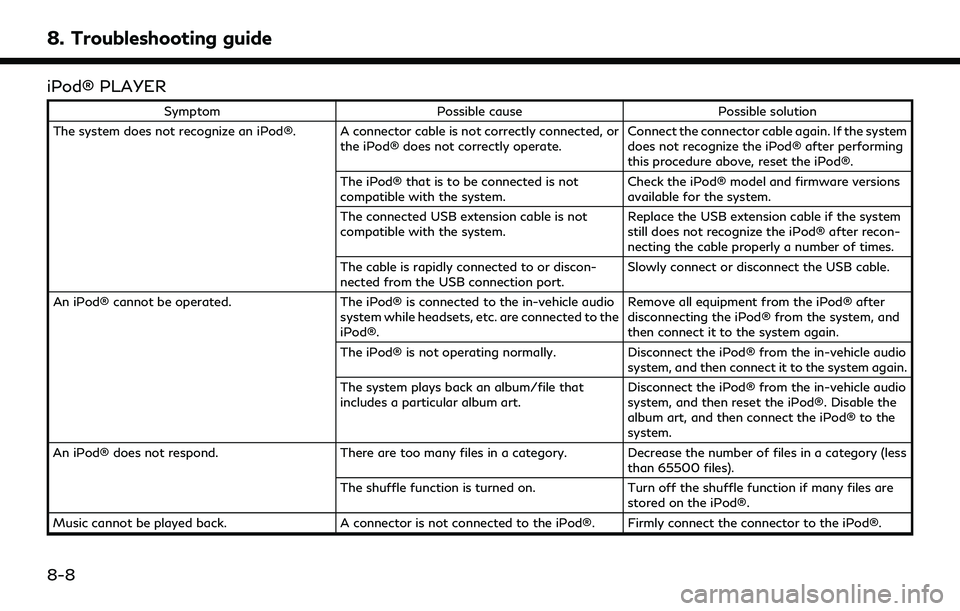
8. Troubleshooting guide
iPod® PLAYER
SymptomPossible cause Possible solution
The system does not recognize an iPod®. A connector cable is not correctly connected, or the iPod® does not correctly operate.Connect the connector cable again. If the system
does not recognize the iPod® after performing
this procedure above, reset the iPod®.
The iPod® that is to be connected is not
compatible with the system. Check the iPod® model and firmware versions
available for the system.
The connected USB extension cable is not
compatible with the system. Replace the USB extension cable if the system
still does not recognize the iPod® after recon-
necting the cable properly a number of times.
The cable is rapidly connected to or discon-
nected from the USB connection port. Slowly connect or disconnect the USB cable.
An iPod® cannot be operated. The iPod® is connected to the in-vehicle audio
system while headsets, etc. are connected to the
iPod®. Remove all equipment from the iPod® after
disconnecting the iPod® from the system, and
then connect it to the system again.
The iPod® is not operating normally. Disconnect the iPod® from the in-vehicle audio
system, and then connect it to the system again.
The system plays back an album/file that
includes a particular album art. Disconnect the iPod® from the in-vehicle audio
system, and then reset the iPod®. Disable the
album art, and then connect the iPod® to the
system.
An iPod® does not respond. There are too many files in a category. Decrease the number of files in a category (less
than 65500 files).
The shuffle function is turned on. Turn off the shuffle function if many files are
stored on the iPod®.
Music cannot be played back. A connector is not connected to the iPod®. Firmly connect the connector to the iPod®.
8-8
Page 162 of 192
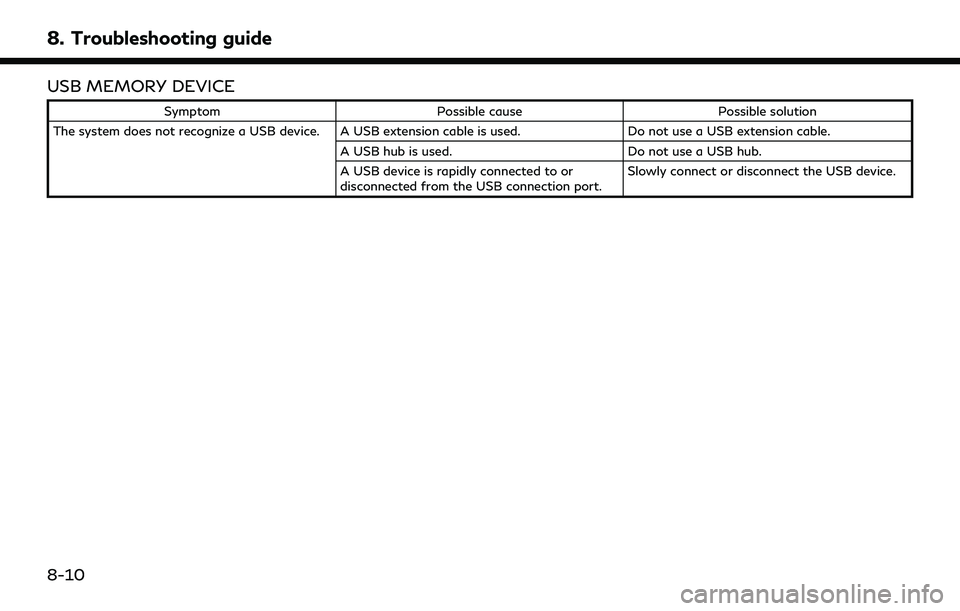
8. Troubleshooting guide
USB MEMORY DEVICE
SymptomPossible cause Possible solution
The system does not recognize a USB device. A USB extension cable is used. Do not use a USB extension cable.
A USB hub is used. Do not use a USB hub.
A USB device is rapidly connected to or
disconnected from the USB connection port. Slowly connect or disconnect the USB device.
8-10
Page 170 of 192
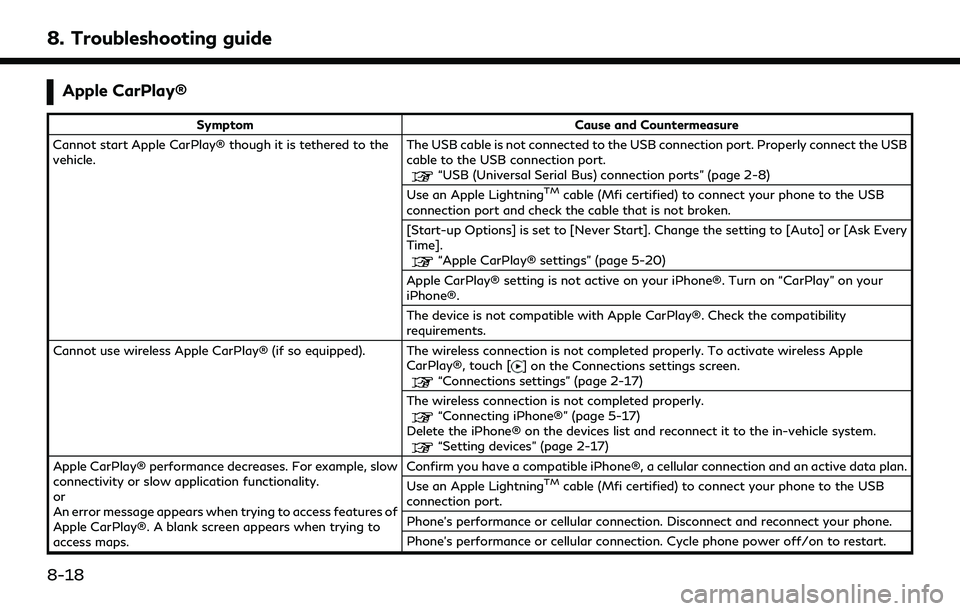
8. Troubleshooting guide
Apple CarPlay®
SymptomCause and Countermeasure
Cannot start Apple CarPlay® though it is tethered to the
vehicle. The USB cable is not connected to the USB connection port. Properly connect the USB
cable to the USB connection port.
“USB (Universal Serial Bus) connection ports” (page 2-8)
Use an Apple LightningTMcable (Mfi certified) to connect your phone to the USB
connection port and check the cable that is not broken.
[Start-up Options] is set to [Never Start]. Change the setting to [Auto] or [Ask Every
Time].
“Apple CarPlay® settings” (page 5-20)
Apple CarPlay® setting is not active on your iPhone®. Turn on “CarPlay” on your
iPhone®.
The device is not compatible with Apple CarPlay®. Check the compatibility
requirements.
Cannot use wireless Apple CarPlay® (if so equipped). The wireless connection is not completed properly. To activate wireless Apple CarPlay®, touch [
] on the Connections settings screen.“Connections settings” (page 2-17)
The wireless connection is not completed properly.
“Connecting iPhone®” (page 5-17)
Delete the iPhone® on the devices list and reconnect it to the in-vehicle system.
“Setting devices” (page 2-17)
Apple CarPlay® performance decreases. For example, slow
connectivity or slow application functionality.
or
An error message appears when trying to access features of
Apple CarPlay®. A blank screen appears when trying to
access maps. Confirm you have a compatible iPhone®, a cellular connection and an active data plan.
Use an Apple Lightning
TMcable (Mfi certified) to connect your phone to the USB
connection port.
Phone’s performance or cellular connection. Disconnect and reconnect your phone.
Phone’s performance or cellular connection. Cycle phone power off/on to restart.
8-18
Page 172 of 192
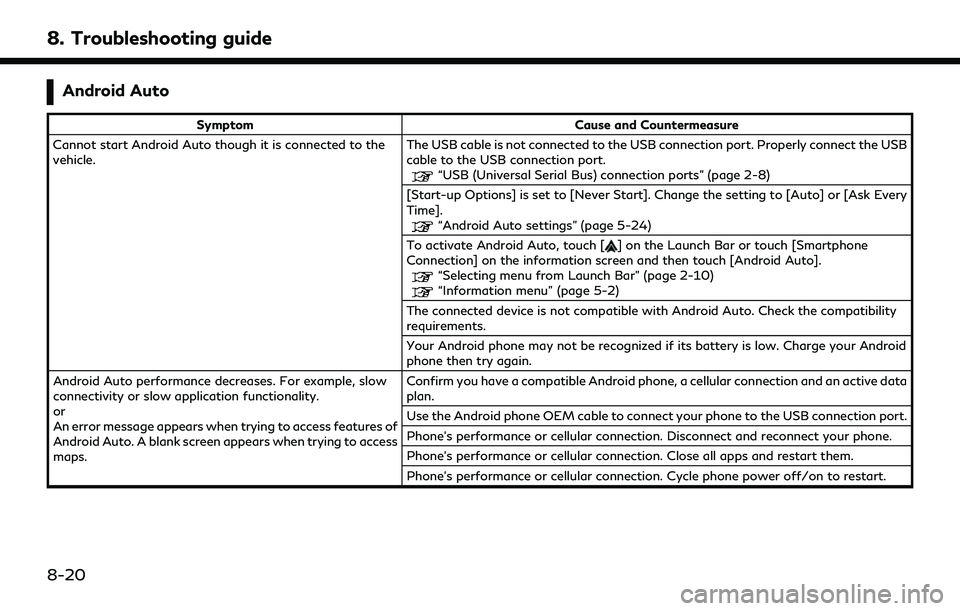
8. Troubleshooting guide
Android Auto
SymptomCause and Countermeasure
Cannot start Android Auto though it is connected to the
vehicle. The USB cable is not connected to the USB connection port. Properly connect the USB
cable to the USB connection port.
“USB (Universal Serial Bus) connection ports” (page 2-8)
[Start-up Options] is set to [Never Start]. Change the setting to [Auto] or [Ask Every
Time].
“Android Auto settings” (page 5-24)
To activate Android Auto, touch [
] on the Launch Bar or touch [Smartphone
Connection] on the information screen and then touch [Android Auto].
“Selecting menu from Launch Bar” (page 2-10)“Information menu” (page 5-2)
The connected device is not compatible with Android Auto. Check the compatibility
requirements.
Your Android phone may not be recognized if its battery is low. Charge your Android
phone then try again.
Android Auto performance decreases. For example, slow
connectivity or slow application functionality.
or
An error message appears when trying to access features of
Android Auto. A blank screen appears when trying to access
maps. Confirm you have a compatible Android phone, a cellular connection and an active data
plan.
Use the Android phone OEM cable to connect your phone to the USB connection port.
Phone’s performance or cellular connection. Disconnect and reconnect your phone.
Phone’s performance or cellular connection. Close all apps and restart them.
Phone’s performance or cellular connection. Cycle phone power off/on to restart.
8-20
Page 188 of 192
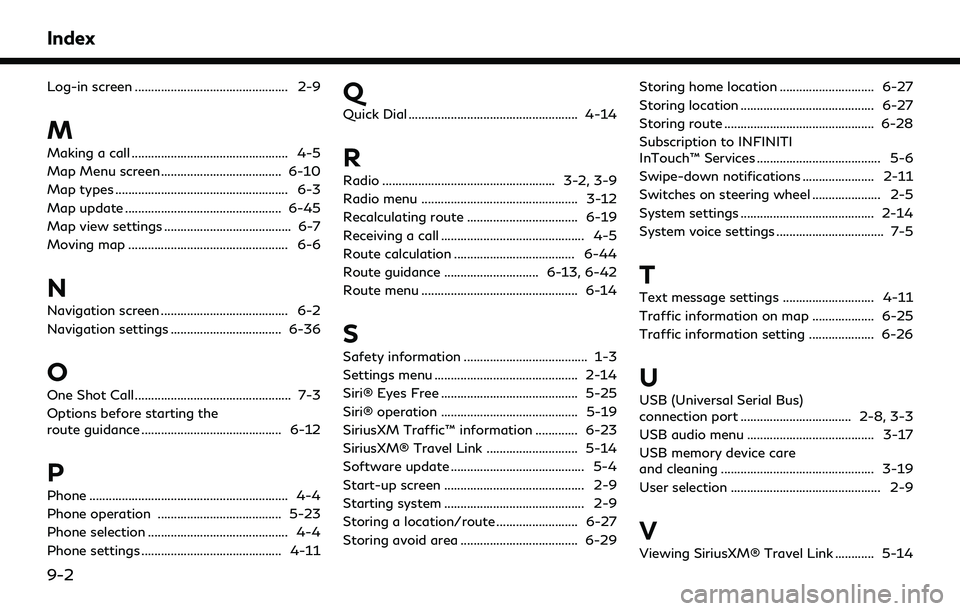
Index
Log-in screen ............................................... 2-9
M
Making a call ................................................ 4-5
Map Menu screen ..................................... 6-10
Map types ..................................................... 6-3
Map update ................................................ 6-45
Map view settings ....................................... 6-7
Moving map ................................................. 6-6
N
Navigation screen ....................................... 6-2
Navigation settings .................................. 6-36
O
One Shot Call ................................................ 7-3
Options before starting the
route guidance ........................................... 6-12
P
Phone ............................................................. 4-4
Phone operation ...................................... 5-23
Phone selection ........................................... 4-4
Phone settings ........................................... 4-11
Q
Quick Dial .................................................... 4-14
R
Radio ..................................................... 3-2, 3-9
Radio menu ................................................ 3-12
Recalculating route .................................. 6-19
Receiving a call ............................................ 4-5
Route calculation ..................................... 6-44
Route guidance ............................. 6-13, 6-42
Route menu ................................................ 6-14
S
Safety information ...................................... 1-3
Settings menu ............................................ 2-14
Siri® Eyes Free .......................................... 5-25
Siri® operation .......................................... 5-19
SiriusXM Traffic™ information ............. 6-23
SiriusXM® Travel Link ............................ 5-14
Software update ......................................... 5-4
Start-up screen ........................................... 2-9
Starting system ........................................... 2-9
Storing a location/route ......................... 6-27
Storing avoid area .................................... 6-29Storing home location ............................. 6-27
Storing location ......................................... 6-27
Storing route .............................................. 6-28
Subscription to INFINITI
InTouch™ Services ...................................... 5-6
Swipe-down notifications ...................... 2-11
Switches on steering wheel ..................... 2-5
System settings ......................................... 2-14
System voice settings ................................. 7-5
T
Text message settings ............................ 4-11
Traffic information on map ................... 6-25
Traffic information setting .................... 6-26
U
USB (Universal Serial Bus)
connection port .................................. 2-8, 3-3
USB audio menu ....................................... 3-17
USB memory device care
and cleaning ............................................... 3-19
User selection .............................................. 2-9
V
Viewing SiriusXM® Travel Link ............ 5-14
9-2