change language JAGUAR XF 2010 1.G User Guide
[x] Cancel search | Manufacturer: JAGUAR, Model Year: 2010, Model line: XF, Model: JAGUAR XF 2010 1.GPages: 225, PDF Size: 8 MB
Page 57 of 225
R
(FM8) SEMCON JLR OWNER GUIDE VER 1.00 EURO
LANGUAGE: english-en; MARQUE: jaguar; MODEL: XF
Message centre
57
METRIC/IMPERIAL/MIXED DISPLAY
The display of me tric, imperial or mixed units is
selected via the touch screen:
• With the touch screen switched on, select
Set-up from the Home menu.
• Select Security/vehicle , then select Units.
• Touch the appropriate button to select
Metric or Imperial units.
Note: Temperature display can be changed
between °C (Celsius) and °F (Fahrenheit)
independently of Metric or Imperial units.
SERVICE INTERVAL INDICATOR
The service interval message will only be
displayed when the vehicle has less than
3200 km (2000 miles) be fore the service is
due.
When the ignition is switched on, and the
vehicle has started it s service countdown,
SERVICE REQ'D XXXX km (XXXX MLS) is
displayed in the message centre.
When the service distance has been reached,
SERVICE REQUIRED is displayed in the
message centre.
If no service inte rval indicator is
displayed during the vehicle service
cycle, make sure that your vehicle is
serviced in accordance with the
intervals, as stated in the Service
Portfolio.
Page 60 of 225

L
(FM8) SEMCON JLR OWNER GUIDE VER 1.00 EURO
LANGUAGE: english-en; MARQUE: jaguar; MODEL: XF
Touch screen
60
SCREEN SETTINGS
Screensaver: Select to change the
screensaver. Touch an option to select.
Screen animations : Select to turn animated
transitions between screens on or off.
Note: While screen animations are on, system
response time will be slower than normal.
Time out home : Sub menu selection screens
can be set to revert to the Home menu after a
pre-determined length of time.
Theme : Changes appearance of the touch
screen soft keys.
SYSTEM SETTINGS
Button feedback : Select to turn the soft key
confirmation tone on or off.
Clock adjust : Select 12 or 24 hour clock. Set
current time. Select Date to change the date, or
to alter the date format. Select Set, to store
new settings.
Note: The clock can also be adjusted from the
touch screen time display.
Home menu shortcuts : Select up to three items
from the displayed list to appear as shortcuts
on the Home menu . Select Clear to deselect
highlighted items.
Language: Select the requir ed language. Select
Male or Female voice. Touch Change to select
alternatives for Voice and text displays. Follow
the on-screen instructions to confirm.
Note: Some languages are not yet available for
both System display text and Voice control. In
this event, it will be necessary to select a
separate language for Voice control.
Volume presets : Adjust volume for the
available sy stems (announcements, phone,
voice etc.).
VOICE SETTINGS
• Command list : View the categories and the
acceptable voice commands.
Select an Information button to view
alternative func tion commands.
• Voicetags : View the categories. Select a
category to manage the voicetags for the
chosen system. See 127, VOICETAGS.
• Operating guide: View brief Voice system
instructions. Select Voice tutorial for more
detailed instructions (cancel via the
displayed pop-up or by pressing and
holding the voice button).
• Preferences : Select to alter the following
settings:
• Voice profile: The voice system can be
trained to have a gr eater recognition of
a particular voice or accent.The default
setting is Standard. To build a voice
profile for either User 1 or User 2, it is
necessary to complete a training
program first.
To complete the training for the first
time, select either User 1 or User 2 and
follow the on-screen and audible
instructions.
• Voice feedback : Select On or Off.
• Feedback volume : Adjust using the +/-
buttons. It is not po ssible to reduce the
volume to zero.
• Voice training: Select to access the voice
system training pr ogram, designed to
enable the system to better recognise the
vocal characteristics of a user.
Select User 1 or User 2 and follow the on
screen and audible instructions. See 127,
VOICE TRAINING.
Page 63 of 225
R
(FM8) SEMCON JLR OWNER GUIDE VER 1.00 EURO
LANGUAGE: english-en; MARQUE: jaguar; MODEL: XF
Heating and ventilation
63
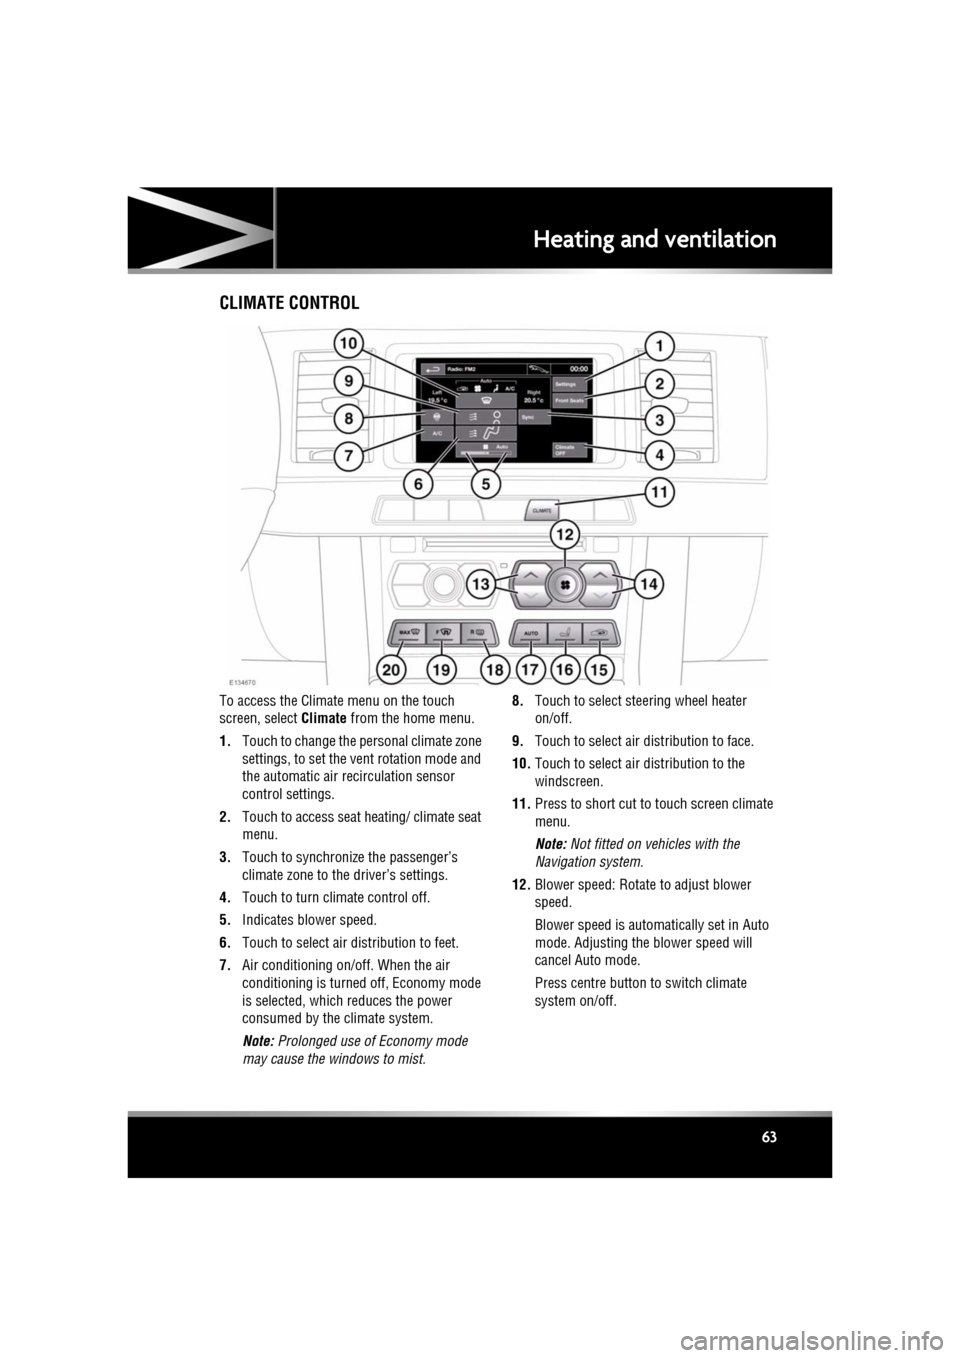
Heating and ventilationCLIMATE CONTROL
To access the Climate menu on the touch
screen, select Climate from the home menu.
1. Touch to change the personal climate zone
settings, to set the vent rotation mode and
the automatic air recirculation sensor
control settings.
2. Touch to access seat heating/ climate seat
menu.
3. Touch to synchronize the passenger’s
climate zone to the driver’s settings.
4. Touch to turn climate control off.
5. Indicates blower speed.
6. Touch to select air distribution to feet.
7. Air conditioning on/off. When the air
conditioning is turned off, Economy mode
is selected, which reduces the power
consumed by the climate system.
Note: Prolonged use of Economy mode
may cause the windows to mist. 8.
Touch to select steering wheel heater
on/off.
9. Touch to select air distribution to face.
10. Touch to select air distribution to the
windscreen.
11. Press to short cut to touch screen climate
menu.
Note: Not fitted on vehicles with the
Navigation system.
12. Blower speed: Rotate to adjust blower
speed.
Blower speed is automatically set in Auto
mode. Adjusting the blower speed will
cancel Auto mode.
Press centre button to switch climate
system on/off.
Page 74 of 225
L
(FM8) SEMCON JLR OWNER GUIDE VER 1.00 EURO
LANGUAGE: english-en; MARQUE: jaguar; MODEL: XF
Starting the engine
74
Starting the engineSTARTING A PETROL ENGINE
The Smart Key may not be detected if it
is placed within a metal container or if it
is shielded by a device with a back-lit
LCD screen, such as a smart phone,
laptop (including laptop bag), games
console etc. Keep the Smart Key clear of
such devices when attempting Keyless
entry or Keyless starting.
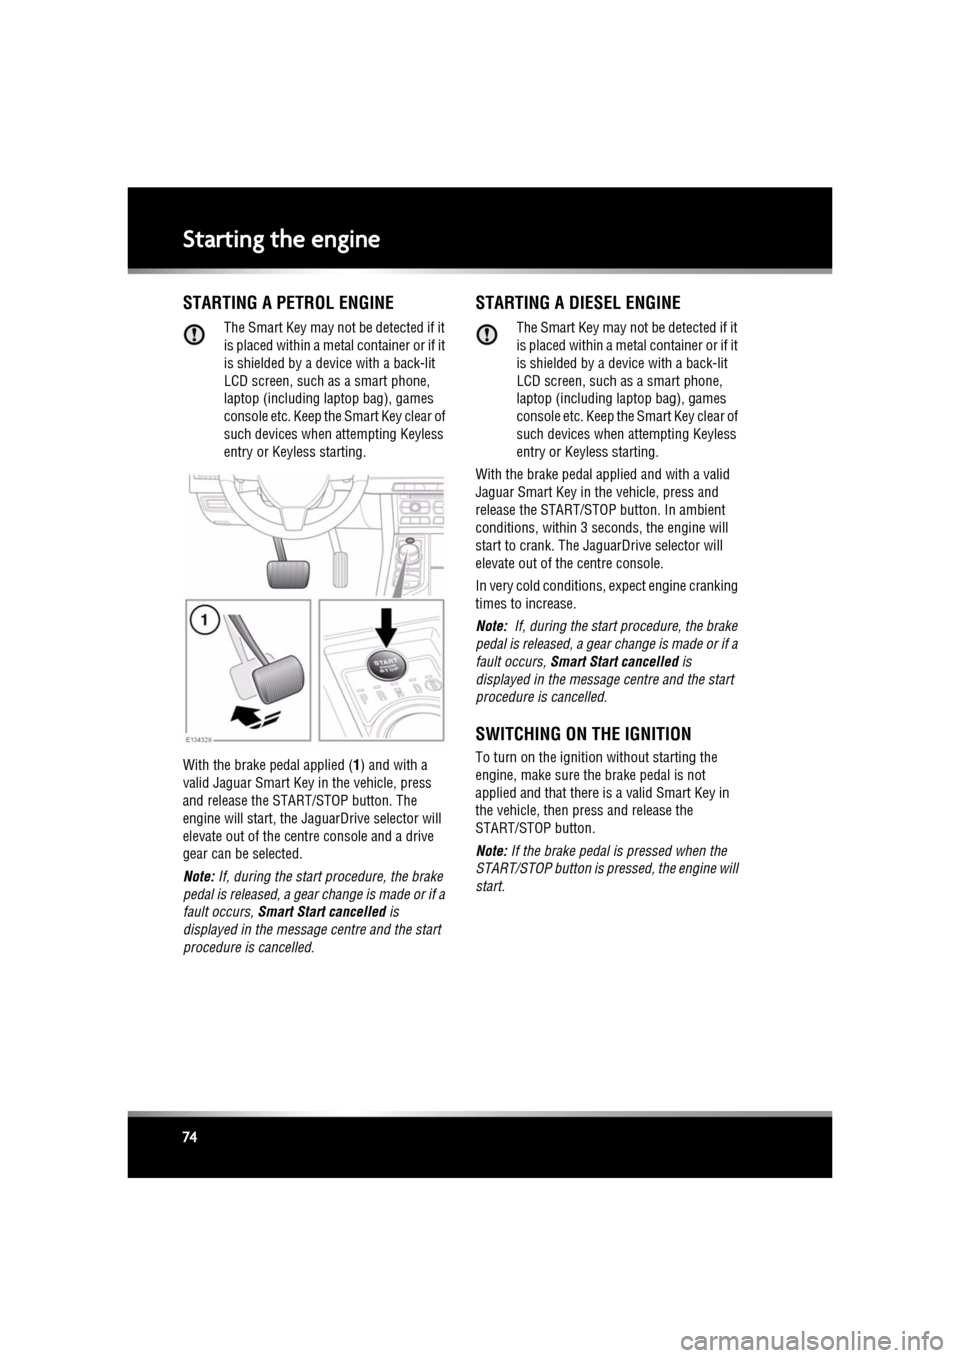
With the brake pedal applied ( 1) and with a
valid Jaguar Smart Key in the vehicle, press
and release the STAR T/STOP button. The
engine will start, the Ja guarDrive selector will
elevate out of the cent re console and a drive
gear can be selected.
Note: If, during the start procedure, the brake
pedal is released, a gear change is made or if a
fault occurs, Smart Start cancelled is
displayed in the message centre and the start
procedure is cancelled.
STARTING A DIESEL ENGINE
The Smart Key may not be detected if it
is placed within a meta l container or if it
is shielded by a device with a back-lit
LCD screen, such as a smart phone,
laptop (including la ptop bag), games
console etc. Keep the Smart Key clear of
such devices when attempting Keyless
entry or Keyless starting.
With the brake pedal applied and with a valid
Jaguar Smart Key in the vehicle, press and
release the START/STOP button. In ambient
conditions, within 3 se conds, the engine will
start to crank. The JaguarDrive selector will
elevate out of the centre console.
In very cold conditions, expect engine cranking
times to increase.
Note: If, during the start procedure, the brake
pedal is released, a gear change is made or if a
fault occurs, Smart Start cancelled is
displayed in the message centre and the start
procedure is cancelled.
SWITCHING ON THE IGNITION
To turn on the ignition without starting the
engine, make sure th e brake pedal is not
applied and that there is a valid Smart Key in
the vehicle, then press and release the
START/STOP button.
Note: If the brake pedal is pressed when the
START/STOP button is pressed, the engine will
start.
Page 81 of 225
R
(FM8) SEMCON JLR OWNER GUIDE VER 1.00 EURO
LANGUAGE: english-en; MARQUE: jaguar; MODEL: XF
Gearbox
81
GearboxAUTOMATIC TRANSMISSION
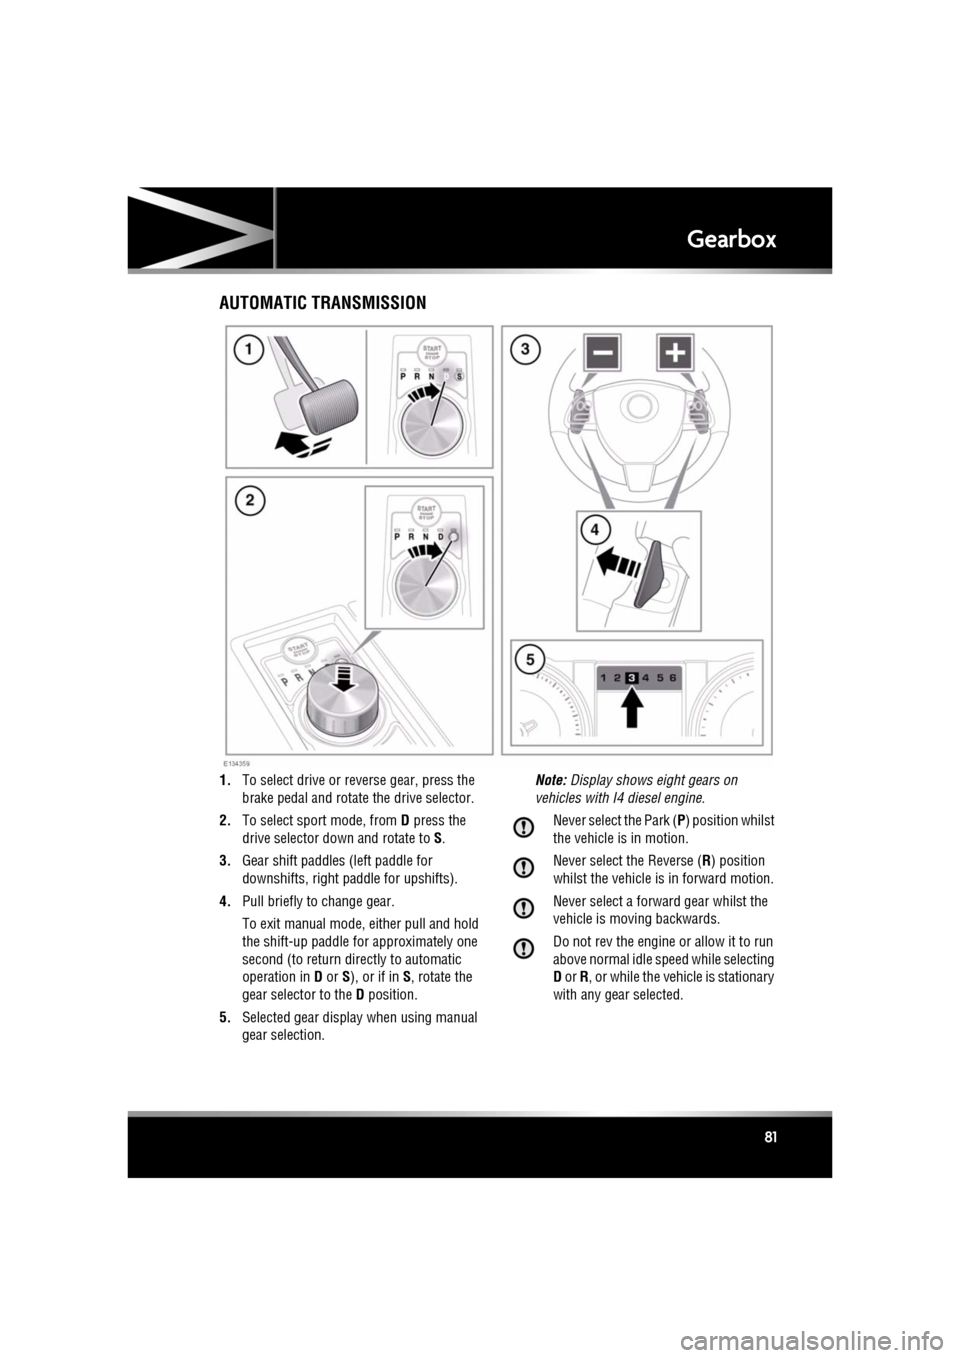
1. To select drive or re verse gear, press the
brake pedal and rotate the drive selector.
2. To select sport mode, from D press the
drive selector dow n and rotate to S.
3. Gear shift paddles (left paddle for
downshifts, right pa ddle for upshifts).
4. Pull briefly to change gear.
To exit manual mode, either pull and hold
the shift-up paddle for approximately one
second (to return directly to automatic
operation in D or S), or if in S, rotate the
gear selector to the D position.
5. Selected gear display when using manual
gear selection. Note:
Display shows eight gears on
vehicles with I4 diesel engine.
Never select the Park ( P) position whilst
the vehicle is in motion.
Never select the Reverse ( R) position
whilst the vehicle is in forward motion.
Never select a forward gear whilst the
vehicle is moving backwards.
Do not rev the engine or allow it to run
above normal idle speed while selecting
D or R, or while the vehicle is stationary
with any gear selected.
Page 83 of 225
R
(FM8) SEMCON JLR OWNER GUIDE VER 1.00 EURO
LANGUAGE: english-en; MARQUE: jaguar; MODEL: XF
Stability control
83
Stability controlWINTER MODE
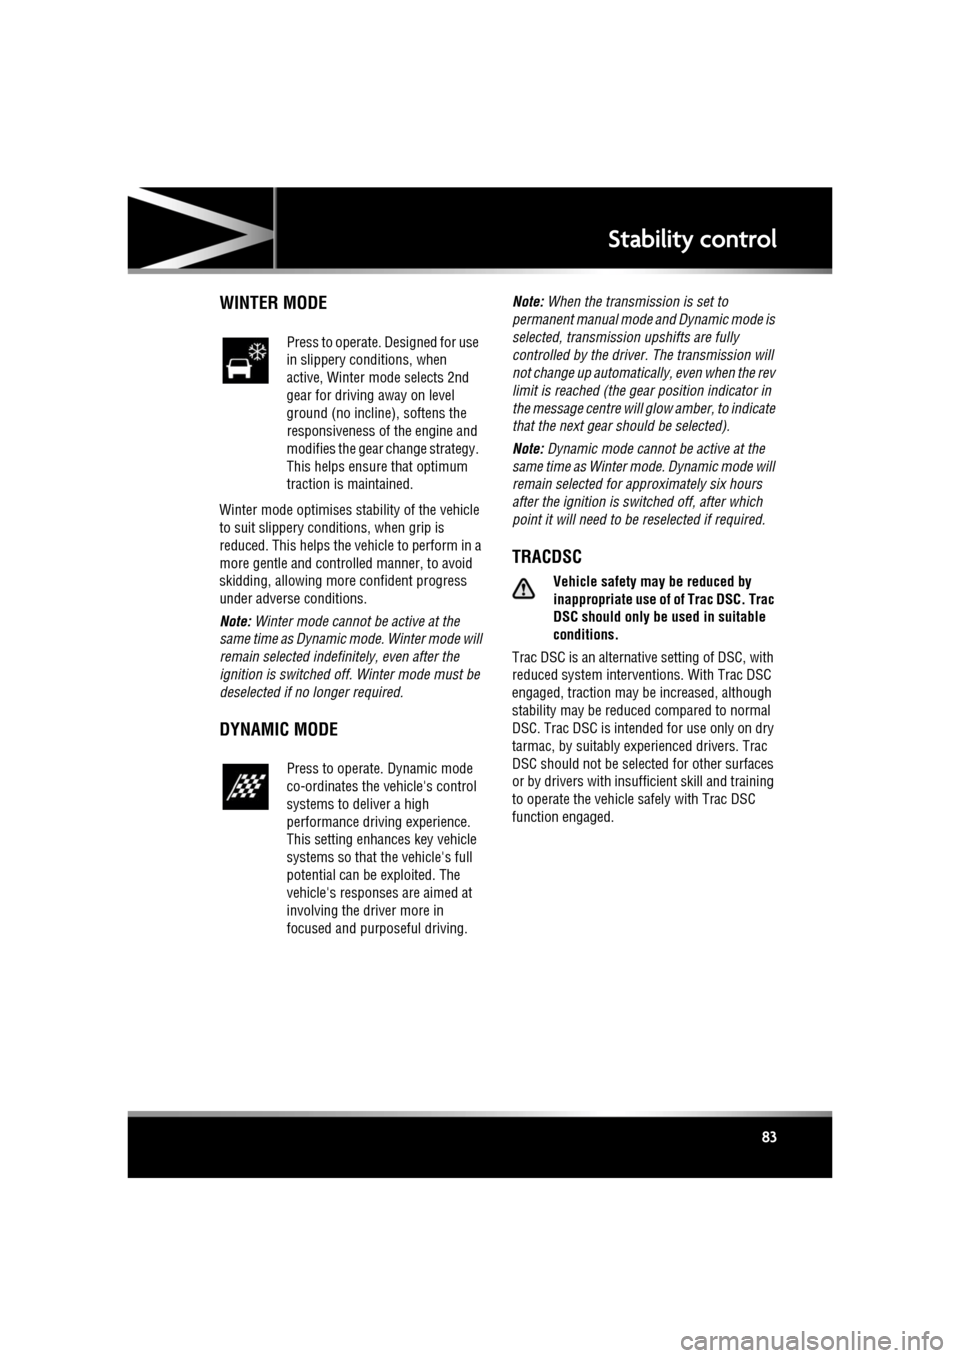
Winter mode optimises stability of the vehicle
to suit slippery conditions, when grip is
reduced. This helps the vehicle to perform in a
more gentle and controlled manner, to avoid
skidding, allowing more confident progress
under adverse conditions.
Note: Winter mode cannot be active at the
same time as Dynamic m ode. Winter mode will
remain selected indefinitely, even after the
ignition is switched off. Winter mode must be
deselected if no longer required.
DYNAMIC MODE
Note: When the transmission is set to
permanent manual mode and Dynamic mode is
selected, transmission upshifts are fully
controlled by the driver . The transmission will
not change up automatically, even when the rev
limit is reached (the ge ar position indicator in
the message centre will gl ow amber, to indicate
that the next gear should be selected).
Note: Dynamic mode cannot be active at the
same time as Winter mode. Dynamic mode will
remain selected for approximately six hours
after the ignition is switched off, after which
point it will need to be reselected if required.
TRACDSC
Vehicle safety may be reduced by
inappropriate use of of Trac DSC. Trac
DSC should only be used in suitable
conditions.
Trac DSC is an alternative setting of DSC, with
reduced system interventions. With Trac DSC
engaged, traction may be increased, although
stability may be reduced compared to normal
DSC. Trac DSC is intended for use only on dry
tarmac, by suitably experienced drivers. Trac
DSC should not be selected for other surfaces
or by drivers with insuff icient skill and training
to operate the vehicle safely with Trac DSC
function engaged.
Press to operate. Designed for use
in slippery conditions, when
active, Winter mode selects 2nd
gear for driving away on level
ground (no incline), softens the
responsiveness of the engine and
modifies the gear change strategy.
This helps ensure that optimum
traction is maintained.
Press to operate. Dynamic mode
co-ordinates the vehicle's control
systems to deliver a high
performance driving experience.
This setting enhances key vehicle
systems so that the vehicle's full
potential can be exploited. The
vehicle's responses are aimed at
involving the driver more in
focused and purposeful driving.
Page 90 of 225
L
(FM8) SEMCON JLR OWNER GUIDE VER 1.00 EURO
LANGUAGE: english-en; MARQUE: jaguar; MODEL: XF
Tyre pressure monitoring system
90
TEMPORARY USE SPARE WHEEL
AND TYRE CHANGE
If the temporary use spare wheel is fitted the
system will automatically recognise the change
in wheel positions. The n after approximately
ten minutes of drivin g above 25 km/h (18
mph), a message deta iling which tyre is
affected (e.g. FRONT LEFT) and TYRE NOT
MONITORED will be displayed accompanied by
illumination of the warning telltale and the
corresponding block in the vehicle graphic.
The warning telltale will initially flash and will
subsequently revert to continuous illumination.
Extended use of the temporary use spare wheel
will produce an additional text message TYRE
PRESSURE MONITORING SYSTEM FAULT .
This TPM system display sequence will be
activated at every ignition cycle until the
temporary use spare wheel is replaced by a
fully operational full size wheel and tyre
assembly. Always replace the temporary use
wheel before having TPM system faults
investigated. The fault may well be rectified
with the fitment of a fu lly operational full size
running tyre in lieu of the temporary use spare
wheel assembly.
TYRE PRESSURE MONITORING
UNAVAILABLE
If all four running wheels and tyres are changed
for a set that are not fitted with TPM system
sensors (e.g. a set of winter wheels and tyres),
the message TYRE PRESSURE MONITORING
UNAVAILABLE is displayed. TPM system
sensors must be fitted to the wheels and tyres
for the system to be able to warn of low tyre
pressures.
When sensors are fitted to the replacement
wheel and tyre set, the vehicle needs to be
driven until the TPM system recognizes the
sensors before TPM will be available ( TYRE
PRESSURE MONITORING AVAILABLE is
displayed).
TYRE CHANGING
Always have your tyres serviced or changed by
a qualified technician.
Care must be taken to avoid contact between
the bead of the tyre and the sensor during
removal and refitting of the tyre, otherwise the
sensor may become damaged and or
inoperable.
Valve stem seal, washer, nut, valve core
and cap should be repl aced at every tyre
change. Valve stem seal, washer and
nut must be replaced if valve retention
nut is loosened. Sensor units and nuts
must be refitted using correct torque
figures and associated profile. Damage
to the vehicle may result if these
precautions are not taken.
Sensors can be removed from the wheel by the
unscrewing of the va lve retention nut.
Page 91 of 225
R
(FM8) SEMCON JLR OWNER GUIDE VER 1.00 EURO
LANGUAGE: english-en; MARQUE: jaguar; MODEL: XF
Tyre pressure monitoring system
91
REPLACEMENT TPMS SENSOR
Should the sensor require replacing, it should
be carried out by a Deal er/Authorised Repairer.
A replacement sensor must be fitted to a
running wheel in order to be recognised by the
system. The vehicle needs to be stationary for
15 minutes during the sensor fitment before
the system is ready to detect the new sensor.
The vehicle must be driven for a minimum of
fifteen minutes after th e sensor change, and
then remain stationary for fifteen minutes to
activate full TPM system operation.
If the TPM system warning for any wheel does
not clear, even after ensuring correct inflation
and driving for more than ten minutes above 25
km/h (18 mph), you s hould seek qualified
assistance as soon as possible.
Page 94 of 225
L
(FM8) SEMCON JLR OWNER GUIDE VER 1.00 EURO
LANGUAGE: english-en; MARQUE: jaguar; MODEL: XF
Cruise control
94
Cruise controlUSING CRUISE CONTROL
The cruise (speed) contro l system can be used
by the driver to maintain a selected vehicle
speed above 30 km/h (18 mph).
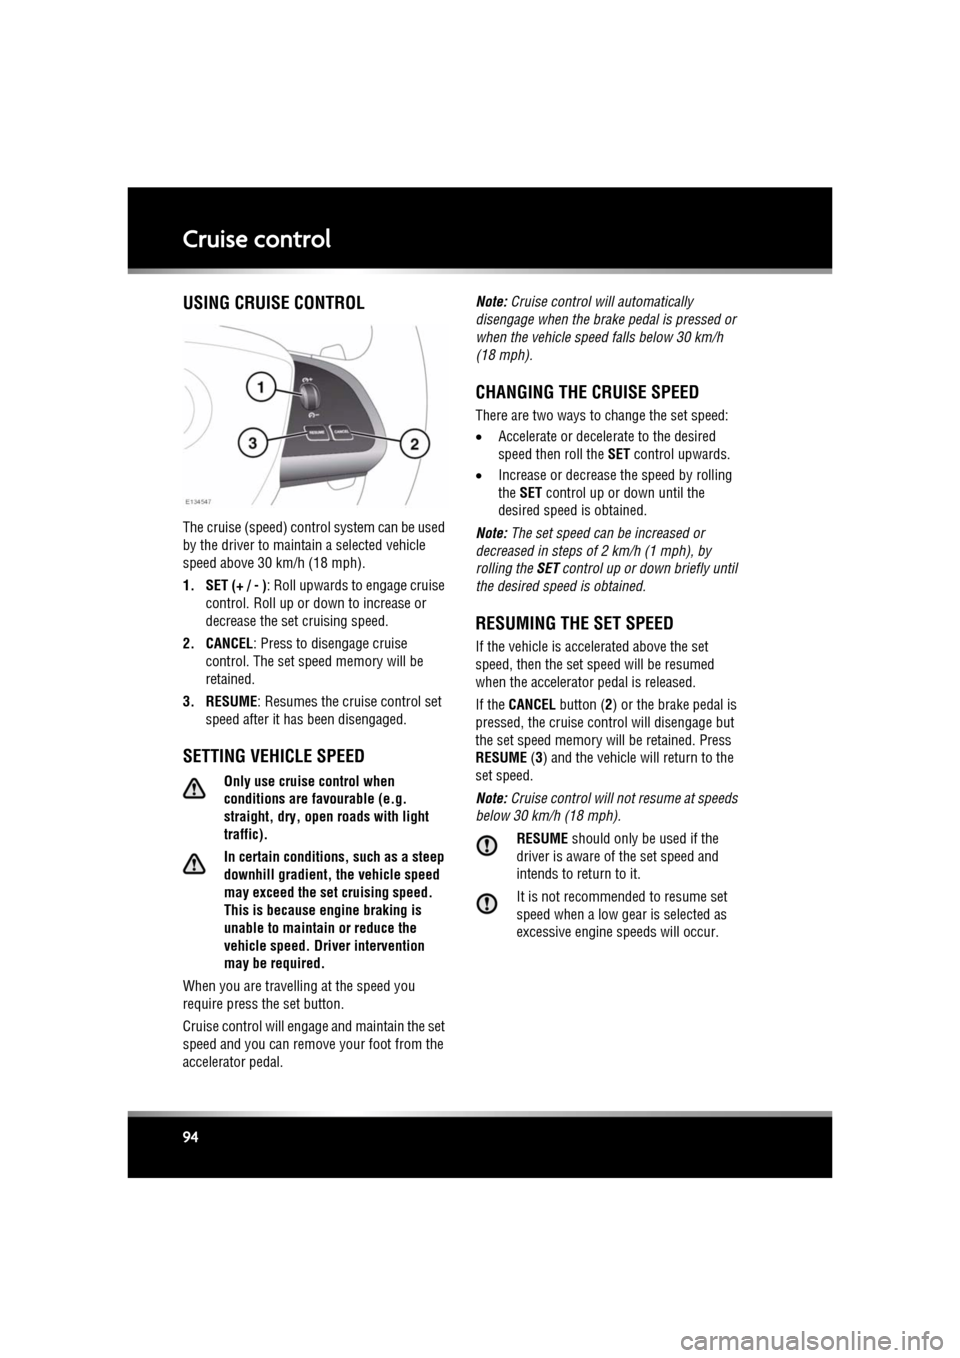
1. SET (+ / - ) : Roll upwards to engage cruise
control. Roll up or down to increase or
decrease the set cruising speed.
2. CANCEL : Press to disengage cruise
control. The set sp eed memory will be
retained.
3. RESUME : Resumes the cruise control set
speed after it has been disengaged.
SETTING VEHICLE SPEED
Only use cruise control when
conditions are favourable (e.g.
straight, dry, open roads with light
traffic).
In certain conditions, such as a steep
downhill gradient, the vehicle speed
may exceed the set cruising speed.
This is because eng ine braking is
unable to maintain or reduce the
vehicle speed. Driver intervention
may be required.
When you are travelling at the speed you
require press the set button.
Cruise control will enga ge and maintain the set
speed and you can remove your foot from the
accelerator pedal. Note:
Cruise control w ill automatically
disengage when the brake pedal is pressed or
when the vehicle speed falls below 30 km/h
(18 mph).
CHANGING THE CRUISE SPEED
There are two ways to change the set speed:
• Accelerate or decele rate to the desired
speed then roll the SET control upwards.
• Increase or decrease the speed by rolling
the SET control up or down until the
desired speed is obtained.
Note: The set speed can be increased or
decreased in steps of 2 km/h (1 mph), by
rolling the SET control up or down briefly until
the desired spee d is obtained.
RESUMING THE SET SPEED
If the vehicle is accelerated above the set
speed, then the set speed will be resumed
when the accelerator pedal is released.
If the CANCEL button ( 2) or the brake pedal is
pressed, the cruise cont rol will disengage but
the set speed memory will be retained. Press
RESUME (3) and the vehicle will return to the
set speed.
Note: Cruise control will not resume at speeds
below 30 km/h (18 mph).
RESUME should only be used if the
driver is aware of the set speed and
intends to return to it.
It is not recomme nded to resume set
speed when a low gear is selected as
excessive engine speeds will occur.
Page 97 of 225
R
(FM8) SEMCON JLR OWNER GUIDE VER 1.00 EURO
LANGUAGE: english-en; MARQUE: jaguar; MODEL: XF
Adaptive cruise control
97
ENTERING FOLLOW MODE
When in follow mode, the vehicle will
not decelerate automat ically to a stop,
nor will the vehicl e always decelerate
quickly enough to av oid a collision.
Note: Follow mode cannot be disengaged
independently from the speed maintenance
aspect of cruise control.
Once a set speed has been selected, the driver
can release the accelerator and the set road
speed will be maintained.
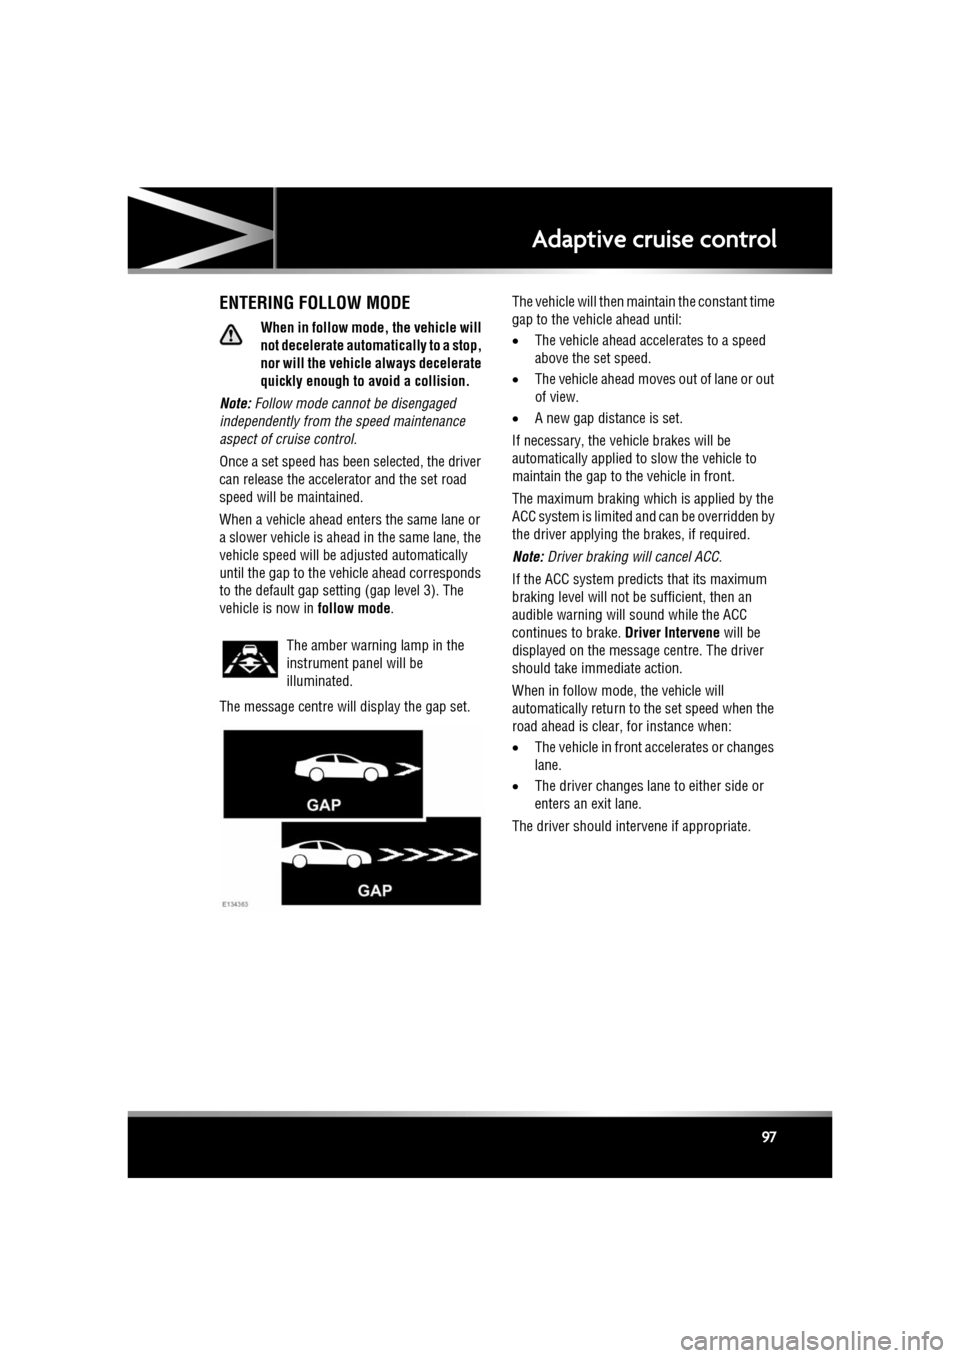
When a vehicle ahead enters the same lane or
a slower vehicle is ahead in the same lane, the
vehicle speed will be adjusted automatically
until the gap to the vehicle ahead corresponds
to the default gap setting (gap level 3). The
vehicle is now in follow mode.
The message centre will display the gap set. The vehicle will then maintain the constant time
gap to the vehicle ahead until:
•
The vehicle ahead accelerates to a speed
above the set speed.
• The vehicle ahead moves out of lane or out
of view.
• A new gap distance is set.
If necessary, the vehicle brakes will be
automatically applied to slow the vehicle to
maintain the gap to the vehicle in front.
The maximum braking which is applied by the
ACC system is limited a nd can be overridden by
the driver applying the brakes, if required.
Note: Driver braking will cancel ACC.
If the ACC system predicts that its maximum
braking level will not be sufficient, then an
audible warning will sound while the ACC
continues to brake. Driver Intervene will be
displayed on the message centre. The driver
should take immediate action.
When in follow mode, the vehicle will
automatically return to the set speed when the
road ahead is clear, for instance when:
• The vehicle in front accelerates or changes
lane.
• The driver changes lane to either side or
enters an exit lane.
The driver should intervene if appropriate.
The amber warning lamp in the
instrument panel will be
illuminated.