child lock JAGUAR XF 2010 1.G Owners Manual
[x] Cancel search | Manufacturer: JAGUAR, Model Year: 2010, Model line: XF, Model: JAGUAR XF 2010 1.GPages: 225, PDF Size: 8 MB
Page 7 of 225
R
(FM8) SEMCON JLR OWNER GUIDE VER 1.00 EURO
LANGUAGE: english-en; MARQUE: jaguar; MODEL: XF
Entering the vehicle
7
CONVENIENCE MODE
When the door is opened using either the
Jaguar Smart Key or keyless entry, the
vehicle's electrical system initiates the
convenience mode. The following systems
become functional:
• Driver position memory.
• Seat and steering column adjustment.
• Interior and exterior lighting.
• Message centre.
• Auxiliary power socket.
GLOBAL OPENING
Press and hold the unlock button on the Jaguar
Smart Key for 3 seconds or press and hold the
exterior lock button. The vehicle will unlock and
the alarm will be disarmed immediately. After
the 3 seconds all of the windows and sunroof
will open.
To stop window movement during global
opening when using the Smart Key, press any
of the buttons on the Smart Key or operate the
driver's window switch . To stop a particular
window from opening, operate the relevant
window switch.
To stop window movement when global
opening using the exterior lock button, release
the button.
Note: Global opening can be enabled/disabled
via the Security/ vehicle settings menu on the
touch screen. See 61, VEHICLE SETTINGS .
DRIVE-AWAY LOCKING
Locks all the doors when the vehicle exceeds a
set speed. One of three set speeds can be
selected via the Security/ vehicle settings menu
on the touch screen. See 61, VEHICLE
SETTINGS . Use of the central locking/
unlocking buttons (see 224, DRIVER
CONTROLS ), will override the drive-away
locking feature for the rest of a journey.
If a door is individually unlocked and opened,
all doors will relock when the open door is
subsequently closed.
Note: Drive-away locking can be enabled/
disabled via the Security/ vehicle settings menu
on the touch screen. See 61, VEHICLE
SETTINGS .
REMOTE KEY FOB CARE
To prevent acci dental operation,
never leave the Jaguar Smart Key in
the vehicle if children or animals are
also left in the vehicle.
Do not expose to extremes of heat,
dust, humidity or fluids. Do not leave
the transmitter exposed to direct
sunlight.
The emergency key blad e number is recorded
on an attached label, which should be peeled
off and affixed to the correct area on the
Security Card, supplied in the literature pack.
Keep the Security Card safe, but not in the
vehicle.
The operational range of the Smart Key varies
considerably, depending on atmospheric
conditions and interferen ce from other devices.
Note: The radio frequency used by the Smart
Key may be used by othe r devices (e.g. medical
equipment). This may prevent the Smart Key
from operati ng correctly.
Page 9 of 225
R
(FM8) SEMCON JLR OWNER GUIDE VER 1.00 EURO
LANGUAGE: english-en; MARQUE: jaguar; MODEL: XF
Exiting the vehicle
9
Exiting the vehicleDOOR LOCK AND RELEASE LEVERS
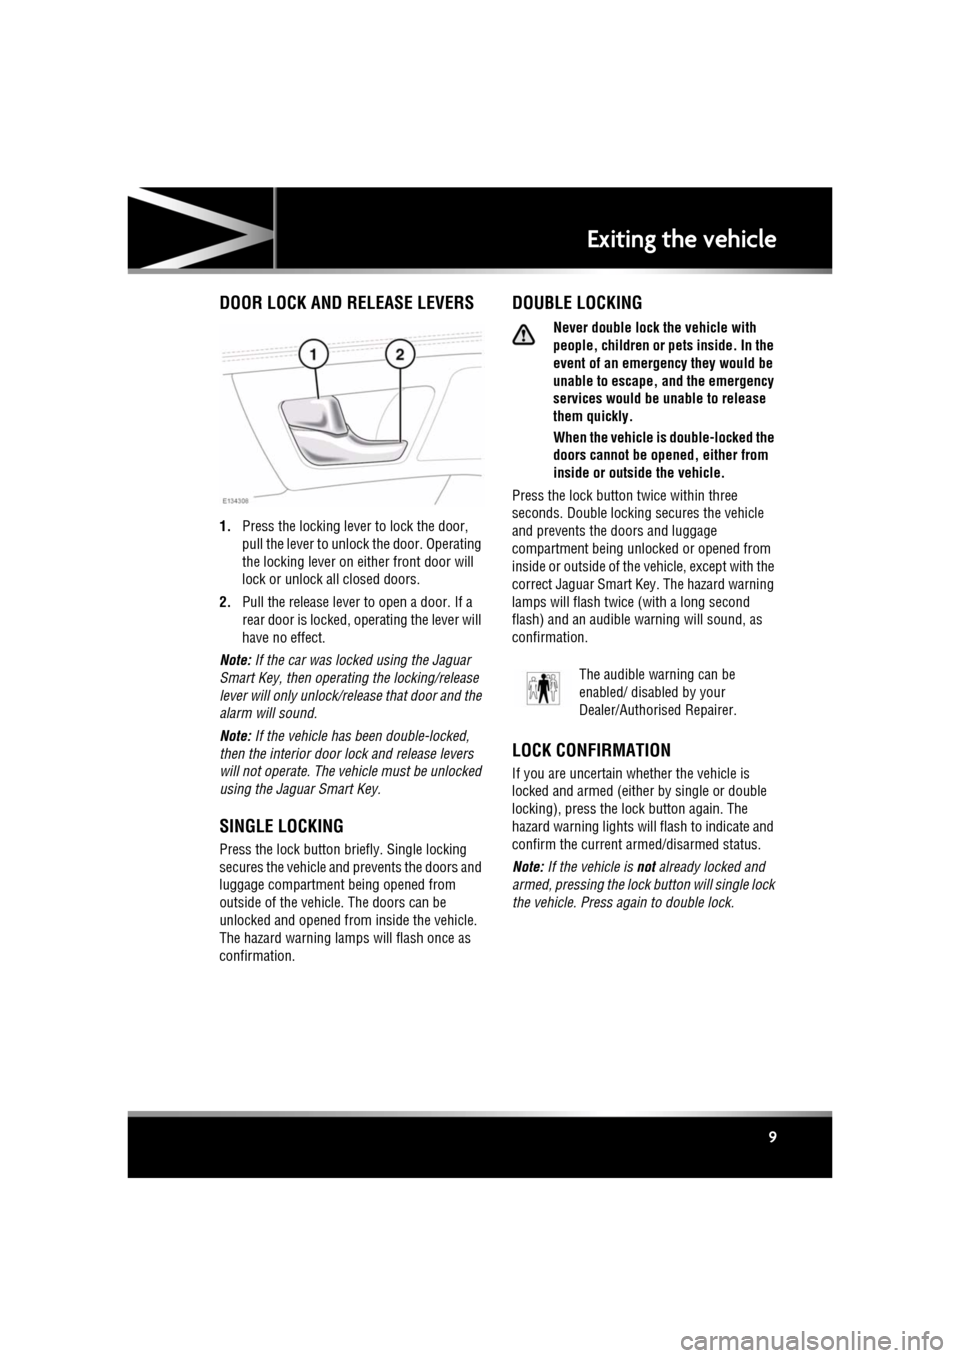
1. Press the locking lever to lock the door,
pull the lever to unlock the door. Operating
the locking lever on either front door will
lock or unlock all closed doors.
2. Pull the release lever to open a door. If a
rear door is locked, ope rating the lever will
have no effect.
Note: If the car was locked using the Jaguar
Smart Key, then operating the locking/release
lever will only unlock/release that door and the
alarm will sound.
Note: If the vehicle has been double-locked,
then the interior door lock and release levers
will not operate. The vehicle must be unlocked
using the Jaguar Smart Key.
SINGLE LOCKING
Press the lock button br iefly. Single locking
secures the vehicle and prevents the doors and
luggage compartment being opened from
outside of the vehicle. The doors can be
unlocked and opened from inside the vehicle.
The hazard warning lamps will flash once as
confirmation.
DOUBLE LOCKING
Never double lock the vehicle with
people, children or pets inside. In the
event of an emergenc y they would be
unable to escape, and the emergency
services would be unable to release
them quickly.
When the vehicle is double-locked the
doors cannot be opened, either from
inside or outside the vehicle.
Press the lock button twice within three
seconds. Double locking secures the vehicle
and prevents the doors and luggage
compartment being unlocked or opened from
inside or outside of the vehicle, except with the
correct Jaguar Smart Key. The hazard warning
lamps will flash twice (with a long second
flash) and an audible warning will sound, as
confirmation.
LOCK CONFIRMATION
If you are uncertain whether the vehicle is
locked and armed (either by single or double
locking), press the lock button again. The
hazard warning lights will flash to indicate and
confirm the current armed/disarmed status.
Note: If the vehicle is not already locked and
armed, pressing the lock button will single lock
the vehicle. Press again to double lock.
The audible warning can be
enabled/ disabled by your
Dealer/Authorised Repairer.
Page 10 of 225
L
(FM8) SEMCON JLR OWNER GUIDE VER 1.00 EURO
LANGUAGE: english-en; MARQUE: jaguar; MODEL: XF
Exiting the vehicle
10
MISLOCK
If one of the doors, the bonnet, or the luggage
compartment are not shut fully when the
vehicle is locked using the Jaguar Smart Key or
by Keyless locking, the vehicle will not lock and
two warning tones will sound. Check that all
doors, the bonnet and the luggage
compartment are closed properly and lock the
vehicle again.
If one or more of the doors fails to lock
properly when a lock attempt is made using the
Jaguar Smart Key, tw o warning tones will
sound and one or more of the doors may not be
locked.
GLOBAL CLOSING
Ensure that no children, pets, or
obstructions are in any open aperture
before operating global closing.
Ensure that all doors are closed, then press and
hold the lock button on the Smart Key for 3
seconds or press and hold the lock button on
the exterior door handle. The vehicle will single
lock and the alarm will be fully armed
immediately. After 3 seconds all of the
windows will close.
Note: If the button on the door handle is
released before the windows have fully closed,
the windows will stop closing.
Note: Global closing can be enabled/disabled
via the Security/ vehicle settings menu on the
touch screen. See 61, VEHICLE SETTINGS .
KEYLESS LOCKING
Remove all Jaguar Smart Keys and
emergency key blades from the vehicle
when it is left unattended. This will help
prevent the alarm being disarmed and
therefore help prevent theft. The Smart Key may not be detected if it
is placed within a meta
l container or if it
is shielded by a device with a back-lit
LCD screen, such as a smart phone,
laptop (including la ptop bag), games
console etc.
The vehicle will not lock automatically.
To single-lock the vehicle, press the button on
the door handle once. The hazard warning
lamps will flash once as confirmation (in some
markets, an audible warning will sound).
To double-lock the vehicle, press the button
twice within three seconds. The hazard
warning lamps will flash twice (with a long
second flash). In some markets, a double
audible warning will sound.
Note: Keyless locking will onl y activate if all
doors, bonnet and the luggage compartment
are closed and the Jagua r Smart Key is outside
the vehicle. If the abov e conditions are not met,
two audible error warnings will sound.
FULL ALARM
To set full alarm protection, ensure that all the
windows and the sunroof are closed. Then, on
vehicles fitted with double-locking, press the
lock button twice within three seconds. The
hazard warning lights will flash twice to
confirm the alarm state and, in some markets,
an audible tone will sound.
Note: If the alarm is armed and a window or the
sunroof are left open, the alarm may sound due
to movement of air currents, detected by the
intrusion sensors in th e front interior light
console.
Note: The intrusion sensors can be temporarily
disabled, for the next time the vehicle is locked,
via the Security/ vehicle settings menu on the
touch screen. See 61, VEHICLE SETTINGS .
Page 20 of 225
L
(FM8) SEMCON JLR OWNER GUIDE VER 1.00 EURO
LANGUAGE: english-en; MARQUE: jaguar; MODEL: XF
Head restraints
20
Head restraintsFRONT HEAD RESTRAINTS
Adjust the head restraint so that the
top of the head restraint is above the
centre line of the he ad. An incorrectly
adjusted head restraint increases the
risk of death or serious injury in the
event of a collision.
It is possible to swivel the head
restraint forwards or backwards. For
greater protection in the event of a
collision, the head restraint should be
adjusted so that it is as close to the
back of the head as is practical.
Never adjust the head restraints while
the vehicle is in motion.
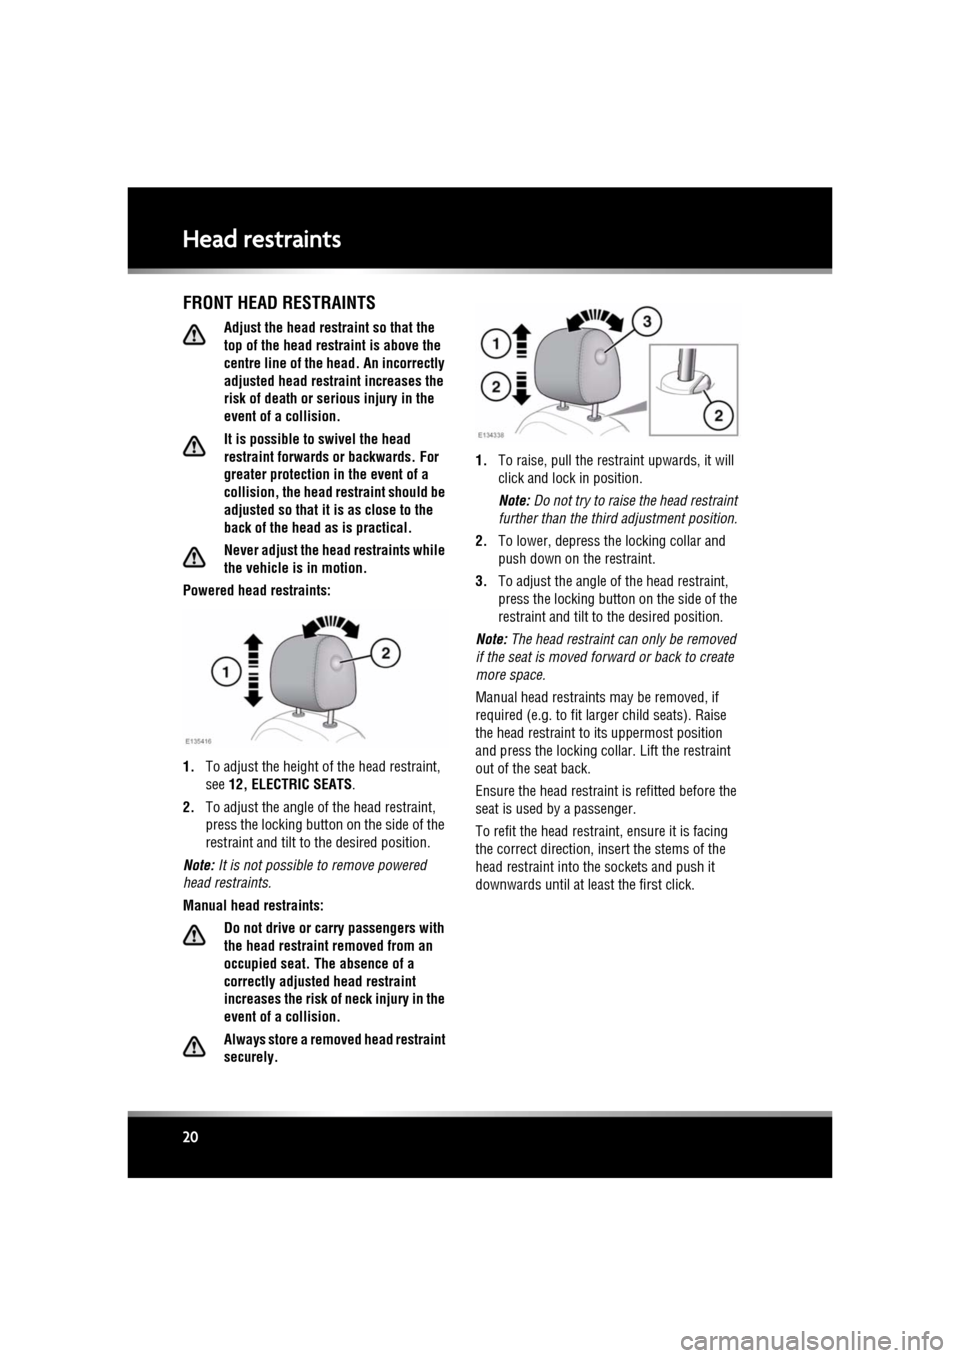
Powered head restraints:
1. To adjust the height of the head restraint,
see 12, ELECTRIC SEATS .
2. To adjust the angle of the head restraint,
press the locking button on the side of the
restraint and tilt to the desired position.
Note: It is not possible to remove powered
head restraints.
Manual head restraints:
Do not drive or carry passengers with
the head restraint removed from an
occupied seat. Th e absence of a
correctly adjusted head restraint
increases the risk of neck injury in the
event of a collision.
Always store a removed head restraint
securely. 1.
To raise, pull the rest raint upwards, it will
click and lock in position.
Note: Do not try to raise the head restraint
further than the thir d adjustment position.
2. To lower, depress the locking collar and
push down on the restraint.
3. To adjust the angle of the head restraint,
press the locking button on the side of the
restraint and tilt to the desired position.
Note: The head restraint can only be removed
if the seat is moved forward or back to create
more space.
Manual head restraints may be removed, if
required (e.g. to fit larger child seats). Raise
the head restraint to its uppermost position
and press the locking collar. Lift the restraint
out of the seat back.
Ensure the head restraint is refitted before the
seat is used by a passenger.
To refit the head restraint, ensure it is facing
the correct direction, insert the stems of the
head restraint into the sockets and push it
downwards until at le ast the first click.
Page 21 of 225
R
(FM8) SEMCON JLR OWNER GUIDE VER 1.00 EURO
LANGUAGE: english-en; MARQUE: jaguar; MODEL: XF
Head restraints
21
REAR HEAD RESTRAINTS
Head restraints are designed to
support the head, not the back of the
neck. The head restraint must be
positioned correctly to restrain
rearward movement of the head in the
event of a collision.
While stationary, adjust the head
restraint so that the top of the head
restraint is above the centre line of the
head. An incorrectly adjusted head
restraint increases the risk of death or
serious injury in the event of a
collision.
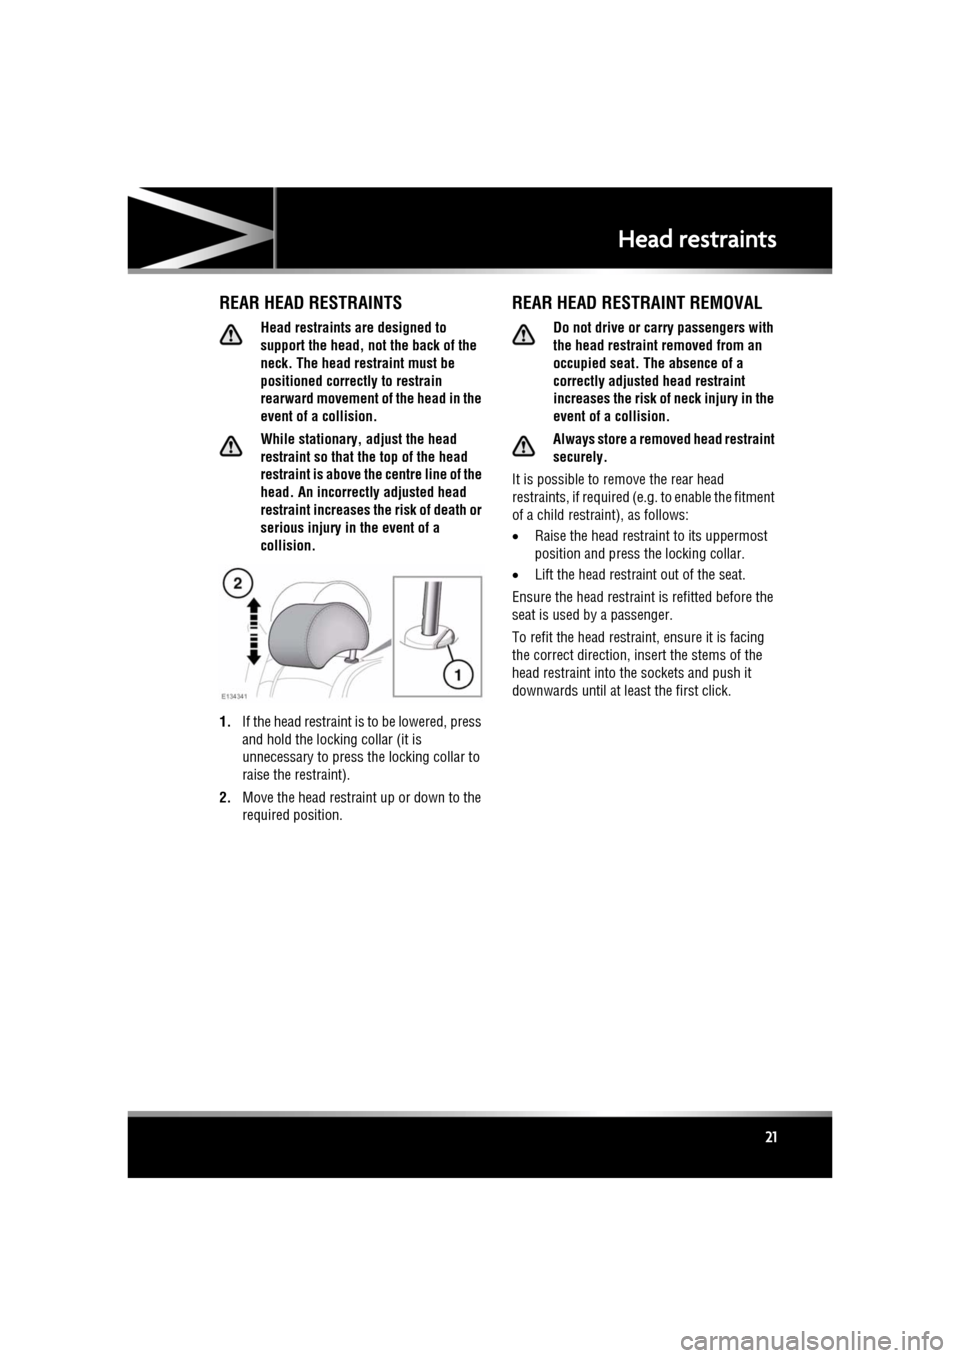
1. If the head restraint is to be lowered, press
and hold the locking collar (it is
unnecessary to press the locking collar to
raise the restraint).
2. Move the head restraint up or down to the
required position.
REAR HEAD RESTRAINT REMOVAL
Do not drive or carry passengers with
the head restraint removed from an
occupied seat. The absence of a
correctly adjusted head restraint
increases the risk of neck injury in the
event of a collision.
Always store a removed head restraint
securely.
It is possible to remove the rear head
restraints, if required (e.g. to enable the fitment
of a child restraint), as follows:
• Raise the head restraint to its uppermost
position and press the locking collar.
• Lift the head restraint out of the seat.
Ensure the head restraint is refitted before the
seat is used by a passenger.
To refit the head restraint, ensure it is facing
the correct direction, insert the stems of the
head restraint into the sockets and push it
downwards until at le ast the first click.
Page 24 of 225
L
(FM8) SEMCON JLR OWNER GUIDE VER 1.00 EURO
LANGUAGE: english-en; MARQUE: jaguar; MODEL: XF
Occupant safety
24
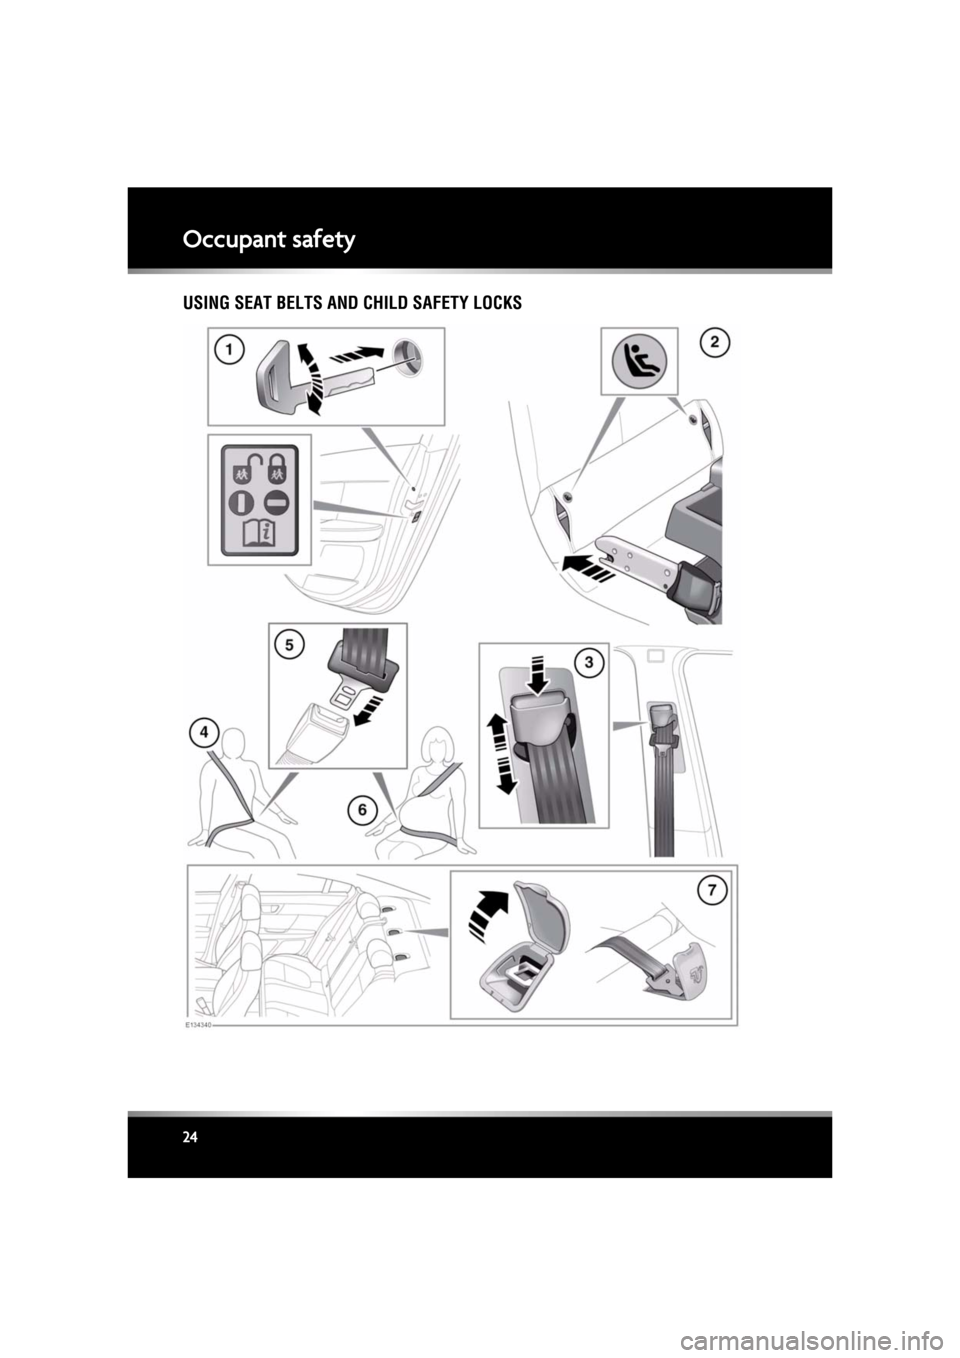
USING SEAT BELTS AND CHILD SAFETY LOCKS
Page 25 of 225
R
(FM8) SEMCON JLR OWNER GUIDE VER 1.00 EURO
LANGUAGE: english-en; MARQUE: jaguar; MODEL: XF
Occupant safety
25
1. If children are to be carried in the rear seat
positions, it is recommended that the rear
door interior handles are disabled.
To change the child lock settings:-
•Open the door to access the child
safety lock.
• Insert the emergency key into the slot
and rotate a quarter of a turn, to enable
or disable the interior door handle, as
required.
2. To install an ISOFIX child seat (not
Australia):-
•Raise the head restraint on the relevant
seat.
• Locate the lower anchor bars which are
accessible through the gap between
the seat back and seat base. Insert the
protective guides supplied with the
child seat as shown. The insertion
positions for the guides are identified
by the ISOFIX labels.
• Slide the child seat locking mechanism
into the protective sleeves and onto the
anchor bars.
• Test the security of the child restraint.
To do this, attempt to pull the restraint
away from the vehicle seat and twist
the restraint from side to side. Even if
the restraint appears secure you
should always check the anchor points
visually to ensure correct attachment.
Note: Always ensure that if an upper tether
is provided, it is fitted and tightened
correctly.
3. To adjust the seat belt height:-
•Press to release the catch.
• With the catch depressed slide the
mechanism up or down to the required
height. Release the catch and ensure
the locking mechanism has engaged. The use of comfort clips or devices
that would create sl
ack in the seat
belt system, is not advised.
No modifications or additions
should be made by the user which
will either prevent the seat belt
adjusting devices from operating
to remove slack, or prevent the
seat belt assembly from being
adjusted to remove slack.
4. Draw the belt out smoothly, ensure that the
belt height, the seat , and your position on
the seat are correct.
Seat belts are designed to bear
upon the bony structure of the
body, and should be worn low
across the front of the pelvis or the
pelvis, chest and shoulders, as
applicable; wearing the lap
section of the belt across the
abdominal area must be avoided.
Seat belts should be adjusted as
firmly as possible, consistent with
comfort, to provide the protection
for which they have been
designed. A slack belt will greatly
reduce the protection afforded to
the wearer.
Belts should not be worn with the
straps twisted.
Each belt assembly must only be
used by one occupant; it is
dangerous to put a belt around a
child being carried on the
occupant's lap.
The occupants of the front seats
should not travel with the seat
back at more than 30 degrees from
upright. Doing so will reduce the
protection afforded by the seat
belt.
Page 31 of 225
R
(FM8) SEMCON JLR OWNER GUIDE VER 1.00 EURO
LANGUAGE: english-en; MARQUE: jaguar; MODEL: XF
Occupant safety
31
INSTALLING TETHER ANCHORAGE
CHILD RESTRAINTS
1. Install the child restraint securely in one of
the rear seating positions.
2. Pass the tether strap over the seat back and
beneath the head restraint.
3. Attach the tether strap hook to the tether
anchor point on the back of the seat.
Ensure that the tether strap hook is facing
the correct way. See item 7 in 24, USING
SEAT BELTS AND CHILD SAFETY
LOCKS24, USING SEAT BELTS AND
CHILD SAFETY LOCKS .
4. Tighten the tether strap according to the
manufacturer's instructions.
Page 155 of 225
R
(FM8) SEMCON JLR OWNER GUIDE VER 1.00 EURO
LANGUAGE: english-en; MARQUE: jaguar; MODEL: XF
Fuel and refuelling
155
To close the filler flap, push the flap until
latched closed.
Note: The filler flap will only be locked closed
when the vehicle is centrally locked.
FUEL FILLER
When refuelling ensure that all
windows, doors, and sunroof are fully
closed, particularly if young children
or animals are in the vehicle.
Do not attempt to fill the tank to its
maximum capacity. If the vehicle is to
be parked on a slope, in direct
sunlight or high am bient temperature,
expansion of the fuel could cause
spillage.
Check the fuel pump information
carefully, to ensure that you are putting
the correct fuel into the vehicle.
If the vehicle is filled with incorrect fuel,
it is essential that you seek qualified
assistance before you start the engine.
Fuel station pumps are equipped with
automatic cut-off sensing, to avoid fuel
spillage. Fill the tank until the filler nozzle
automatically cuts off the supply. Do not
attempt to fill the tank beyond this point.
Note: Filling station pumps used for diesel
commercial vehicles deliver fuel at a higher
rate than normal. The hi gher fill rate can cause
premature cut-off and ma y cause fuel spillage.
Therefore, it is recommended that only
standard light vehicle pumps are used.
DIESEL MISFUELLING PROTECTION
DEVICE
When the misfuelling device is
activated it may cause fuel to be
discharged from the filler neck.
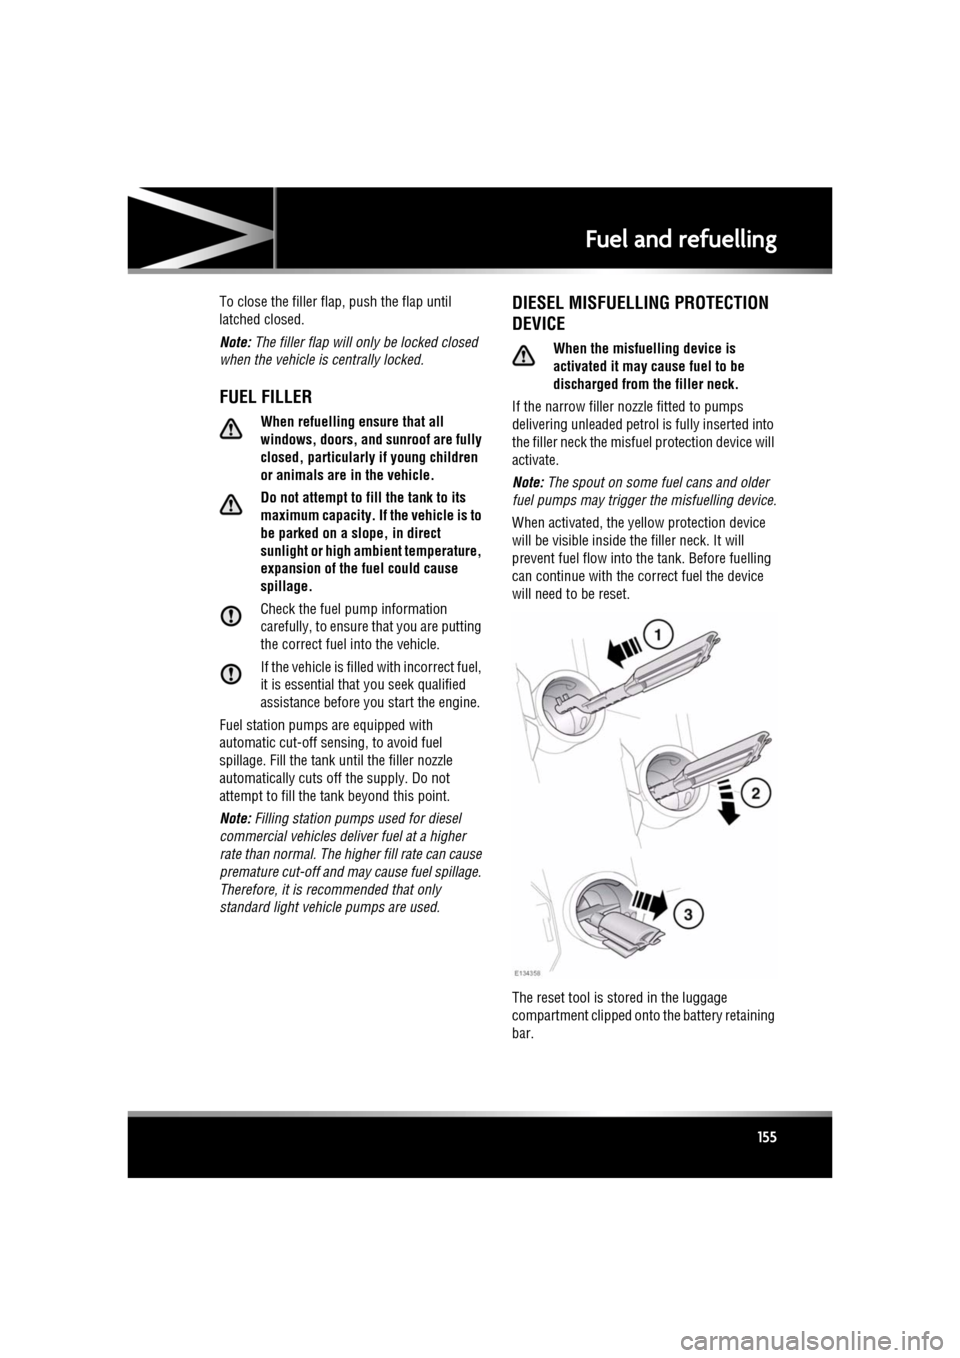
If the narrow filler nozzl e fitted to pumps
delivering unleaded petrol is fully inserted into
the filler neck the misfue l protection device will
activate.
Note: The spout on some fuel cans and older
fuel pumps may trigger the misfuelling device.
When activated, the ye llow protection device
will be visible inside the filler neck. It will
prevent fuel flow into the tank. Before fuelling
can continue with the correct fuel the device
will need to be reset.
The reset tool is stored in the luggage
compartment clipped onto the battery retaining
bar.
Page 206 of 225

L
english-en (10, 18, 21 & 25)
Index
206
video media playercontrols . . . . . . . . . . . . . . . . . . . . . . 124
Auto high beam . . . . . . . . . . . . . . . . . . . . . 38
Auto mode (climate) . . . . . . . . . . . . . . . . . 65
Automatic gearbox . . . . . . . . . . . . . . . . . . 81
Automatic locking . . . . . . . . . . . . . . . . . . . . 7
Automatic reconnection (portable audio) 118
Automatic Stop/Start . . . . . . . . . . . . . . . . . 79
Automatic switch off (ACC) . . . . . . . . . . . . 98
Automatic switch off (cruise) . . . . . . . . . . 95
Auxiliary devices connecting multiple devices . . . . . . . . 117
B
Batteryboost starting . . . . . . . . . . . . . . . . . . . 183
care . . . . . . . . . . . . . . . . . . . . . . . . . . . 182
changingtimed climate remote . . . . . . . . . . . . 184
charging . . . . . . . . . . . . . . . . . . . . . . . 184
jump starting connecting cables . . . . . . . . . . . . . . 183
disconnecting cables . . . . . . . . . . . . 183
monitoring system. . . . . . . . . . . . . . . . 183
warning symbols . . . . . . . . . . . . . . . . . 182
Battery backed sounder . . . . . . . . . . . . . . . 11
Beltminder . . . . . . . . . . . . . . . . . . . . . . . . . 26 warning lamp . . . . . . . . . . . . . . . . . . 26, 52
Belts . . . . . . . . . . . . . . . . . . . . . . . . . . . . 167 safety . . . . . . . . . . . . . . . . . . . . . . . . . . . 23
seatbelt warning lamp . . . . . . . . . . . 26, 52
Bluetooth . . . . . . . . . . . . . . . . . . . . . . . . . 129 audioautomatic reconnection . . . . . . . . . . 118
pairing . . . . . . . . . . . . . . . . . . . 117, 118
media pairing . . . . . . . . . . . . . . . . . . . . . . . 117
telephone compatibility . . . . . . . . . . . . . . . . . . 130
icons . . . . . . . . . . . . . . . . . . . . . . . . 131
overview . . . . . . . . . . . . . . . . . . . . . 128
pairing . . . . . . . . . . . . . . . . . . . . . . . 130 phonebook . . . . . . . . . . . . . . . . . . . . 132
safety . . . . . . . . . . . . . . . . . . . . . . . . 129
Bonnet closing . . . . . . . . . . . . . . . . . . . . . . . . . 160
opening . . . . . . . . . . . . . . . . . . . . . . . . . 160
Boost starting . . . . . . . . . . . . . . . . . . . . . . 183
Brakes ABS warning lamp . . . . . . . . . . . . . . . . . 52
advanced emergency assist . . . . . . . . . 101
EBA (Emergency brake assist) . . . . . . . . 87
EBD (Electronic brake force distribution) 87
fluid
check. . . . . . . . . . . . . . . . . . . . . . . . . 171
specification . . . . . . . . . . . . . . . . . . . 172
top up . . . . . . . . . . . . . . . . . . . . . . . . 172
handbrake . . . . . . . . . . . . . . . . . . . . . . . . 88
pedal travel . . . . . . . . . . . . . . . . . . . . . . 180
warning lamp . . . . . . . . . . . . . . . . . . . . . 51
warning lamps . . . . . . . . . . . . . . . . . . . . 87
BSM (Blind spot monitor) . . . . . . . . . . . . . . 46 detection beam issues . . . . . . . . . . . . . . 99
sensor blockage . . . . . . . . . . . . . . . . . . . 47
system fault . . . . . . . . . . . . . . . . . . . . . . 47
Bulbs
license plate . . . . . . . . . . . . . . . . . . . . . 163
number plate . . . . . . . . . . . . . . . . . . . . . 163
C
Call volume . . . . . . . . . . . . . . . . . . . . . . . . 132
Camerasrear view . . . . . . . . . . . . . . . . . . . . . . . . . 93
Capacities . . . . . . . . . . . . . . . . . . . . . . . . . 179
Carpets and mats . . . . . . . . . . . . . . . . . . . 167
Car-wash . . . . . . . . . . . . . . . . . . . . . . . . . 165
CD player controls. . . . . . . . . . . . . . . . . . . . . . . . . 120
loading discs . . . . . . . . . . . . . . . . . . . . . 119
Chairs child seats tether straps . . . . . . . . . . . . . . . . . . . . 31
memory recalling a position . . . . . . . . . . . . . . . 15