bluetooth JAGUAR XF 2015 1.G Quick Start Guide
[x] Cancel search | Manufacturer: JAGUAR, Model Year: 2015, Model line: XF, Model: JAGUAR XF 2015 1.GPages: 16, PDF Size: 1.28 MB
Page 13 of 16

AUDIO AND TOUCH SCREENAUDIO AND TOUCH SCREEN
13
CD player and portable media
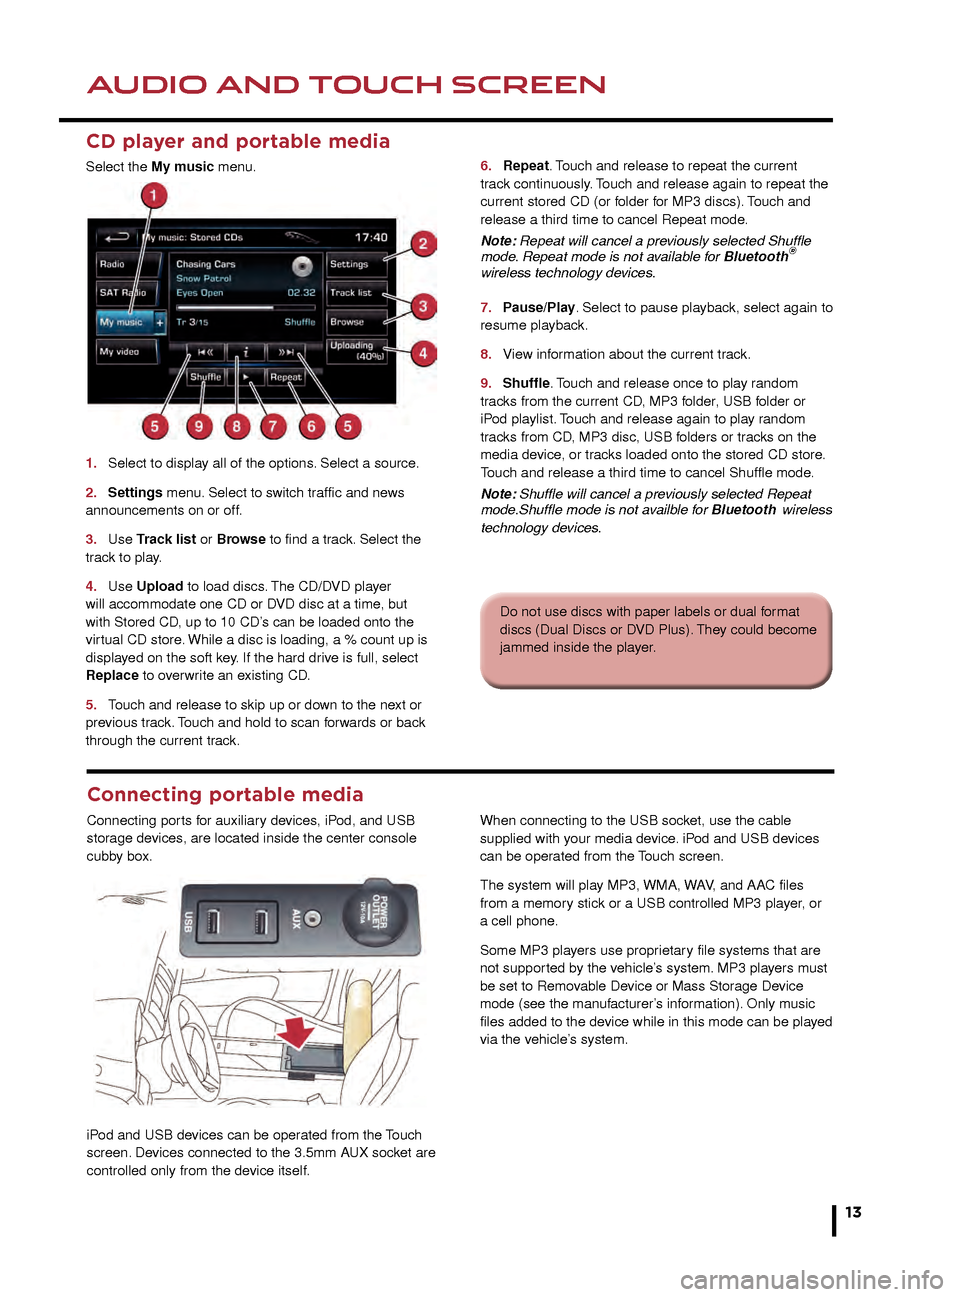
Select the My music menu.
1.
Select to displa
y all of the options. Select a source.
2
.
Settings
menu. Select to switch traffic and news
announcements on or off.
3.
Use
Track list or Browse to find a track. Select the
track to play.
4.
Use
Upload to load discs. The CD/DVD player
will accommodate one CD or DVD disc at a time, but
with Stored CD, up to 10 CD’s can be loaded onto the
virtual CD store. While a disc is loading, a % count up is
displayed on the soft key. If the hard drive is full, select
Replace to overwrite an existing CD.
5.
T
ouch and release to skip up or down to the next or
previous track. Touch and hold to scan forwards or back
through the current track. 6.
Repeat . Touch and release to repeat the current
track continuously. Touch and release again to repeat the
current stored CD (or folder for MP3 discs). Touch and
release a third time to cancel Repeat mode.
Note: Repeat will cancel a previously selected Shuffle
mode. Repeat mode is not available for Bluetooth
®
wireless technology devices.
7.
P
ause/Play. Select to pause playback, select again to
resume playback.
8.
Vie
w information about the current track.
9.
Shuffle
. Touch and release once to play random
tracks from the current CD, MP3 folder, USB folder or
iPod playlist. Touch and release again to play random
tracks from CD, MP3 disc, USB folders or tracks on the
media device, or tracks loaded onto the stored CD store.
Touch and release a third time to cancel Shuffle mode.
Note: Shuffle will cancel a previously selected Repeat
mode.Shuffle mode is not availble for Bluetooth
wireless
technology devices.
5. Settings. Select to make personal settings in
Options, Channel skip, and Parental lock areas.
6. Channel list. View a list of available categories.
7. Channel input. Select to access the touch pad. Enter
any 3 digit channel number and then select OK.
8. Browse. Touch to view a list of channel categories.
Select one to display full details of that channel and the
current track.
9. Add song. Store the currently playing track to the
song memory. If the Audio system subsequently finds a
stored track playing on a subscribed channel, notification
will be given.
Note: Use the seek buttons on the steering wheel to find
preset channels.
Activating satellite radio
1. Call SIRIUS on the displayed telephone number.
2. Provide them with the ID number, also displayed on
the screen.
You will also need your credit card. Make sure you are
parked with a clear view of the sky while activation takes
place. Activation can take up to 15 minutes.
3.
View information broadcast by the radio station.
4. Settings menu. Select from RDS, Traffic, News, AF
, and REG. The Advanced soft key allows favorite stations
to be set for traffic and news information.
5. Station list. Options are available only for FM
wavebands. All available FM stations will be listed. The list
can be sorted by Frequency, Name, or Category (pop,
news, sport), by selecting the appropriate soft key.
Autostore replaces Station list when an AM
waveband is selected. Select to store the 6 strongest AM
stations. These stations will be on the preset keys.
6. Frequency input. Enter a station frequency. When
the final digit is entered, the station will be tuned.
7. Preset soft keys. Can store 6 stations for each
waveband. Touch and hold a soft key to store the
current radio station.
Do not use discs with paper labels or dual format
discs (Dual Discs or DVD Plus). They could become
jammed inside the player.
Connecting portable media
Connecting ports for auxiliary devices, iPod, and USB
storage devices, are located inside the center console
cubby box.
iPod and USB devices can be operated from the Touch
screen. Devices connected to the 3.5mm AUX socket are
controlled only from the device itself.When connecting to the USB socket, use the cable
supplied with your media device. iPod and USB devices
can be operated from the Touch screen.
The system will play MP3, WMA, WAV, and AAC files
from a memory stick or a USB controlled MP3 player, or
a cell phone.
Some MP3 players use proprietary file systems that are
not supported by the vehicle’s system. MP3 players must
be set to Removable Device or Mass Storage Device
mode (see the manufacturer’s information). Only music
files added to the device while in this mode can be played
via the vehicle’s system.
JJM189640151.indd 1326/02/2014 16:29:31
Page 14 of 16

NAVIGATION
14
TELEPHONE
Nav menus
Country selection
On initial activation, make sure
that both the correct country
and search area have been
selected.
For more information, refer to
the Navigation section of the
Owner’s Handbook.
Note: To access navigation, press either the N AV hard
key or touch the Nav icon on the Home menu.
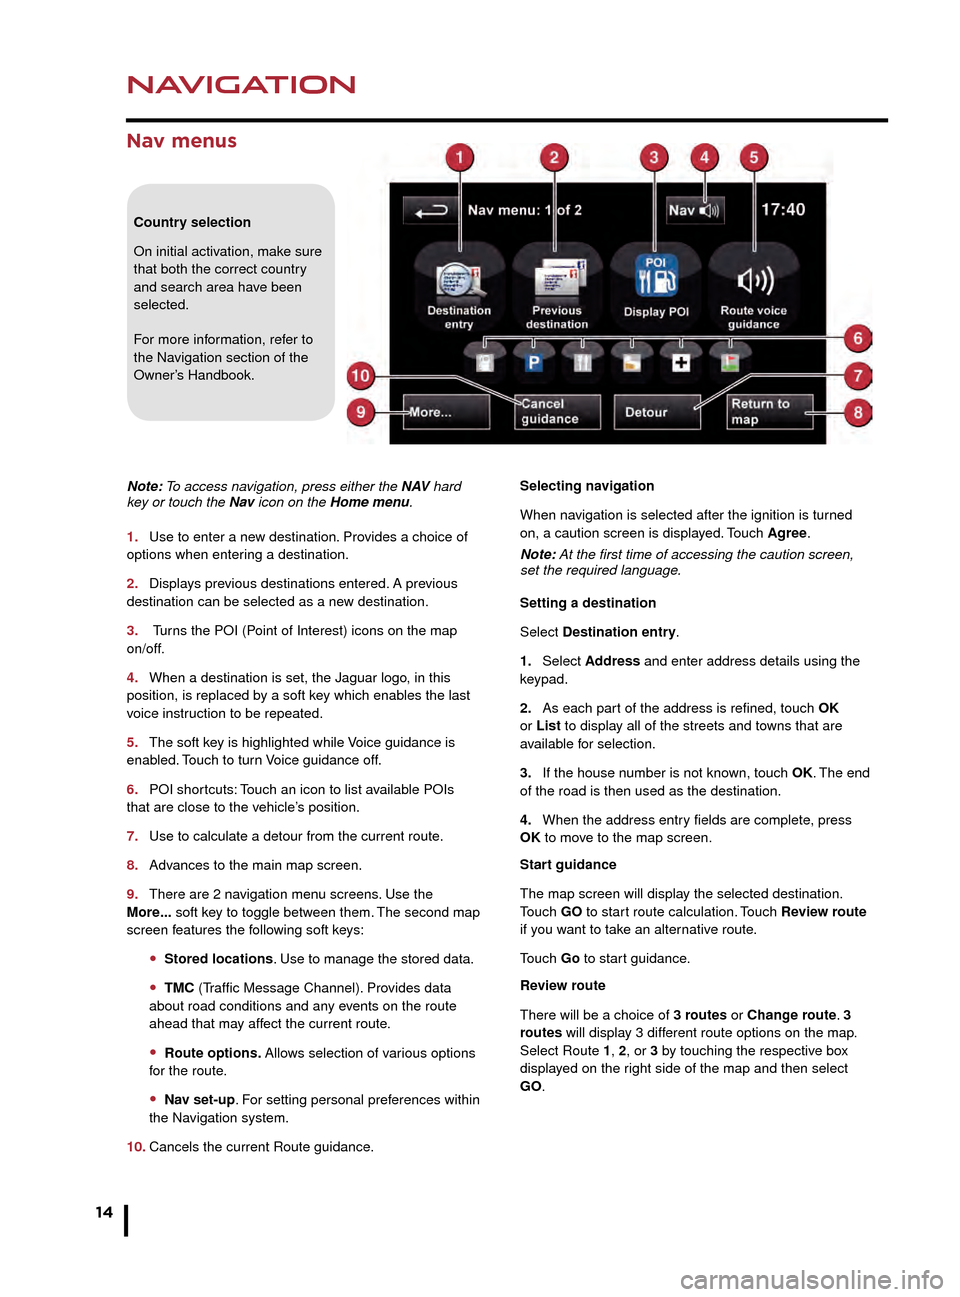
1.
Use to enter a ne
w destination. Provides a choice of
options when entering a destination.
2.
Displa
ys previous destinations entered. A previous
destination can be selected as a new destination.
3.
Turns the POI (Point of Interest) icons on the map
on/off.
4.
When a destination is set, the J
aguar logo, in this
position, is replaced by a soft key which enables the last
voice instruction to be repeated.
5.
The soft k
ey is highlighted while Voice guidance is
enabled. Touch to turn Voice guidance off.
6.
POI shor
tcuts: Touch an icon to list available POIs
that are close to the vehicle’s position.
7.
Use to calculate a detour from the current route
.
8.
Adv
ances to the main map screen.
9.
There are 2 na
vigation menu screens. Use the
More... soft key to toggle between them. The second map
screen features the following soft keys:
• Stored locations. Use to manage the stored data.
• TMC (Traffic Message Channel). Provides data
about road conditions and any events on the route
ahead that may affect the current route.
• Route options. Allows selection of various options
for the route.
• Nav set-up. For setting personal preferences within
the Navigation system.
10.
Cancels the current Route guidance
.Selecting navigation
When navigation is selected after the ignition is turned
on, a caution screen is displayed. Touch Agree.
Note: At the first time of accessing the caution screen,
set the required language.
Setting a destination
Select Destination entry.
1.
Select
Address and enter address details using the
keypad.
2.
As each par
t of the address is refined, touch OK
or List to display all of the streets and towns that are
available for selection.
3.
If the house n
umber is not known, touch OK. The end
of the road is then used as the destination.
4.
When the address entr
y fields are complete, press
OK to move to the map screen.
Start guidance
The map screen will display the selected destination.
Touch GO to start route calculation. Touch Review route
if you want to take an alternative route.
Touch Go to start guidance.
Review route
There will be a choice of 3 routes or Change route. 3
routes will display 3 different route options on the map.
Select Route 1, 2, or 3 by touching the respective box
displayed on the right side of the map and then select
GO.
Bluetooth® wireless technology
devices
See page 2, item 3.
Connection must be made with the ignition on or the
engine running.
Use the following procedure in conjunction with your
phone manufacturer’s instructions.
Pairing and connecting using a phone
Note: The process of pairing and connecting a phone
to the vehicle will vary depending on the type of phone
used.
1. Switch the ignition on and make sure that the Touch
screen is active.
2. From the Home menu, select Phone.
3. If no phone is connected, select Search new,
otherwise select Change phone and then select Search
new.
4. Select the Device to vehicle option.
Note: The vehicle’s Bluetooth wireless technology
system is discoverable for only 3 minutes.
5. Using your phone, search for Bluetooth wireless
technology devices. On some phones, this is referred
to as a new paired device. See your phone’s operating
instructions for further information.
6. When the vehicle’s system is discovered, begin the
pairing process and follow the on-screen instructions.
7. When requested, enter a PIN of your choice into your
phone and the vehicle’s system. Select OK.
8. When your phone is paired and connected, a
confirmation message will be displayed.
Note: Some phones require the pairing to be set as
‘authorised’ or ‘trusted’, in order to automatically connect.
Please refer to your phone’s operating instructions for
further information.
Downloading phonebook entries
When a phone with phonebook download capability
is paired and docked, its phonebook directory can be
automatically downloaded to the vehicle’s system.
See PHONEBOOK in the Owner’s Handbook for more
information.
Bluetooth Connectivity
Compatible Bluetooth wireless technology
devices can communicate with the vehicle’s in-built
telephone system. For the latest compatibility
information, refer to www.jaguar.com and route to
the Ownership area.
JJM189640151.indd 1426/02/2014 16:29:33
Page 15 of 16

NAVIGATIONTELEPHONE
15
Signal reception
• Reception is dependent on the phone and network
signal. Performance may be improved by changing
your phone’s settings (e.g., from 3G to 2G).
• If echo is experienced during a call, reduce the
Audio system volume.
Calls via the Touch screen
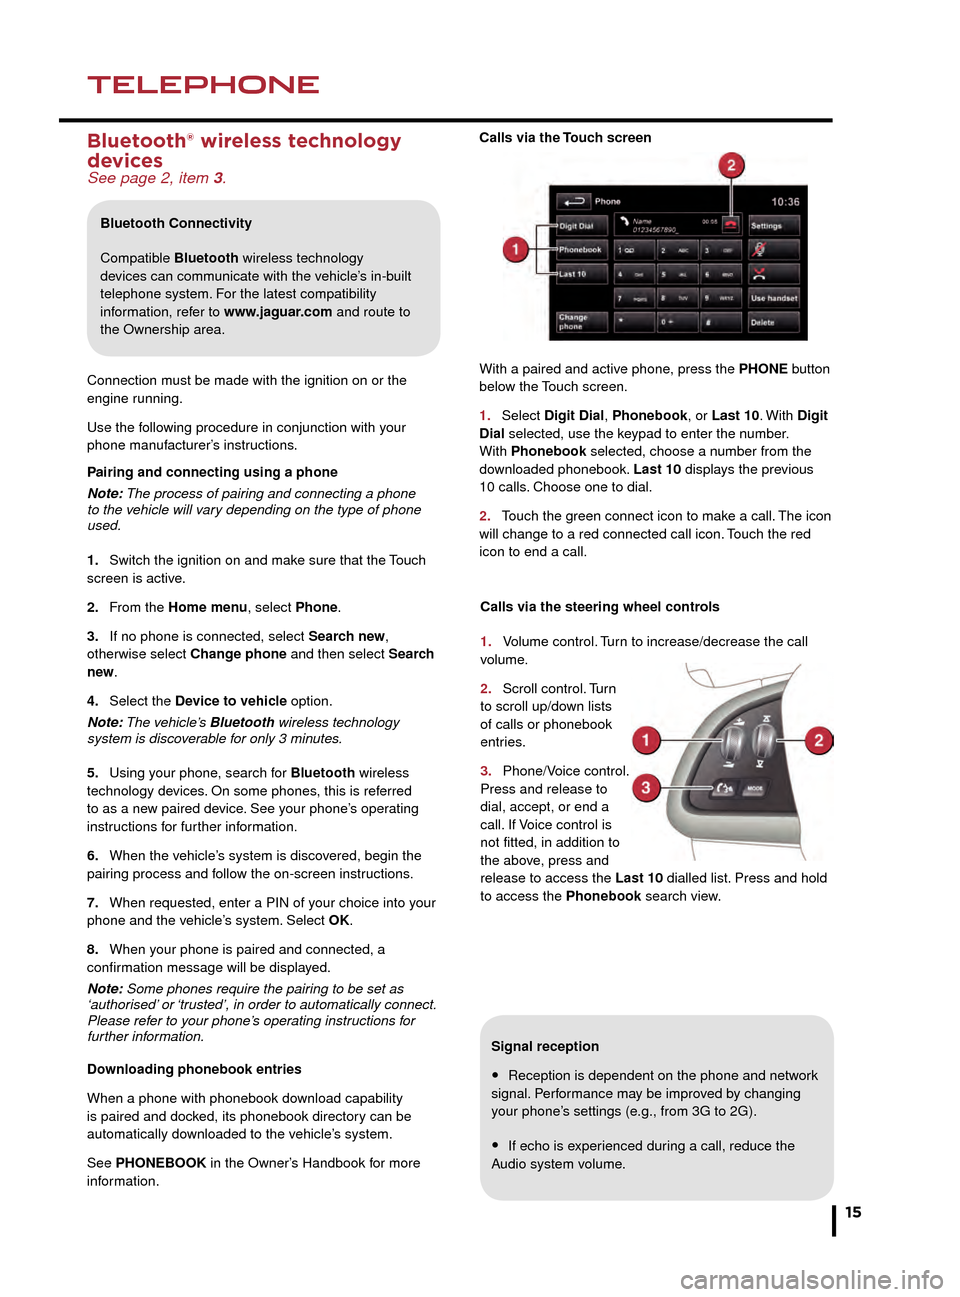
With a paired and active phone, press the PHONE button
below the Touch screen.
1.
Select
Digit Dial, Phonebook, or Last 10. With
Digit
Dial selected, use the keypad to enter the number.
With Phonebook selected, choose a number from the
downloaded phonebook. Last 10 displays the previous
10 calls. Choose one to dial.
2.
T
ouch the green connect icon to make a call. The icon
will change to a red connected call icon. Touch the red
icon to end a call.
Selecting navigation
When navigation is selected after the ignition is turned
on, a caution screen is displayed. Touch Agree.
Note: At the first time of accessing the caution screen,
set the required language.
Setting a destination
Select Destination entry.
1. Select Address and enter address details using the
keypad.
2. As each part of the address is refined, touch OK
or List to display all of the streets and towns that are
available for selection.
3. If the house number is not known, touch OK. The end
of the road is then used as the destination.
4. When the address entry fields are complete, press
OK to move to the map screen.
Start guidance
The map screen will display the selected destination.
Touch GO to start route calculation. Touch Review route
if you want to take an alternative route.
Touch Go to start guidance.
Review route
There will be a choice of 3 routes or Change route. 3
routes will display 3 different route options on the map.
Select Route 1, 2, or 3 by touching the respective box
displayed on the right side of the map and then select
GO.
Bluetooth® wireless technology
devices
See page 2, item 3.
Connection must be made with the ignition on or the
engine running.
Use the following procedure in conjunction with your
phone manufacturer’s instructions.
Pairing and connecting using a phone
Note: The process of pairing and connecting a phone
to the vehicle will vary depending on the type of phone
used.
1.
Switch the ignition on and mak
e sure that the Touch
screen is active.
2.
F
rom the Home menu, select Phone.
3.
If no phone is connected, select
Search new,
otherwise select Change phone and then select Search
new .
4.
Select the
Device to vehicle option.
Note: The vehicle’s Bluetooth wireless technology
system is discoverable for only 3 minutes.
5.
Using y
our phone, search for Bluetooth wireless
technology devices. On some phones, this is referred
to as a new paired device. See your phone’s operating
instructions for further information.
6.
When the v
ehicle’s system is discovered, begin the
pairing process and follow the on-screen instructions.
7.
When requested, enter a PIN of y
our choice into your
phone and the vehicle’s system. Select OK.
8.
When y
our phone is paired and connected, a
confirmation message will be displayed.
Note: Some phones require the pairing to be set as
‘authorised’ or ‘trusted’, in order to automatically connect.
Please refer to your phone’s operating instructions for
further information.
Downloading phonebook entries
When a phone with phonebook download capability
is paired and docked, its phonebook directory can be
automatically downloaded to the vehicle’s system.
See PHONEBOOK in the Owner’s Handbook for more
information.
Bluetooth Connectivity
Compatible Bluetooth wireless technology
devices can communicate with the vehicle’s in-built
telephone system. For the latest compatibility
information, refer to www.jaguar.com and route to
the Ownership area.
Calls via the steering wheel controls
1.
V
olume control. Turn to increase/decrease the call
volume.
2.
Scroll
control. Turn
to scroll up/down lists
of calls or phonebook
entries.
3.
Phone/V
oice control.
Press and release to
dial, accept, or end a
call. If Voice control is
not fitted, in addition to
the above, press and
release to access the Last 10 dialled list. Press and hold
to access the Phonebook search view.
JJM189640151.indd 1526/02/2014 16:29:35