buttons JAGUAR XFR 2010 1.G Workshop Manual
[x] Cancel search | Manufacturer: JAGUAR, Model Year: 2010, Model line: XFR, Model: JAGUAR XFR 2010 1.GPages: 3039, PDF Size: 58.49 MB
Page 165 of 3039

DTC Description Possible Causes Action module/component B10AC-82 Cruise Control Switch - Alive / sequence counter incorrect / not updated
Cruise buttons alive counter is not
incrementing. Which suggests that
the LIN bus is faulty
Steering wheel module is not
connected
Steering wheel module failure
Refer to the electrical circuit
diagrams and check the speed
control switch circuit for open circuit,
short circuit to power, short circuit to
ground, disconnected
Refer to the electrical circuit
diagrams and check the LIN bus
between steering wheel module and
the CAN gateway
Check and install a new steering
wheel module as required. Refer to
the warranty policy and procedures
manual, or determine if any prior
approval programme is in operation,
prior to the installation of a new
module/component B10AC-83
Cruise Control Switch - Value
of signal protection
calculation incorrect
Cruise buttons checksum incorrect,
incorrect cruise switches fitted to
vehicle
Check and install new cruise
switches as required. Refer to the
warranty policy and procedures
manual, or determine if any prior
approval programme is in operation,
prior to the installation of a new
module/component B10AC-96
Cruise Control Switch -
Component internal failure
Speed control switch circuit, open
circuit, short circuit to power, short
circuit to ground, disconnected
Speed control switch failure
Steering wheel module failure
Check for related DTCs in other
central junction boxes
Refer to the electrical circuit
diagrams and check the speed
control switch circuit for open circuit,
short circuit to power, short circuit to
ground, disconnected
Check and install a new speed
control switch as required. Check and
install a new steering wheel module
as required. Refer to the warranty
policy and procedures manual, or
determine if any prior approval
programme is in operation, prior to
the installation of a new
module/component B10FF-68
Ignition Control - Event
information
Spark plug(s) fault
Wiring harness fault
Ignition coil(s) fault
Refer to repair manual and check
spark plug(s) for condition and
security. Replace any defective
components as required
Refer to electrical wiring diagrams
and check ignition coil circuit for
intermittent open circuit, short
circuit to power, short circuit to
ground
Check and install a new coil(s) as
required. Refer to the warranty policy
and procedures manual, or determine
if any prior approval programme is in
operation, prior to the installation of
a new module/component B11DB-01
Battery Monitoring Module -
General electrical failure
NOTE: - Circuit BATTERY -
Charging system fault Battery
monitoring signal line
circuit fault
Vehicle battery fault
Refer to electrical wiring diagrams
and check charging system for faults.
Perform any repairs required
Refer to the electrical wiring
diagrams and check the battery
monitoring system module circuit for
open circuit, short circuit to ground,
short circuit to power
Refer to the workshop manual and
the battery care manual, inspect the
vehicle battery and ensure it is fully
charged and serviceable before
performing further tests
Page 493 of 3039
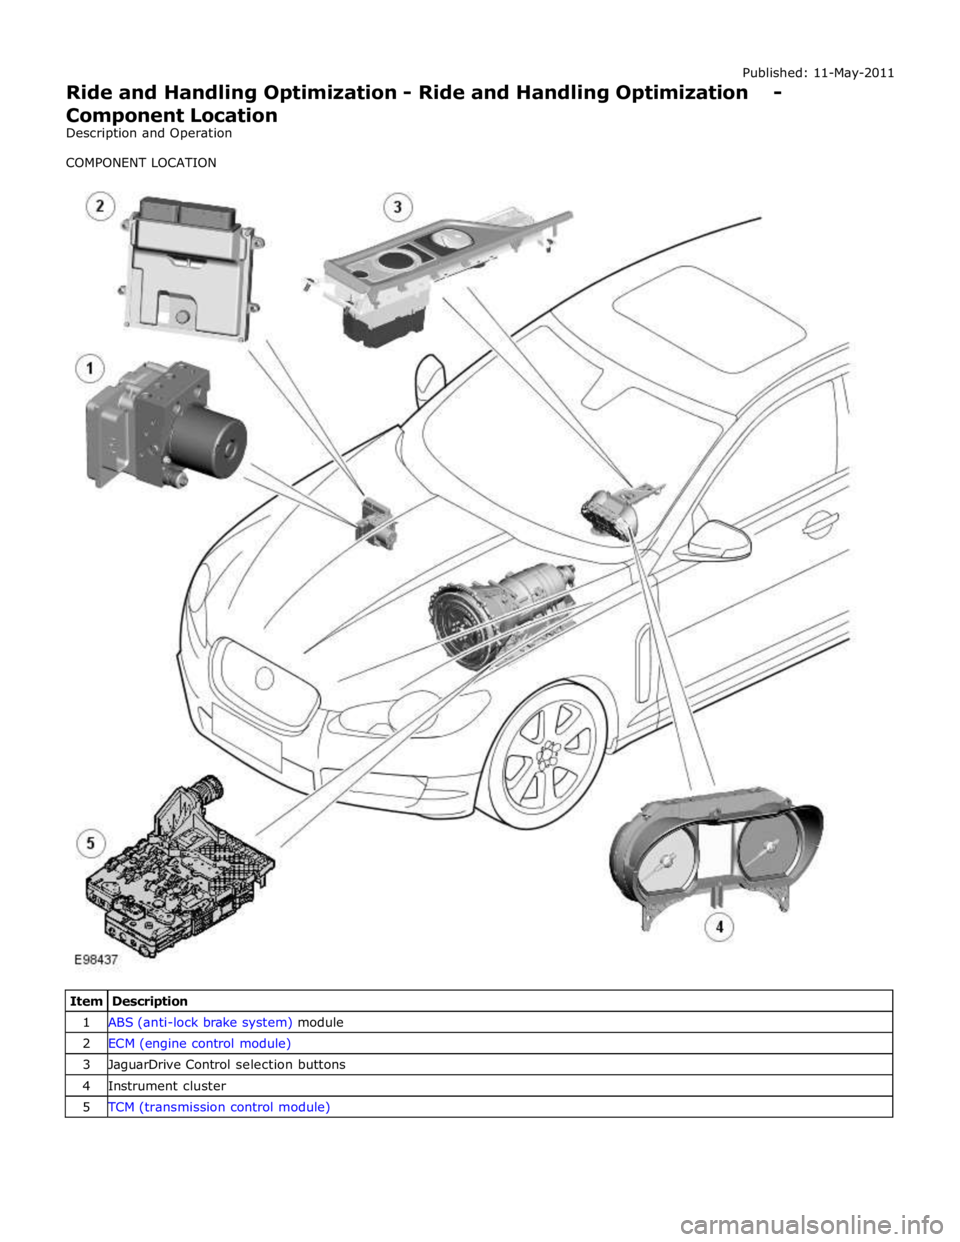
1 ABS (anti-lock brake system) module 2 ECM (engine control module) 3 JaguarDrive Control selection buttons 4 Instrument cluster 5 TCM (transmission control module)
Page 496 of 3039
JaguarDrive Control Sub-System Faults
If a fault occurs in a sub-system, the driver is alerted by the illumination of a warning indicator and/or an appropriate message
for that sub-system in the instrument cluster message center. No JaguarDrive Control message will be shown when a failed
sub-system displays its own message.
When a sub-system fault is present and the driver attempts to select a different JaguarDrive Control mode or at the next
ignition on cycle, a message 'WINTER MODE FAULT' or 'DYNAMIC MODE FAULT' will appear in the message center. This
generally implies that the JaguarDrive Control system has a fault, but only because a sub-system fault is preventing its
operation. This message will be displayed once per ignition cycle, but is repeated if a further selection is made by the driver
using the JaguarDrive Control buttons or at the next ignition on cycle.
NOTE: The message 'WINTER MODE FAULT' or 'DYNAMIC MODE FAULT' can also in very rare circumstances be generated
by a fault in the JaguarDrive Control module.
It is not possible for the JaguarDrive Control module to cause any fault behavior (warning indicator illumination or message
generation) in any of the sub-systems. Illumination of a sub-system warning indicator and/or a sub-system related message
will never be associated with a JaguarDrive Control module or JaguarDrive Control system fault.
The sub-system control modules can detect a fault with the CAN (controller area network) bus signal from the transmission
selector module. If a fault in the JaguarDrive Control system is detected, the sub-system control modules will operate in the
'special modes off' setting. The sub-system control modules will record a fault code for a failure of the JaguarDrive Control CAN signal. These faults can be retrieved using the Jaguar approved diagnostic tool and will provide useful information to indicate
investigation of the JaguarDrive Selector module or the CAN bus network. JaguarDrive Control System or Control Module Fault
If a fault occurs in the JaguarDrive Control system, all button icon LED (light emitting diode)'s will be turned off (background
illumination will remain on) and pressing of the JaguarDrive Control buttons is ignored. The instrument cluster message center
will display a message 'WINTER MODE FAULT' or 'DYNAMIC MODE FAULT' when the fault occurs, if the fault is present and the
driver attempts to select a special mode (if the control module is able to do this) or at the next ignition on cycle.
The JaguarDrive Control buttons and control module (JaguarDrive Selector module) are an integral unit. If a fault occurs in
either component, the whole unit will require replacement, however, this is extremely unlikely.
CAN Bus Faults
If a CAN bus fault exists and prevents JaguarDrive Control system operation, all of the JaguarDrive Control button icon LED's will be illuminated and rotation pressing of the JaguarDrive Control buttons is ignored.
If the instrument cluster does not receive a JaguarDrive Control system CAN bus message from the JaguarDrive Control module, the message 'SPECIAL MODE UNAVAILABLE' will be displayed when the fault occurs and will be repeated at every
ignition on cycle.
User Error
A special mode change while DSC or ABS is active (this includes ABS cycling) may be misinterpreted as a system fault.
Page 497 of 3039
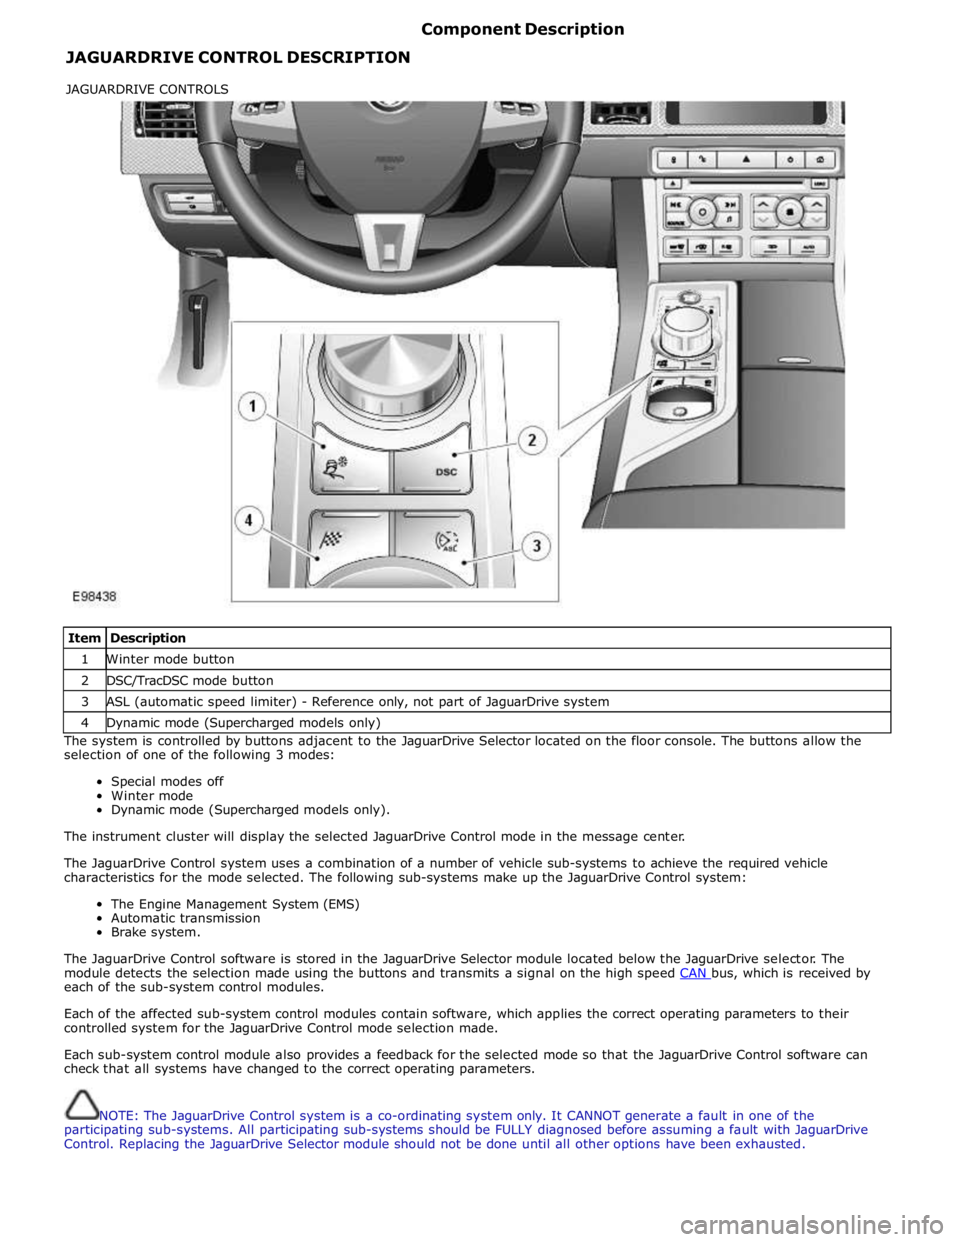
JAGUARDRIVE CONTROL DESCRIPTION Component Description
Item Description 1 Winter mode button 2 DSC/TracDSC mode button 3 ASL (automatic speed limiter) - Reference only, not part of JaguarDrive system 4 Dynamic mode (Supercharged models only) The system is controlled by buttons adjacent to the JaguarDrive Selector located on the floor console. The buttons allow the
selection of one of the following 3 modes:
Special modes off
Winter mode
Dynamic mode (Supercharged models only).
The instrument cluster will display the selected JaguarDrive Control mode in the message center.
The JaguarDrive Control system uses a combination of a number of vehicle sub-systems to achieve the required vehicle
characteristics for the mode selected. The following sub-systems make up the JaguarDrive Control system:
The Engine Management System (EMS)
Automatic transmission
Brake system.
The JaguarDrive Control software is stored in the JaguarDrive Selector module located below the JaguarDrive selector. The
module detects the selection made using the buttons and transmits a signal on the high speed CAN bus, which is received by each of the sub-system control modules.
Each of the affected sub-system control modules contain software, which applies the correct operating parameters to their
controlled system for the JaguarDrive Control mode selection made.
Each sub-system control module also provides a feedback for the selected mode so that the JaguarDrive Control software can
check that all systems have changed to the correct operating parameters.
NOTE: The JaguarDrive Control system is a co-ordinating system only. It CANNOT generate a fault in one of the
participating sub-systems. All participating sub-systems should be FULLY diagnosed before assuming a fault with JaguarDrive
Control. Replacing the JaguarDrive Selector module should not be done until all other options have been exhausted. JAGUARDRIVE CONTROLS
Page 498 of 3039
Winter Mode
To activate winter mode, press the winter mode button briefly (not less than 300 ms) to activate or de-activate the mode.
NOTE: Winter mode cannot be active at the same time as dynamic mode (Supercharged models only).
When active the winter mode icon and message appear in the instrument cluster message center to confirm the activation.
Dynamic Stability Control (DSC)
Press the DSC mode button briefly (not less than 300 ms) to switch between DSC and TracDSC. The instrument cluster
message center will display either 'DSC ON' or 'TRAC DSC' depending on which selection is made. When TracDSC is selected,
the DSC warning lamp in the instrument cluster is illuminated and the DSC button is illuminated.
DSC can be manually switched off by pressing the DSC mode button for more than 10 seconds. Confirmation is given by a
chime from the instrument cluster, 'DSC OFF' is displayed in the instrument cluster message center and the DSC warning lamp
in the instrument cluster is illuminated.
NOTE: DSC is operational at all times when the engine is running unless manually switched off.
Dynamic Mode (Supercharged models only)
To activate Dynamic mode, press the button briefly. The dynamic mode and DSC buttons are illuminated. 'Dynamic Mode
Confirmed' message is displayed in the instrument cluster message center and the DSC off warning lamp in the instrument
cluster is illuminated (due to automatic selection of TracDSC in Dynamic mode).
NOTE: Dynamic mode cannot be active at the same time as winter mode.
Once activated, TracDSC is automatically selected. In gearbox Sport mode, the driver has full control over the transmission
shift points and the TCM will not intervene to prevent engine overspeed (for example; upshifts are inhibited in gearbox sport mode when Dynamic mode is selected). In this setting, the gear indicator in the instrument cluster will turn amber at high
rev's to indicate an appropriate manual upshift point.
Page 802 of 3039
Turn signal indicators
Side lamps
Headlamps
Auto lamps
High/low beam
Headlamp flash
Headlamp timer
Trip computer.
The switch is located in a slot in the clockspring and secured with 2 plastic clips.
RH Multifunction Switch
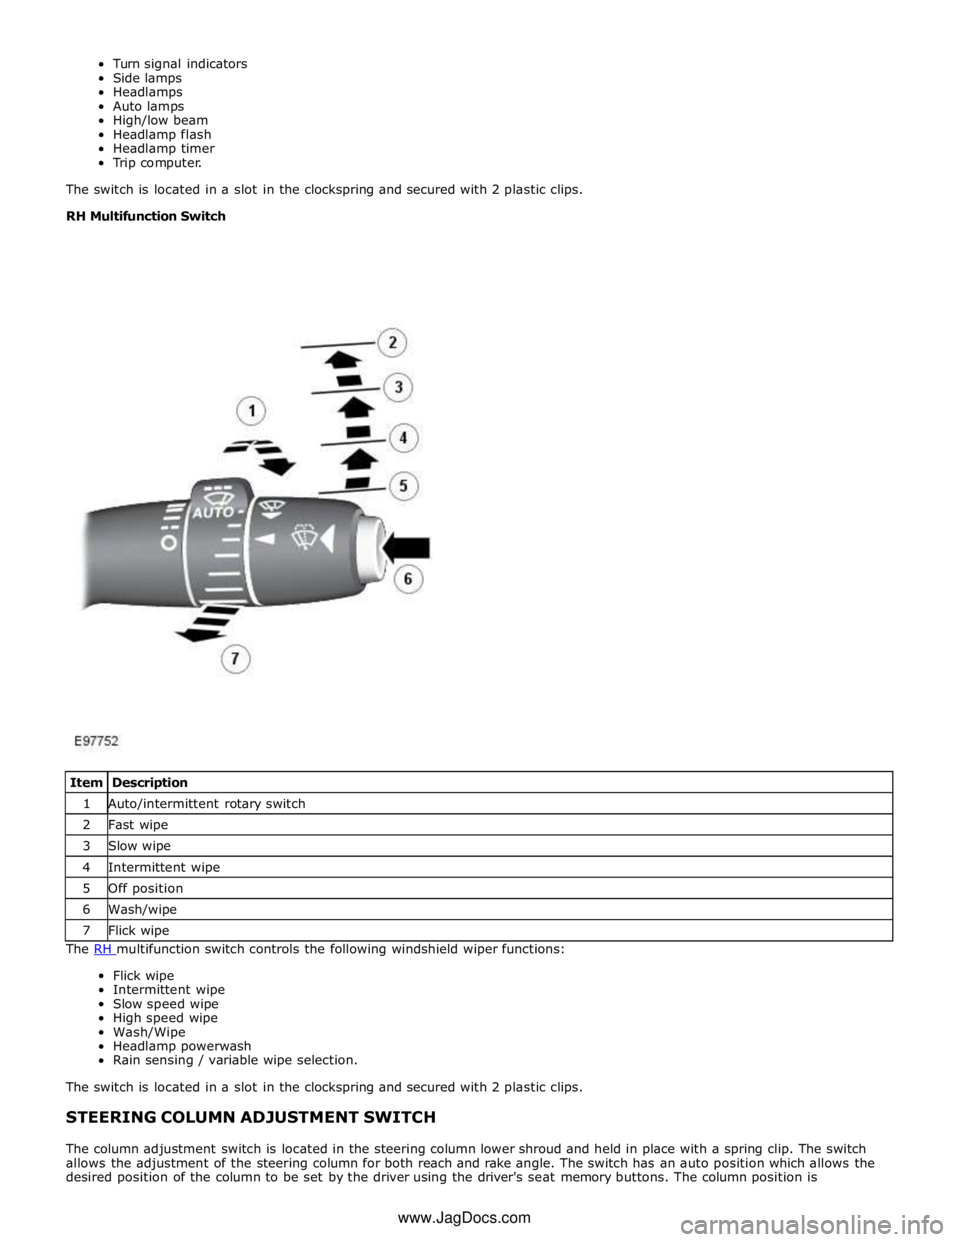
The RH multifunction switch controls the following windshield wiper functions: Flick wipe
Intermittent wipe
Slow speed wipe
High speed wipe
Wash/Wipe
Headlamp powerwash
Rain sensing / variable wipe selection.
The switch is located in a slot in the clockspring and secured with 2 plastic clips.
STEERING COLUMN ADJUSTMENT SWITCH
The column adjustment switch is located in the steering column lower shroud and held in place with a spring clip. The switch
allows the adjustment of the steering column for both reach and rake angle. The switch has an auto position which allows the
desired position of the column to be set by the driver using the driver's seat memory buttons. The column position is Item Description 1 Auto/intermittent rotary switch 2 Fast wipe 3 Slow wipe 4 Intermittent wipe 5 Off position 6 Wash/wipe 7 Flick wipe www.JagDocs.com
Page 1373 of 3039

DTC Description Possible Causes Action B10AC-81
Cruise Control Switch -
invalid serial data received
The Engine Control Module
(ECM) has received an invalid
command from the steering
wheel switch pack Clear the DTC and press all the steering wheel
switches, re-check for DTCs. Refer to the
electrical circuit diagrams and check the Cruise
control switch circuit for open circuit, short to
power, short to ground, disconnected. Check
and install a new Steering Wheel Module (SWM) as required. B10AC-82 Cruise Control Switch - alive / sequence counter incorrect / not updated
Cruise Buttons alive counter is
not incrementing. Which
suggests that the LIN bus is
faulty
Steering Wheel Module (SWM) is
not connected
Steering Wheel Module (SWM)
failure Refer to the electrical circuit diagrams and
check the Cruise control switch circuit for open
circuit, short to power, short to ground,
disconnected. Check and install a new Steering
Wheel Module (SWM) as required. B10AC-83
Cruise Control Switch - value
of signal protection
calculation incorrect
Cruise buttons checksum
incorrect, incorrect cruise
switches fitted to vehicle Check and install new cruise switches as
required. B10AC-96
Cruise Control Switch -
component internal failure
Cruise control switch circuit,
open circuit, short to power,
short to ground, disconnected
Cruise Control Switch failure
Steering Wheel Module (SWM)
failure Check for related DTCs in other Central
Junction Box (CJB)s. Refer to the electrical
circuit diagrams and check the Cruise control
switch circuit for open circuit, short to power,
short to ground, disconnected. Check and
install a new cruise control switch as required.
Check and install a new Steering Wheel
Module (SWM) as required. B10FF-68
Ignition Control - Event
information
Spark plug(s) fault
Wiring harness fault
Ignition coil(s) fault Refer to repair manual and check spark plug(s)
for condition and security. Replace any
defective components as required. Refer to
electrical wiring diagrams and check ignition
coil circuit for intermittent open circuit, short
to power, short to ground. Check and install a
new coil(s) as required. B11DB-01
Battery Monitoring Module -
General Electrical Failure
Charging system fault Battery
monitoring signal line
circuit fault
Vehicle battery fault Refer to electrical wiring diagrams and check
charging system for faults. Perform any repairs
required. Refer to the electrical wiring
diagrams and check the Battery Monitoring
System (BMS) module circuit for open circuit,
short to ground, short to power. Refer to the
battery care manual and check and install a
new battery. B11DB-87
Battery Monitoring Module -
missing message
Battery signal line circuit fault Refer to the electrical wiring diagrams and
check the Battery Monitoring System (BMS)
module circuit for open circuit, short to ground,
short to power. B1206-68
Crash Occurred - event
information
Engine control Module (ECM) has
detected the vehicle has crashed
- event information DTC only Refer to the electrical circuit diagrams and
check the Engine Control Module (ECM) to
Restraints Control Module (RCM) circuit for
short to ground, short to power, open circuit.
Repair circuit as required, clear DTC and retest
system to confirm repair. C0031-00
Left Front Wheel Speed
Sensor - No sub type
information
Invalid data received from
Anti-lock Braking System (ABS)
module - left front wheel speed
signal fault Check Anti-lock Braking System (ABS) module
for related DTCs and refer to relevant DTC
Index. C0034-00
Right Front Wheel Speed
Sensor - No sub type
information
Invalid data received from
Anti-lock Braking System (ABS)
module - right front wheel speed
signal fault Check Anti-lock Braking System (ABS) module
for related DTCs and refer to relevant DTC
Index. C0037-00
Left Rear Wheel Speed
Sensor - No sub type
information
Invalid data received from
Anti-lock Braking System (ABS)
module - left rear wheel speed
signal fault Check Anti-lock Braking System (ABS) module
for related DTCs and refer to relevant DTC
Index. C003A-00
Right Rear Wheel Speed
Sensor - No sub type
information
Invalid data received from
Anti-lock Braking System (ABS)
module - right rear wheel speed
signal fault Check Anti-lock Braking System (ABS) module
for related DTCs and refer to relevant DTC
Index.
Page 1534 of 3039
Published: 19-Jun-2013
Automatic Transmission/Transaxle External Controls - TDV6 3.0L Diesel /V8 5.0L Petrol/V8 S/C 5.0L Petrol - External Controls
Diagnosis and Testing
Principles of Operation
For a detailed description of the transmission external controls, refer to the relevant Description and Operation sections in the
workshop manual. REFER to: (307-05)
External Controls (Description and Operation),
External Controls (Description and Operation),
External Controls (Description and Operation).
Inspection and Verification
CAUTION: Diagnosis by substitution from a donor vehicle is NOT acceptable. Substitution of control modules does not
guarantee confirmation of a fault, and may also cause additional faults in the vehicle being tested and/or the donor vehicle.
1. Verify the customer concern.
2. Visually inspect for obvious signs of damage and system integrity.
Visual Inspection
Mechanical Electrical
Check for stuck/jammed switches and buttons
Visibly damaged or worn components
Loose or missing fasteners
Fuse(s)
Loose or corroded electrical connector(s)
Transmission control module
Transmission control switch
3. If an obvious cause for an observed or reported concern is found, correct the cause (if possible) before proceeding to
the next step.
4. If the cause is not visually evident, check for Diagnostic Trouble Codes (DTCs) and refer to the DTC Index.
DTC Index
For a list of DTCs that could be logged on this vehicle, please refer to Section 100-00.
REFER to: Diagnostic Trouble Code (DTC) Index - DTC: Transmission Control Module (TCM) (100-00, Description and Operation)
/
Diagnostic Trouble Code (DTC) Index - DTC: Transmission Control Switch (TCS) (100-00, Description and Operation).
Page 1710 of 3039
control switch on the integrated control panel or the + and - soft buttons on the touch screen display (TSD). The ATC module also adjusts blower speed to compensate for the ram effect on inlet air produced by forward movement of the vehicle. As
vehicle speed and ram effect increases, blower motor speed is reduced, and vice versa.
Air Distribution Control
Two air distribution doors are used to direct air into the passenger compartment. The doors are operated by stepper motors,
which are controlled by the ATC module using LIN bus messages.
When the A/C system is in automatic mode, the ATC module automatically controls air distribution into the passenger compartment in line with its 'comfort' algorithm. Automatic control is overridden if any of the TSD air distribution soft buttons
are selected. Air distribution in the passenger compartment will remain as selected until the 'Auto' switch is pressed or a
different manual selection is made.
A/C Compressor Control
When A/C is selected the ATC module maintains the evaporator at an operating temperature that varies with the passenger compartment cooling requirements. If the requirement for cooled air decreases, the ATC module raises the evaporator operating temperature by reducing the flow of refrigerant provided by the A/C compressor. The ATC module closely controls the rate of temperature increase to avoid introducing moisture into the passenger compartment.
If the requirement for cooled air increases, the ATC module lowers the evaporator operating temperature by increasing the flow of refrigerant provided by the A/C compressor.
When A/C is off, the compressor current signal supplied by the ATC module holds the A/C compressor solenoid valve in the minimum flow position, effectively switching off the A/C function.
The ATC module incorporates limits for the operating pressure of the refrigerant system. If the system approaches the high pressure limit, the compressor current signal is progressively reduced until the system pressure decreases. If the system falls
below the low pressure limit, the compressor current signal is held at its lowest setting so that the A/C compressor is maintained at its minimum stroke. This avoids depletion of the lubricant from the A/C compressor.
A/C Compressor Torque
The ATC module transmits refrigerant pressure and A/C compressor current values to the ECM (engine control module) over the medium speed then high speed CAN bus, using the CJB as a gateway. The ECM uses these values to calculate the torque being used to drive the A/C compressor. The ECM compares the calculated value with its allowable value and if necessary forces the ATC module to inhibit the A/C compressor by transmitting the 'ACClutchInhibit' CAN message. This forces the ATC module to reduce the drive current to the A/C compressor solenoid valve, which reduces refrigerant flow. This in turn reduces the torque required to drive the A/C compressor.
By reducing the maximum A/C compressor torque, the ECM is able to reduce the load on the engine when it needs to maintain vehicle performance or cooling system integrity.
Cooling Fan Control
The ATC module determines the amount of condenser cooling required from the refrigerant pressure sensor, since there is a direct relationship between the temperature and pressure of the refrigerant. The cooling requirement is broadcast to the ECM on the medium speed CAN bus. The ECM then controls the temperature of the condenser using the cooling fan.
Programmed Defrost
The programmed defrost DEF switch is located on the integrated control panel. When the switch is pressed, the ATC module instigates the programmed defrost function. When selected, the ATC module configures the system as follows:
Automatic mode off.
A/C on. Selected temperature unchanged.
Air inlet set to fresh air.
Air distribution set to windshield.
Blower speed set to level 6.
Windshield heater (where fitted) and rear window heater on.
The programmed defrost function can be cancelled by one of the following:
Selecting any air distribution switch on the TSD.
Pressing the AUTO switch on the integrated control panel.
A second press of the DEF button.
Switching the ignition OFF.
The blower speed can be adjusted without terminating the programmed defrost function.
Rear Window Heater
Rear window heater operation is only enabled when the engine is running. The ATC module controls operation of the rear window heater using a relay in the RJB. When rear window heater operation is required, the ATC module broadcasts a message to the RJB on the medium speed CAN bus. On receipt of the message, the RJB energizes the relay by providing a ground path for the relay coil. This allows a battery feed to flow across the relay to power the rear window heater element.
Page 2059 of 3039
Once the timer has expired and the lamps are off, any one of the following will 'wake up' the battery saver and the interior
lamps will function again. The timer will be restarted as soon as an input is received by the CJB from one of the following:
Ignition mode changed from off power mode 0 to accessory power mode 4, ignition power mode 6 or crank power mode
9.
Any door, including the luggage compartment lid is opened
An unlock request is received from the Smart Key via the keyless vehicle module
Overhead console interior lamp is switched on via the JaguarSense function.
INTERIOR LAMPS
When the interior lighting system switches the interior lamps on, the CJB ramps the lamps up to full power over a period of 1.3 seconds. When the system switches the lamps off, after the time-out period has expired, the CJB fades the lamps off over a period of 2.6 seconds.
The interior lighting system will illuminate the interior lamps when one of the following events occurs:
The CJB receives an unlock signal from the Smart Key via the keyless vehicle module Any door is opened including the luggage compartment lid
The ignition mode is changed from ignition power mode 6 or accessory power mode 4 to off power mode 0.
The interior lighting system will turn off the interior lamps when one of the following events occurs:
Once the time-out timer delay has expired since the lamps were either activated or the last door is closed and the
vehicle is not locked
The ignition is in off power mode 0 and an external lock is requested (using either the door lock buttons or the Smart
Key) with all doors closed
The ignition mode is changed from the off power mode 0 or the accessory power mode 4 to the ignition power mode 6
The last door is closed and the vehicle is externally locked, on receipt of an unlock request from the Smart Key or door
handle operation detected when the time-out timer is still active.
DELIVERY MODE
Delivery mode is set at the factory on vehicles to minimize battery drain. The mode enables the switching off of non-critical
electrical components, including the interior lighting system. The delivery mode feature is cancelled by the dealer during the
Pre-Delivery Inspection using an approved Jaguar diagnostic system.
CRASH ILLUMINATION
When a crash signal is received from the RCM (restraints control module), the CJB activates the interior lamps once the vehicle speed has reduced to 5 km/h (3.1 mph). The hazard flashers are also activated and the doors are prevented from being locked.
The lamps remain on until the crash signal is removed, they cannot be switched off using the JaguarSense feature. The crash
signal is removed by completing one ignition on and off cycle.
INTERIOR BULB TYPE/RATING Component Description
The following table shows the bulbs used for the interior lighting system and their type and specification.
NOTE: The front overhead console and the front door ambience lighting is illuminated by LED's and are non-serviceable components.
Bulb Type Rating Front overhead console - interior lamp W6WX 6W Front overhead console - LH/RH map reading lamps W6WX 6W Rear interior lamps W6WX 10W Sunvisor lamps TS1.3W 1.3W LH/RH footwell lamps W5W 5W Glovebox lamp W5W 5W LH/RH door mirror approach lamps W5W 5W Luggage compartment lamp S10W 10W JUNCTION BOXES
The CJB is an integrated unit located on the RH 'A' pillar, below the instrument panel. The CJB contains fuses, relays and number of microprocessors which control the power supply and functionality of the interior lighting system and other vehicle
systems.
The RJB is located on the RH side of the luggage compartment. The RJB contains fuses, relays and microprocessors which in conjunction with the CJB control the interior lighting system and other vehicle systems. Circuit Protection
The CJB and the RJB provide circuit protection for all interior lamp circuits. The lamps are protected by fuses in the CJB and the RJB.