fuse JAGUAR XJ 2004 X350 / 3.G Owners Manual
[x] Cancel search | Manufacturer: JAGUAR, Model Year: 2004, Model line: XJ, Model: JAGUAR XJ 2004 X350 / 3.GPages: 227, PDF Size: 4.22 MB
Page 11 of 227
Owner Information 1 - 7
Health and Safety
!WARNING:
1. Many liquids and other substances used in vehicles are
poisonous and should never be
consumed and must be kept away
from open wounds.
These substances include anti-
freeze, brake fluid, fuel,
windscreen washer additives,
lubricants and various adhesives.
2. The presence of any unusual fumes (for example; petrol or
exhaust fumes) in the passenger
compartment and/or luggage
compartment should be corrected
immediately by a Jaguar Retailer.
If you must drive under these
conditions do so only with all
windows fully open.
3. By operating other electronic equipment (for example; a mobile
phone without an exterior
antenna) electro-magnetic fields
can cause malfunctions of the
vehicle electronics.
Therefore, you should observe the
instructions of the equipment
manufacturers. 4. Any modifications to the fuel
system not specifically designed
for this Jaguar are prohibited.
Such modifications in some
circumstances could result in a
fire. All service actions must be
entrusted to a Jaguar Retailer.
5. Alterations to the electrical system, including the fitting of
accessories not designed for this
Jaguar, will cause damage to the
electrical circuits and systems.
In some circumstances this could
result in a malfunction or fire.
All accessory work should be
entrusted to a Jaguar Retailer.
6. No attempt should be made to repair a fuse that has blown.
Always install a new fuse of the
correct amperage. Failure to
comply with the above may cause
a fire hazard or create serious
damage elsewhere in the
electrical circuit.
7. Avoid contact with battery acid which is poisonous and corrosive.
Acid will cause burns to the skin
as well as to the eyes. In the event
of skin or eye contamination,
wash the affected area with water
thoroughly. Seek immediate medical attention when eye
contact has occurred.
8. Do not disconnect any pipes in the air conditioning refrigeration
system. A refrigerant is used
which can cause blindness if
allowed to contact the eyes.
If refrigerant should contact the
eyes or skin, wash the eyes or
affected area with cold water for
several minutes. Do not rub.
As soon as possible thereafter,
obtain treatment from a doctor or
eye specialist.
9. When working within the engine compartment, take care to avoid
contact with moving parts and hot
components.
10. California Proposition 65: Engine exhaust, some of it’s
constituents, and certain vehicle
components, contain or emit
chemicals known to the State of
California to cause cancer and
birth defects or other
reproductive harm.
Page 55 of 227
3 - 16 Before Driving
Air bag fault warning light
The air bag warning light in the driver’s
instrument cluster will be lit for
approximately six seconds when the
ignition is turned on.
If the light remains on or flashes,
it indicates a fault within the air bag
electrical circuits. Report the fault to a
Jaguar Retailer immediately. It is safe to
drive the vehicle; however, in an accident
the air bags may not operate.
Air bag warning ligh t information is
shown on page 4 - 8. Air bag disposal
!WARNING:
Do not attempt to service, repair or
modify the air bag sy stem or its fuses.
All work on the air bag system,
including renewal after deployment
and renewal at the end of its service
life, must be carried out by an
authorised Jaguar Retailer.
In the event of the vehicle being
dismantled, air bag module removal and
disposal MUST be made by a qualified
person. Instructions can be obtained
from an authorised Jaguar Retailer. Front protection
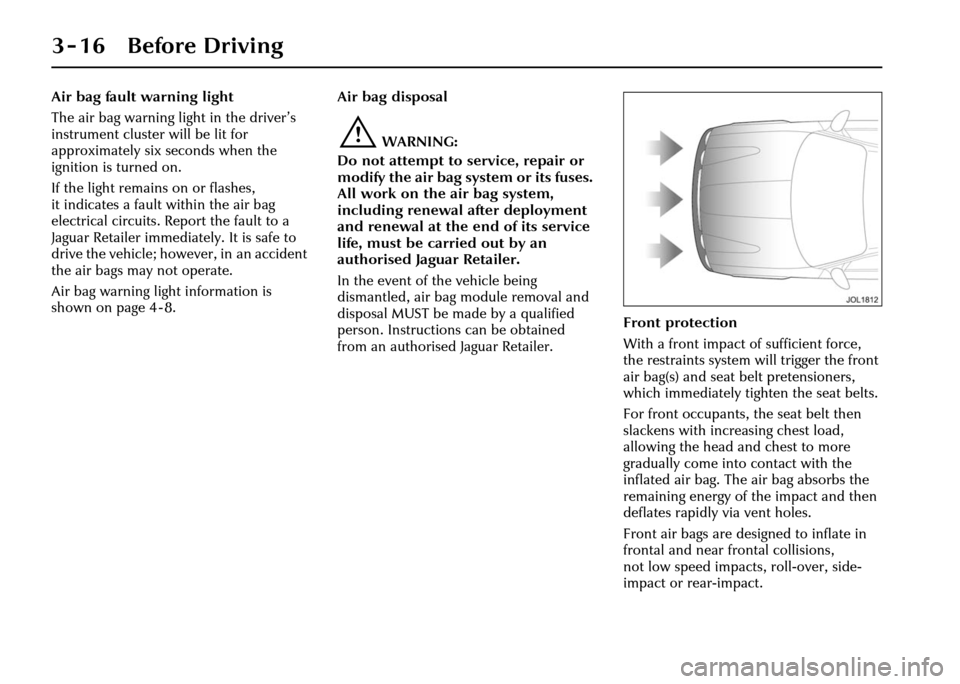
With a front impact of sufficient force,
the restraints system will trigger the front
air bag(s) and seat belt pretensioners,
which immediately tighten the seat belts.
For front occupants, the seat belt then
slackens with increasing chest load,
allowing the head and chest to more
gradually come into contact with the
inflated air bag. The air bag absorbs the
remaining energy of the impact and then
deflates rapidly via vent holes.
Front air bags are designed to inflate in
frontal and near fr
ontal collisions,
not low speed impacts, roll-over, side-
impact or rear-impact.
Page 152 of 227
Roadside Emergency
Inertia Switch . . . . . . . . . . . . . . . . . . . . . . . . . . . 6 - 3
Trunk Underfloor Access . . . . . . . . . . . . . . . . . . 6 - 4
Emergency Starting . . . . . . . . . . . . . . . . . . . . . . . 6 - 4
Wheel Changing and Jacking . . . . . . . . . . . . . . . . 6 - 6
Vehicle Recovery . . . . . . . . . . . . . . . . . . . . . . . 6 - 11
Bulb Renewal . . . . . . . . . . . . . . . . . . . . . . . . . . 6 - 14
Fire Extinguisher . . . . . . . . . . . . . . . . . . . . . . . . 6 - 20
Fuses and Fuse Boxes . . . . . . . . . . . . . . . . . . . . 6 - 21
Page 155 of 227
6 - 4 Roadside Emergency
Trunk Underfloor Access
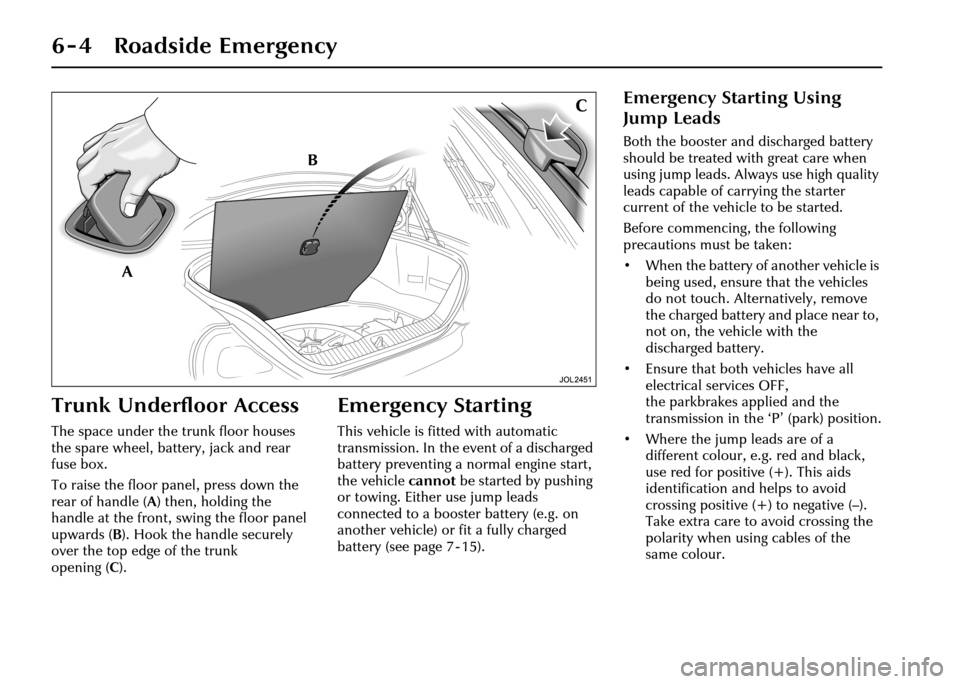
The space under the trunk floor houses
the spare wheel, battery, jack and rear
fuse box.
To raise the floor panel, press down the
rear of handle (A) then, holding the
handle at the front, swing the floor panel
upwards ( B). Hook the handle securely
over the top edge of the trunk
opening ( C).
Emergency Starting
This vehicle is fitted with automatic
transmission. In the event of a discharged
battery preventing a normal engine start,
the vehicle cannot be started by pushing
or towing. Either use jump leads
connected to a booster battery (e.g. on
another vehicle) or fit a fully charged
battery (see page 7 - 15).
Emergency Starting Using
Jump Leads
Both the booster and discharged battery
should be treated with great care when
using jump leads. Al ways use high quality
leads capable of carrying the starter
current of the vehicle to be started.
Before commencing, the following
precautions must be taken:
• When the battery of another vehicle is being used, ensure that the vehicles
do not touch. Alternatively, remove
the charged battery and place near to,
not on, the vehicle with the
discharged battery.
• Ensure that both vehicles have all electrical services OFF,
the parkbrakes applied and the
transmission in the ‘P’ (park) position.
• Where the jump leads are of a different colour, e.g. red and black,
use red for positive (+). This aids
identification and helps to avoid
crossing positive (+) to negative (–).
Take extra care to avoid crossing the
polarity when using cables of the
same colour.
Page 172 of 227
Roadside Emergency 6 - 21
Fuses and Fuse Boxes
Do not fit a new fuse if the wiring is
damaged; contact a Jaguar Retailer.
After renewing a fuse have the circuit
checked by a Jaguar Retailer.
Two types of fuses are fitted in the fuse
boxes, ATO type and Midi type.
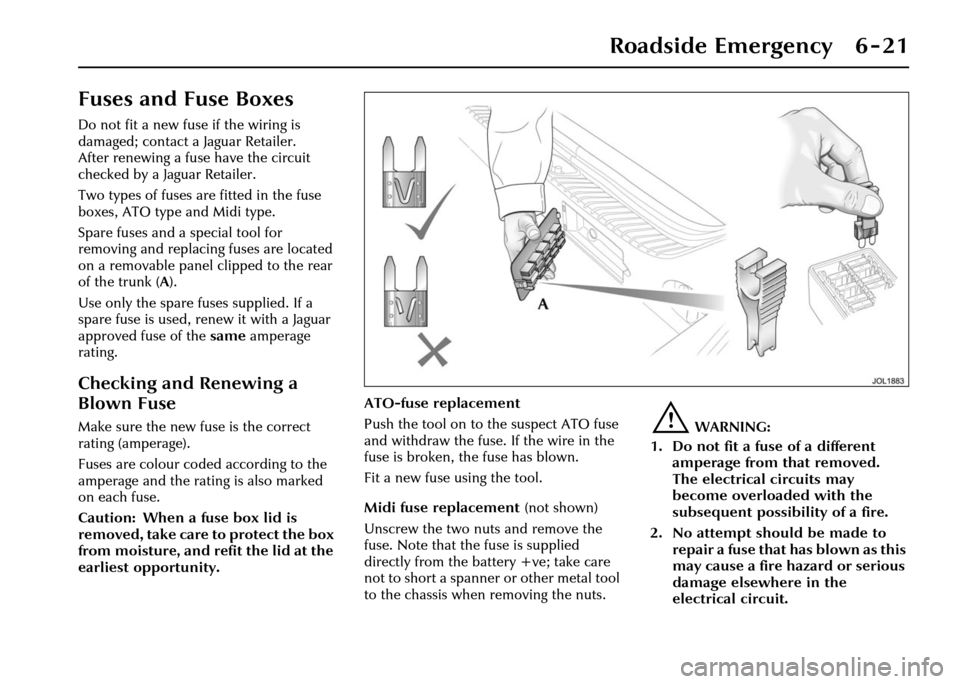
Spare fuses and a special tool for
removing and replacing fuses are located
on a removable panel clipped to the rear
of the trunk ( A).
Use only the spare fuses supplied. If a
spare fuse is used, renew it with a Jaguar
approved fuse of the same amperage
rating.
Checking and Renewing a
Blown Fuse
Make sure the new fuse is the correct
rating (amperage).
Fuses are colour coded according to the
amperage and the rating is also marked
on each fuse.
Caution: When a fuse box lid is
removed, take care to protect the box
from moisture, and refit the lid at the
earliest opportunity. ATO-fuse replacement
Push the tool on to the suspect ATO fuse
and withdraw the fuse. If the wire in the
fuse is broken, the fuse has blown.
Fit a new fuse using the tool.
Midi fuse replacement
(not shown)
Unscrew the two nuts and remove the
fuse. Note that the fuse is supplied
directly from the battery +ve; take care
not to short a spanner or other metal tool
to the chassis when removing the nuts.!WARNING:
1. Do not fit a fuse of a different amperage from that removed.
The electrical circuits may
become overloaded with the
subsequent possibility of a fire.
2. No attempt should be made to repair a fuse that has blown as this
may cause a fire hazard or serious
damage elsewhere in the
electrical circuit.
Page 173 of 227
6 - 22 Roadside Emergency
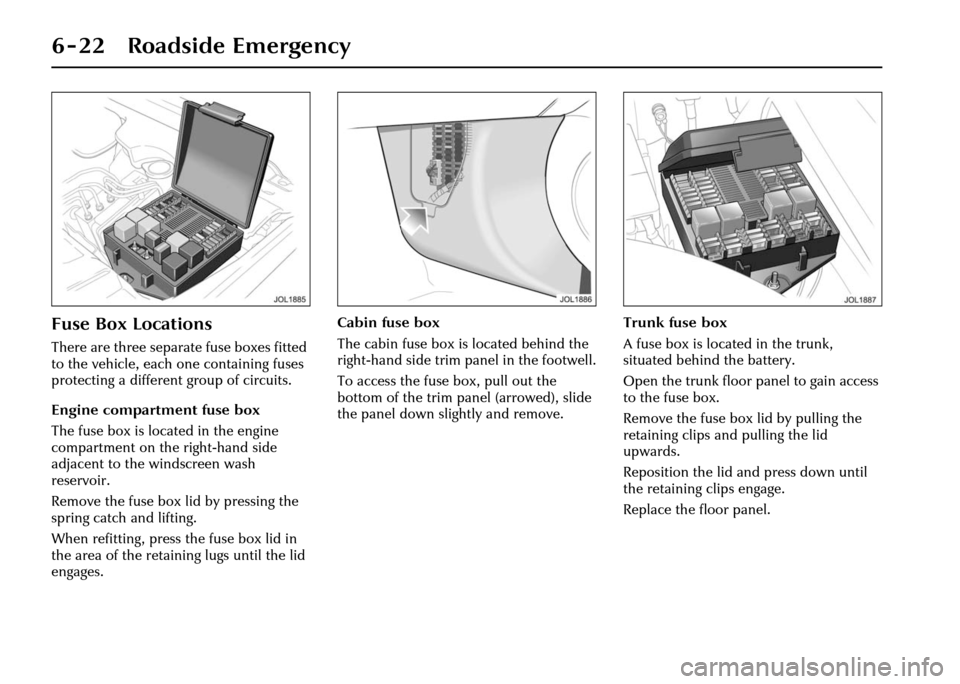
Fuse Box Locations
There are three separate fuse boxes fitted
to the vehicle, each one containing fuses
protecting a different group of circuits.
Engine compartment fuse box
The fuse box is located in the engine
compartment on the right-hand side
adjacent to the windscreen wash
reservoir.
Remove the fuse box lid by pressing the
spring catch and lifting.
When refitting, press the fuse box lid in
the area of the retaining lugs until the lid
engages. Cabin fuse box
The cabin fuse box is located behind the
right-hand side trim panel in the footwell.
To access the fuse box, pull out the
bottom of the trim panel (arrowed), slide
the panel down slightly and remove.
Trunk fuse box
A fuse box is located in the trunk,
situated behind the battery.
Open the trunk floor panel to gain access
to the fuse box.
Remove the fuse box lid by pulling the
retaining clips and pulling the lid
upwards.
Reposition the lid and press down until
the retaining clips engage.
Replace the floor panel.
Page 174 of 227
Roadside Emergency 6 - 23
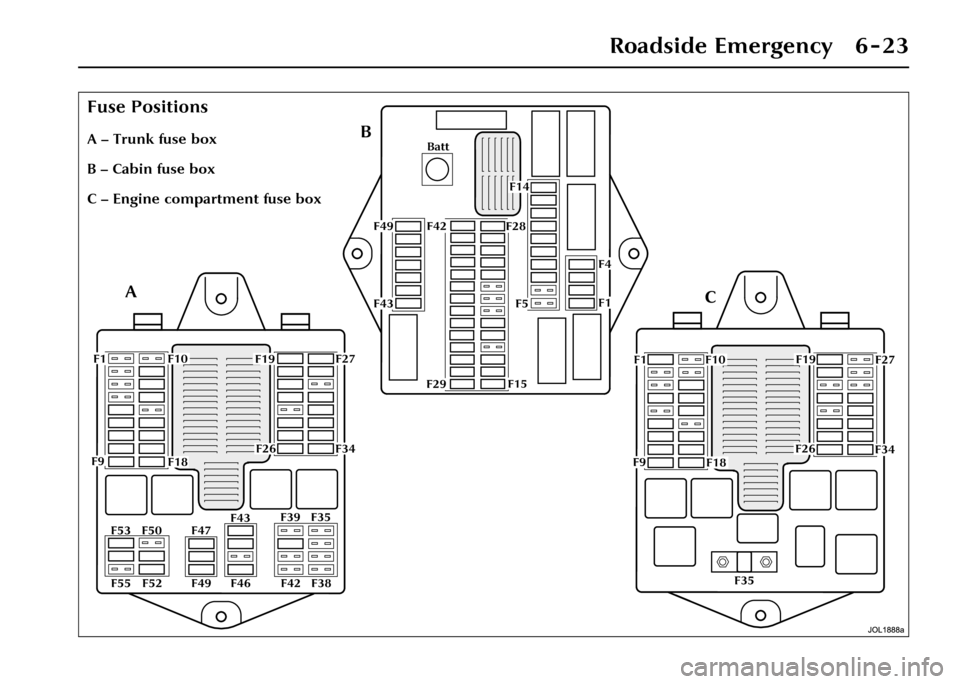
Fuse Positions
A – Trunk fuse box
B – Cabin fuse box
C – Engine compartment fuse box
Page 175 of 227
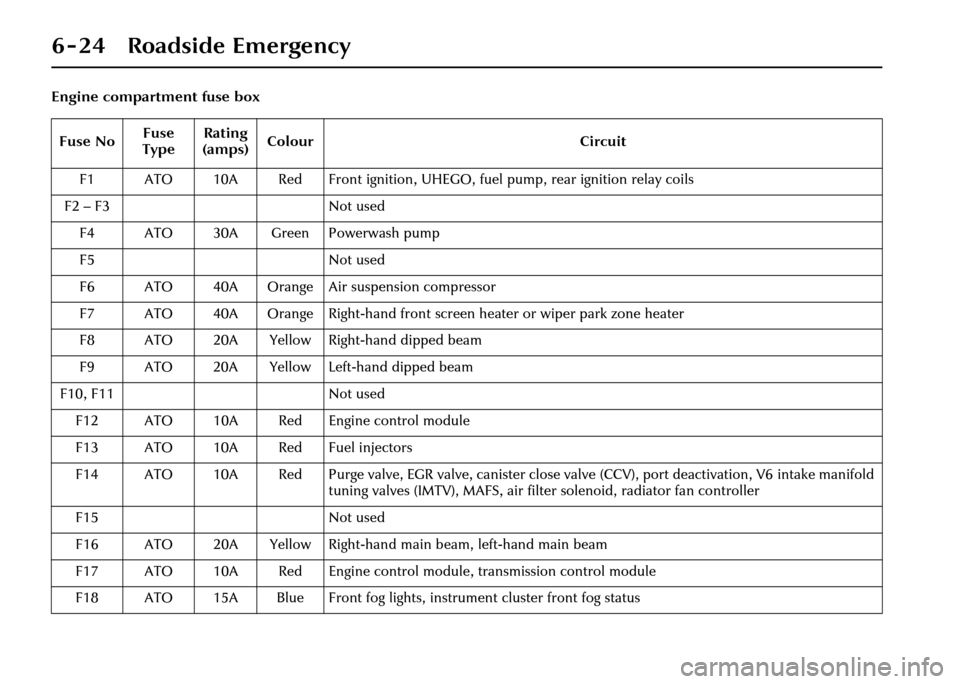
6 - 24 Roadside Emergency
Engine compartment fuse boxFuse No Fuse
Type Rating
(amps) Colour
Circuit
F1 ATO 10A Red Front ignition, UHEGO, fu el pump, rear ignition relay coils
F2 – F3 Not used
F4 ATO 30A Green Powerwash pump
F5 Not used
F6 ATO 40A Orange Air suspension compressor
F7 ATO 40A Orange Right-hand front screen heater or wiper park zone heater
F8 ATO 20A Yellow Right-hand dipped beam
F9 ATO 20A Yellow Left-hand dipped beam
F10, F11 Not used
F12 ATO 10A Red Engine control module
F13 ATO 10A Red Fuel injectors
F14 ATO 10A Red Purge valve, EGR valve, canister close valve (CCV), port deactivation, V6 intake manifold
tuning valves (IMTV), MAFS, air filter solenoid, radiator fan controller
F15 Not used
F16 ATO 20A Yellow Right-hand main beam, left-hand main beam
F17 ATO 10A Red Engine control module, transmission control module
F18 ATO 15A Blue Front fog lights, instrument cluster front fog status
Page 176 of 227
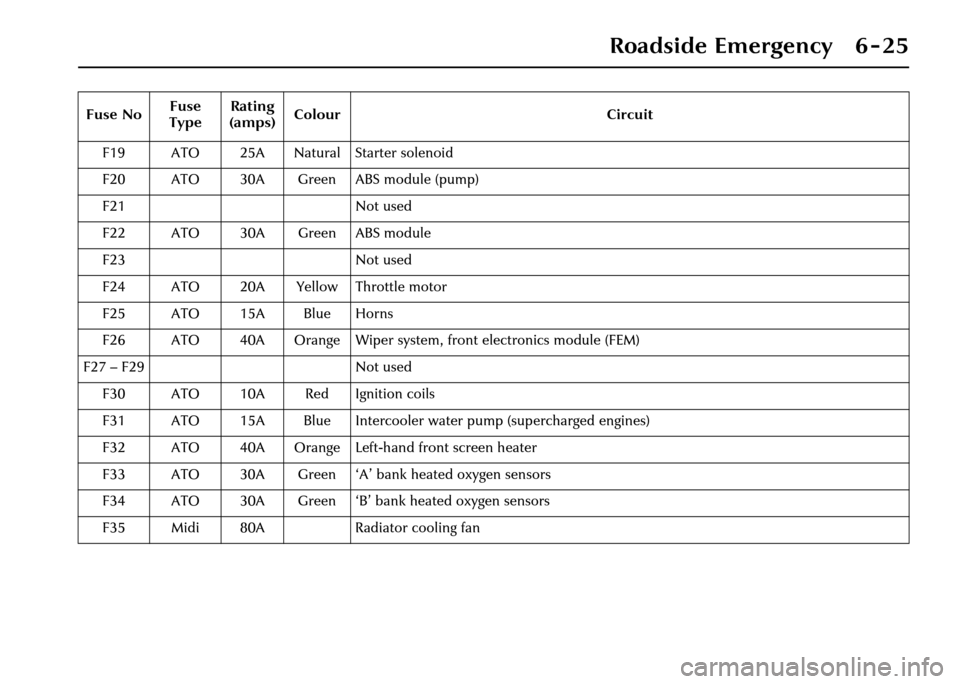
Roadside Emergency 6 - 25
F19 ATO 25A Natural Starter solenoid
F20 ATO 30A Green ABS module (pump)
F21 Not used
F22 ATO 30A Green ABS module
F23 Not used
F24 ATO 20A Yellow Throttle motor
F25 ATO 15A Blue Horns
F26 ATO 40A Orange Wiper system, front electronics module (FEM)
F27 – F29 Not used F30 ATO 10A Red Ignition coils
F31 ATO 15A Blue Intercooler water pump (supercharged engines)
F32 ATO 40A Orange Left-hand front screen heater
F33 ATO 30A Green ‘A’ bank heated oxygen sensors
F34 ATO 30A Green ‘B’ bank heated oxygen sensors
F35 Midi 80A Radiator cooling fan
Fuse No
Fuse
Type Rating
(amps) Colour Circuit
Page 177 of 227
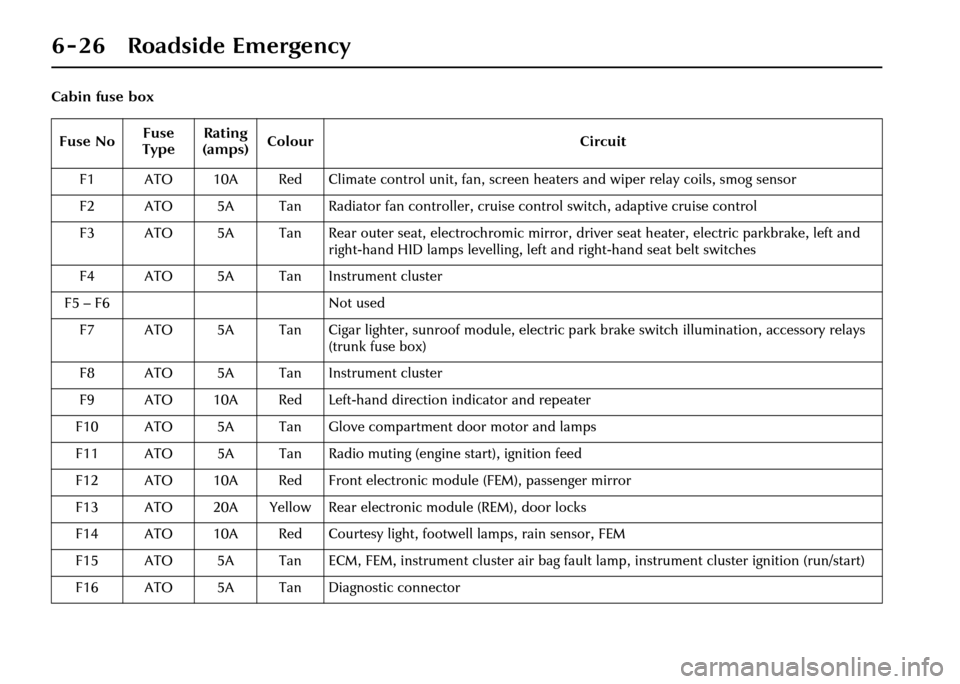
6 - 26 Roadside Emergency
Cabin fuse boxFuse No Fuse
Type Rating
(amps) Colour
Circuit
F1 ATO 10A Red Climate control unit, fan, screen heaters and wiper relay coils, smog sensor
F2 ATO 5A Tan Radiator fan controller, cruise control switch, adaptive cruise control
F3 ATO 5A Tan Rear outer seat, electrochromic mirror, driver seat heater, electric parkbrake, left and right-hand HID lamps levelling, left and right-hand seat belt switches
F4 ATO 5A Tan Instrument cluster
F5 – F6 Not used
F7 ATO 5A Tan Cigar lighter, sunroof module, electric park brake switch illumination, accessory relays (trunk fuse box)
F8 ATO 5A Tan Instrument cluster
F9 ATO 10A Red Left-hand direction indicator and repeater
F10 ATO 5A Tan Glove compartm ent door motor and lamps
F11 ATO 5A Tan Radio muting (engine start), ignition feed
F12 ATO 10A Red Front electronic module (FEM), passenger mirror
F13 ATO 20A Yellow Rear electronic module (REM), door locks
F14 ATO 10A Red Courtesy light, footwell lamps, rain sensor, FEM
F15 ATO 5A Tan ECM, FEM, instrument cluster air bag fa ult lamp, instrument cluster ignition (run/start)
F16 ATO 5A Tan Diagnostic connector