garage JAGUAR XJ 2004 X350 / 3.G Owners Manual
[x] Cancel search | Manufacturer: JAGUAR, Model Year: 2004, Model line: XJ, Model: JAGUAR XJ 2004 X350 / 3.GPages: 227, PDF Size: 4.22 MB
Page 16 of 227
Security and Locks
Ignition Switch . . . . . . . . . . . . . . . . . . . . . . . . . . 2 - 3
Vehicle Security . . . . . . . . . . . . . . . . . . . . . . . . . 2 - 4
Key Transmitter . . . . . . . . . . . . . . . . . . . . . . . . . 2 - 4
Keys . . . . . . . . . . . . . . . . . . . . . . . . . . . . . . . . . . 2 - 7
Door Locks and Handles . . . . . . . . . . . . . . . . . . . 2 - 8
Alarms and Audible Signals. . . . . . . . . . . . . . . . 2 - 15
Security Features . . . . . . . . . . . . . . . . . . . . . . . 2 - 17
Luggage Compartment Emergency Release . . . . 2 - 19
Garage Door Opener Transceiver . . . . . . . . . . . 2 - 20
Page 19 of 227
2 - 4 Security and Locks
Vehicle Security
When the vehicle is unoccupied or
unattended, you are advised to do the
following:
• Apply the electronic parkbrake and move the gear selector to the
Park ‘P’ position.
• Do not leave children or pets in the vehicle unattended.
• Do not leave luggage or valuables on display.
• Remove all keys, including remote transmitters, from the vehicle prior to
locking the doors, even when the
vehicle is in your garage.
• Close all windows, hood, luggage compartment and glove
compartment, and lock all the doors.
• Park the vehicle where it can be seen. At night, park in a well-lit area.
• It is important to keep your keys in safe places at all times. Leaving them
in conspicuous places is an invitation
for a thief to steal them and,
consequently, your vehicle or
belongings. Keep them as secure as
you would your wallet or purse, both
at home and away.
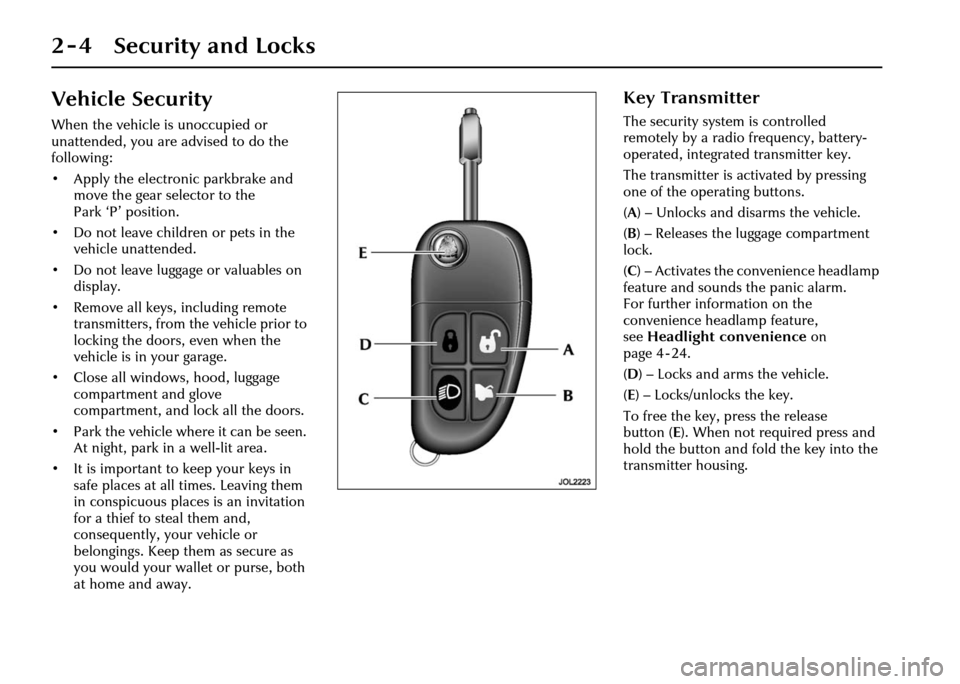
Key Transmitter
The security system is controlled
remotely by a radio frequency, battery-
operated, integrated transmitter key.
The transmitter is ac tivated by pressing
one of the operating buttons.
( A ) – Unlocks and disarms the vehicle.
( B ) – Releases the luggage compartment
lock.
( C ) – Activates the convenience headlamp
feature and sounds the panic alarm.
For further information on the
convenience headlamp feature,
see Headlight convenience on
page 4 - 24.
( D ) – Locks and arms the vehicle.
( E ) – Locks/unlocks the key.
To free the key, press the release
button ( E). When not required press and
hold the button and fold the key into the
transmitter housing.
Page 35 of 227
2 - 20 Security and Locks
Garage Door Opener
Transceiver
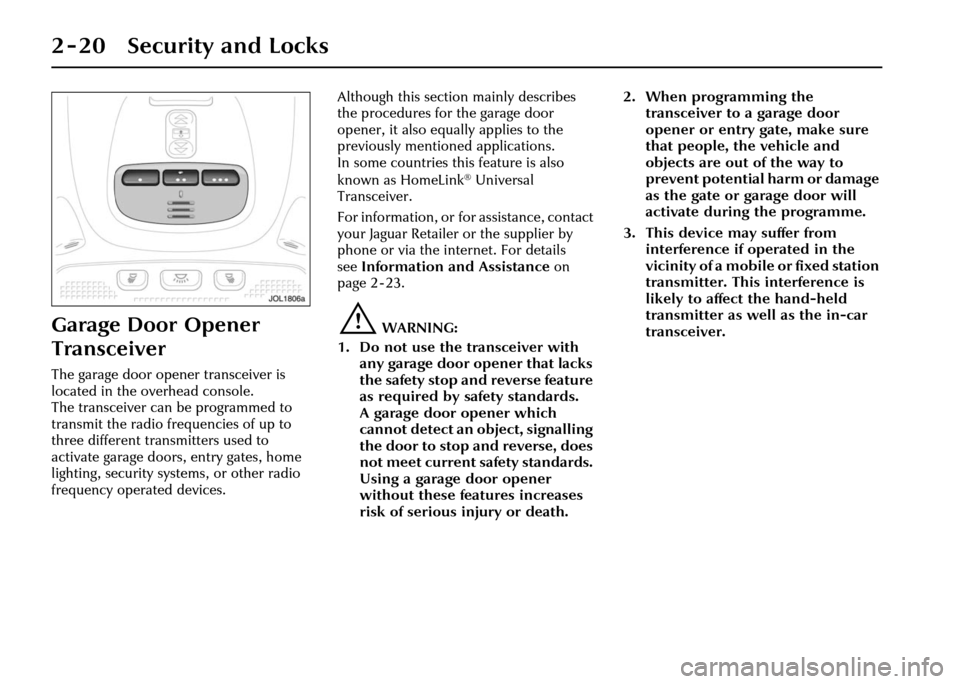
The garage door opener transceiver is
located in the overhead console.
The transceiver can be programmed to
transmit the radio frequencies of up to
three different transmitters used to
activate garage doors, entry gates, home
lighting, security systems, or other radio
frequency operated devices.Although this section mainly describes
the procedures for the garage door
opener, it also equally applies to the
previously mentioned applications.
In some countries this feature is also
known as HomeLink
® Universal
Transceiver.
For information, or for assistance, contact
your Jaguar Retailer or the supplier by
phone or via the internet. For details
see Information and Assistance on
page 2 - 23.
!WARNING:
1. Do not use the transceiver with any garage door opener that lacks
the safety stop and reverse feature
as required by safety standards.
A garage door opener which
cannot detect an object, signalling
the door to stop and reverse, does
not meet current safety standards.
Using a garage door opener
without these features increases
risk of serious injury or death. 2. When programming the
transceiver to a garage door
opener or entry gate, make sure
that people, the vehicle and
objects are out of the way to
prevent potential harm or damage
as the gate or garage door will
activate during the programme.
3. This device may suffer from interference if operated in the
vicinity of a mobile or fixed station
transmitter. This interference is
likely to affect the hand-held
transmitter as well as the in-car
transceiver.
Page 36 of 227
Security and Locks 2 - 21
Before Programming
Caution: When programming a
garage door opener or entry gate that
may require you to press and re-press
the hand-held transmitter (cycle),
unplug the device during the ‘cycling’
process to prevent possible motor
failure.
It is recommended that for best results,
fit a new battery to the hand-held
transmitter of the garage door opener
(or other device) before programming.
If your garage door opener receiver
(located in the garage) is equipped with
an antenna, ensure that the antenna is
hanging straight down.
To Erase All Programming
For first time progra mming, ensure that
the engine is switched off:
1. Turn the ignition switch to position ‘I’.
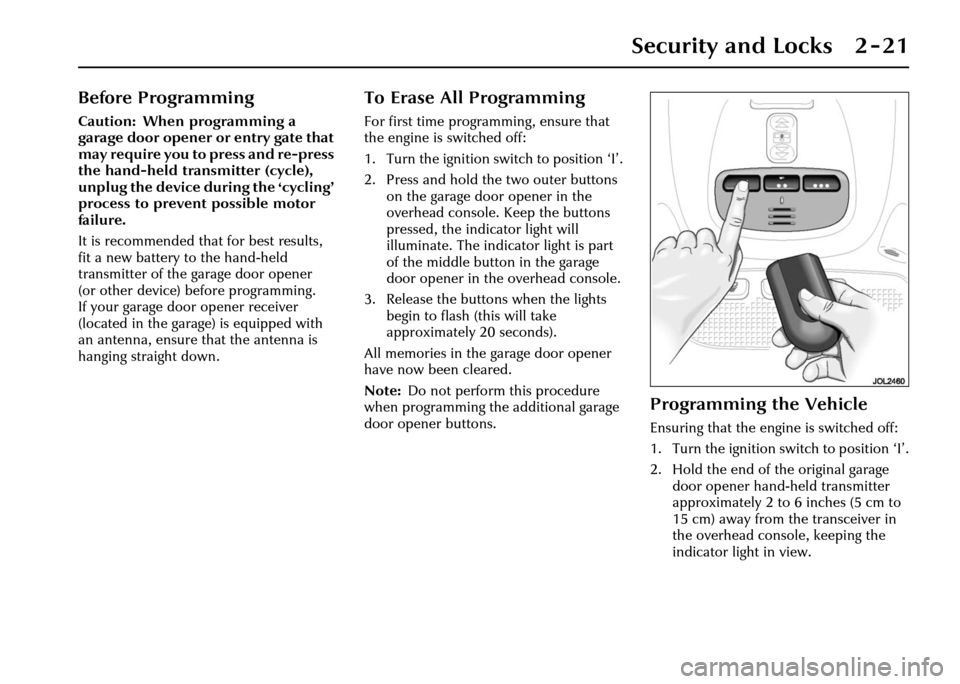
2. Press and hold th e two outer buttons
on the garage door opener in the
overhead console. Keep the buttons
pressed, the indicator light will
illuminate. The indicator light is part
of the middle button in the garage
door opener in the overhead console.
3. Release the buttons when the lights
begin to flash (this will take
approximately 20 seconds).
All memories in the garage door opener
have now been cleared.
Note: Do not perform this procedure
when programming the additional garage
door opener buttons.
Programming the Vehicle
Ensuring that the engine is switched off:
1. Turn the ignition switch to position ‘I’.
2. Hold the end of the original garage door opener hand -held transmitter
approximately 2 to 6 inches (5 cm to
15 cm) away from the transceiver in
the overhead console, keeping the
indicator light in view.
Page 37 of 227
2 - 22 Security and Locks
3. Using both hands, simultaneously press and hold both the desired garage
door opener button on the overhead
console and the hand -held transmitter
button. Keep both buttons pressed.
The light will flash, slowly at first and
then change to a fast flash. When the
indicator light flashes rapidly, release
both buttons. The rapid flashing light
indicates successful programming.
4. If, after 60 seconds, the indicator light does not flash rapidl y, release both the
transceiver and the hand-held
transmitter buttons and repeat the
procedure starting with Step 2.
However, position the hand-held
transmitter at a different angle and/or
distance.
5. Press and hold the programmed overhead console garage door opener
button and observe the indicator light:
• If the indicator light is solid/continuous, programming is
complete. Your device should
activate when the garage door
opener button is pressed and held
for 1 to 2 seconds and then
released. • If the indicator light blinks rapidly
for 2 seconds and then turns a
solid/continuous light, proceed
with the following programming
instructions for ‘rolling code’
device equipment.
Note: To programme additional garage
door opener buttons, begin at Step 2.
Rolling code device equipment
programming
Note: A second person may make the
following steps quicker and easier as once
the button has been pressed there are
30 seconds only in which to complete
Step 3.
1. At the garage door opener receiver (motor head unit) in the garage, locate
the ‘learn’ or ‘smart’ button/switch.
Note: The name of the button/switch
may vary between manufacturers.
2. Press and release the ‘learn’ or ‘smart’ button.
3. Return to the vehicle and firmly press and hold the programmed garage door
opener button for 2 seconds and
release. 4. Repeat the press/hold/release
sequence 3 times to complete the
learning/training process.
The garage door opener in the overhead
console should now activate the ‘rolling
code’ device.
Reprogramming a sing le garage door
opener button
To programme a device to a previously
trained button:
1. Press and hold the desired pre- programmed garage door opener
button for at least 20 seconds, but no
longer than 30 seconds, until the
indicator light begins to flash.
2. Without releasing the overhead console button, position the hand-
held transmitter approximately 2 to
6 inches (5 cm to 15 cm) away from
the transceiver in the overhead
console, keeping the indicator light in
view.
3. Carry out Step 3 of programming the vehicle, see column 1.
Page 44 of 227
Before Driving 3 - 5
Heated Seats
Some seats have heaters in the backrests
and cushions. The heaters have three
heat settings and each seat has its own
control.
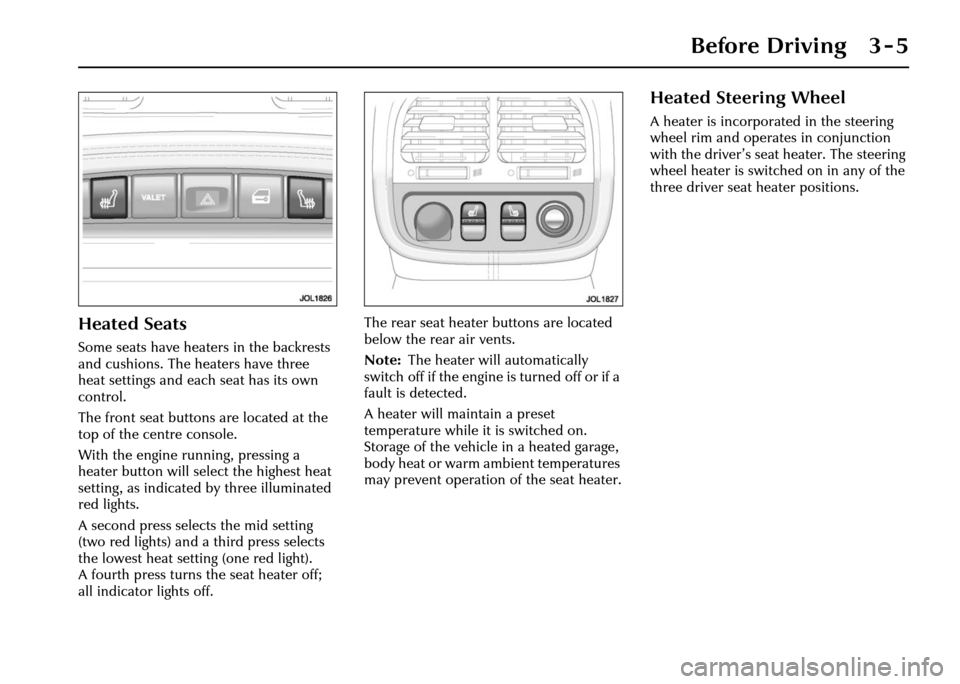
The front seat buttons are located at the
top of the centre console.
With the engine running, pressing a
heater button will select the highest heat
setting, as indicated by three illuminated
red lights.
A second press selects the mid setting
(two red lights) and a third press selects
the lowest heat setting (one red light).
A fourth press turns the seat heater off;
all indicator lights off. The rear seat heater buttons are located
below the rear air vents.
Note:
The heater will automatically
switch off if the engine is turned off or if a
fault is detected.
A heater will maintain a preset
temperature while it is switched on.
Storage of the vehicle in a heated garage,
body heat or warm ambient temperatures
may prevent operation of the seat heater.
Heated Steering Wheel
A heater is incorporated in the steering
wheel rim and operates in conjunction
with the driver’s seat heater. The steering
wheel heater is switched on in any of the
three driver seat heater positions.
Page 106 of 227
On the Road 4 - 35
Park Distance Control
Caution: It remains the driver’s
responsibility to detect obstacles and
estimate the car’s distance from
them. Some overhanging objects,
barriers, thin obstructions or painted
surfaces which could possibly cause
damage to the vehicle may not be
detected by the system. Always be
vigilant when reversing.
Park distance control is always
automatically switched on when the
ignition is turned on.
Caution:
1. If, for example, you are driving into a confined space such as a
home garage, the outer sensors
will detect the side walls and after
3 seconds will switch the tone off.
However, as movement
continues, the inner sensors will
eventually detect the rear wall
and will start the tone again.
2. The sensors are not active when the gear selector is in neutral,
therefore, take care if moving the
vehicle as the tone will not be
heard.
3. Do not clean the sensors with abrasive or sharp objects. Note:
1. For reliable operation, the sensors in
the front (if fitted) and rear bumpers
should be kept free from frost, ice and
grime.
2. When using a high pressure spray the sensors should only be sprayed briefly
and at least 8 inches (20 cm) distance
from the sensors.
3. The front parking aid may sound spurious tones if it detects a frequency
tone using the same band as the
sensors.
Rear Park Distance Control
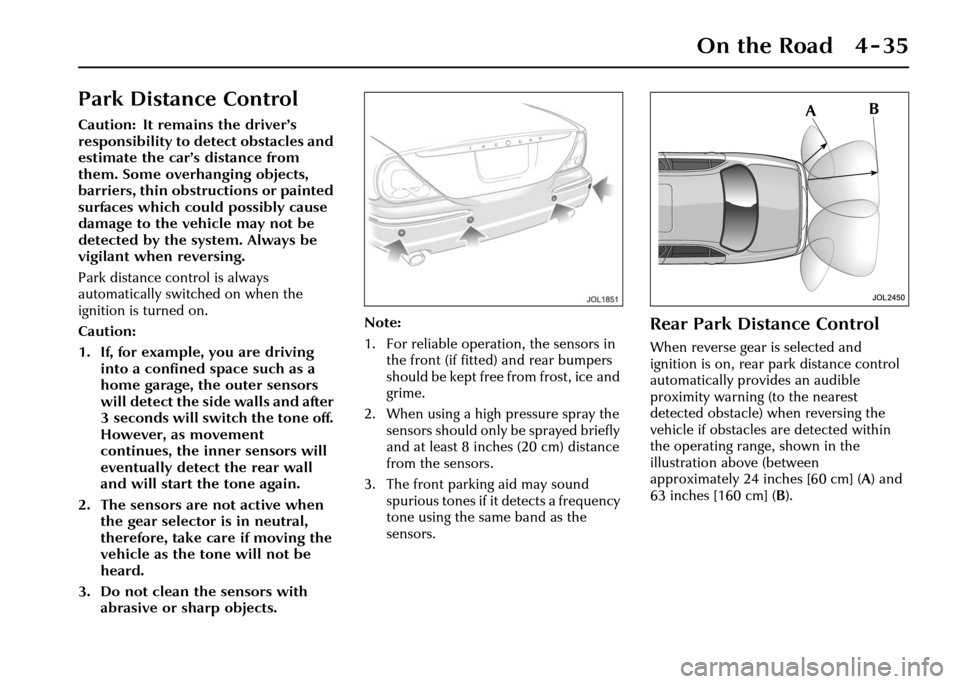
When reverse gear is selected and
ignition is on, rear park distance control
automatically provides an audible
proximity warning (to the nearest
detected obstacle) when reversing the
vehicle if obstacles are detected within
the operating range, shown in the
illustration above (between
approximately 24 inches [60 cm] ( A) and
63 inches [160 cm] ( B).
Page 131 of 227
4-60 On the Road
Use of Headlamps In Daylight
When visibility is poor the headlamps
with dipped beam setting should be
switched on so that the vehicle may be
seen more easily by other road users.
The instrument illumination dimmer
control adjusts the brightness of the panel
lighting.
Engine Oil Consumption
A certain amount of oil consumption is
normal. The rate of consumption will
depend on the following:
• The quality and viscosity of the oil.
• The amount of oxidation and dilution of the oil.
• Climatic conditions.
• The speed at which the engine is being operated.
• Road conditions.
Drivers should expect above normal
consumption when the engine is new,
and after running-in if high speeds are
sustained.
Winter Driving
Freeing a frozen door lock
Caution: Do not ap ply a proprietary
lock de-icer through the keyhole.
Should the lock beco me frozen, warm the
end of the key before use.
Windscreen wiper blades
Before driving away, clear any ice from
the windscreen and check that the wiper
blades are free. Switching on the heated
screen will accelerate this process.
The heated wiper park, if fitted, will come
on automatically.
Frost precautions
The correct concentration of coolant
must be maintained at all times when
‘topping up’ or ‘refilling’ the cooling
system.
Parking the Vehicle
When leaving the vehicle, remember the
following:
• Whenever the vehicle is being parked, apply the parkbrake and move the
gear selector to Park ‘P’.
• Do not leave children or pets in the vehicle unattended.
• Do not leave luggage or valuables on view. Always take your valuables with
you or lock them in the luggage
compartment.
• Remove the ignition key and spare keys, even when the vehicle is in your
garage.
• When the vehicle is unoccupied, close
all windows and lock all doors
securely.
• Park the vehicle where it can be seen. At night, park in a well-lit area.
• Ensure that the keys and the key transmitters are removed from the
vehicle before locking the doors,
and that all doors, the luggage
compartment and the hood are
closed.
Page 134 of 227
On the Road 4 - 63
Fuel and Refuelling
Before refuelling, switch off the ignition
and remove the key.
Note:Do not leave the ignition key in the
vehicle; vehicles have been stolen from
garage service/filling stations whilst the
driver is absent from the vehicle. It is
recommended that the vehicle is locked,
if left unattended.
Caution: No additives of any kind
(fuel or oil) must be put into the fuel
tank. Additives could reduce engine
life or affect exhaust emissions.
!WARNING:
1. Fuel vapour is highly flammable and in confined spaces is
explosive and toxic. In the event
of inadvertent spillage, and before
refuelling, always switch OFF the
engine. Do not use exposed flame
or light. Do not smoke. Do not
inhale fumes.
2. Do not fill the tank so that fuel is visible in the fuel filler intake
tube. This could cause spillage
and danger from exposed fuel.
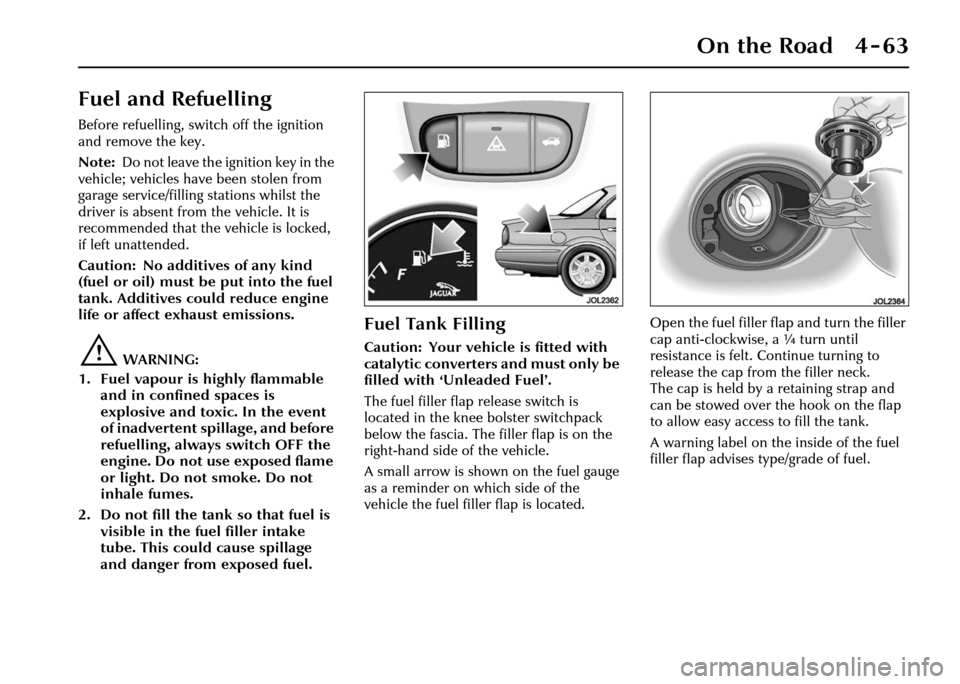
Fuel Tank Filling
Caution: Your vehicle is fitted with
catalytic converters and must only be
filled with ‘Unleaded Fuel’.
The fuel filler flap release switch is
located in the knee bolster switchpack
below the fascia. The fi ller flap is on the
right-hand side of the vehicle.
A small arrow is shown on the fuel gauge
as a reminder on which side of the
vehicle the fuel filler flap is located. Open the fuel filler flap and turn the filler
cap anti-clockwise, a ¼ turn until
resistance is felt. Continue turning to
release the cap from the filler neck.
The cap is held by a retaining strap and
can be stowed over the hook on the flap
to allow easy access to fill the tank.
A warning label on the inside of the fuel
filler flap advises type/grade of fuel.
Page 186 of 227
Maintenance 7 - 3
7 Maintenance
Regular Checks
In the interests of safety and reliability,
it is advisable to carry out the following
checks at the recommended intervals,
and always before starting on a long
journey.
Daily
Check that there is sufficient fuel for the
journey intended, particularly at night
and before joining motorways.
Weekly
Tyres– Check the tyres, including the
spare, for condition and pressure.
Tyre pressures are explained on page 8 - 8
and shown on a label inside the fuel filler
flap.
Lights – Check that all exterior lights and
direction indicators function correctly
and that the lenses are clean.
Engine oil – With the vehicle standing
on level ground, check the oil level and
top up if necessary with oil of the correct
grade.
Engine coolant – With the engine cold,
check the level of the coolant in the
coolant reservoir header tank. Any loss of
fluid must be checked by a Jaguar
Retailer. Brake fluid
– Check the level of the fluid
in the brake fluid reservoir. Top up if
necessary with new, unused Jaguar
approved brake fluid.
The reservoir is initially nearly full,
but the level will drop as the brake pads
wear. If the level appears unusually low,
location of the fluid leakage must be
checked by a Jaguar Retailer.
Power steering fluid – With the engine
cold, check the level of the fluid in the
power steering fluid reservoir. Top up if
necessary with fluid of the correct
specification. Any loss of fluid should be
checked by a Jaguar Retailer.
Windscreen washer fluid – Top up
with windscreen washer fluid and clean
soft water. Check the operation of the
washers. It is recommended that you
use Jaguar Windscreen Washer Fluid to
keep the glass clean and also to prevent
the fluid from freezing during cold
weather.
Monthly
Wiper blades – Check the quality of the
wipe. If smearing or juddering is evident,
clean the windscreen and wiper blades.
Used Engine Oil
!WARNING:
Prolonged and repeated contact may
cause serious skin disorders,
including dermatitis and cancer.
Always use a hand cream to protect the
skin from oil contamination.
Avoid contact with the skin as far as
possible and wash thoroughly after any
contact. Keep oils out of reach of
children.
PROTECT THE ENVIRONMENT: It is
illegal to pollute drai ns, watercourses and
soil. Use authorised waste collection
facilities, including civic amenity sites and
garages providing fa cilities for the
disposal of used oi l, oil filters and
batteries. If in doubt, contact your Local
Authority for advice on disposal.