JAGUAR XK 2014 1.G Quick Start Guide
Manufacturer: JAGUAR, Model Year: 2014, Model line: XK, Model: JAGUAR XK 2014 1.GPages: 16, PDF Size: 1.7 MB
Page 11 of 16
HEATING AND VENTILATIONAUDIO AND TOUCH SCREEN
11
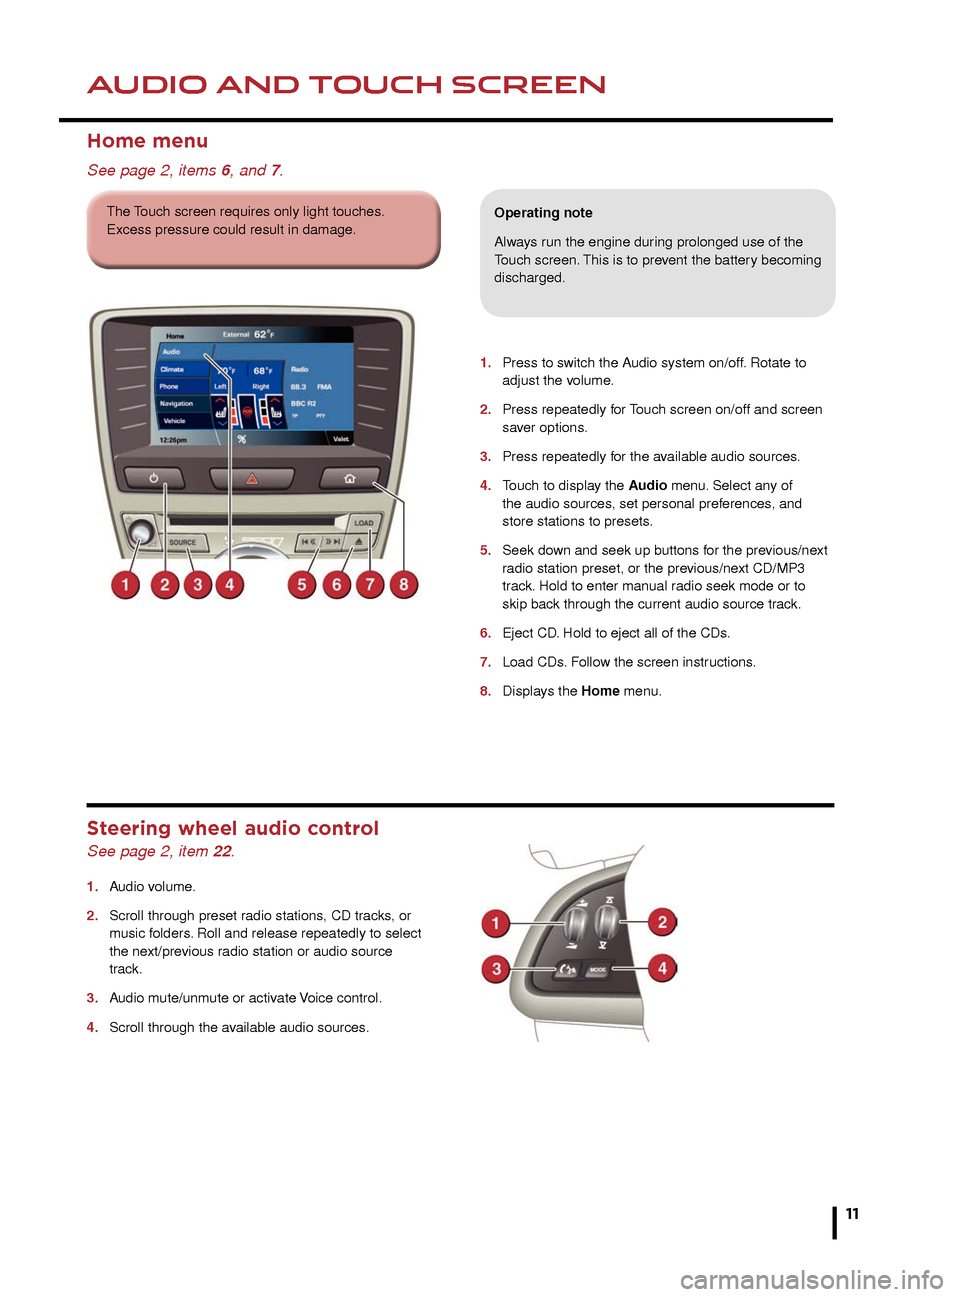
1. Press to switch the Audio system on/off. Rotate to
adjust the v olume.
2.
Press repeatedly f
or Touch screen on/off and screen
sa
ver options.
3.
Press repeatedly f
or the available audio sources.
4.
T
ouch to display the Audio menu. Select any of
the audio sources
, set personal preferences, and
store stations to presets
.
5.
Seek do
wn and seek up buttons for the previous/next
r
adio station preset, or the previous/next CD/MP3
tr
ack. Hold to enter manual radio seek mode or to
skip bac
k through the current audio source track.
6.
Eject CD
. Hold to eject all of the CDs.
7.
Load CDs
. Follow the screen instructions.
8.
Displa
ys the Home menu.
Home menu
See page 2, items 6, and 7.
Operating note
Always run the engine during prolonged use of the
Touch screen. This is to prevent the battery becoming
discharged.
Steering wheel audio control
See page 2, item 22.
1. Audio volume.
2.
Scroll through preset r
adio stations, CD tracks, or
m
usic folders. Roll and release repeatedly to select
the ne
xt/previous radio station or audio source
track.
3.
A
udio mute/unmute or activate Voice control.
4.
Scroll through the a
vailable audio sources.
The Touch screen requires only light touches.
Excess pressure could result in damage.Touch screen controls
Touch Climate on the Home menu.
8. OFF. Select to turn climate on/off.
9. A/C. Select for economy mode. Turns off the air
conditioning compressor.
10. Settings. Use to personalize zone settings. Also
gives access to the automatic air recirculation sensor
control setting.
11. AUTO . This is the recommended operating mode.
Automatically adjusts the air conditioning, blower
speed, air intake, and airflow distribution, to maintain
the selected temperature(s). Helps to prevent screen
fogging.
12. Air distribution to the windshield, face and feet.
13. Temp. sync. Synchronizes all of the temperature
settings to match the driver’s settings.
14. Blower speed. Touch the + or - symbols to increase
or decrease the blower speed. Blower speed is
automatically set in Auto mode. Adjusting the blower
speed will cancel Auto mode.
Page 12 of 16
AUDIO AND TOUCH SCREEN
12
AUDIO AND TOUCH SCREEN
CD player and portable media
1. Select CD to view the CD menu.
2. Touch and release to skip down to the previous track.
Hold to scan back through the current track.
3. Touch and release to skip up to the next track.
Hold to scan forward through the current track.
4. Settings menu. Select for Sound, Bal/Fade,
Satellite radio
Satellite radio subscription service
Use channel 184 to preview satellite radio. When the
preview time expires, you will need to subscribe to
SIRIUS to enable further satellite reception.
Activating satellite radio
1.
Call SIRIUS on the displa
yed telephone number.
2.
Pro
vide them with the ID number, also displayed on
the screen.
Y
ou will also need your credit card. Make sure you are
parked with a clear view of the sky while activation takes
place. Activation can take up to 15 minutes.
Satellite radio
1.
T
ouch to select the satellite bands. Touch to move
through SAT 1, 2, and 3. 2.
Seek do
wn to the previous channel.
3.
Seek up to the ne
xt channel.
4.
Settings
. Select to make personal settings for
Sound
, Bal/Fade, and Song Seek.
5.
SA
T Options. Touch to access and select from
Categor
y Lists, Direct Channel, Parental Lock,
Channel Skip
and SAT information.
In Category Lists a category can be selected for
use. Direct Channel allows a channel number to be
inser
ted via the keypad. Parental Lock
allo
ws channels/categories to be censored.
In Channel Skip, individual channels, or even entire
categor
ies, can be selected for exclusion when using
the skip soft k
eys. SAT Information gives access to
the SIRIUS ID n
umber and subscription contact
number.
6.
Channel presets
. Each S AT band has 6 preset soft
k
eys. Touch and hold a soft key to store the current
channel.
A brief touch will access the stored channel.
Alter
natively, use the seek button on the steering
wheel, to find the ne
xt or previous preset channel.
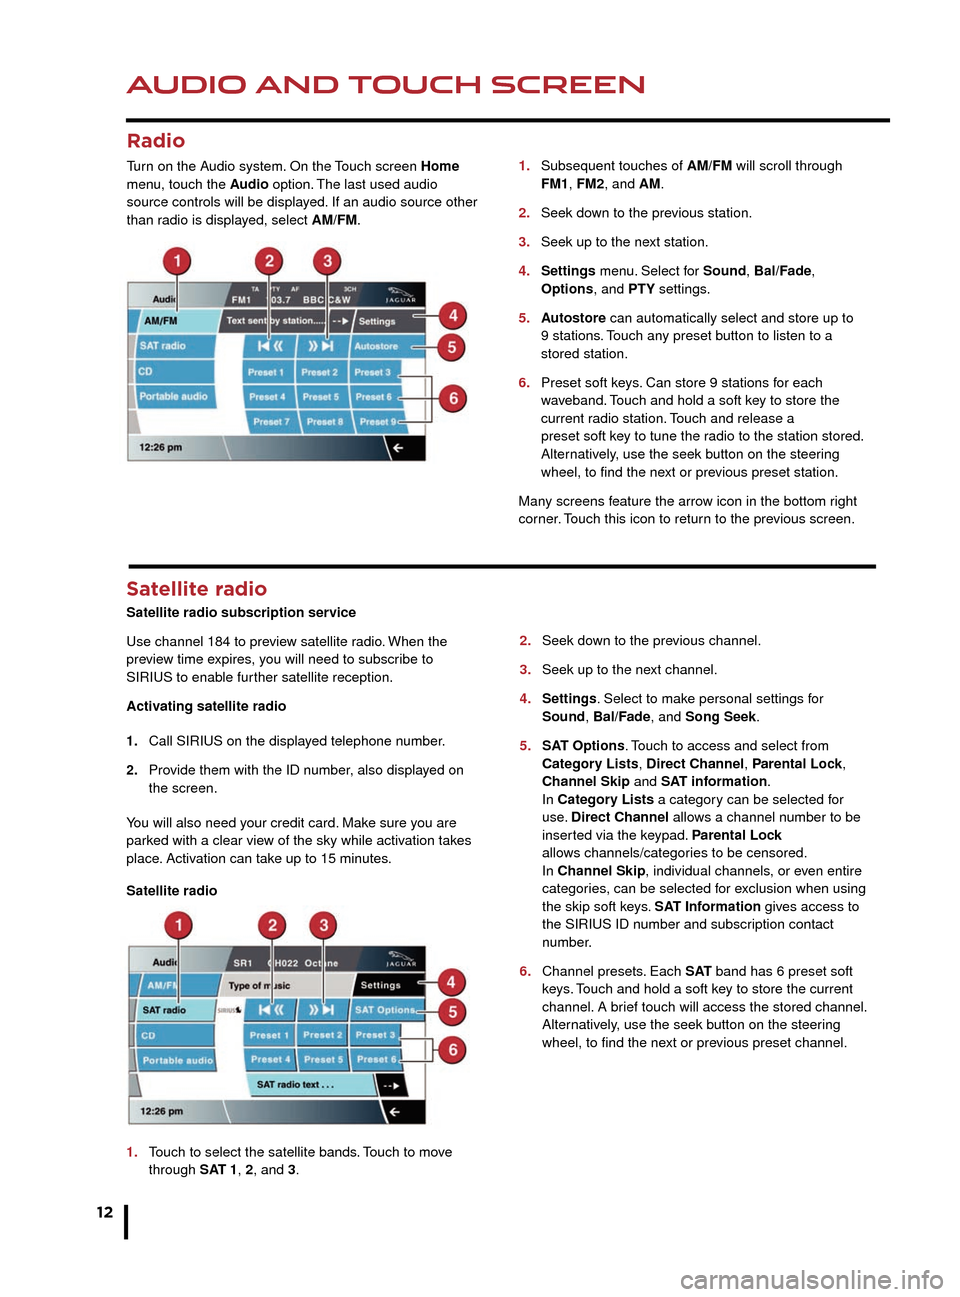
1.
Subsequent touches of
AM/FM will scroll through
FM1
, FM2, and AM.
2.
Seek do
wn to the previous station.
3.
Seek up to the ne
xt station.
4.
Settings
menu. Select for Sound, Bal/Fade,
Options
, and PTY settings.
5.
A
utostore can automatically select and store up to
9 stations
. Touch any preset button to listen to a
stored station.
6
.
Preset soft k
eys. Can store 9 stations for each
w
aveband. Touch and hold a soft key to store the
current r
adio station. Touch and release a
preset soft k
ey to tune the radio to the station stored.
Alter
natively, use the seek button on the steering
wheel, to find the ne
xt or previous preset station.
Many screens feature the arrow icon in the bottom right
corner. Touch this icon to return to the previous screen.
Radio
Turn on the Audio system. On the Touch screen Home
menu, touch the Audio option. The last used audio
source controls will be displayed. If an audio source other
than radio is displayed, select AM/FM.
Connecting portable media
Connecting ports are located inside the center console
cubby box.
iPod and USB devices can be operated from the Touch
screen. Devices connected to the 3.5mm AUX socket are
controlled only from the device itself. When connecting to
the USB socket, use the cable supplied with your media
device.
The system will play MP3, WMA, WAV, and AAC files
from a memory stick or a USB controlled MP3 player, or
a telephone.
Some MP3 players use proprietary file systems that are
not supported by the vehicle’s system. MP3 players must
be set to Removable Device or Mass Storage Device
mode (see the manufacturer’s information). Only music
files added to the device while in this mode can be played
via the vehicle’s system.
Page 13 of 16
AUDIO AND TOUCH SCREENAUDIO AND TOUCH SCREEN
13
CD player and portable media
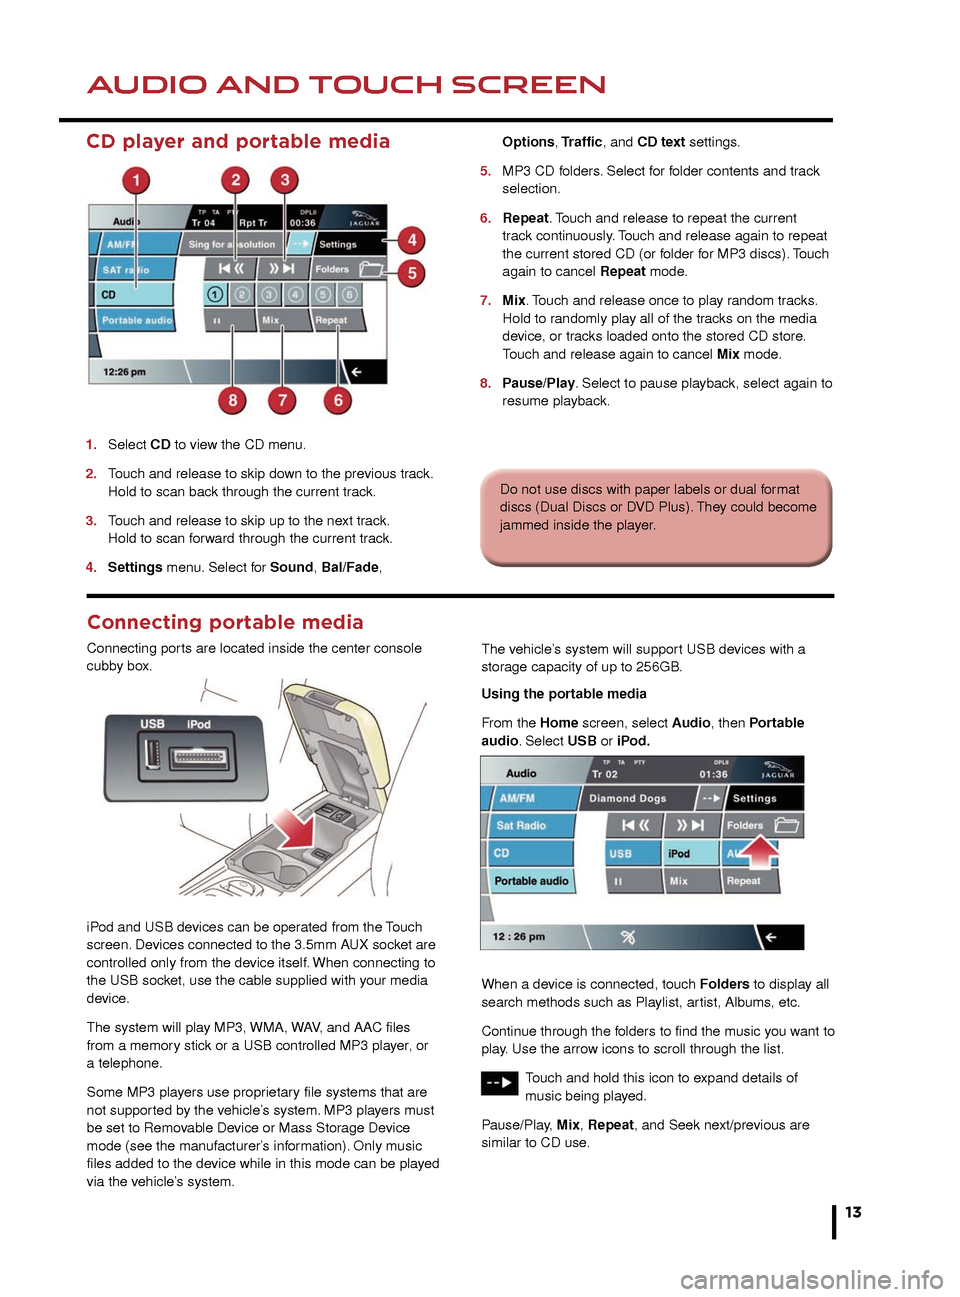
1. Select CD to view the CD menu.
2.
T
ouch and release to skip down to the previous track.
Hold to scan bac
k through the current track.
3.
T
ouch and release to skip up to the next track.
Hold to scan f
orward through the current track.
4.
Settings
menu. Select for Sound, Bal/Fade,
Options
, Traffic, and CD text settings.
5.
MP3 CD f
olders. Select for folder contents and track
selection.
6.
Repeat
. Touch and release to repeat the current
tr
ack continuously. Touch and release again to repeat
the current stored CD (or f
older for MP3 discs). Touch
again to cancel
Repeat mode.
7.
Mix
. Touch and release once to play random tracks.
Hold to r
andomly play all of the tracks on the media
de
vice, or tracks loaded onto the stored CD store.
T
ouch and release again to cancel Mix mode.
8.
P
ause/Play. Select to pause playback, select again to
resume pla
yback.
2.
Seek down to the previous channel.
3. Seek up to the next channel.
4. Settings. Select to make personal settings for
Sound, Bal/Fade, and Song Seek.
5. SAT Options. Touch to access and select from
Category Lists, Direct Channel, Parental Lock,
Channel Skip and SAT information.
In Category Lists a category can be selected for
use. Direct Channel allows a channel number to be
inserted via the keypad. Parental Lock
allows channels/categories to be censored.
In Channel Skip, individual channels, or even entire
categories, can be selected for exclusion when using
the skip soft keys. SAT Information gives access to
the SIRIUS ID number and subscription contact
number.
6. Channel presets. Each S AT band has 6 preset soft
keys. Touch and hold a soft key to store the current
channel. A brief touch will access the stored channel.
Alternatively, use the seek button on the steering
wheel, to find the next or previous preset channel.
1.
Subsequent touches of AM/FM will scroll through
FM1, FM2, and AM.
2. Seek down to the previous station.
3. Seek up to the next station.
4. Settings menu. Select for Sound, Bal/Fade,
Options, and PTY settings.
5. Autostore can automatically select and store up to
9 stations. Touch any preset button to listen to a
stored station.
6. Preset soft keys. Can store 9 stations for each
waveband. Touch and hold a soft key to store the
current radio station. Touch and release a
preset soft key to tune the radio to the station stored.
Alternatively, use the seek button on the steering
wheel, to find the next or previous preset station.
Many screens feature the arrow icon in the bottom right
corner. Touch this icon to return to the previous screen.
Do not use discs with paper labels or dual format
discs (Dual Discs or DVD Plus). They could become
jammed inside the player.
Connecting portable media
Connecting ports are located inside the center console
cubby box.
iPod and USB devices can be operated from the Touch
screen. Devices connected to the 3.5mm AUX socket are
controlled only from the device itself. When connecting to
the USB socket, use the cable supplied with your media
device.
The system will play MP3, WMA, WAV, and AAC files
from a memory stick or a USB controlled MP3 player, or
a telephone.
Some MP3 players use proprietary file systems that are
not supported by the vehicle’s system. MP3 players must
be set to Removable Device or Mass Storage Device
mode (see the manufacturer’s information). Only music
files added to the device while in this mode can be played
via the vehicle’s system. The vehicle’s system will support USB devices with a
storage capacity of up to 256GB.
Using the portable media
From the Home screen, select Audio, then Portable
audio. Select USB or iPod.
When a device is connected, touch Folders to display all
search methods such as Playlist, artist, Albums, etc.
Continue through the folders to find the music you want to
play. Use the arrow icons to scroll through the list.
Touch and hold this icon to expand details of
music being played.
Pause/Play, Mix, Repeat, and Seek next/previous are
similar to CD use.
Page 14 of 16
NAVIGATION
14
TELEPHONE
Setting a destination
Country selection
On initial activation, make sure that both the correct
country and search area have been selected. For
more information, refer to Search Area in the
Navigation section of the Owner’s Handbook.
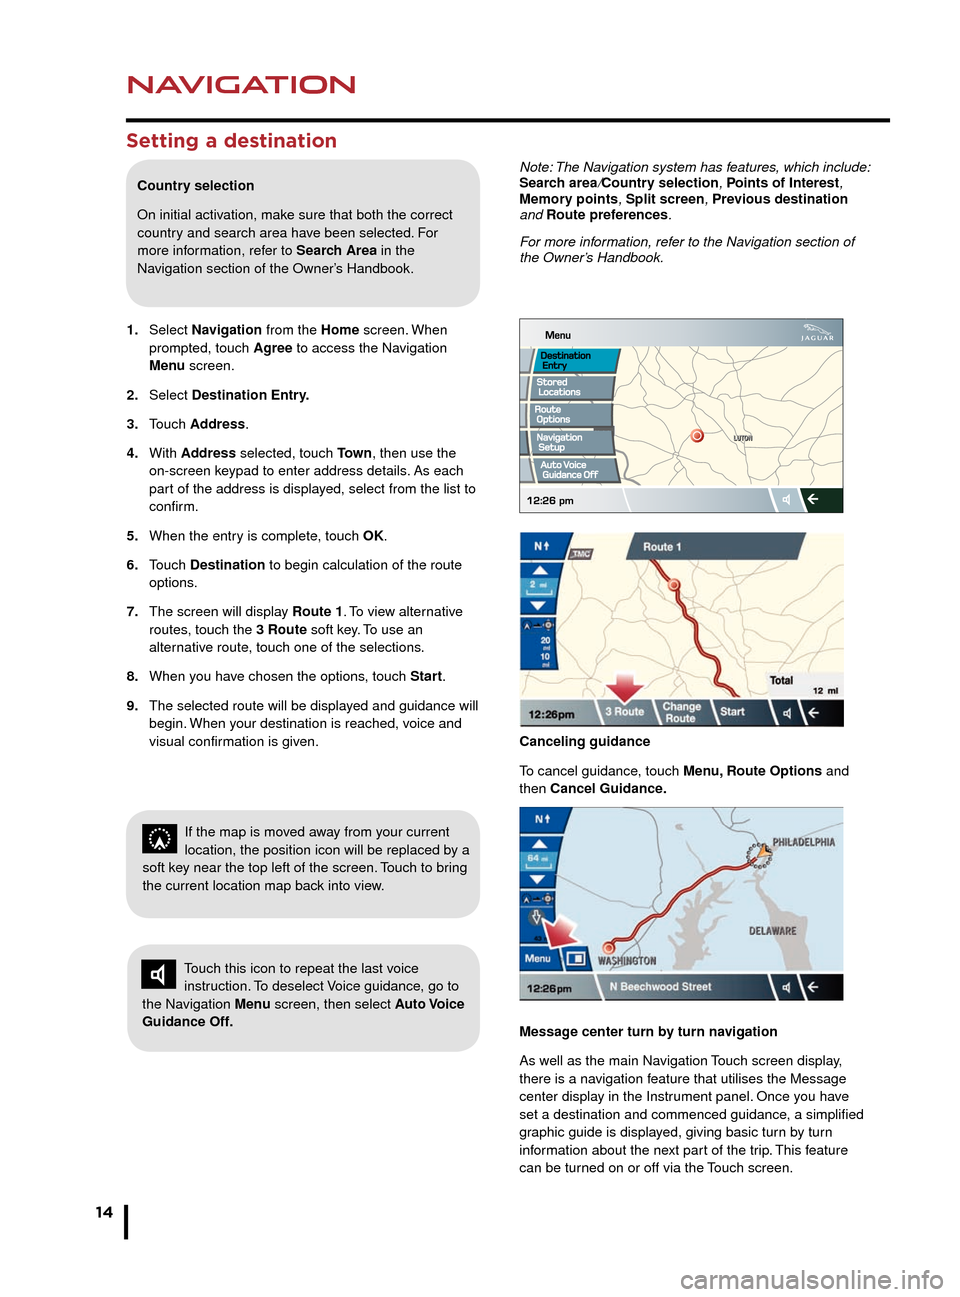
1.
Select
Navigation from the Home screen. When
prompted, touch
Agree to access the Navigation
Men
u screen.
2.
Select
Destination Entry.
3.
T
ouch Address.
4.
With
Address selected, touch To w n , then use the
on-screen k
eypad to enter address details. As each
par
t of the address is displayed, select from the list to
confirm.
5.
When the entr
y is complete, touch OK.
6.
T
ouch Destination to begin calculation of the route
options.
7.
The screen will displa
y Route 1. To view alternative
routes
, touch the 3 Route soft key. To use an
alter
native route, touch one of the selections.
8.
When y
ou have chosen the options, touch Start.
9.
The selected route will be displa
yed and guidance will
begin.
When your destination is reached, voice and
visual confir
mation is given.
Bluetooth® wireless technology
devices
See page 2, item 22.
Connection must be made with the ignition on or the
engine running.
Use the following procedure in conjunction with your
phone manufacturer’s instructions.
Pairing and connecting using a phone
Note: The process of pairing and connecting a phone
to the vehicle will vary depending on the type of phone
used.
1. Make sure that the Touch screen is active.
2. From the Home menu, select Phone.
Note: The vehicle’s Bluetooth wireless technology
system is discoverable for only 3 minutes.
3. Using your phone, search for Bluetooth wireless
technology devices. On some phones, this is referred
to as a new paired device. See your phone’s
operating instructions for further information.
4. When the vehicle’s system is discovered, select it and
begin the pairing process, following the on-screen
instructions.
5. When requested, enter the PIN 1313 into your phone
and select OK to confirm.
6. When your phone is paired and connected, a
confirmation message will be displayed.
Note: Some phones require the pairing to be set as
‘authorised’ or ‘trusted’, in order to automatically connect.
Please refer to your phone’s operating instructions for
further information.
To change or undock a paired phone, go to the Settings
option on the Phone menu screen.
Downloading phonebook entries
When a phone with phonebook download capability
is paired and docked, its phonebook directory can be
automatically downloaded to the vehicle’s system.
The vehicle’s phonebook will be updated each time a
phone is docked to the system. To change the Auto
download setting via the Touch screen, touch Phone,
select Phone options, then Phonebook. Apply the
change.
Bluetooth Connectivity
Compatible Bluetooth wireless technology
devices can communicate with the vehicle’s in-built
telephone system. For the latest compatibility
information, refer to www.jaguar.com/Ownership
support.
Note: The Navigation system has features, which include:
Search area/Country selection, Points of Interest,
Memory points, Split screen, Previous destination
and Route preferences.
For more information, refer to the Navigation section of
the Owner’s Handbook.
Touch this icon to repeat the last voice
instruction. To deselect Voice guidance, go to
the Navigation Menu screen, then select Auto Voice
Guidance Off.
If the map is moved away from your current
location, the position icon will be replaced by a
soft key near the top left of the screen. Touch to bring
the current location map back into view.
Canceling guidance
To cancel guidance, touch Menu, Route Options and
then Cancel Guidance.
Message center turn by turn navigation
As well as the main Navigation Touch screen display,
there is a navigation feature that utilises the Message
center display in the Instrument panel. Once you have
set a destination and commenced guidance, a simplified
graphic guide is displayed, giving basic turn by turn
information about the next part of the trip. This feature
can be turned on or off via the Touch screen.
Page 15 of 16
NAVIGATIONTELEPHONE
15
Signal reception
• Reception is dependent on the phone and network
signal. Performance may be improved by changing
your phone’s settings (e.g., from 3G to 2G).
• If echo is experienced during a call, reduce the
Audio system’s volume.
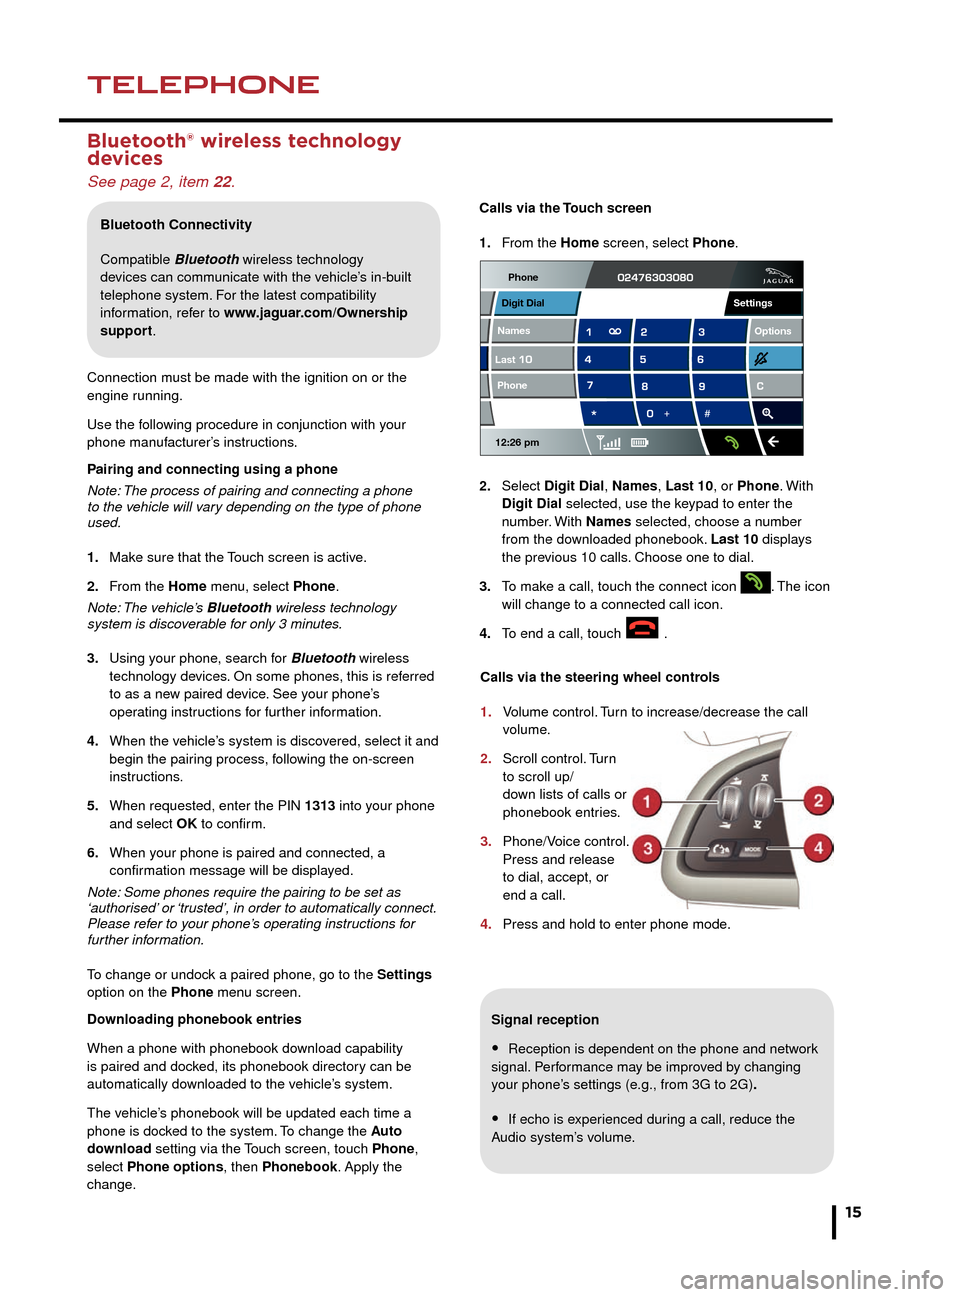
Calls via the Touch screen
1.
F
rom the Home screen, select Phone.
2.
Select
Digit Dial, Names, Last 10, or Phone. With
Digit Dial
selected, use the keypad to enter the
n
umber. With
Names selected, choose a number
from the do
wnloaded phonebook. Last 10 displays
the pre
vious 10 calls. Choose one to dial.
3.
T
o make a call, touch the connect icon
. The icon
will change to a connected call icon.
4
.
T
o end a call, touch .
Bluetooth® wireless technology
devices
See page 2, item 22.
Connection must be made with the ignition on or the
engine running.
Use the following procedure in conjunction with your
phone manufacturer’s instructions.
Pairing and connecting using a phone
Note: The process of pairing and connecting a phone
to the vehicle will vary depending on the type of phone
used.
1.
Mak
e sure that the Touch screen is active.
2.
F
rom the Home menu, select Phone.
Note: The vehicle’s Bluetooth wireless technology
system is discoverable for only 3 minutes.
3.
Using y
our phone, search for Bluetooth wireless
technology de
vices. On some phones, this is referred
to as a ne
w paired device. See your phone’s
oper
ating instructions for further information.
4.
When the v
ehicle’s system is discovered, select it and
begin the pair
ing process, following the on-screen
instructions.
5.
When requested, enter the PIN
1313 into your phone
and select
OK to confirm.
6.
When y
our phone is paired and connected, a
confir
mation message will be displayed.
Note: Some phones require the pairing to be set as
‘authorised’ or ‘trusted’, in order to automatically connect.
Please refer to your phone’s operating instructions for
further information.
To change or undock a paired phone, go to the Settings
option on the Phone menu screen.
Downloading phonebook entries
When a phone with phonebook download capability
is paired and docked, its phonebook directory can be
automatically downloaded to the vehicle’s system.
The vehicle’s phonebook will be updated each time a
phone is docked to the system. To change the Auto
download setting via the Touch screen, touch Phone,
select Phone options, then Phonebook. Apply the
change.
Bluetooth Connectivity
Compatible Bluetooth wireless technology
devices can communicate with the vehicle’s in-built
telephone system. For the latest compatibility
information, refer to www.jaguar.com/Ownership
support.
Calls via the steering wheel controls
1.
V
olume control. Turn to increase/decrease the call
volume.
2.
Scroll control.
Turn
to scroll up/
do
wn lists of calls or
phonebook entr
ies.
3.
Phone/V
oice control.
Press and release
to dial, accept, or
end a call.
4.
Press and hold to enter phone mode
.
Note: The Navigation system has features, which include:
Search area/Country selection, Points of Interest,
Memory points, Split screen, Previous destination
and Route preferences.
For more information, refer to the Navigation section of
the Owner’s Handbook.
Canceling guidance
To cancel guidance, touch Menu, Route Options and
then Cancel Guidance.
Message center turn by turn navigation
As well as the main Navigation Touch screen display,
there is a navigation feature that utilises the Message
center display in the Instrument panel. Once you have
set a destination and commenced guidance, a simplified
graphic guide is displayed, giving basic turn by turn
information about the next part of the trip. This feature
can be turned on or off via the Touch screen.
Phone
12:26 pm
Last Names Phone
Digit Dial
Options
Settings
Page 16 of 16
GAS STATION INFORMATION
16
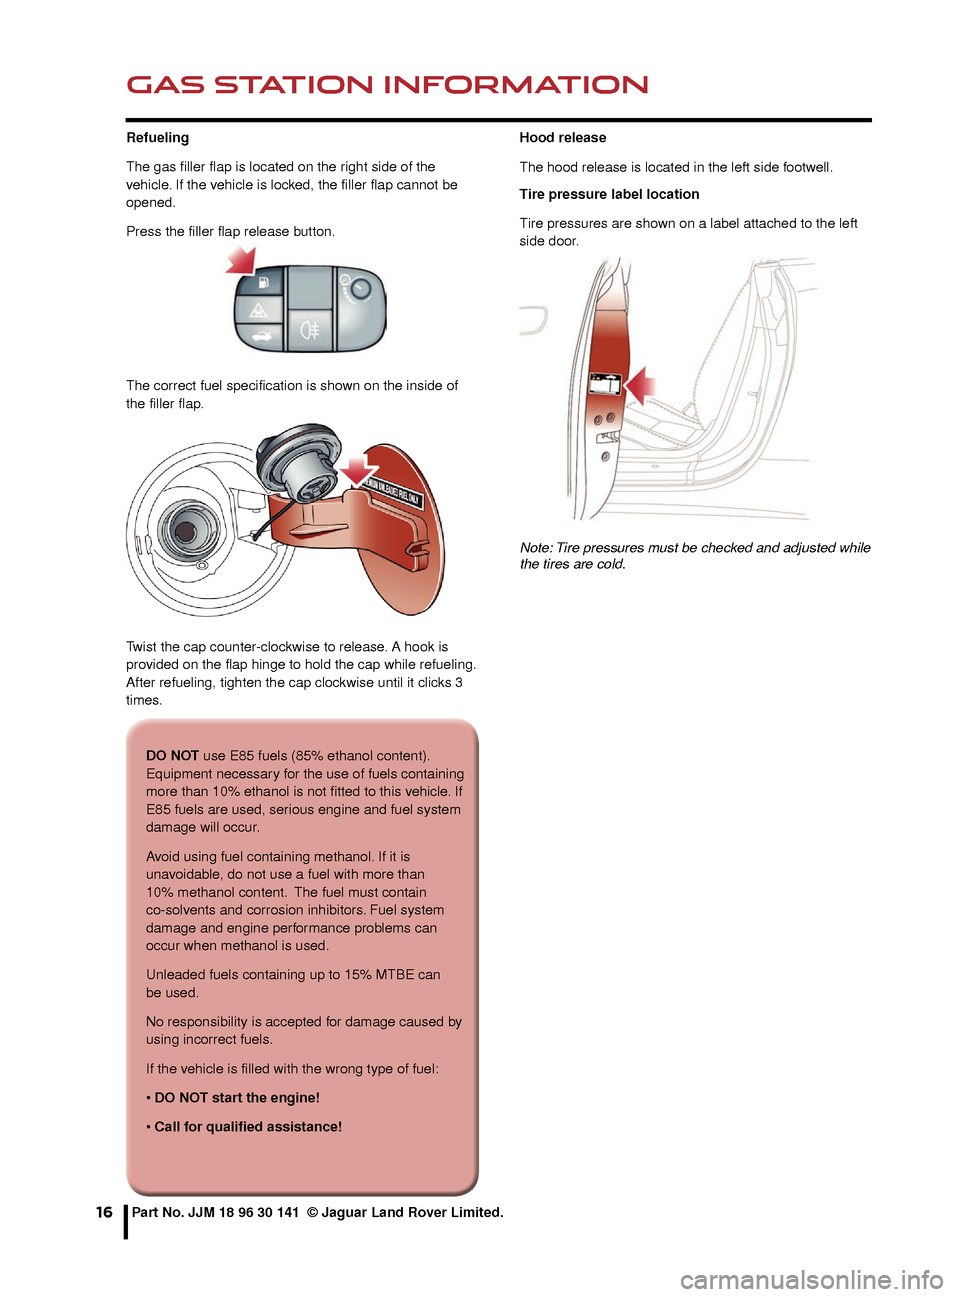
Refueling
The gas filler flap is located on the right side of the
vehicle. If the vehicle is locked, the filler flap cannot be
opened.
Press the filler flap release button.
The correct fuel specification is shown on the inside of
the filler flap.
Twist the cap counter-clockwise to release. A hook is
provided on the flap hinge to hold the cap while refueling.
After refueling, tighten the cap clockwise until it clicks 3
times.Hood release
The hood release is located in the left side footwell.
Tire pressure label location
Tire pressures are shown on a label attached to the left
side door.
Note: Tire pressures must be checked and adjusted while
the tires are cold.
Part No. JJM 18 96 30 141 © Jaguar Land Rover Limited.
DO NOT use E85 fuels (85% ethanol content).
Equipment necessary for the use of fuels containing
more than 10% ethanol is not fitted to this vehicle. If
E85 fuels are used, serious engine and fuel system
damage will occur.
Avoid using fuel containing methanol. If it is
unavoidable, do not use a fuel with more than
10% methanol content. The fuel must contain
co-solvents and corrosion inhibitors. Fuel system
damage and engine performance problems can
occur when methanol is used.
Unleaded fuels containing up to 15% MTBE can
be used.
No responsibility is accepted for damage caused by
using incorrect fuels.
If the vehicle is filled with the wrong type of fuel:
• DO NOT start the engine!
• Call for qualified assistance!