ECO mode JAGUAR XK 2014 1.G Quick Start Guide
[x] Cancel search | Manufacturer: JAGUAR, Model Year: 2014, Model line: XK, Model: JAGUAR XK 2014 1.GPages: 16, PDF Size: 1.7 MB
Page 2 of 16
2
DRIVER CONTROLSVEHICLE ACCESS
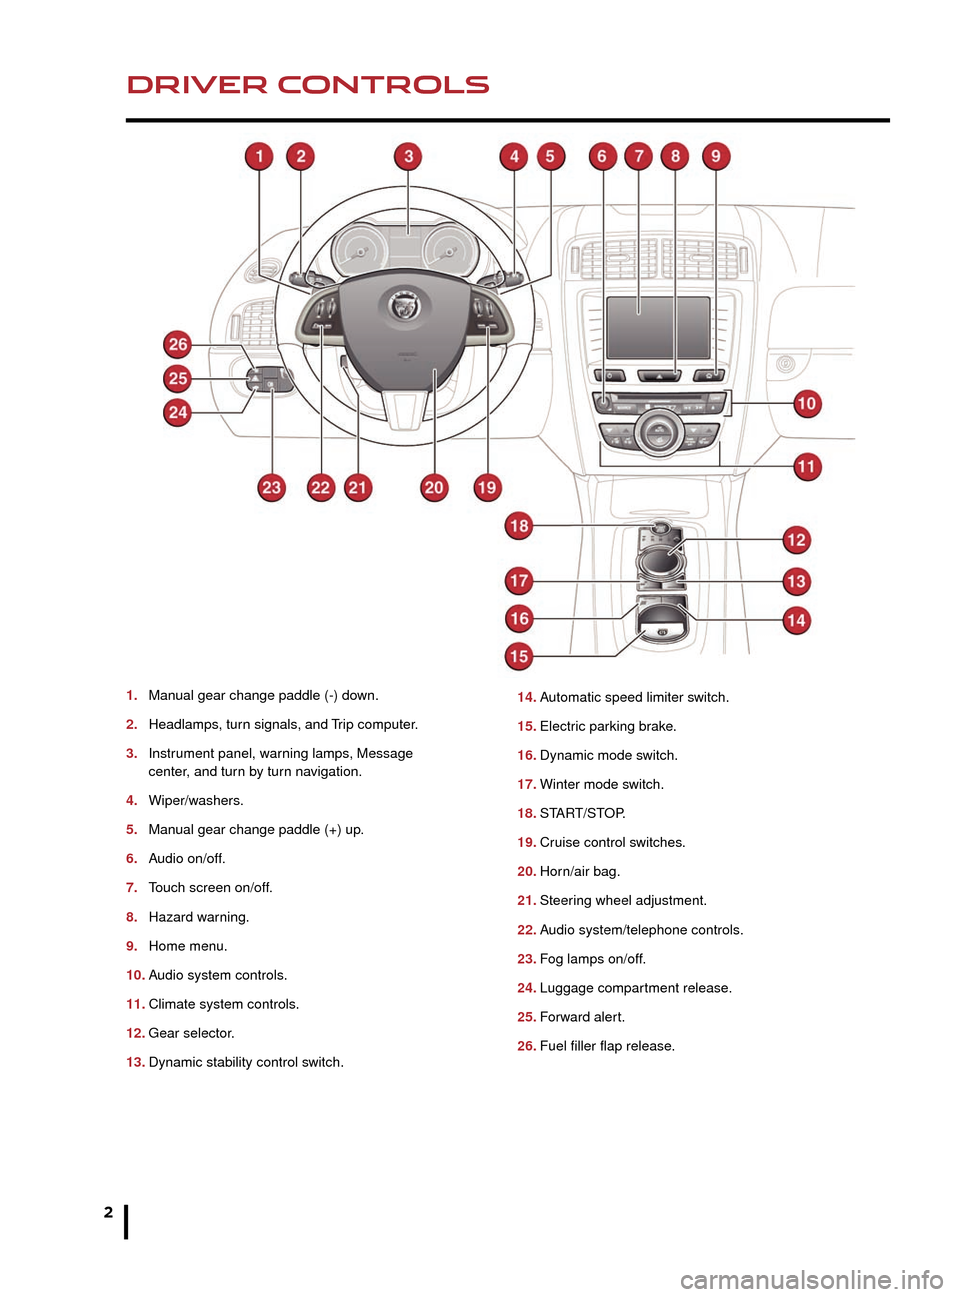
1. Manual gear change paddle (-) down.
2.
Headlamps
, turn signals, and Trip computer.
3.
Instr
ument panel, warning lamps, Message
center
, and turn by turn navigation.
4.
Wiper/w
ashers.
5.
Man
ual gear change paddle (+) up.
6.
A
udio on/off.
7.
T
ouch screen on/off.
8.
Hazard w
arning.
9.
Home men
u.
10.
A
udio system controls.
11.
Climate system controls
.
12.
Gear selector
.
13.
Dynamic stability control s
witch. 14. A
utomatic speed limiter switch.
15.
Electr
ic parking brake.
16.
Dynamic mode s
witch.
17.
Winter mode s
witch.
18.
ST
ART/STOP.
19.
Cr
uise control switches.
20.
Hor
n/air bag.
21.
Steer
ing wheel adjustment.
22.
A
udio system/telephone controls.
23.
F
og lamps on/off.
24.
Luggage compar
tment release.
25.
F
orward alert.
26.
Fuel filler flap release
.
Unlocking mode alternatives
Single-point entry allows only the driver’s door to
unlock with a single press. A second press unlocks the
other door and the Luggage compartment.
Multi-point entry will unlock both of the doors and the
Luggage compartment with a single press.
To change between modes, with the vehicle unlocked,
press the lock and unlock buttons simultaneously for 3
seconds. The hazard warning lamps will flash twice to
confirm the change.
Smart key
Keyless entry/exit
To unlock the vehicle and disarm the alarm, first make
sure that the Smart key is outside of the vehicle but within
3 ft (1 m).
Operate a door handle or the Luggage compartment
release button.
To lock the vehicle and arm the alarm, first make sure
that the Smart key is outside of the vehicle but within
3 ft (1 m).
Press a door handle button once to lock.
Drive-away door locking
When enabled, the Luggage compartment and doors
will automatically lock when the vehicle’s forward speed
exceeds 5 mph (7 km/h). This feature can be disabled/
enabled via the Touch screen. From the Home screen,
select Vehicle, then Veh. settings, and then Security.
Page 3 of 16
3
DRIVER CONTROLSVEHICLE ACCESS
The Smart key may not be detected if it is placed in
a metal container, or if it is shielded by a device with
a back-lit LCD screen, (e.g., laptop, smart phone,
etc). Keep the Smart key clear of such devices
when attempting Keyless entry or Keyless starting.
Do not leave your Smart key in the Luggage
compartment, as the vehicle WILL NOT
automatically unlock (should it become shielded).
14. Automatic speed limiter switch.
15. Electric parking brake.
16. Dynamic mode switch.
17. Winter mode switch.
18. START/STOP.
19. Cruise control switches.
20. Horn/air bag.
21. Steering wheel adjustment.
22. Audio system/telephone controls.
23. Fog lamps on/off.
24. Luggage compartment release.
25. Forward alert.
26. Fuel filler flap release.
Unlocking mode alternatives
Single-point entry allows only the driver’s door to
unlock with a single press. A second press unlocks the
other door and the Luggage compartment.
Multi-point entry will unlock both of the doors and the
Luggage compartment with a single press.
To change between modes, with the vehicle unlocked,
press the lock and unlock buttons simultaneously for 3
seconds. The hazard warning lamps will flash twice to
confirm the change.
Smart key
Press once to lock the vehicle and arm only the
exterior (perimetric) alarm.
Multi-point entry - Press once to disarm the alarm,
unlock both of the doors and unlock the Luggage
compartment.
Press and hold to open the windows (Global
opening).
Press once to switch the headlamps on for up
to 120 seconds. Time delay is set on the lighting
control. Press again to switch off.
Press to open only the Luggage compartment.
The rest of the security system remains active.
Press and hold for 3 seconds to
activ
ate/cancel the panic alarm.
Keyless entry/exit
To unlock the vehicle and disarm the alarm, first make
sure that the Smart key is outside of the vehicle but within
3 ft (1 m).
Operate a door handle or the Luggage compartment
release button.
To lock the vehicle and arm the alarm, first make sure
that the Smart key is outside of the vehicle but within
3 ft (1 m).
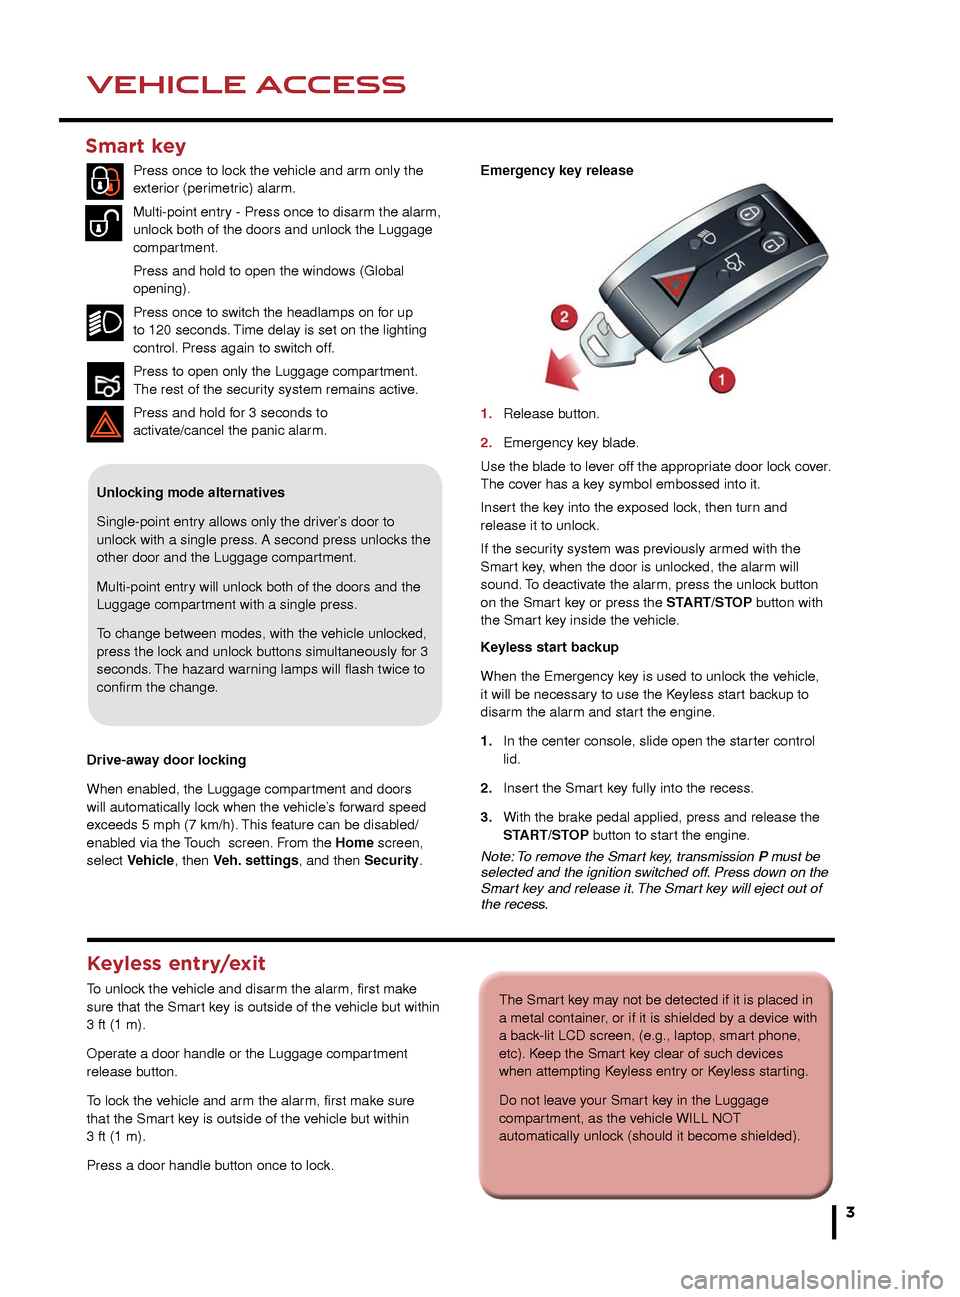
Press a door handle button once to lock. Emergency key release
1.
Release b
utton.
2.
Emergency k
ey blade.
Use the blade to lever off the appropriate door lock cover.
The cover has a key symbol embossed into it.
Insert the key into the exposed lock, then turn and
release it to unlock.
If the security system was previously armed with the
Smart key, when the door is unlocked, the alarm will
sound. To deactivate the alarm, press the unlock button
on the Smart key or press the START/STOP button with
the Smart key inside the vehicle.
Keyless start backup
When the Emergency key is used to unlock the vehicle,
it will be necessary to use the Keyless start backup to
disarm the alarm and start the engine.
1.
In the center console
, slide open the starter control
lid.
2.
Inser
t the Smart key fully into the recess.
3.
With the br
ake pedal applied, press and release the
ST
ART/STOP button to start the engine.
Note: To remove the Smart key, transmission P must be
selected and the ignition switched off. Press down on the
Smart key and release it. The Smart key will eject out of
the recess.
Drive-away door locking
When enabled, the Luggage compartment and doors
will automatically lock when the vehicle’s forward speed
exceeds 5 mph (7 km/h). This feature can be disabled/
enabled via the Touch screen. From the Home screen,
select Vehicle, then Veh. settings, and then Security.
Page 5 of 16
VEHICLE ACCESSCOMFORT ADJUSTMENTS
5
2. Alternatively, press the button on the facia.
Convertible roof operation
DO NOT press the engine START/STOP
button while the roof is operating. Doing so will
cause the system to lose its position memory.
DO NOT open the Luggage compartment while
the roof is operating. This will cause the operation
to stop.
1.
To close, press and hold the FRONT of the switch.
Once again, an audible chime will be given. If the
windows have been raised, they will will lower before
the roof moves back into position. When the process
is complete, another audible chime will be given.
2. Release the switch.
Setting the driving position
Driver’s seat
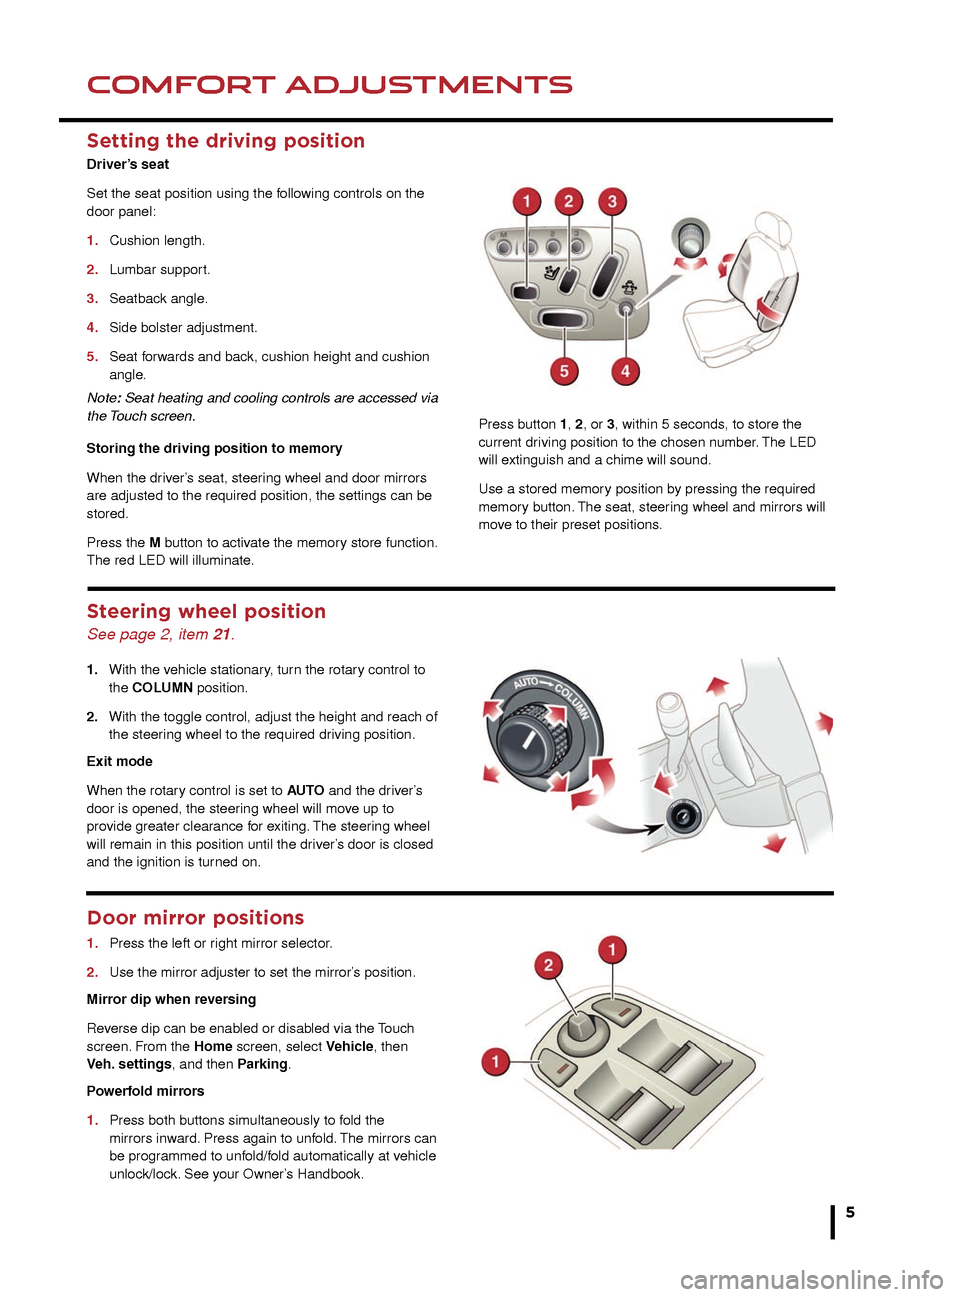
Set the seat position using the following controls on the
door panel:
1.
Cushion length.
2.
Lumbar suppor
t.
3.
Seatbac
k angle.
4.
Side bolster adjustment.
5
.
Seat f
orwards and back, cushion height and cushion
angle.
Note: Seat heating and cooling controls are accessed via
the Touch screen.
Storing the driving position to memory
When the driver’s seat, steering wheel and door mirrors
are adjusted to the required position, the settings can be
stored.
Press the M button to activate the memory store function.
The red LED will illuminate.
Steering wheel position
See page 2, item 21.
1. With the v ehicle stationary, turn the rotary control to
the COLUMN position.
2.
With the toggle control, adjust the height and reach of
the steer
ing wheel to the required driving position.
Exit mode
When the rotary control is set to AUTO and the driver’s
door is opened, the steering wheel will move up to
provide greater clearance for exiting. The steering wheel
will remain in this position until the driver’s door is closed
and the ignition is turned on.
Door mirror positions
1. Press the left or r ight mirror selector.
2.
Use the mirror adjuster to set the mirror’
s position.
Mirror dip when reversing
Reverse dip can be enabled or disabled via the Touch
screen. From the Home screen, select Vehicle, then
Veh.
settings, and then Parking.
Powerfold mirrors
1.
Press both b
uttons simultaneously to fold the
mirrors inw
ard. Press again to unfold. The mirrors can
be prog
rammed to unfold/fold automatically at vehicle
unloc
k/lock. See your Owner’s Handbook.
Press button 1, 2, or 3, within 5 seconds, to store the
current driving position to the chosen number. The LED
will extinguish and a chime will sound.
Use a stored memory position by pressing the required
memory button. The seat, steering wheel and mirrors will
move to their preset positions.
DO NOT leave the Smart key inside the Luggage
compartment. The vehicle WILL NOT automatically
unlock if the Smart key is shielded.
DO NOT operate the top while the vehicle is in
motion. Doing so may damage the convertible top
and/or its operating mechanism.
Page 6 of 16
Transmission
See page 2, items 1, 5 and 12.
Apply the brake pedal, then
rotate the gear selector from
the P position. Maintain
brake pressure until a gear is
selected.
Select transmission P before
switching off the engine.
However, if the engine is
switched off with R, D or S
selected, the selector will
automatically return to P while
retracting.
STARTING AND DRIVING
6
STARTING AND DRIVING
Auto headlamps and wipers
See page 2, items 2 and 4.
Auto headlamps
1. When AUTO position is selected, the side lamps and
headlamps will turn on automatically as ambient light
falls below a preset level.
2. 3. 4. The headlamps can temporarily illuminate the
way ahead when exiting the car at night. Rotate the
control for delay periods of 30, 60, or 120
seconds. Use the Smart key headlamp button to turn
the headlamps on or off.
• The EPB is automatically released when the
tr ansmission is moved from the P position.
Note: DO NOT use the EPB
recess as a storage area.
Electric parking brake (EPB)
See page 2, item 15.
Applying
1.
With the v
ehicle stationary, lift up the EPB switch and
then release it.
The red warning lamp in the
Instr
ument panel will illuminate.
Releasing
1.
With the ignition on, apply the br
ake pedal and press
do
wn on the EPB switch.
2.
If the v
ehicle is stationary with the EPB applied and
either tr
ansmission D or R is selected, pressing the
acceler
ator will automatically release the EPB. Rolling start
If the engine is switched off while the vehicle is moving,
it can be restarted after 2 seconds have elapsed. Select
transmission N position and then press the START/STOP
button.
Smart key use
The engine will continue to run, even if the Smart
key is removed from the vehicle. However, if the
engine is stopped, it cannot be restarted until the
Smart key is returned to the vehicle.
Engine start/stop
See page 2, item 18.
Ignition only on
1.
With the Smar
t key inside the vehicle, press the
ST
ART/STOP button once to switch on the ignition.
2.
A second press will s
witch off the ignition.
Engine start
• The transmission must be in either P or N position to
enab le engine starting.
1.
With the br
ake pedal pressed firmly, press and
release the
START/STOP button to start the engine.
2.
Press again to stop the engine and s
witch off the
ignition.
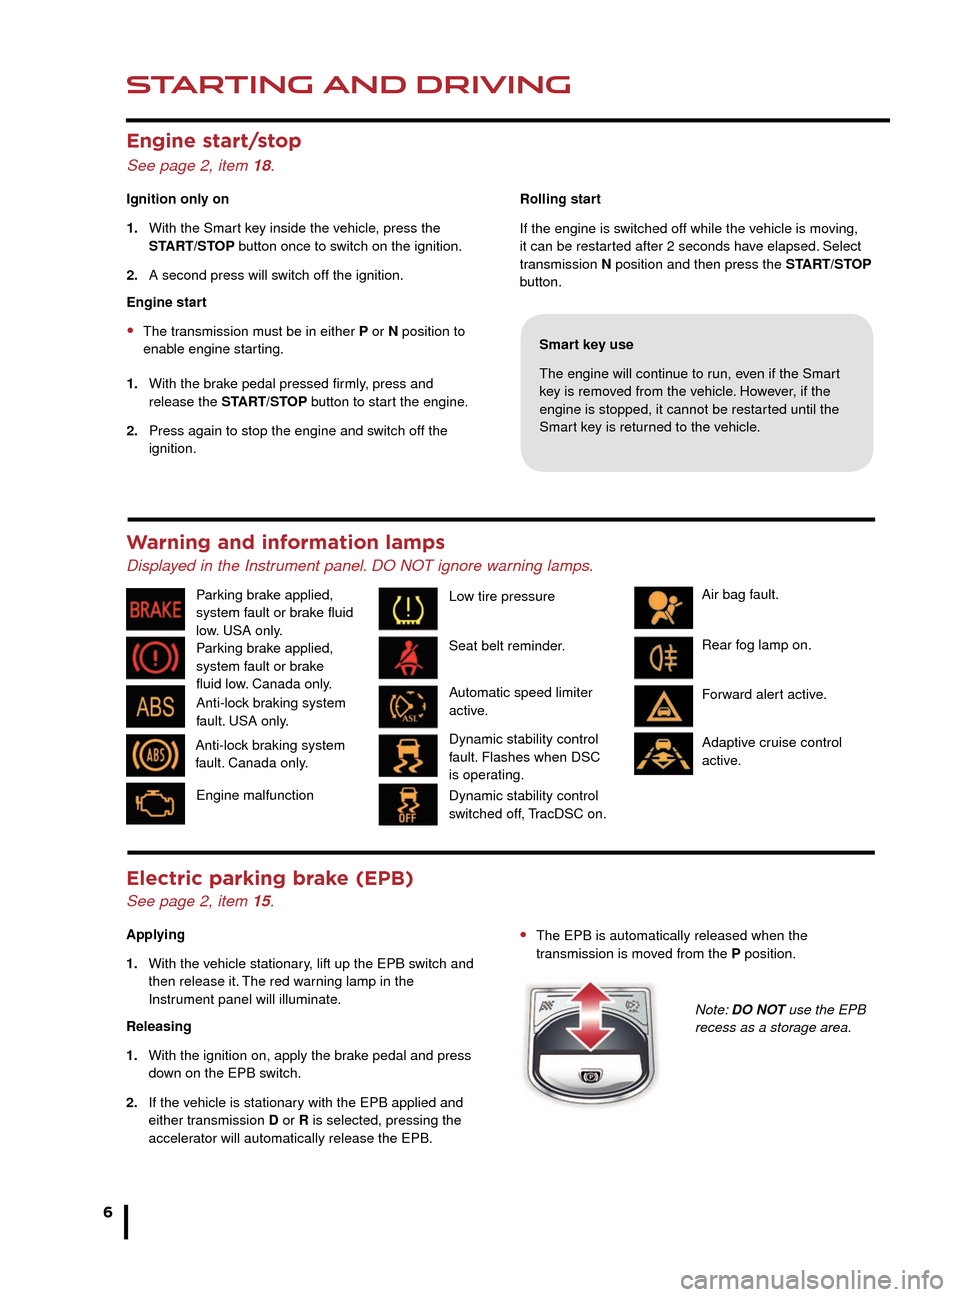
Warning and information lamps
Displayed in the Instrument panel. DO NOT ignore warning lamps.
Seat belt reminder. Air bag fault.
Parking brake applied,
system fault or brake
fluid low. Canada only. Parking brake applied,
system fault or brake fluid
low. USA only.
Automatic speed limiter
active.Rear fog lamp on.
Forward alert active.
Adaptive cruise control
active.
Dynamic stability control
fault. Flashes when DSC
is operating.
Anti-lock braking system
fault. USA only.
Anti-lock braking system
fault. Canada only.
Dynamic stability control
switched off, TracDSC on.
Operating note
If the engine is switched off with N selected, automatic
selection of P is delayed for 10 minutes. DO NOT use
this feature to enable towing of the vehicle. Refer to
Vehicle recovery in the Owner’s Handbook.
Sport mode
When selected, automatic gear change points are
modified to make full use of engine power.
Press the selector down and rotate from D to S.
Engine malfunction Low tire pressure
Page 7 of 16
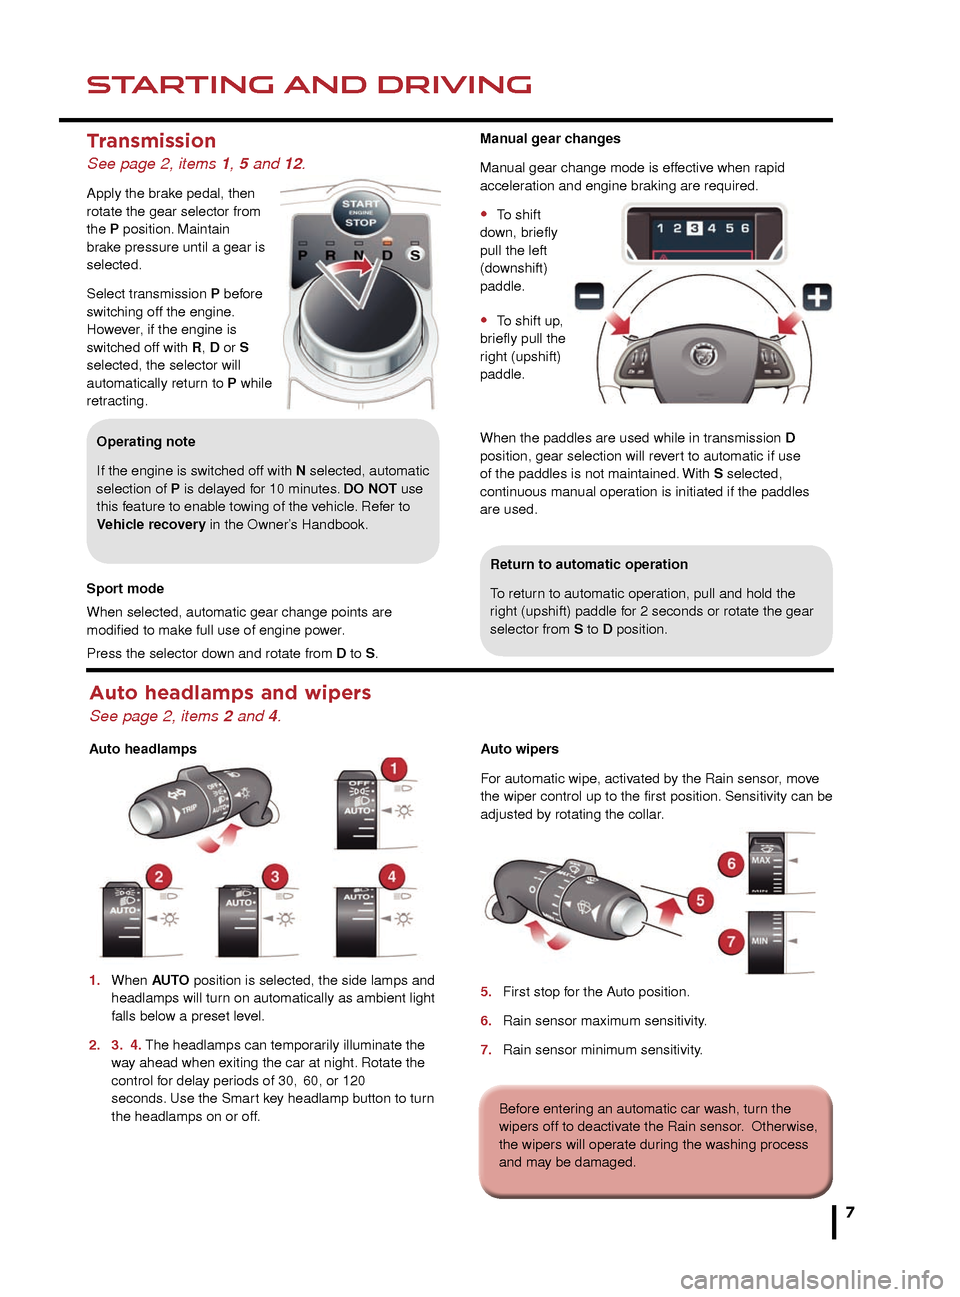
Transmission
See page 2, items 1, 5 and 12.
Apply the brake pedal, then
rotate the gear selector from
the P position. Maintain
brake pressure until a gear is
selected.
Select transmission P before
switching off the engine.
However, if the engine is
switched off with R, D or S
selected, the selector will
automatically return to P while
retracting.
STARTING AND DRIVINGSTARTING AND DRIVING
7
7
Return to automatic operation
To return to automatic operation, pull and hold the
right (upshift) paddle for 2 seconds or rotate the gear
selector from S to D position.
Auto headlamps and wipers
See page 2, items 2 and 4.
Auto headlamps
1.
When
AUTO position is selected, the side lamps and
headlamps will tur
n on automatically as ambient light
f
alls below a preset level.
2.
3.
4. The headlamps can temporarily illuminate the
w
ay ahead when exiting the car at night. Rotate the
control f
or delay periods of 30,
60, or 120
seconds
. Use the Smart key headlamp button to turn
the headlamps on or off
.Auto wipers
For automatic wipe, activated by the Rain sensor, move
the wiper control up to the first position. Sensitivity can be
adjusted by rotating the collar.
5.
First stop f
or the Auto position.
6.
Rain sensor maxim
um sensitivity.
7.
Rain sensor minim
um sensitivity.
Before entering an automatic car wash, turn the
wipers off to deactivate the Rain sensor. Otherwise,
the wipers will operate during the washing process
and may be damaged.
Manual gear changes
Manual gear change mode is effective when rapid
acceleration and engine braking are required.
• To shift
down, briefly
pull the left
(downshift)
paddle.
• To shift up,
briefly pull the
right (upshift)
paddle.
When the paddles are used while in transmission D
position, gear selection will revert to automatic if use
of the paddles is not maintained. With S selected,
continuous manual operation is initiated if the paddles
are used.
• The EPB is automatically released when the
transmission is moved from the P position.
Note: DO NOT use the EPB
recess as a storage area.
Rolling start
If the engine is switched off while the vehicle is moving,
it can be restarted after 2 seconds have elapsed. Select
transmission N position and then press the START/STOP
button.
Smart key use
The engine will continue to run, even if the Smart
key is removed from the vehicle. However, if the
engine is stopped, it cannot be restarted until the
Smart key is returned to the vehicle.
Air bag fault.
Rear fog lamp on.
Forward alert active.
Adaptive cruise control
active.
Operating note
If the engine is switched off with N selected, automatic
selection of P is delayed for 10 minutes. DO NOT use
this feature to enable towing of the vehicle. Refer to
Vehicle recovery in the Owner’s Handbook.
Sport mode
When selected, automatic gear change points are
modified to make full use of engine power.
Press the selector down and rotate from D to S.
Page 10 of 16
HEATING AND VENTILATION
10
AUDIO AND TOUCH SCREEN
Heating and ventilation
See page 2, item 11.
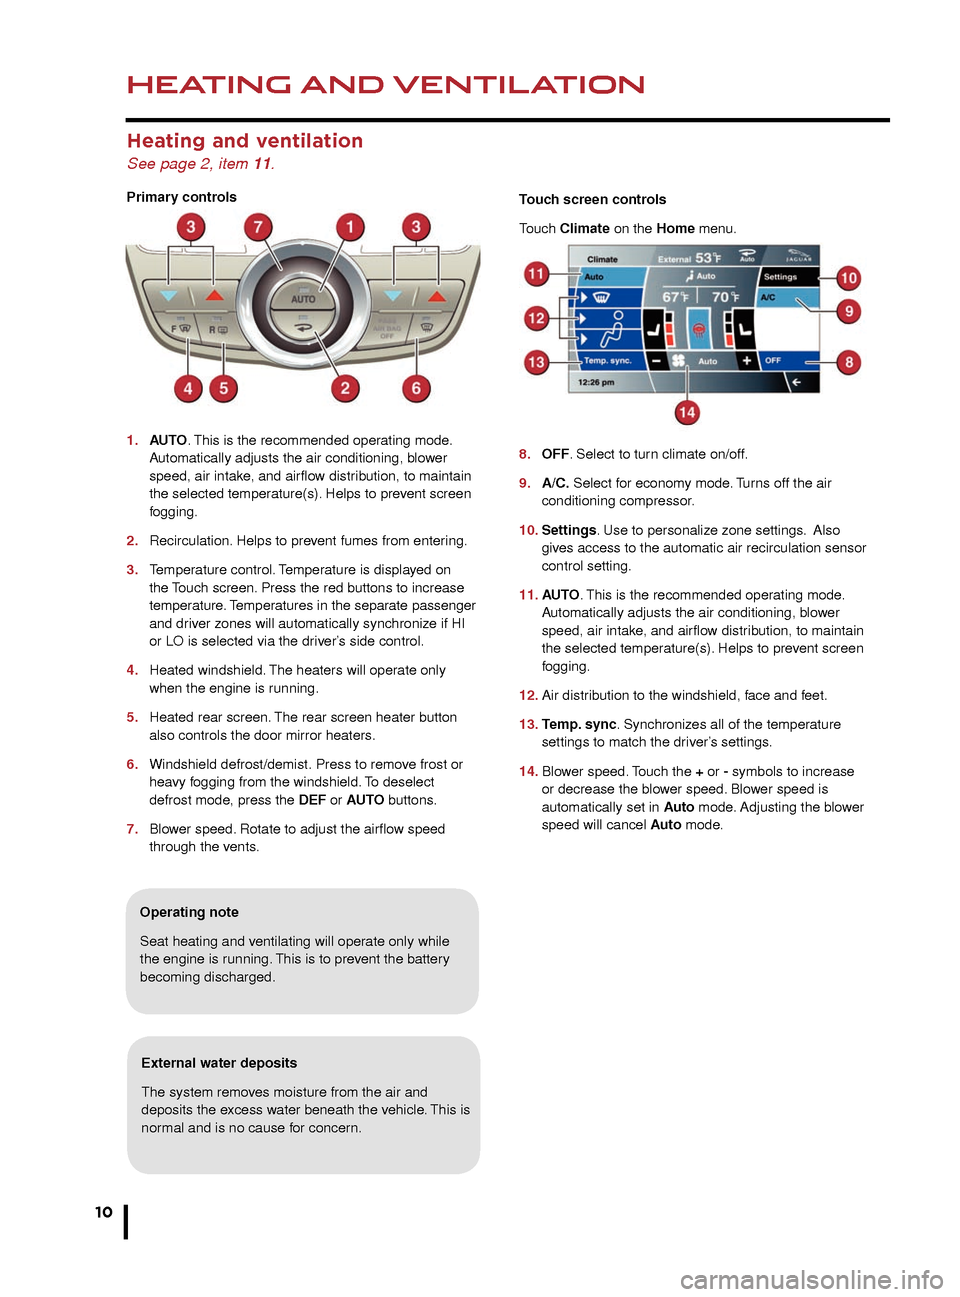
Primary controls
1.
AU
TO. This is the recommended operating mode.
A
utomatically adjusts the air conditioning, blower
speed, air intak
e, and airflow distribution, to maintain
the selected temper
ature(s). Helps to prevent screen
fogging.
2.
Recirculation.
Helps to prevent fumes from entering.
3.
T
emperature control. Temperature is displayed on
the
Touch screen. Press the red buttons to increase
te
mperature. Temperatures in the separate passenger
and dr
iver zones will automatically synchronize if HI
or LO is selected via the dr
iver’s side control.
4.
Heated windshield.
The heaters will operate only
when the engine is r
unning.
5.
Heated rear screen.
The rear screen heater button
also controls the door mirror heaters
.
6.
Windshield defrost/demist.
Press to remove frost or
hea
vy fogging from the windshield. To deselect
defrost mode
, press the DEF or AUTO buttons.
7.
Blo
wer speed. Rotate to adjust the airflow speed
through the v
ents.
Operating note
Seat heating and ventilating will operate only while
the engine is running. This is to prevent the battery
becoming discharged.
External water deposits
The system removes moisture from the air and
deposits the excess water beneath the vehicle. This is
normal and is no cause for concern.
Home menu
See page 2, items 6, and 7.
Steering wheel audio control
See page 2, item 22.
1. Audio volume.
2. Scroll through preset radio stations, CD tracks, or
music folders. Roll and release repeatedly to select
the next/previous radio station or audio source
track.
3. Audio mute/unmute or activate Voice control.
4. Scroll through the available audio sources.
The Touch screen requires only light touches.
Excess pressure could result in damage.Touch screen controls
Touch Climate on the Home menu.
8.
OFF
. Select to turn climate on/off.
9
.
A/C.
Select for economy mode. Turns off the air
conditioning compressor
.
10. Settings. Use to personalize zone settings. Also
giv
es access to the automatic air recirculation sensor
control setting.
11.
AU
TO . This is the recommended operating mode.
A
utomatically adjusts the air conditioning, blower
speed, air intak
e, and airflow distribution, to maintain
the selected temper
ature(s). Helps to prevent screen
fogging.
12.
Air distr
ibution to the windshield, face and feet.
13.
T
emp. sync. Synchronizes all of the temperature
settings to match the dr
iver’s settings.
14.
Blo
wer speed. Touch the + or - symbols to increase
or decrease the b
lower speed. Blower speed is
automatically set in
Auto mode. Adjusting the blower
speed will cancel
Auto mode.
Page 11 of 16
HEATING AND VENTILATIONAUDIO AND TOUCH SCREEN
11
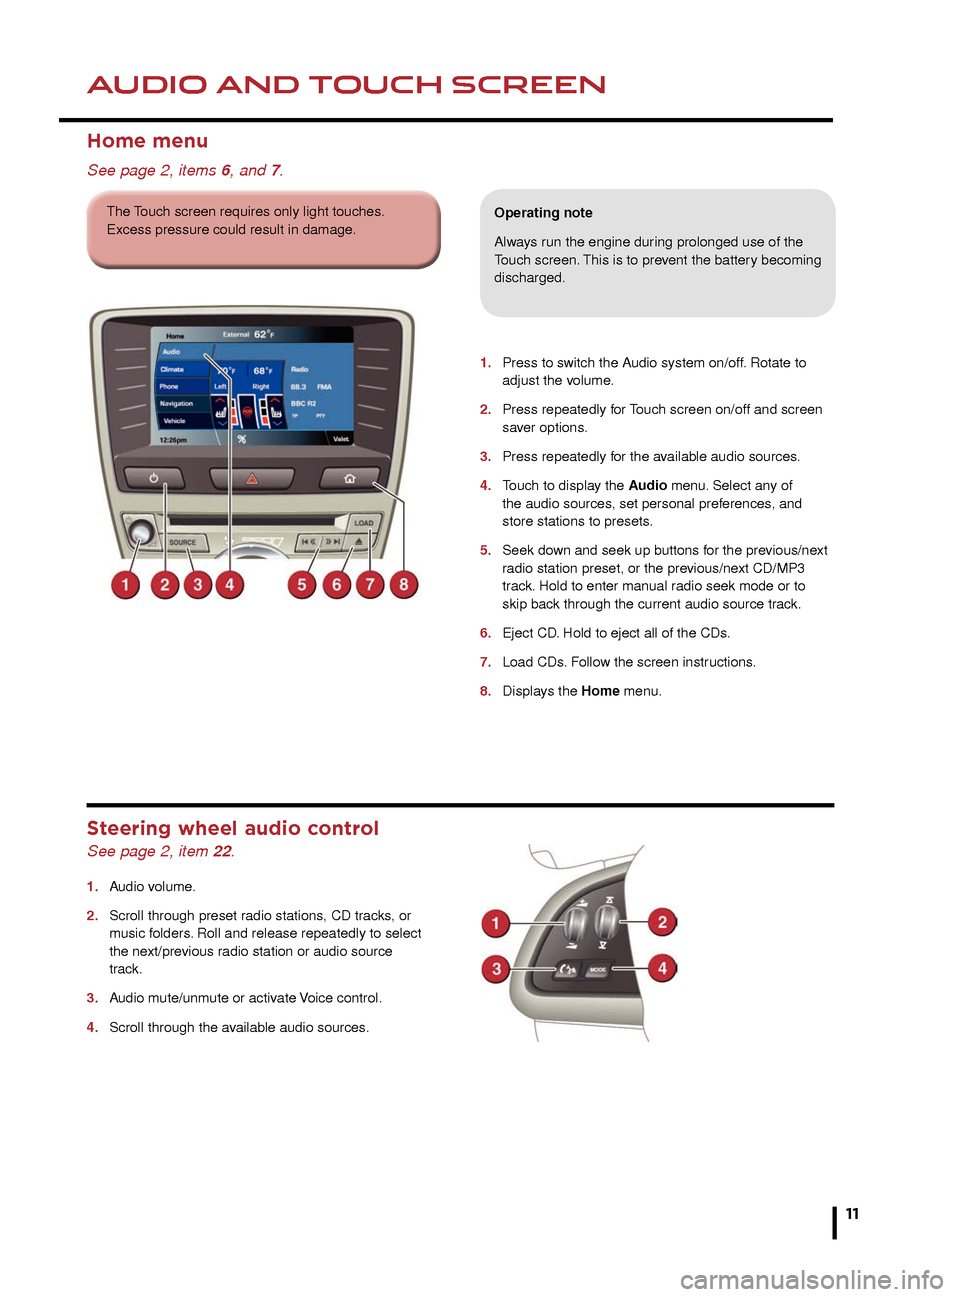
1. Press to switch the Audio system on/off. Rotate to
adjust the v olume.
2.
Press repeatedly f
or Touch screen on/off and screen
sa
ver options.
3.
Press repeatedly f
or the available audio sources.
4.
T
ouch to display the Audio menu. Select any of
the audio sources
, set personal preferences, and
store stations to presets
.
5.
Seek do
wn and seek up buttons for the previous/next
r
adio station preset, or the previous/next CD/MP3
tr
ack. Hold to enter manual radio seek mode or to
skip bac
k through the current audio source track.
6.
Eject CD
. Hold to eject all of the CDs.
7.
Load CDs
. Follow the screen instructions.
8.
Displa
ys the Home menu.
Home menu
See page 2, items 6, and 7.
Operating note
Always run the engine during prolonged use of the
Touch screen. This is to prevent the battery becoming
discharged.
Steering wheel audio control
See page 2, item 22.
1. Audio volume.
2.
Scroll through preset r
adio stations, CD tracks, or
m
usic folders. Roll and release repeatedly to select
the ne
xt/previous radio station or audio source
track.
3.
A
udio mute/unmute or activate Voice control.
4.
Scroll through the a
vailable audio sources.
The Touch screen requires only light touches.
Excess pressure could result in damage.Touch screen controls
Touch Climate on the Home menu.
8. OFF. Select to turn climate on/off.
9. A/C. Select for economy mode. Turns off the air
conditioning compressor.
10. Settings. Use to personalize zone settings. Also
gives access to the automatic air recirculation sensor
control setting.
11. AUTO . This is the recommended operating mode.
Automatically adjusts the air conditioning, blower
speed, air intake, and airflow distribution, to maintain
the selected temperature(s). Helps to prevent screen
fogging.
12. Air distribution to the windshield, face and feet.
13. Temp. sync. Synchronizes all of the temperature
settings to match the driver’s settings.
14. Blower speed. Touch the + or - symbols to increase
or decrease the blower speed. Blower speed is
automatically set in Auto mode. Adjusting the blower
speed will cancel Auto mode.
Page 13 of 16
AUDIO AND TOUCH SCREENAUDIO AND TOUCH SCREEN
13
CD player and portable media
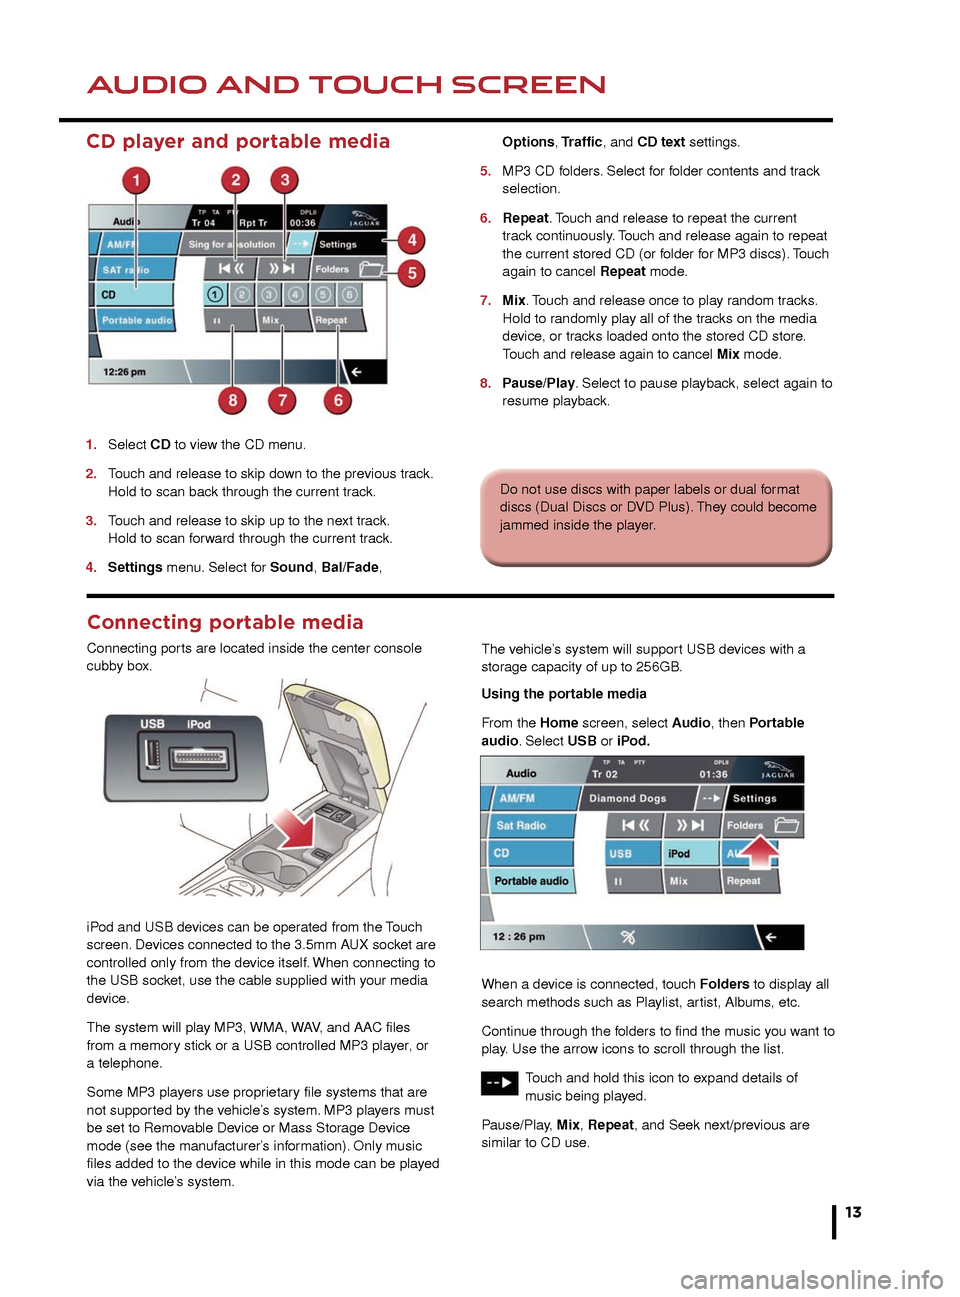
1. Select CD to view the CD menu.
2.
T
ouch and release to skip down to the previous track.
Hold to scan bac
k through the current track.
3.
T
ouch and release to skip up to the next track.
Hold to scan f
orward through the current track.
4.
Settings
menu. Select for Sound, Bal/Fade,
Options
, Traffic, and CD text settings.
5.
MP3 CD f
olders. Select for folder contents and track
selection.
6.
Repeat
. Touch and release to repeat the current
tr
ack continuously. Touch and release again to repeat
the current stored CD (or f
older for MP3 discs). Touch
again to cancel
Repeat mode.
7.
Mix
. Touch and release once to play random tracks.
Hold to r
andomly play all of the tracks on the media
de
vice, or tracks loaded onto the stored CD store.
T
ouch and release again to cancel Mix mode.
8.
P
ause/Play. Select to pause playback, select again to
resume pla
yback.
2.
Seek down to the previous channel.
3. Seek up to the next channel.
4. Settings. Select to make personal settings for
Sound, Bal/Fade, and Song Seek.
5. SAT Options. Touch to access and select from
Category Lists, Direct Channel, Parental Lock,
Channel Skip and SAT information.
In Category Lists a category can be selected for
use. Direct Channel allows a channel number to be
inserted via the keypad. Parental Lock
allows channels/categories to be censored.
In Channel Skip, individual channels, or even entire
categories, can be selected for exclusion when using
the skip soft keys. SAT Information gives access to
the SIRIUS ID number and subscription contact
number.
6. Channel presets. Each S AT band has 6 preset soft
keys. Touch and hold a soft key to store the current
channel. A brief touch will access the stored channel.
Alternatively, use the seek button on the steering
wheel, to find the next or previous preset channel.
1.
Subsequent touches of AM/FM will scroll through
FM1, FM2, and AM.
2. Seek down to the previous station.
3. Seek up to the next station.
4. Settings menu. Select for Sound, Bal/Fade,
Options, and PTY settings.
5. Autostore can automatically select and store up to
9 stations. Touch any preset button to listen to a
stored station.
6. Preset soft keys. Can store 9 stations for each
waveband. Touch and hold a soft key to store the
current radio station. Touch and release a
preset soft key to tune the radio to the station stored.
Alternatively, use the seek button on the steering
wheel, to find the next or previous preset station.
Many screens feature the arrow icon in the bottom right
corner. Touch this icon to return to the previous screen.
Do not use discs with paper labels or dual format
discs (Dual Discs or DVD Plus). They could become
jammed inside the player.
Connecting portable media
Connecting ports are located inside the center console
cubby box.
iPod and USB devices can be operated from the Touch
screen. Devices connected to the 3.5mm AUX socket are
controlled only from the device itself. When connecting to
the USB socket, use the cable supplied with your media
device.
The system will play MP3, WMA, WAV, and AAC files
from a memory stick or a USB controlled MP3 player, or
a telephone.
Some MP3 players use proprietary file systems that are
not supported by the vehicle’s system. MP3 players must
be set to Removable Device or Mass Storage Device
mode (see the manufacturer’s information). Only music
files added to the device while in this mode can be played
via the vehicle’s system. The vehicle’s system will support USB devices with a
storage capacity of up to 256GB.
Using the portable media
From the Home screen, select Audio, then Portable
audio. Select USB or iPod.
When a device is connected, touch Folders to display all
search methods such as Playlist, artist, Albums, etc.
Continue through the folders to find the music you want to
play. Use the arrow icons to scroll through the list.
Touch and hold this icon to expand details of
music being played.
Pause/Play, Mix, Repeat, and Seek next/previous are
similar to CD use.