coolant reservoir JEEP CHEROKEE 1994 Service User Guide
[x] Cancel search | Manufacturer: JEEP, Model Year: 1994, Model line: CHEROKEE, Model: JEEP CHEROKEE 1994Pages: 1784, PDF Size: 77.09 MB
Page 900 of 1784
(17) Tighten the serpentine drive belt according to
the specifications listed in Group 7, Cooling System.
(18) Install the fan shroud and radiator (refer to
Group 7, Cooling System for the proper procedure).
(19) Connect the radiator hoses.
(20) Connect the throttle valve rod and retainer.
(21) Connect the throttle cable and install the rod.
(22) Install the throttle valve rod spring.
(23) Connect the speed control cable, if equipped.
(24) Connect the oxygen sensor wire connector.
(25) Install the vacuum hose and check valve on
the brake booster.
(26) Connect the coolant temperature sensor wire
connector.
(27) Connect the idle speed actuator wire connec-
tor.
(28) Connect the fuel inlet and return hoses at the
fuel rail. Verify that the quick-connect fitting assem-
bly fits securely over the fuel lines by giving the fuel
lines a firm tug.
(29) Install the fuel line bracket to the intake
manifold.
(30) Connect all fuel injection wire connections.
(31) Install the engine ground strap.
(32) Connect the ignition coil wire connector.
(33) Remove the coolant temperature sending unit
to permit air to escape from the block. Fill the cool-
ing system with coolant. Install the coolant tempera-
ture sending unit when the system is filled.
(34) If equipped with power steering:
(a) Remove the protective caps
(b) Connect the hoses to the fittings at the steer-
ing gear. Tighten the nut to 52 Nzm (38 ft. lbs.)
torque.
(c) Fill the pump reservoir with fluid.
(35) Install the battery and connect the battery ca-
bles.
(36) Install the air cleaner bonnet to the throttle
body.
(37) Install the air cleaner.
(38) Lower the hood and secure in place.
(39) Start the engine and inspect for leaks.
(40) Stop the engine and check the fluid levels.
Add fluid, as required.
ENGINE CYLINDER HEAD COVER
A cured gasket is part of the engine cylinder head
cover.
REMOVAL
(1) Disconnect negative cable from battery.
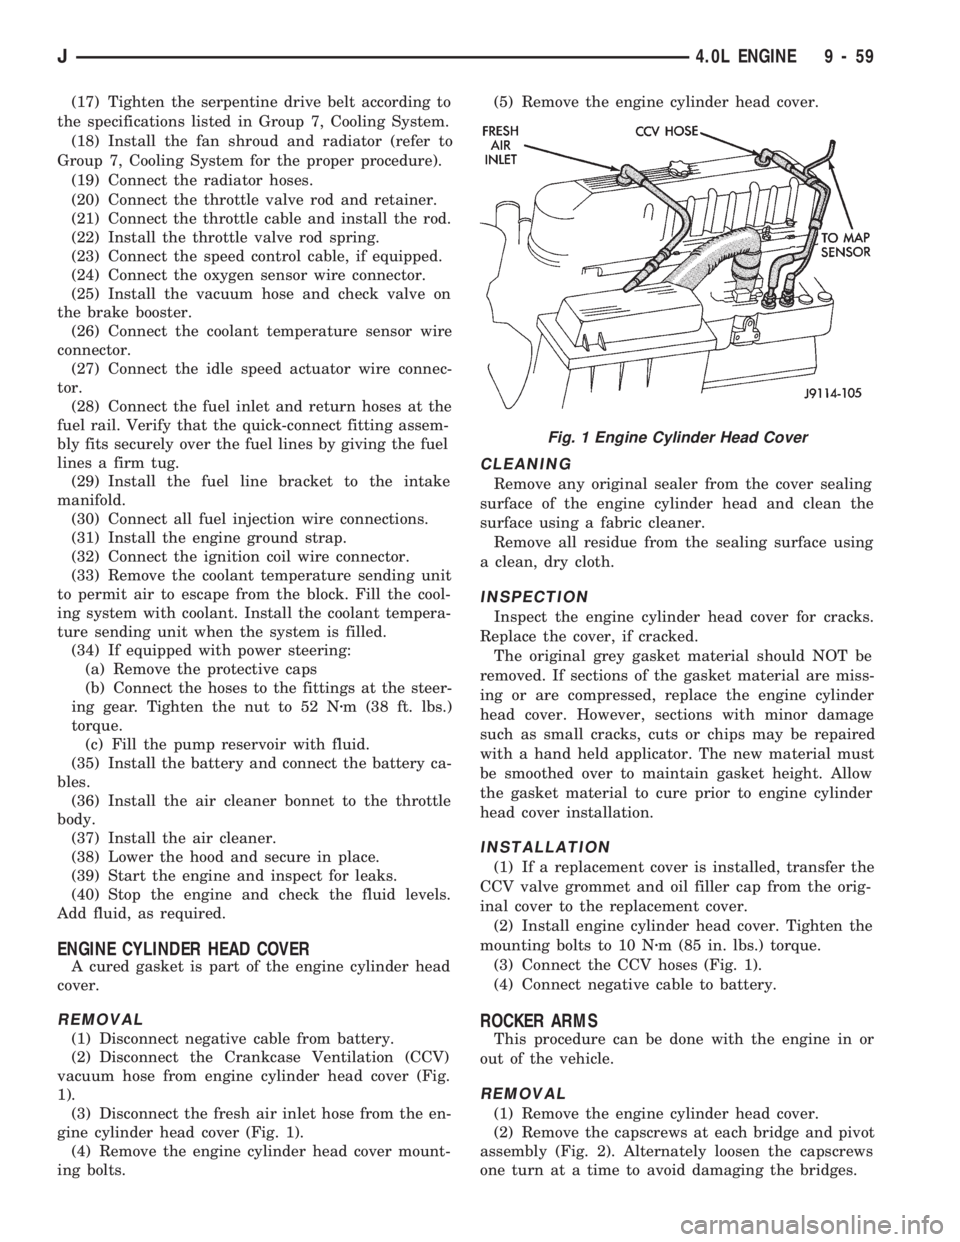
(2) Disconnect the Crankcase Ventilation (CCV)
vacuum hose from engine cylinder head cover (Fig.
1).
(3) Disconnect the fresh air inlet hose from the en-
gine cylinder head cover (Fig. 1).
(4) Remove the engine cylinder head cover mount-
ing bolts.(5) Remove the engine cylinder head cover.
CLEANING
Remove any original sealer from the cover sealing
surface of the engine cylinder head and clean the
surface using a fabric cleaner.
Remove all residue from the sealing surface using
a clean, dry cloth.
INSPECTION
Inspect the engine cylinder head cover for cracks.
Replace the cover, if cracked.
The original grey gasket material should NOT be
removed. If sections of the gasket material are miss-
ing or are compressed, replace the engine cylinder
head cover. However, sections with minor damage
such as small cracks, cuts or chips may be repaired
with a hand held applicator. The new material must
be smoothed over to maintain gasket height. Allow
the gasket material to cure prior to engine cylinder
head cover installation.
INSTALLATION
(1) If a replacement cover is installed, transfer the
CCV valve grommet and oil filler cap from the orig-
inal cover to the replacement cover.
(2) Install engine cylinder head cover. Tighten the
mounting bolts to 10 Nzm (85 in. lbs.) torque.
(3) Connect the CCV hoses (Fig. 1).
(4) Connect negative cable to battery.
ROCKER ARMS
This procedure can be done with the engine in or
out of the vehicle.
REMOVAL
(1) Remove the engine cylinder head cover.
(2) Remove the capscrews at each bridge and pivot
assembly (Fig. 2). Alternately loosen the capscrews
one turn at a time to avoid damaging the bridges.
Fig. 1 Engine Cylinder Head Cover
J4.0L ENGINE 9 - 59
Page 979 of 1784
charges when the PCM supplies a ground. By switch-
ing the ground path on and off, the PCM regulates
ignition timing.
The sensors and switches that provide inputs to the
powertrain control module (PCM) comprise the En-
gine Control System. It is also comprised of the PCM
Outputs (engine control devices that the are operated
by the PCM).
SYSTEM DIAGNOSIS
The powertrain control module (PCM) tests many
of its own input and output circuits. If a Diagnostic
Trouble Code (DTC) is found in a major system, this
information is stored in the PCM memory. Refer to
On-Board Diagnostics in the MFI SystemÐGeneral
Diagnosis section of this group for DTC information.
POWERTRAIN CONTROL MODULE (PCM)
The PCM operates the fuel system. The PCM was
formerly referred to as the SBEC or engine control-
ler. The PCM is a pre-programmed, dual micropro-
cessor digital computer. It regulates ignition timing,
air-fuel ratio, emission control devices, charging sys-
tem, speed control, air conditioning compressor
clutch engagement and idle speed. The PCM can
adapt its programming to meet changing operating
conditions.
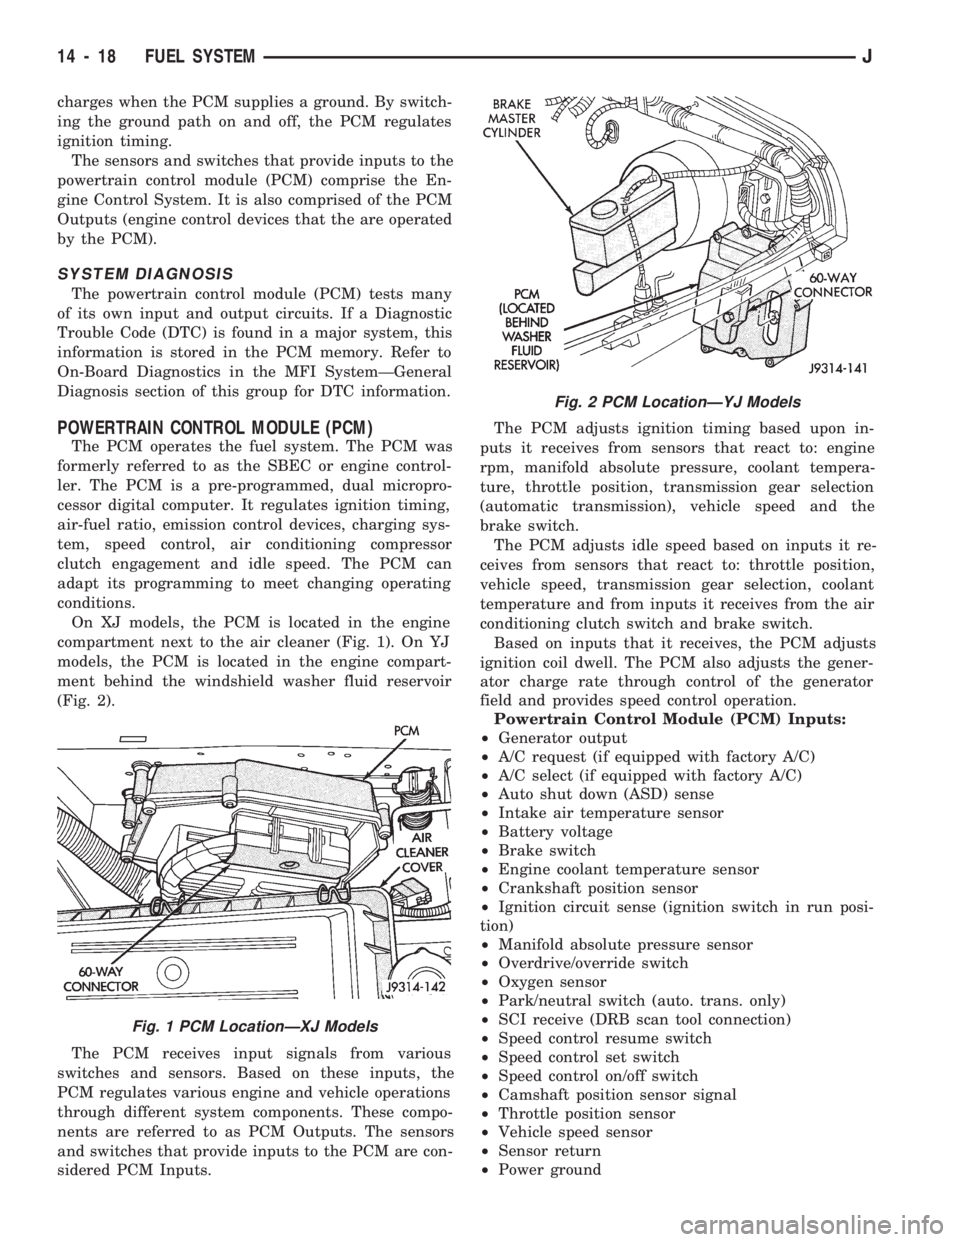
On XJ models, the PCM is located in the engine
compartment next to the air cleaner (Fig. 1). On YJ
models, the PCM is located in the engine compart-
ment behind the windshield washer fluid reservoir
(Fig. 2).
The PCM receives input signals from various
switches and sensors. Based on these inputs, the
PCM regulates various engine and vehicle operations
through different system components. These compo-
nents are referred to as PCM Outputs. The sensors
and switches that provide inputs to the PCM are con-
sidered PCM Inputs.The PCM adjusts ignition timing based upon in-
puts it receives from sensors that react to: engine
rpm, manifold absolute pressure, coolant tempera-
ture, throttle position, transmission gear selection
(automatic transmission), vehicle speed and the
brake switch.
The PCM adjusts idle speed based on inputs it re-
ceives from sensors that react to: throttle position,
vehicle speed, transmission gear selection, coolant
temperature and from inputs it receives from the air
conditioning clutch switch and brake switch.
Based on inputs that it receives, the PCM adjusts
ignition coil dwell. The PCM also adjusts the gener-
ator charge rate through control of the generator
field and provides speed control operation.
Powertrain Control Module (PCM) Inputs:
²Generator output
²A/C request (if equipped with factory A/C)
²A/C select (if equipped with factory A/C)
²Auto shut down (ASD) sense
²Intake air temperature sensor
²Battery voltage
²Brake switch
²Engine coolant temperature sensor
²Crankshaft position sensor
²Ignition circuit sense (ignition switch in run posi-
tion)
²Manifold absolute pressure sensor
²Overdrive/override switch
²Oxygen sensor
²Park/neutral switch (auto. trans. only)
²SCI receive (DRB scan tool connection)
²Speed control resume switch
²Speed control set switch
²Speed control on/off switch
²Camshaft position sensor signal
²Throttle position sensor
²Vehicle speed sensor
²Sensor return
²Power ground
Fig. 1 PCM LocationÐXJ Models
Fig. 2 PCM LocationÐYJ Models
14 - 18 FUEL SYSTEMJ
Page 1469 of 1784
FRONT FENDER
The following information includes procedures for
removal/installation of:
²a fender liner,
²a front fender flare and retainers, and
²a front fender.
REMOVAL
(1) Remove the front bumper.
(2) Right fender only:
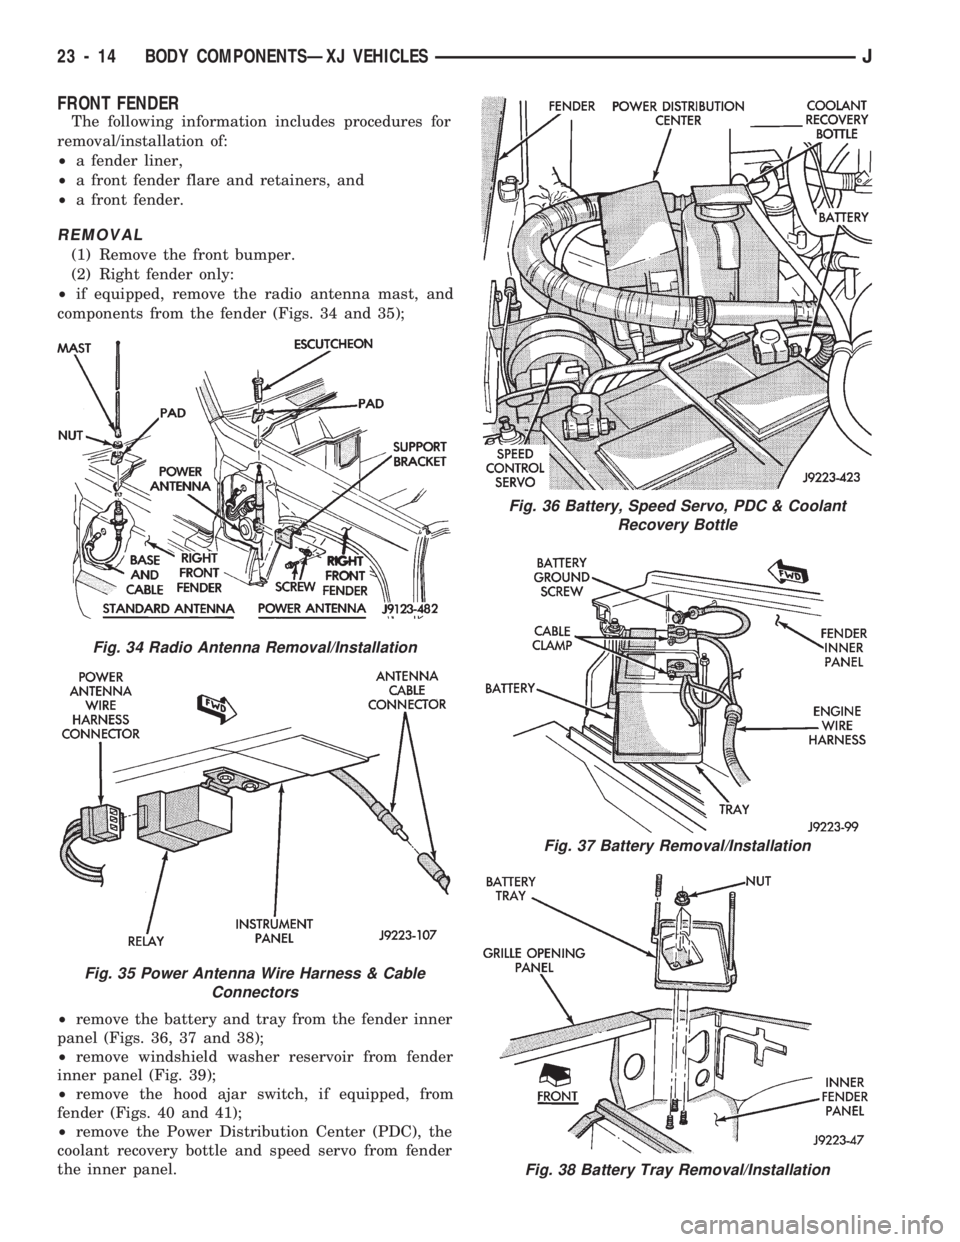
²if equipped, remove the radio antenna mast, and
components from the fender (Figs. 34 and 35);
²remove the battery and tray from the fender inner
panel (Figs. 36, 37 and 38);
²remove windshield washer reservoir from fender
inner panel (Fig. 39);
²remove the hood ajar switch, if equipped, from
fender (Figs. 40 and 41);
²remove the Power Distribution Center (PDC), the
coolant recovery bottle and speed servo from fender
the inner panel.
Fig. 36 Battery, Speed Servo, PDC & Coolant
Recovery Bottle
Fig. 37 Battery Removal/Installation
Fig. 38 Battery Tray Removal/Installation
Fig. 34 Radio Antenna Removal/Installation
Fig. 35 Power Antenna Wire Harness & Cable
Connectors
23 - 14 BODY COMPONENTSÐXJ VEHICLESJ
Page 1470 of 1784
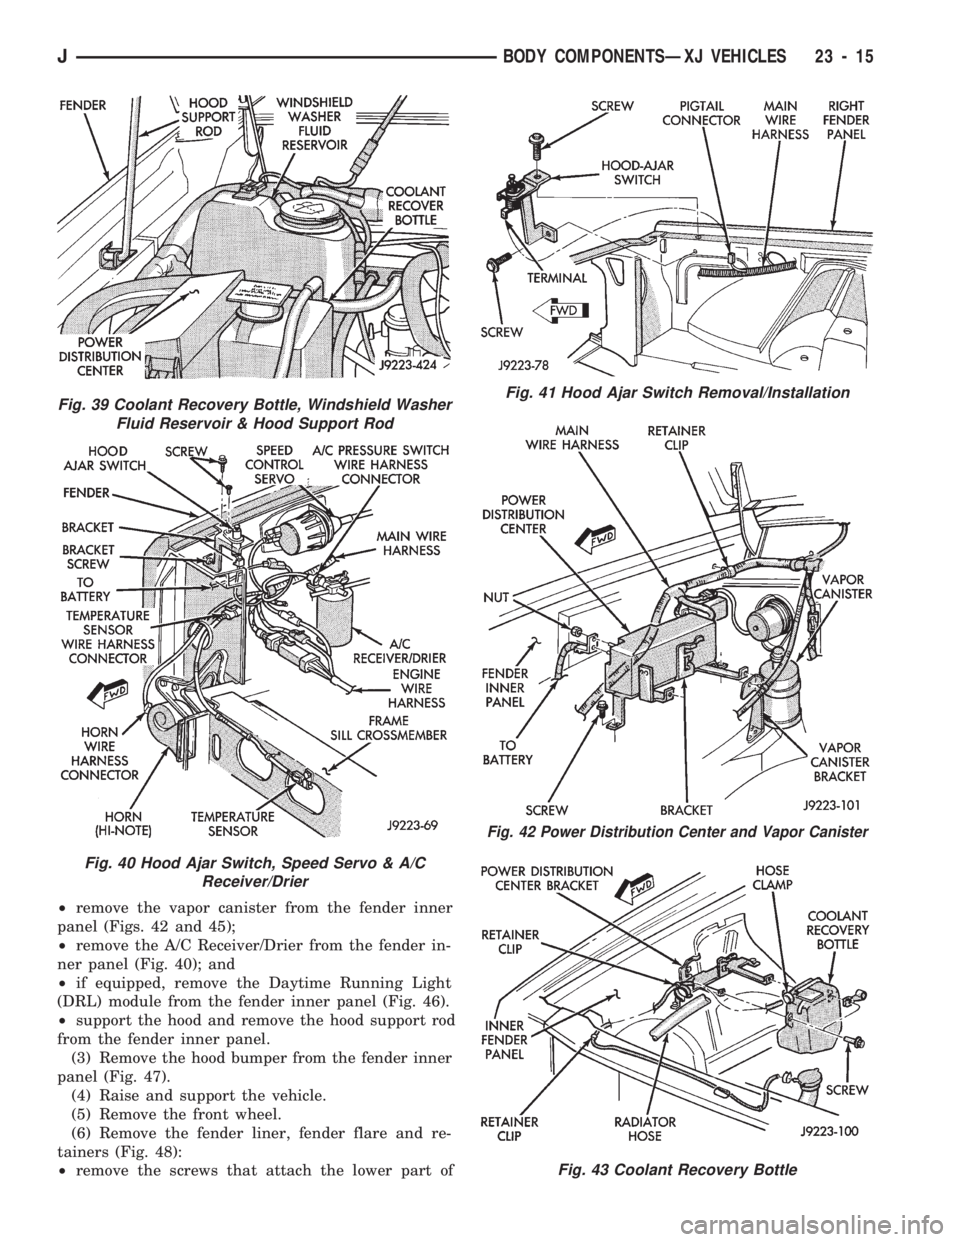
²remove the vapor canister from the fender inner
panel (Figs. 42 and 45);
²remove the A/C Receiver/Drier from the fender in-
ner panel (Fig. 40); and
²if equipped, remove the Daytime Running Light
(DRL) module from the fender inner panel (Fig. 46).
²support the hood and remove the hood support rod
from the fender inner panel.
(3) Remove the hood bumper from the fender inner
panel (Fig. 47).
(4) Raise and support the vehicle.
(5) Remove the front wheel.
(6) Remove the fender liner, fender flare and re-
tainers (Fig. 48):
²remove the screws that attach the lower part of
Fig. 41 Hood Ajar Switch Removal/Installation
Fig. 42 Power Distribution Center and Vapor Canister
Fig. 43 Coolant Recovery Bottle
Fig. 39 Coolant Recovery Bottle, Windshield Washer
Fluid Reservoir & Hood Support Rod
Fig. 40 Hood Ajar Switch, Speed Servo & A/C
Receiver/Drier
JBODY COMPONENTSÐXJ VEHICLES 23 - 15
Page 1473 of 1784

(15) Right fender only: install the A/C Receiver/
Drier on the fender inner panel.
(16) Right fender only: install the vapor canister
on the fender inner panel. Tighten the vapor canister
screws to 5 Nzm (45 in-lbs) torque.
(17) Right fender only: install the PDC, coolant recov-
ery bottle and speed servo on the fender inner panel.
(18) Right fender only: install the hood ajar switch,
if equipped. Tighten the screws to 2 Nzm (15 in-lbs)
torque.
(19) Right fender only: install the windshield
washer fluid reservoir on the inner panel (Fig. 39).
(20) Right fender only: install the battery tray and
battery on the inner panel.
(21) Right fender only: if equipped, install the ra-
dio antenna. Tighten the nut/escutcheon to 4.5 Nzm
(40 in-lbs) torque. Tighten the power antenna bracket
screws to 2 Nzm (20 in-lbs) torque.
REAR WHEELHOUSE FLARES AND LINERS
REMOVAL
(1) Remove the flare and liner lower screws.Fig. 50 Fender Flare & Retainers
Fig. 51 Fender Liner and Retainers
Fig. 52 Front Lamp Wire Harness Connectors
Fig. 53 Rear Wheelhouse Flare, Retainers and Liner
Fig. 54 Rear Wheelhouse LinerÐXJ Vehicles
23 - 18 BODY COMPONENTSÐXJ VEHICLESJ
Page 1597 of 1784
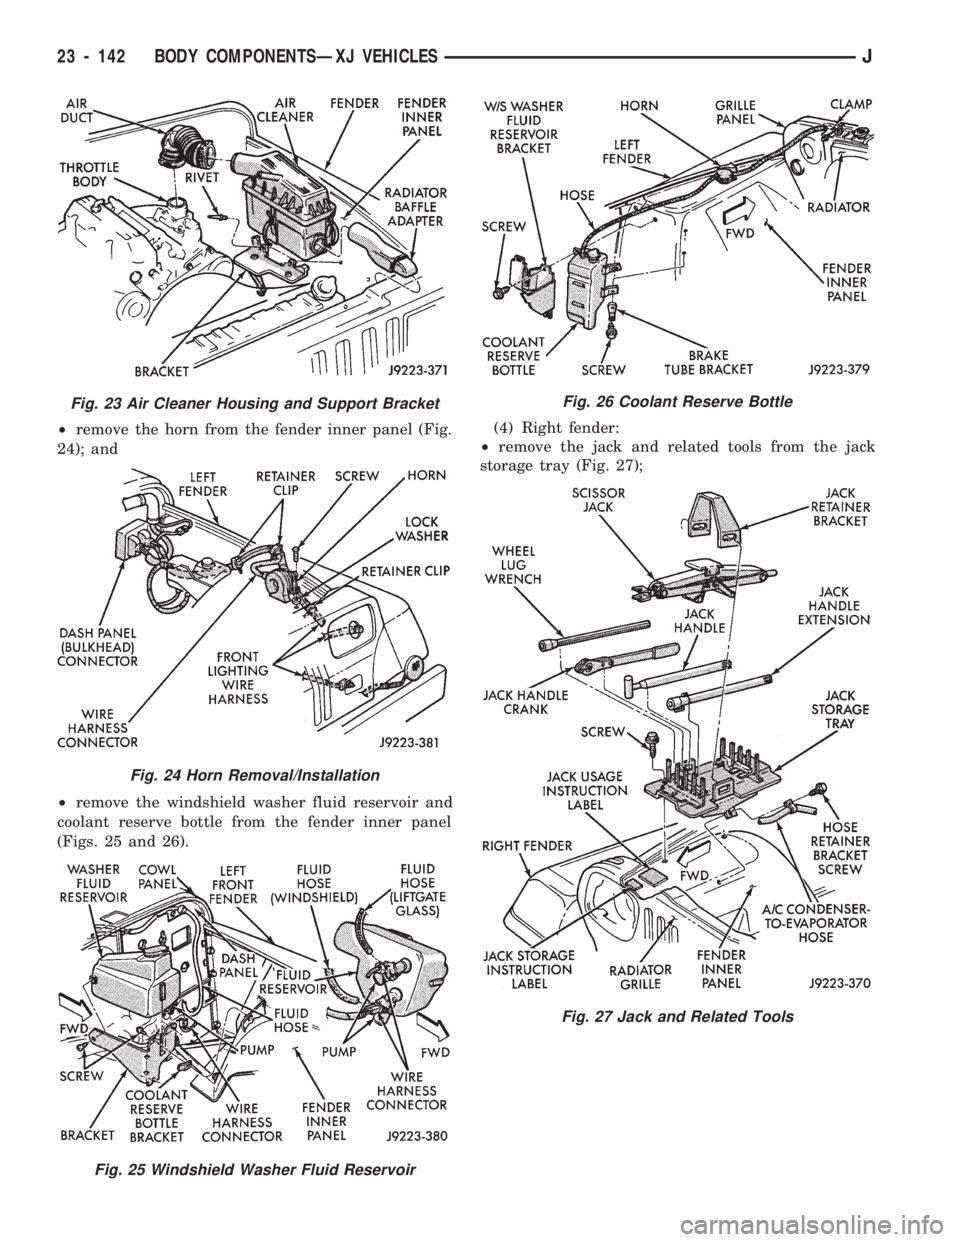
²remove the horn from the fender inner panel (Fig.
24); and
²remove the windshield washer fluid reservoir and
coolant reserve bottle from the fender inner panel
(Figs. 25 and 26).(4) Right fender:
²remove the jack and related tools from the jack
storage tray (Fig. 27);
Fig. 23 Air Cleaner Housing and Support Bracket
Fig. 24 Horn Removal/Installation
Fig. 25 Windshield Washer Fluid Reservoir
Fig. 26 Coolant Reserve Bottle
Fig. 27 Jack and Related Tools
23 - 142 BODY COMPONENTSÐXJ VEHICLESJ
Page 1599 of 1784
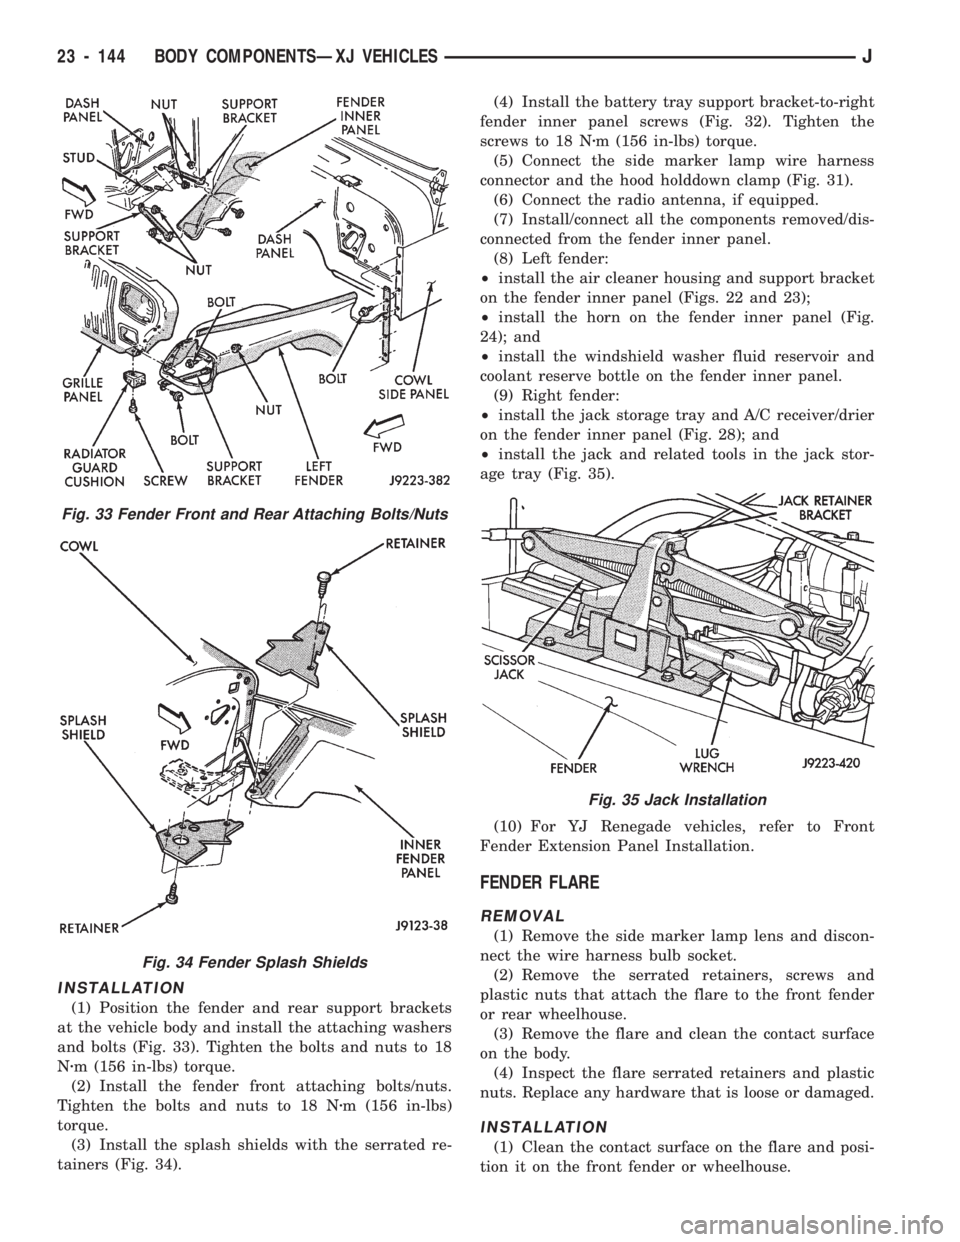
INSTALLATION
(1) Position the fender and rear support brackets
at the vehicle body and install the attaching washers
and bolts (Fig. 33). Tighten the bolts and nuts to 18
Nzm (156 in-lbs) torque.
(2) Install the fender front attaching bolts/nuts.
Tighten the bolts and nuts to 18 Nzm (156 in-lbs)
torque.
(3) Install the splash shields with the serrated re-
tainers (Fig. 34).(4) Install the battery tray support bracket-to-right
fender inner panel screws (Fig. 32). Tighten the
screws to 18 Nzm (156 in-lbs) torque.
(5) Connect the side marker lamp wire harness
connector and the hood holddown clamp (Fig. 31).
(6) Connect the radio antenna, if equipped.
(7) Install/connect all the components removed/dis-
connected from the fender inner panel.
(8) Left fender:
²install the air cleaner housing and support bracket
on the fender inner panel (Figs. 22 and 23);
²install the horn on the fender inner panel (Fig.
24); and
²install the windshield washer fluid reservoir and
coolant reserve bottle on the fender inner panel.
(9) Right fender:
²install the jack storage tray and A/C receiver/drier
on the fender inner panel (Fig. 28); and
²install the jack and related tools in the jack stor-
age tray (Fig. 35).
(10) For YJ Renegade vehicles, refer to Front
Fender Extension Panel Installation.
FENDER FLARE
REMOVAL
(1) Remove the side marker lamp lens and discon-
nect the wire harness bulb socket.
(2) Remove the serrated retainers, screws and
plastic nuts that attach the flare to the front fender
or rear wheelhouse.
(3) Remove the flare and clean the contact surface
on the body.
(4) Inspect the flare serrated retainers and plastic
nuts. Replace any hardware that is loose or damaged.
INSTALLATION
(1) Clean the contact surface on the flare and posi-
tion it on the front fender or wheelhouse.
Fig. 33 Fender Front and Rear Attaching Bolts/Nuts
Fig. 34 Fender Splash Shields
Fig. 35 Jack Installation
23 - 144 BODY COMPONENTSÐXJ VEHICLESJ
Page 1763 of 1784

REMOVAL (XJ WITH MINI CONSOLE),
PARKING BRAKE LEVER................5-58
REMOVAL (XJ WITHOUT CONSOLE),
PARKING BRAKE LEVER................5-60
REMOVALÐYJ, HCU....................5-54
REMOVAL (YJ), PARKING BRAKE PEDAL....5-61
REMOVAL/DISASSEMBLY, PINION;
FRONT SUSPENSION AND AXLE..........2-34
REMOVAL/DISASSEMBLY, PINION; REAR
SUSPENSION AND AXLES...............3-17
REMOVAL/INSTALLATION, 2.5L STARTER
MOTOR.............................8B-5
REMOVAL/INSTALLATION, 4.0L
STARTER MOTOR.....................8B-6
REMOVAL/INSTALLATION, COMPONENT;
EMISSION CONTROL SYSTEMS..........25-8
REMOVAL/INSTALLATION, COMPONENT;
IGNITION SYSTEMS..................8D-20
REMOVAL/INSTALLATION, DOOR..........23-40
REMOVAL/INSTALLATION, LIFTGATE.......23-65
REMOVAL/INSTALLATION, MULTI-PORT
FUEL INJECTION (MFI)ÐCOMPONENT....14-54
RENEGADE VEHICLES, BODY EXTENSION
PANELS AND FASCIASÐYJ............23-147
RENEGADE VEHICLES, FOG LAMPÐYJ....23-150
RENEGADE VEHICLES, FRONT FASCIA
AND SKID PLATEÐYJ................23-148
RENEGADE VEHICLES, FRONT FENDER
EXTENSION PANELÐYJ..............23-149
RENEGADE VEHICLES, REAR FASCIA
AND SKID PLATEÐYJ................23-152
RENEGADE VEHICLES, REAR QUARTER
EXTENSION PANELÐYJ..............23-151
RENEGADE VEHICLES, ROCKER
EXTENSION PANELÐYJ..............23-150
REPAIR DAMAGED OR WORN THREADS......9-4
REPAIR, FIXED GLASS WATER LEAK
DETECTION...................23-83,23-189
REPAIR, HARD TOP...................23-165
REPAIR ON GALVANIZED METALS, PAINT . . 23-202
REPAIR PROCEDURES, COMPASS..........8C-4
REPAIR PROCEDURES, CONSOLE..........8C-6
REPAIR PROCEDURES, THERMOMETER
AND SENSOR SYSTEM.................8C-6
REPAIR, REAR WINDOW DEFOGGER GRID . . . 8N-2
REPAIR SERVICE, FRAME...............13-13
REPAIR, WIRING.......................8W-4
REPAIRING LEAKS......................22-3
REQUIREMENTS, AW-4 CLUTCH AND
BRAKE PACK.......................21-328
REQUIREMENTS, FUEL....................0-2
RESERVE/OVERFLOW SYSTEM, COOLANT . . . 7-19
RESERVOIR REPLACEMENT..............19-12
RESISTANCE, IGNITION COIL............8D-11
RESISTANCE (OHMS), SENSOR.....8D-12,8D-14
RESISTANCE (OHMS)ÐCOOLANT
TEMPERATURE SENSOR/MANIFOLD AIR
TEMPERATURE, SENSOR..............14-43
RESISTANCE, SPARK PLUG CABLE........8D-18
RESISTORS REPLACEMENT, BLOWER
MOTOR............................24-35
RESPONSE IN ANTILOCK MODE, VEHICLE....5-3
RESPONSE, STEERING....................5-3
RESTRAINT REPLACEMENT, DOOR........23-47
RETAINER AND PISTON SPECIFICATIONS,
AW-4 .............................21-327
RETAINER CLIP, FUEL AND BRAKE FLUID
TUBE; BODY COMPONENTSÐXJ
VEHICLES..........................23-86
RETAINER CLIP, FUEL AND BRAKE
FLUID TUBE; FRAME AND BUMPERS.....13-16
RETAINING BRACKET, REARVIEW
MIRROR..........................23-183
RETURN HOSE REPLACEMENT,
PRESSURE..........................19-9
RETURNÐPCM INPUT, SENSOR..........14-23
REVEAL MOULDING, WINDSHIELD . . 23-73,23-183
REVERSE FLUSHING, TRANSMISSION
COOLER...........................21-105
REVERSE, HYDRAULIC FLOW IN..........21-95
RHD MODELS, BELT TENSIONÐEXCEPT.....7-38
RHD SPLICE LOCATIONS, XJ
............8W-67
RHD, STEERING
.......................19-69
RHD, XJ WIRING
......................8W-43
RHEOSTAT, HEADLAMP
SWITCH/ILLUMINATION
...............8E-21RIGHT HAND DRIVE, BELT SERVICEÐ
EXCEPT.............................7-34
RIGHT HAND DRIVE, BELT SERVICEÐ
WITH...............................7-35
RIGHT HAND DRIVE, DRIVERS DOOR
POWER LOCK SWITCHÐ2-DOOR.........8P-3
RIGHT HAND DRIVE, DRIVERS DOOR
POWER WINDOW SWITCHÐ2-DOOR......8S-7
RIGHT HAND DRIVE (RHD), BELT
TENSIONÐEXCEPT....................7-33
RIGHT HAND DRIVE VEHICLES............23-1
RIGHT (R) POSITION, SWITCH TEST
WITH SWITCH IN.....................8T-3
RING CHARTÐAX 15 MANUAL
TRANSMISSION, SELECTIVE SNAP......21-321
RING GEAR INSTALLATION...............3-24
RING/THRUST WASHER/THRUST PLATE
SPECIFICATIONS, 30RH/32RH SNAP.....21-322
ROAD TEST, ANALYZING THE.............21-70
ROAD TEST, OPERATIONAL CHECK.........8H-7
ROAD TEST; TRANSMISSION AND
TRANSFER CASE.....................21-70
ROAD TEST; VEHICLE SPEED CONTROL
SYSTEM............................8H-5
ROAD TESTING.........................5-7
ROCKER ARMS....................9-19,9-59
ROCKER EXTENSION PANELÐYJ
RENEGADE VEHICLES................23-150
ROD AND PAWL SERVICE, PARK.........21-181
ROD BALL STUD REPLACEMENT,
LIFTGATE SUPPORT..................23-70
ROD BEARING FITTING CHART,
CONNECTING.....................9-36,9-76
ROD CYLINDER DISPOSAL, LIFTGATE
SUPPORT..........................23-70
ROD CYLINDER, LIFTGATE SUPPORT......23-69
ROD, TIE.......................19-14,19-17
RODS, DOOR INSIDE LATCH RELEASE
AND LOCK..........................23-57
RODS, PISTONS AND CONNECTING....9-34,9-74
ROOF VENT, HARD TOP................23-165
ROTATION, TIRES.......................22-3
ROTOR, DISTRIBUTOR.................8D-10
ROTOR, IGNITION CABLES, DISTRIBUTOR
CAP ................................0-18
ROTOR INSTALLATION...................5-30
ROTOR REFINISHING, DISC BRAKE.........5-32
ROTOR REMOVAL......................5-30
ROTOR RUNOUT, DISC BRAKE............5-31
ROTORÐSPEEDOMETER DRIVE GEAR,
SPEED SENSOR.....................21-183
ROTOR THICKNESS, DISC BRAKE..........5-31
ROTOR THICKNESS VARIATION, DISC
BRAKE..............................5-31
ROUGH AND/OR HAS A MISS, INJECTOR
DIAGNOSISÐVEHICLE RUNS...........14-49
ROUTINE SERVICE.......................0-2
ROUTING SCHEMATICÐ2.5L 4 CYLINDER
ENGINE, VACUUM.....................25-2
ROUTING SCHEMATICÐ4.0L 6 CYLINDER
ENGINE, VACUUM.....................25-3
ROUTING SCHEMATICS, VACUUM HOSE.....25-1
ROUTING, SYSTEM COOLANT..............7-1
RUBBER AND PLASTIC DUCTS/HOSES/
TUBING.............................0-19
RUBBER AND PLASTIC HOSES/
TUBING.............................0-28
RUNNING LIGHTS (CANADA ONLY),
DAYTIME...........................8L-16
RUNOUT..............................16-4
RUNOUT, DISC BRAKE ROTOR............5-31
RUNOUT SPECIFICATIONS................16-4
RUNOUT, TIRE AND WHEEL...............22-8
RUNS ROUGH AND/OR HAS A MISS,
INJECTOR DIAGNOSISÐVEHICLE........14-49
SAFETY CERTIFICATION LABEL, VEHICLE . INTRO.-1
SAFETY LATCH, HOOD.................23-139
SAFETY LATCH STRIKER REPLACEMENT . . . 23-10
SAFETY PRECAUTIONS................23-200
SAFETY PRECAUTIONS, BRAKE.............5-2
SAFETY PRECAUTIONS, CLUTCH...........6-10
SCAN TOOL, DRB; COOLING SYSTEM
........7-5
SCAN TOOL, DRB; EMISSION CONTROL
SYSTEMS
...........................25-2
SCAN TOOL, DRB; FUEL SYSTEM
.........14-51
SCAN TOOL, DRB; IGNITION SYSTEMS
.....8D-10SCHEDULES, MAINTENANCE...............0-5
SCHEMATICÐ2.5L 4 CYLINDER ENGINE,
VACUUM ROUTING....................25-2
SCHEMATIC, AIR CONDITIONING..........24-25
SCHEMATIC, HEATING..................24-24
SCHEMATICÐ4.0L 6 CYLINDER ENGINE,
VACUUM ROUTING....................25-3
SCHEMATICS, BELT.....................7-34
SCHEMATICS, SYSTEM.................14-38
SCHEMATICS, VACUUM HOSE ROUTING.....25-1
SCI RECEIVEÐPCM INPUT..............14-22
SCI TRANSMITÐPCM OUTPUT...........14-26
SCREEN, COWL GRILLE...........23-11,23-139
SCREW ANCHOR AND BUMPER,
LIFTGATE LICENSE PLATE..............23-72
SCUFF PLATE/COWL SIDE TRIM PANELÐ
XJ VEHICLES, FRONT INNER..........23-114
SCUFF PLATESÐXJ VEHICLES,
INTERIOR TRIM PANELS..............23-112
SCUFF PLATESÐXJ VEHICLES, OUTER....23-118
SEAL AND BEARING, AXLE SHAFT.........3-15
SEAL AND BEARING SERVICE, AXLE
SHAFT,..............................3-31
SEAL, COWL WEATHERSTRIP...........23-139
SEALÐDRIVE PLATE SERVICE,
CONVERTERÐPUMP.................21-109
SEAL, FLOW CONTROL VALVE FITTING
O-RING............................19-12
SEAL, LIFTGATE OPENING
WEATHERSTRIP.....................23-70
SEAL REPLACEMENT, ADAPTER HOUSING . . 21-182
SEAL REPLACEMENT, INNER AXLE
SHAFT OIL...........................2-33
SEAL REPLACEMENT, LIFTGATE GLASS
WEATHERSTRIP....................23-163
SEAL REPLACEMENT, MANUAL VALVE
SHAFT............................21-178
SEAL REPLACEMENT, OIL PUMP.........21-189
SEAL REPLACEMENT, PINION; FRONT
SUSPENSION AND AXLE................2-23
SEAL REPLACEMENT, PINION; REAR
SUSPENSION AND AXLES...............3-32
SEAL REPLACEMENT, PINION SHAFT.......3-13
SEAL REPLACEMENT, PITMAN SHAFT......19-35
SEAL REPLACEMENT, TIMING CASE
COVER OIL
......................9-26,9-67
SEAL, TAILGATE WEATHERSTRIP
........23-161
SEAL, WINDSHIELD FRAME
WEATHERSTRIP
....................23-185
SEAL/CROSSMEMBER AIR DEFLECTOR,
COWL WEATHERSTRIP
................23-10
SEALS AND BEARING REPLACEMENT,
PITMAN SHAFT
......................19-32
SEALS, DOOR WINDOW GLASS AND
DOOR OPENING WEATHERSTRIP
........23-62
SEALS, FULL-METAL DOOR
WEATHERSTRIP
....................23-180
SEALSÐIN CAR REPLACEMENT, PITMAN
SHAFT
.............................19-21
SEALS, REAR MAIN OIL
..............9-44,9-84
SEALS, VALVE SPRINGS AND OIL
......9-21,9-62
SEAT BELT INDICATOR
...................8E-4
SEAT BELT REMINDER LAMP
............8E-16
SEAT COMPONENTS, POWER BUCKET
....23-106
SEAT CUSHIONÐXJ VEHICLES, REAR
.....23-107
SEAT CUSHION AND COVER, BUCKET
......23-98
SEAT CUSHION COVERÐXJ VEHICLES,
REAR
.............................23-107
SEAT CUSHION RECONDITIONINGÐXJ
VEHICLES, REAR
....................23-108
SEAT MOTOR REPLACEMENT, POWER
......8R-2
SEAT PLATFORM AND TRACKS, BUCKET
. . . 23-105
SEAT, POWER
..........................8A-1
SEATBACK COVERÐXJ VEHICLES, REAR
. . 23-111
SEATBACK COVER AND FRAME, BUCKET
. . 23-100
SEATBACK LATCH STRIKER AND
BUMPERÐXJ VEHICLES, REAR
........23-111
SEATBACK RECONDITIONING, BUCKET
....23-102
SEATBACK RECONDITIONINGÐXJ
VEHICLES, REAR
....................23-111
SEATBACKÐXJ VEHICLES, REAR
........23-109
SEATS
..............................23-195
SEATS, FRONT BUCKET
.................23-97
JINDEX19
Description Group-Page Description Group-Page Description Group-Page