engine JEEP CHEROKEE 2015 KL / 5.G Repair Manual
[x] Cancel search | Manufacturer: JEEP, Model Year: 2015, Model line: CHEROKEE, Model: JEEP CHEROKEE 2015 KL / 5.GPages: 772, PDF Size: 18.21 MB
Page 404 of 772
& Locks, Auto-On Comfort, Engine Off Options, Audio,
Phone/Bluetooth®, SiriusXM Setup, Restore Settings,
Clear Personal Data, and System Information.
NOTE:Only one category may be selected at a time.
To adjust the setting of a programmable feature, press the
desired setting option. Once in the desired setting option,
press and release the preferred setting until a check-mark
appears next to the setting, showing that the setting has
been selected.
Once the setting is complete, press the Back Arrow
button on the touchscreen to return to the previous menu
or press the X button on the touchscreen to close out of
the settings screen. Pressing the Up or Down Arrow
button on the right side of the screen will allow you to
toggle up or down through the list of available settings.
Display
After pressing the “Display” button on the touchscreen
the following settings will be available.
•Display Mode
When in this display you may select one of the auto
display settings. To change Mode status, select from
“Day,” “Night” or “Auto” until a check-mark appears
next to the setting, showing that setting has been se-
lected. Then press the arrow back button on the touch-
screen.
NOTE:When Day or Night is selected for the Display
Mode, the usage of the Parade Mode feature will cause
the radio to activate the Display Brightness Day control
even though the headlights are on.
402 UNDERSTANDING YOUR INSTRUMENT PANEL
Page 413 of 772
had been selected. Press the back arrow button on the
touchscreen to return to the previous menu.
•Hill Start Assist — If Equipped
When this feature is selected, the Hill Start Assist (HSA)
system is active. Refer to “Electronic Brake Control
System” in “Starting And Operating” for system function
and operating information. To make your selection, press
the “Hill Start Assist” button on the touchscreen, until a
check-mark appears next to setting, indicating that the
setting had been selected. Press the back arrow button on
the touchscreen to return to the previous menu.
Lights
After pressing the Lights button on the touchscreen the
following settings will be available.
•Headlight Off Delay
When this feature is selected, it allows adjustment of the
amount of time the headlights remain on after the engine
is shut off. To change the Headlights Off Delay setting,
press the “+” or “-” button on the touchscreen to select
your desired time interval, and choose either 0 sec, 30 sec,
60 sec or 90 seconds. Press the back arrow button on the
touchscreen to return to the previous menu, or push the
back button on the faceplate.
•Headlight Illumination On Approach
When this feature is selected, the headlights will activate
and remain on for 0, 30, 60, or 90 seconds when the doors
are unlocked with the Remote Keyless Entry (RKE)
transmitter. To change the Illuminated Approach status,
press the “+” or “–” button on the touchscreen to select
your desired time interval. Press the back arrow button
on the touchscreen to return to the previous menu, or
push the back button on the faceplate.
4
UNDERSTANDING YOUR INSTRUMENT PANEL 411
Page 418 of 772
NOTE:The seat will return to the memorized seat
location (if Recall Memory with Remote Key Unlock is set
to ON) when the Remote Keyless Entry (RKE) transmitter
is used to unlock the door. Refer to “Driver Memory
Seat” in “Understanding The Features Of Your Vehicle”
for further information.
•Power Lift Gate Chime — If Equipped
This feature plays an alert when the power lift gate is
raising or lowering. To make your selection, press the
“Power Lift Gate Chime” button on the touchscreen, until
a check-mark appears next to setting, showing that
setting has been selected. Press the back arrow button on
the touchscreen to return to the previous menu, or push
the back button on the faceplate.
Auto-On Comfort — If Equipped
After pressing the “Auto-On Comfort” button on the
touchscreen the following settings will be available:
•Auto-On Driver Heated/Ventilated Seat & Steering
Wheel With Vehicle Start — If Equipped
When this feature is selected the driver’s heated seat will
automatically turn on when temperatures are below 40° F
(4.4° C). When temperatures are above 80° F (26.7° C) the
driver vented seat will turn on. To make your selection,
press the “Auto-On Driver Heated/Ventilated Seat &
Steering Wheel With Vehicle Start” button on the touch-
screen, then select either “Off,” “Remote Start” or “All
Starts” until a check-mark appears next to setting, show-
ing that setting has been selected. Press the back arrow/
Done button on the touchscreen to return to the previous
menu.
Engine Off Options
After pressing the Engine Off Options button on the
touchscreen the following settings will be available.
416 UNDERSTANDING YOUR INSTRUMENT PANEL
Page 419 of 772
•Easy Exit Seat — If Equipped
This feature provides automatic driver seat positioning to
enhance driver mobility when entering and exiting the
vehicle. To make your selection, press the “Easy Exit
Seat” button on the touchscreen until a check-mark
appears next to setting, showing that setting has been
selected. Press the back arrow button on the touchscreen
to return to the previous menu.
•Engine Off Power Delay
When this feature is selected, the power window
switches, radio, Uconnect® phone system (if equipped),
DVD video system (if equipped), power sunroof (if
equipped), and power outlets will remain active for up to
10 minutes after the ignition is cycled to OFF. Opening
either front door will cancel this feature. To change the
Engine Off Power Delay status press the press the “+” or
“-” button to choose from “0 seconds,” “45 seconds,” “5
minutes,” or “10 minutes.” Press the back arrow button
on the touchscreen to return to the previous menu.
•Headlight Off Delay
When this feature is selected, the driver can choose to
have the headlights remain on for 0, 30, 60, or 90 seconds
when exiting the vehicle. To change the Headlight Off
Delay status press the “+” or “-” button on the touch-
screen to select your desired time interval. Press the back
arrow button on the touchscreen to return to the previous
menu.
Audio
After pressing the “Audio” button on the touchscreen the
following settings will be available.
•Balance/Fade
This feature allows you to adjust the Balance and Fade
settings. Press and drag the speaker icon, use the arrows
4
UNDERSTANDING YOUR INSTRUMENT PANEL 417
Page 433 of 772
•Activation By Rear Defrost
The wiper de-icer activates automatically when the Rear
Defrost is operating and theambient temperature is
below 40° F (4.4° C).
•Activation By Remote Start Operation
When the Remote Start is activated and theoutside
ambient temperature is less than 40° F (4.4° C)the
windshield wiper de-icer is activated. Upon exiting Re-
mote Start, the climate control functions will resume their
previous operation except, if the de-icer is active, the
de-icer timer and operation will continue.
Stop/Start System — If Equipped
While in an Autostop, the Climate Controls system may
automatically adjust airflow to maintain cabin comfort.
Customer settings will be maintained upon return to an
engine running condition.
Manual Climate Controls With Touchscreen — If
Equipped
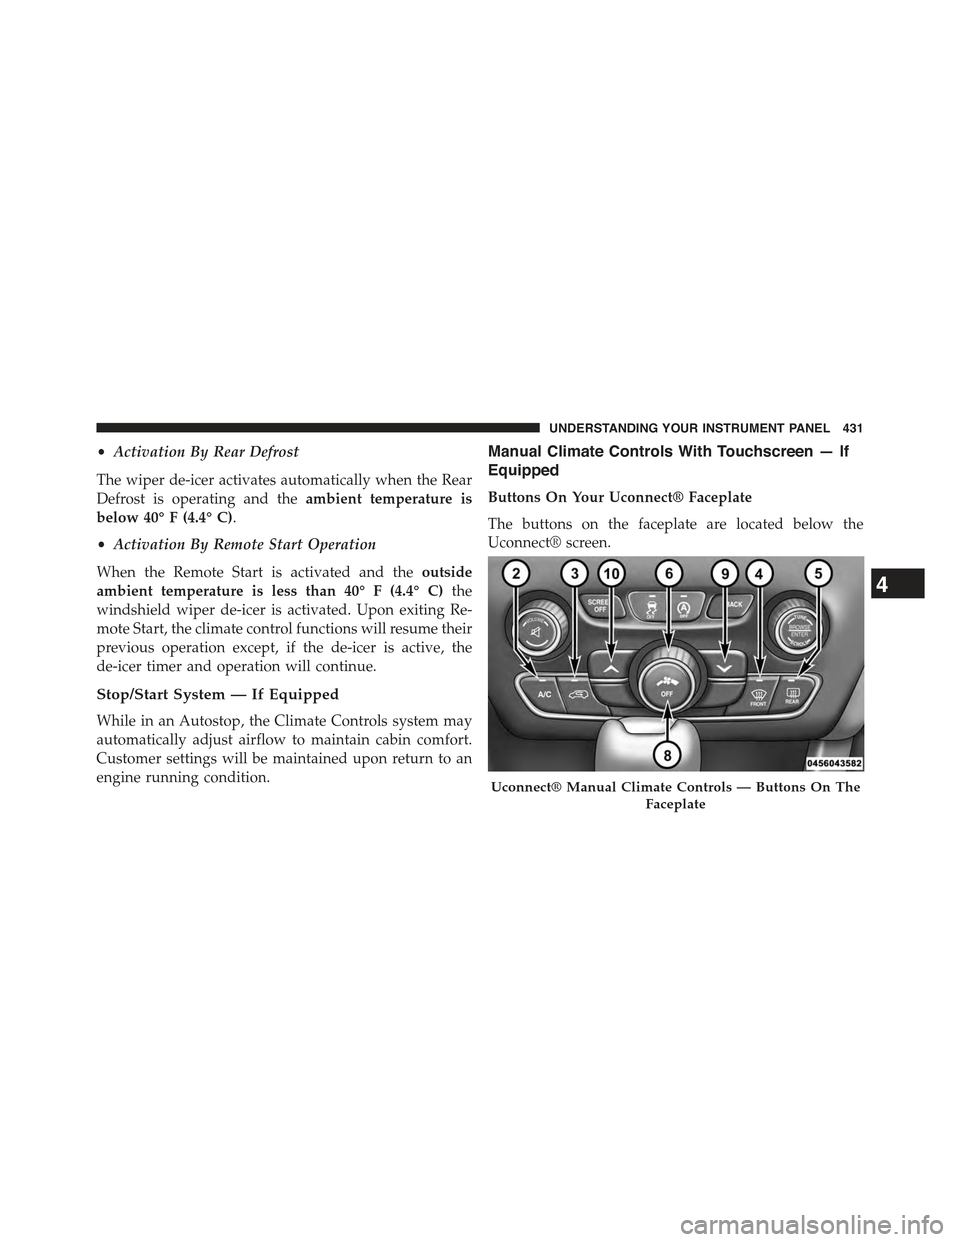
Buttons On Your Uconnect® Faceplate
The buttons on the faceplate are located below the
Uconnect® screen.
Uconnect® Manual Climate Controls — Buttons On The
Faceplate
4
UNDERSTANDING YOUR INSTRUMENT PANEL 431
Page 448 of 772
3. When the system is set up for your comfort level, it is
not necessary to change the temperature. You will
experience the greatest efficiency by simply allowing
the system to function automatically.
NOTE:
•It is not necessary to move the temperature settings.
The system automatically adjusts the temperature,
mode, and blower speed to provide comfort as quickly
as possible.
•The temperature can be displayed in U.S. or Metric
units by selecting the Uconnect® customer-
programmable feature. Refer to the “Uconnect® Sys-
tem Settings” in this section of the manual.
To provide you with maximum comfort in the Automatic
mode, during cold start-ups the blower fan will remain
on low until the engine warms up. The blower will
increase in speed and transition into Auto mode.
Manual Operation Override
The system allows for manual selection of blower speed,
air distribution mode, A/C status and recirculation con-
trol.
The blower fan speed can be set to any fixed speed by
adjusting the blower control. The fan will now operate at
a fixed speed until additional speeds are selected. This
allows the front occupants to control the volume of air
circulated in the vehicle and cancel the Auto mode.
The operator can also select the direction of the airflow
by selecting one of the available mode settings. A/C
operation and Recirculation control can also be manually
selected in Manual operation.
NOTE:Each of these features operates independently
from each other. If any feature is controlled manually,
temperature control will continue to operate automati-
cally.
446 UNDERSTANDING YOUR INSTRUMENT PANEL
Page 449 of 772
Operating Tips
NOTE:Refer to the chart at the end of this section for
suggested control settings for various weather condi-
tions.
Summer Operation
The engine cooling system must be protected with a
high-quality antifreeze coolant to provide proper corro-
sion protection and to protect against engine overheating.
A solution of 50% OAT (Organic Additive Technology)
coolant that meets the requirements of Chrysler Material
Standard MS-12106 and 50% water is recommended.
Refer to “Maintenance Procedures” in “Maintaining Your
Vehicle” for proper coolant selection.
Winter Operation
Use of the air Recirculation mode during winter months
is not recommended because it may cause window
fogging.
Vacation Storage
Any time you store your vehicle or keep it out of service
(i.e., vacation) for two weeks or more, run the air
conditioning system at idle for about five minutes in the
fresh air and high blower setting. This will ensure
adequate system lubrication to minimize the possibility
of compressor damage when the system is started again.
Window Fogging
Interior fogging on the windshield can be quickly re-
moved by turning the mode selector to Defrost. The
Defrost/Floor mode can be used to maintain a clear
windshield and provide sufficient heating. If side win-
dow fogging becomes objectionable, increase blower
speed to improve airflow and clearing of the side win-
dows. Vehicle windows tend to fog on the inside in mild
but rainy or humid weather.
4
UNDERSTANDING YOUR INSTRUMENT PANEL 447
Page 469 of 772
STARTING AND OPERATING
CONTENTS
!STARTING PROCEDURES — GASOLINE
ENGINES............................472
▫Normal Starting.......................472
▫Extreme Cold Weather
(Below –20°F Or−29°C)................473
▫Extended Park Starting..................473
▫If Engine Fails To Start.................474
▫After Starting........................475
!STOP/START SYSTEM — 3.2L ENGINE.......475
▫Automatic Mode......................475
▫Possible Reasons The Engine Does Not
AUTOSTOP . . . . . . . . . . . . . . . . . . . . . . . ..476
▫To Start The Engine While In Autostop Mode . .477
▫To Manually Turn Off The Stop/Start System . .479
▫To Manually Turn On The Stop/Start System . .479
▫System Malfunction....................479
!ENGINE BLOCK HEATER — IF EQUIPPED . . .480
!AUTOMATIC TRANSMISSION............481
▫Key Ignition Park Interlock...............483
▫Brake/Transmission Shift Interlock System . . .483
5
Page 472 of 772
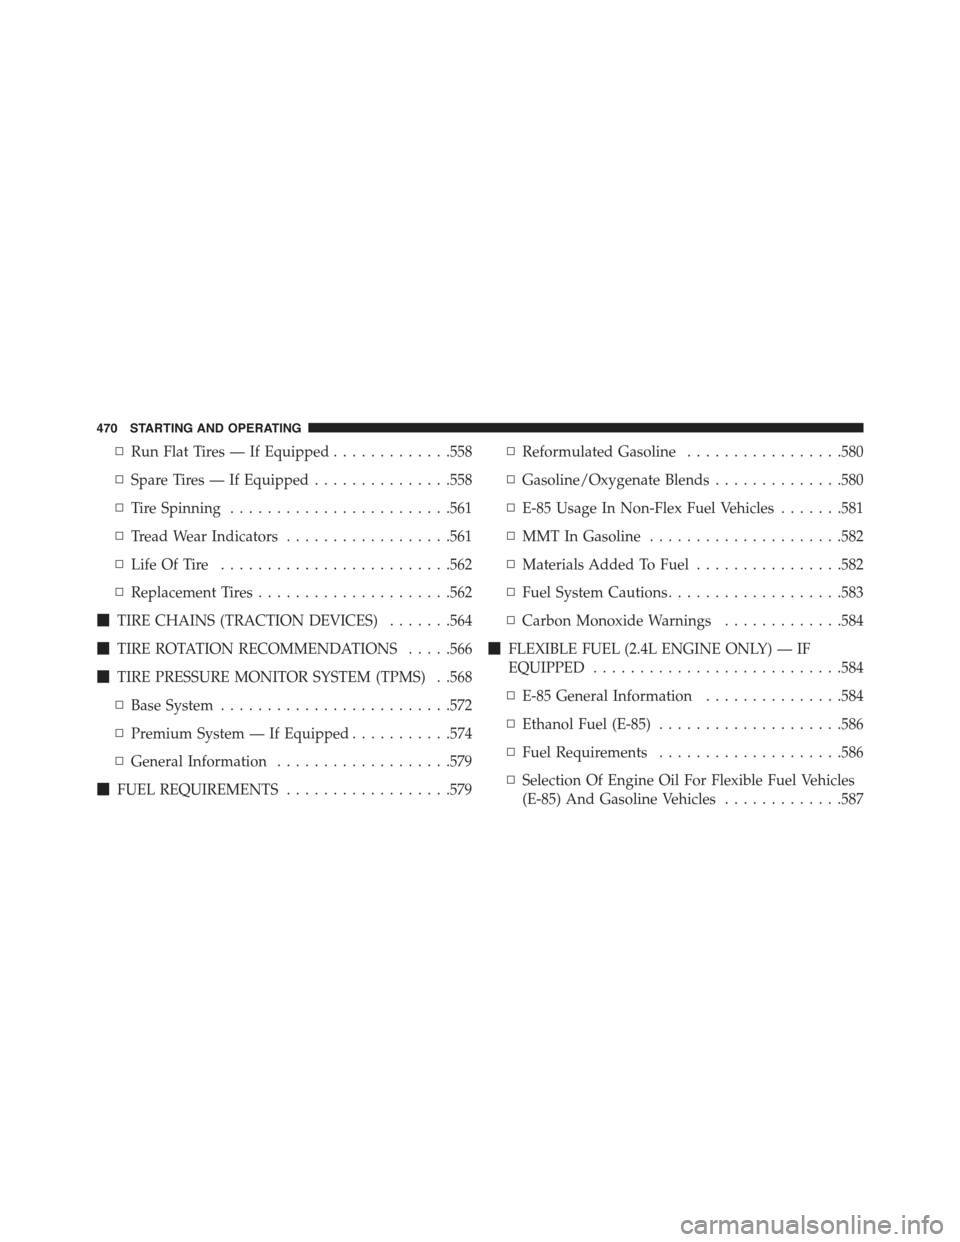
▫Run Flat Tires — If Equipped.............558
▫Spare Tires — If Equipped...............558
▫Tire Spinning........................561
▫Tread Wear Indicators..................561
▫Life Of Tire.........................562
▫Replacement Tires.....................562
!TIRE CHAINS (TRACTION DEVICES).......564
!TIRE ROTATION RECOMMENDATIONS.....566
!TIRE PRESSURE MONITOR SYSTEM (TPMS) . .568
▫Base System.........................572
▫Premium System — If Equipped...........574
▫General Information...................579
!FUEL REQUIREMENTS..................579
▫Reformulated Gasoline.................580
▫Gasoline/Oxygenate Blends..............580
▫E-85 Usage In Non-Flex Fuel Vehicles.......581
▫MMT In Gasoline.....................582
▫Materials Added To Fuel................582
▫Fuel System Cautions...................583
▫Carbon Monoxide Warnings.............584
!FLEXIBLE FUEL (2.4L ENGINE ONLY) — IF
EQUIPPED...........................584
▫E-85 General Information...............584
▫Ethanol Fuel (E-85)....................586
▫Fuel Requirements....................586
▫Selection Of Engine Oil For Flexible Fuel Vehicles
(E-85) And Gasoline Vehicles.............587
470 STARTING AND OPERATING
Page 474 of 772
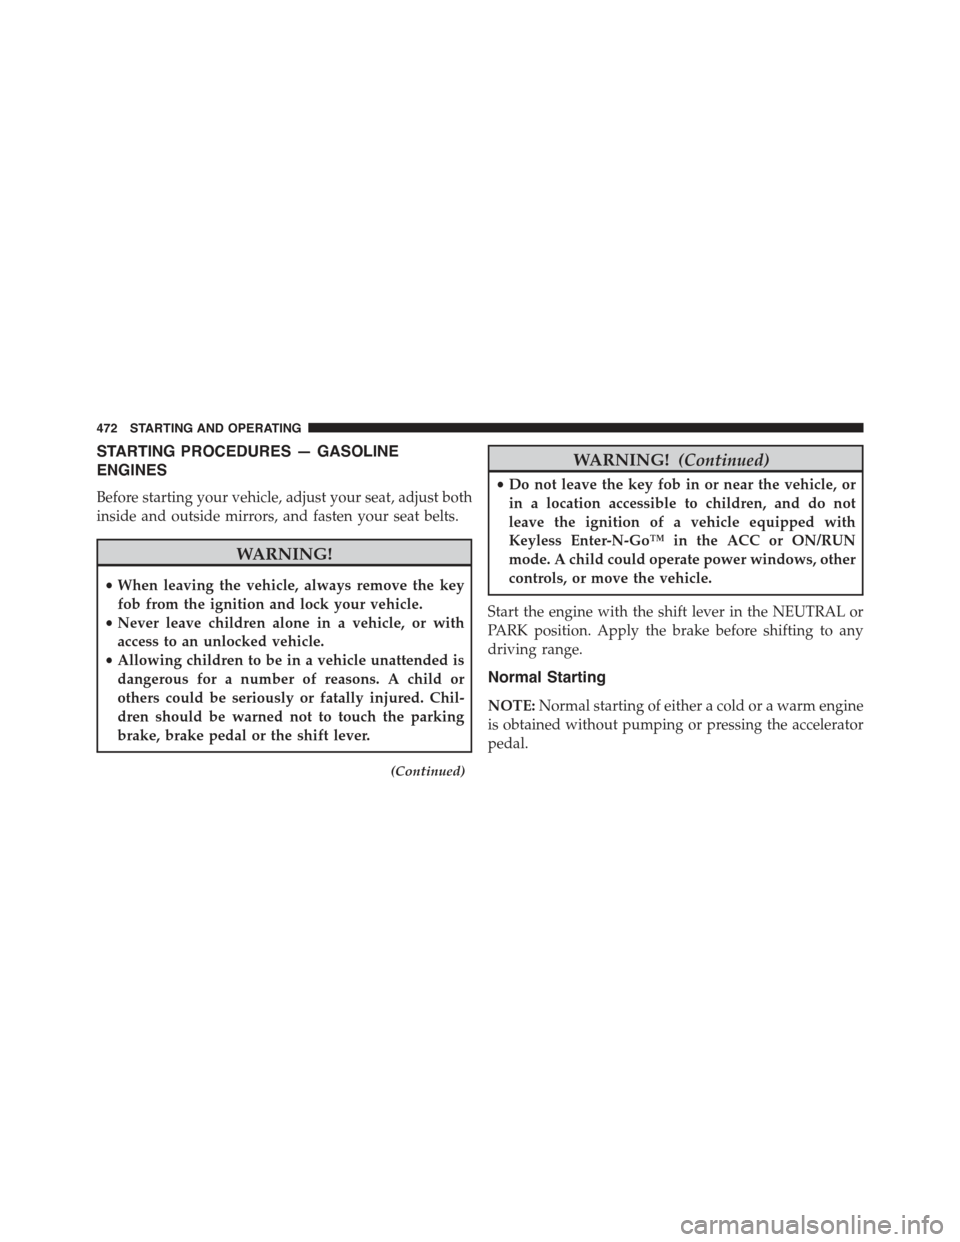
STARTING PROCEDURES — GASOLINE
ENGINES
Before starting your vehicle, adjust your seat, adjust both
inside and outside mirrors, and fasten your seat belts.
WARNING!
•When leaving the vehicle, always remove the key
fob from the ignition and lock your vehicle.
•Never leave children alone in a vehicle, or with
access to an unlocked vehicle.
•Allowing children to be in a vehicle unattended is
dangerous for a number of reasons. A child or
others could be seriously or fatally injured. Chil-
dren should be warned not to touch the parking
brake, brake pedal or the shift lever.
(Continued)
WARNING!(Continued)
•Do not leave the key fob in or near the vehicle, or
in a location accessible to children, and do not
leave the ignition of a vehicle equipped with
Keyless Enter-N-Go™ in the ACC or ON/RUN
mode. A child could operate power windows, other
controls, or move the vehicle.
Start the engine with the shift lever in the NEUTRAL or
PARK position. Apply the brake before shifting to any
driving range.
Normal Starting
NOTE:Normal starting of either a cold or a warm engine
is obtained without pumping or pressing the accelerator
pedal.
472 STARTING AND OPERATING