clock JEEP CHEROKEE 2015 KL / 5.G User Guide
[x] Cancel search | Manufacturer: JEEP, Model Year: 2015, Model line: CHEROKEE, Model: JEEP CHEROKEE 2015 KL / 5.GPages: 244, PDF Size: 30.6 MB
Page 91 of 244
Clock Setting
To start the clock setting procedure:
1. Push the MORE button on the faceplate. Next press the “Settings” button on the
touchscreen and then press the “Clock and Date” button on the touchscreen.
2. Press the “Set Time & Format” button on the touchscreen.
3. Press the “Up” or “Down” arrows to adjust the hours or minutes, next select the
“AM” or “PM” button on the touchscreen. You can also select 12hr or 24hr
format by pressing the desired button on the touchscreen.
4. Once the time is set press the “Done” button on the touchscreen to exit the time
screen.
NOTE:
In the Clock Setting Menu you can also select Display Clock. Display Clock turns the
clock display in the status bar on or off.
Equalizer, Balance And Fade
1. Push the MORE button on the faceplate, then press the “Settings” button on the
touchscreen.
2. Then scroll down and press the “Audio” button on the touchscreen to get to the
Audio menu.
3. The Audio Menu shows the following options for you to customize your audio
settings.
Equalizer
• Press the “Equalizer” button on the touchscreen to adjust the Bass, Mid and
Treble. Use the “+” or “–” button on the touchscreen to adjust the equalizer to your
desired settings. Press the “back arrow” button on the touchscreen when done.
Balance/Fade
• Press the “Balance/Fade” button on the touchscreen to adjust the sound from the
speakers. Use the “arrow” button on the touchscreen to adjust the sound level
from the front and rear or right and left side speakers. Press the Center “C” button
on the touchscreen to reset the balance and fade to the factory setting. Press the
“back arrow” button on the touchscreen when done.
Speed Adjustable
• Press the “Speed Adjusted Volume” button on the touchscreen to select between
OFF, 1, 2 or 3. This will decrease the radio volume relative to a decrease in vehicle
speed. Press the “back arrow” button on the touchscreen when done.
Loudness
• Press the “Loudness” button on the touchscreen to select the Loudness feature.
When this feature is activated it improves sound quality at lower volumes. Press
the “back arrow” button on the touchscreen when done.
ELECTRONICS
89
Page 102 of 244
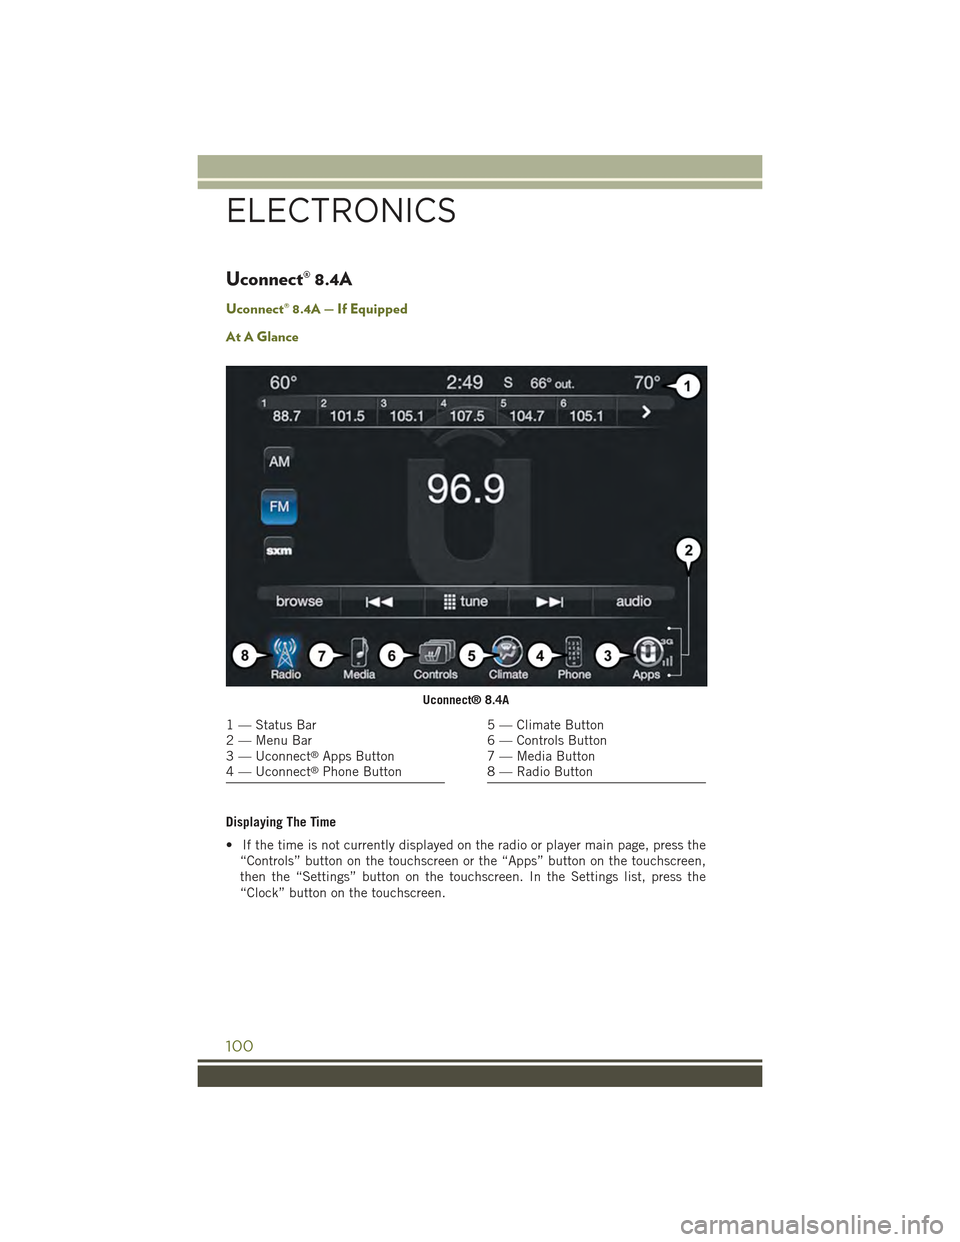
Uconnect® 8.4A
Uconnect® 8.4A — If Equipped
At A Glance
Displaying The Time
• If the time is not currently displayed on the radio or player main page, press the
“Controls” button on the touchscreen or the “Apps” button on the touchscreen,
then the “Settings” button on the touchscreen. In the Settings list, press the
“Clock” button on the touchscreen.
Uconnect® 8.4A
1 — Status Bar2 — Menu Bar3 — Uconnect®Apps Button4 — Uconnect®Phone Button
5 — Climate Button6 — Controls Button7 — Media Button8 — Radio Button
ELECTRONICS
100
Page 103 of 244
Setting The Time
Model 8.4AN synchronizes time automatically via GPS, so it should not require any
time adjustment. If you do need to set the time manually, follow the instructions
below for Model 8.4A.
1. Turn the unit on, then press the “Time Display” at the top of the screen. Press
“Yes.”
NOTE:
If the time is not displayed at the top of the screen, press the “Controls” or the
“Apps” button on the touchscreen, then the “Settings” button on the touchscreen.
In the Settings screen, press the “Clock” button on the touchscreen.
2. Press “+” or “–” next to Set Time Hours and Set Time Minutes to adjust the time.
3. If these features are not available, uncheck the Sync with GPS box.
4. Press “X” to save your settings and exit out of the Clock Setting screen.
Audio Settings
1. Press the “Media” or “Radio” button on the touchscreen.
2. Press the “Audio” button on the touchscreen to activate the Audio settings screen
to adjust Balance/Fade, Equalizer and Speed Adjusted Volume.
3. You can return to the Radio screen by pressing the “X” located at the top right.
Balance/Fade
1. Press the “Media” or “Radio” button on the touchscreen.
2. Press the “Audio” button on the touchscreen to activate the Audio settings screen
to adjust Balance/Fade, Equalizer and Speed Adjusted Volume.
3. Press the “Balance/Fade” button on the touchscreen to Balance audio between
the front speakers or fade the audio between the rear and front speakers.
4. Pressing the “Front,” “Rear,” “Left” or “Right” button on the touchscreens or
press and drag the Speaker Icon to adjust the Balance/Fade.
ELECTRONICS
101
Page 136 of 244
Displaying The Time
• If the time is not currently displayed on the radio or player main page, press the
“Controls” button on the touchscreen or the “Apps” button on the touchscreen,
then the “Settings” button on the touchscreen. In the Settings list, press the
“Clock” button on the touchscreen.
Setting The Time
Model 8.4AN synchronizes time automatically via GPS, so it should not require any
time adjustment. If you do need to set the time manually, follow the instructions
below for Model 8.4A.
1.Turn the unit on, then press the “Time Display” at the top of the screen. Press “Yes.”
NOTE:
If the time is not displayed at the top of the screen, press the “Controls” or the
“Apps” button on the touchscreen, then the “Settings” button on the touchscreen.
In the Settings screen, press the “Clock” button on the touchscreen.
2. Press “+” or “–” next to Set Time Hours and Set Time Minutes to adjust the time.
3. If these features are not available, uncheck the Sync with GPS box.
4. Press “X” to save your settings and exit out of the Clock Setting screen.
Audio Settings
1. Press the “Media” or “Radio” button on the touchscreen.
2. Press the “Audio” button on the touchscreen to activate the Audio settings screen
to adjust Balance/Fade, Equalizer and Speed Adjusted Volume.
3. You can return to the Radio screen by pressing the “X” located at the top right.
Balance/Fade
1. Press the “Media” or “Radio” button on the touchscreen.
2. Press the “Audio” button on the touchscreen to activate the Audio settings screen
to adjust Balance/Fade, Equalizer and Speed Adjusted Volume.
3. Press the “Balance/Fade” button on the touchscreen to Balance audio between
the front speakers or fade the audio between the rear and front speakers.
4. Pressing the “Front,” “Rear,” “Left” or “Right” button on the touchscreens or
press and drag the Speaker Icon to adjust the Balance/Fade.
ELECTRONICS
134
Page 155 of 244
PROGRAMMABLE FEATURES
Uconnect® Customer Programmable Features
The Uconnect®system allows you to access Customer Programmable feature
settings such as Display, Clock, Safety & Driving Assistance, Lights, Doors & Locks,
Auto-On Comfort & Remote Start, Engine Off Operation, Compass Settings, Audio,
Trailer Brake, Phone/Bluetooth®, SiriusXM Setup and System Information through
buttons on the touchscreen.
• Press the SETTINGS button (Uconnect®5.0), or press the “Apps” button
(Uconnect®8.4) located near the bottom of the touchscreen, then press the
“Settings” button on the touchscreen to access the Settings screen. When making
a selection, scroll up or down until the preferred setting is highlighted, then press
and release the preferred setting until a check-mark appears next to the setting,
showing that setting has been selected. The following feature settings are
available:
• Display• Doors & Locks
• Safety & Driving Assistance• Engine Off Options
• Auto-On Comfort & Remote Start • Audio
• Phone/Bluetooth®• SiriusXM Setup
• Lights• Trailer Brake
• Compass (Uconnect®5.0)• System Information
• Units• Voice
• Clock
NOTE:
Depending on the vehicles options, feature settings may vary.
ELECTRONICS
153
Page 194 of 244
9. Position the spare wheel/tire on the vehicle and install lug bolts with the
cone-shaped end toward the wheel. Lightly tighten the bolts.
10. Lower the vehicle by turning the jack screw to the left, and remove the jack.
11. Finish tightening the lug bolts. Push down on the wrench while at the end of the
handle for increased leverage. Tighten the lug bolts in a star pattern until each
nut has been tightened twice. The correct wheel bolt tightness is 100 ft lb
(135 N·m). If in doubt about the correct tightness, have them checked with a
torque wrench by your authorized dealer or at a service station.
12. Lower the jack to it's fully closed position.
13. Secure the tire, jack, and tools in their proper locations.
14. Remove chocks from wheels.
Road Tire Installation
1. Mount the road tire on the axle.
2. Install the remaining lug bolts with the threaded end of the bolt toward the wheel.
Lightly tighten the lug bolts.
3. Lower the vehicle to the ground by turning the jack handle counterclockwise.
4. Finish tightening the lug bolts. Push down on the wrench while at the end of the
handle for increased leverage. Tighten the lug bolts in a star pattern until each
bolt has been tightened twice. The correct tightness of each lug bolt is 100 ft/lbs
(135 N·m). If in doubt about the correct tightness, have them checked with a
torque wrench by your authorized dealer or service station.
5. After 25 miles (40 km) check the lug bolt torque with a torque wrench to ensure
that all lug bolts are properly seated against the wheel.
CAUTION!
Do not attempt to raise the vehicle by jacking on locations other than those
indicated in the Jacking Instructions for this vehicle.
WHAT TO DO IN EMERGENCIES
192
Page 229 of 244
FREQUENTLY ASKED QUESTIONS
GETTING STARTED
• How do I install my LATCH Equipped Child Seat? pg. 27
• How do I program my Front Seat Memory? pg. 31
ELECTRONICS
• Which radio is in my vehicle?
• Uconnect®5.0 pg. 88
• Uconnect®8.4A pg. 100
• Uconnect®8.4AN pg. 133
• How do I activate the Audio Jack?
• Uconnect®5.0 pg. 88
• Uconnect®8.4A pg. 100
• Uconnect®8.4AN pg. 133
• How do I set the clock on my radio?
• Uconnect®5.0 pg. 88
• Uconnect®8.4A pg. 100
• Uconnect®8.4AN pg. 133
• How do I use the Navigation feature?
• Uconnect®8.4A pg. 100
• Uconnect®8.4AN pg. 133
• How do I pair my cell phone via Bluetooth®with the Uconnect®Hands-Free Voice
Activation System? pg. 147
• How do I configure my Universal Garage Door Opener (HomeLink®)? pg. 154
OFF-ROAD CAPABILITIES
• How do I shift into different four-wheel drive selections? pg. 162
UTILITY
• How do I know how much I can tow with my Jeep Cherokee? pg. 167
FAQ’s
227
Page 231 of 244
Access, Uconnect®...........71
Adaptive Cruise Control (ACC)
(Cruise Control)...........44
Adding Engine Coolant (Antifreeze)..208
Adding Washer Fluid.........208
Air Bag
Advanced Front Air Bag . . . . . .18
Advance Front Air Bag . . . . . .18
Air Bags . . . . . . . . . . . . . . .18
Air Bag Warning Light . . . .18, 174Front Air Bag . . . . . . . . . . . .18Rollover...............18Side Impacts . . . . . . . . . . . .18Air Cleaner, Engine (Engine AirCleaner Filter)...........208Air Conditioner Maintenance....208Air Conditioning.....49,50,53,55Air Conditioning Refrigerant.....208Air Conditioning System.......208AlarmArm The System..........13Disarm The System........13Vehicle Security Alarm......13Alarm, Panic . . . . . . . . . . . . . .12Alarm (Security Alarm).....13,180Antifreeze (Engine Coolant) . .206, 208Disposal..............208Anti-Lock Brake System (ABS) . . .173APPUconnect®Access.........73Appearance Care...........208Assistance Towing..........173Automatic Headlights......39,180Automatic High Beams........39Automatic TemperatureControl (ATC)............53Automatic TransmissionAdding Fluid...........207Fluid Type . . . . . . . . . . . .207Axle Fluid . . . . . . . . . . . . . . .207Axle Lubrication............207
Back-Up Camera............63Battery.................208Charging System Light.....173Body Mechanism Lubrication....208Brake Fluid..............207Brakes.................208
Brake System.............208
Fluid Check . . . . . . . . . . . .207
Master Cylinder.........208
Warning Light . . . . . . . . . .176
Break-In Recommendations,
New Vehicle.............38
Bulb Replacement..........222
Bulbs, Light..............222
Calibration, Compass.........152Capacities, Fluid...........206Caps, FillerOil (Engine) . . . . . . . . . . . .208Car Washes . . . . . . . . . . . . . .208Change Oil Indicator.........178Changing A Flat Tire . . . . . . . . .189Charging Pad, Wireless........159Charging System Light........173Check Engine Light (MalfunctionIndicator Light)..........177Child Restraint...........24,25Child RestraintsLower Anchors And TethersFor Children............25CleaningWheels..............208Windshield Wiper Blades....208Climate Control........49,50,53Clock...................89Clock Setting..............89Cluster Warning/Indicator LightsAir Bag Warning Light . . . . . .174Brake Warning Light.......176Electronic Speed Control ONIndicator..............180Electronic Speed Control SETIndicator.............180Front Fog Light Indicator....179High Beam Indicator......179Park/Headlight ON Indicator . .181Seat Belt Reminder Light....176Turn Signal Indicator......179Vehicle Security Light......180Clutch . . . . . . . . . . . . . . . . .208Clutch Fluid . . . . . . . . . . . . . .208Compact Spare Tire . . . . . . . . . .220Compass Calibration.........152Cooling System............208
INDEX
229