buttons JEEP CHEROKEE 2016 KL / 5.G Owner's Manual
[x] Cancel search | Manufacturer: JEEP, Model Year: 2016, Model line: CHEROKEE, Model: JEEP CHEROKEE 2016 KL / 5.GPages: 236, PDF Size: 11.24 MB
Page 106 of 236
Disc Operation (If Equipped)
• Your vehicle may have a remote CD player located in the lower center consolestorage bin, or in the lower center bench seat bin.
• CD/Disc Mode is entered by either inserting a CD/Disc or by pressing the MEDIA button. Once in Media Mode, select “Disc.”
• Gently insert one CD into the CD player with the CD label facing as indicated on the illustration located on the Disc player.
Seek Up/Down Buttons
• Press to seek through Disc tracks.
• Hold either button to bypass tracks without stopping.
Browse
• Press the “Browse” button on the touchscreen to scroll through and select a desired track on the Disc. Press the “Exit” button on the touchscreen if you wish
to cancel the browse function.
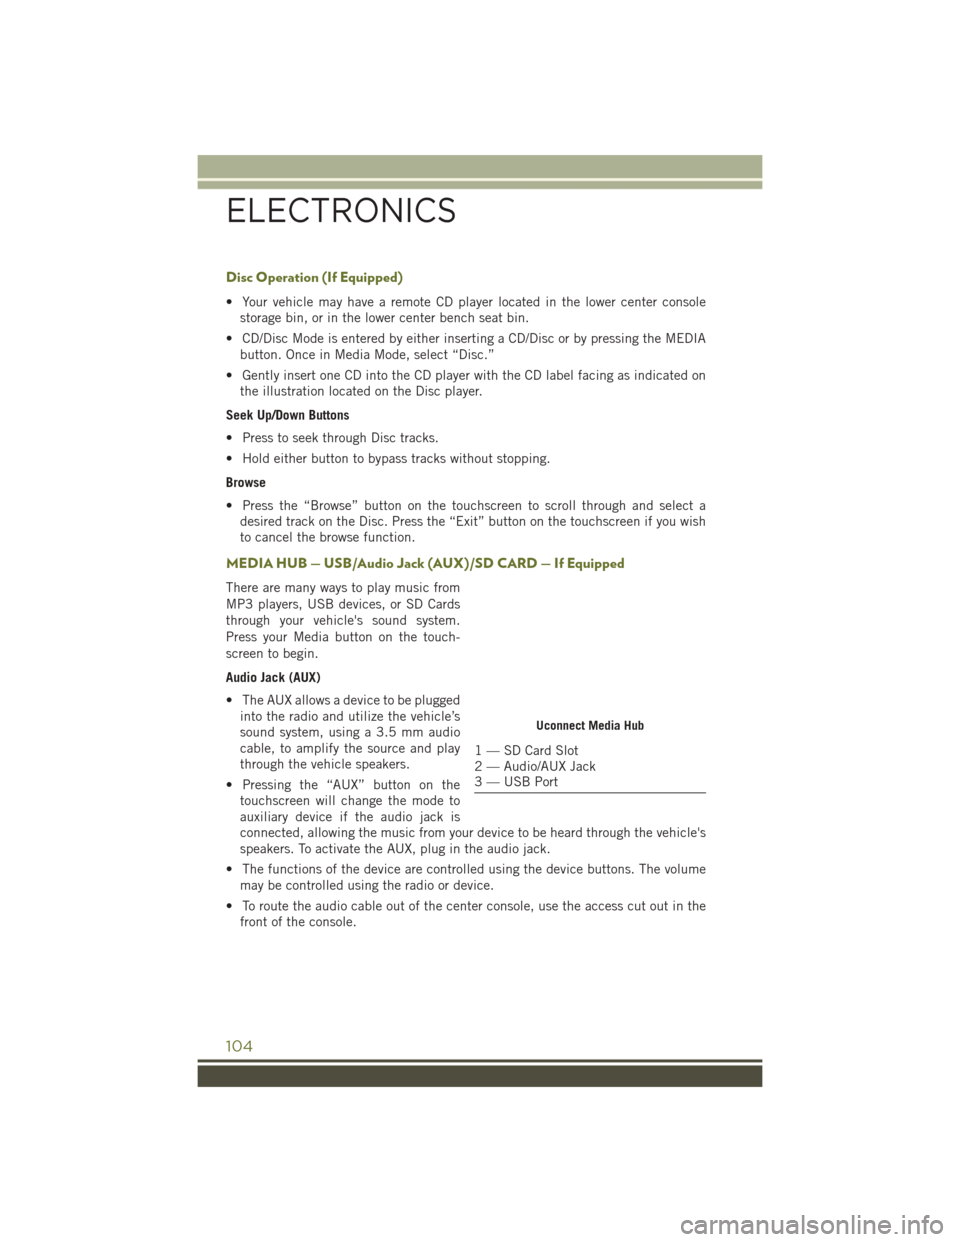
MEDIA HUB — USB/Audio Jack (AUX)/SD CARD — If Equipped
There are many ways to play music from
MP3 players, USB devices, or SD Cards
through your vehicle's sound system.
Press your Media button on the touch-
screen to begin.
Audio Jack (AUX)
• The AUX allows a device to be pluggedinto the radio and utilize the vehicle’s
sound system, using a 3.5 mm audio
cable, to amplify the source and play
through the vehicle speakers.
• Pressing the “AUX” button on the touchscreen will change the mode to
auxiliary device if the audio jack is
connected, allowing the music from your device to be heard through the vehicle's
speakers. To activate the AUX, plug in the audio jack.
• The functions of the device are controlled using the device buttons. The volume may be controlled using the radio or device.
• To route the audio cable out of the center console, use the access cut out in the front of the console.
Uconnect Media Hub
1 — SD Card Slot
2 — Audio/AUX Jack
3 — USB Port
ELECTRONICS
104
Page 109 of 236
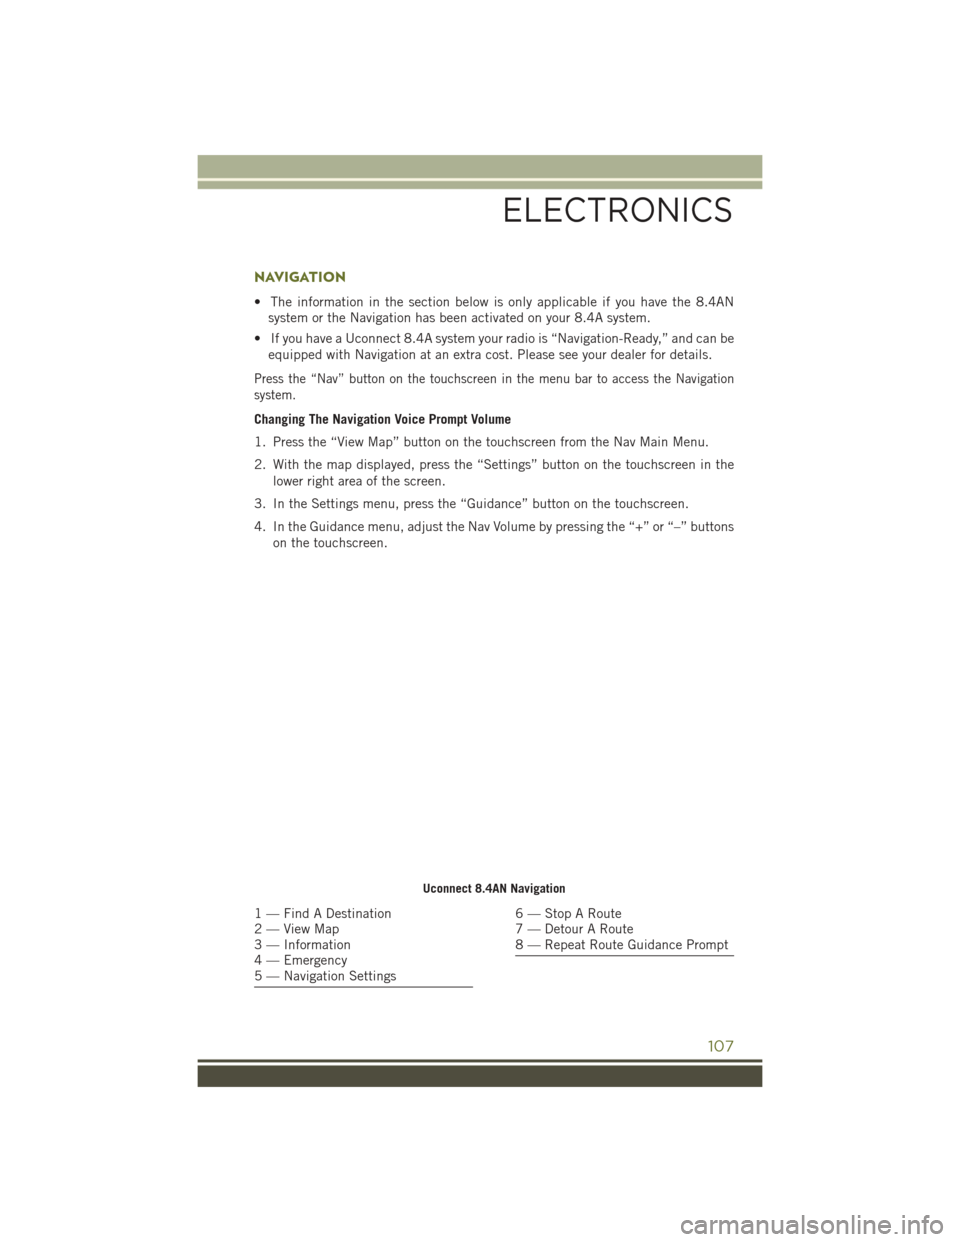
NAVIGATION
• The information in the section below is only applicable if you have the 8.4ANsystem or the Navigation has been activated on your 8.4A system.
• If you have a Uconnect 8.4A system your radio is “Navigation-Ready,” and can be equipped with Navigation at an extra cost. Please see your dealer for details.
Press the “Nav” button on the touchscreen in the menu bar to access the Navigation
system.
Changing The Navigation Voice Prompt Volume
1. Press the “View Map” button on the touchscreen from the Nav Main Menu.
2. With the map displayed, press the “Settings” button on the touchscreen in the
lower right area of the screen.
3. In the Settings menu, press the “Guidance” button on the touchscreen.
4. In the Guidance menu, adjust the Nav Volume by pressing the “+” or “–” buttons on the touchscreen.
Uconnect 8.4AN Navigation
1 — Find A Destination
2 — View Map
3 — Information
4 — Emergency
5 — Navigation Settings6 — Stop A Route
7 — Detour A Route
8 — Repeat Route Guidance Prompt
ELECTRONICS
107
Page 115 of 236
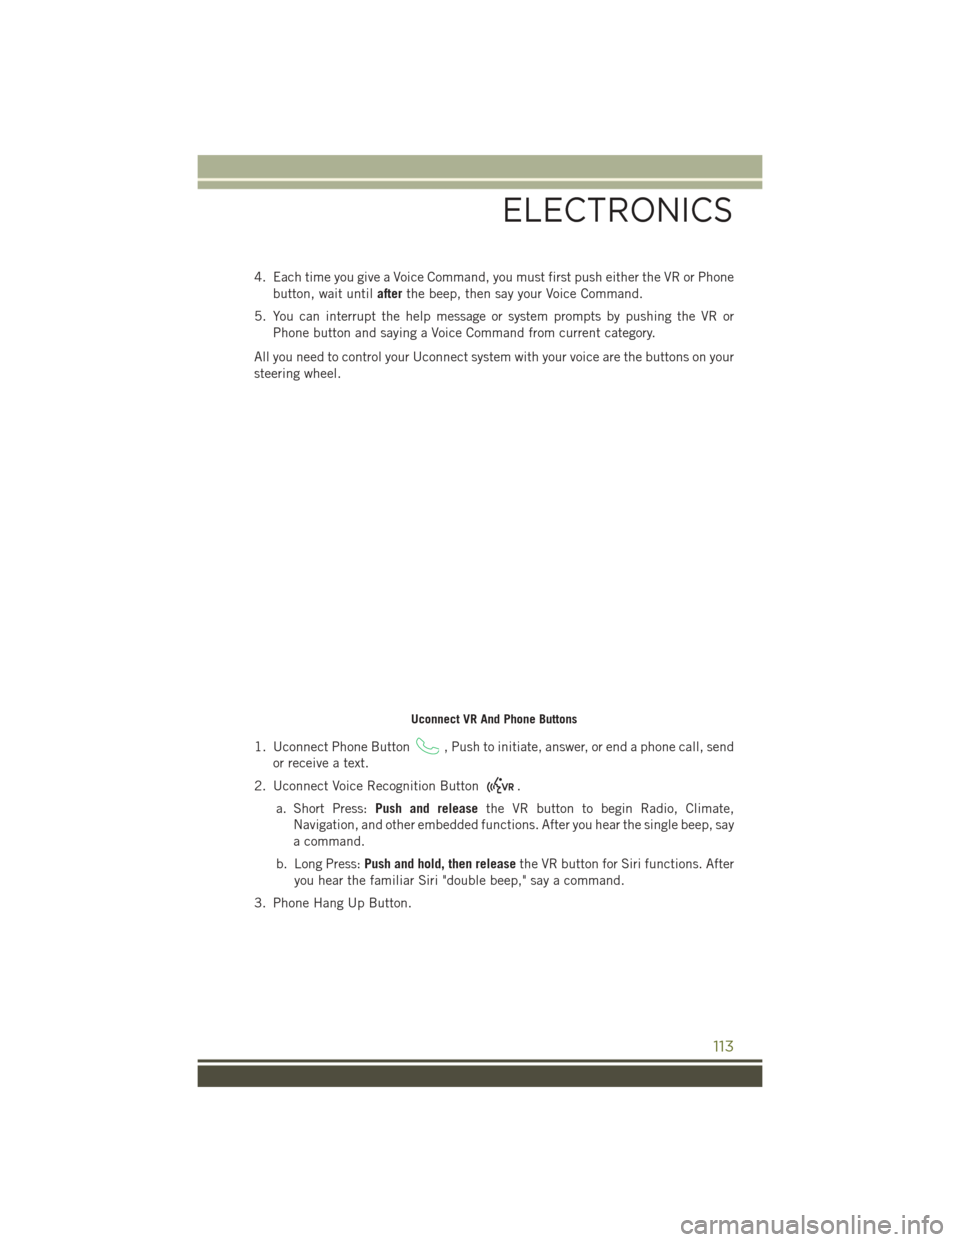
4. Each time you give a Voice Command, you must first push either the VR or Phonebutton, wait until afterthe beep, then say your Voice Command.
5. You can interrupt the help message or system prompts by pushing the VR or Phone button and saying a Voice Command from current category.
All you need to control your Uconnect system with your voice are the buttons on your
steering wheel.
1. Uconnect Phone Button
, Push to initiate, answer, or end a phone call, send
or receive a text.
2. Uconnect Voice Recognition Button
.
a. Short Press: Push and release the VR button to begin Radio, Climate,
Navigation, and other embedded functions. After you hear the single beep, say
a command.
b. Long Press: Push and hold, then release the VR button for Siri functions. After
you hear the familiar Siri "double beep," say a command.
3. Phone Hang Up Button.
Uconnect VR And Phone Buttons
ELECTRONICS
113
Page 134 of 236
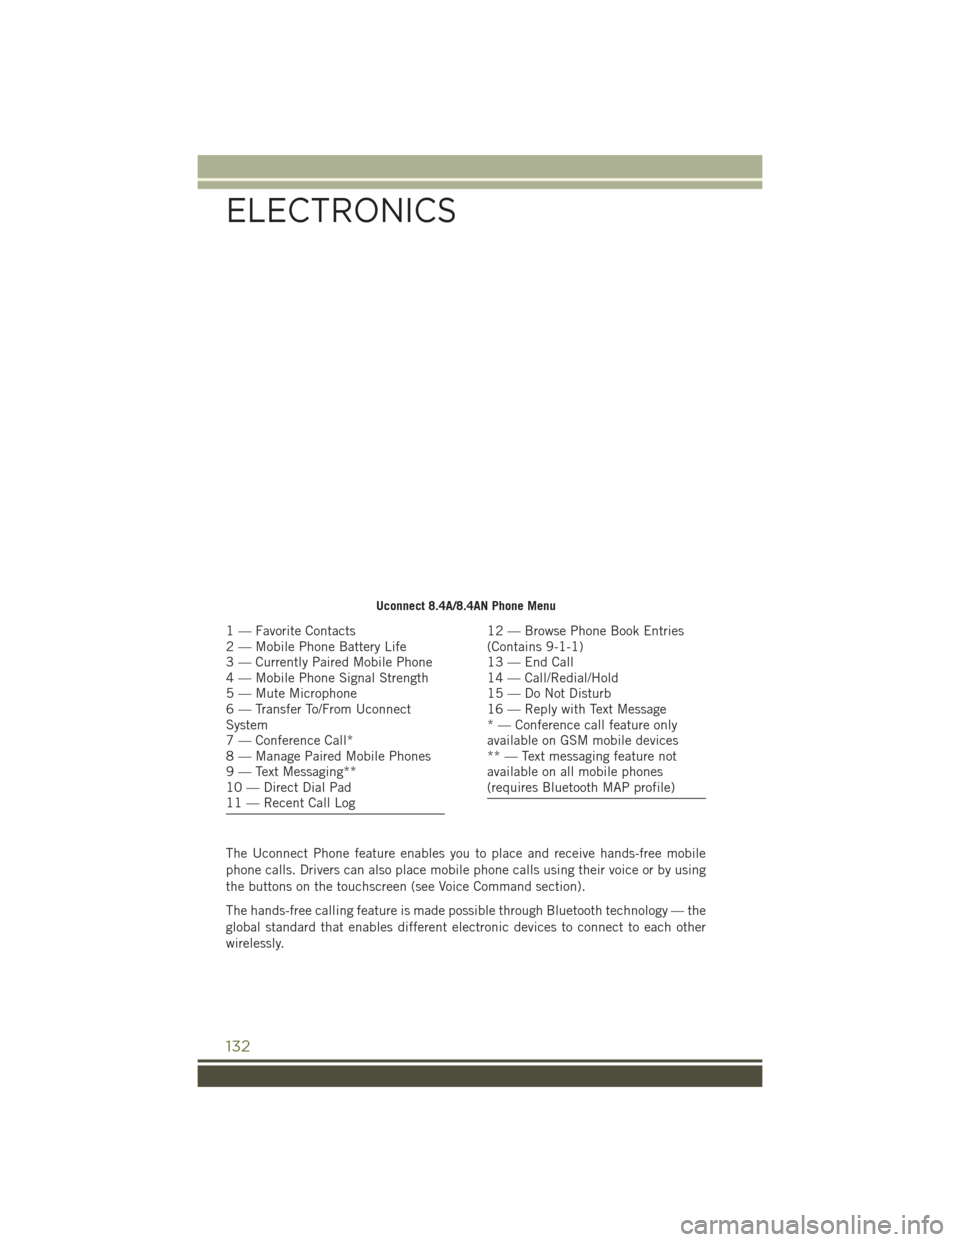
The Uconnect Phone feature enables you to place and receive hands-free mobile
phone calls. Drivers can also place mobile phone calls using their voice or by using
the buttons on the touchscreen (see Voice Command section).
The hands-free calling feature is made possible through Bluetooth technology — the
global standard that enables different electronic devices to connect to each other
wirelessly.
Uconnect 8.4A/8.4AN Phone Menu
1 — Favorite Contacts
2 — Mobile Phone Battery Life
3 — Currently Paired Mobile Phone
4 — Mobile Phone Signal Strength
5 — Mute Microphone
6 — Transfer To/From Uconnect
System
7 — Conference Call*
8 — Manage Paired Mobile Phones
9 — Text Messaging**
10 — Direct Dial Pad
11 — Recent Call Log12 — Browse Phone Book Entries
(Contains 9-1-1)
13 — End Call
14 — Call/Redial/Hold
15 — Do Not Disturb
16 — Reply with Text Message
* — Conference call feature only
available on GSM mobile devices
** — Text messaging feature not
available on all mobile phones
(requires Bluetooth MAP profile)
ELECTRONICS
132
Page 145 of 236
• Push theRIGHTarrow button to access the information screens or submenu
screens of a main menu item.
• Push the LEFT
arrow button to access the information screens or submenu
screens of a main menu item.
• Push the OKbutton to access/select the information screens or submenu screens
of a main menu item. Push and hold the OKarrow button for two seconds to reset
displayed/selected features that can be reset.
Compass Calibration
This compass is self-calibrating, which eliminates the need to set the compass
manually. When the vehicle is new, the compass may appear erratic, and the
EVIC/DID will display “CAL” until the compass is calibrated.
You may also calibrate the compass by completing one or more 360 degree turns (in
an area free from large metal or metallic objects) until the “CAL” message displayed
in the EVIC/DID turns off. The compass will now function normally.
PROGRAMMABLE FEATURES
Uconnect Customer Programmable Features
The Uconnect system allows you to access Customer Programmable feature settings
through buttons on the touchscreen.
•
Push the MORE or SETTINGS button (Uconnect 5.0), or press the “Apps” button
(Uconnect 8.4) located near the bottom of the touchscreen, then press the “Settings”
button on the touchscreen to access the Settings screen. When making a selection,
scroll up or down until the preferred setting is highlighted, then press and release the
preferred setting until a check-mark appears next to the setting, showing that setting
has been selected. The following feature settings are available:
• Display • Engine Off Options
• Voice • Audio
• Clock • Phone/Bluetooth
• Safety & Driving Assistance • SiriusXM Setup
• Lights • Restore Settings
• Compass (Uconnect 5.0) • Clear Personal Data
• Doors & Locks • System Information
• Auto-On Comfort
NOTE:
Depending on the vehicles options, feature settings may vary.
ELECTRONICS
143
Page 146 of 236
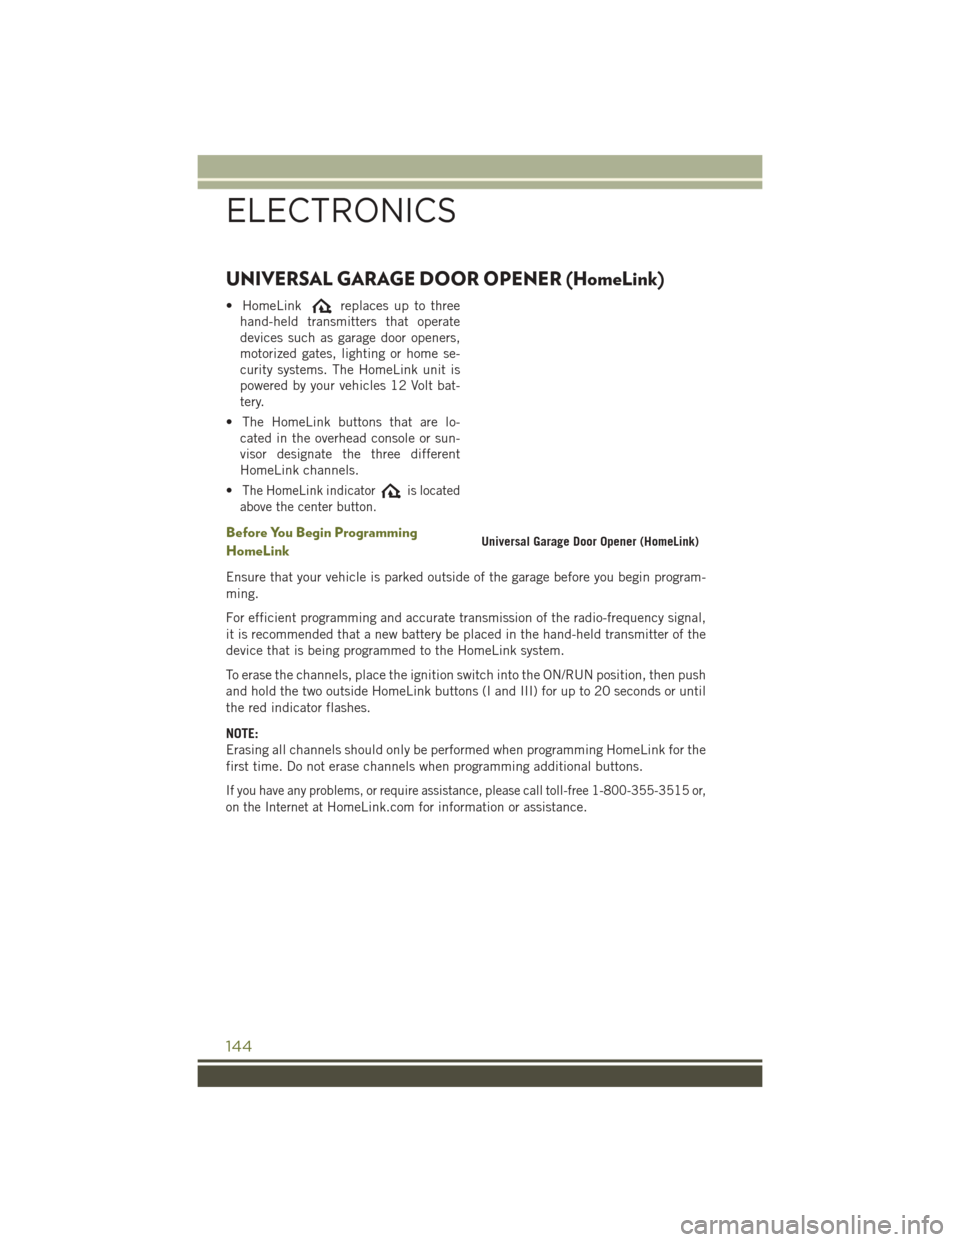
UNIVERSAL GARAGE DOOR OPENER (HomeLink)
• HomeLinkreplaces up to three
hand-held transmitters that operate
devices such as garage door openers,
motorized gates, lighting or home se-
curity systems. The HomeLink unit is
powered by your vehicles 12 Volt bat-
tery.
• The HomeLink buttons that are lo- cated in the overhead console or sun-
visor designate the three different
HomeLink channels.
•
The HomeLink indicatoris located
above the center button.
Before You Begin Programming
HomeLink
Ensure that your vehicle is parked outside of the garage before you begin program-
ming.
For efficient programming and accurate transmission of the radio-frequency signal,
it is recommended that a new battery be placed in the hand-held transmitter of the
device that is being programmed to the HomeLink system.
To erase the channels, place the ignition switch into the ON/RUN position, then push
and hold the two outside HomeLink buttons (I and III) for up to 20 seconds or until
the red indicator flashes.
NOTE:
Erasing all channels should only be performed when programming HomeLink for the
first time. Do not erase channels when programming additional buttons.
If you have any problems, or require assistance, please call toll-free 1-800-355-3515 or,
on the Internet at
HomeLink.com for information or assistance.
Universal Garage Door Opener (HomeLink)
ELECTRONICS
144
Page 147 of 236
Programming A Rolling Code
NOTE:
For programming Garage Door Openers that were manufactured after 1995. These
Garage Door Openers can be identified by the “LEARN” or “TRAIN” button located
where the hanging antenna is attached to the Garage Door Opener. It is NOT the
button that is normally used to open and close the door. The name and color of the
button may vary by manufacturer.
1. Place the ignition switch into the ON/RUN position.
2. Place the hand-held transmitter 1 to 3 inches (3 to 8 cm) away from theHomeLink button you wish to program while keeping the HomeLink indicator light
in view.
3. Push and hold the HomeLink button you want to program while you push and hold the hand-held transmitter button.
4. Continue to hold both buttons and observe the indicator light. The HomeLink indicator will flash slowly and then rapidly after HomeLink has received the
frequency signal from the hand-held transmitter. Release both buttons after the
indicator light changes from slow to rapid.
5.
At the garage door opener motor (in the garage), locate the “LEARN” or “TRAINING”
button. This can usually be found where the hanging antenna wire is attached to the
garage door opener motor. Firmly push and release the “LEARN” or “TRAINING”
button.
NOTE:
You have 30 seconds in which to initiate the next step after the LEARN button has
been pushed.
6. Return to the vehicle and push the programmed HomeLink button twice (holding the button for two seconds each time). If the device is plugged in and activates,
programming is complete.
NOTE:
If the device does not activate, push the button a third time (for two seconds) to
complete the training.
7. To program the remaining two HomeLink buttons, repeat each step for each remaining button. DO NOT erase the channels.
ELECTRONICS
145
Page 148 of 236
Programming A Non-Rolling Code
NOTE:
For programming Garage Door Openers manufactured before 1995.
1. Turn the ignition switch to the ON/RUN position.
2.
Place the hand-held transmitter 1 to 3 inches (3 to 8 cm) away from the HomeLink
button you wish to program while keeping the HomeLink indicator light in view.
3. Push and hold the HomeLink button you want to program while you push and hold the hand-held transmitter button.
4. Continue to hold both buttons and observe the indicator light. The HomeLink indicator will flash slowly and then rapidly after HomeLink has received the
frequency signal from the hand-held transmitter. Release both buttons after the
indicator light changes from slow to rapid.
5. Push and hold the programmed HomeLink button and observe the indicator light. If the indicator light stays on constantly, programming is complete and the garage
door (or device) should activate when the HomeLink button is pushed.
6. To program the two remaining HomeLink buttons, repeat each step for each remaining button. DO NOT erase the channels.
Using HomeLink
To operate, push and release the programmed HomeLink button. Activation will now
occur for the programmed device (i.e., garage door opener, gate operator, security
system, entry door lock, home/office lighting, etc.,). The hand-held transmitter of the
device may also be used at any time.
WARNING!
• Your motorized door or gate will open and close while you are programming theuniversal transceiver. Do not program the transceiver if people or pets are in the
path of the door or gate.
• Do not run your vehicle in a closed garage or confined area while programming
the transceiver. Exhaust gas from your vehicle contains Carbon Monoxide (CO)
which is odorless and colorless. Carbon Monoxide is poisonous when inhaled
and can cause you and others to be severely injured or killed.
ELECTRONICS
146