engine JEEP CHEROKEE 2017 KL / 5.G Owners Manual
[x] Cancel search | Manufacturer: JEEP, Model Year: 2017, Model line: CHEROKEE, Model: JEEP CHEROKEE 2017 KL / 5.GPages: 615, PDF Size: 5.72 MB
Page 404 of 615
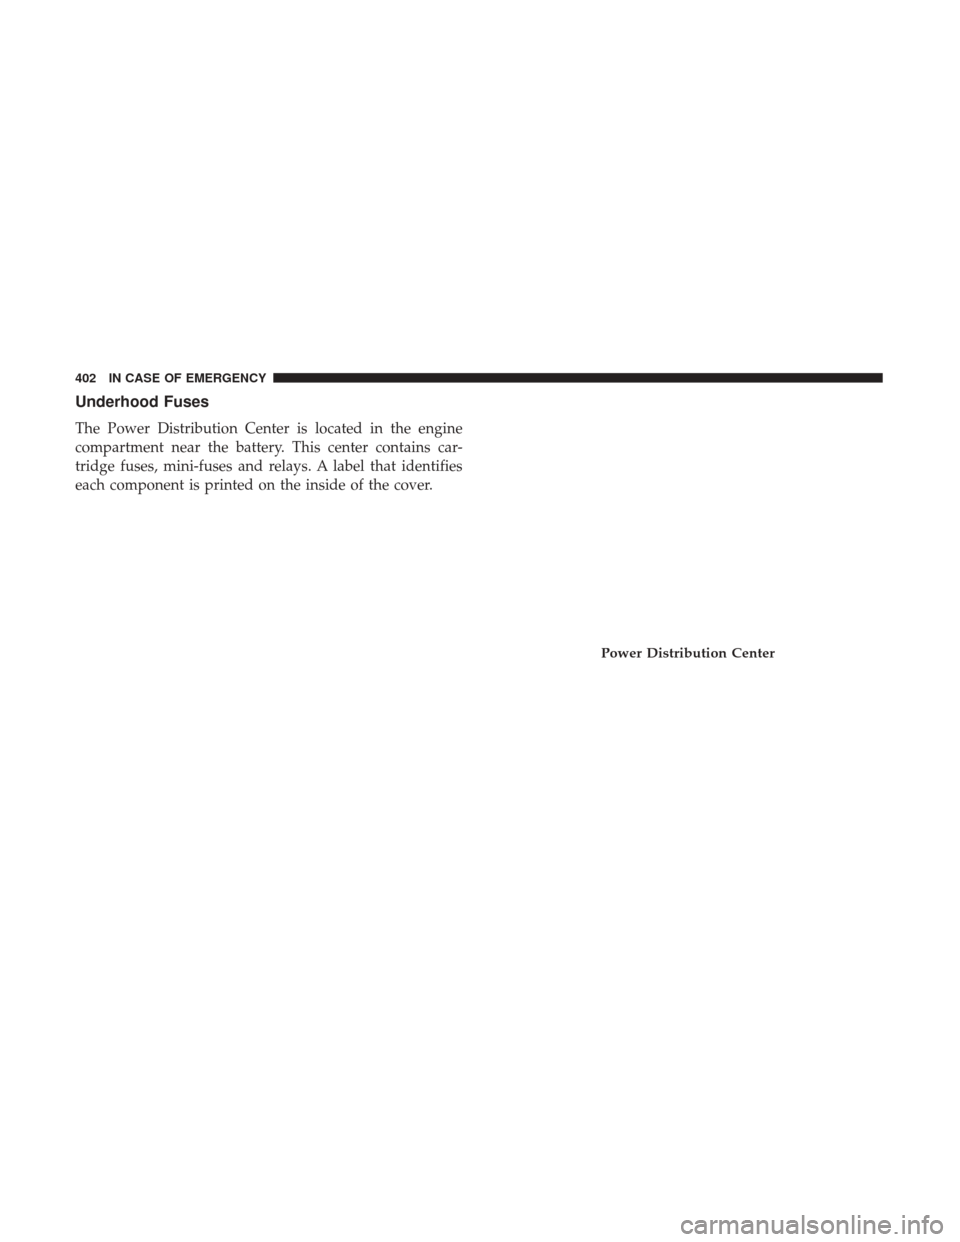
Underhood Fuses
The Power Distribution Center is located in the engine
compartment near the battery. This center contains car-
tridge fuses, mini-fuses and relays. A label that identifies
each component is printed on the inside of the cover.
Power Distribution Center
402 IN CASE OF EMERGENCY
Page 405 of 615
CavityBlade Fuse Cartridge Fuse Description
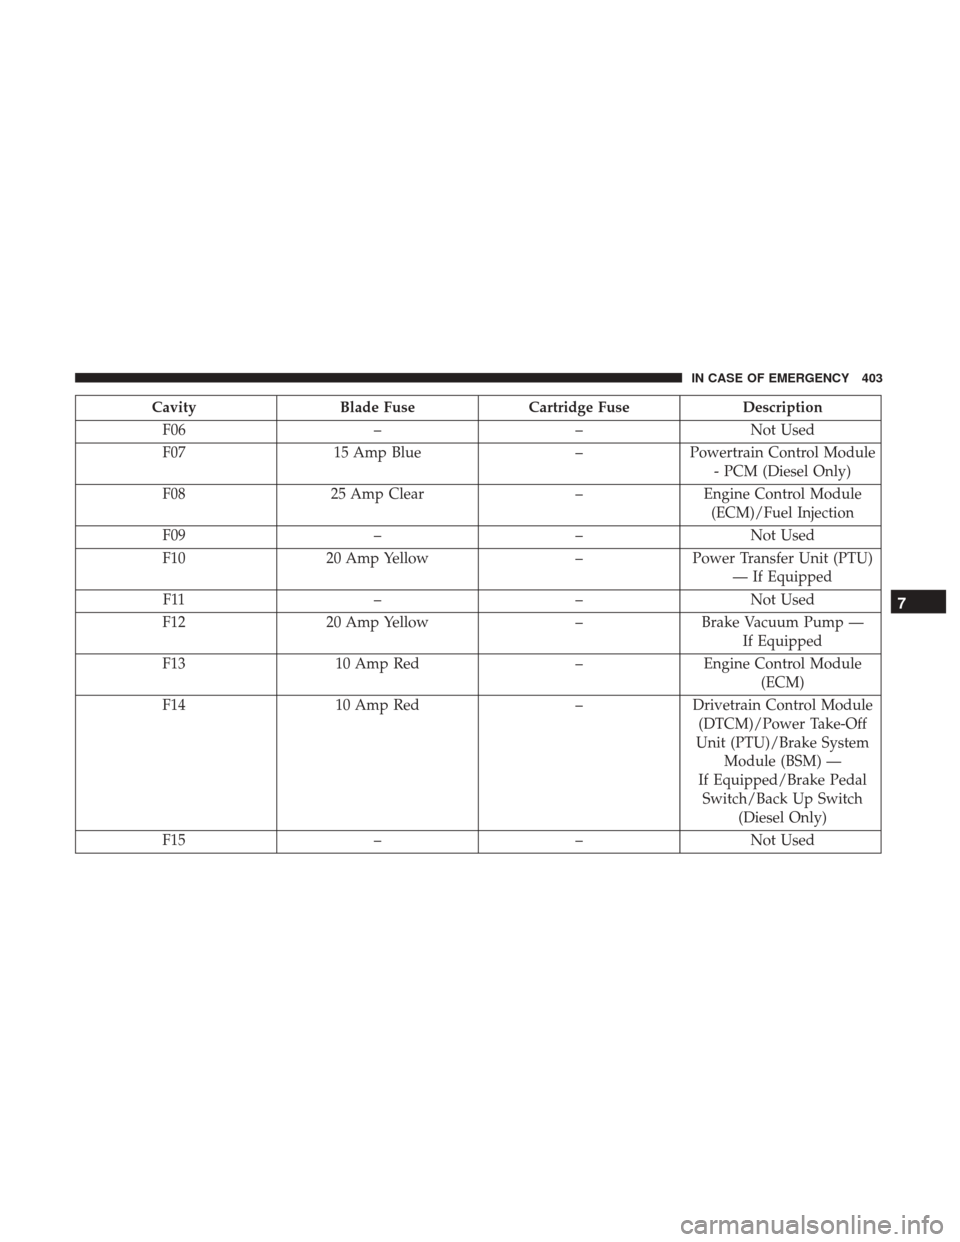
F06 ––Not Used
F07 15 Amp Blue –Powertrain Control Module
- PCM (Diesel Only)
F08 25 Amp Clear –Engine Control Module
(ECM)/Fuel Injection
F09 ––Not Used
F10 20 Amp Yellow –Power Transfer Unit (PTU)
— If Equipped
F11 ––Not Used
F12 20 Amp Yellow –Brake Vacuum Pump —
If Equipped
F13 10 Amp Red –Engine Control Module
(ECM)
F14 10 Amp Red –Drivetrain Control Module
(DTCM)/Power Take-Off
Unit (PTU)/Brake System Module (BSM) —
If Equipped/Brake Pedal Switch/Back Up Switch (Diesel Only)
F15 ––Not Used
7
IN CASE OF EMERGENCY 403
Page 406 of 615
CavityBlade Fuse Cartridge Fuse Description
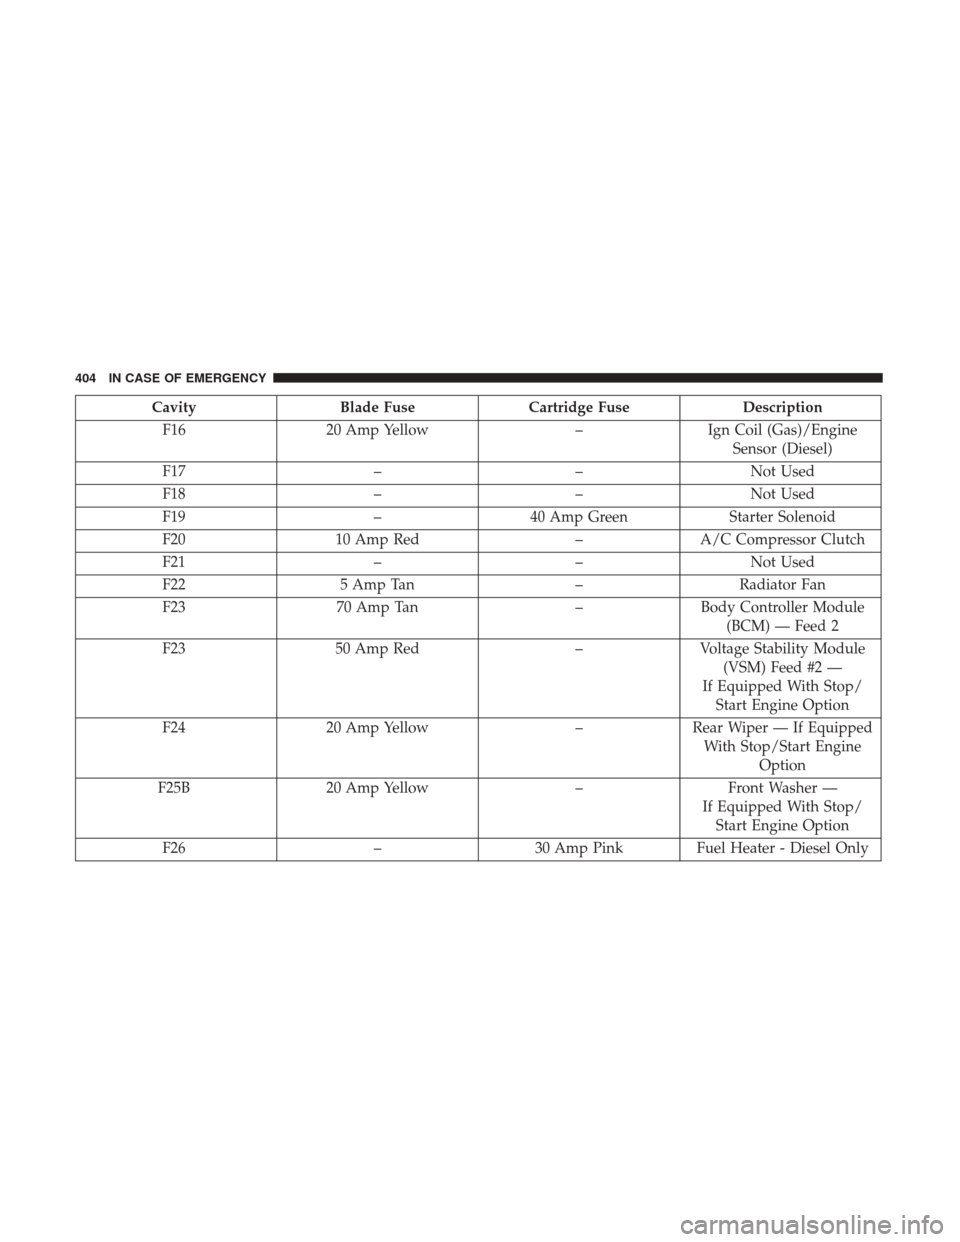
F16 20 Amp Yellow –Ign Coil (Gas)/Engine
Sensor (Diesel)
F17 ––Not Used
F18 ––Not Used
F19 –40 Amp Green Starter Solenoid
F20 10 Amp Red –A/C Compressor Clutch
F21 ––Not Used
F22 5 Amp Tan –Radiator Fan
F23 70 Amp Tan –Body Controller Module
(BCM) — Feed 2
F23 50 Amp Red –Voltage Stability Module
(VSM) Feed #2 —
If Equipped With Stop/ Start Engine Option
F24 20 Amp Yellow –Rear Wiper — If Equipped
With Stop/Start Engine Option
F25B 20 Amp Yellow –Front Washer —
If Equipped With Stop/ Start Engine Option
F26 –30 Amp Pink Fuel Heater - Diesel Only
404 IN CASE OF EMERGENCY
Page 407 of 615
CavityBlade Fuse Cartridge Fuse Description
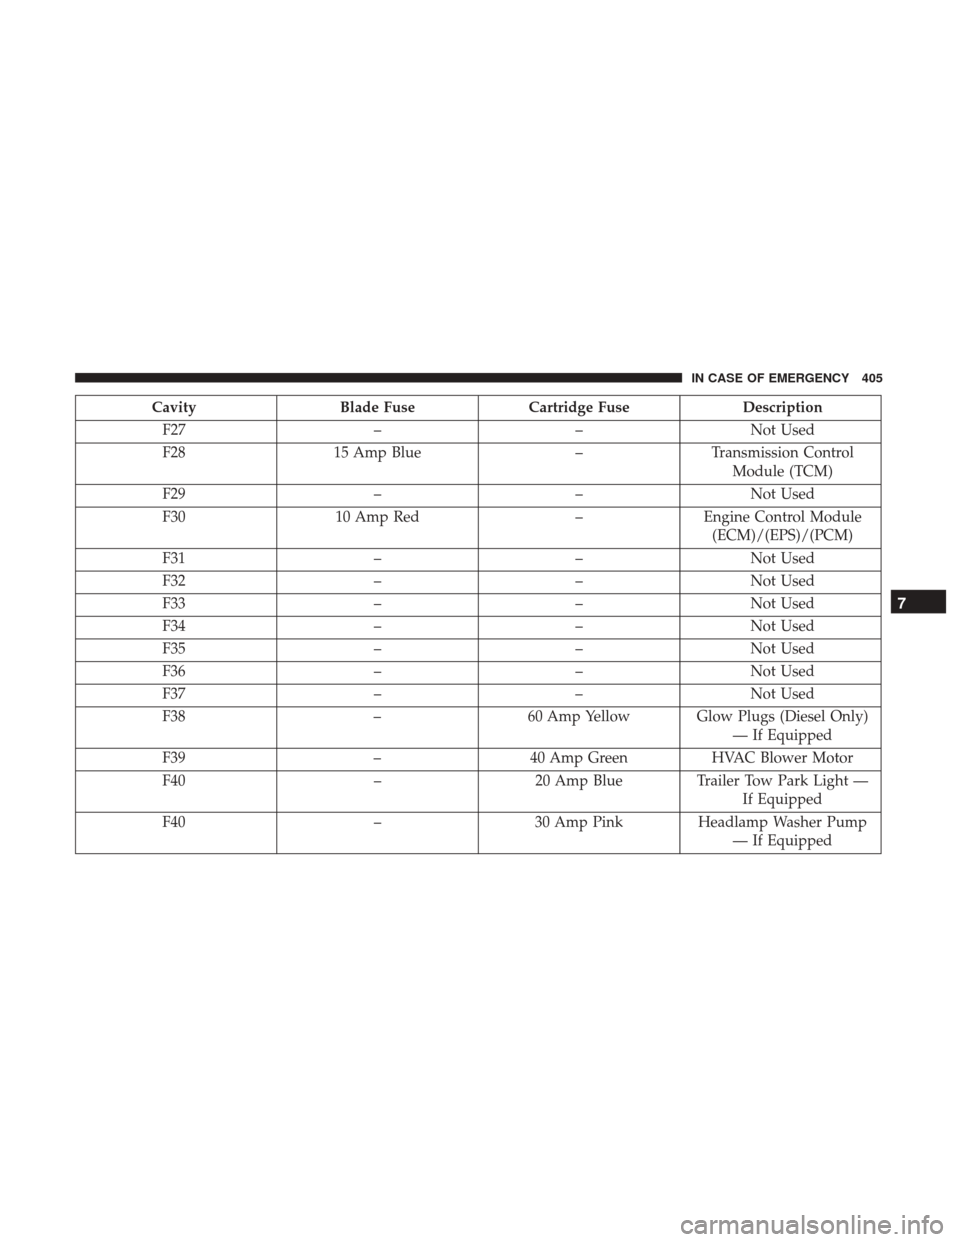
F27 ––Not Used
F28 15 Amp Blue –Transmission Control
Module (TCM)
F29 ––Not Used
F30 10 Amp Red –Engine Control Module
(ECM)/(EPS)/(PCM)
F31 ––Not Used
F32 ––Not Used
F33 ––Not Used
F34 ––Not Used
F35 ––Not Used
F36 ––Not Used
F37 ––Not Used
F38 –60 Amp Yellow Glow Plugs (Diesel Only)
— If Equipped
F39 –40 Amp Green HVAC Blower Motor
F40 –20 Amp Blue Trailer Tow Park Light —
If Equipped
F40 –30 Amp Pink Headlamp Washer Pump
— If Equipped
7
IN CASE OF EMERGENCY 405
Page 408 of 615
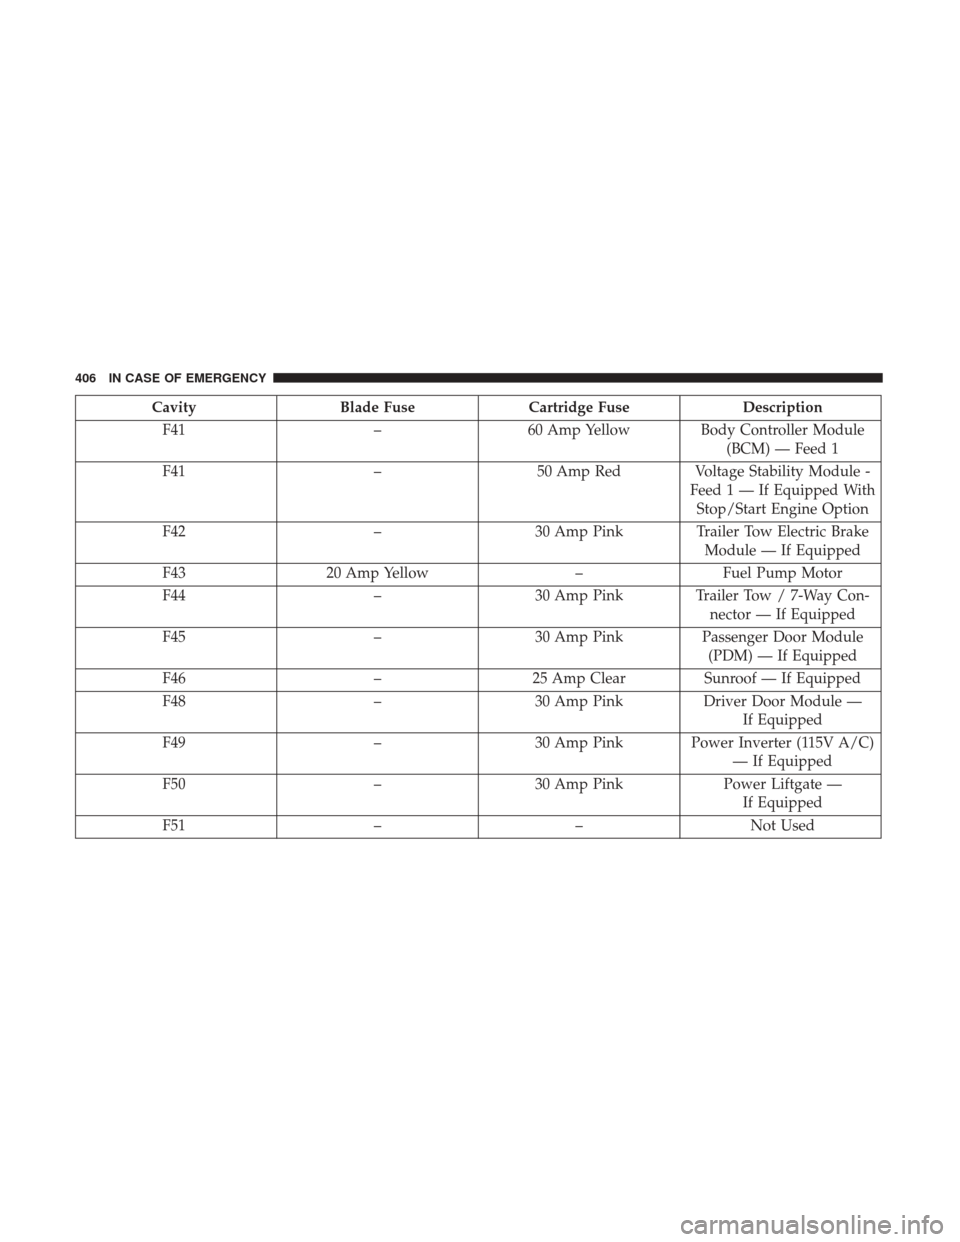
CavityBlade Fuse Cartridge Fuse Description
F41 –60 Amp Yellow Body Controller Module
(BCM) — Feed 1
F41 –50 Amp Red Voltage Stability Module -
Feed1—IfEquipped WithStop/Start Engine Option
F42 –30 Amp Pink Trailer Tow Electric Brake
Module — If Equipped
F43 20 Amp Yellow –Fuel Pump Motor
F44 –30 Amp Pink Trailer Tow / 7-Way Con-
nector — If Equipped
F45 –30 Amp Pink Passenger Door Module
(PDM) — If Equipped
F46 –25 Amp Clear Sunroof — If Equipped
F48 –30 Amp Pink Driver Door Module —
If Equipped
F49 –30 Amp Pink Power Inverter (115V A/C)
— If Equipped
F50 –30 Amp Pink Power Liftgate —
If Equipped
F51 ––Not Used
406 IN CASE OF EMERGENCY
Page 409 of 615
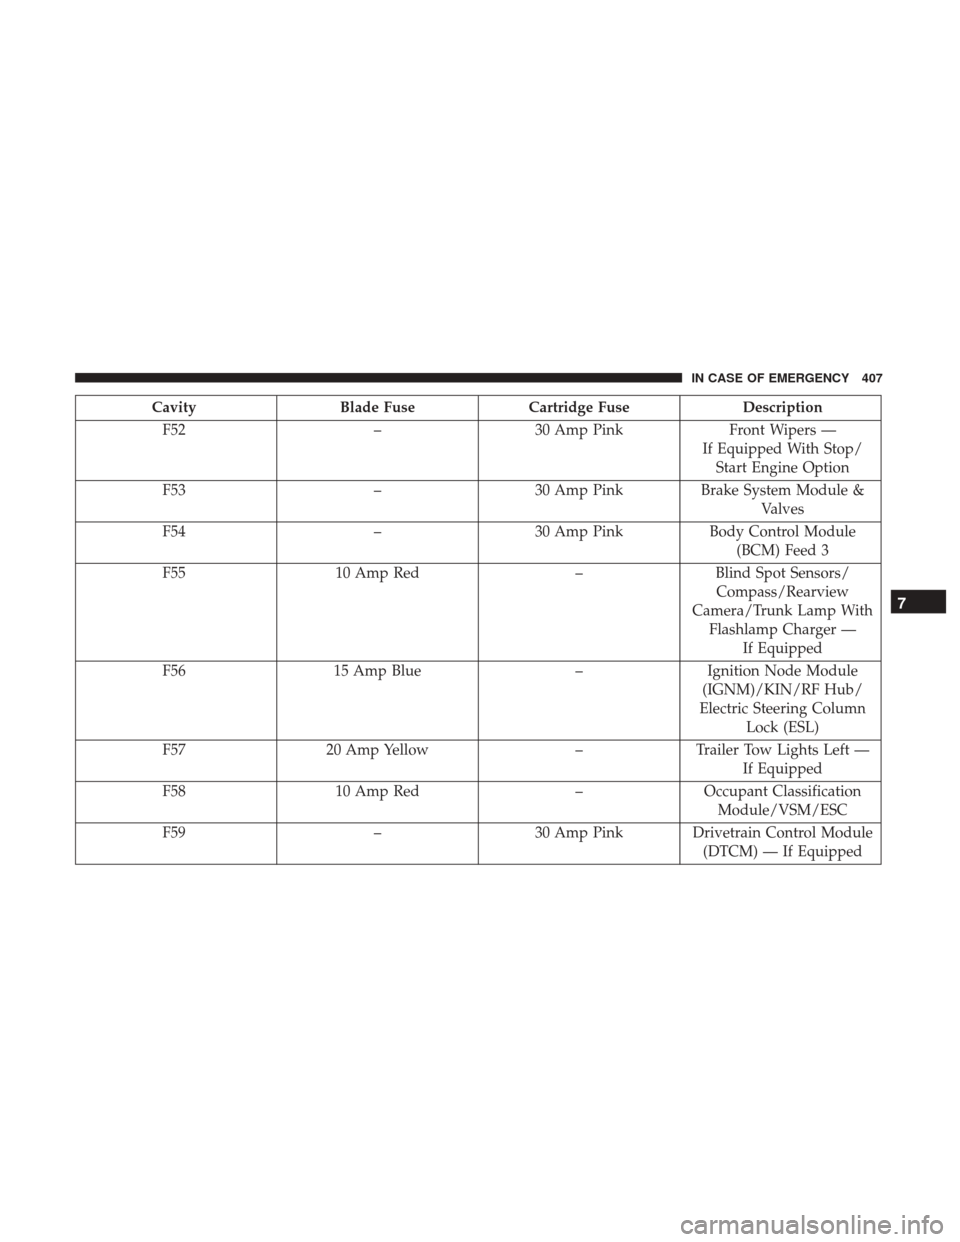
CavityBlade Fuse Cartridge Fuse Description
F52 –30 Amp Pink Front Wipers —
If Equipped With Stop/ Start Engine Option
F53 –30 Amp Pink Brake System Module &
Valves
F54 –30 Amp Pink Body Control Module
(BCM) Feed 3
F55 10 Amp Red –Blind Spot Sensors/
Compass/Rearview
Camera/Trunk Lamp With Flashlamp Charger — If Equipped
F56 15 Amp Blue –Ignition Node Module
(IGNM)/KIN/RF Hub/
Electric Steering Column Lock (ESL)
F57 20 Amp Yellow –Trailer Tow Lights Left —
If Equipped
F58 10 Amp Red –Occupant Classification
Module/VSM/ESC
F59 –30 Amp Pink Drivetrain Control Module
(DTCM) — If Equipped
7
IN CASE OF EMERGENCY 407
Page 411 of 615
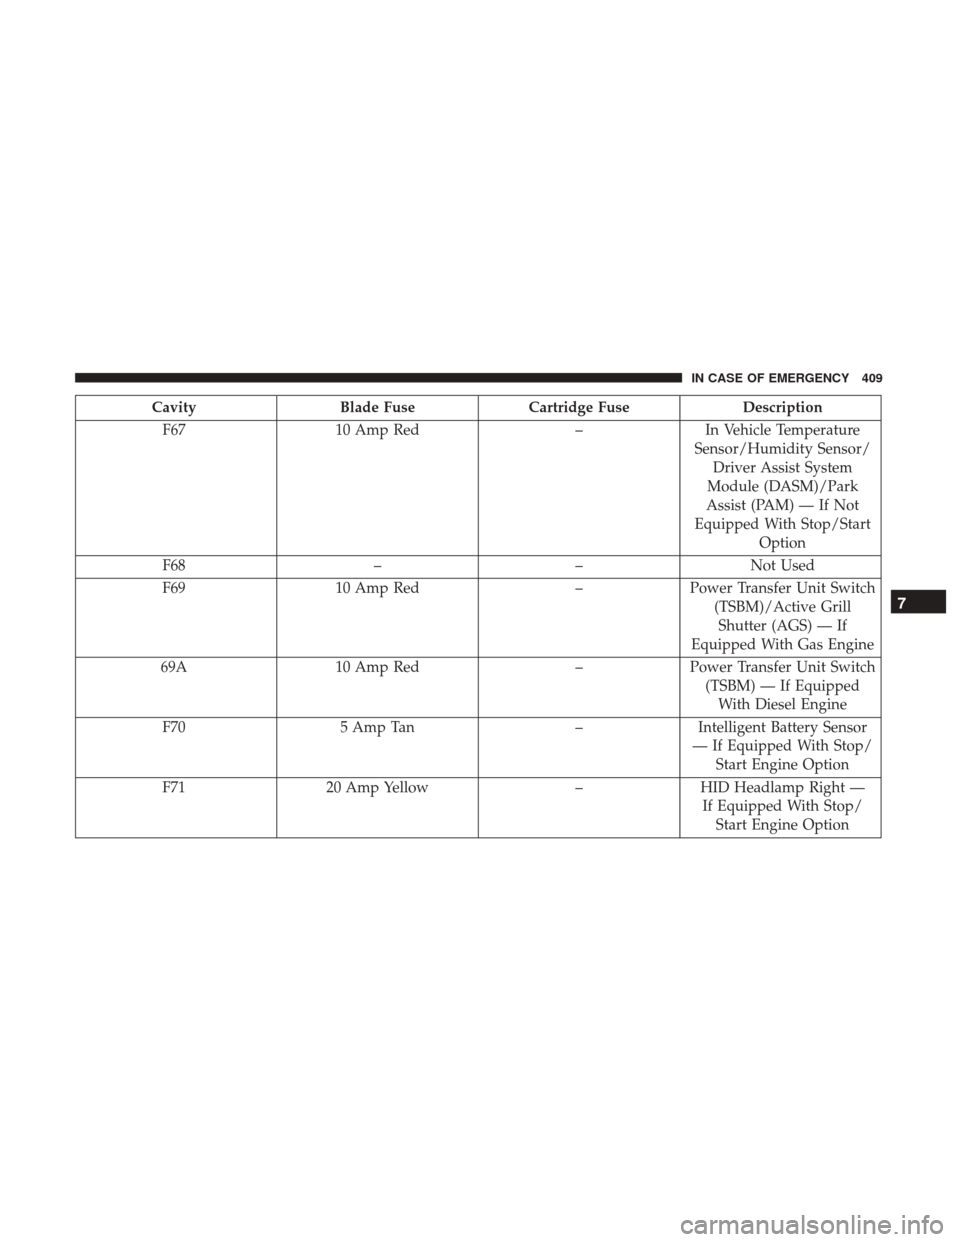
CavityBlade Fuse Cartridge Fuse Description
F67 10 Amp Red –In Vehicle Temperature
Sensor/Humidity Sensor/ Driver Assist System
Module (DASM)/Park
Assist (PAM) — If Not
Equipped With Stop/Start Option
F68 ––Not Used
F69 10 Amp Red –Power Transfer Unit Switch
(TSBM)/Active GrillShutter (AGS) — If
Equipped With Gas Engine
69A 10 Amp Red –Power Transfer Unit Switch
(TSBM) — If EquippedWith Diesel Engine
F70 5 Amp Tan –Intelligent Battery Sensor
— If Equipped With Stop/ Start Engine Option
F71 20 Amp Yellow –HID Headlamp Right —
If Equipped With Stop/ Start Engine Option
7
IN CASE OF EMERGENCY 409
Page 413 of 615
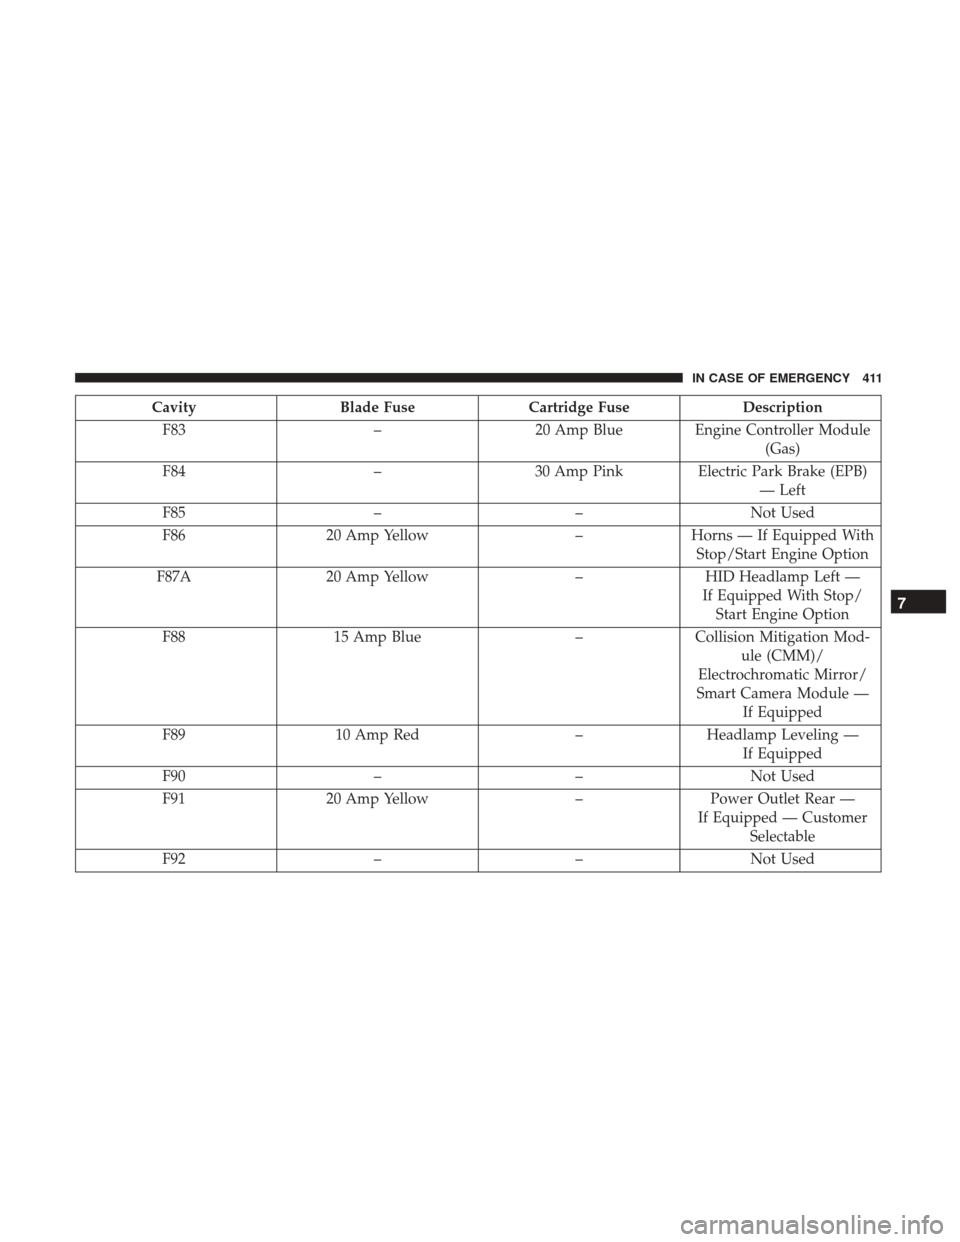
CavityBlade Fuse Cartridge Fuse Description
F83 –20 Amp Blue Engine Controller Module
(Gas)
F84 –30 Amp Pink Electric Park Brake (EPB)
— Left
F85 ––Not Used
F86 20 Amp Yellow –Horns — If Equipped With
Stop/Start Engine Option
F87A 20 Amp Yellow –HID Headlamp Left —
If Equipped With Stop/ Start Engine Option
F88 15 Amp Blue –Collision Mitigation Mod-
ule (CMM)/
Electrochromatic Mirror/
Smart Camera Module — If Equipped
F89 10 Amp Red –Headlamp Leveling —
If Equipped
F90 ––Not Used
F91 20 Amp Yellow –Power Outlet Rear —
If Equipped — Customer Selectable
F92 ––Not Used
7
IN CASE OF EMERGENCY 411
Page 416 of 615
JACKING AND TIRE CHANGING
WARNING!
•Do not attempt to change a tire on the side of the
vehicle close to moving traffic. Pull far enough off
the road to avoid the danger of being hit when
operating the jack or changing the wheel.
• Being under a jacked-up vehicle is dangerous. The
vehicle could slip off the jack and fall on you. You
could be crushed. Never put any part of your body
under a vehicle that is on a jack. If you need to get
under a raised vehicle, take it to a service center
where it can be raised on a lift.
• Never start or run the engine while the vehicle is on
a jack.
• The jack is designed to be used as a tool for changing
tires only. The jack should not be used to lift the
vehicle for service purposes. The vehicle should be
jacked on a firm level surface only. Avoid ice or
slippery areas.
Jack Location/Spare Tire Stowage
The jack, wheel chocks and spare tire are stowed under the
load floor behind the rear seat.
1. Open the liftgate.
2. Lift the access cover using the load floor handle.
3. Remove the hook from the stowed position on the back side of the load floor and place the hook over the top
body flange and weather seal. This will hold the load
floor up while obtaining the jack and spare tire.
Load Floor Handle
414 IN CASE OF EMERGENCY
Page 419 of 615
Jacking Instructions
WARNING!
Carefully follow these tire changing warnings to help
prevent personal injury or damage to your vehicle:
•
Always park on a firm, level surface as far from the
edge of the roadway as possible before raising the
vehicle.
• Turn on the Hazard Warning flasher.
•
Chock the wheel diagonally opposite the wheel to be
raised.
•Set the parking brake firmly and set the transmission
in PARK.
•Never start or run the engine with the vehicle on a
jack.
•Do not let anyone sit in the vehicle when it is on a jack.
•Do not get under the vehicle when it is on a jack. If you
need to get under a raised vehicle, take it to a service
center where it can be raised on a lift.
•Only use the jack in the positions indicated and for
lifting this vehicle during a tire change.
•If working on or near a roadway, be extremely careful
of motor traffic.
(Continued)
WARNING! (Continued)
•To assure that spare tires, flat or inflated, are securely
stowed, spares must be stowed with the valve stem
facing the ground.
Jack Warning Label
7
IN CASE OF EMERGENCY 417