reset JEEP CHEROKEE 2017 KL / 5.G Owner's Manual
[x] Cancel search | Manufacturer: JEEP, Model Year: 2017, Model line: CHEROKEE, Model: JEEP CHEROKEE 2017 KL / 5.GPages: 615, PDF Size: 5.72 MB
Page 449 of 615
SCHEDULED SERVICING
Your vehicle is equipped with an automatic oil change
indicator system. The oil change indicator system will
remind you that it is time to take your vehicle in for
scheduled maintenance.
Based on engine operation conditions, the oil change
indicator message will illuminate. This means that service
is required for your vehicle. Operating conditions such as
frequent short-trips, trailer tow, extremely hot or cold
ambient temperatures will influence when the “Oil Change
Required” message is displayed. Severe Operating Condi-
tions can cause the change oil message to illuminate as
early as 3,500 miles (5,600 km) since last reset. Have your
vehicle serviced as soon as possible, within the next 500
miles (805 km).
Your authorized dealer will reset the oil change indicator
message after completing the scheduled oil change. If a
scheduled oil change is performed by someone other than
your authorized dealer, the message can be reset by
referring to the steps described under “Instrument Cluster
Display” in “Understanding Your Instrument Panel” for
further information.NOTE:
Under no circumstances should oil change inter-
vals exceed 10,000 miles (16,000 km), twelve months or 350
hours of engine run time, whichever comes first. The 350
hours of engine run or idle time is generally only a concern
for fleet customers.
Severe Duty All Models
Change Engine Oil at 4,000 miles (6,500 km) if the vehicle
is operated in a dusty and off road environment or is
operated predominately at idle or only very low engine
RPM’s. This type of vehicle use is considered Severe Duty.
Once A Month Or Before A Long Trip:
• Check engine oil level.
• Check windshield washer fluid level.
• Check tire pressure and look for unusual wear or
damage. Rotate tires at the first sign of irregular wear,
even if it occurs before the oil indicator system turns on.
• Check the fluid levels of the coolant reservoir and brake
master cylinder, fill as needed.
• Check function of all interior and exterior lights.
8
SERVICING AND MAINTENANCE 447
Page 482 of 615
CAUTION!
Using a transmission fluid other than the manufactur-
er ’s recommended fluid may cause deterioration in
transmission shift quality and/or torque converter
shudder. Refer to “Fluids And Lubricants” in “Techni-
cal Specifications” for fluid specifications.
Special Additives
The manufacturer strongly recommends against using any
special additives in the transmission. Automatic Transmis-
sion Fluid (ATF) is an engineered product and its perfor-
mance may be impaired by supplemental additives. There-
fore, do not add any fluid additives to the transmission.
Avoid using transmission sealers as they may adversely
affect seals.
CAUTION!
Do not use chemical flushes in your transmission as
the chemicals can damage your transmission compo-
nents. Such damage is not covered by the New Vehicle
Limited Warranty.
Fluid Level Check
The fluid level is preset at the factory and does not require
adjustment under normal operating conditions. Routine
fluid level checks are not required, therefore the transmission
has no dipstick. Your authorized dealer can check your
transmission fluid level using special service tools. If you
notice fluid leakage or transmission malfunction, visit your
authorized dealer immediately to have the transmission fluid
level checked. Operating the vehicle with an improper fluid
level can cause severe transmission damage.
CAUTION!
If a transmission fluid leak occurs, visit your autho-
rized dealer immediately. Severe transmission damage
may occur. Your authorized dealer has the proper tools
to adjust the fluid level accurately.
480 SERVICING AND MAINTENANCE
Page 547 of 615
Audio
After pressing the “Audio” button on the touchscreen the following settings will be available:
Setting NameAdjustable Options
Equalizer BassMidTreble
NOTE:
When in the “Equalizer” display you may adjust the “Bass”, “Mid” and “Treble” settings. Adjust the settings with the
“+” and “–” setting buttons on the touchscreen or by selecting any point on the scale between the “+” and “–” but-
tons on the touchscreen. Bass/Mid/Treble also allow you to simply slide your finger up or down to change the set-
ting as well as press directly on the desired setting. Balance/Fade Up Arrow
Button Down Ar-
row Button Left Arrow
Button Right Ar-
row Button Center “C”
Button
NOTE:
When in the “Balance/Fade” display you may adjust the “Balance/Fade” of the audio by using the “Arrow” button
on the touchscreen to adjust the sound level from the front and rear or right and left side speakers. Press the “Center
‘C’ Button” on the touchscreen to reset the balance and fade to the factory setting. Speed Adjusted Volume Off123
Surround Sound — If Equipped OnOff
Loudness — If Equipped Ye sN o
NOTE:
The “Loudness” feature improves sound quality at lower volumes when enabled.
10
MULTIMEDIA 545
Page 550 of 615
Restore Settings
After pressing the “Restore Settings” button on the touchscreen the following settings will be available:
Setting NameSelectable Options
Restore Settings OKCancel
NOTE:
When the “Restore Settings” feature is selected it will reset all settings to their default settings.
Clear Personal Data
After pressing the “Clear Personal Data Settings” button on the touchscreen the following settings will be available:
Setting Name Selectable Options
Clear Personal Data OKCancel
NOTE:
When the “Clear Personal Data” feature is selected it will remove all personal data including Bluetooth devices and
presets.
548 MULTIMEDIA
Page 566 of 615
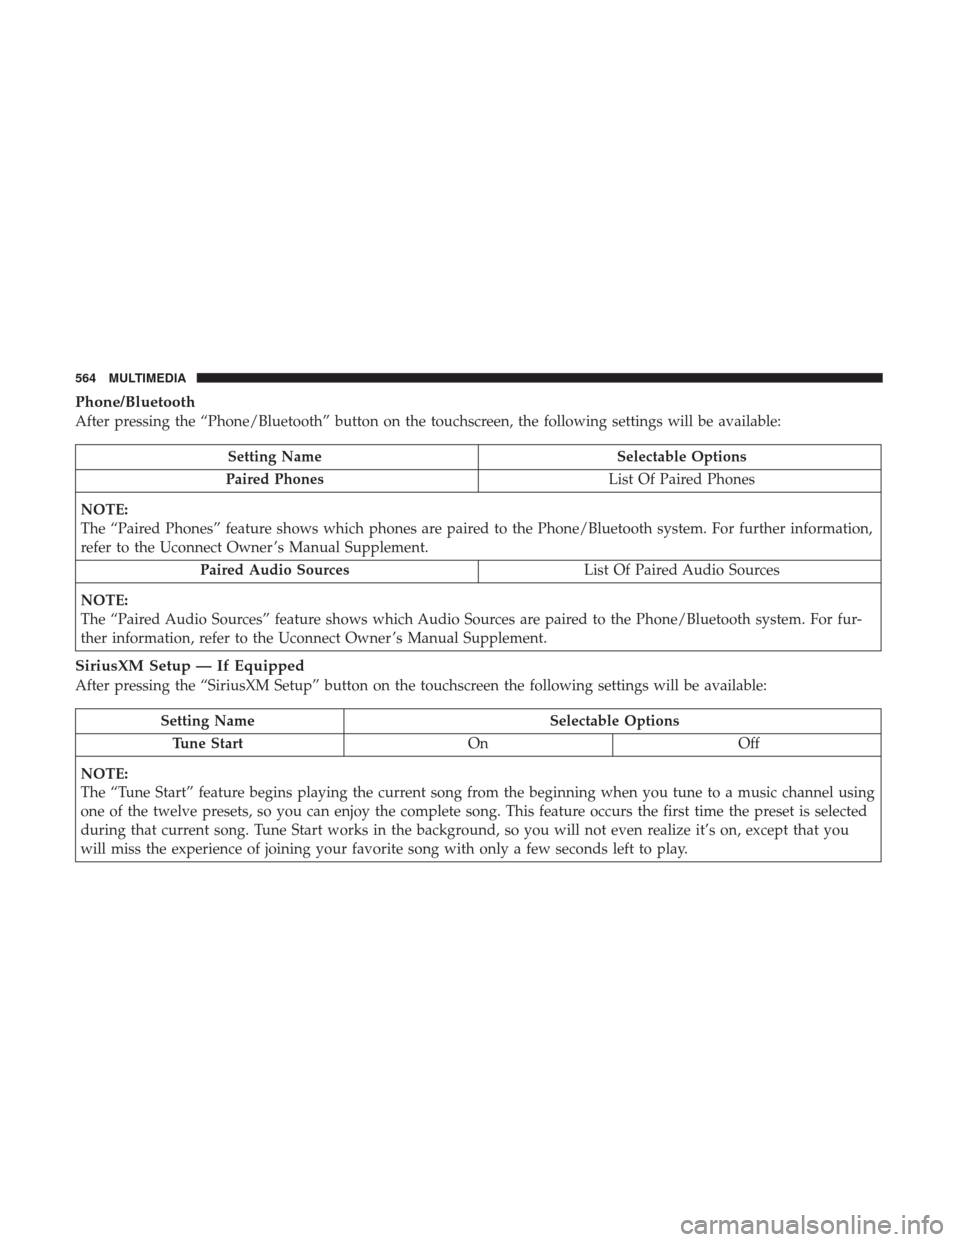
Phone/Bluetooth
After pressing the “Phone/Bluetooth” button on the touchscreen, the following settings will be available:
Setting NameSelectable Options
Paired Phones List Of Paired Phones
NOTE:
The “Paired Phones” feature shows which phones are paired to the Phone/Bluetooth system. For further information,
refer to the Uconnect Owner ’s Manual Supplement. Paired Audio Sources List Of Paired Audio Sources
NOTE:
The “Paired Audio Sources” feature shows which Audio Sources are paired to the Phone/Bluetooth system. For fur-
ther information, refer to the Uconnect Owner ’s Manual Supplement.
SiriusXM Setup — If Equipped
After pressing the “SiriusXM Setup” button on the touchscreen the following settings will be available:
Setting Name Selectable Options
Tune Start OnOff
NOTE:
The “Tune Start” feature begins playing the current song from the beginning when you tune to a music channel using
one of the twelve presets, so you can enjoy the complete song. This feature occurs the first time the preset is selected
during that current song. Tune Start works in the background, so you will not even realize it’s on, except that you
will miss the experience of joining your favorite song with only a few seconds left to play.
564 MULTIMEDIA
Page 567 of 615
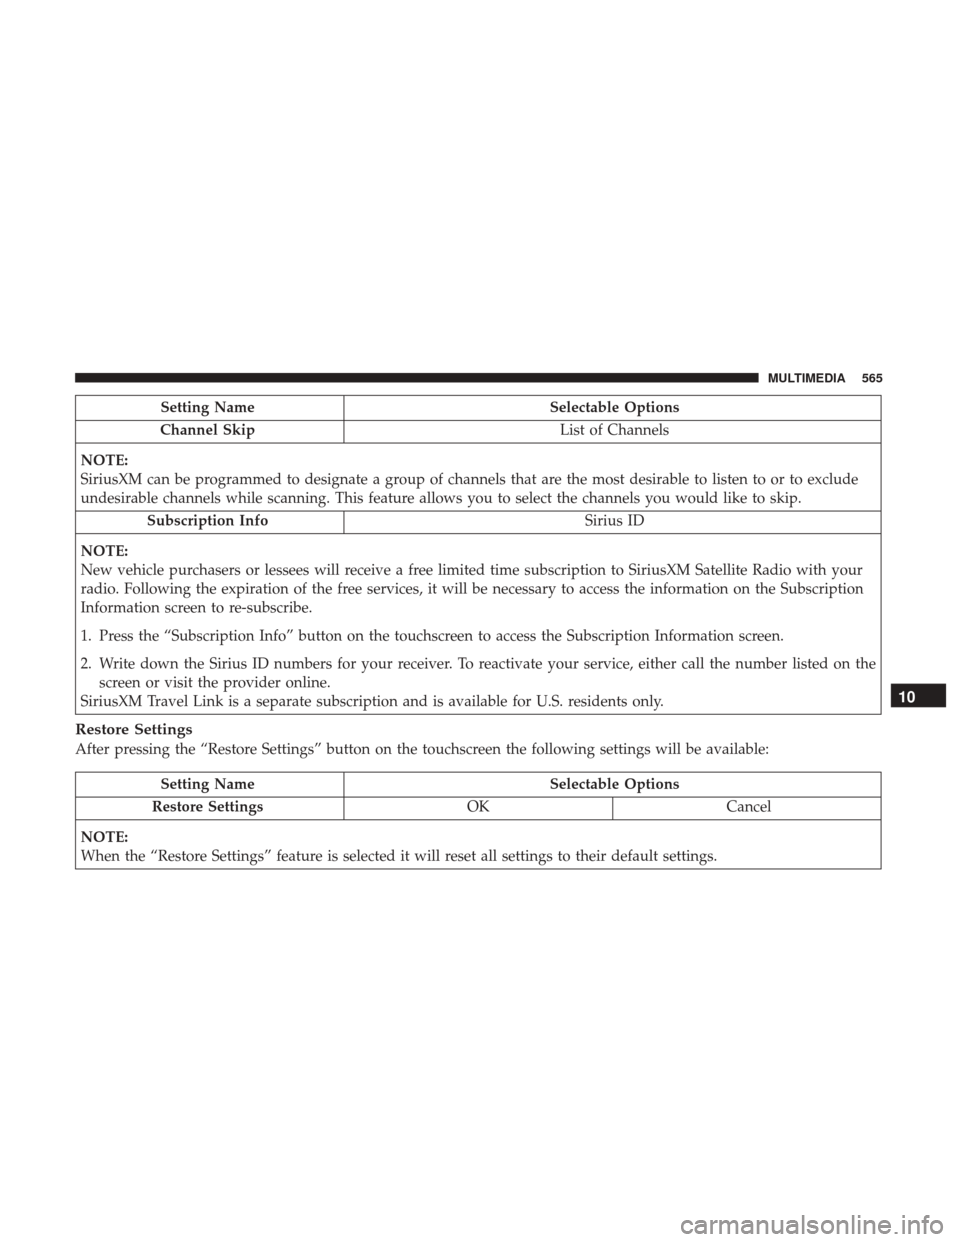
Setting NameSelectable Options
Channel Skip List of Channels
NOTE:
SiriusXM can be programmed to designate a group of channels that are the most desirable to listen to or to exclude
undesirable channels while scanning. This feature allows you to select the channels you would like to skip. Subscription Info Sirius ID
NOTE:
New vehicle purchasers or lessees will receive a free limited time subscription to SiriusXM Satellite Radio with your
radio. Following the expiration of the free services, it will be necessary to access the information on the Subscription
Information screen to re-subscribe.
1. Press the “Subscription Info” button on the touchscreen to access the Subscription Information screen.
2. Write down the Sirius ID numbers for your receiver. To reactivate your service, either call the number listed on the screen or visit the provider online.
SiriusXM Travel Link is a separate subscription and is available for U.S. residents only.
Restore Settings
After pressing the “Restore Settings” button on the touchscreen the following settings will be available:
Setting Name Selectable Options
Restore Settings OKCancel
NOTE:
When the “Restore Settings” feature is selected it will reset all settings to their default settings.
10
MULTIMEDIA 565
Page 568 of 615
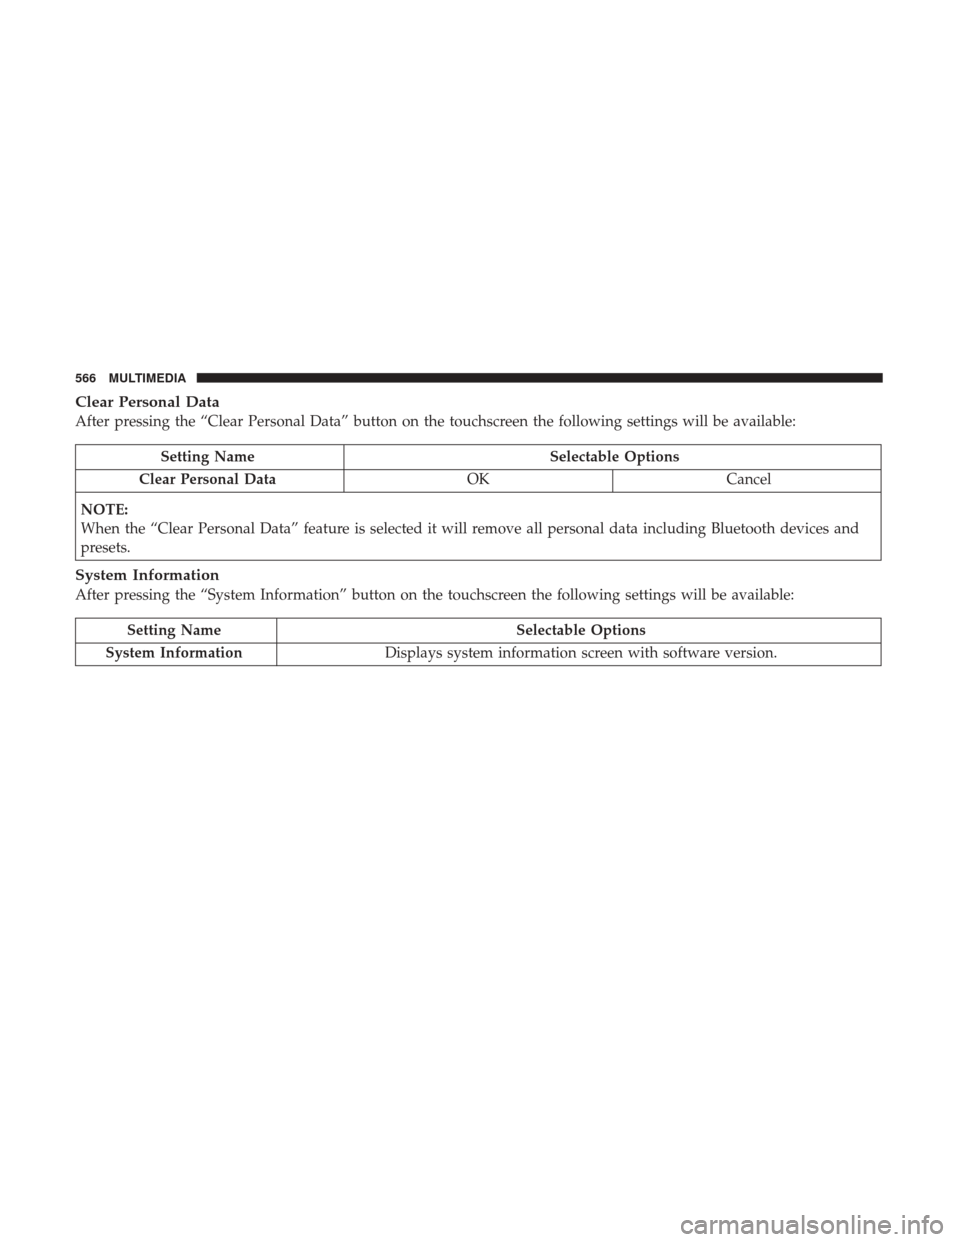
Clear Personal Data
After pressing the “Clear Personal Data” button on the touchscreen the following settings will be available:
Setting NameSelectable Options
Clear Personal Data OKCancel
NOTE:
When the “Clear Personal Data” feature is selected it will remove all personal data including Bluetooth devices and
presets.
System Information
After pressing the “System Information” button on the touchscreen the following settings will be available:
Setting Name Selectable Options
System Information Displays system information screen with software version.
566 MULTIMEDIA
Page 569 of 615
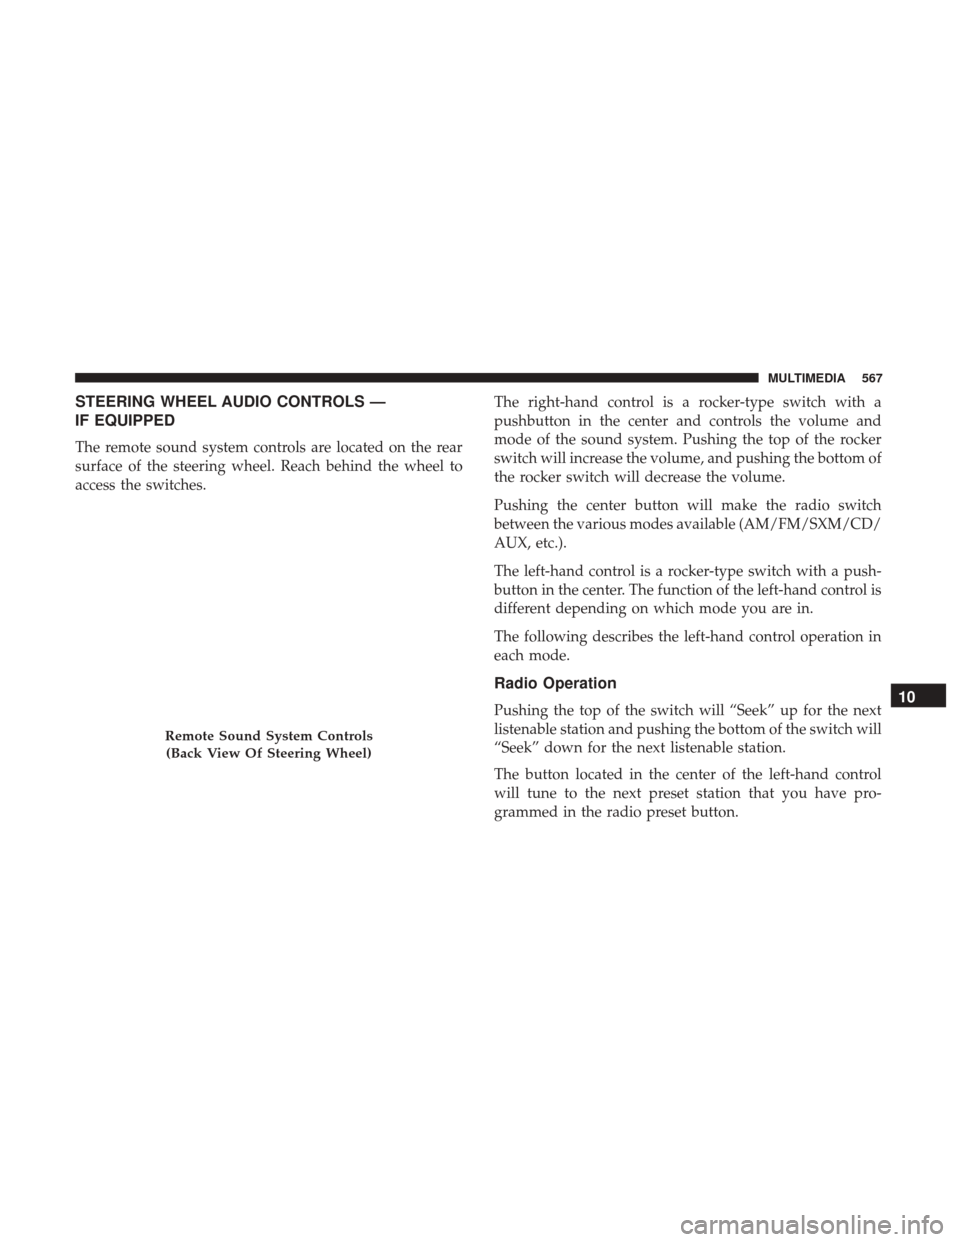
STEERING WHEEL AUDIO CONTROLS —
IF EQUIPPED
The remote sound system controls are located on the rear
surface of the steering wheel. Reach behind the wheel to
access the switches.The right-hand control is a rocker-type switch with a
pushbutton in the center and controls the volume and
mode of the sound system. Pushing the top of the rocker
switch will increase the volume, and pushing the bottom of
the rocker switch will decrease the volume.
Pushing the center button will make the radio switch
between the various modes available (AM/FM/SXM/CD/
AUX, etc.).
The left-hand control is a rocker-type switch with a push-
button in the center. The function of the left-hand control is
different depending on which mode you are in.
The following describes the left-hand control operation in
each mode.
Radio Operation
Pushing the top of the switch will “Seek” up for the next
listenable station and pushing the bottom of the switch will
“Seek” down for the next listenable station.
The button located in the center of the left-hand control
will tune to the next preset station that you have pro-
grammed in the radio preset button.
Remote Sound System Controls
(Back View Of Steering Wheel)
10
MULTIMEDIA 567