bluetooth JEEP CHEROKEE 2017 KL / 5.G User Guide
[x] Cancel search | Manufacturer: JEEP, Model Year: 2017, Model line: CHEROKEE, Model: JEEP CHEROKEE 2017 KL / 5.GPages: 615, PDF Size: 5.72 MB
Page 532 of 615
Buttons On The Faceplate
Buttons on the faceplate are located below the Uconnect
system in the center of the instrument panel. In addition,
there is a Scroll/Enter control knob located on the right
side of the Climate Controls in the center of the instrument
panel. Turn the control knob to scroll through menus and
change settings (i.e., 30, 60, 90), push the center of the
control knob one or more times to select or change a setting
(i.e., ON, OFF).
Your Uconnect system may also have Screen Off and Back
buttons located below the Uconnect system.
Push the Screen Off button to turn off the Uconnect
touchscreen. Push the Screen Off button a second time to
turn the touchscreen on.
Push the Back button to exit out of a Menu or certain
option on the Uconnect system.
Buttons On The Touchscreen
Buttons on the touchscreen are accessible on the Uconnect
display.
Customer Programmable Features/Personal
Settings — Uconnect 5.0 Settings
Push the SETTINGS or the MORE button on the faceplate,
then the “Settings” button on the touchscreen (if equipped)
to display the menu setting screen. In this mode the
Uconnect system allows you to access programmable fea-
tures that may be equipped such as Display, Voice, Clock &
Date, Safety & Assistance, Lights, Doors & Locks, Auto-On
Comfort, Engine Off Options, Compass Settings, Audio,
Phone/Bluetooth, Sirius Setup, Restore Settings, and Clear
Personal Data, Brakes and System Information.
NOTE:Only one category may be selected at a time.
When making a selection, press the button on the touch-
screen to enter the desired mode. Once in the desired
mode, press and release the preferred setting and make
your selection. Once the setting is complete, either press
the Back Arrow/Done button on the touchscreen or the
Back button on the faceplate to return to the previous menu
or press the “X” button on the touchscreen to close out of
the settings screen. Pressing the Up or Down Arrow
buttons on the right side of the screen will allow you to
toggle up or down through the available settings.
530 MULTIMEDIA
Page 548 of 615
Setting NameAdjustable Options
AUX Volume Offset — If Equipped OnOff
NOTE:
The “AUX Volume Offset” feature provides the ability to tune the audio level for portable devices connected through
the AUX input
Phone/Bluetooth
After pressing the “Phone/Bluetooth” button on the touchscreen, the following settings will be available:
Setting Name Selectable Options
Paired Phones List Of Paired Phones
NOTE:
The “Paired Phones” feature shows which phones are paired to the Phone/Bluetooth system. For further information,
refer to the Uconnect Owner ’s Manual Supplement. Paired Audio Sources List Of Paired Audio Sources
NOTE:
The “Paired Audio Sources” feature shows which Audio Sources are paired to the Phone/Bluetooth system. For fur-
ther information, refer to the Uconnect Owner ’s Manual Supplement.
546 MULTIMEDIA
Page 550 of 615
Restore Settings
After pressing the “Restore Settings” button on the touchscreen the following settings will be available:
Setting NameSelectable Options
Restore Settings OKCancel
NOTE:
When the “Restore Settings” feature is selected it will reset all settings to their default settings.
Clear Personal Data
After pressing the “Clear Personal Data Settings” button on the touchscreen the following settings will be available:
Setting Name Selectable Options
Clear Personal Data OKCancel
NOTE:
When the “Clear Personal Data” feature is selected it will remove all personal data including Bluetooth devices and
presets.
548 MULTIMEDIA
Page 551 of 615
Customer Programmable Features/Personal
Settings — Uconnect 8.4 Personal Settings
Press the “Apps” or the “Controls” button on the touchscreen,
then press the “Settings” button on the touchscreen to display
the menu setting screen. In this mode the Uconnect system
allows you to access programmable features that may be
equipped such as Display, Voice, Clock, Safety & Driving
Assistance, Lights, Doors & Locks, Auto-On Comfort, Engine
Off Options, Audio, Phone/Bluetooth, SiriusXM Setup, Re-
store Settings, Clear Personal Data, and System Information.
NOTE:Only one category may be selected at a time. To adjust the setting of a programmable feature, press the
desired setting option. Once in the desired setting option,
press and release the preferred setting until a check-mark
appears next to the setting, showing that the setting has
been selected.
Once the setting is complete, press the Back Arrow button
on the touchscreen to return to the previous menu or press
the X button on the touchscreen to close out of the settings
screen. Pressing the Up or Down Arrow button on the right
side of the screen will allow you to toggle up or down
through the list of available settings.
10
MULTIMEDIA 549
Page 566 of 615
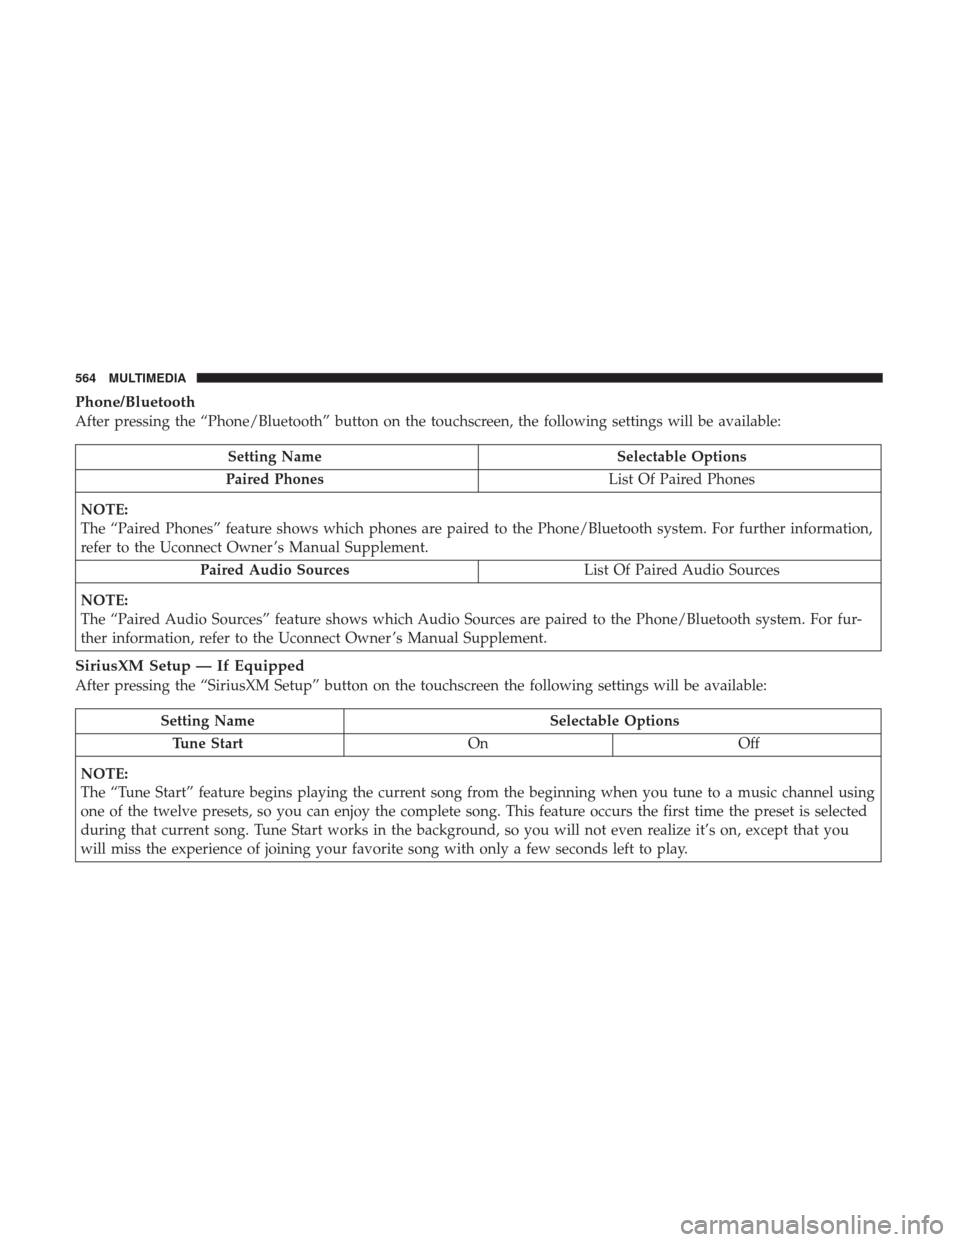
Phone/Bluetooth
After pressing the “Phone/Bluetooth” button on the touchscreen, the following settings will be available:
Setting NameSelectable Options
Paired Phones List Of Paired Phones
NOTE:
The “Paired Phones” feature shows which phones are paired to the Phone/Bluetooth system. For further information,
refer to the Uconnect Owner ’s Manual Supplement. Paired Audio Sources List Of Paired Audio Sources
NOTE:
The “Paired Audio Sources” feature shows which Audio Sources are paired to the Phone/Bluetooth system. For fur-
ther information, refer to the Uconnect Owner ’s Manual Supplement.
SiriusXM Setup — If Equipped
After pressing the “SiriusXM Setup” button on the touchscreen the following settings will be available:
Setting Name Selectable Options
Tune Start OnOff
NOTE:
The “Tune Start” feature begins playing the current song from the beginning when you tune to a music channel using
one of the twelve presets, so you can enjoy the complete song. This feature occurs the first time the preset is selected
during that current song. Tune Start works in the background, so you will not even realize it’s on, except that you
will miss the experience of joining your favorite song with only a few seconds left to play.
564 MULTIMEDIA
Page 568 of 615
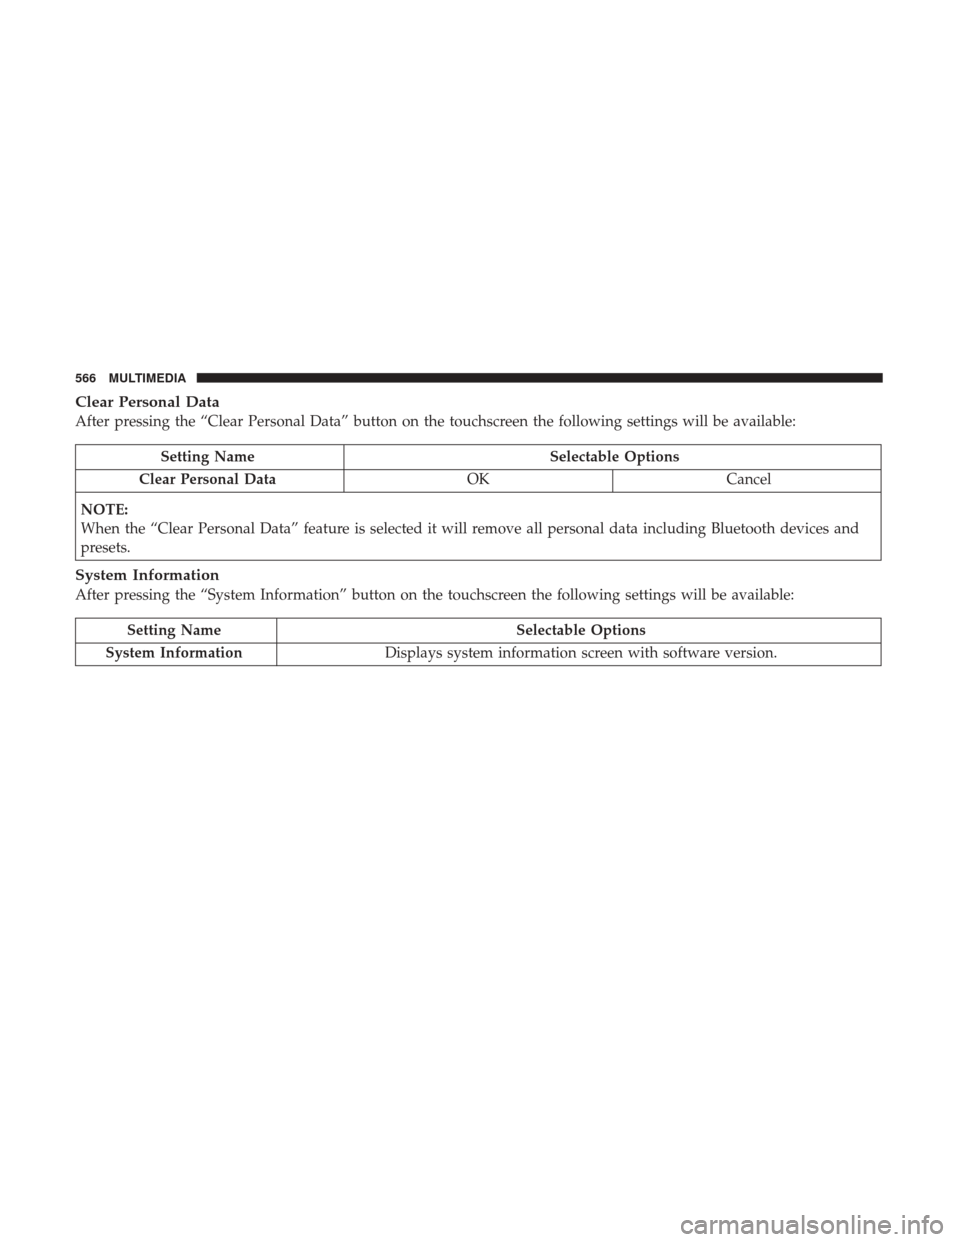
Clear Personal Data
After pressing the “Clear Personal Data” button on the touchscreen the following settings will be available:
Setting NameSelectable Options
Clear Personal Data OKCancel
NOTE:
When the “Clear Personal Data” feature is selected it will remove all personal data including Bluetooth devices and
presets.
System Information
After pressing the “System Information” button on the touchscreen the following settings will be available:
Setting Name Selectable Options
System Information Displays system information screen with software version.
566 MULTIMEDIA
Page 576 of 615
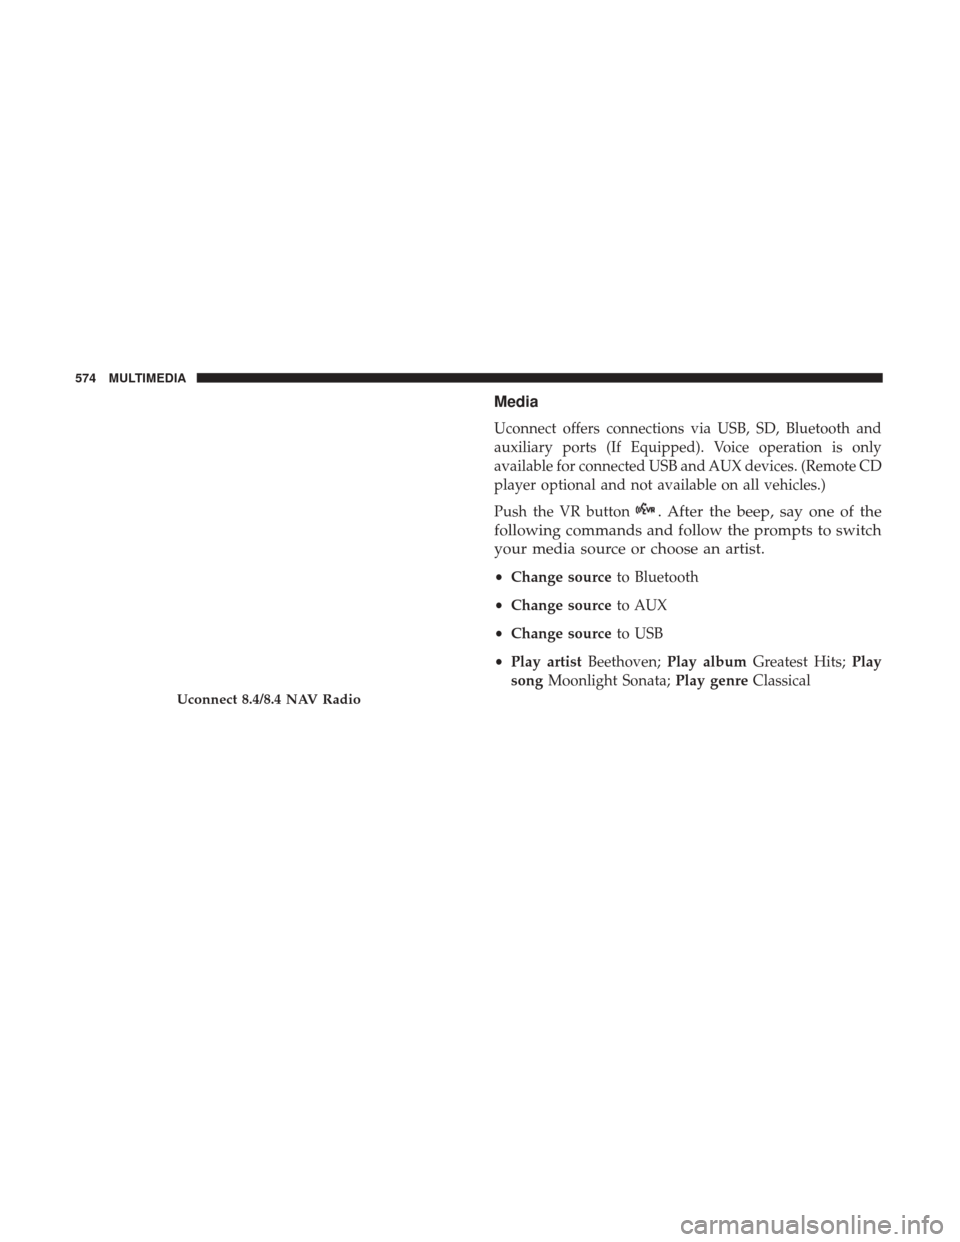
Media
Uconnect offers connections via USB, SD, Bluetooth and
auxiliary ports (If Equipped). Voice operation is only
available for connected USB and AUX devices. (Remote CD
player optional and not available on all vehicles.)
Push the VR button
. After the beep, say one of the
following commands and follow the prompts to switch
your media source or choose an artist.
• Change source to Bluetooth
• Change source to AUX
• Change source to USB
• Play artist Beethoven; Play album Greatest Hits; Play
song Moonlight Sonata; Play genreClassical
Uconnect 8.4/8.4 NAV Radio
574 MULTIMEDIA
Page 580 of 615
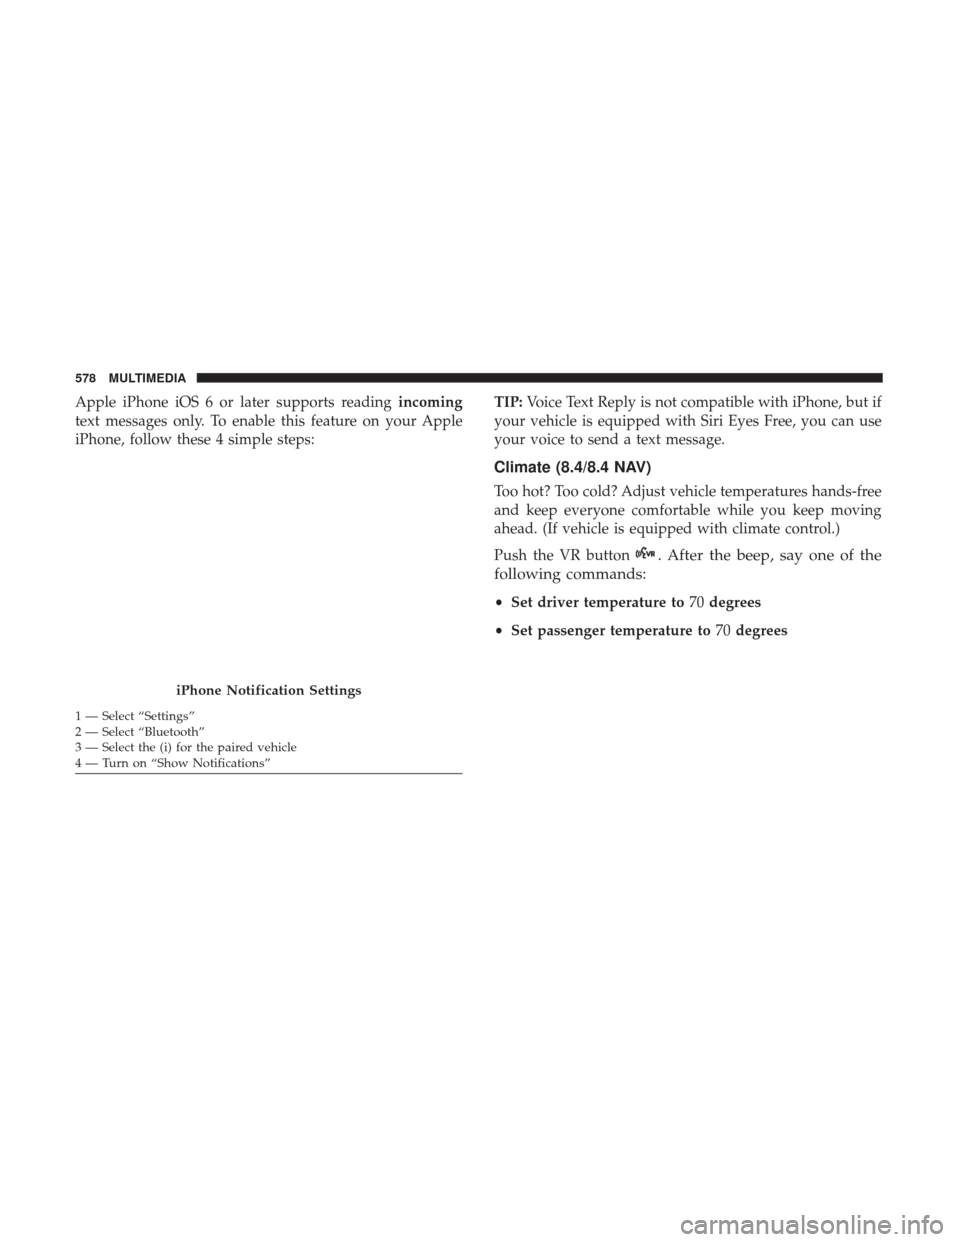
Apple iPhone iOS 6 or later supports readingincoming
text messages only. To enable this feature on your Apple
iPhone, follow these 4 simple steps: TIP:
Voice Text Reply is not compatible with iPhone, but if
your vehicle is equipped with Siri Eyes Free, you can use
your voice to send a text message.
Climate (8.4/8.4 NAV)
Too hot? Too cold? Adjust vehicle temperatures hands-free
and keep everyone comfortable while you keep moving
ahead. (If vehicle is equipped with climate control.)
Push the VR button
. After the beep, say one of the
following commands:
• Set driver temperature to 70degrees
• Set passenger temperature to 70degrees
iPhone Notification Settings
1 — Select “Settings”
2 — Select “Bluetooth”
3 — Select the (i) for the paired vehicle
4 — Turn on “Show Notifications” 578 MULTIMEDIA
Page 584 of 615
Signing up is easy!Simply follow the steps above. Or,
press the “Apps
” button on the touchscreen to
“Register By Web” to complete the process using your
smartphone or computer.
For further information, please visit DriveUconnect.com.
Vehicle Health Alert
Your vehicle will send you an email alert if it senses a
problem under the hood with one of your vehicles key
systems. For further information go to the Mopar Owner
Connect website moparownerconnect.com.
Mobile App (8.4/8.4 NAV)
You’re only a few steps away from using remote com-
mands and playing your favorite music in your vehicle. To link your internet radio accounts:
1.Download the Uconnect Access App to your mobile device.
2.Press the Via Mobile icon on the navigation bar at the
bottom of the app.
3.Press the app you’d like to connect to your vehicle.
4.Enter your login information for the selected app and press
Link.
5.Next time you’re in your vehicle, enable Bluetooth, pair
your phone and select the Via Mobile app you want to play
from the Uconnect touchscreen to stream your personal-
ized music.
Mobile App
582 MULTIMEDIA
Page 585 of 615
NOTE:
•You can also complete this process on the web. Simply
visit moparownerconnect.com log in and click Set Up
Via Mobile Profile (under Quick Links).
• Once you download the app to your compatible mobile
device, you will also be able to start your vehicle and
lock/unlock its doors from virtually anywhere.
Voice Texting (8.4/8.4 NAV)
1. To send a message, push the Phone button. After the
beep, say the following command: “Send messageto
John Smith.”
2. Listen to the prompt. After the beep, dictate the message you would like to send. Wait for Uconnect to process
your message.
3. The Uconnect system will repeat your message and provide a variety of options to add to, delete, send or
hear the message again. After the beep, tell Uconnect
what you’d like to do. For instance, if you’re happy with
your message, after the beep, say: “Send.”You must be registered with Uconnect Access and have a
compatible MAP – enabled smartphone to use your voice
to send a personalized text message. For details about
MAP, visit UconnectPhone.com.
Apple iPhone iOS6 or later supports reading
incomingtext
messages only. To enable this feature on your Apple
iPhone, follow these 4 simple steps:
iPhone Notification Settings
1 — Select “Settings”
2 — Select “Bluetooth”
3 — Select the (i) for the paired vehicle
4 — Turn on “Show Notifications”
10
MULTIMEDIA 583