engine coolant JEEP CHEROKEE 2017 KL / 5.G User Guide
[x] Cancel search | Manufacturer: JEEP, Model Year: 2017, Model line: CHEROKEE, Model: JEEP CHEROKEE 2017 KL / 5.GPages: 615, PDF Size: 5.72 MB
Page 95 of 615
Operating Tips
NOTE:Refer to the chart at the end of this section for
suggested control settings for various weather conditions.
Summer Operation
The engine cooling system must be protected with a
high-quality antifreeze coolant to provide proper corrosion
protection and to protect against engine overheating. OAT
coolant (conforming to MS.90032) is recommended.
Winter Operation
To ensure the best possible heater and defroster perfor-
mance, make sure the engine cooling system is functioning
properly and the proper amount, type, and concentration
of coolant is used. Use of the air Recirculation mode during
Winter months is not recommended, because it may cause
window fogging.
Vacation/Storage
Before you store your vehicle, or keep it out of service (i.e.,
vacation) for two weeks or more, run the air conditioning
system at idle for about five minutes, in fresh air with the
blower setting on high. This will ensure adequate system
lubrication to minimize the possibility of compressor dam-
age when the system is started again.
Window Fogging
Vehicle windows tend to fog on the inside in mild, rainy
and/or humid weather. To clear the windows, select De-
frost or Mix mode and increase the front blower speed. Do
not use the Recirculation mode without A/C for long
periods, as fogging may occur.
Outside Air Intake
Make sure the air intake, located directly in front of the
windshield, is free of obstructions such as leaves. Leaves
collected in the air intake may reduce airflow, and if they
enter the plenum, they could plug the water drains. In
winter months, make sure the air intake is clear of ice,
slush, and snow.
Cabin Air Filter
The climate control system filters out dust and pollen from
the air. Contact your authorized dealer to service your
cabin air filter, and to have it replaced when needed.
3
GETTING TO KNOW YOUR VEHICLE 93
Page 132 of 615
Instrument Cluster Descriptions
1. Tachometer•Indicates the engine speed in revolutions per minute
(RPM x 1000).
2. Instrument Cluster Display •The instrument cluster display features a driver-
interactive display. Refer to “Instrument Cluster Dis-
play” in “Getting To Know Your Instrument Panel” for
further information.
3. Speedometer •Indicates vehicle speed.
4. Fuel Gauge •The fuel gauge shows the level of fuel in the fuel tank
when the ignition is in the ON/RUN position.
•
The fuel pump symbol points to the side of the
vehicle where the fuel door is located.
5. Temperature Gauge
•The temperature gauge shows engine coolant tem-
perature. Any reading within the normal range indi-
cates that the engine cooling system is operating
satisfactorily.
• The gauge will likely indicate a higher temperature
when driving in hot weather or up mountain grades. It
should not be allowed to exceed the upper limits of the
normal operating range.
WARNING!
A hot engine cooling system is dangerous. You or
others could be badly burned by steam or boiling
coolant. You may want to call an authorized dealer for
service if your vehicle overheats.
130 GETTING TO KNOW YOUR INSTRUMENT PANEL
Page 149 of 615
Engine Temperature Warning Light
Red WarningLight What It Means
Engine Temperature Warning Light
This light warns of an overheated engine condition. As engine coolant temperatures rise and the
gauge approaches
H,this indicator will illuminate and a single chime will sound after reaching a
set threshold.
If the light turns on while driving, safely pull over and stop the vehicle. If the A/C system is on,
turn it off. Also, shift the transmission into NEUTRAL and idle the vehicle. If the temperature
reading does not return to normal, turn the engine off immediately and call for service. Refer to
“If Your Engine Overheats” in “In Case Of Emergency” for further information.
Oil Temperature Warning Light
Red Telltale Light What It Means
Oil Temperature Warning Light
This telltale indicates engine oil temperature is high. If the light turns on while driving, stop the ve-
hicle and shut off the engine as soon as possible.
4
GETTING TO KNOW YOUR INSTRUMENT PANEL 147
Page 257 of 615
WARNING!(Continued)
•NEVER place any objects under the floor mat (e.g.,
towels, keys, etc.). These objects could change the
position of the floor mat and may cause interference
with the accelerator, brake, or clutch pedals.
• If the vehicle carpet has been removed and re-
installed, always properly attach carpet to the floor
and check the floor mat fasteners are secure to the
vehicle carpet. Fully depress each pedal to check for
interference with the accelerator, brake, or clutch
pedals then re-install the floor mats.
• It is recommended to only use mild soap and water
to clean your floor mats. After cleaning, always check
your floor mat has been properly installed and is
secured to your vehicle using the floor mat fasteners
by lightly pulling mat.
Periodic Safety Checks You Should Make Outside
The Vehicle
Tires
Examine tires for excessive tread wear and uneven wear
patterns. Check for stones, nails, glass, or other objects
lodged in the tread or sidewall. Inspect the tread for cuts
and cracks. Inspect sidewalls for cuts, cracks, and bulges.
Check the wheel nuts for tightness. Check the tires (includ-
ing spare) for proper cold inflation pressure.
Lights
Have someone observe the operation of brake lights and
exterior lights while you work the controls. Check turn signal
and high beam indicator lights on the instrument panel.
Door Latches
Check for proper closing, latching, and locking.
Fluid Leaks
Check area under vehicle after overnight parking for fuel,
engine coolant, oil, or other fluid leaks. Also, if gasoline
fumes are detected or if fuel, power steering fluid (if
equipped), or brake fluid leaks are suspected. The cause
should be located and corrected immediately.
5
SAFETY 255
Page 438 of 615
IF YOUR ENGINE OVERHEATS
In any of the following situations, you can reduce the
potential for overheating your engine by taking the appro-
priate action.
•On the highways — slow down.
• In city traffic — while stopped, put transmission in
NEUTRAL, but do not increase engine idle speed.
CAUTION!
Driving with a hot cooling system could damage your
vehicle. If the temperature gauge reads “H,” pull over
and stop the vehicle. Idle the vehicle with the air
conditioner turned off until the pointer drops back
into the normal range. If the pointer remains on the
“H” and you hear continuous chimes, turn the engine
off immediately and call for service. NOTE:
There are steps that you can take to slow down an
impending overheat condition:
• If your air conditioner (A/C) is on, turn it off. The A/C
system adds heat to the engine cooling system and
turning the A/C off can help remove this heat.
• You can also turn the temperature control to maximum
heat, the mode control to floor and the blower control to
high. This allows the heater core to act as a supplement
to the radiator and aids in removing heat from the
engine cooling system.
WARNING!
You or others can be badly burned by hot engine
coolant (antifreeze) or steam from your radiator. If you
see or hear steam coming from under the hood, do not
open the hood until the radiator has had time to cool.
Never try to open a cooling system pressure cap when
the radiator or coolant bottle is hot.
436 IN CASE OF EMERGENCY
Page 449 of 615
SCHEDULED SERVICING
Your vehicle is equipped with an automatic oil change
indicator system. The oil change indicator system will
remind you that it is time to take your vehicle in for
scheduled maintenance.
Based on engine operation conditions, the oil change
indicator message will illuminate. This means that service
is required for your vehicle. Operating conditions such as
frequent short-trips, trailer tow, extremely hot or cold
ambient temperatures will influence when the “Oil Change
Required” message is displayed. Severe Operating Condi-
tions can cause the change oil message to illuminate as
early as 3,500 miles (5,600 km) since last reset. Have your
vehicle serviced as soon as possible, within the next 500
miles (805 km).
Your authorized dealer will reset the oil change indicator
message after completing the scheduled oil change. If a
scheduled oil change is performed by someone other than
your authorized dealer, the message can be reset by
referring to the steps described under “Instrument Cluster
Display” in “Understanding Your Instrument Panel” for
further information.NOTE:
Under no circumstances should oil change inter-
vals exceed 10,000 miles (16,000 km), twelve months or 350
hours of engine run time, whichever comes first. The 350
hours of engine run or idle time is generally only a concern
for fleet customers.
Severe Duty All Models
Change Engine Oil at 4,000 miles (6,500 km) if the vehicle
is operated in a dusty and off road environment or is
operated predominately at idle or only very low engine
RPM’s. This type of vehicle use is considered Severe Duty.
Once A Month Or Before A Long Trip:
• Check engine oil level.
• Check windshield washer fluid level.
• Check tire pressure and look for unusual wear or
damage. Rotate tires at the first sign of irregular wear,
even if it occurs before the oil indicator system turns on.
• Check the fluid levels of the coolant reservoir and brake
master cylinder, fill as needed.
• Check function of all interior and exterior lights.
8
SERVICING AND MAINTENANCE 447
Page 451 of 615
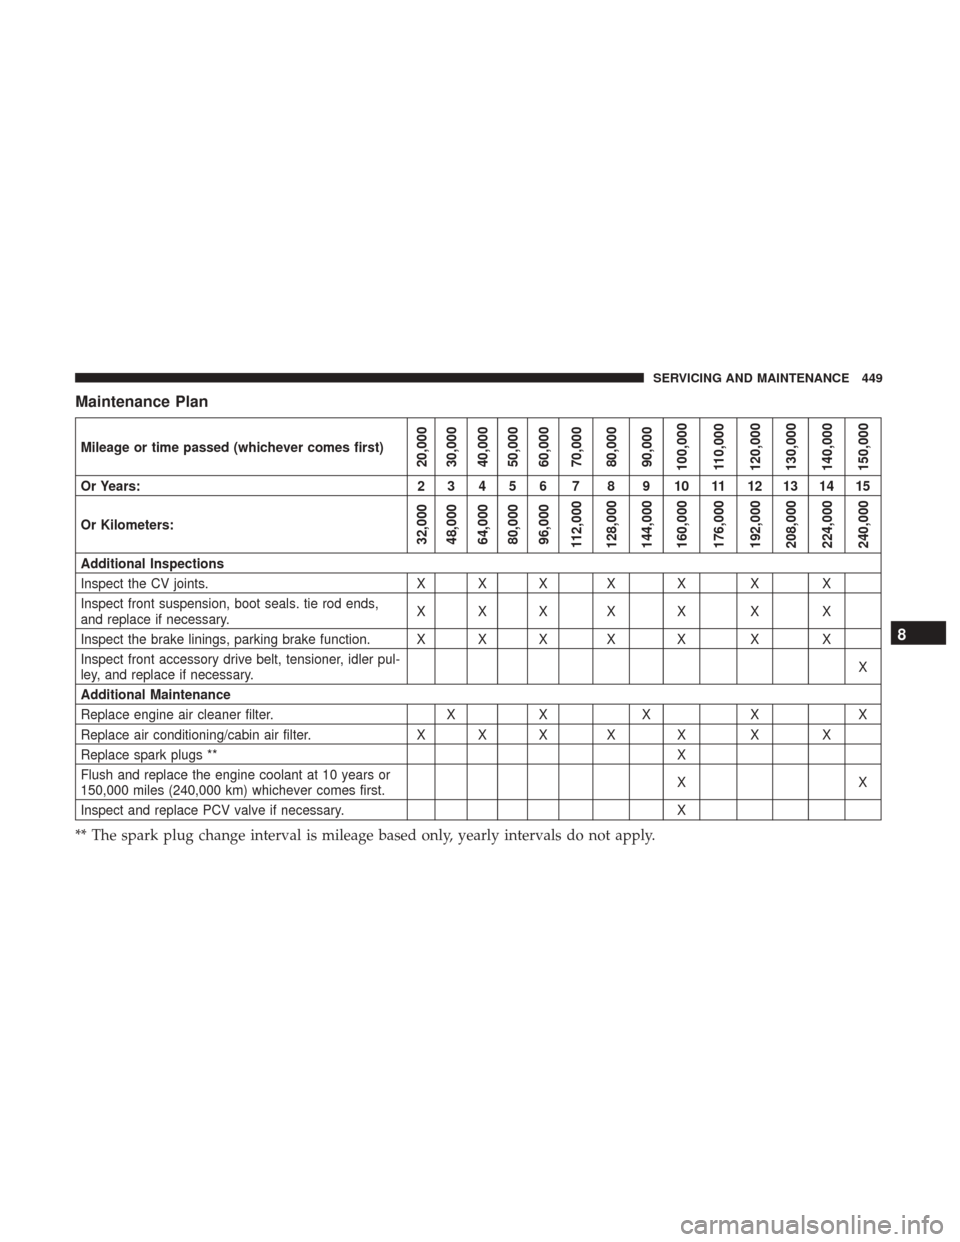
Maintenance Plan
Mileage or time passed (whichever comes first)20,000
30,000
40,000
50,000
60,000
70,000
80,000
90,000
100,000
110,000
120,000
130,000
140,000
150,000
Or Years: 2 3 4 5 6 7 8 9 10 11 12 13 14 15
Or Kilometers:
32,000
48,000
64,000
80,000
96,000
112,000
128,000
144,000
160,000
176,000
192,000
208,000
224,000
240,000
Additional Inspections
Inspect the CV joints. X X X X X X X
Inspect front suspension, boot seals. tie rod ends,
and replace if necessary. XXX X X X X
Inspect the brake linings, parking brake function. X X X X X X X
Inspect front accessory drive belt, tensioner, idler pul-
ley, and replace if necessary. X
Additional Maintenance
Replace engine air cleaner filter. XX X XX
Replace air conditioning/cabin air filter. X X X X X X X
Replace spark plugs ** X
Flush and replace the engine coolant at 10 years or
150,000 miles (240,000 km) whichever comes first. XX
Inspect and replace PCV valve if necessary. X
** The spark plug change interval is mileage based only, yearly intervals do not apply.
8
SERVICING AND MAINTENANCE 449
Page 453 of 615
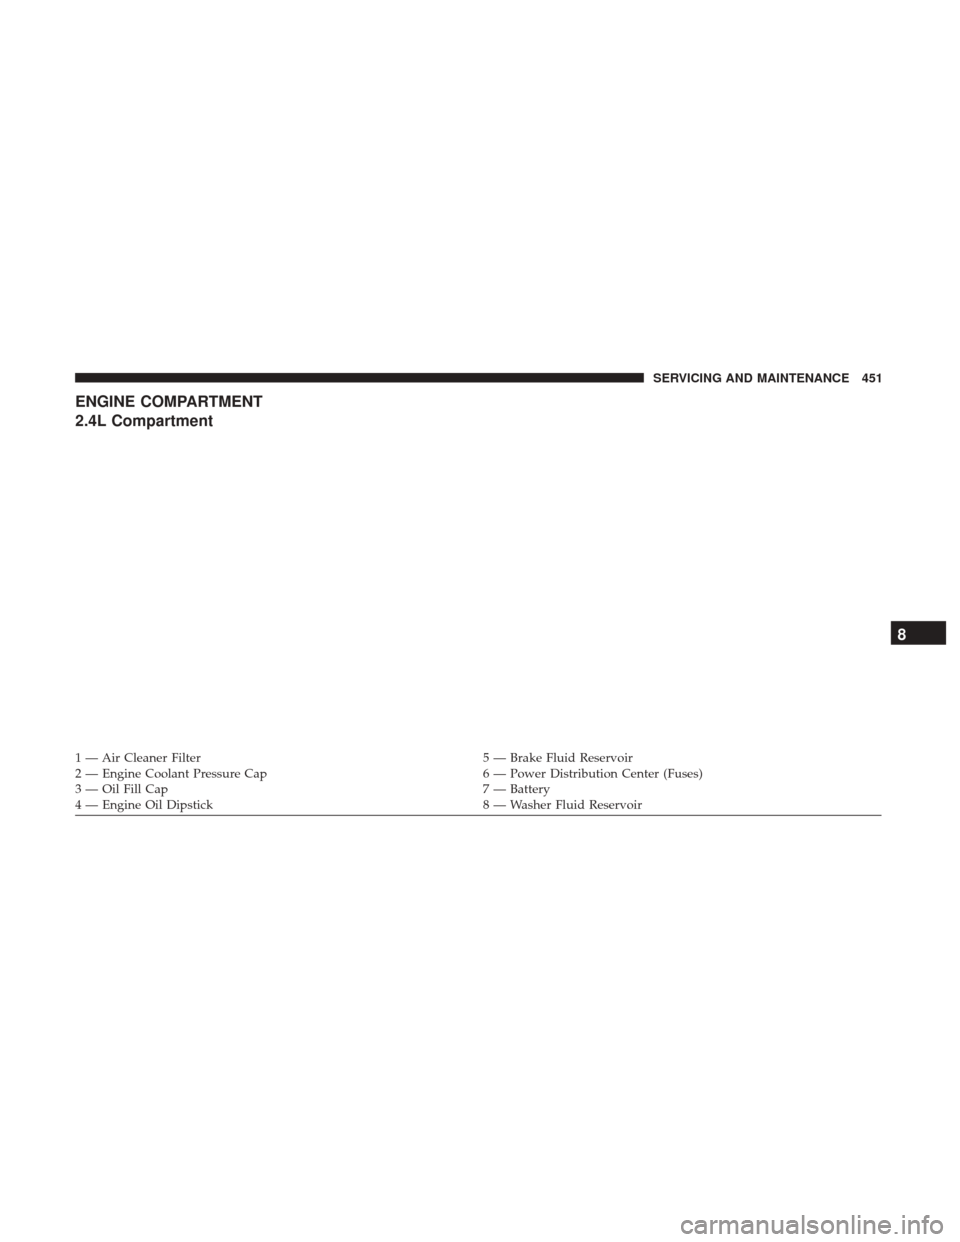
ENGINE COMPARTMENT
2.4L Compartment
1 — Air Cleaner Filter5 — Brake Fluid Reservoir
2 — Engine Coolant Pressure Cap 6 — Power Distribution Center (Fuses)
3 — Oil Fill Cap 7 — Battery
4 — Engine Oil Dipstick 8 — Washer Fluid Reservoir
8
SERVICING AND MAINTENANCE 451
Page 454 of 615
3.2L Compartment
1 — Air Cleaner Filter6 — Brake Fluid Reservoir
2 — Engine Coolant Pressure Cap 7 — Power Distribution Center (Fuses)
3 — Oil Filter Access Cover 8 — Battery
4 — Engine Oil Dipstick 9 — Washer Fluid Reservoir
5 — Engine Oil Fill 452 SERVICING AND MAINTENANCE
Page 476 of 615
Cooling System
WARNING!
You or others can be badly burned by hot engine
coolant (antifreeze) or steam from your radiator. If you
see or hear steam coming from under the hood, do not
open the hood until the radiator has had time to cool.
Never try to open a cooling system pressure cap when
the radiator or coolant bottle is hot.
Engine Coolant Checks
Check the engine coolant (antifreeze) protection every 12
months (before the onset of freezing weather, where appli-
cable). If the engine coolant (antifreeze) is dirty, the system
should be drained, flushed, and refilled with fresh OAT
coolant (conforming to MS.90032) by an authorized dealer.
Check the front of the A/C condenser for any accumula-
tion of bugs, leaves, etc. If dirty, clean by gently spraying
water from a garden hose vertically down the face of the
condenser.
Check the engine cooling system hoses for brittle rubber,
cracking, tears, cuts, and tightness of the connection at the
coolant recovery bottle and radiator. Inspect the entire
system for leaks.With the engine at normal operating temperature (but not
running), check the cooling system pressure cap for proper
vacuum sealing by draining a small amount of engine
coolant (antifreeze) from the radiator drain cock. If the cap
is sealing properly, the engine coolant (antifreeze) will
begin to drain from the coolant recovery bottle. DO NOT
REMOVE THE COOLANT PRESSURE CAP WHEN THE
COOLING SYSTEM IS HOT.
Cooling System — Drain, Flush And Refill
NOTE:
Some vehicles require special tools to add coolant
properly. Failure to fill these systems properly could lead to
severe internal engine damage. If any coolant is needed to
be added to the system please contact your local autho-
rized dealer.
If the engine coolant (antifreeze) is dirty or contains visible
sediment, have an authorized dealer clean and flush with
OAT coolant (antifreeze) (conforming to MS.90032).
Refer to the “Maintenance Plan” in this section for the
proper maintenance intervals.
Selection Of Coolant
Refer to “Fluids And Lubricants” in “Technical Specifica-
tions” for further information.
474 SERVICING AND MAINTENANCE