engine light on JEEP CHEROKEE 2018 Owner handbook (in English)
[x] Cancel search | Manufacturer: JEEP, Model Year: 2018, Model line: CHEROKEE, Model: JEEP CHEROKEE 2018Pages: 312, PDF Size: 4.91 MB
Page 135 of 312
NOTE:
If shift conditions/interlocks are not met, a
message will flash from the instrument clus-
ter display with instructions on how to com-
plete the requested shift. Refer to “Instru-
ment Cluster Display” in “Getting To know
Your Instrument Panel” for further informa-
tion.
Shifting Out Of 4X4 LOW
With the vehicle at speeds of 0 to 3 mph (0 to
5 km/h), the ignition in the ON mode and the
engine running, shift the transmission into
NEUTRAL, and push the “4WD LOW” button
once. The “4WD LOW” indicator light in the
instrument cluster will flash and go out when
the shift is complete.
NOTE:
• If shift conditions/interlocks are not met, amessage will flash from the instrument
cluster display with instructions on how to
complete the requested shift. Refer to “In-
strument Cluster Display” in “Getting To
Know Your Instrument Panel” for further
information.
•
Shifting into or out of 4WD LOW is possible
with the vehicle completely stopped; however,
difficulty may occur due to the mating clutch
teeth not being properly aligned. Several at-
tempts may be required for clutch teeth align-
ment and shift completion to occur. The pre-
ferred method is with the vehicle rolling 0 to
3 mph (0 to 5 km/h). If the vehicle is moving
faster than 3 mph (5 km/h), the 4WD system
will not allow the shift.
NEUTRAL Shift Procedure
WARNING!
You or others could be injured or killed if
you leave the vehicle unattended with the
power transfer unit in the NEUTRAL (N)
position without first fully engaging the
parking brake. The NEUTRAL (N) position
disengages both the front and rear drive-
shafts from the powertrain and will allow
the vehicle to roll, even if the automatic
transmission is in PARK (or manual trans-
mission is in gear). The parking brake
should always be applied when the driver
is not in the vehicle.
1. Bring the vehicle to a complete stop on level ground and shift the automatic
transmission to PARK.
2. Turn the engine OFF.
3. Turn the ignition to the ON/RUN mode, but do not start the engine.
4. Press and hold the brake pedal.
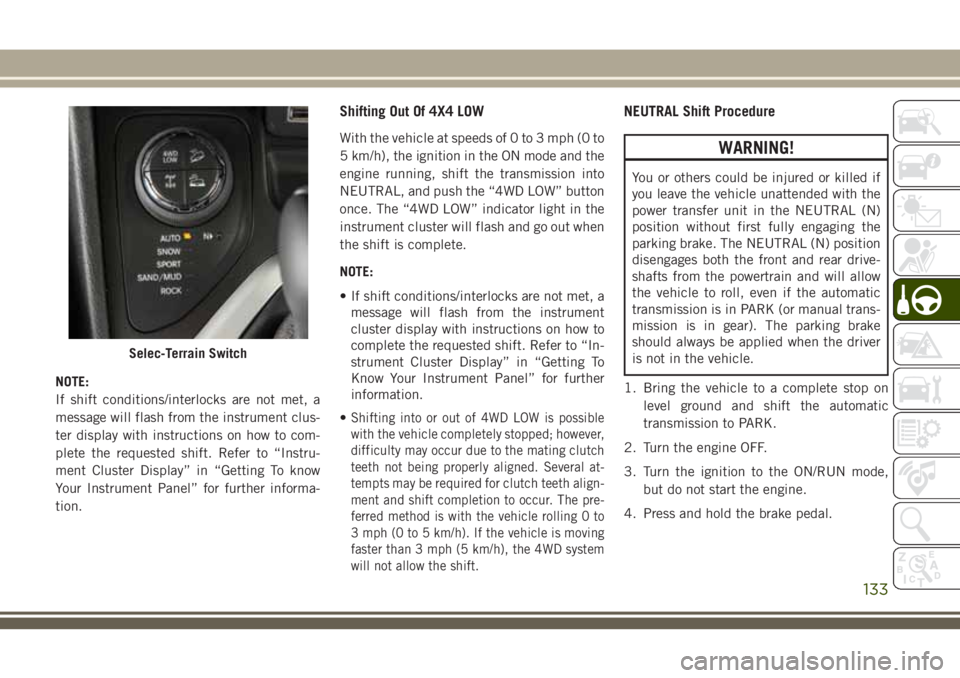
Selec-Terrain Switch
133
Page 136 of 312
5. Shift the transmission into NEUTRAL.
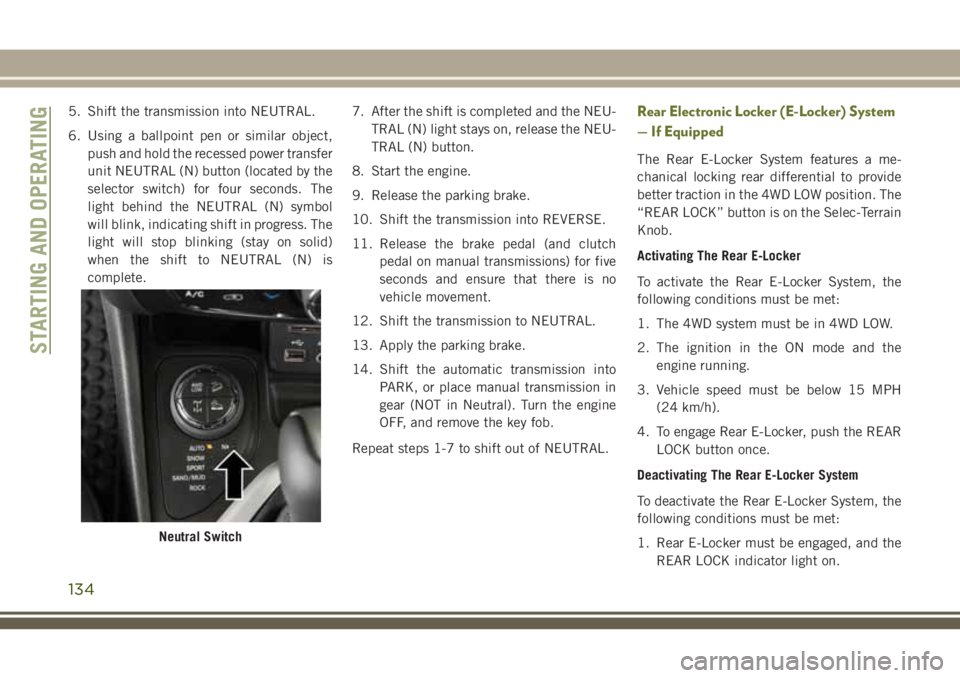
6. Using a ballpoint pen or similar object,push and hold the recessed power transfer
unit NEUTRAL (N) button (located by the
selector switch) for four seconds. The
light behind the NEUTRAL (N) symbol
will blink, indicating shift in progress. The
light will stop blinking (stay on solid)
when the shift to NEUTRAL (N) is
complete. 7. After the shift is completed and the NEU-
TRAL (N) light stays on, release the NEU-
TRAL (N) button.
8. Start the engine.
9. Release the parking brake.
10. Shift the transmission into REVERSE.
11. Release the brake pedal (and clutch pedal on manual transmissions) for five
seconds and ensure that there is no
vehicle movement.
12. Shift the transmission to NEUTRAL.
13. Apply the parking brake.
14. Shift the automatic transmission into PARK, or place manual transmission in
gear (NOT in Neutral). Turn the engine
OFF, and remove the key fob.
Repeat steps 1-7 to shift out of NEUTRAL.Rear Electronic Locker (E-Locker) System
— If Equipped
The Rear E-Locker System features a me-
chanical locking rear differential to provide
better traction in the 4WD LOW position. The
“REAR LOCK” button is on the Selec-Terrain
Knob.
Activating The Rear E-Locker
To activate the Rear E-Locker System, the
following conditions must be met:
1. The 4WD system must be in 4WD LOW.
2. The ignition in the ON mode and the engine running.
3. Vehicle speed must be below 15 MPH (24 km/h).
4. To engage Rear E-Locker, push the REAR LOCK button once.
Deactivating The Rear E-Locker System
To deactivate the Rear E-Locker System, the
following conditions must be met:
1. Rear E-Locker must be engaged, and the REAR LOCK indicator light on.
Neutral Switch
STARTING AND OPERATING
134
Page 137 of 312
2. The ignition in the ON mode and theengine running.
3. To disengage Rear E-Locker, push the REAR LOCK button once.
NOTE:
• It may also be necessary to drive slowly steering back and forth to complete en-
gagement and disengagement of the
E-Locker.
• When engaging Rear E-Locker, the indica- tor lights in the instrument cluster and on
the REAR LOCK button will begin to flash.
When the shift is complete the REAR LOCK
indicator lights will remain on.
• When disengaging Rear E-Locker, the indi- cator lights in the instrument cluster and on
the REAR LOCK button will begin to flash.
When the shift is complete the REAR LOCK
indicator lights will remain off.
• Shifting into or out of Rear E-Locker is possible with the vehicle completely
stopped; however, difficulty may occur due
to the mating clutch teeth not being prop-
erly aligned. Several attempts may be re-
quired for clutch teeth alignment and shift
completion to occur. The preferred method is for the vehicle to be rolling, below
15 MPH (24 km/h), while including right
and left steering maneuvers to allow for the
clutch teeth to align.
• The Rear E-Locker System must be disen- gaged prior to taking the vehicle out of 4WD
LOW range. If 4WD LOW shift conditions/
interlocks are not met, a message will flash
from the instrument cluster display with
instructions on how to complete the re-
quested shift.
SELEC-TERRAIN
Description
Selec-Terrain combines the capabilities of
the vehicle control systems, along with driver
input, to provide the best performance for all
terrains.
Rotate the Selec-Terrain knob to select the
desired mode. Selec-Terrain offers the following modes:
•
Auto — Fully automatic full time four-wheel
drive operation can be used on and off road.
Balances traction with seamless steering
feel to provide improved handling and ac-
celeration over two-wheel drive vehicles.
• Snow — Tuning set for additional stability
in inclement weather. Use on and off road
on loose traction surfaces such as snow.
When in SNOW mode (depending on cer-
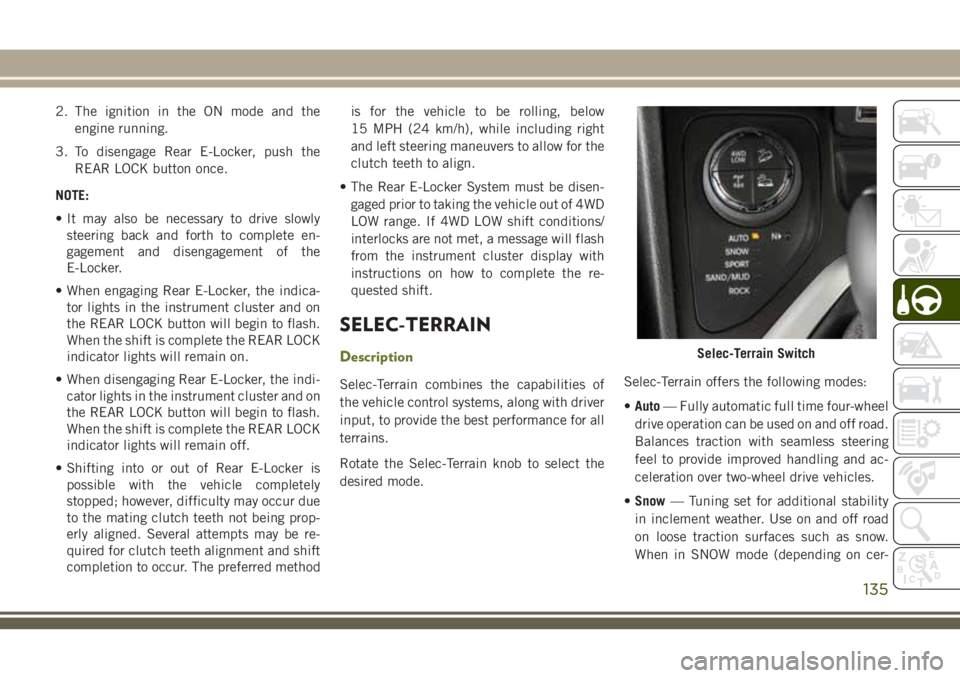
Selec-Terrain Switch
135
Page 138 of 312
tain operating conditions), the transmis-
sion may use second gear (rather than first
gear) during launches, to minimize wheel
slippage.
• Sport — This mode alters the transmis-
sion's automatic shift schedule for sportier
driving. Upshift speeds are increased to
make full use of available engine power.
NOTE:
SPORT mode is not available when 4WD LOW
is selected.
• Sand/Mud — Off-road calibration for use on
low traction surfaces such as mud, sand, or
wet grass. Driveline is maximized for trac-
tion. Some binding may be felt on less
forgiving surfaces. The electronic brake
controls are set to limit traction control
management of throttle and wheel spin.
• Rock — Off-road calibration only available
in 4WD LOW range. Traction based tuning
with improved steer-ability for use on high
traction off-road surfaces. Use for low
speed obstacles such as large rocks, deep
ruts, etc. NOTE:
• Rock mode is only available on the vehicles
equipped with the Off-Road package.
• Activate the Hill Descent Control or Selec Speed Control for steep downhill control.
See “Electronic Brake Control System” in
“Safety” for further information.
STOP/START SYSTEM —
IF EQUIPPED
The Stop/Start function was developed to
reduce fuel consumption. The system will
stop the engine automatically during a ve-
hicle stop if the required conditions are met.
Releasing the brake pedal or pressing the
accelerator pedal will automatically restart
the engine.
This vehicle has been upgraded with a Heavy
Duty Battery, Starter, as well as other engine
parts, to handle the Additional engine starts.
Automatic Mode
The Stop/Start feature is enabled after every
normal customer engine start. At that time,
the system will go into STOP/START READY
and if all other conditions are met, can go
into a STOP/START AUTOSTOP ACTIVE “Au-
tostop” mode.
To Activate The Autostop Mode, The Following
Must Occur:
• The system must be in STOP/STARTREADY state. A STOP/START READY mes-
sage will be displayed in the instrument
cluster display within the Stop/Start sec-
tion. Refer to “Warning Lights And Mes-
sages” in “Getting To Know Your Instru-
ment Panel” in your Owner’s Manual.
• The vehicle must be completely stopped.
• The gear selector must be in a forward gear and the brake pedal depressed.
The engine will shut down, the tachometer
will move to the zero position and the Stop/
Start telltale will illuminate indicating you
are in Autostop. Customer settings will be
maintained upon return to an engine running
condition.
STARTING AND OPERATING
136
Page 140 of 312
Conditions That Force An Application Of The
Electric Park Brake While In Autostop Mode:
• The driver’s door is open and brake pedalreleased.
• The driver’s door is open and the driver’s seat belt is unbuckled.
• The engine hood has been opened.
• A STOP/START system error occurs.
If the Electric Park Brake is applied with the
engine off, the engine may require a manual
restart and the electric park brake may re-
quire a manual release (depress brake pedal
and push Electric Park Brake switch). Refer
to “Instrument Cluster Display” in “Getting
To Know Your Instrument Panel” in your Own-
er’s Manual.
To Manually Turn Off The Stop/Start
System
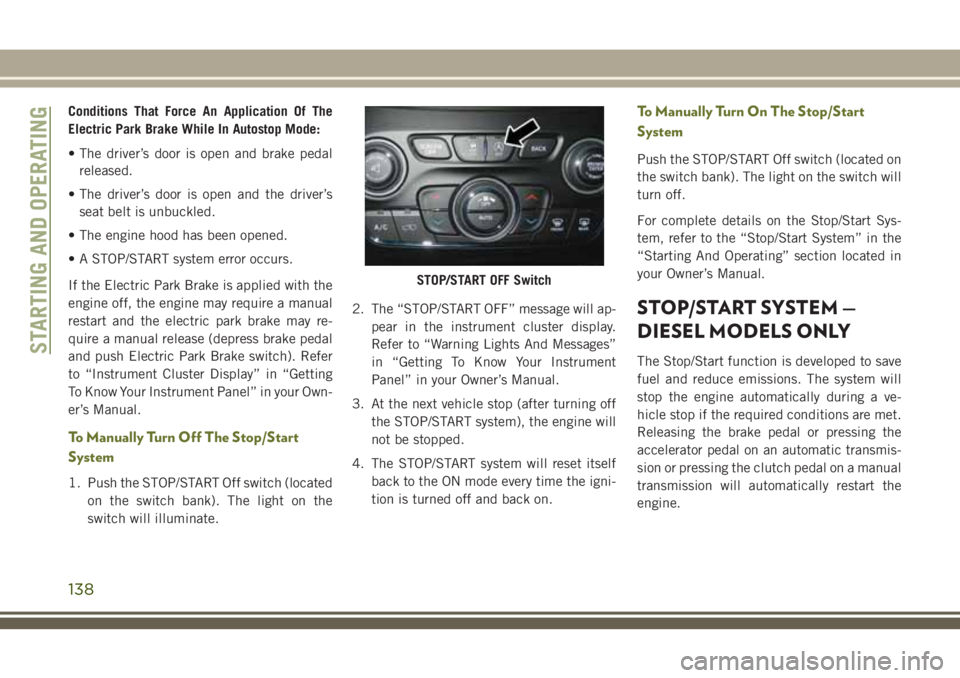
1. Push the STOP/START Off switch (located on the switch bank). The light on the
switch will illuminate. 2. The “STOP/START OFF” message will ap-
pear in the instrument cluster display.
Refer to “Warning Lights And Messages”
in “Getting To Know Your Instrument
Panel” in your Owner’s Manual.
3. At the next vehicle stop (after turning off the STOP/START system), the engine will
not be stopped.
4. The STOP/START system will reset itself back to the ON mode every time the igni-
tion is turned off and back on.
To Manually Turn On The Stop/Start
System
Push the STOP/START Off switch (located on
the switch bank). The light on the switch will
turn off.
For complete details on the Stop/Start Sys-
tem, refer to the “Stop/Start System” in the
“Starting And Operating” section located in
your Owner’s Manual.
STOP/START SYSTEM —
DIESEL MODELS ONLY
The Stop/Start function is developed to save
fuel and reduce emissions. The system will
stop the engine automatically during a ve-
hicle stop if the required conditions are met.
Releasing the brake pedal or pressing the
accelerator pedal on an automatic transmis-
sion or pressing the clutch pedal on a manual
transmission will automatically restart the
engine.
STOP/START OFF Switch
STARTING AND OPERATING
138
Page 142 of 312
To Start The Engine While In Autostop
Mode
Automatic Transmission:
While in DRIVE, the engine will start when
the brake pedal is released or the throttle
pedal is depressed. The transmission will
automatically re-engage upon engine restart.
During this transition, the brakes will hold
the vehicle to avoid undesired vehicle move-
ment.
Manual Transmission:
When the gear selector is in NEUTRAL, the
engine will start when the clutch pedal is
pressed. The vehicle will go into STOP/
START SYSTEM NOT READY mode until the
vehicle speed is greater than 4 mph (7 km/h).
Conditions That Will Cause The Engine To Start
Automatically While In Autostop Mode:
• The transmission gear selector is movedfrom DRIVE to REVERSE or NEUTRAL.
• To maintain cabin temperature comfort.
• HVAC is set to full defrost mode. • Battery voltage drops too low.
• Low brake vacuum (e.g. after several brake
pedal applications).
• STOP/START OFF switch is pushed.
• 4WD system is put into 4LO mode.
• The emissions system requires it.
• A STOP/START system error occurs.
• HVAC system temperature or fan speed is manually adjusted.
Conditions That Force An Application Of The
Electric Park Brake While In Autostop Mode:
• The driver door is open and brake pedal released.
• The driver door is open and the driver seat belt is unbuckled.
• The engine hood has been opened.
• A STOP/START system error occurs.
If the Electric Park Brake is applied with the
engine off, the engine may require a manual
restart and the electric park brake may re-
quire a manual release (depress brake pedal
and push Electric Park Brake switch). Refer to “Instrument Cluster Display” in “Getting
To Know Your Instrument Panel” in your Own-
er’s Manual for further information.
To Manually Turn Off The Stop/Start
System
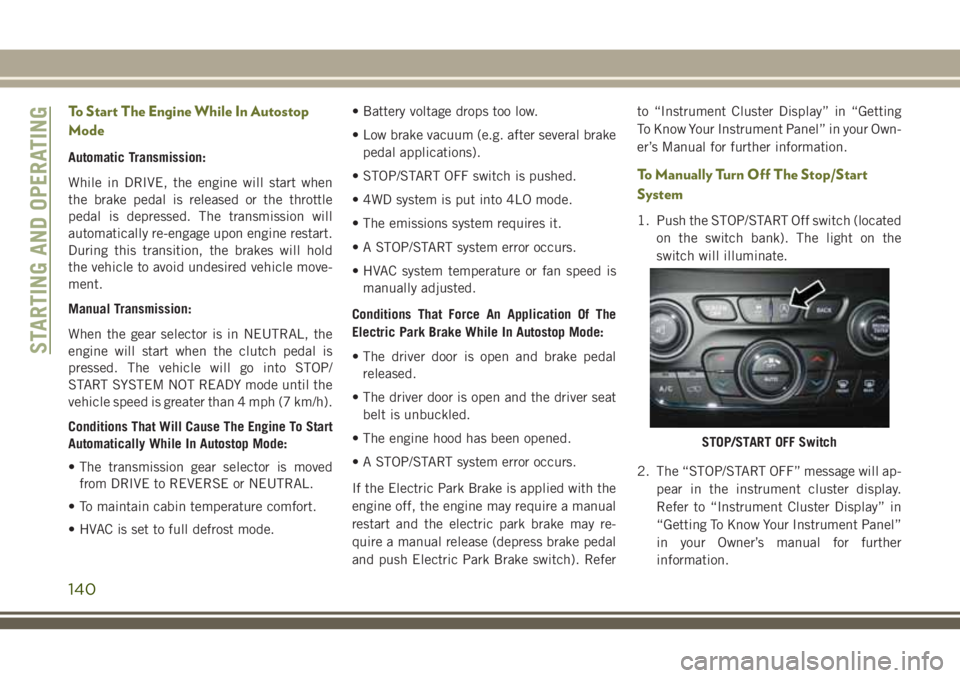
1. Push the STOP/START Off switch (located
on the switch bank). The light on the
switch will illuminate.
2. The “STOP/START OFF” message will ap- pear in the instrument cluster display.
Refer to “Instrument Cluster Display” in
“Getting To Know Your Instrument Panel”
in your Owner’s manual for further
information.
STOP/START OFF Switch
STARTING AND OPERATING
140
Page 143 of 312
3. At the next vehicle stop (after turning offthe STOP/START system) the engine will
not be stopped.
4. If the STOP/START system is manually turned off, the engine can only be started
and stopped by cycling the ignition
switch.
5. The STOP/START system will reset itself back to an ON condition every time the
key is turned off and back on.
To Manually Turn On The Stop/Start
System
Push the STOP/START Off switch (located on
the switch bank). The light on the switch will
turn off.
SPEED CONTROL
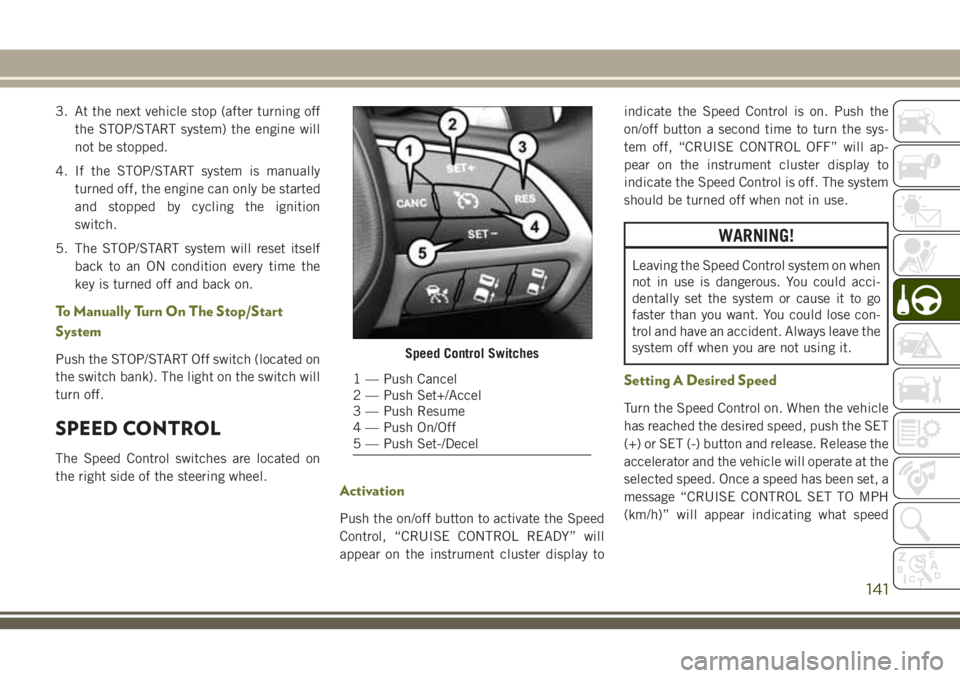
The Speed Control switches are located on
the right side of the steering wheel.
Activation
Push the on/off button to activate the Speed
Control, “CRUISE CONTROL READY” will
appear on the instrument cluster display to indicate the Speed Control is on. Push the
on/off button a second time to turn the sys-
tem off, “CRUISE CONTROL OFF” will ap-
pear on the instrument cluster display to
indicate the Speed Control is off. The system
should be turned off when not in use.
WARNING!
Leaving the Speed Control system on when
not in use is dangerous. You could acci-
dentally set the system or cause it to go
faster than you want. You could lose con-
trol and have an accident. Always leave the
system off when you are not using it.
Setting A Desired Speed
Turn the Speed Control on. When the vehicle
has reached the desired speed, push the SET
(+) or SET (-) button and release. Release the
accelerator and the vehicle will operate at the
selected speed. Once a speed has been set, a
message “CRUISE CONTROL SET TO MPH
(km/h)” will appear indicating what speed
Speed Control Switches
1 — Push Cancel
2 — Push Set+/Accel
3 — Push Resume
4 — Push On/Off
5 — Push Set-/Decel
141
Page 146 of 312
Remove your foot from the accelerator pedal.
If you do not, the vehicle may continue to
accelerate beyond the set speed. If this oc-
curs:
• The message “DRIVER OVERRIDE” willappear in the instrument cluster display.
• The system will not be controlling the dis- tance between your vehicle and the vehicle
ahead. The vehicle speed will only be de-
termined by the position of the accelerator
pedal.
Varying The Speed
Once the ACC has been activated, the speed
can be increased or decreased.
NOTE:
• When you override and push the SET (+)
button or SET (-)buttons, the new set
speed will be the current speed of the
vehicle.
• When you use the SET (-)button to decel-
erate, if the engine’s braking power does
not slow the vehicle sufficiently to reach
the set speed, the brake system will auto-
matically slow the vehicle. • The ACC system applies the brake down to
a full stop when following a target vehicle.
If an ACC host vehicle follows a target
vehicle to a standstill, the host vehicle will
release the vehicle brakes two seconds af-
ter coming to a full stop.
• The ACC system maintains set speed when driving up hill and down hill. However, a
slight speed change on moderate hills is
normal. In addition, downshifting may oc-
cur while climbing uphill or descending
downhill. This is normal operation and nec-
essary to maintain set speed. When driving
up hill and down hill, the ACC system will
cancel if the braking temperature exceeds
normal range (overheated).
To Increase Speed
While ACC is set, you can increase the set
speed by pushing the SET (+)button.
The driver's preferred units can be selected
through the instrument panel settings if
equipped. Refer to “Getting To Know Your
Instrument Panel” in the Owner’s Manual for
further information. The speed increment
shown is dependant on the chosen speed unit
of U.S. (mph) or Metric (km/h): U.S. Speed (mph)
• Pushing the SET
(+)button once will result
in a 1 mph increase in set speed. Each
subsequent tap of the button results in an
increase of 1 mph.
• If the button is continually pushed, the set speed will continue to increase in 5 mph
increments until the button is released.
The increase in set speed is reflected in the
instrument cluster display.
Metric Speed (km/h)
• Pushing the SET (+)button once will result
in a 1 km/h increase in set speed. Each
subsequent tap of the button results in an
increase of 1 km/h.
• If the button is continually pushed, the set speed will continue to increase in 10 km/h
increments until the button is released.
The increase in set speed is reflected in the
instrument cluster display.
To Decrease Speed
While ACC is set, the set speed can be de-
creased by pushing the SET (-)button.
STARTING AND OPERATING
144
Page 158 of 312
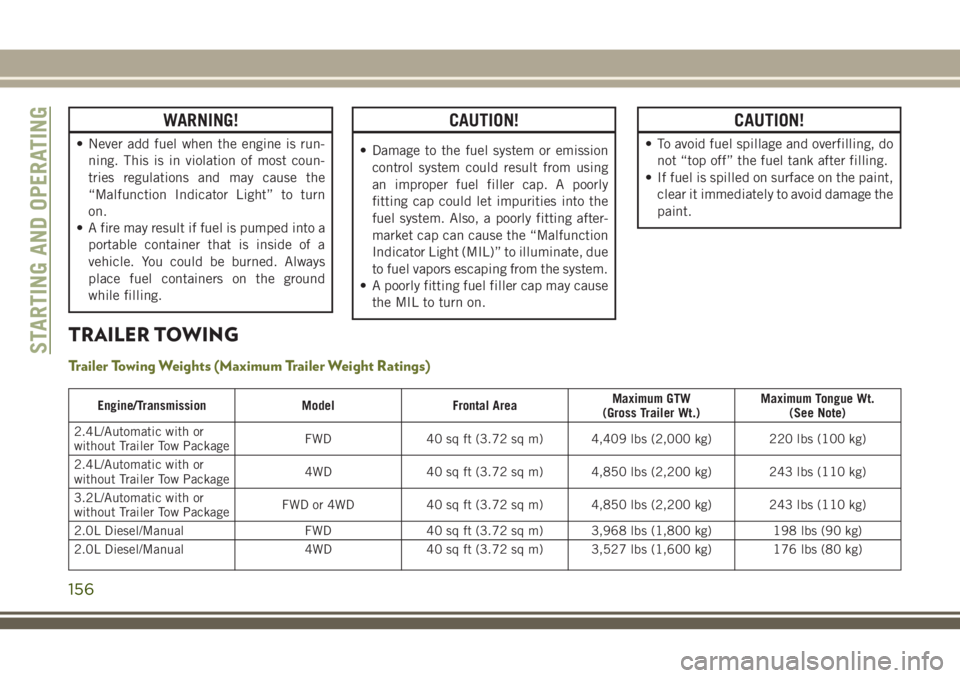
WARNING!
• Never add fuel when the engine is run-ning. This is in violation of most coun-
tries regulations and may cause the
“Malfunction Indicator Light” to turn
on.
• A fire may result if fuel is pumped into a
portable container that is inside of a
vehicle. You could be burned. Always
place fuel containers on the ground
while filling.
CAUTION!
• Damage to the fuel system or emissioncontrol system could result from using
an improper fuel filler cap. A poorly
fitting cap could let impurities into the
fuel system. Also, a poorly fitting after-
market cap can cause the “Malfunction
Indicator Light (MIL)” to illuminate, due
to fuel vapors escaping from the system.
• A poorly fitting fuel filler cap may cause
the MIL to turn on.
CAUTION!
• To avoid fuel spillage and overfilling, donot “top off” the fuel tank after filling.
• If fuel is spilled on surface on the paint,
clear it immediately to avoid damage the
paint.
TRAILER TOWING
Trailer Towing Weights (Maximum Trailer Weight Ratings)
Engine/Transmission ModelFrontal Area Maximum GTW
(Gross Trailer Wt.) Maximum Tongue Wt.
(See Note)
2.4L/Automatic with or
without Trailer Tow Package FWD
40 sq ft (3.72 sq m) 4,409 lbs (2,000 kg) 220 lbs (100 kg)
2.4L/Automatic with or
without Trailer Tow Package 4WD
40 sq ft (3.72 sq m) 4,850 lbs (2,200 kg) 243 lbs (110 kg)
3.2L/Automatic with or
without Trailer Tow Package FWD or 4WD
40 sq ft (3.72 sq m) 4,850 lbs (2,200 kg) 243 lbs (110 kg)
2.0L Diesel/Manual FWD40 sq ft (3.72 sq m) 3,968 lbs (1,800 kg) 198 lbs (90 kg)
2.0L Diesel/Manual 4WD40 sq ft (3.72 sq m) 3,527 lbs (1,600 kg) 176 lbs (80 kg)
STARTING AND OPERATING
156
Page 169 of 312
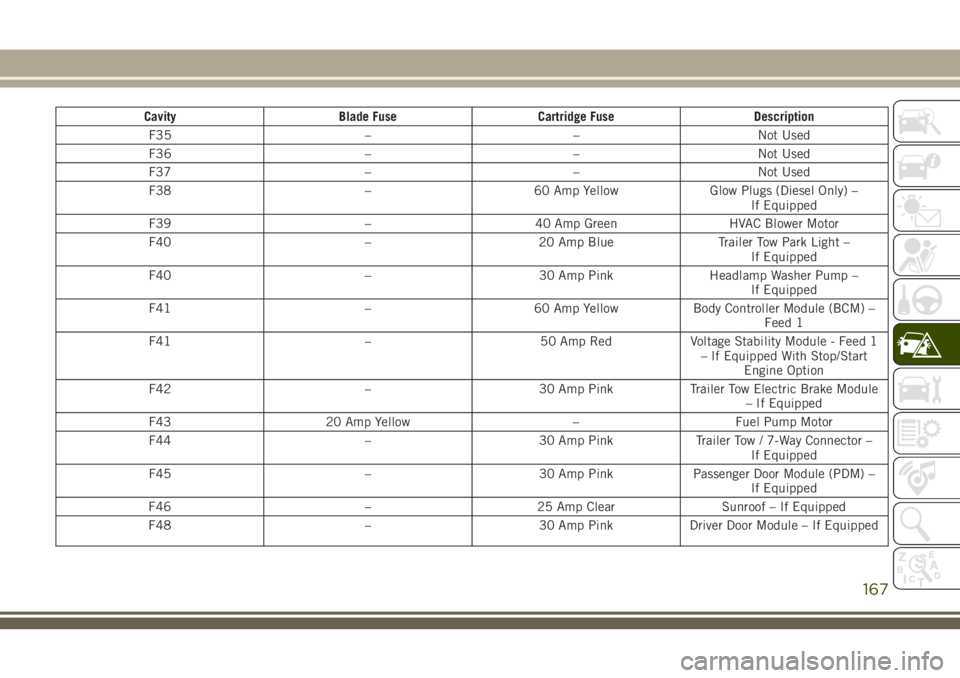
CavityBlade Fuse Cartridge Fuse Description
F35 ––Not Used
F36 ––Not Used
F37 ––Not Used
F38 –60 Amp Yellow Glow Plugs (Diesel Only) –
If Equipped
F39 –40 Amp Green HVAC Blower Motor
F40 –20 Amp Blue Trailer Tow Park Light –
If Equipped
F40 –30 Amp PinkHeadlamp Washer Pump –
If Equipped
F41 –60 Amp YellowBody Controller Module (BCM) –
Feed 1
F41 –50 Amp RedVoltage Stability Module - Feed 1
– If Equipped With Stop/Start Engine Option
F42 –30 Amp PinkTrailer Tow Electric Brake Module
– If Equipped
F43 20 Amp Yellow –Fuel Pump Motor
F44 –30 Amp PinkTrailer Tow / 7-Way Connector –
If Equipped
F45 –30 Amp PinkPassenger Door Module (PDM) –
If Equipped
F46 –25 Amp Clear Sunroof – If Equipped
F48 –30 Amp PinkDriver Door Module – If Equipped
167