USB JEEP CHEROKEE 2018 Owner handbook (in English)
[x] Cancel search | Manufacturer: JEEP, Model Year: 2018, Model line: CHEROKEE, Model: JEEP CHEROKEE 2018Pages: 312, PDF Size: 4.91 MB
Page 174 of 312
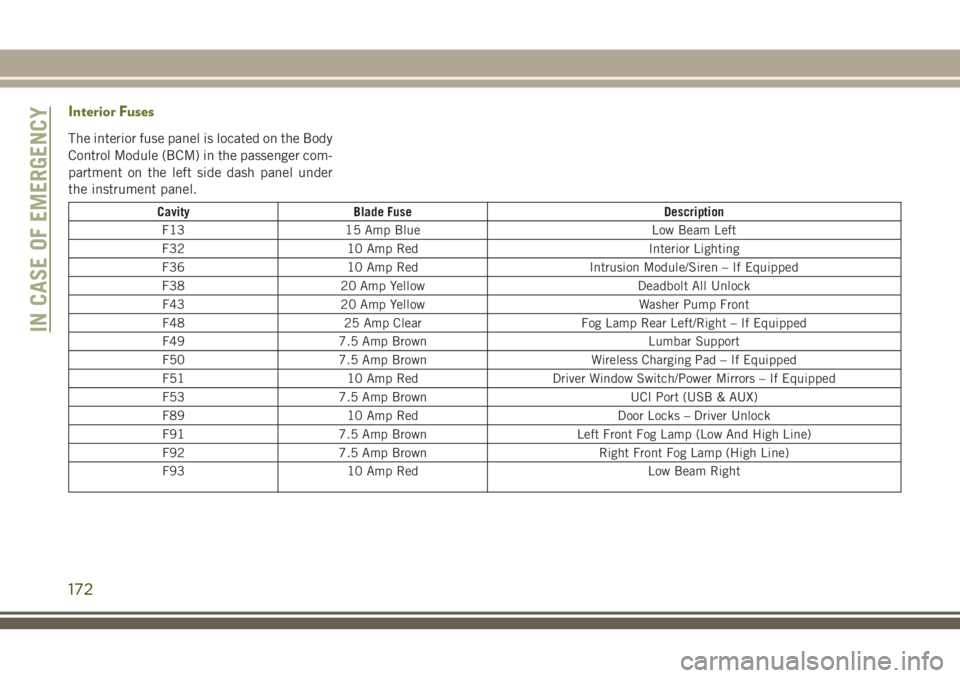
Interior Fuses
The interior fuse panel is located on the Body
Control Module (BCM) in the passenger com-
partment on the left side dash panel under
the instrument panel.
CavityBlade Fuse Description
F13 15 Amp Blue Low Beam Left
F32 10 Amp Red Interior Lighting
F36 10 Amp Red Intrusion Module/Siren – If Equipped
F38 20 Amp Yellow Deadbolt All Unlock
F43 20 Amp Yellow Washer Pump Front
F48 25 Amp Clear Fog Lamp Rear Left/Right – If Equipped
F49 7.5 Amp Brown Lumbar Support
F50 7.5 Amp Brown Wireless Charging Pad – If Equipped
F51 10 Amp Red Driver Window Switch/Power Mirrors – If Equipped
F53 7.5 Amp Brown UCI Port (USB & AUX)
F89 10 Amp Red Door Locks – Driver Unlock
F91 7.5 Amp Brown Left Front Fog Lamp (Low And High Line)
F92 7.5 Amp Brown Right Front Fog Lamp (High Line)
F93 10 Amp Red Low Beam Right
IN CASE OF EMERGENCY
172
Page 245 of 312
MULTIMEDIA
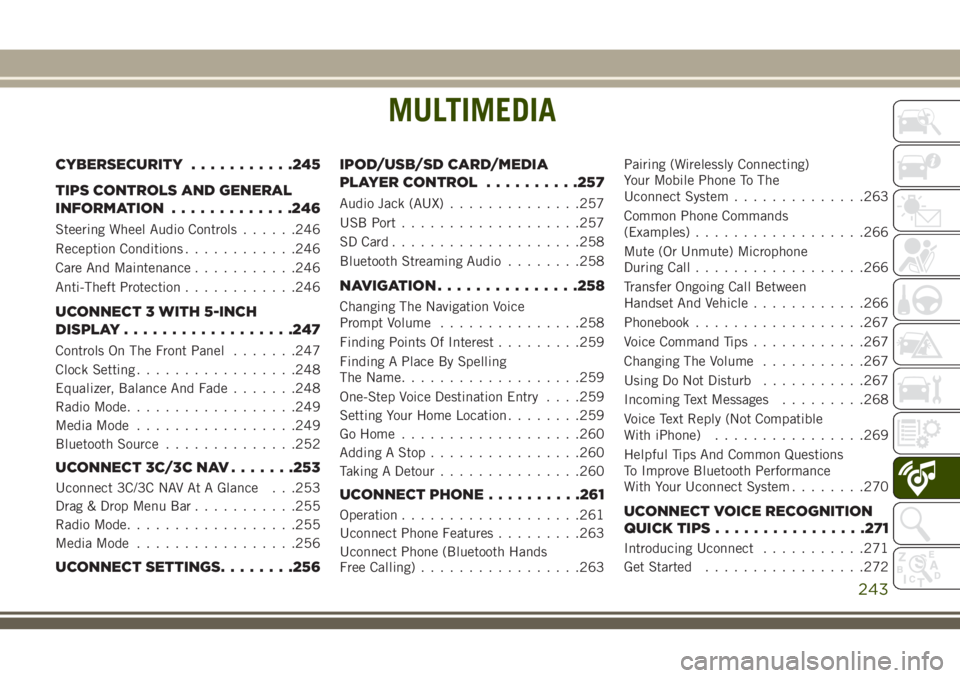
CYBERSECURITY...........245
TIPS CONTROLS AND GENERAL
INFORMATION .............246
Steering Wheel Audio Controls ......246
Reception Conditions ............246
Care And Maintenance ...........246
Anti-Theft Protection ............246
UCONNECT 3 WITH 5-INCH
DISPLAY..................247
Controls On The Front Panel .......247
Clock Setting .................248
Equalizer, Balance And Fade .......248
Radio Mode ..................249
Media Mode .................249
Bluetooth Source ..............252
UCONNECT 3C/3C NAV .......253
Uconnect 3C/3C NAV At A Glance . . .253
Drag & Drop Menu Bar...........255
Radio Mode ..................255
Media Mode .................256
UCONNECT SETTINGS ........256IPOD/USB/SD CARD/MEDIA
PLAYER CONTROL
..........257
Audio Jack (AUX)..............257
USB Port ...................257
SD Card ................... .258
Bluetooth Streaming Audio ........258
NAVIGATION...............258
Changing The Navigation Voice
Prompt Volume ...............258
Finding Points Of Interest .........259
Finding A Place By Spelling
The Name ...................259
One-Step Voice Destination Entry . . . .259
Setting Your Home Location ........259
Go Home ...................260
Adding A Stop ................260
Taking A Detour ...............260
UCONNECT PHONE ..........261
Operation...................261
Uconnect Phone Features .........263
Uconnect Phone (Bluetooth Hands
Free Calling) .................263 Pairing (Wirelessly Connecting)
Your Mobile Phone To The
Uconnect System
..............263
Common Phone Commands
(Examples) ..................266
Mute (Or Unmute) Microphone
During Call ..................266
Transfer Ongoing Call Between
Handset And Vehicle ............266
Phonebook ..................267
Voice Command Tips ............267
Changing The Volume ...........267
Using Do Not Disturb ...........267
Incoming Text Messages .........268
Voice Text Reply (Not Compatible
With iPhone) ................269
Helpful Tips And Common Questions
To Improve Bluetooth Performance
With Your Uconnect System ........270UCONNECT VOICE RECOGNITION
QUICK TIPS................271
Introducing Uconnect ...........271
Get Started .................272
MULTIMEDIA
243
Page 247 of 312
CYBERSECURITY
Your vehicle may be a connected vehicle and
may be equipped with both wired and wire-
less networks. These networks allow your ve-
hicle to send and receive information. This
information allows systems and features in
your vehicle to function properly.
Your vehicle may be equipped with certain
security features to reduce the risk of unau-
thorized and unlawful access to vehicle sys-
tems and wireless communications. Vehicle
software technology continues to evolve over
time and FCA US LLC, working with its sup-
pliers, evaluates and takes appropriate steps
as needed. Similar to a computer or other
devices, your vehicle may require software
updates to improve the usability and perfor-
mance of your systems or to reduce the po-
tential risk of unauthorized and unlawful ac-
cess to your vehicle systems.
The risk of unauthorized and unlawful access
to your vehicle systems may still exist, even if
the most recent version of vehicle software
(such as Uconnect software) is installed.
WARNING!
• It is not possible to know or to predict allof the possible outcomes if your vehi-
cle’s systems are breached. It may be
possible that vehicle systems, including
safety related systems, could be im-
paired or a loss of vehicle control could
occur that may result in an accident
involving serious injury or death.
• ONLY insert media (e.g., USB, SD card,
or CD) into your vehicle if it came from a
trusted source. Media of unknown origin
could possibly contain malicious soft-
ware, and if installed in your vehicle, it
may increase the possibility for vehicle
systems to be breached.
• As always, if you experience unusual
vehicle behavior, take your vehicle to
your nearest authorized dealer immedi-
ately. NOTE:
• FCA US LLC or your dealer may contact you
directly regarding software updates.
• To help further improve vehicle security and minimize the potential risk of a security
breach, vehicle owners should: –
Routinely check www.driveuconnect.com/
support/software-update.html to learn
about available Uconnect software up-
dates.
– Only connect and use trusted media
devices (e.g. personal mobile phones,
USBs, CDs).
Privacy of any wireless and wired communi-
cations cannot be assured. Third parties may
unlawfully intercept information and private
communications without your consent. For
further information, refer to “ “Onboard Di-
agnostic System (OBD II) Cybersecurity” in
“Getting To Know Your Instrument Panel” in
your Owner’s Manual.
245
Page 252 of 312
Media Mode is entered by pushing the ME-
DIA button located on the faceplate. Once in
Media Mode, press the “Source” button on
the touchscreen and the desired mode button
on the touchscreen. Disc (if equipped), USB,
AUX, and Bluetooth (if equipped), are the
Media sources available. When available, you
can select the “Browse” button on the touch-
screen to be given these options:
• Now Playing
• Artists
• Albums
• Genres
• Songs
• Playlists
• Folders
Source
Press the “Source” button on the touch-
screen to select the desired audio source:
Disc (if equipped), USB, AUX and Bluetooth
(if equipped). This screen will time out after a
few seconds and return to the main radio
screen if no selection is made.You can press the “Source,” “Pause/Play” or
the “Info” button on the touchscreen for artist
information on the current song playing.
Disc Mode — If Equipped
Your vehicle may have a remote Disc player
located in the center console storage bin.
Disc Mode is entered by either inserting a
CD/Disc or by pushing the MEDIA button on
the faceplate. Once in Media Mode, press the
“Source” button on the touchscreen and se-
lect “Disc.”
Inserting Compact Disc
Gently insert one disc into the disc player
with the disc label following the illustration
indicated on the player. The disc automati-
cally pulls into the disc player and the disc
icon illuminates on the radio display. If a disc
does not go into the slot more than 1 inch
(2.5 cm), a disc may already be loaded and
must be ejected before a new disc can be
loaded.
If you insert a disc with the ignition ON and
the radio ON, the unit will switch to disc
mode and begin to play when you insert the
disc. The display will show the track numberand index time in minutes and seconds. Play
will begin at the start of track one.
Browse
Press the “Browse” button on the touch-
screen to scroll through and select a desired
track on the Disc. Press the “Exit” button on
the touchscreen if you wish to cancel the
browse function.
Eject Button — Ejecting a Disc
Push the eject button to eject the disc. If you
have ejected a disc and have not removed it
within ten seconds, it will be reloaded. If the
Disc is not removed, the radio will reinsert
the disc but will not play it.
A disc can be ejected with the radio and
ignition OFF.
USB/iPod Mode
USB/iPod Mode is entered by either inserting
a USB Jump Drive or iPod cable into the USB
port, or by pushing the MEDIA button located
on the faceplate. Once in Media Mode, press
the “Source” button on the touchscreen and
select “USB/iPod.”
MULTIMEDIA
250
Page 253 of 312
Inserting USB/iPod Device
Gently insert the USB/iPod device into the
USB Port. If you insert a USB/iPod device
with the ignition ON, the unit will switch to
USB/iPod mode and begin to play when you
insert the device. The display will show the
track number and index time in minutes and
seconds. Play will begin at the start of track
one.
Browse
Press the “Browse” button on the touch-
screen to select Artist, Albums, Genres,
Songs, Playlists or Folders from the USB/
iPod device. Once the desired selection is
made you can chose from the available media
by pressing the button on the touchscreen.
Press the “Exit” button on the touchscreen if
you wish to cancel the browse function.
AUX Mode
AUX Mode is entered by inserting a AUX
device using a stereo cable with a 3.5 mm
audio jack into the AUX port, or by pushing
the MEDIA button located on the faceplate.
Once in Media Mode, press the “Source”
button on the touchscreen and select “AUX.”Inserting Auxiliary Device
Gently insert the Auxiliary device cable into
the AUX Port. If you insert a Auxiliary device
with the ignition ON, the unit will switch to
AUX mode and begin to play when you insert
the device cable.
Controlling The Auxiliary Device
The control of the Auxiliary device (e.g., se-
lecting playlists, play, fast forward, etc.) can-
not be provided by the radio; use the device
controls instead. Adjust the volume with the
VOLUME/MUTE rotary knob, or with the vol-
ume of the attached device.
The radio unit is acting as the amplifier for
audio output from the Auxiliary device.
Therefore if the volume control on the Auxil-
iary device is set too low, there will be insuf-
ficient audio signal for the radio unit to play
the music on the device.
Track Selection
Seek Up/Seek Down
Press and release the “Right Arrow”but-
ton on the touchscreen for the next selection.
Press and release the “Left Arrow”
button on the touchscreen to return to the beginning
of the current selection, or return to the
beginning of the previous selection if the Disc
is within the first second of the current selec-
tion.
Fast Seek Up
Press and hold the “Right Arrow”button
on the touchscreen and the desired mode will
begin to fast forward through the current
track until the button on the touchscreen is
released.
Fast Seek Down
Press and hold the “Left Arrow”button
on the touchscreen and the desired mode will
begin to rewind through the current track
until the button on the touchscreen is re-
leased.
Info
Press the “Info” button on the touchscreen to
display the current track information. Press
the “X” button on the touchscreen to cancel
this feature.
251
Page 254 of 312
Shuffle
Press the “Shuffle” button on the touch-
screen to play the selections on the USB/iPod
device in random order to provide an interest-
ing change of pace. Press the “Shuffle” but-
ton on the touchscreen a second time to turn
this feature off.
Repeat
Press the “Repeat” button on the touch-
screen to repeat the song selection. To cancel
repeat, press the “Repeat” button on the
touchscreen a second time.
Bluetooth Source
Bluetooth Streaming Audio (BTSA) or
Bluetooth Mode is entered by pairing a
Bluetooth device containing music to the
Uconnect system.
Before proceeding, the Bluetooth device
must be paired with the Uconnect Phone to
communicate with the Uconnect system.
See the “Pairing Procedure” in this manual
for further details.Once the Bluetooth device is paired to the
Uconnect system, push the MEDIA button
located on the faceplate. Once in Media
Mode, press the “Source” button on the
touchscreen and select “Bluetooth.”
NOTE:
For mobile phone compatibility and pairing in-
structions, please visit
UconnectPhone.com.
Uconnect LIVE
The Uconnect LIVE app is available in the
Apple Store or the Google Play Store. A whole
range of apps can be viewed and controlled
through the touchscreen of the Uconnect
system. The apps have been designed to
ensure that the driver’s concentration re-
mains focused on driving. For further infor-
mation refer to www.driveuconnect.eu/.
Pairing A Bluetooth Audio Device
To begin using your audio device, you must
pair your compatible Bluetooth enabled au-
dio device. Pairing is the process of estab-
lishing a wireless connection between a de-
vice and the Uconnect system. NOTE:
• You must have Bluetooth enabled on your
device to complete this procedure.
• The vehicle must be in PARK.
1. Place the ignition in the ACC or ON position.
2. Push the PHONE button on the faceplate.
• If there is no devices currently con-nected with the system, a pop-up will
appear asking if you would like to pair a
device.
3. Select “Yes” to begin the pairing process.
4. Search for available devices on your Bluetooth enabled device.
• Select Bluetooth and ensure it is en- abled. Once enabled, the device will
begin to search for Bluetooth
connections.
5. If No is selected, and you still would like to pair a device, press the “Settings”
button from the Uconnect Phone main
screen.
MULTIMEDIA
252
Page 258 of 312
Direct Tune
• Tune directly to a radio station by pressingthe “Tune” button on the screen, and en-
tering the desired station number.
Store Radio Presets Manually
Your radio can store 24 total preset stations,
12 presets per band (AM, and FM). They are
shown at the top of your radio screen. To see
the 12 preset stations per band, press the
arrow button on the touchscreen at the top
right of the screen to toggle between the two
sets of six presets.
To store a radio preset manually, follow the
steps below:
1. Tune to the desired station.
2. Press and hold the desired numbered but-
ton on the touchscreen for more than two
seconds or until you hear a confirmation
beep.
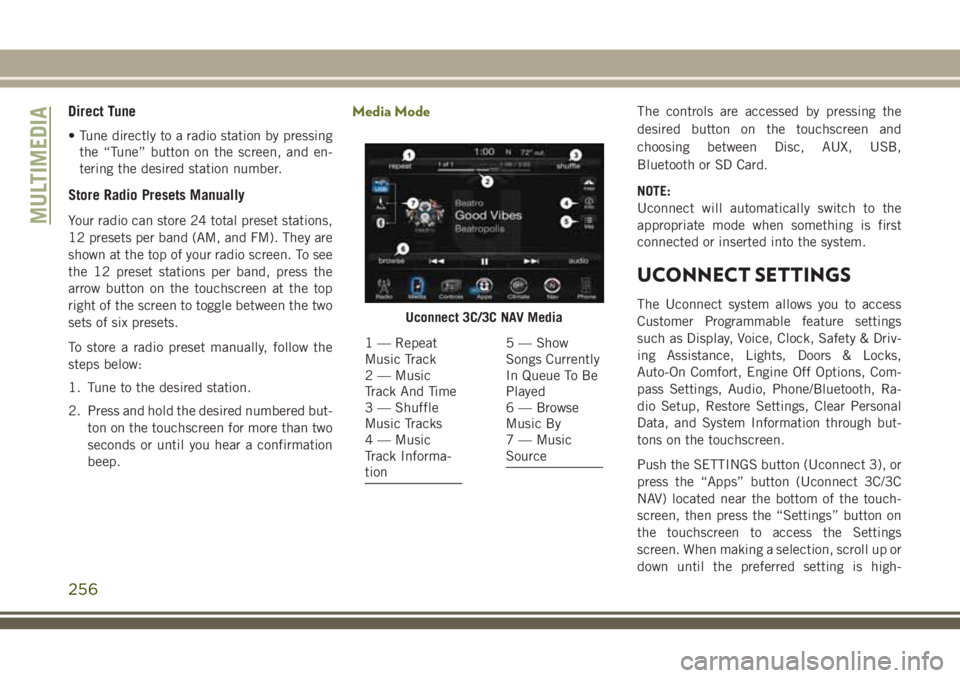
Media ModeThe controls are accessed by pressing the
desired button on the touchscreen and
choosing between Disc, AUX, USB,
Bluetooth or SD Card.
NOTE:
Uconnect will automatically switch to the
appropriate mode when something is first
connected or inserted into the system.
UCONNECT SETTINGS
The Uconnect system allows you to access
Customer Programmable feature settings
such as Display, Voice, Clock, Safety & Driv-
ing Assistance, Lights, Doors & Locks,
Auto-On Comfort, Engine Off Options, Com-
pass Settings, Audio, Phone/Bluetooth, Ra-
dio Setup, Restore Settings, Clear Personal
Data, and System Information through but-
tons on the touchscreen.
Push the SETTINGS button (Uconnect 3), or
press the “Apps” button (Uconnect 3C/3C
NAV) located near the bottom of the touch-
screen, then press the “Settings” button on
the touchscreen to access the Settings
screen. When making a selection, scroll up or
down until the preferred setting is high-Uconnect 3C/3C NAV Media
1 — Repeat
Music Track
2 — Music
Track And Time
3 — Shuffle
Music Tracks
4 — Music
Track Informa-
tion5 — Show
Songs Currently
In Queue To Be
Played
6 — Browse
Music By
7 — Music
Source
MULTIMEDIA
256
Page 259 of 312
lighted, then press the preferred setting until
a check-mark appears next to the setting,
showing that setting has been selected. The
following feature settings are available:
• Display• Engine Off Options
• Voice • Audio
• Clock • Phone/Bluetooth
• Safety & Driving
Assistance • Radio Setup
• Lights • Restore Settings
• Doors & Locks • Clear Personal Data
• Auto-On Comfort • System Information
• Compass
(Uconnect 3)
NOTE:
Depending on the vehicles options, feature
settings may vary.
Refer to “Uconnect Settings” in “Multime-
dia” in the Owner’s Manual for further infor-
mation.
IPOD/USB/SD CARD/MEDIA
PLAYER CONTROL
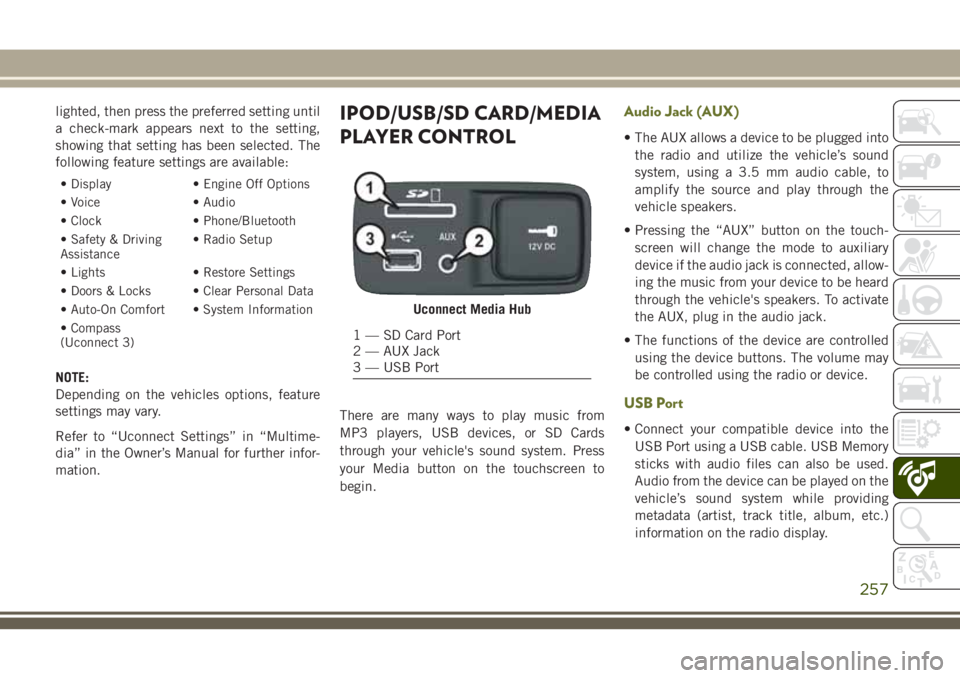
There are many ways to play music from
MP3 players, USB devices, or SD Cards
through your vehicle's sound system. Press
your Media button on the touchscreen to
begin.
Audio Jack (AUX)
• The AUX allows a device to be plugged into the radio and utilize the vehicle’s sound
system, using a 3.5 mm audio cable, to
amplify the source and play through the
vehicle speakers.
• Pressing the “AUX” button on the touch- screen will change the mode to auxiliary
device if the audio jack is connected, allow-
ing the music from your device to be heard
through the vehicle's speakers. To activate
the AUX, plug in the audio jack.
• The functions of the device are controlled using the device buttons. The volume may
be controlled using the radio or device.
USB Port
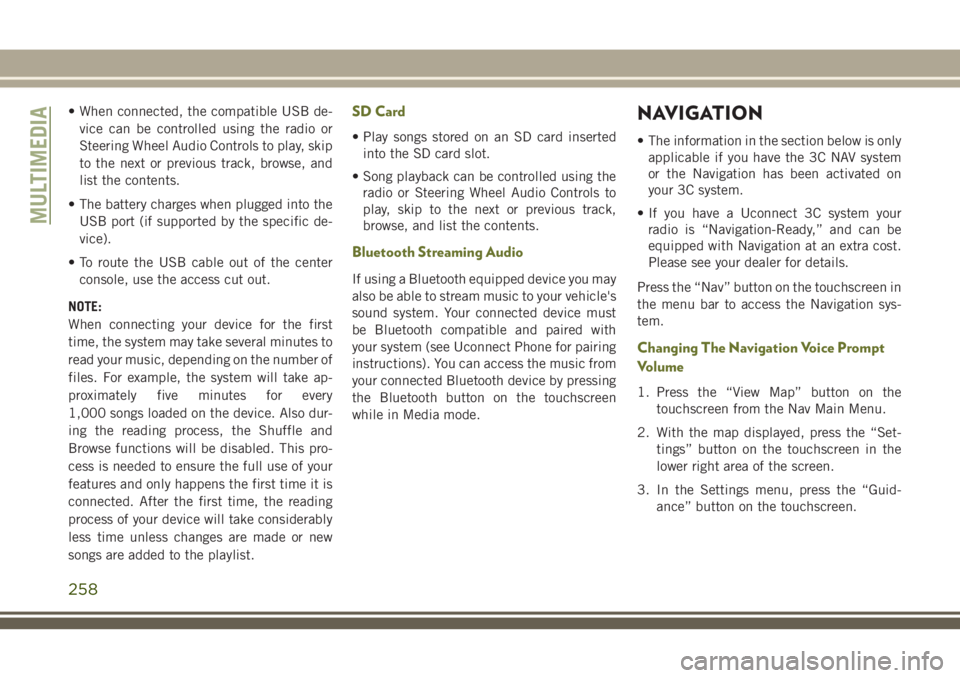
• Connect your compatible device into theUSB Port using a USB cable. USB Memory
sticks with audio files can also be used.
Audio from the device can be played on the
vehicle’s sound system while providing
metadata (artist, track title, album, etc.)
information on the radio display.
Uconnect Media Hub
1 — SD Card Port
2 — AUX Jack
3 — USB Port
257
Page 260 of 312
• When connected, the compatible USB de-vice can be controlled using the radio or
Steering Wheel Audio Controls to play, skip
to the next or previous track, browse, and
list the contents.
• The battery charges when plugged into the USB port (if supported by the specific de-
vice).
• To route the USB cable out of the center console, use the access cut out.
NOTE:
When connecting your device for the first
time, the system may take several minutes to
read your music, depending on the number of
files. For example, the system will take ap-
proximately five minutes for every
1,000 songs loaded on the device. Also dur-
ing the reading process, the Shuffle and
Browse functions will be disabled. This pro-
cess is needed to ensure the full use of your
features and only happens the first time it is
connected. After the first time, the reading
process of your device will take considerably
less time unless changes are made or new
songs are added to the playlist.SD Card
• Play songs stored on an SD card inserted into the SD card slot.
• Song playback can be controlled using the radio or Steering Wheel Audio Controls to
play, skip to the next or previous track,
browse, and list the contents.
Bluetooth Streaming Audio
If using a Bluetooth equipped device you may
also be able to stream music to your vehicle's
sound system. Your connected device must
be Bluetooth compatible and paired with
your system (see Uconnect Phone for pairing
instructions). You can access the music from
your connected Bluetooth device by pressing
the Bluetooth button on the touchscreen
while in Media mode.
NAVIGATION
• The information in the section below is onlyapplicable if you have the 3C NAV system
or the Navigation has been activated on
your 3C system.
• If you have a Uconnect 3C system your radio is “Navigation-Ready,” and can be
equipped with Navigation at an extra cost.
Please see your dealer for details.
Press the “Nav” button on the touchscreen in
the menu bar to access the Navigation sys-
tem.
Changing The Navigation Voice Prompt
Volume
1. Press the “View Map” button on the touchscreen from the Nav Main Menu.
2. With the map displayed, press the “Set- tings” button on the touchscreen in the
lower right area of the screen.
3. In the Settings menu, press the “Guid- ance” button on the touchscreen.
MULTIMEDIA
258
Page 275 of 312
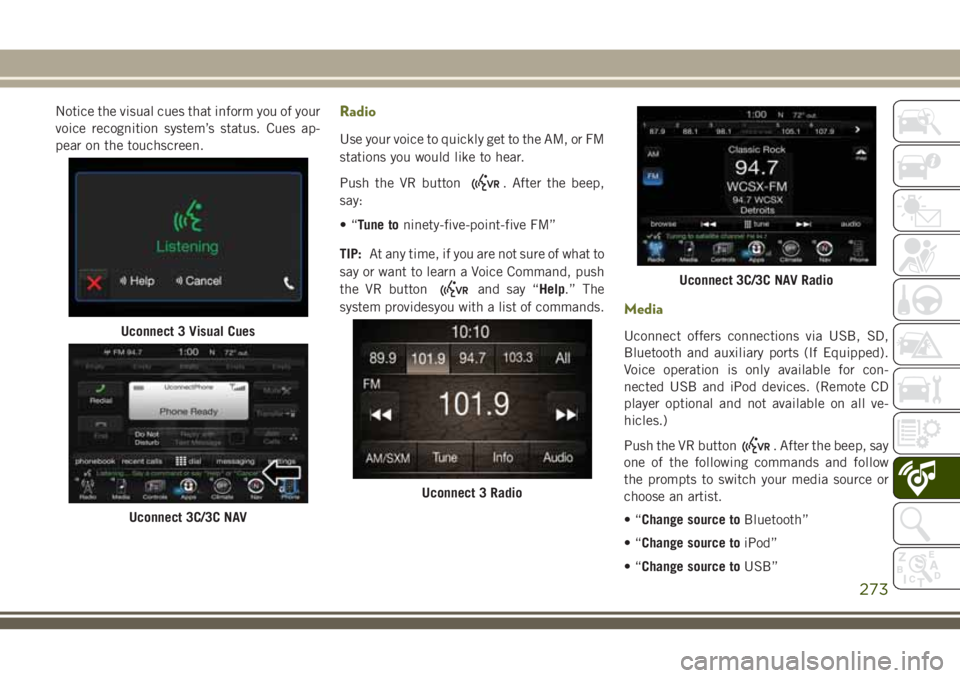
Notice the visual cues that inform you of your
voice recognition system’s status. Cues ap-
pear on the touchscreen.Radio
Use your voice to quickly get to the AM, or FM
stations you would like to hear.
Push the VR button
. After the beep,
say:
•“ Tune to ninety-five-point-five FM”
TIP: At any time, if you are not sure of what to
say or want to learn a Voice Command, push
the VR button
and say “Help.” The
system providesyou with a list of commands.
Media
Uconnect offers connections via USB, SD,
Bluetooth and auxiliary ports (If Equipped).
Voice operation is only available for con-
nected USB and iPod devices. (Remote CD
player optional and not available on all ve-
hicles.)
Push the VR button
. After the beep, say
one of the following commands and follow
the prompts to switch your media source or
choose an artist.
•“ Change source to Bluetooth”
•“ Change source to iPod”
•“ Change source to USB”
Uconnect 3 Visual Cues
Uconnect 3C/3C NAV
Uconnect 3 Radio
Uconnect 3C/3C NAV Radio
273