climate control JEEP CHEROKEE 2018 Owner handbook (in English)
[x] Cancel search | Manufacturer: JEEP, Model Year: 2018, Model line: CHEROKEE, Model: JEEP CHEROKEE 2018Pages: 312, PDF Size: 4.91 MB
Page 11 of 312
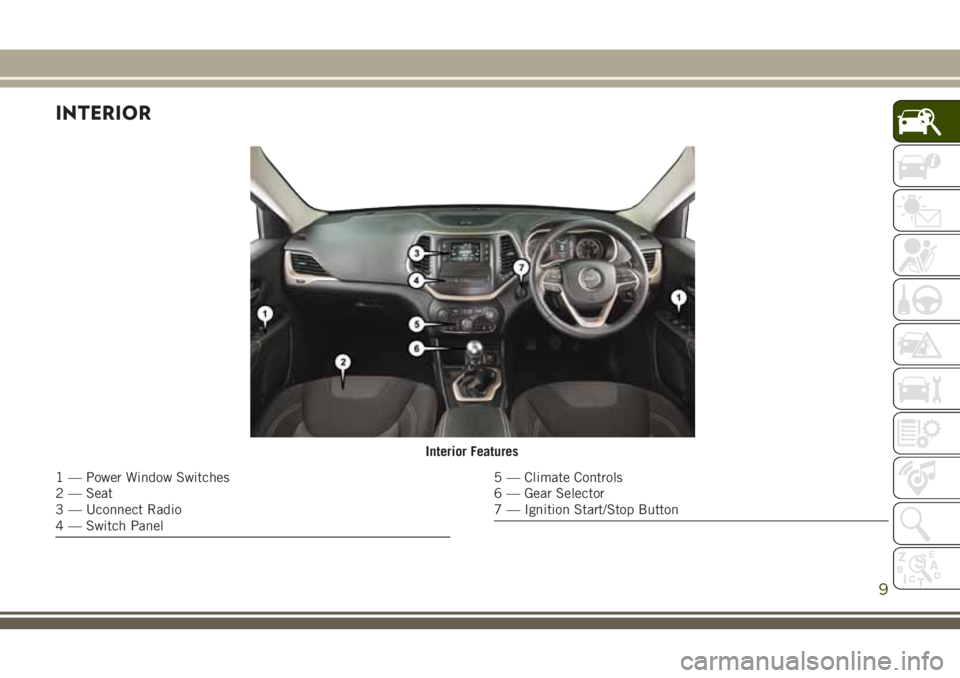
INTERIOR
Interior Features
1 — Power Window Switches
2 — Seat
3 — Uconnect Radio
4 — Switch Panel5 — Climate Controls
6 — Gear Selector
7 — Ignition Start/Stop Button
9
Page 13 of 312
GETTING TO KNOW YOUR VEHICLE
KEYS .....................13
KeyFob.....................13
IGNITION SWITCH............15
Ignition Node Module (IGNM) —
If Equipped..................15
Keyless Enter-N-Go — Ignition .......15
Electronic Steering Wheel Lock —
If Equipped ..................17
REMOTE STARTING SYSTEM —
IF EQUIPPED ................17
SENTRY KEY ................17
Irregular Operation ..............17
VEHICLE SECURITY ALARM —
IF EQUIPPED................18
To Arm The System .............18
To Disarm The System ............18
DOORS....................19
Keyless Enter-N-Go — Passive Entry . . .19
Locking The Doors With One Or
More Doors Open ...............22
Auto Relocking ................22 Child-Protection Door Lock System —
Rear Doors
...................22
SEATS.....................23
Memory Seat .................23
Heated/Ventilated Seats ...........24
HEAD RESTRAINTS...........25
Front Adjustment...............25
Front Removal .................26
Rear Adjustment ...............27
Rear Removal .................28
STEERING WHEEL ............28
Adjustment..................28
Heated Steering Wheel ............28
MIRRORS..................29
Power Folding Mirrors — If Equipped . . .29
Heated Mirrors — If Equipped .......29
EXTERIOR LIGHTS...........30
Headlight Switch...............30
Headlights ...................30
Adaptive Bi-Xenon High Intensity
Discharge Headlights — If Equipped . . .30 Daytime Running Lights (DRL) —
If Equipped
..................30
High Beams ..................31
Flash-To-Pass .................31
Automatic Lighting ..............31
Parking Lighting ...............31
Headlight Delay ...............31
Front And Rear Fog Lights —
If Equipped ..................32
Turn Signals ..................32
Lane Change Assist .............32
Automatic Headlight Leveling —
HID Headlights Only .............32
WIPER AND WASHERS ........32
Front Wipers.................33
Rain Sensing Wipers .............33
Rear Wiper ...................34
CLIMATE CONTROLS ..........35
Climate Controls With A Touchscreen
Overview....................35
Climate Control Functions ..........42
GETTING TO KNOW YOUR VEHICLE
11
Page 26 of 312
4. Push and release the lock button on thekey fob within 10 seconds.
To recall the saved positions, push memory
button (1) or (2), or push unlock on the
programmed key fob.
Easy Entry/Exit Feature
The memory seat has an Easy Entry/Exit fea-
ture. This feature provides automatic driver
seat positioning to enhance driver mobility
when entering and exiting the vehicle.
NOTE:
The Easy Entry/Exit feature is not enabled
when the vehicle is delivered from the fac-
tory. To enable (or later disable) this feature
you must select “Easy Exit Seats” in “Engine
Off Options” through the programmable fea-
tures in the Uconnect system.
For further details refer to “Uconnect Set-
tings” in “Multimedia” in the Owner's
Manual for further details.Heated/Ventilated Seats
Front Heated Seats
If your vehicle is equipped with front heated
seats, the control buttons are located within
the Uconnect system. You can gain access to
the control buttons through the climate
screen or the controls screen.
• Press the heated seat button
once to
turn the HI setting ON.
• Press the heated seat button
a second
time to turn the LO setting ON.
• Press the heated seat button
a third
time to turn the heating elements OFF.
If the HI-level setting is selected, the system
will automatically switch to LO-level after
approximately 60 minutes of continuous op-
eration. At that time, the display will change
from HI to LO, indicating the change. The
LO-level setting will turn OFF automatically
after approximately 45 minutes.
NOTE:
The engine must be running for the heated
seats to operate. Vehicles Equipped With Remote Start
On models that are equipped with remote
start, the heated seats can be programmed to
come on during a remote start.
This feature can be programmed through the
Uconnect system. Refer to “Uconnect Set-
tings” in “Multimedia” in the Owner’s
Manual for further details.
WARNING!
• Persons who are unable to feel pain to
the skin because of advanced age,
chronic illness, diabetes, spinal cord in-
jury, medication, alcohol use, exhaus-
tion or other physical condition must
exercise care when using the seat
heater. It may cause burns even at low
temperatures, especially if used for long
periods of time.
• Do not place anything on the seat or
seatback that insulates against heat,
such as a blanket or cushion. This may
cause the seat heater to overheat. Sit-
ting in a seat that has been overheated
GETTING TO KNOW YOUR VEHICLE
24
Page 27 of 312
WARNING!
could cause serious burns due to the
increased surface temperature of the
seat.
Front Ventilated Seats
If your vehicle is equipped with ventilated
seats, the seat cushion and seat back will
have fans that draw the air from the passen-
ger compartment and move air through fine
perforations in the seat cover to help keep the
driver and front passenger cooler in higher
ambient temperatures. The fans operate at
two speeds, HI and LO.
The front ventilated seats control buttons are
located within the Uconnect system. You can
gain access to the control buttons through
the climate screen or the controls screen.
•
Press the ventilated seat buttononce to
choose HI.
•Press the ventilated seat buttona sec-
ond time to choose LO.
• Press the ventilated seat buttona third
time to turn the ventilated seat OFF. NOTE:
The engine must be running for the ventilated
seats to operate.
Vehicles Equipped With Remote Start
On models that are equipped with remote
start, the ventilated seats can be pro-
grammed to come on during a remote start.
This feature can be programmed through the
Uconnect system. Refer to “Uconnect Set-
tings” in “Multimedia” in the Owner’s
Manual for further details.
HEAD RESTRAINTS
Head restraints are designed to reduce the
risk of injury by restricting head movement in
the event of a rear impact. Head restraints
should be adjusted so that the top of the head
restraint is located above the top of your ear.
WARNING!
• All occupants, including the driver,
should not operate a vehicle or sit in a
vehicle’s seat until the head restraints
are placed in their proper positions in
WARNING!
order to minimize the risk of neck injury
in the event of a crash.
• Head restraints should never be ad-
justed while the vehicle is in motion.
Driving a vehicle with the head restraints
improperly adjusted or removed could
cause serious injury or death in the event
of a collision.
NOTE:
Do not reverse the head restraints (making
the rear of the head restraint face forward) in
an attempt to gain additional clearance to the
back of your head.
Front Adjustment
The front driver and passenger seats are
equipped with Reactive Head Restraints
(RHR). In the event of a rear impact, the
RHRs will automatically extend forward mini-
mizing the gap between the back of the
occupant’s head and the RHR.
25
Page 31 of 312
operate for an average of 80 minutes or more
before automatically shutting off. This time
may vary depending on environmental tem-
peratures. The heated steering wheel can
shut off early or may not turn on when the
steering wheel is already warm.
The heated steering wheel control button is
located within the Uconnect system. You can
gain access to the control button through the
climate screen or the controls screen.
• Press the heated steering wheel button
once to turn the heating element on.
• Press the heated steering wheel button
a second time to turn the heating element
off.
NOTE:
The engine must be running for the heated
steering wheel to operate.
Vehicles With Remote Start — If Equipped
On models that are equipped with remote
start, the heated steering wheel can be pro-
grammed to come on during a remote start
through the Uconnect system. Refer to
“Uconnect Settings” in “Multimedia” in the
Owner’s Manual for further information.
WARNING!
•Persons who are unable to feel pain to the
skin because of advanced age, chronic
illness, diabetes, spinal cord injury, medi-
cation, alcohol use, exhaustion, or other
physical conditions must exercise care
when using the steering wheel heater. It
may cause burns even at low tempera-
tures, especially if used for long periods.
• Do not place anything on the steering wheel that insulates against heat, such
as a blanket or steering wheel covers of
any type and material. This may cause
the steering wheel heater to overheat.
MIRRORS
Power Folding Mirrors — If Equipped
If equipped, the switch for the power folding
mirrors is located between the power mirror
switches L (left) and R (right). Push the
switch once and the mirrors will fold in.
Pushing the switch a second time will return
the mirrors to the normal driving position. NOTE:
If the vehicle speed is greater than 10 mph
(16 km/h), the folding feature will be dis-
abled.
If the mirrors are in the folded position, and
the vehicle speed is equal or greater than 10
mph (16 km/h), they will automatically un-
fold.
Resetting The Power Folding Outside Mirrors
To reset the power folding mirrors: Fold and
unfold them by pushing the button (this may
require multiple button pushes). This resets
them to their normal position.
Heated Mirrors — If Equipped
These mirrors are heated to melt
frost or ice. This feature will be ac-
tivated whenever you turn on the
rear window defroster. Refer to “Climate Con-
trols” in this chapter for further information.
29
Page 37 of 312
CLIMATE CONTROLS
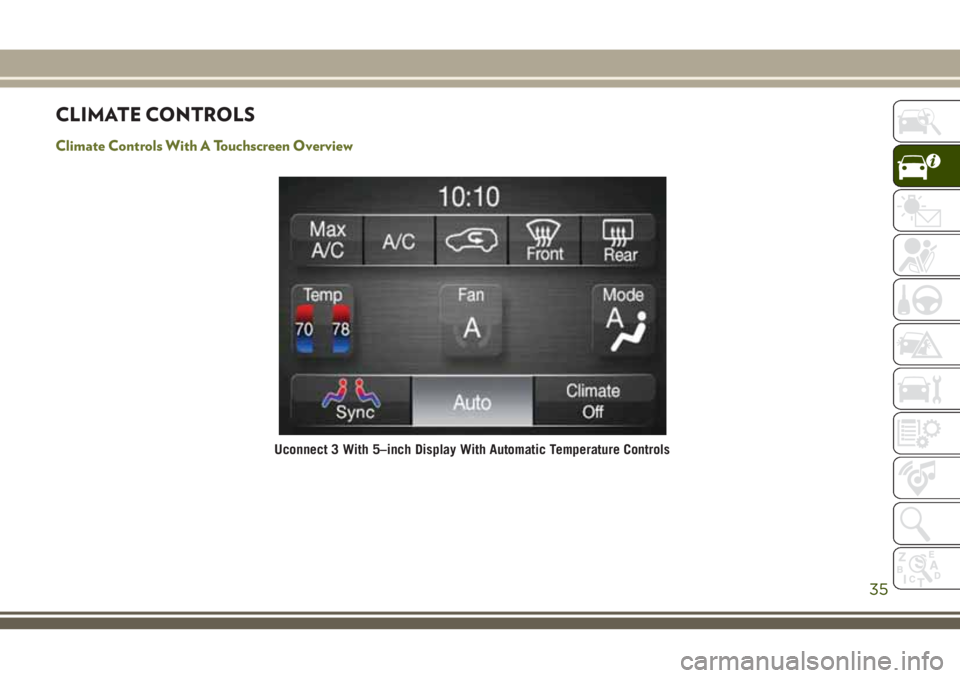
Climate Controls With A Touchscreen Overview
Uconnect 3 With 5–inch Display With Automatic Temperature Controls
35
Page 40 of 312
Climate Control With A Touchscreen Descriptions
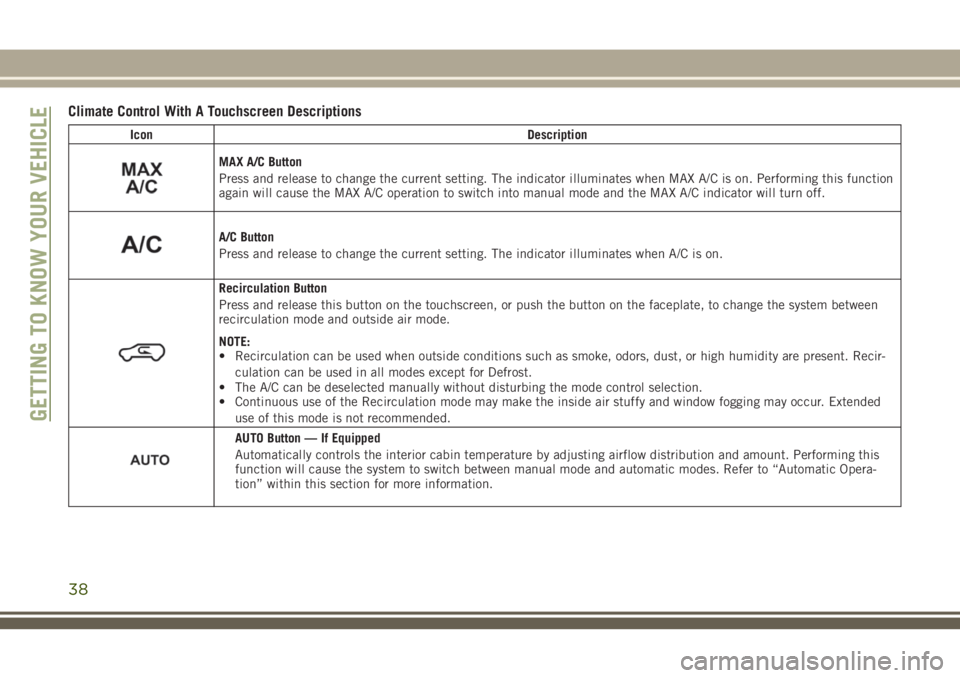
IconDescription
MAX A/C Button
Press and release to change the current setting. The indicator illuminates when MAX A/C is on. Performing this function
again will cause the MAX A/C operation to switch into manual mode and the MAX A/C indicator will turn off.
A/C Button
Press and release to change the current setting. The indicator illuminates when A/C is on.
Recirculation Button
Press and release this button on the touchscreen, or push the button on the faceplate, to change the system between
recirculation mode and outside air mode.
NOTE:
• Recirculation can be used when outside conditions such as smoke, odors, dust, or high humidity are present. Recir-
culation can be used in all modes except for Defrost.
• The A/C can be deselected manually without disturbing the mode control selection.
• Continuous use of the Recirculation mode may make the inside air stuffy and window fogging may occur. Extended
use of this mode is not recommended.
AUTO Button — If Equipped
Automatically controls the interior cabin temperature by adjusting airflow distribution and amount. Performing this
function will cause the system to switch between manual mode and automatic modes. Refer to “Automatic Opera-
tion” within this section for more information.
GETTING TO KNOW YOUR VEHICLE
38
Page 41 of 312
IconDescription
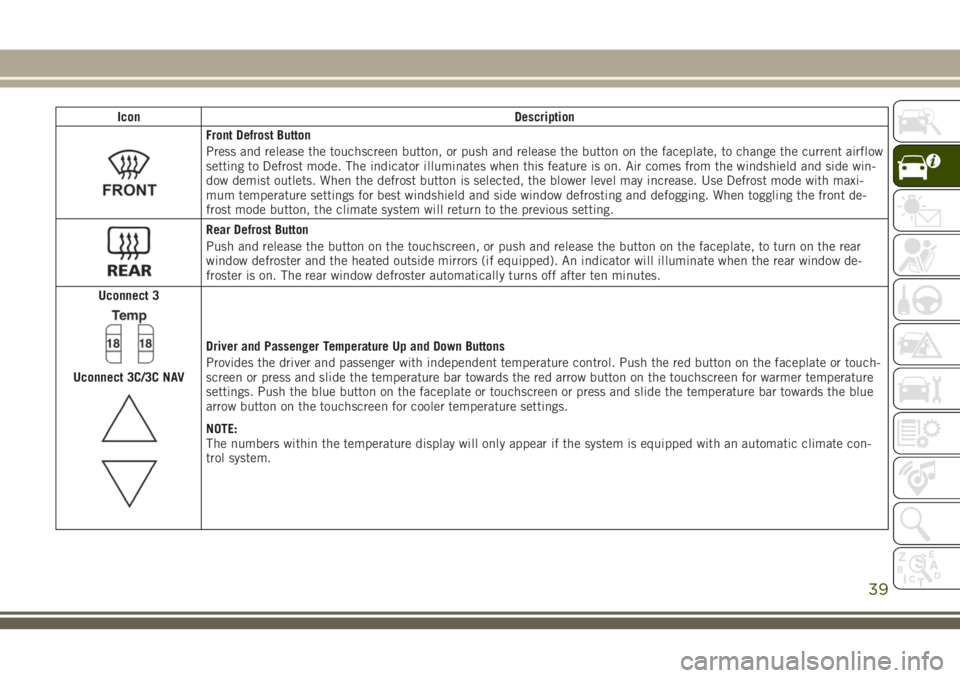
Front Defrost Button
Press and release the touchscreen button, or push and release the button on the faceplate, to change the current airflow
setting to Defrost mode. The indicator illuminates when this feature is on. Air comes from the windshield and side win-
dow demist outlets. When the defrost button is selected, the blower level may increase. Use Defrost mode with maxi-
mum temperature settings for best windshield and side window defrosting and defogging. When toggling the front de-
frost mode button, the climate system will return to the previous setting.
Rear Defrost Button
Push and release the button on the touchscreen, or push and release the button on the faceplate, to turn on the rear
window defroster and the heated outside mirrors (if equipped). An indicator will illuminate when the rear window de-
froster is on. The rear window defroster automatically turns off after ten minutes.
Uconnect 3
Uconnect 3C/3C NAV
Driver and Passenger Temperature Up and Down Buttons
Provides the driver and passenger with independent temperature control. Push the red button on the faceplate or touch-
screen or press and slide the temperature bar towards the red arrow button on the touchscreen for warmer temperature
settings. Push the blue button on the faceplate or touchscreen or press and slide the temperature bar towards the blue
arrow button on the touchscreen for cooler temperature settings.
NOTE:
The numbers within the temperature display will only appear if the system is equipped with an automatic climate con-
trol system.
39
Page 42 of 312
IconDescription
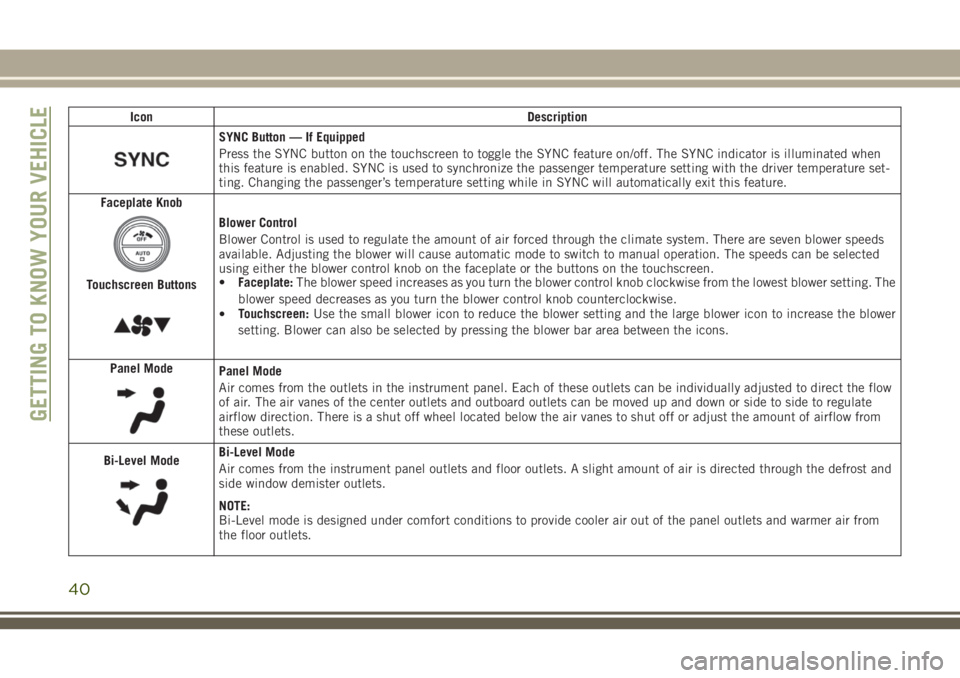
SYNC Button — If Equipped
Press the SYNC button on the touchscreen to toggle the SYNC feature on/off. The SYNC indicator is illuminated when
this feature is enabled. SYNC is used to synchronize the passenger temperature setting with the driver temperature set-
ting. Changing the passenger’s temperature setting while in SYNC will automatically exit this feature.
Faceplate Knob
Touchscreen Buttons
Blower Control
Blower Control is used to regulate the amount of air forced through the climate system. There are seven blower speeds
available. Adjusting the blower will cause automatic mode to switch to manual operation. The speeds can be selected
using either the blower control knob on the faceplate or the buttons on the touchscreen.
• Faceplate: The blower speed increases as you turn the blower control knob clockwise from the lowest blower setting. The
blower speed decreases as you turn the blower control knob counterclockwise.
• Touchscreen:
Use the small blower icon to reduce the blower setting and the large blower icon to increase the blower
setting. Blower can also be selected by pressing the blower bar area between the icons.
Panel Mode
Panel Mode
Air comes from the outlets in the instrument panel. Each of these outlets can be individually adjusted to direct the flow
of air. The air vanes of the center outlets and outboard outlets can be moved up and down or side to side to regulate
airflow direction. There is a shut off wheel located below the air vanes to shut off or adjust the amount of airflow from
these outlets.
Bi-Level Mode
Bi-Level Mode
Air comes from the instrument panel outlets and floor outlets. A slight amount of air is directed through the defrost and
side window demister outlets.
NOTE:
Bi-Level mode is designed under comfort conditions to provide cooler air out of the panel outlets and warmer air from
the floor outlets.
GETTING TO KNOW YOUR VEHICLE
40
Page 43 of 312
IconDescription
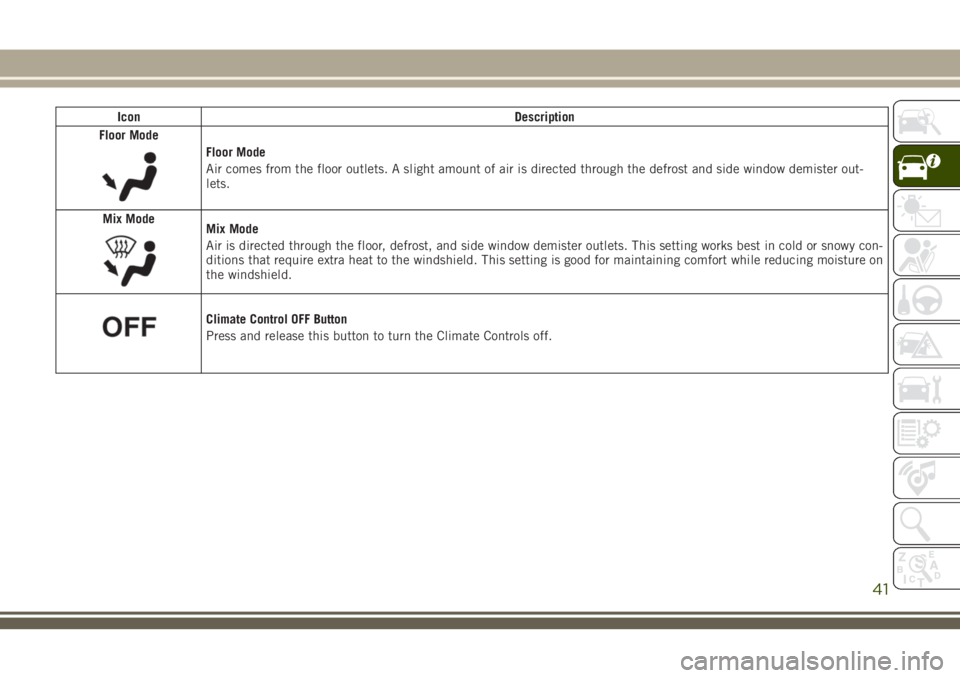
Floor Mode
Floor Mode
Air comes from the floor outlets. A slight amount of air is directed through the defrost and side window demister out-
lets.
Mix Mode
Mix Mode
Air is directed through the floor, defrost, and side window demister outlets. This setting works best in cold or snowy con-
ditions that require extra heat to the windshield. This setting is good for maintaining comfort while reducing moisture on
the windshield.
Climate Control OFF Button
Press and release this button to turn the Climate Controls off.
41