cruise control JEEP CHEROKEE 2018 Owner handbook (in English)
[x] Cancel search | Manufacturer: JEEP, Model Year: 2018, Model line: CHEROKEE, Model: JEEP CHEROKEE 2018Pages: 312, PDF Size: 4.91 MB
Page 64 of 312
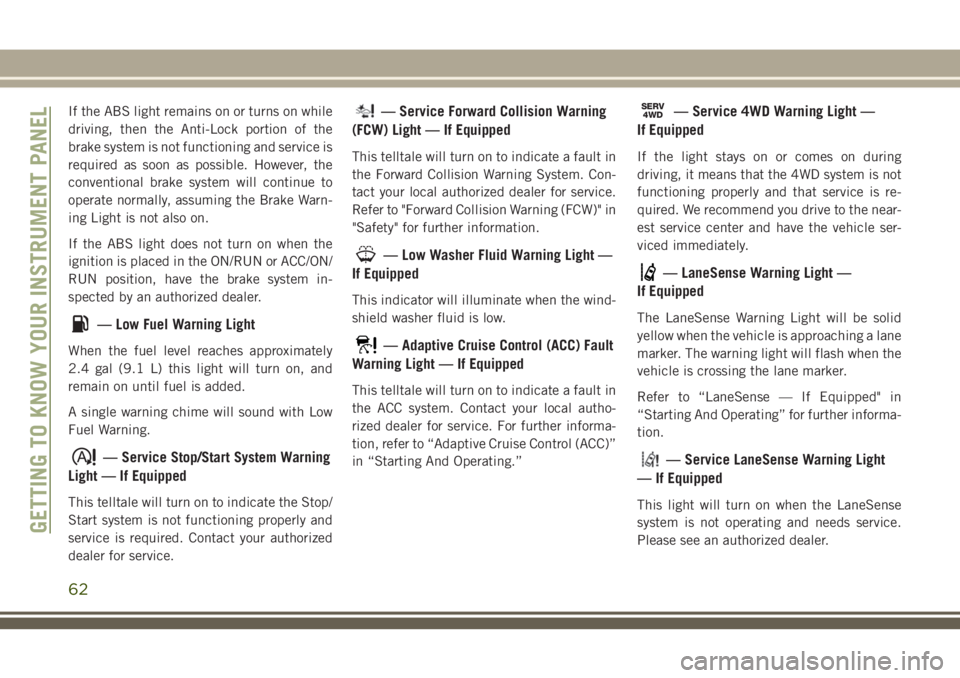
If the ABS light remains on or turns on while
driving, then the Anti-Lock portion of the
brake system is not functioning and service is
required as soon as possible. However, the
conventional brake system will continue to
operate normally, assuming the Brake Warn-
ing Light is not also on.
If the ABS light does not turn on when the
ignition is placed in the ON/RUN or ACC/ON/
RUN position, have the brake system in-
spected by an authorized dealer.
— Low Fuel Warning Light
When the fuel level reaches approximately
2.4 gal (9.1 L) this light will turn on, and
remain on until fuel is added.
A single warning chime will sound with Low
Fuel Warning.
— Service Stop/Start System Warning
Light — If Equipped
This telltale will turn on to indicate the Stop/
Start system is not functioning properly and
service is required. Contact your authorized
dealer for service.
— Service Forward Collision Warning
(FCW) Light — If Equipped
This telltale will turn on to indicate a fault in
the Forward Collision Warning System. Con-
tact your local authorized dealer for service.
Refer to "Forward Collision Warning (FCW)" in
"Safety" for further information.
— Low Washer Fluid Warning Light —
If Equipped
This indicator will illuminate when the wind-
shield washer fluid is low.
— Adaptive Cruise Control (ACC) Fault
Warning Light — If Equipped
This telltale will turn on to indicate a fault in
the ACC system. Contact your local autho-
rized dealer for service. For further informa-
tion, refer to “Adaptive Cruise Control (ACC)”
in “Starting And Operating.”
SERV4WD— Service 4WD Warning Light —
If Equipped
If the light stays on or comes on during
driving, it means that the 4WD system is not
functioning properly and that service is re-
quired. We recommend you drive to the near-
est service center and have the vehicle ser-
viced immediately.
— LaneSense Warning Light —
If Equipped
The LaneSense Warning Light will be solid
yellow when the vehicle is approaching a lane
marker. The warning light will flash when the
vehicle is crossing the lane marker.
Refer to “LaneSense — If Equipped" in
“Starting And Operating” for further informa-
tion.
— Service LaneSense Warning Light
— If Equipped
This light will turn on when the LaneSense
system is not operating and needs service.
Please see an authorized dealer.
GETTING TO KNOW YOUR INSTRUMENT PANEL
62
Page 65 of 312
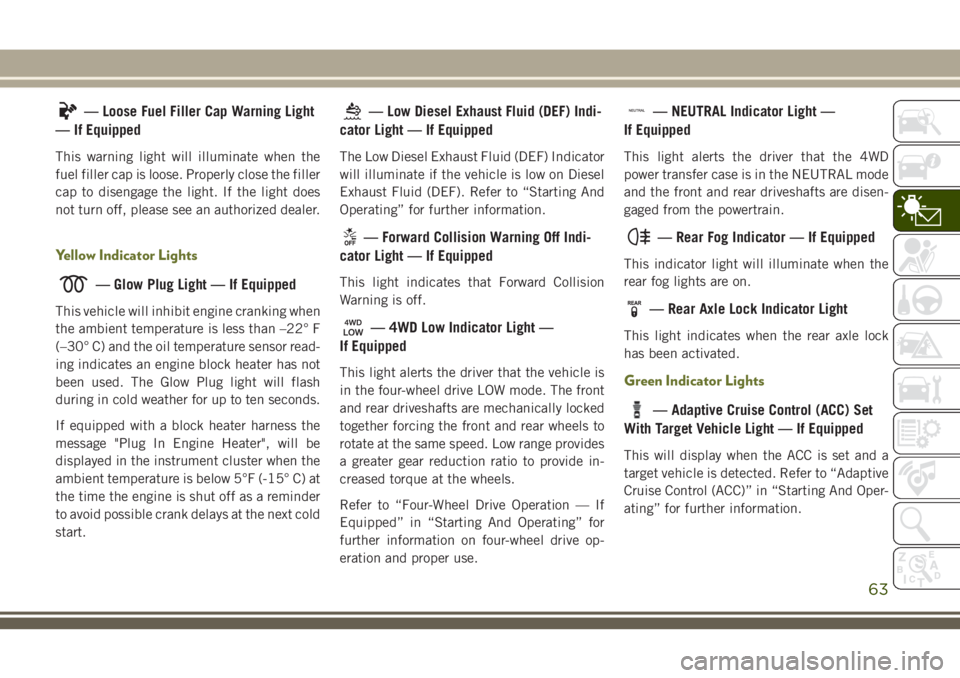
— Loose Fuel Filler Cap Warning Light
— If Equipped
This warning light will illuminate when the
fuel filler cap is loose. Properly close the filler
cap to disengage the light. If the light does
not turn off, please see an authorized dealer.
Yellow Indicator Lights
— Glow Plug Light — If Equipped
This vehicle will inhibit engine cranking when
the ambient temperature is less than –22° F
(–30° C) and the oil temperature sensor read-
ing indicates an engine block heater has not
been used. The Glow Plug light will flash
during in cold weather for up to ten seconds.
If equipped with a block heater harness the
message "Plug In Engine Heater", will be
displayed in the instrument cluster when the
ambient temperature is below 5°F (-15° C) at
the time the engine is shut off as a reminder
to avoid possible crank delays at the next cold
start.
— Low Diesel Exhaust Fluid (DEF) Indi-
cator Light — If Equipped
The Low Diesel Exhaust Fluid (DEF) Indicator
will illuminate if the vehicle is low on Diesel
Exhaust Fluid (DEF). Refer to “Starting And
Operating” for further information.
— Forward Collision Warning Off Indi-
cator Light — If Equipped
This light indicates that Forward Collision
Warning is off.
— 4WD Low Indicator Light —
If Equipped
This light alerts the driver that the vehicle is
in the four-wheel drive LOW mode. The front
and rear driveshafts are mechanically locked
together forcing the front and rear wheels to
rotate at the same speed. Low range provides
a greater gear reduction ratio to provide in-
creased torque at the wheels.
Refer to “Four-Wheel Drive Operation — If
Equipped” in “Starting And Operating” for
further information on four-wheel drive op-
eration and proper use.
— NEUTRAL Indicator Light —
If Equipped
This light alerts the driver that the 4WD
power transfer case is in the NEUTRAL mode
and the front and rear driveshafts are disen-
gaged from the powertrain.
— Rear Fog Indicator — If Equipped
This indicator light will illuminate when the
rear fog lights are on.
— Rear Axle Lock Indicator Light
This light indicates when the rear axle lock
has been activated.
Green Indicator Lights
— Adaptive Cruise Control (ACC) Set
With Target Vehicle Light — If Equipped
This will display when the ACC is set and a
target vehicle is detected. Refer to “Adaptive
Cruise Control (ACC)” in “Starting And Oper-
ating” for further information.
63
Page 66 of 312
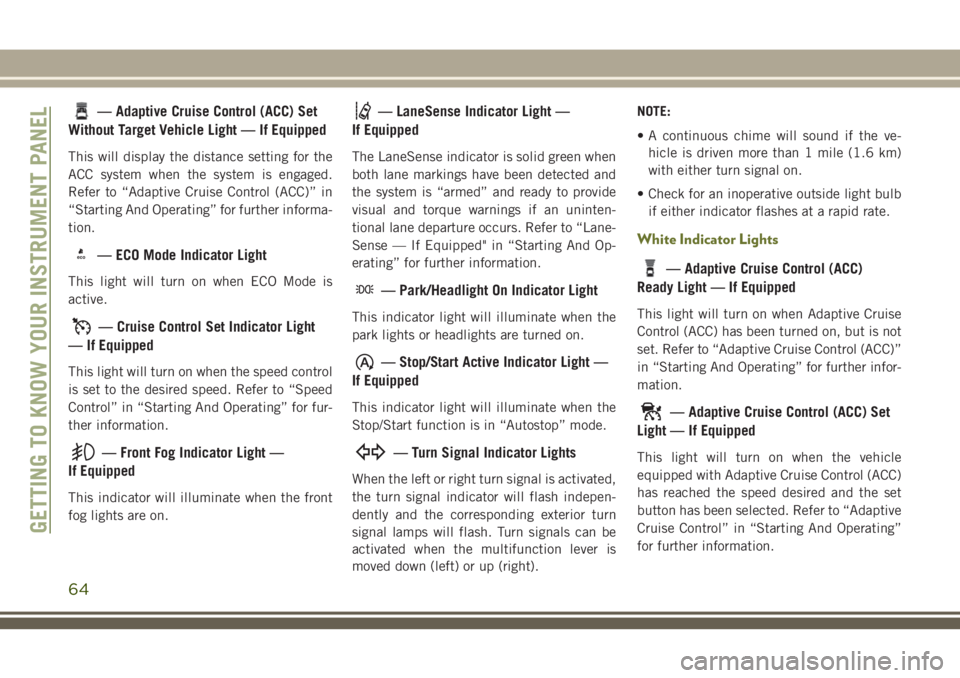
— Adaptive Cruise Control (ACC) Set
Without Target Vehicle Light — If Equipped
This will display the distance setting for the
ACC system when the system is engaged.
Refer to “Adaptive Cruise Control (ACC)” in
“Starting And Operating” for further informa-
tion.
eco— ECO Mode Indicator Light
This light will turn on when ECO Mode is
active.
— Cruise Control Set Indicator Light
— If Equipped
This light will turn on when the speed control
is set to the desired speed. Refer to “Speed
Control” in “Starting And Operating” for fur-
ther information.
— Front Fog Indicator Light —
If Equipped
This indicator will illuminate when the front
fog lights are on.
— LaneSense Indicator Light —
If Equipped
The LaneSense indicator is solid green when
both lane markings have been detected and
the system is “armed” and ready to provide
visual and torque warnings if an uninten-
tional lane departure occurs. Refer to “Lane-
Sense — If Equipped" in “Starting And Op-
erating” for further information.
— Park/Headlight On Indicator Light
This indicator light will illuminate when the
park lights or headlights are turned on.
— Stop/Start Active Indicator Light —
If Equipped
This indicator light will illuminate when the
Stop/Start function is in “Autostop” mode.
— Turn Signal Indicator Lights
When the left or right turn signal is activated,
the turn signal indicator will flash indepen-
dently and the corresponding exterior turn
signal lamps will flash. Turn signals can be
activated when the multifunction lever is
moved down (left) or up (right). NOTE:
• A continuous chime will sound if the ve-
hicle is driven more than 1 mile (1.6 km)
with either turn signal on.
• Check for an inoperative outside light bulb if either indicator flashes at a rapid rate.
White Indicator Lights
— Adaptive Cruise Control (ACC)
Ready Light — If Equipped
This light will turn on when Adaptive Cruise
Control (ACC) has been turned on, but is not
set. Refer to “Adaptive Cruise Control (ACC)”
in “Starting And Operating” for further infor-
mation.
— Adaptive Cruise Control (ACC) Set
Light — If Equipped
This light will turn on when the vehicle
equipped with Adaptive Cruise Control (ACC)
has reached the speed desired and the set
button has been selected. Refer to “Adaptive
Cruise Control” in “Starting And Operating”
for further information.
GETTING TO KNOW YOUR INSTRUMENT PANEL
64
Page 67 of 312
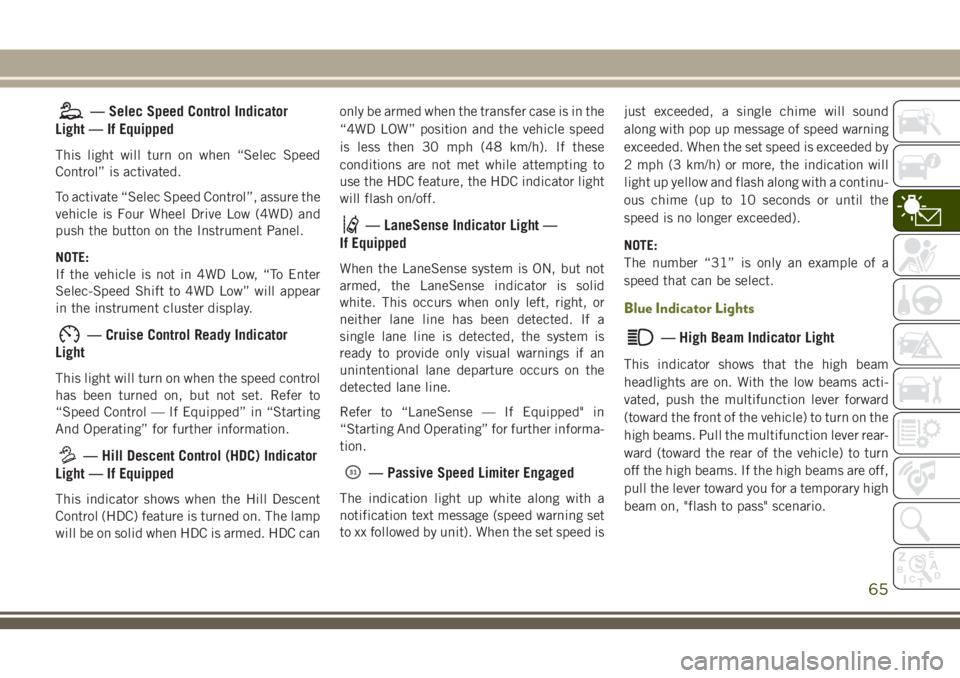
— Selec Speed Control Indicator
Light — If Equipped
This light will turn on when “Selec Speed
Control” is activated.
To activate “Selec Speed Control”, assure the
vehicle is Four Wheel Drive Low (4WD) and
push the button on the Instrument Panel.
NOTE:
If the vehicle is not in 4WD Low, “To Enter
Selec-Speed Shift to 4WD Low” will appear
in the instrument cluster display.
— Cruise Control Ready Indicator
Light
This light will turn on when the speed control
has been turned on, but not set. Refer to
“Speed Control — If Equipped” in “Starting
And Operating” for further information.
— Hill Descent Control (HDC) Indicator
Light — If Equipped
This indicator shows when the Hill Descent
Control (HDC) feature is turned on. The lamp
will be on solid when HDC is armed. HDC can only be armed when the transfer case is in the
“4WD LOW” position and the vehicle speed
is less then 30 mph (48 km/h). If these
conditions are not met while attempting to
use the HDC feature, the HDC indicator light
will flash on/off.
— LaneSense Indicator Light —
If Equipped
When the LaneSense system is ON, but not
armed, the LaneSense indicator is solid
white. This occurs when only left, right, or
neither lane line has been detected. If a
single lane line is detected, the system is
ready to provide only visual warnings if an
unintentional lane departure occurs on the
detected lane line.
Refer to “LaneSense — If Equipped" in
“Starting And Operating” for further informa-
tion.
— Passive Speed Limiter Engaged
The indication light up white along with a
notification text message (speed warning set
to xx followed by unit). When the set speed is just exceeded, a single chime will sound
along with pop up message of speed warning
exceeded. When the set speed is exceeded by
2 mph (3 km/h) or more, the indication will
light up yellow and flash along with a continu-
ous chime (up to 10 seconds or until the
speed is no longer exceeded).
NOTE:
The number “31” is only an example of a
speed that can be select.
Blue Indicator Lights
— High Beam Indicator Light
This indicator shows that the high beam
headlights are on. With the low beams acti-
vated, push the multifunction lever forward
(toward the front of the vehicle) to turn on the
high beams. Pull the multifunction lever rear-
ward (toward the rear of the vehicle) to turn
off the high beams. If the high beams are off,
pull the lever toward you for a temporary high
beam on, "flash to pass" scenario.
65
Page 121 of 312
STARTING AND OPERATING
STARTING THE ENGINE.......121
Normal Starting — Gasoline Engine . . .121
Extreme Cold Weather (Below –22°F
Or −30°C)..................121
Normal Starting — Diesel Engine . . . .121
ENGINE BREAK-IN
RECOMMENDATIONS ........123
PARKING BRAKE ............124
Electric Park Brake (EPB) .........124
MANUAL TRANSMISSION —
IF EQUIPPED...............126
Shifting................... .126
Downshifting .................127
AUTOMATIC TRANSMISSION —
IF EQUIPPED ...............128
Key Ignition Park Interlock ........129
Brake/Transmission Shift Interlock
System ....................129
Nine-Speed Automatic Transmission . .129
FOUR-WHEEL DRIVE OPERA-
TION .....................130
1-Speed Four-Wheel Drive (4X4) —
If Equipped .................130
2-Speed Four-Wheel Drive (4x4) —
If Equipped ..................131
Shift Positions ................132
Shifting Procedures .............132
Rear Electronic Locker (E-Locker)
System — If Equipped ...........134
SELEC-TERRAIN............135
Description..................135
STOP/START SYSTEM —
IF EQUIPPED ...............136
Automatic Mode ...............136
Possible Reasons The Engine Does
Not Autostop .................137
To Start The Engine While In Autostop
Mode .....................137
To Manually Turn Off The Stop/Start
System ....................138
To Manually Turn On The Stop/Start
System ....................138
STOP/START SYSTEM — DIESEL
MODELS ONLY ..............138
Automatic Mode...............139
Possible Reasons The Engine Does
Not Autostop .................139
To Start The Engine While In Autostop
Mode .....................140
To Manually Turn Off The Stop/Start
System ....................140
To Manually Turn On The Stop/Start
System ....................141
SPEED CONTROL ............141
Activation...................141
Setting A Desired Speed .........141
Varying The Speed .............142
Resume ...................142
Accelerating For Passing .........143
Deactivation .................143
ADAPTIVE CRUISE CONTROL
(ACC) ................... .143
Activation..................143
Setting A Desired ACC Speed .......143
Varying The Speed .............144
Resume ....................145
STARTING AND OPERATING
119
Page 143 of 312
3. At the next vehicle stop (after turning offthe STOP/START system) the engine will
not be stopped.
4. If the STOP/START system is manually turned off, the engine can only be started
and stopped by cycling the ignition
switch.
5. The STOP/START system will reset itself back to an ON condition every time the
key is turned off and back on.
To Manually Turn On The Stop/Start
System
Push the STOP/START Off switch (located on
the switch bank). The light on the switch will
turn off.
SPEED CONTROL
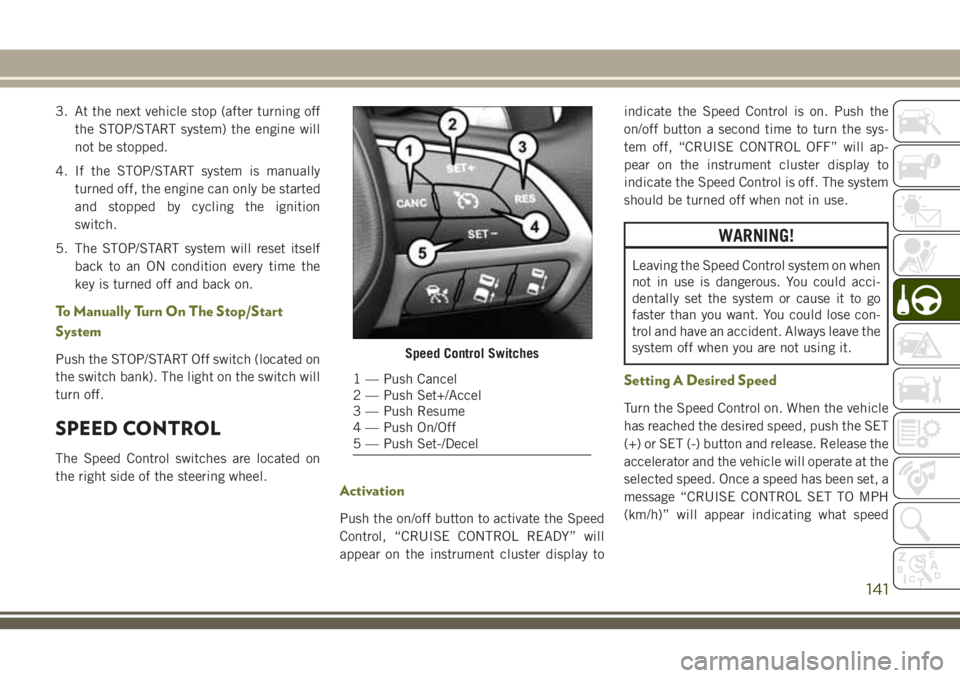
The Speed Control switches are located on
the right side of the steering wheel.
Activation
Push the on/off button to activate the Speed
Control, “CRUISE CONTROL READY” will
appear on the instrument cluster display to indicate the Speed Control is on. Push the
on/off button a second time to turn the sys-
tem off, “CRUISE CONTROL OFF” will ap-
pear on the instrument cluster display to
indicate the Speed Control is off. The system
should be turned off when not in use.
WARNING!
Leaving the Speed Control system on when
not in use is dangerous. You could acci-
dentally set the system or cause it to go
faster than you want. You could lose con-
trol and have an accident. Always leave the
system off when you are not using it.
Setting A Desired Speed
Turn the Speed Control on. When the vehicle
has reached the desired speed, push the SET
(+) or SET (-) button and release. Release the
accelerator and the vehicle will operate at the
selected speed. Once a speed has been set, a
message “CRUISE CONTROL SET TO MPH
(km/h)” will appear indicating what speed
Speed Control Switches
1 — Push Cancel
2 — Push Set+/Accel
3 — Push Resume
4 — Push On/Off
5 — Push Set-/Decel
141
Page 144 of 312
was set. A cruise indicator lamp, along with
set speed will also appear and stay on in the
instrument cluster display when the speed is
set.
Varying The Speed
Once the Speed Control has been activated,
the speed can be increased or decreased.
To Increase Speed
When the Speed Control is set, you can in-
crease speed by pushing the SET(+)button.
The driver's preferred units can be selected
through the instrument panel settings if
equipped. Refer to “Getting To Know Your
Instrument Panel” in the Owner’s Manual for
more information. The speed increment
shown is dependant on the chosen speed unit
of U.S. (mph) or Metric (km/h):
U.S. Speed (mph)
• Pushing the SET (+)button once will result
in a 1 mph increase in set speed. Each
subsequent tap of the button results in an
increase of 1 mph. • If the button is continually pushed, the set
speed will continue to increase until the
button is released, then the new set speed
will be established.
Metric Speed (km/h)
• Pushing the SET (+)button once will result
in a 1 km/h increase in set speed. Each
subsequent tap of the button results in an
increase of 1 km/h.
• If the button is continually pushed, the set speed will continue to increase until the
button is released, then the new set speed
will be established.
To Decrease Speed
When the Speed Control is set, you can de-
crease speed by pushing the SET (-)button.
The driver's preferred units can be selected
through the instrument panel settings if
equipped. Refer to “Getting To Know Your
Instrument Panel” in the Owner’s Manual for
more information. The speed increment
shown is dependant on the chosen speed unit
of U.S. (mph) or Metric (km/h): U.S. Speed (mph)
• Pushing the SET
(-)button once will result
in a 1 mph decrease in set speed. Each
subsequent tap of the button results in a
decrease of 1 mph.
• If the button is continually pushed, the set speed will continue to decrease until the
button is released, then the new set speed
will be established.
Metric Speed (km/h)
• Pushing the SET (-)button once will result
in a 1 km/h decrease in set speed. Each
subsequent tap of the button results in a
decrease of 1 km/h.
• If the button is continually pushed, the set speed will continue to decrease until the
button is released, then the new set speed
will be established.
Resume
To resume a previously selected set speed in
memory, push and release the RES button.
STARTING AND OPERATING
142
Page 145 of 312
Accelerating For Passing
Press the accelerator as you would normally.
When the pedal is released, the vehicle will
return to the set speed.
Deactivation
A soft tap on the brake pedal, pushing the
CANC button, or normal brake pressure while
slowing the vehicle will deactivate the Speed
Control without erasing the set speed from
memory.
Pushing the on/off button or turning the igni-
tion switch OFF erases the set speed from
memory.
ADAPTIVE CRUISE
CONTROL (ACC)
If your vehicle is equipped with Adaptive
Cruise Control, the controls operate exactly
the same as the Speed Control with only a
couple of differences. With this option, you
can set a specified distance you would like to
maintain between you and the vehicle in front
of you.If the ACC sensor detects a vehicle ahead,
ACC will apply limited braking or acceleration
automatically to maintain a preset following
distance, while matching the speed of the
vehicle ahead.If the sensor does not detect a vehicle ahead
of you, ACC will maintain a fixed set speed.
Activation
Push and release the Adaptive Cruise Control
(ACC) on/off button.
“ACC READY” will appear in the instrument
cluster display to indicate the ACC is on.
Setting A Desired ACC Speed
When the vehicle reaches the speed desired,
push the SET
(+)button or the SET (-)button
and release. The instrument cluster display
will show the set speed.
If the system is set when the vehicle speed is
below 19 mph (30 km/h), the set speed shall
be defaulted to 19 mph (30 km/h). If the
system is set when the vehicle speed is above
19 mph (30 km/h), the set speed shall be the
current speed of the vehicle.
NOTE:
ACC cannot be set if there is a stationary
vehicle in front of your vehicle in close prox-
imity.
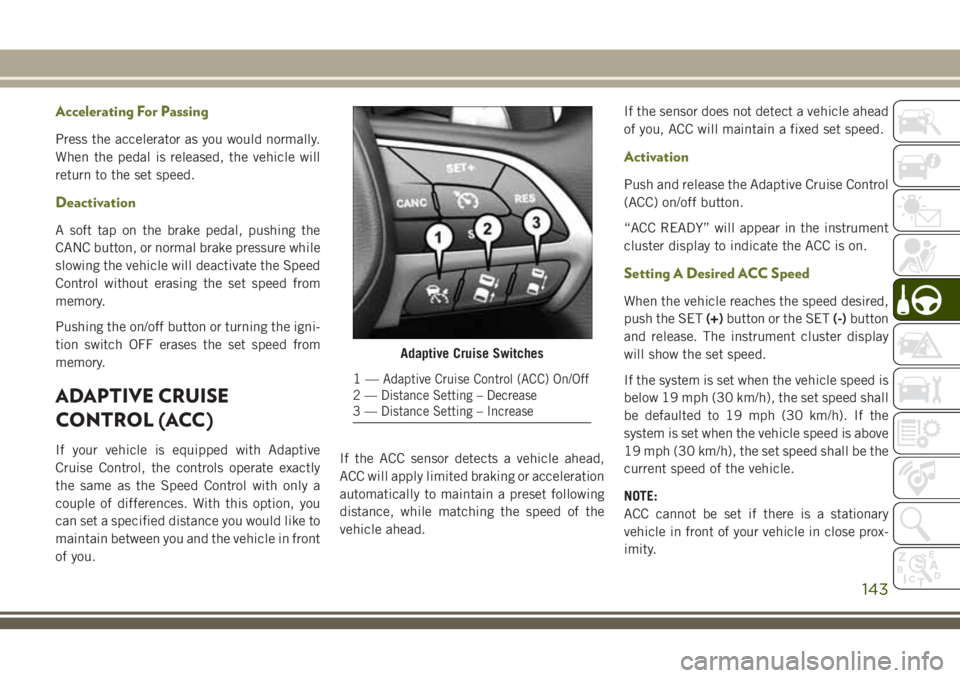
Adaptive Cruise Switches
1—Adaptive Cruise Control (ACC) On/Off
2 — Distance Setting – Decrease
3 — Distance Setting – Increase
143
Page 147 of 312
The driver's preferred units can be selected
through the instrument panel settings if
equipped. Refer to “Getting To Know Your
Instrument Panel” in the Owner’s Manual for
further information. The speed increment
shown is dependant on the chosen speed unit
of U.S. (mph) or Metric (km/h):
U.S. Speed (mph)
• Pushing the SET(-)button once will result
in a 1 mph decrease in set speed. Each
subsequent tap of the button results in a
decrease of 1 mph.
• If the button is continually pushed, the set speed will continue to decrease in 5 mph
decrements until the button is released.
The decrease in set speed is reflected in the
instrument cluster display.
Metric Speed (km/h)
• Pushing the SET (-)button once will result
in a 1 km/h decrease in set speed. Each
subsequent tap of the button results in a
decrease of 1 km/h. • If the button is continually pushed, the set
speed will continue to decrease in 10 km/h
decrements until the button is released.
The decrease in set speed is reflected in the
instrument cluster display.
Resume
If there is a set speed in memory, push the
RES (resume) button and remove your foot
from the accelerator pedal. The instrument
cluster display will show the last set speed.
NOTE:
• If your vehicle stays at standstill for longerthan two seconds, the driver will either have
to push the RES (resume) button or apply
the accelerator pedal to reengage the ACC
to the existing set speed.
• ACC cannot be resumed if there is a station- ary vehicle in-front of your vehicle in close
proximity.
WARNING!
The Resume function should only be used
if traffic and road conditions permit. Re-
suming a set speed that is too high or too
WARNING!
low for prevailing traffic and road condi-
tions could cause the vehicle to accelerate
or decelerate too sharply for safe opera-
tion. Failure to follow these warnings can
result in a collision and death or serious
personal injury.
Deactivation
Push and release the Adaptive Cruise Control
(ACC) on/off button a second time to turn the
system off.
“Adaptive Cruise Control (ACC) Off” will ap-
pear in the instrument cluster display to in-
dicate the ACC is off.
Setting The Following Distance
The specified following distance for ACC can
be set by varying the distance setting be-
tween four bars (longest), three bars (long),
two bars (medium) and one bar (short). Using
this distance setting and the vehicle speed,
ACC calculates and sets the distance to the
vehicle ahead. This distance setting appears
in the instrument cluster display.
145
Page 148 of 312
• To increase the distance setting, push theDistance Setting—Increase button and re-
lease. Each time the button is pushed, the
distance setting increases by one bar (lon-
ger).
• To decrease the distance setting, push the Distance Setting—Decrease button and re-
lease. Each time the button is pushed, the
distance setting decreases by one bar
(shorter).
Changing Modes
If desired, the Adaptive Cruise Control mode
can be turned off and the system can be
operated as a Normal (Fixed Speed) Cruise
Control mode. When in the Normal (Fixed
Speed) Cruise Control mode the distance
setting feature will be disabled and the sys-
tem will maintain the speed you set.
• To change between the different cruisecontrol modes, push the Adaptive Cruise
Control (ACC) on/off button which turns the
ACC and the Normal (Fixed Speed) Cruise
Control off. • Pushing the Normal (Fixed Speed) Cruise
Control on/off button will result in turning
on (changing to) the Normal (Fixed Speed)
Cruise Control mode.
Refer to “Normal (Fixed Speed) Cruise Con-
trol Mode” in “Starting And Operating” in
your Owner's Manual for further information.
WARNING!
Adaptive Cruise Control (ACC) is a conve-
nience system. It is not a substitute for
active driving involvement. It is always the
driver’s responsibility to be attentive of
road, traffic, and weather conditions, ve-
hicle speed, distance to the vehicle ahead;
and, most importantly, brake operation to
ensure safe operation of the vehicle under
all road conditions. Your complete atten-
tion is always required while driving to
maintain safe control of your vehicle. Fail-
ure to follow these warnings can result in a
collision and death or serious personal
injury.
The ACC system:
• Does not react to pedestrians, oncoming vehicles, and stationary objects (e.g., a
WARNING!
stopped vehicle in a traffic jam or a
disabled vehicle).
• Cannot take street, traffic, and weather
conditions into account, and may be
limited upon adverse sight distance con-
ditions.
• Does not always fully recognize complex
driving conditions, which can result in
wrong or missing distance warnings.
• Will bring the vehicle to a complete stop
while following a target vehicle and hold
the vehicle for 2 seconds in the stop
position. If the target vehicle does not
start moving within two seconds the ACC
system will display a message that the
system will release the brakes and that
the brakes must be applied manually. An
audible chime will sound when the
brakes are released.
You should switch off the ACC system:
• When driving in fog, heavy rain, heavy
snow, sleet, heavy traffic, and complex
driving situations (i.e., in highway con-
struction zones).
STARTING AND OPERATING
146