sensor JEEP CHEROKEE 2019 Owner handbook (in English)
[x] Cancel search | Manufacturer: JEEP, Model Year: 2019, Model line: CHEROKEE, Model: JEEP CHEROKEE 2019Pages: 344, PDF Size: 6.35 MB
Page 165 of 344
• If the ACC sensor detects a vehicle ahead,
ACC will apply limited braking or accelera-
tion (not to exceed the original set speed)
automatically to maintain a preset follow-
ing distance, while matching the speed of
the vehicle ahead.
WARNING!
• Adaptive Cruise Control (ACC) is a con-
venience system. It is not a substitute
for active driving involvement. It is al-
ways the driver’s responsibility to be at-
tentive of road, traffic, and weather con-
ditions, vehicle speed, distance to the
vehicle ahead; and, most importantly,
brake operation to ensure safe operation
of the vehicle under all road conditions.
Your complete attention is always re-
quired while driving to maintain safe
control of your vehicle. Failure to follow
these warnings can result in a collision
and death or serious personal injury.
• The ACC system:
• Does not react to pedestrians, on-
coming vehicles, and stationary ob-
WARNING!
jects (e.g., a stopped vehicle in a
traffic jam or a disabled vehicle).
• Cannot take street, traffic, and
weather conditions into account,
and may be limited upon adverse
sight distance conditions.
• Does not always fully recognize
complex driving conditions, which
can result in wrong or missing dis-
tance warnings.
• Will bring the vehicle to a complete
stop while following a target vehicle
and hold the vehicle for approxi-
mately 3 minutes in the stop posi-
tion. If the target vehicle does not
start moving within 3 minutes the
parking brake will be activated, and
the ACC system will be cancelled.
You should switch off the ACC system:
• When driving in fog, heavy rain, heavy
snow, sleet, heavy traffic, and complex
driving situations (i.e., in highway con-
struction zones).
WARNING!
• When entering a turn lane or highway off
ramp; when driving on roads that are
winding, icy, snow-covered, slippery, or
have steep uphill or downhill slopes.
• When towing a trailer up or down steep
slopes.
• When circumstances do not allow safe
driving at a constant speed.
Activating Adaptive Cruise Control (ACC )
Push and release the Adaptive Cruise Control
(ACC) on/off button.
The minimum set speed for the ACC system is
19 mph (30 km/h).
When the system is turned on and in the
ready state, the instrument cluster display
will read “ACC Ready.”
When the system is off, the instrument clus-
ter display will read “Adaptive Cruise Control
(ACC) Off.”
163
Page 168 of 344
Setting The Following Distance In ACC
The specified following distance for ACC can
be set by varying the distance setting be-
tween four bars (longest), three bars (long),
two bars (medium) and one bar (short). Using
this distance setting and the vehicle speed,
ACC calculates and sets the distance to the
vehicle ahead. This distance setting appears
in the instrument cluster display.
To increase the distance setting, push the
Distance Setting — Increase button and re-
lease. Each time the button is pushed, the
distance setting increases by one bar (longer).
To decrease the distance setting, push the
Distance Setting — Decrease button and
release. Each time the button is pushed, the
distance setting decreases by one bar
(shorter).
PARKSENSE REAR PARK
ASSIST — IF EQUIPPED
The ParkSense Rear Park Assist system pro-
vides visual and audible indications of the
distance between the rear fascia and a de-
tected obstacle when backing up, e.g. duringa parking maneuver. If your vehicle is
equipped with an automatic transmission,
the vehicle brakes may be automatically ap-
plied and released when performing a reverse
parking maneuver if the system detects a
possible collision with an obstacle.
Refer to “ParkSense System Usage Precau-
tions” for limitations of this system and rec-
ommendations.
ParkSense will retain the last system state
(enabled or disabled) from the last ignition
cycle when the ignition is changed to the
ON/RUN position.
ParkSense Sensors
The four ParkSense sensors, located in the
rear fascia/bumper, monitor the area behind
the vehicle that is within the sensors’ field of
view. The sensors can detect obstacles from
approximately 12 inches (30 cm) up to
79 inches (200 cm) from the rear fascia/
bumper in the horizontal direction, depend-
ing on the location, type and orientation of
the obstacle.
ParkSense Warning Display
The ParkSense Warning screen will only be
displayed if Sound and Display is selected
from the Customer - Programmable Features
section of the Uconnect System.
Refer to "Uconnect Settings” in “Multime-
dia” in your Owner’s Manual for further infor-
mation.
The ParkSense Warning screen is located
within the instrument cluster display. It pro-
vides visual warnings to indicate the distance
between the rear fascia/bumper and the de-
tected obstacle.
Refer to “Instrument Cluster Display” in
“Getting To Know Your Instrument Panel” in
your Owner’s Manual for further information.
Enabling And Disabling ParkSense
ParkSense can be enabled and disabled with
the ParkSense switch.
When the ParkSense switch is
pushed to disable the system, the
instrument cluster will display the
“PARKSENSE OFF” message for
approximately five seconds. When the gear
STARTING AND OPERATING
166
Page 169 of 344
selector is moved to REVERSE and the sys-
tem is disabled, the instrument cluster dis-
play will display the “PARKSENSE OFF”
message for as long as the vehicle is in
REVERSE.
Refer to “Instrument Cluster Display” in
“Getting To Know Your Instrument Panel” in
your Owner’s Manual for further information.
The ParkSense switch LED will be on when
ParkSense is disabled or requires service.
The ParkSense switch LED will be off when
the system is enabled. If the ParkSense
switch is pushed, and the system requires
service, the ParkSense switch LED will blink
momentarily, and then the LED will be on.
ParkSense System Usage Precautions
NOTE:
• Ensure that the rear bumper is free of snow,
ice, mud, dirt and debris to keep the
ParkSense system operating properly.
• Jackhammers, large trucks, and other vi-
brations could affect the performance of
ParkSense.• When you turn ParkSense off, the instru-
ment cluster will display “PARKSENSE
OFF.” Furthermore, once you turn
ParkSense off, it remains off until you turn
it on again, even if you cycle the ignition.
• When you move the gear selector to the
REVERSE position and ParkSense is turned
off, the instrument cluster display will dis-
play “PARKSENSE OFF” message for as
long as the vehicle is in REVERSE.
• ParkSense, when on, will reduce the vol-
ume of the radio when it is sounding a tone.
• Clean the ParkSense sensors regularly, tak-
ing care not to scratch or damage them. The
sensors must not be covered with ice, snow,
slush, mud, dirt or debris. Failure to do so
can result in the system not working prop-
erly. The ParkSense system might not de-
tect an obstacle behind the fascia/bumper,
or it could provide a false indication that an
obstacle is behind the fascia/bumper.
• Use the ParkSense switch to turn the
ParkSense system off if objects such as
bicycle carriers, trailer hitches, etc. are
placed within 12 inches (30 cm) from the
rear fascia/bumper. Failure to do so can
result in the system misinterpreting a closeobject as a sensor problem, causing the
“PARKSENSE UNAVAILABLE SERVICE
REQUIRED” message to be displayed in
the instrument cluster display.
• ParkSense should be disabled when the
liftgate is in the open position and the
vehicle is in REVERSE. An open liftgate
could provide a false indication that an
obstacle is behind the vehicle.
WARNING!
• Drivers must be careful when backing up
even when using ParkSense. Always
check carefully behind your vehicle, look
behind you, and be sure to check for
pedestrians, animals, other vehicles, ob-
structions, and blind spots before back-
ing up. You are responsible for safety
and must continue to pay attention to
your surroundings. Failure to do so can
result in serious injury or death.
• Before using ParkSense, it is strongly
recommended that the ball mount and
hitch ball assembly is disconnected
from the vehicle when the vehicle is not
used for towing. Failure to do so can
167
Page 170 of 344
WARNING!
result in injury or damage to vehicles or
obstacles because the hitch ball will be
much closer to the obstacle than the rear
fascia when the loudspeaker sounds the
continuous tone. Also, the sensors could
detect the ball mount and hitch ball
assembly, depending on its size and
shape, giving a false indication that an
obstacle is behind the vehicle.
CAUTION!
• ParkSense is only a parking aid and it is
unable to recognize every obstacle, in-
cluding small obstacles. Parking curbs
might be temporarily detected or not
detected at all. Obstacles located above
or below the sensors will not be detected
when they are in close proximity.
• The vehicle must be driven slowly when
using ParkSense in order to be able to
stop in time when an obstacle is de-
tected. It is recommended that the
driver looks over his/her shoulder when
using ParkSense.
PARKSENSE FRONT AND
REAR PARK ASSIST — IF
EQUIPPED
The ParkSense Park Assist system provides
visual and audible indications of the distance
between the rear and/or front fascia and a
detected obstacle when backing up or mov-
ing forward, e.g. during a parking maneuver.
If your vehicle is equipped with an automatic
transmission, the vehicle brakes may be au-
tomatically applied and released when per-
forming a reverse parking maneuver if the
system detects a possible collision with an
obstacle.
Refer to “ParkSense System Usage Precau-
tions” in “Starting And Operating” in your
Owner’s Manual for limitations of this system
and recommendations.
ParkSense will retain the last system state
(enabled or disabled) from the last ignition
cycle when the ignition is changed to the
ON/RUN position.
ParkSense Sensors
The four ParkSense sensors, located in the
rear fascia/bumper, monitor the area behind
the vehicle that is within the sensors’ field of
view. The sensors can detect obstacles from
approximately 12 inches (30 cm) up to
79 inches (200 cm) from the rear fascia/
bumper in the horizontal direction, depend-
ing on the location, type and orientation of
the obstacle.
The six ParkSense sensors, located in the
front fascia/bumper, monitor the area in front
of the vehicle that is within the sensors’ field
of view. The sensors can detect obstacles
from approximately 12 inches (30 cm) up to
47 inches (120 cm) from the front fascia/
bumper in the horizontal direction, depend-
ing on the location, type and orientation of
the obstacle.
When an object is detected within 79 inches
(200 cm) behind the rear bumper while the
vehicle is in REVERSE, a warning will appear
in the instrument cluster display. In addition
a chime will sound (when Sound and Display
is selected from the Customer Programmable
Features section of the Uconnect System
STARTING AND OPERATING
168
Page 171 of 344
screen). As the vehicle moves closer to the
object, the chime rate will change from single
1/2 second tone (for rear only), to slow (for
rear only), to fast, to continuous.
Enabling And Disabling ParkSense
ParkSense can be enabled and disabled with
the ParkSense switch.
When the ParkSense switch is
pushed to disable the system, the
instrument cluster will display the
“PARKSENSE OFF” message for
approximately five seconds. When the gear
selector is moved to REVERSE and the sys-
tem is disabled, the instrument cluster dis-
play will display the “PARKSENSE OFF”
message for as long as the vehicle is in
REVERSE.
Refer to “Instrument Cluster Display” in
“Getting To Know Your Instrument Panel” in
your Owner’s Manual for further information.
NOTE:
When ParkSense is disabled and the gear
selector is moved to the DRIVE position, no
warning message will be displayed.The ParkSense switch LED will be on when
ParkSense is disabled or requires service.
The ParkSense switch LED will be off when
the system is enabled. If the ParkSense
switch is pushed, and the system requires
service, the ParkSense switch LED will blink
momentarily, and then the LED will be on.
Operation With A Trailer
The operation of the sensors is automatically
deactivated when the trailer's electric plug is
inserted in the vehicle's tow hook socket. The
sensors are automatically reactivated when
the trailer's cable plug is removed.
PARKSENSE ACTIVE PARK
ASSIST SYSTEM — IF
EQUIPPED
The ParkSense Active Park Assist system is
intended to assist the driver during parallel
and perpendicular parking maneuvers by
identifying a proper parking space, providing
audible/visual instructions, and controlling
the steering wheel. The ParkSense Active
Park Assist system is defined as “semi-
automatic” since the driver maintains controlof the accelerator, gear selector and brakes.
Depending on the driver's parking maneuver
selection, the ParkSense Active Park Assist
system is capable of maneuvering a vehicle
into a parallel or a perpendicular parking
space on either side (i.e., driver side or pas-
senger side).
NOTE:
• The driver is always responsible for control-
ling the vehicle, responsible for any sur-
rounding objects, and must intervene as
required.
• The system is provided to assist the driver
and not to substitute the driver.
• During a semi-automatic maneuver, if the
driver touches the steering wheel after be-
ing instructed to remove their hands from
the steering wheel, the system will cancel,
and the driver will be required to manually
complete the parking maneuver.
• The system may not work in all conditions
(e.g. environmental conditions such as
heavy rain, snow, etc., or if searching for a
parking space that has surfaces that will
absorb the ultrasonic sensor waves).
169
Page 179 of 344
quantity AdBlue (UREA) is injected into the
exhaust upstream of a catalyst where, when
vaporized, it converts smog-forming nitrogen
oxides (NOx) into harmless nitrogen (N2) and
water vapor (H2O), two natural components
of the air we breathe. You can operate with
the comfort that your vehicle is contributing
to a cleaner, healthier world environment for
this and generations to come.
System Overview
This vehicle is equipped with a AdBlue
(UREA) injection system and a Selective
Catalytic Reduction (SCR) catalyst to meet
the emission requirements.
The AdBlue (UREA) injection system con-
sists of the following components:
• AdBlue (UREA) Tank
• AdBlue (UREA) Pump
• AdBlue (UREA) Injector
• Electronically-heated AdBlue (UREA)
Lines
• NOx sensors• Temperature sensors
• SCR catalyst
The AdBlue (UREA) injection system and
SCR catalyst enable the achievement of die-
sel emissions requirements; while maintain-
ing outstanding fuel economy, drivability,
torque and power ratings.
Refer to “Instrument Cluster Display” in
“Getting To Know Your Instrument Panel” for
system messages and warnings.
NOTE:
• Your vehicle is equipped with a AdBlue
(UREA) injection system. You may occa-
sionally hear an audible clicking noise from
under the vehicle at a stop. This is normal
operation.
• The AdBlue (UREA) pump will run for a
period of time after engine shutdown to
purge the AdBlue (UREA) system. This is
normal operation and may be audible from
the rear of the vehicle.
AdBlue (UREA) Storage
AdBlue (UREA) is considered a very stable
product with a long shelf life. If AdBlue
(UREA) is kept in temperatures between
10° and 90°F (-12° and 32°C), it will last a
minimum of one year.
AdBlue (UREA) is subject to freezing at the
lowest temperatures. For example, AdBlue
(UREA) may freeze at temperatures at or
below 12° F (-11° C). The system has been
designed to operate in this environment.
NOTE:
When working with AdBlue (UREA), it is
important to know that:
• Any containers or parts that come into con-
tact with AdBlue (UREA) must be AdBlue
(UREA) compatible (plastic or stainless
steel). Copper, brass, aluminum, iron or
non-stainless steel should be avoided as
they are subject to corrosion by AdBlue
(UREA).
• If AdBlue (UREA) is spilled, it should be
wiped up completely.
177
Page 192 of 344
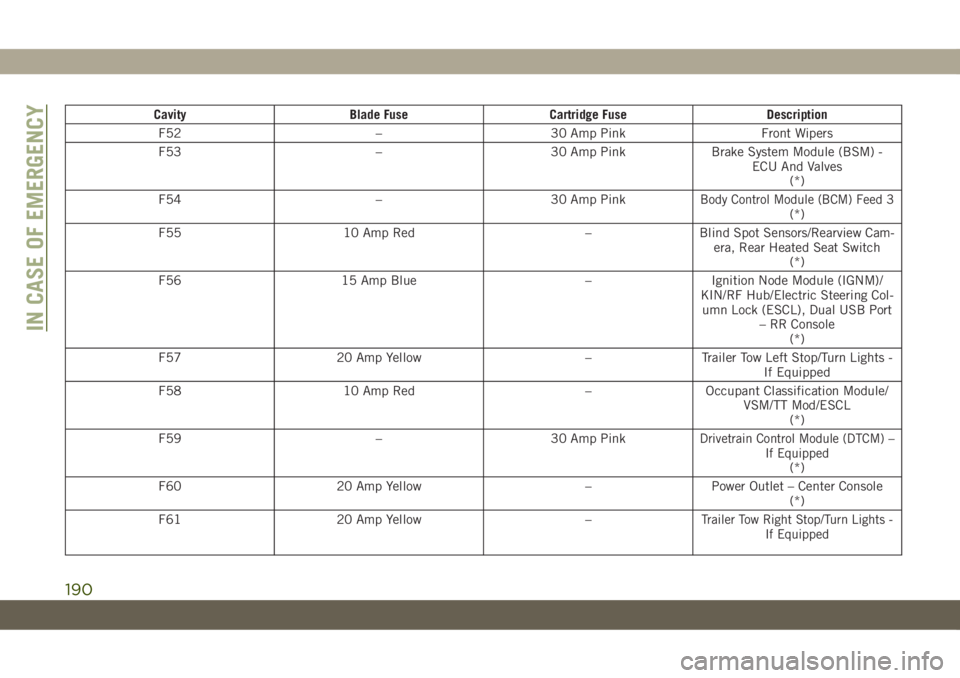
Cavity Blade Fuse Cartridge Fuse Description
F52 – 30 Amp Pink Front Wipers
F53 – 30 Amp Pink Brake System Module (BSM) -
ECU And Valves
(*)
F54 – 30 Amp Pink
Body Control Module (BCM) Feed 3(*)
F55 10 Amp Red – Blind Spot Sensors/Rearview Cam-
era, Rear Heated Seat Switch
(*)
F56 15 Amp Blue – Ignition Node Module (IGNM)/
KIN/RF Hub/Electric Steering Col-
umn Lock (ESCL), Dual USB Port
– RR Console
(*)
F57 20 Amp Yellow – Trailer Tow Left Stop/Turn Lights -
If Equipped
F58 10 Amp Red – Occupant Classification Module/
VSM/TT Mod/ESCL
(*)
F59 – 30 Amp Pink
Drivetrain Control Module (DTCM) –
If Equipped
(*)
F60 20 Amp Yellow – Power Outlet – Center Console
(*)
F61 20 Amp Yellow –
Trailer Tow Right Stop/Turn Lights -
If Equipped
IN CASE OF EMERGENCY
190
Page 193 of 344
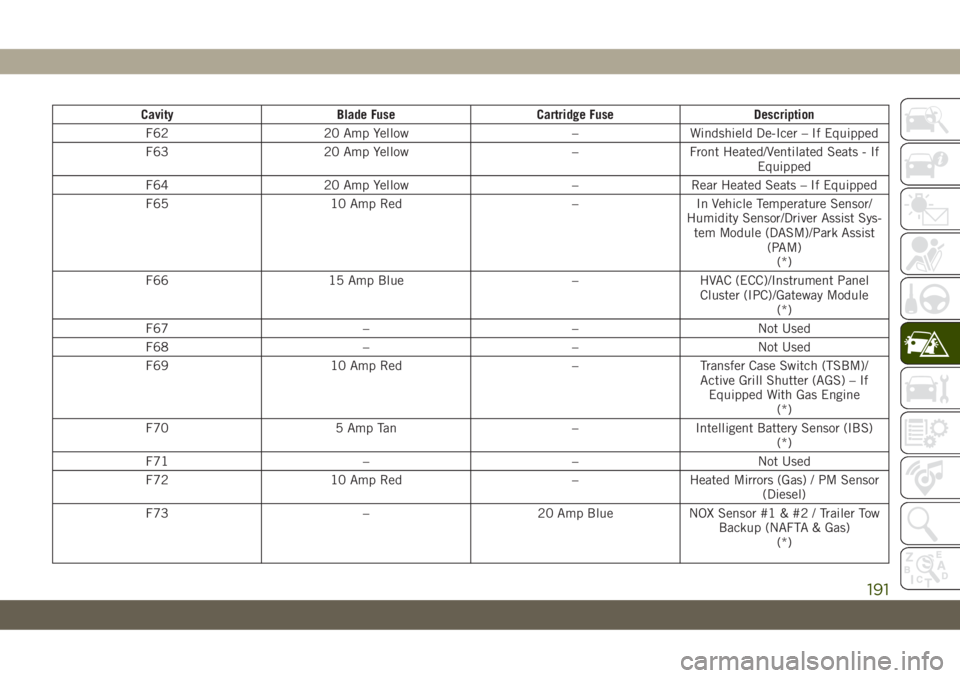
Cavity Blade Fuse Cartridge Fuse Description
F62 20 Amp Yellow – Windshield De-Icer – If Equipped
F63 20 Amp Yellow – Front Heated/Ventilated Seats - If
Equipped
F64 20 Amp Yellow – Rear Heated Seats – If Equipped
F65 10 Amp Red – In Vehicle Temperature Sensor/
Humidity Sensor/Driver Assist Sys-
tem Module (DASM)/Park Assist
(PAM)
(*)
F66 15 Amp Blue – HVAC (ECC)/Instrument Panel
Cluster (IPC)/Gateway Module
(*)
F67 – – Not Used
F68 – – Not Used
F69 10 Amp Red – Transfer Case Switch (TSBM)/
Active Grill Shutter (AGS) – If
Equipped With Gas Engine
(*)
F70 5 Amp Tan – Intelligent Battery Sensor (IBS)
(*)
F71 – – Not Used
F72 10 Amp Red – Heated Mirrors (Gas) / PM Sensor
(Diesel)
F73 – 20 Amp Blue NOX Sensor #1 & #2 / Trailer Tow
Backup (NAFTA & Gas)
(*)
191
Page 195 of 344
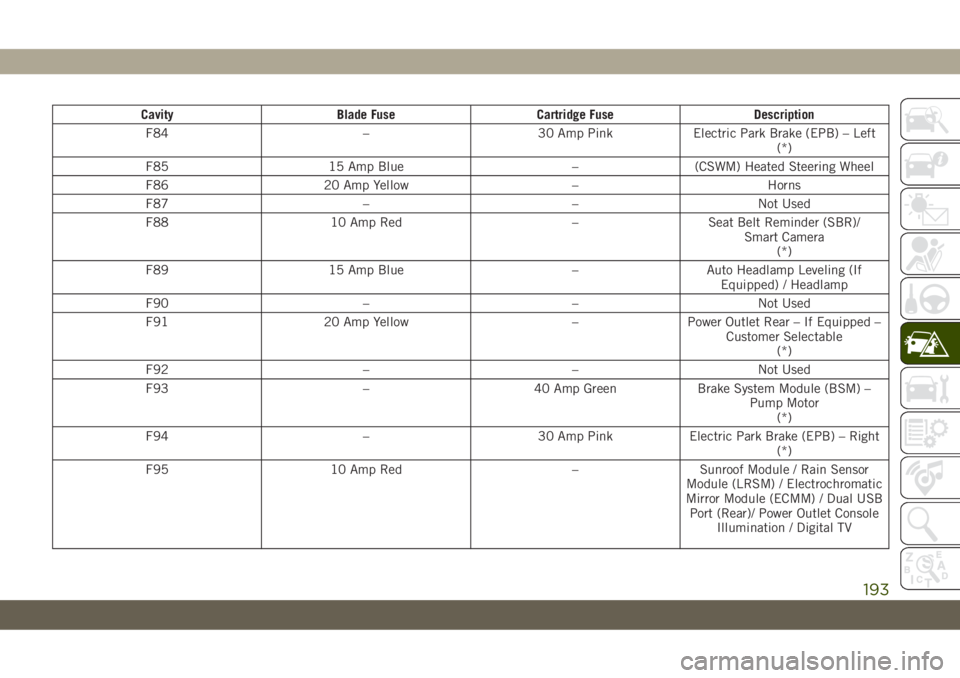
Cavity Blade Fuse Cartridge Fuse Description
F84 – 30 Amp Pink Electric Park Brake (EPB) – Left
(*)
F85 15 Amp Blue – (CSWM) Heated Steering Wheel
F86 20 Amp Yellow – Horns
F87 – – Not Used
F88 10 Amp Red – Seat Belt Reminder (SBR)/
Smart Camera
(*)
F89 15 Amp Blue – Auto Headlamp Leveling (If
Equipped) / Headlamp
F90 – – Not Used
F91 20 Amp Yellow – Power Outlet Rear – If Equipped –
Customer Selectable
(*)
F92 – – Not Used
F93 – 40 Amp Green Brake System Module (BSM) –
Pump Motor
(*)
F94 – 30 Amp Pink Electric Park Brake (EPB) – Right
(*)
F95 10 Amp Red – Sunroof Module / Rain Sensor
Module (LRSM) / Electrochromatic
Mirror Module (ECMM) / Dual USB
Port (Rear)/ Power Outlet Console
Illumination / Digital TV
193
Page 243 of 344
Example: If garage temperature = 68°F
(20°C) and the outside temperature = 32°F
(0°C) then the cold tire inflation pressure
should be increased by 3 psi (21 kPa), which
equals 1 psi (7 kPa) for every 12°F (7°C) for
this outside temperature condition.
Tire pressure may increase from 2 to 6 psi
(13 to 40 kPa) during operation. DO NOT
reduce this normal pressure build up or your
tire pressure will be too low.
Tire Pressures For High Speed Operation
The manufacturer advocates driving at safe
speeds and within posted speed limits.
Where speed limits or conditions are such
that the vehicle can be driven at high speeds,
maintaining correct tire inflation pressure is
very important. Increased tire pressure and
reduced vehicle loading may be required for
high-speed vehicle operation. Refer to an
authorized tire dealer or original equipment
vehicle dealer for recommended safe operat-
ing speeds, loading and cold tire inflation
pressures.
WARNING!
High speed driving with your vehicle under
maximum load is dangerous. The added
strain on your tires could cause them to
fail. You could have a serious collision. Do
not drive a vehicle loaded to the maximum
capacity at continuous speeds above
75 mph (120 km/h).
Radial Ply Tires
WARNING!
Combining radial ply tires with other types
of tires on your vehicle will cause your
vehicle to handle poorly. The instability
could cause a collision. Always use radial
ply tires in sets of four. Never combine
them with other types of tires.
Tire Repair
If your tire becomes damaged, it may be
repaired if it meets the following criteria:
• The tire has not been driven on when flat.
•
The damage is only on the tread section of
your tire (sidewall damage is not repairable).
• The puncture is no greater thana¼ofan
inch (6 mm).
Consult an authorized tire dealer for tire re-
pairs and additional information.
Damaged Run Flat tires, or Run Flat tires that
have experienced a loss of pressure should be
replaced immediately with another Run Flat
tire of identical size and service description
(Load Index and Speed Symbol). Replace the
tire pressure sensor as well as it is not de-
signed to be reused.
Run Flat Tires — If Equipped
Run Flat tires allow you the capability to drive
50 miles (80 km) at 50 mph (80 km/h) after
a rapid loss of inflation pressure. This rapid
loss of inflation is referred to as the Run Flat
mode. A Run Flat mode occurs when the tire
inflation pressure is of/or below 14 psi
(96 kPa). Once a Run Flat tire reaches the
run flat mode it has limited driving capabili-
ties and needs to be replaced immediately. A
Run Flat tire is not repairable. When a run flat
tire is changed after driving with underin-
241