hood release JEEP CHEROKEE 2019 Owner handbook (in English)
[x] Cancel search | Manufacturer: JEEP, Model Year: 2019, Model line: CHEROKEE, Model: JEEP CHEROKEE 2019Pages: 344, PDF Size: 6.35 MB
Page 10 of 344
ADAPTIVE CRUISE CONTROL (ACC) — IF
EQUIPPED....................... 162
Activating Adaptive Cruise Control (ACC) . . 163
To Set A Desired ACC Speed.......... 164
Resume...................... 164
To Vary The Speed Setting........... 164
Setting The Following Distance In ACC.... 166
PARKSENSE REAR PARK ASSIST — IF EQUIPPED . . 166ParkSense Sensors................ 166
ParkSense Warning Display........... 166
Enabling And Disabling ParkSense...... 166
ParkSense System Usage Precautions.... 167
PARKSENSE FRONT AND REAR PARK ASSIST — IF
EQUIPPED....................... 168
ParkSense Sensors................ 168
Enabling And Disabling ParkSense...... 169
Operation With A Trailer............. 169
PARKSENSE ACTIVE PARK ASSIST SYSTEM — IF
EQUIPPED....................... 169
LANESENSE...................... 170
LaneSense Operation.............. 170
Turning LaneSense On Or Off......... 170
LaneSense Warning Message.......... 171
Changing LaneSense Status.......... 172
PARKVIEW REAR BACK UP CAMERA — IF
EQUIPPED....................... 173
REFUELING THE VEHICLE............... 173
REFUELING THE VEHICLE — DIESEL ENGINE.... 175
AdBlue (UREA) — If Equipped........ 176
TRAILER TOWING................... 181Trailer Towing Weights (Maximum Trailer Weight
Ratings)...................... 181
RECREATIONAL TOWING (BEHIND MOTORHOME,
ETC.).......................... 182
Towing This Vehicle Behind Another
Vehicle....................... 182
Recreational Towing — Front-Wheel Drive (FWD)
Models...................... 183
Recreational Towing — 4x4 Models...... 183
IN CASE OF EMERGENCY
HAZARD WARNING FLASHERS............ 184
BULB REPLACEMENT................. 184
Replacement Bulbs............... 184
Replacing Exterior Bulbs............ 185
FUSES......................... 185General Information............... 186
Underhood Fuses................ 186
Interior Fuses................... 195
JACKING AND TIRE CHANGING............ 196Jack Location/Spare Tire Stowage....... 196
Preparations For Jacking............ 197
Jacking Instructions............... 197
Road Tire Installation.............. 200
Declaration Of Conformance.......... 200
Jack Usage Precautions............ 203
TIRE SERVICE KIT — IF EQUIPPED.......... 204Tire Service Kit Storage............. 204
Tire Service Kit Components And Operation . 204
Tire Service Kit Usage Precautions...... 205
Sealing A Tire With Tire Service Kit...... 206
JUMP STARTING.................... 209Preparations For Jump Start.......... 210
Jump Starting Procedure............ 211
REFUELING IN EMERGENCY.............. 212Emergency Fuel Filler Door Release..... 212
IF YOUR ENGINE OVERHEATS............. 212
GEAR SELECTOR OVERRIDE.............. 213
FREEING A STUCK VEHICLE.............. 213
TOWING A DISABLED VEHICLE............ 214
Without The Key Fob.............. 215
Front-Wheel Drive (FWD) Models....... 215
4x4 Models.................... 216
Recovery Strap — If Equipped......... 216
ENHANCED ACCIDENT RESPONSE SYSTEM (EARS) . 217
EVENT DATA RECORDER (EDR)............ 217
SERVICING AND MAINTENANCE
SCHEDULED SERVICING................ 218Scheduled Servicing — Gasoline Engine . . . 218
Scheduled Servicing — Diesel Engine.... 222
ENGINE COMPARTMENT............... 2272.0L Engine.................... 227
2.4L Engine.................... 228
3.2L Engine.................... 229
2.2L Diesel Engine............... 230
Checking Oil Level................ 231
Cooling System.................. 231
Adding Washer Fluid.............. 232
Brake System.................. 232
Manual Transmission — If Equipped..... 233
Automatic Transmission............ 234
Maintenance-Free Battery........... 234
DEALER SERVICE................... 235Windshield Wiper Blades............ 235
TABLE OF CONTENTS
8
Page 20 of 344
To drive the vehicle, push the unlock button,
insert the key in the ignition and turn to the
ON/RUN position.
NOTE:
• With remote start, the engine will only run
for 15 minutes (timeout) unless the igni-
tion key is placed in the ON/RUN position.
• The vehicle must be started with the key
after two consecutive timeouts.
All of the following conditions must be met
before the engine will remote start:
• Gear selector in PARK
• Doors closed
• Hood closed
• Liftgate closed
• Hazard switch off
• Brake switch inactive (brake pedal not
pushed)
• Battery at an acceptable charge level
• Check engine light shall not be present• System not disabled from previous remote
start event
• Vehicle alarm system indicator flashing
• Ignition in STOP/OFF position
• Fuel level meets minimum requirement
• Vehicle security alarm is not signaling an
intrusion
WARNING!
• Do not start or run an engine in a closed
garage or confined area. Exhaust gas
contains Carbon Monoxide (CO) which is
odorless and colorless. Carbon Monox-
ide is poisonous and can cause serious
injury or death when inhaled.
• Keep key fobs away from children. Op-
eration of the Remote Start System, win-
dows, door locks or other controls could
cause serious injury or death.
To Enter Remote Start Mode
Push and release the remote start button on
the key fob twice within five seconds. The
vehicle doors will lock, the parking lights will
flash, and the horn will chirp twice (if pro-
grammed). Then, the engine will start, and
the vehicle will remain in the Remote Start
mode for a 15-minute cycle.
NOTE:
• If an engine fault is present or fuel level is
low, the vehicle will start and then shut
down in 10 seconds.
• The park lamps will turn on and remain on
during Remote Start mode.
• For security, power window and power sun-
roof operation (if equipped) are disabled
when the vehicle is in the Remote Start
mode.
• The engine can be started two consecutive
times with the key fob. However, the igni-
tion must be cycled by pushing the START/
STOP button twice (or the ignition switch
must be cycled to the ON/RUN position)
before you can repeat the start sequence
for a third cycle.
GETTING TO KNOW YOUR VEHICLE
18
Page 21 of 344
VEHICLE SECURITY ALARM
— IF EQUIPPED
The vehicle security alarm monitors the ve-
hicle doors, hood, liftgate, and the Keyless
Enter-N-Go — Ignition for unauthorized op-
eration. While the vehicle security alarm is
armed, interior switches for door locks and
liftgate release are disabled. If something
triggers the alarm, the vehicle security alarm
will provide the following audible and visible
signals:
• The horn will pulse.
• The turn signals will flash.
• The vehicle security light in the instrument
cluster will flash.
To Arm The System
Follow these steps to arm the vehicle security
alarm:
1. Make sure the vehicle’s ignition is placed
in the “OFF” mode.
• For vehicles equipped with Keyless En-
try, make sure the vehicle’s keyless
ignition system is OFF.2. Perform one of the following methods to
lock the vehicle:
• Push the lock button on the interior
power door lock switch with the driver
and/or passenger door open.
• Push the lock button on the exterior
Passive Entry Door Handle with a valid
key fob available in the same exterior
zone. Refer to "Doors" in "Getting To
Know Your Vehicle" in your Owner’s
Manual for further information.
• Push the lock button on the key fob.
3. If any doors are open, close them.
To Disarm The System
The vehicle security alarm can be disarmed
using any of the following methods:
• Push the unlock button on the key fob.
• Grasp the passive entry door handle to
unlock the door, refer to "Doors" in "Getting
To Know Your Vehicle" in your Owner’s
Manual for further information.
• Cycle the ignition out of the off mode to
disarm the system.NOTE:
• The driver's door key cylinder and the lift-
gate button on the key fob cannot arm or
disarm the vehicle security alarm.
• The vehicle security alarm remains armed
during power liftgate entry. Pushing the
liftgate button will not disarm the vehicle
security alarm. If someone enters the ve-
hicle through the liftgate and opens any
door, the alarm will sound.
• When the vehicle security alarm is armed,
the interior power door lock switches will
not unlock the doors.
The vehicle security alarm is designed to
protect your vehicle. However, you can create
conditions where the system will give you a
false alarm. If one of the previously described
arming sequences has occurred, the vehicle
security alarm will arm, regardless of whether
you are in the vehicle or not. If you remain in
the vehicle and open a door, the alarm will
sound. If this occurs, disarm the vehicle
security alarm.
If the vehicle security alarm is armed and the
battery becomes disconnected, the vehicle
security alarm will remain armed when the
19
Page 55 of 344
and stop automatically. This is called “Ex-
press Open”. During Express Open operation,
any movement of the sunshade switch will
stop the shade.
Manual Mode
Push and hold the sunshade switch rearward,
the shade will open to the half open position
and stop automatically. Push and hold the
sunshade switch rearward again and the
shade will open automatically to the full-open
position. Any release of the switch will stop
the movement and the sunshade will remain
in a partially opened condition until the
switch is pushed again.
Closing Power Shade
If the sunroof is open or vented the sunshade
cannot be closed beyond the half open posi-
tion. Pushing the sunshade close switch
when the sunroof is open/vented and the
sunshade is at half open position will first
automatically close sunroof prior to the sun-
shade closing.Express
Push the switch forward and release it within
one-half second and the shade will close
automatically from any position.
Manual
To close the shade, push and hold the switch
in the forward position.
Pinch Protect Feature
This feature will detect an obstruction in the
closing of the sunroof during the Express
Close operation. If an obstruction in the path
of the sunroof is detected, the sunroof will
automatically retract. Remove the obstruc-
tion if this occurs.
NOTE:
If three consecutive sunroof close attempts
result in Pinch Protect reversals, Pinch Pro-
tect will disable and the sunroof must be
closed in Manual Mode.
Sunroof Maintenance
Use only a non-abrasive cleaner and a soft
cloth to clean the glass panel.
Ignition Off Operation
The power sunroof switch will remain active
for up to approximately 10 minutes after the
ignition switch is turned to the OFF/LOCK
position. Opening either front door will can-
cel this feature.
NOTE:
Ignition Off time is programmable through
the Uconnect System. Refer to “Uconnect
Settings” in “Multimedia” in your Owner’s
Manual for further information.
HOOD
Opening The Hood
Two latches must be released to open the
hood.
1. Pull the hood release lever located under
the driver’s side of the instrument panel.
53
Page 56 of 344
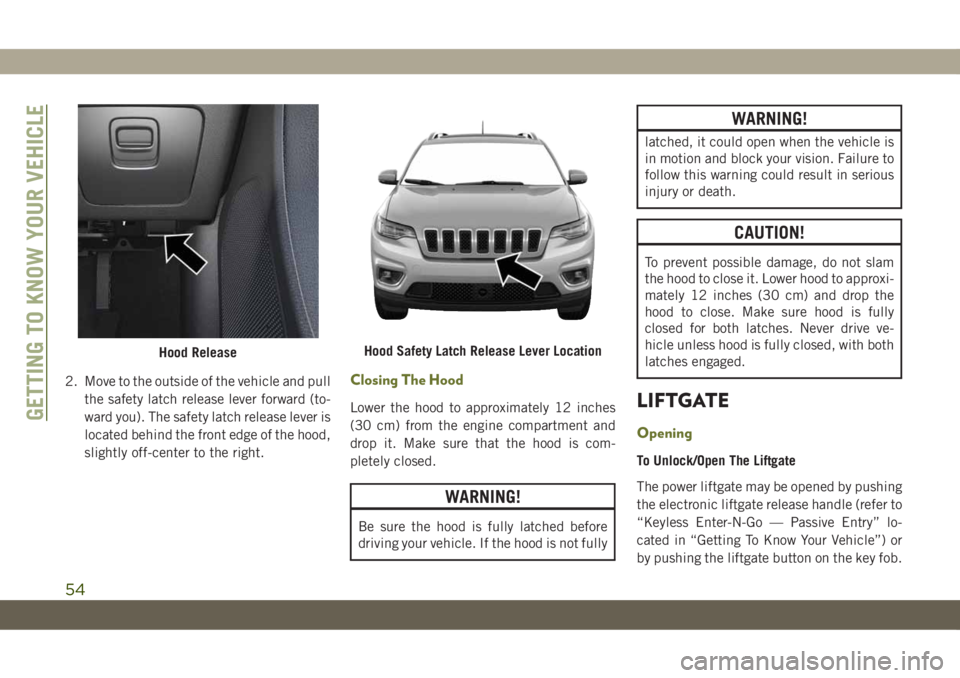
2. Move to the outside of the vehicle and pull
the safety latch release lever forward (to-
ward you). The safety latch release lever is
located behind the front edge of the hood,
slightly off-center to the right.Closing The Hood
Lower the hood to approximately 12 inches
(30 cm) from the engine compartment and
drop it. Make sure that the hood is com-
pletely closed.
WARNING!
Be sure the hood is fully latched before
driving your vehicle. If the hood is not fully
WARNING!
latched, it could open when the vehicle is
in motion and block your vision. Failure to
follow this warning could result in serious
injury or death.
CAUTION!
To prevent possible damage, do not slam
the hood to close it. Lower hood to approxi-
mately 12 inches (30 cm) and drop the
hood to close. Make sure hood is fully
closed for both latches. Never drive ve-
hicle unless hood is fully closed, with both
latches engaged.
LIFTGATE
Opening
To Unlock/Open The Liftgate
The power liftgate may be opened by pushing
the electronic liftgate release handle (refer to
“Keyless Enter-N-Go — Passive Entry” lo-
cated in “Getting To Know Your Vehicle”) or
by pushing the liftgate button on the key fob.
Hood ReleaseHood Safety Latch Release Lever Location
GETTING TO KNOW YOUR VEHICLE
54
Page 159 of 344
Refer to the “Stop/Start System” in the
“Starting And Operating” in your Owner’s
Manual.
Possible Reasons The Engine Does Not
Autostop
Prior to engine shut down, the system will
check many safety and comfort conditions to
see if they are fulfilled. Detailed information
about the operation of the Stop/Start system
may be viewed in the instrument cluster dis-
play Stop/Start Screen. In the following situ-
ations the engine will not stop:
• Driver’s seat belt is not buckled.
• Driver’s door is not closed.
• Battery temperature is too warm or cold.
• Battery charge is low.
• The vehicle is on a steep grade.
• Cabin heating or cooling is in process and
an acceptable cabin temperature has not
been achieved.
• HVAC is set to full defrost mode at a high
blower speed.
• HVAC set to MAX A/C.• Engine has not reached normal operating
temperature.
• The transmission is not in a forward or
reverse gear.
• Hood is open.
• Vehicle is in 4LO transfer case mode (if
equipped with 4WD).
• Brake pedal is not pressed with sufficient
pressure with vehicle in DRIVE position.
Other Factors Which Can Inhibit Autostop In-
clude:
• Accelerator pedal input.
• Engine temp too high.
• 5 mph threshold not achieved from previ-
ous AUTOSTOP.
• Steering angle beyond threshold.
• ACC is on and speed is set.
It may be possible for the vehicle to be driven
several times without the STOP/START sys-
tem going into a STOP/START READY state
under more extreme conditions of the items
listed above.
To Start The Engine While In Autostop
Mode
While in a forward gear, the engine will start
when the brake pedal is released or the
throttle pedal is depressed. The transmission
will automatically re-engage upon engine re-
start.
Conditions That Will Cause The Engine To Start
Automatically While In Autostop Mode:
• The transmission gear selector is moved out
of DRIVE except in the PARK position.
• To maintain cabin temperature comfort.
• HVAC is set to full defrost mode.
• HVAC system temperature or fan speed is
manually adjusted.
• Battery voltage drops too low.
• Low brake vacuum (e.g. after several brake
pedal applications).
• STOP/START OFF switch is pushed.
• A STOP/START system error occurs.
• 4WD system is put into 4LO mode (if
equipped with 4WD).
157
Page 160 of 344
Conditions That Force An Application Of The
Electric Park Brake While In Autostop Mode:
• The driver’s door is open and brake pedal
released.
• The driver’s door is open and the driver’s
seat belt is unbuckled.
• The engine hood has been opened.
• A STOP/START system error occurs.
If the Electric Park Brake is applied with the
engine off, the engine may require a manual
restart and the electric park brake may re-
quire a manual release (depress brake pedal
and push Electric Park Brake switch). Refer
to “Instrument Cluster Display” in “Getting
To Know Your Instrument Panel” in your Own-
er’s Manual.
To Manually Turn Off The Stop/Start
System
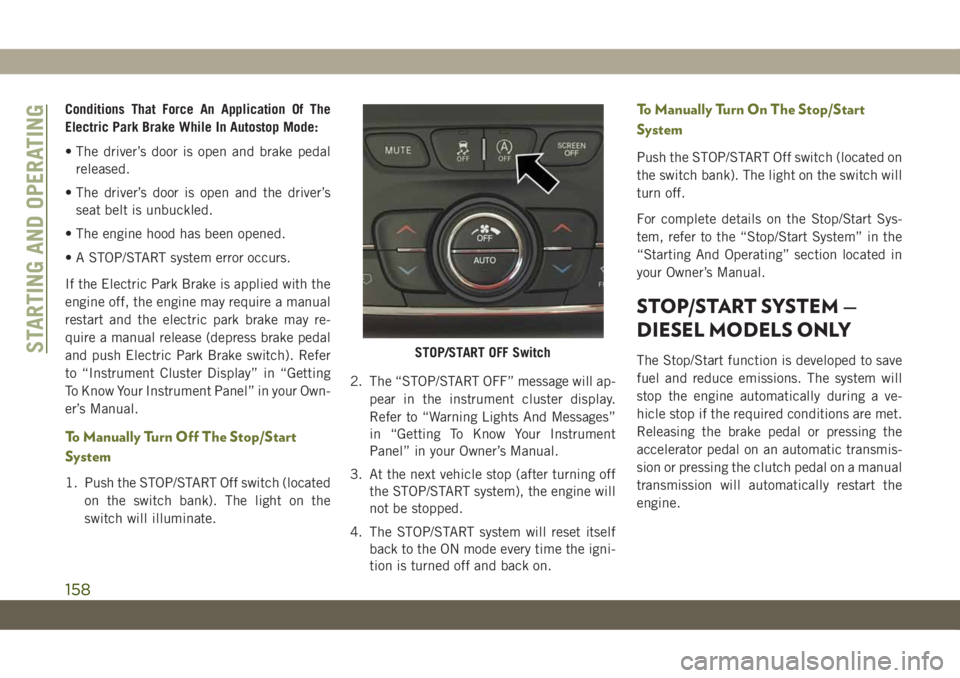
1. Push the STOP/START Off switch (located
on the switch bank). The light on the
switch will illuminate.2. The “STOP/START OFF” message will ap-
pear in the instrument cluster display.
Refer to “Warning Lights And Messages”
in “Getting To Know Your Instrument
Panel” in your Owner’s Manual.
3. At the next vehicle stop (after turning off
the STOP/START system), the engine will
not be stopped.
4. The STOP/START system will reset itself
back to the ON mode every time the igni-
tion is turned off and back on.
To Manually Turn On The Stop/Start
System
Push the STOP/START Off switch (located on
the switch bank). The light on the switch will
turn off.
For complete details on the Stop/Start Sys-
tem, refer to the “Stop/Start System” in the
“Starting And Operating” section located in
your Owner’s Manual.
STOP/START SYSTEM —
DIESEL MODELS ONLY
The Stop/Start function is developed to save
fuel and reduce emissions. The system will
stop the engine automatically during a ve-
hicle stop if the required conditions are met.
Releasing the brake pedal or pressing the
accelerator pedal on an automatic transmis-
sion or pressing the clutch pedal on a manual
transmission will automatically restart the
engine.STOP/START OFF SwitchSTARTING AND OPERATING
158
Page 161 of 344
Automatic Mode
The Stop/Start feature is enabled after every
normal customer engine start. It will remain
in STOP/START NOT READY until you drive
forward with a vehicle speed greater than
4 mph (7 km/h). At that time, the system will
go into STOP/START READY and if all other
conditions are met, can go into a STOP/
START AUTOSTOP ACTIVE “Autostop”
mode.
To Activate The Autostop Mode, The Following
Must Occur:
• The system must be in STOP/START
READY state. A STOP/START READY mes-
sage will be displayed in the instrument
cluster display within the Stop/Start sec-
tion. Refer to “Instrument Cluster Display”
in “Getting To Know Your Instrument
Panel” in your Owner’s information for fur-
ther details.
• The vehicle must be completely stopped.
• The gear selector must be in DRIVE and the
brake pedal depressed (automatic trans-
mission) or the gear selector must be in
NEUTRAL and the clutch pedal must be
fully released (manual transmission).The engine will shut down, the tachometer
will move to the zero position and the Stop/
Start telltale will illuminate indicating you
are in Autostop. While in Autostop, the Cli-
mate Controls system may automatically ad-
just airflow to maintain cabin comfort. Cus-
tomer settings will be maintained upon return
to an engine running condition.
Possible Reasons The Engine Does Not
Autostop
Prior to engine shut down, the system will
check many safety and comfort conditions to
see if they are fulfilled. Detailed information
about the operation of the Stop/Start system
may be viewed in the instrument cluster
Stop/Start Screen. In the following situations
the engine will not stop:
• Driver’s seat belt is not buckled.
• Driver’s door is not closed.
• Battery temperature is too warm or cold.
• The vehicle is on a steep grade.
• Cabin heating or cooling is in process and
an acceptable cabin temperature has not
been achieved.• HVAC is set to full defrost mode at a high
blower speed.
• Engine has not reached normal operating
temperature.
• Battery charge is low.
• The transmission is not in DRIVE (auto-
matic transmission) or NEUTRAL (manual
transmission).
• Hood is open.
• Vehicle is in 4LO transfer case mode.
• Exhaust system regeneration in process.
Other Factors Which Can Inhibit Autostop In-
clude:
• Fuel level.
• Accelerator pedal input (automatic trans-
mission only).
• Engine temperature too high.
It may be possible for the vehicle to be driven
several times without the STOP/START sys-
tem going into a STOP/START READY state
under more extreme conditions of the items
listed above.
159
Page 162 of 344
To Start The Engine While In Autostop
Mode
Automatic Transmission:
While in DRIVE, the engine will start when
the brake pedal is released or the throttle
pedal is depressed. The transmission will
automatically re-engage upon engine restart.
During this transition, the brakes will hold
the vehicle to avoid undesired vehicle move-
ment.
Manual Transmission:
When the gear selector is in NEUTRAL, the
engine will start when the clutch pedal is
pressed. The vehicle will go into STOP/
START SYSTEM NOT READY mode until the
vehicle speed is greater than 4 mph (7 km/h).
Conditions That Will Cause The Engine To Start
Automatically While In Autostop Mode:
• The transmission gear selector is moved
from DRIVE to REVERSE or NEUTRAL.
• To maintain cabin temperature comfort.
• HVAC is set to full defrost mode.
• Battery voltage drops too low.• Low brake vacuum (e.g. after several brake
pedal applications).
• STOP/START OFF switch is pushed.
• 4WD system is put into 4LO mode.
• The emissions system requires it.
• A STOP/START system error occurs.
• HVAC system temperature or fan speed is
manually adjusted.
Conditions That Force An Application Of The
Electric Park Brake While In Autostop Mode:
• The driver door is open and brake pedal
released.
• The driver door is open and the driver seat
belt is unbuckled.
• The engine hood has been opened.
• A STOP/START system error occurs.
If the Electric Park Brake is applied with the
engine off, the engine may require a manual
restart and the electric park brake may re-
quire a manual release (depress brake pedal
and push Electric Park Brake switch). Referto “Instrument Cluster Display” in “Getting
To Know Your Instrument Panel” in your Own-
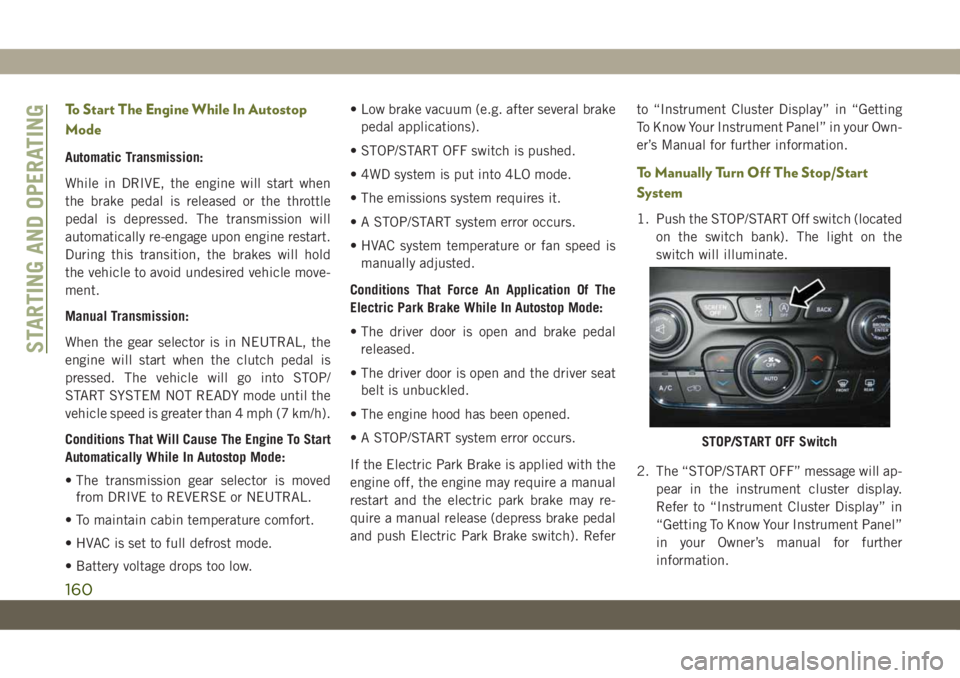
er’s Manual for further information.To Manually Turn Off The Stop/Start
System
1. Push the STOP/START Off switch (located
on the switch bank). The light on the
switch will illuminate.
2. The “STOP/START OFF” message will ap-
pear in the instrument cluster display.
Refer to “Instrument Cluster Display” in
“Getting To Know Your Instrument Panel”
in your Owner’s manual for further
information.
STOP/START OFF Switch
STARTING AND OPERATING
160
Page 214 of 344
CAUTION!
Accessories plugged into the vehicle
power outlets draw power from the vehi-
cle’s battery, even when not in use (i.e.,
cellular devices, etc.). Eventually, if
plugged in long enough without engine
operation, the vehicle’s battery will dis-
charge sufficiently to degrade battery life
and/or prevent the engine from starting.
REFUELING IN EMERGENCY
Emergency Fuel Filler Door Release
If you are unable to open the fuel filler door,
use the fuel filler door emergency release.
1. Open the liftgate.
2. Remove access door located on right inte-
rior trim panel for release cable with the
tip of your key.
3. Grab the release cable tether and pull up
to release the fuel filler door.
IF YOUR ENGINE
OVERHEATS
In any of the following situations, you can
reduce the potential for overheating your en-
gine by taking the appropriate action.
• On the highways — slow down.
• In city traffic — while stopped, place the
transmission in NEUTRAL, but do not in-
crease engine idle speed.
CAUTION!
Driving with a hot cooling system could
damage your vehicle. If the temperature
gauge reads “H,” pull over and stop the
vehicle. Idle the vehicle with the air con-
ditioner turned off until the pointer drops
back into the normal range. If the pointer
remains on the “H” and you hear continu-
ous chimes, turn the engine off immedi-
ately and call for service.NOTE:
There are steps that you can take to slow
down an impending overheat condition:
• If your Air Conditioner (A/C) is on, turn it
off. The A/C system adds heat to the engine
cooling system and turning the A/C off can
help remove this heat.
• You can also turn the temperature control
to maximum heat, the mode control to floor
and the blower control to high. This allows
the heater core to act as a supplement to
the radiator and aids in removing heat from
the engine cooling system.WARNING!
You or others can be badly burned by hot
engine coolant (antifreeze) or steam from
your radiator. If you see or hear steam
coming from under the hood, do not open
the hood until the radiator has had time to
cool. Never try to open a cooling system
pressure cap when the radiator or coolant
bottle is hot.
IN CASE OF EMERGENCY
212