trailer JEEP CHEROKEE 2019 Owner handbook (in English)
[x] Cancel search | Manufacturer: JEEP, Model Year: 2019, Model line: CHEROKEE, Model: JEEP CHEROKEE 2019Pages: 344, PDF Size: 6.35 MB
Page 10 of 344
ADAPTIVE CRUISE CONTROL (ACC) — IF
EQUIPPED....................... 162
Activating Adaptive Cruise Control (ACC) . . 163
To Set A Desired ACC Speed.......... 164
Resume...................... 164
To Vary The Speed Setting........... 164
Setting The Following Distance In ACC.... 166
PARKSENSE REAR PARK ASSIST — IF EQUIPPED . . 166ParkSense Sensors................ 166
ParkSense Warning Display........... 166
Enabling And Disabling ParkSense...... 166
ParkSense System Usage Precautions.... 167
PARKSENSE FRONT AND REAR PARK ASSIST — IF
EQUIPPED....................... 168
ParkSense Sensors................ 168
Enabling And Disabling ParkSense...... 169
Operation With A Trailer............. 169
PARKSENSE ACTIVE PARK ASSIST SYSTEM — IF
EQUIPPED....................... 169
LANESENSE...................... 170
LaneSense Operation.............. 170
Turning LaneSense On Or Off......... 170
LaneSense Warning Message.......... 171
Changing LaneSense Status.......... 172
PARKVIEW REAR BACK UP CAMERA — IF
EQUIPPED....................... 173
REFUELING THE VEHICLE............... 173
REFUELING THE VEHICLE — DIESEL ENGINE.... 175
AdBlue (UREA) — If Equipped........ 176
TRAILER TOWING................... 181Trailer Towing Weights (Maximum Trailer Weight
Ratings)...................... 181
RECREATIONAL TOWING (BEHIND MOTORHOME,
ETC.).......................... 182
Towing This Vehicle Behind Another
Vehicle....................... 182
Recreational Towing — Front-Wheel Drive (FWD)
Models...................... 183
Recreational Towing — 4x4 Models...... 183
IN CASE OF EMERGENCY
HAZARD WARNING FLASHERS............ 184
BULB REPLACEMENT................. 184
Replacement Bulbs............... 184
Replacing Exterior Bulbs............ 185
FUSES......................... 185General Information............... 186
Underhood Fuses................ 186
Interior Fuses................... 195
JACKING AND TIRE CHANGING............ 196Jack Location/Spare Tire Stowage....... 196
Preparations For Jacking............ 197
Jacking Instructions............... 197
Road Tire Installation.............. 200
Declaration Of Conformance.......... 200
Jack Usage Precautions............ 203
TIRE SERVICE KIT — IF EQUIPPED.......... 204Tire Service Kit Storage............. 204
Tire Service Kit Components And Operation . 204
Tire Service Kit Usage Precautions...... 205
Sealing A Tire With Tire Service Kit...... 206
JUMP STARTING.................... 209Preparations For Jump Start.......... 210
Jump Starting Procedure............ 211
REFUELING IN EMERGENCY.............. 212Emergency Fuel Filler Door Release..... 212
IF YOUR ENGINE OVERHEATS............. 212
GEAR SELECTOR OVERRIDE.............. 213
FREEING A STUCK VEHICLE.............. 213
TOWING A DISABLED VEHICLE............ 214
Without The Key Fob.............. 215
Front-Wheel Drive (FWD) Models....... 215
4x4 Models.................... 216
Recovery Strap — If Equipped......... 216
ENHANCED ACCIDENT RESPONSE SYSTEM (EARS) . 217
EVENT DATA RECORDER (EDR)............ 217
SERVICING AND MAINTENANCE
SCHEDULED SERVICING................ 218Scheduled Servicing — Gasoline Engine . . . 218
Scheduled Servicing — Diesel Engine.... 222
ENGINE COMPARTMENT............... 2272.0L Engine.................... 227
2.4L Engine.................... 228
3.2L Engine.................... 229
2.2L Diesel Engine............... 230
Checking Oil Level................ 231
Cooling System.................. 231
Adding Washer Fluid.............. 232
Brake System.................. 232
Manual Transmission — If Equipped..... 233
Automatic Transmission............ 234
Maintenance-Free Battery........... 234
DEALER SERVICE................... 235Windshield Wiper Blades............ 235
TABLE OF CONTENTS
8
Page 59 of 344
NOTE:
Activation zone is the same for vehicles
equipped with and without trailer tow package.
When a valid kicking motion is completed,
the liftgate will chime, the hazard lights will
flash and the liftgate will open after approxi-
mately one second, or close after approxi-
mately three seconds. This assumes all op-
tions are enabled in the radio.
NOTE:
• Opening or closing the Hands-Free Liftgate
requires a valid Passive Entry key fob within
5 ft (1.5 m) of the door handle. If a valid
Passive Entry key fob is not within 5 ft
(1.5 m), the liftgate will not respond to any
kicks.
• The Hands-Free Liftgate feature may be
turned on or off in Uconnect Settings. Refer
to “Uconnect Settings” in “Multimedia” in
the Owner’s Manual for further information.
The Hands-Free Liftgate feature should be
turned off during Jacking, Tire Changing,
Manual Car Wash, and Vehicle Service.NOTE:
The Hands-free liftgate feature can be acti-
vated by any metallic object making a similar
in-and-out motion under the rear bumper,
such as cleaning using a metal broom.
NOTE:
• The Hands-Free Liftgate will only operate
when the transmission is in PARK.
• If anything obstructs the Hands-Free lift-
gate while it is opening or closing, the
liftgate will automatically reverse to the
closed/open position, provided it meets
sufficient resistance.
• There are pinch sensors attached to the
side of the liftgate opening. Light pressure
anywhere along these strips will cause the
liftgate to return to the open position.
• If the power liftgate encounters multiple
obstructions within the same cycle, the
system will automatically stop. If this oc-
curs, the liftgate must be operated manu-
ally.• The power liftgate will release, but not
power open, in temperatures below −12° F
(−24° C). Be sure to remove any buildup of
snow or ice from the liftgate before opening
the liftgate.
• If the liftgate is left open for an extended
period of time, the liftgate may need to be
closed manually to reset power liftgate
functionality.
WARNING!
• Driving with the liftgate open can allow
poisonous exhaust gases into your ve-
hicle. You and your passengers could be
injured by these fumes. Keep the liftgate
closed when you are operating the ve-
hicle.
• If you are required to drive with the
liftgate open, make sure that all win-
dows are closed, and the climate control
blower switch is set at high speed. Do
not use the recirculation mode.
57
Page 69 of 344
If the light turns on while driving, safely pull
over and stop the vehicle. If the A/C system is
on, turn it off. Also, shift the transmission
into NEUTRAL and idle the vehicle. If the
temperature reading does not return to nor-
mal, turn the engine off immediately and call
for service. Refer to “If Your Engine Over-
heats” in “In Case Of Emergency” for further
information.
— Hood Open Warning Light
This warning light will illuminate when the
hood is left open and not fully closed.
NOTE:
If the vehicle is moving, there will also be a
single chime.
— Liftgate Open Warning Light
This warning light will illuminate when the
liftgate is open.
NOTE:
If the vehicle is moving, there will also be a
single chime.
— Oil Pressure Warning Light
This warning light will illuminate to indicate
low engine oil pressure. If the light turns on
while driving, stop the vehicle, shut off the
engine as soon as possible, and contact an
authorized dealer. A chime will sound when
this light turns on.
Do not operate the vehicle until the cause is
corrected. This light does not indicate how
much oil is in the engine. The engine oil level
must be checked under the hood.
— Oil Temperature Warning Light
This warning light will illuminate to indicate
the engine oil temperature is high. If the light
turns on while driving, stop the vehicle and
shut off the engine as soon as possible. Wait
for oil temperature to return to normal levels.
— Transmission Temperature Warning
Light — If Equipped
This warning light will illuminate to warn of a
high transmission fluid temperature. This
may occur with strenuous usage such as
trailer towing. If this light turns on, stop thevehicle and run the engine at idle or slightly
faster, with the transmission in PARK or
NEUTRAL, until the light turns off. Once the
light turns off, you may continue to drive
normally.
WARNING!
If you continue operating the vehicle when
the Transmission Temperature Warning
Light is illuminated you could cause the
fluid to boil over, come in contact with hot
engine or exhaust components and cause a
fire.
CAUTION!
Continuous driving with the Transmission
Temperature Warning Light illuminated
will eventually cause severe transmission
damage or transmission failure.
67
Page 80 of 344
required. However, the conventional brake
system will continue to operate normally if
the “Anti-Lock Brake Warning Light” is on.
If the “Anti-Lock Brake Warning Light” is on,
the brake system should be serviced as soon
as possible to restore the benefits of anti-lock
brakes. If the “Anti-Lock Brake Warning
Light” does not come on when the ignition is
turned to the ON/RUN mode, have the light
repaired as soon as possible.
Electronic Brake Control System
Your vehicle is equipped with an advanced
Electronic Brake Control system (EBC). This
system includes Electronic Brake Force Dis-
tribution (EBD), Anti-Lock Brake System
(ABS), Brake Assist System (BAS), Hill Start
Assist (HSA), Traction Control System (TCS),
Electronic Stability Control (ESC), and Elec-
tronic Roll Mitigation (ERM). These systems
work together to enhance both vehicle stabil-
ity and control in various driving conditions.Your vehicle may also be equipped with
Trailer Sway Control (TSC), Ready Alert Brak-
ing (RAB), Rain Brake Support (RBS), Dy-
namic Steering Torque (DST), Hill Descent
Control (HDC), and Selec-Speed Control
(SSC).
Electronic Brake Force Distribution (EBD)
This function manages the distribution of the
braking torque between the front and rear
axles by limiting braking pressure to the rear
axle. This is done to prevent overslip of the
rear wheels to avoid vehicle instability, and to
prevent the rear axle from entering ABS be-
fore the front axle.
Brake System Warning Light
The red “Brake System Warning Light” will
turn on when the ignition is turned to the
ON/RUN mode and may stay on for as long as
four seconds.
If the “Brake System Warning Light” remains
on or comes on while driving, it indicates that
the brake system is not functioning properly
and that immediate service is required. If the“Brake System Warning Light” does not
come on when the ignition is turned to the
ON/RUN mode, have the light repaired as
soon as possible.
Brake Assist System (BAS)
The BAS is designed to optimize the vehicle’s
braking capability during emergency braking
maneuvers. The system detects an emer-
gency braking situation by sensing the rate
and amount of brake application and then
applies optimum pressure to the brakes. This
can help reduce braking distances. The BAS
complements the anti-lock brake system
(ABS). Applying the brakes very quickly re-
sults in the best BAS assistance. To receive
the benefit of the system, you must apply
continuous braking pressure during the stop-
ping sequence, (do not “pump” the brakes).
Do not reduce brake pedal pressure unless
braking is no longer desired. Once the brake
pedal is released, the BAS is deactivated.
WARNING!
The Brake Assist System (BAS) cannot
prevent the natural laws of physics from
SAFETY
78
Page 81 of 344
WARNING!
acting on the vehicle, nor can it increase
the traction afforded by prevailing road
conditions. BAS cannot prevent collisions,
including those resulting from excessive
speed in turns, driving on very slippery
surfaces, or hydroplaning. The capabilities
of a BAS-equipped vehicle must never be
exploited in a reckless or dangerous man-
ner, which could jeopardize the user's
safety or the safety of others.
Hill Start Assist (HSA)
The HSA system is designed to mitigate roll
back from a complete stop while on an in-
cline. If the driver releases the brake while
stopped on an incline, HSA will continue to
hold the brake pressure for a short period. If
the driver does not apply the throttle before
this time expires, the system will release
brake pressure and the vehicle will roll down
the hill as normal.
The following conditions must be met in
order for HSA to activate:
• The feature must be enabled.• The vehicle must be stopped.
• Park brake must be off.
• Driver door must be closed.
• The vehicle must be on a sufficient grade.
• The gear selection must match vehicle up-
hill direction (i.e., vehicle facing uphill is in
forward gear; vehicle backing uphill is in
REVERSE gear).
• HSA will work in REVERSE gear and all
forward gears. The system will not activate
if the transmission is in PARK or NEU-
TRAL. For vehicles equipped with a manual
transmission, if the clutch is pressed, HSA
will remain active.
WARNING!
There may be situations where the Hill
Start Assist (HSA) will not activate and
slight rolling may occur, such as on minor
hills or with a loaded vehicle, or while
pulling a trailer. HSA is not a substitute for
active driving involvement. It is always the
driver’s responsibility to be attentive to
distance to other vehicles, people, and
objects, and most importantly brake op-
WARNING!
eration to ensure safe operation of the
vehicle under all road conditions. Your
complete attention is always required
while driving to maintain safe control of
your vehicle. Failure to follow these warn-
ings can result in a collision or serious
personal injury.
Disabling And Enabling HSA
This feature can be turned on or turned off. To
change the current setting, proceed as fol-
lows:
• If disabling HSA using your instrument
cluster display, refer to “Instrument Cluster
Display” in “Getting To Know Your Instru-
ment Panel” for further information.
• If disabling HSA using Uconnect Settings,
refer to “Uconnect Settings” in “Multime-
dia” for further information.
For vehicles not equipped with an instrument
cluster display, perform the following steps:
1. Center the steering wheel (front wheels
pointing straight forward).
79
Page 82 of 344
2. Shift the transmission into PARK.
3. Apply the parking brake.
4. Start the engine.
5. Rotate the steering wheel slightly more
than one-half turn to the left.
6. Push the “ESC Off” button located in the
lower switch bank below the climate con-
trol four times within 20 seconds. The
“ESC Off Indicator Light” should turn on
and turn off two times.
7. Rotate the steering wheel back to center
and then an additional slightly more than
one-half turn to the right.
8. Turn the ignition to the OFF mode and
then back to ON. If the sequence was
completed properly, the “ESC Off Indica-
tor Light” will blink several times to con-
firm HSA is disabled.
9. Repeat these steps if you want to return
this feature to its previous setting.Towing With HSA
HSA will also provide assistance to mitigate
roll back while towing a trailer.
WARNING!
• If you use a trailer brake controller with
your trailer, the trailer brakes may be
activated and deactivated with the brake
switch. If so, there may not be enough
brake pressure to hold both the vehicle
and the trailer on a hill when the brake
pedal is released. In order to avoid roll-
ing down an incline while resuming ac-
celeration, manually activate the trailer
brake or apply more vehicle brake pres-
sure prior to releasing the brake pedal.
• HSA is not a parking brake. Always apply
the parking brake fully when exiting your
vehicle. Also, be certain to place the
transmission in PARK.
• Failure to follow these warnings can re-
sult in a collision or serious personal
injury.
Traction Control System (TCS)
This system monitors the amount of wheel
spin of each of the driven wheels. If wheel
spin is detected, the TCS may apply brake
pressure to the spinning wheel(s) and/or re-
duce engine power to provide enhanced ac-
celeration and stability. A feature of the TCS,
Brake Limited Differential (BLD), functions
similar to a limited slip differential and con-
trols the wheel spin across a driven axle. If
one wheel on a driven axle is spinning faster
than the other, the system will apply the
brake of the spinning wheel. This will allow
more engine torque to be applied to the wheel
that is not spinning. BLD may remain en-
abled even if TCS and ESC are in a reduced
mode.
Electronic Stability Control (ESC)
This system enhances directional control and
stability of the vehicle under various driving
conditions. ESC corrects for oversteering or
understeering of the vehicle by applying the
brake of the appropriate wheel(s) to assist in
counteracting the oversteer or understeer
condition. Engine power may also be reduced
to help the vehicle maintain the desired path.
SAFETY
80
Page 84 of 344
should be used for most driving conditions.
Alternate ESC modes should only be used for
specific reasons as noted in the following
paragraphs.
Partial Off
The “Partial Off” mode is intended for times
when a more spirited driving experience is
desired. This mode may modify TCS and ESC
thresholds for activation, which allows for
more wheel spin than normally allowed. This
mode may be useful if the vehicle becomes
stuck.
To enter the “Partial Off” mode, momentarily
push the “ESC Off” switch and the “ESC Off
Indicator Light” will illuminate. To turn the
ESC on again, momentarily push the “ESC
Off” switch and the “ESC Off Indicator Light”
will turn off.
NOTE:
For vehicles with multiple partial ESC modes
a momentary button push will toggle the ESC
mode. Multiple momentary button pushed
may be required to return to ESC On.WARNING!
• When in “Partial Off” mode, the TCS
functionality of ESC, (except for the lim-
ited slip feature described in the TCS
section), has been disabled and the
“ESC Off Indicator Light” will be illumi-
nated. When in “Partial Off” mode, the
engine power reduction feature of TCS is
disabled, and the enhanced vehicle sta-
bility offered by the ESC system is re-
duced.
• Trailer Sway control (TSC) is disabled
when the ESC system is in the “Partial
Off” mode.
Full Off — If Equipped
This mode is intended for off-highway or
off-road use only and should not be used on
any public roadways. In this mode, TCS and
ESC features are turned OFF. To enter the
“Full Off” mode, push and hold the “ESC
Off” switch for five seconds while the vehicle
is stopped with the engine running. After five
seconds, a chime will sound, the “ESC Off
Indicator Light” will illuminate, and the“ESC OFF” message will display in the in-
strument cluster. To turn ESC ON again,
momentarily push the “ESC Off” switch.
NOTE:
System may switch from ESC “Full Off” to
“Partial Off” mode when vehicle exceeds a
predetermined speed. When the vehicle
speed slows below the predetermined speed
the system will return to ESC “Full Off”.
ESC modes may also be affected by drive
modes if so equipped.
WARNING!
• In the ESC “Full Off” mode, the engine
torque reduction and stability features
are disabled. Therefore, enhanced ve-
hicle stability offered by the ESC system
is unavailable. In an emergency evasive
maneuver, the ESC system will not en-
gage to assist in maintaining stability.
ESC “Full Off” mode is intended for
off-highway or off-road use only.
• With the ESC switched off, the en-
hanced vehicle stability offered by ESC
is unavailable. In an emergency evasive
SAFETY
82
Page 86 of 344
maneuvers; it cannot prevent wheel lift due
to other factors, such as road conditions,
leaving the roadway, or striking objects or
other vehicles.
NOTE:
ERM is disabled anytime the ESC is in “Full
Off” mode (if equipped). Refer to “Electronic
Stability Control (ESC)” in this section for a
complete explanation of the available ESC
modes.
WARNING!
Many factors, such as vehicle loading,
road conditions and driving conditions,
influence the chance that wheel lift or
rollover may occur. ERM cannot prevent
all wheel lift or roll overs, especially those
that involve leaving the roadway or striking
objects or other vehicles. The capabilities
of an ERM-equipped vehicle must never
be exploited in a reckless or dangerous
manner which could jeopardize the user's
safety or the safety of others.
Trailer Sway Control (TSC)
TSC uses sensors in the vehicle to recognize
an excessively swaying trailer and will take
the appropriate actions to attempt to stop the
sway. TSC will become active automatically
once an excessively swaying trailer is recog-
nized.
NOTE:
TSC cannot stop all trailers from swaying.
Always use caution when towing a trailer and
follow the trailer tongue weight recommenda-
tions. Refer to “Trailer Towing” in “Starting
And Operating” for further information.
When TSC is functioning, the “ESC
Activation/Malfunction Indicator Light” will
flash, the engine power may be reduced and
you may feel the brakes being applied to
individual wheels to attempt to stop the
trailer from swaying. TSC is disabled when
the ESC system is in the “Partial Off” or “Full
Off” modes.WARNING!
If TSC activates while driving, slow the
vehicle down, stop at the nearest safe
location, and adjust the trailer load to
eliminate trailer sway.
Ready Alert Braking (RAB)
Ready Alert Braking may reduce the time
required to reach full braking during emer-
gency braking situations. It anticipates when
an emergency braking situation may occur by
monitoring how fast the throttle is released by
the driver. The EBC will prepare the brake
system for a panic stop.
Rain Brake Support (RBS)
Rain Brake Support may improve braking
performance in wet conditions. It will periodi-
cally apply a small amount of brake pressure
to remove any water buildup on the front
brake rotors. It functions when the wind-
shield wipers are in LO or HI speed. When
Rain Brake Support is active, there is no
notification to the driver and no driver inter-
action is required.
SAFETY
84
Page 91 of 344
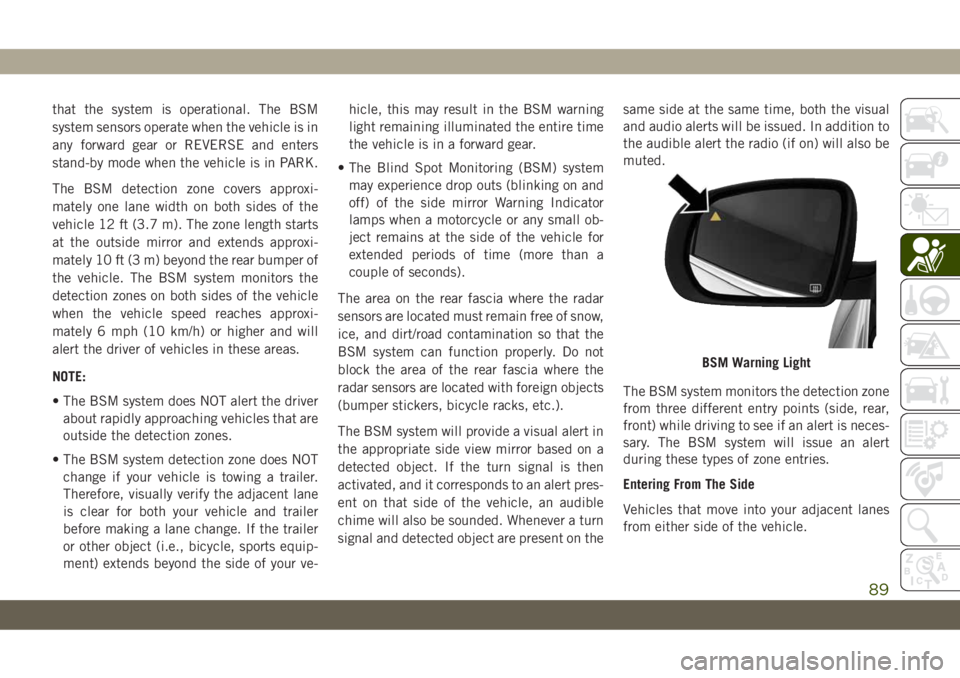
that the system is operational. The BSM
system sensors operate when the vehicle is in
any forward gear or REVERSE and enters
stand-by mode when the vehicle is in PARK.
The BSM detection zone covers approxi-
mately one lane width on both sides of the
vehicle 12 ft (3.7 m). The zone length starts
at the outside mirror and extends approxi-
mately 10 ft (3 m) beyond the rear bumper of
the vehicle. The BSM system monitors the
detection zones on both sides of the vehicle
when the vehicle speed reaches approxi-
mately 6 mph (10 km/h) or higher and will
alert the driver of vehicles in these areas.
NOTE:
• The BSM system does NOT alert the driver
about rapidly approaching vehicles that are
outside the detection zones.
• The BSM system detection zone does NOT
change if your vehicle is towing a trailer.
Therefore, visually verify the adjacent lane
is clear for both your vehicle and trailer
before making a lane change. If the trailer
or other object (i.e., bicycle, sports equip-
ment) extends beyond the side of your ve-hicle, this may result in the BSM warning
light remaining illuminated the entire time
the vehicle is in a forward gear.
• The Blind Spot Monitoring (BSM) system
may experience drop outs (blinking on and
off) of the side mirror Warning Indicator
lamps when a motorcycle or any small ob-
ject remains at the side of the vehicle for
extended periods of time (more than a
couple of seconds).
The area on the rear fascia where the radar
sensors are located must remain free of snow,
ice, and dirt/road contamination so that the
BSM system can function properly. Do not
block the area of the rear fascia where the
radar sensors are located with foreign objects
(bumper stickers, bicycle racks, etc.).
The BSM system will provide a visual alert in
the appropriate side view mirror based on a
detected object. If the turn signal is then
activated, and it corresponds to an alert pres-
ent on that side of the vehicle, an audible
chime will also be sounded. Whenever a turn
signal and detected object are present on thesame side at the same time, both the visual
and audio alerts will be issued. In addition to
the audible alert the radio (if on) will also be
muted.
The BSM system monitors the detection zone
from three different entry points (side, rear,
front) while driving to see if an alert is neces-
sary. The BSM system will issue an alert
during these types of zone entries.
Entering From The Side
Vehicles that move into your adjacent lanes
from either side of the vehicle.
BSM Warning Light
89
Page 147 of 344
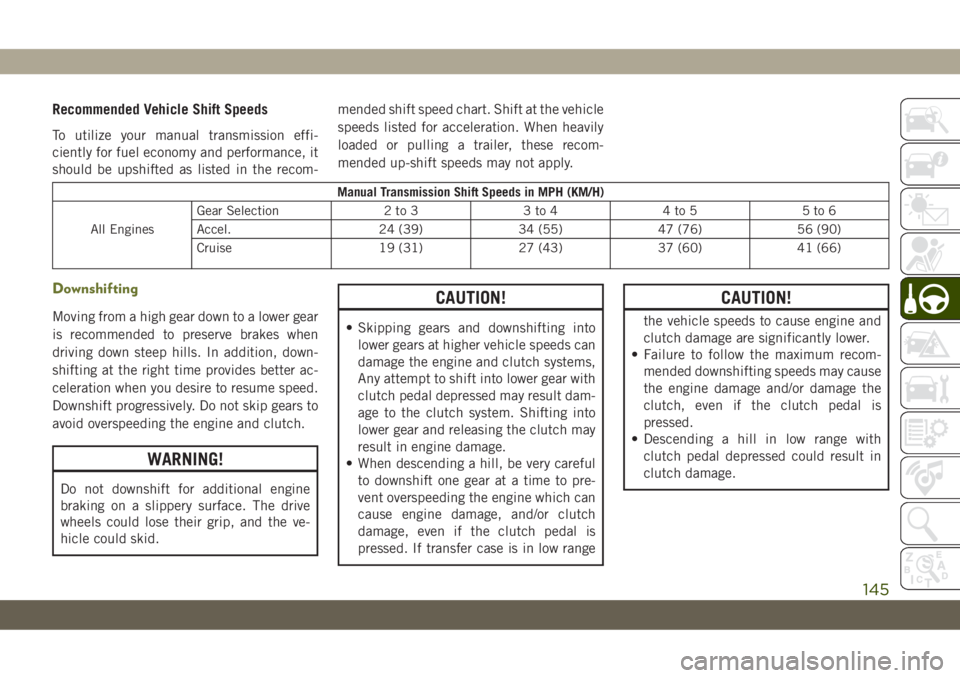
Recommended Vehicle Shift Speeds
To utilize your manual transmission effi-
ciently for fuel economy and performance, it
should be upshifted as listed in the recom-mended shift speed chart. Shift at the vehicle
speeds listed for acceleration. When heavily
loaded or pulling a trailer, these recom-
mended up-shift speeds may not apply.
Manual Transmission Shift Speeds in MPH (KM/H)
All EnginesGear Selection 2 to 3 3 to 4 4 to 5 5 to 6
Accel. 24 (39) 34 (55) 47 (76) 56 (90)
Cruise 19 (31) 27 (43) 37 (60) 41 (66)
Downshifting
Moving from a high gear down to a lower gear
is recommended to preserve brakes when
driving down steep hills. In addition, down-
shifting at the right time provides better ac-
celeration when you desire to resume speed.
Downshift progressively. Do not skip gears to
avoid overspeeding the engine and clutch.
WARNING!
Do not downshift for additional engine
braking on a slippery surface. The drive
wheels could lose their grip, and the ve-
hicle could skid.
CAUTION!
• Skipping gears and downshifting into
lower gears at higher vehicle speeds can
damage the engine and clutch systems,
Any attempt to shift into lower gear with
clutch pedal depressed may result dam-
age to the clutch system. Shifting into
lower gear and releasing the clutch may
result in engine damage.
• When descending a hill, be very careful
to downshift one gear at a time to pre-
vent overspeeding the engine which can
cause engine damage, and/or clutch
damage, even if the clutch pedal is
pressed. If transfer case is in low range
CAUTION!
the vehicle speeds to cause engine and
clutch damage are significantly lower.
• Failure to follow the maximum recom-
mended downshifting speeds may cause
the engine damage and/or damage the
clutch, even if the clutch pedal is
pressed.
• Descending a hill in low range with
clutch pedal depressed could result in
clutch damage.
145