service JEEP CHEROKEE 2020 Owner handbook (in English)
[x] Cancel search | Manufacturer: JEEP, Model Year: 2020, Model line: CHEROKEE, Model: JEEP CHEROKEE 2020Pages: 332, PDF Size: 8.87 MB
Page 137 of 332
135
Exhaust GasThe best protection against carbon monoxide
entry into the vehicle body is a properly
maintained engine exhaust system.
Whenever a change is noticed in the sound of
the exhaust system, when exhaust fumes can
be detected inside the vehicle, or when the
underside or rear of the vehicle is damaged,
have a competent mechanic inspect the
complete exhaust system and adjacent body
areas for broken, damaged, deteriorated, or
mispositioned parts. Open seams or loose
connections could permit exhaust fumes to
seep into the passenger compartment. In
addition, inspect the exhaust system each
time the vehicle is raised for lubrication or oil
change. Replace as required.
Safety Checks You Should Make Inside
The Vehicle
Seat Belts
Inspect the seat belt system periodically,
checking for cuts, frays, and loose parts.
Damaged parts must be replaced immediately.
Do not disassemble or modify the system.
Front seat belt assemblies must be replaced
after a collision. Rear seat belt assemblies
must be replaced after a collision if they
have been damaged (i.e., bent retractor, torn
webbing, etc.). If there is any question
regarding seat belt or retractor condition,
replace the seat belt.
Air Bag Warning Light
The Air Bag warning light will turn on for
four to eight seconds as a bulb check when
the ignition switch is first turned to ON/RUN.
If the light is either not on during starting,
stays on, or turns on while driving, have the
system inspected at an authorized dealer as
soon as possible. After the bulb check, this
light will illuminate with a single chime when
a fault with the Air Bag System has been
detected. It will stay on until the fault is
removed. If the light comes on intermittently
or remains on while driving, have an autho
-
rized dealer service the vehicle immediately.
Refer to “Occupant Restraint Systems” in
“Safety” for further information.
WARNING!
Exhaust gases can injure or kill. They
contain carbon monoxide (CO), which is
colorless and odorless. Breathing it can
make you unconscious and can eventually
poison you. To avoid breathing (CO), follow
these safety tips:
Do not run the engine in a closed garage
or in confined areas any longer than
needed to move your vehicle in or out of
the area.
If you are required to drive with the
trunk/liftgate/rear doors open, make sure
that all windows are closed and the
climate control BLOWER switch is set at
high speed. DO NOT use the recircula-
tion mode.
If it is necessary to sit in a parked vehicle
with the engine running, adjust your
heating or cooling controls to force
outside air into the vehicle. Set the
blower at high speed.
2020_JEEP_CHEROKEE_UG_RHD_UK.book Page 135
Page 138 of 332
SAFETY
136
(Continued)
(Continued)
(Continued)
Defroster
Check operation by selecting the defrost
mode and place the blower control on high
speed. You should be able to feel the air
directed against the windshield. See an
authorized dealer for service if your defroster
is inoperable.
Floor Mat Safety Information
Always use floor mats designed to fit your
vehicle. Only use a floor mat that does not
interfere with the operation of the acceler -
ator, brake or clutch pedals. Only use a floor
mat that is securely attached using the floor
mat fasteners so it cannot slip out of position
and interfere with the accelerator, brake or
clutch pedals or impair safe operation of your
vehicle in other ways.
WARNING!
An improperly attached, damaged, folded,
or stacked floor mat, or damaged floor mat
fasteners may cause your floor mat to
interfere with the accelerator, brake, or
clutch pedals and cause a loss of vehicle
control. To prevent SERIOUS INJURY or
DEATH:
ALWAYS securely attach your floor
mat using the floor mat fasteners. DO
NOT install your floor mat upside down
or turn your floor mat over. Lightly pull to
confirm mat is secured using the floor
mat fasteners on a regular basis.
ALWAYS REMOVE THE EXISTING
FLOOR MAT FROM THE VEHICLE
before installing any other floor mat.
NEVER install or stack an additional
floor mat on top of an existing floor mat.
ONLY install floor mats designed to fit
your vehicle. NEVER install a floor mat
that cannot be properly attached and
secured to your vehicle. If a floor mat
needs to be replaced, only use a FCA
approved floor mat for the specific make,
model, and year of your vehicle.
WARNING! (Continued)
ONLY use the driver’s side floor mat on
the driver’s side floor area. To check for
interference, with the vehicle properly
parked with the engine off, fully depress
the accelerator, the brake, and the
clutch pedal (if present) to check for
interference. If your floor mat interferes
with the operation of any pedal, or is not
secure to the floor, remove the floor mat
from the vehicle and place the floor mat
in your trunk.
ONLY use the passenger’s side floor mat
on the passenger’s side floor area.
ALWAYS make sure objects cannot fall
or slide into the driver’s side floor area
when the vehicle is moving. Objects can
become trapped under accelerator,
brake, or clutch pedals and could cause
a loss of vehicle control.
NEVER place any objects under the floor
mat (e.g., towels, keys, etc.). These
objects could change the position of the
floor mat and may cause interference
with the accelerator, brake, or clutch
pedals.
WARNING! (Continued)
2020_JEEP_CHEROKEE_UG_RHD_UK.book Page 136
Page 144 of 332
STARTING AND OPERATING
142
(Continued)
Refer to the Starting And Operating section
in the Owner’s Manual.
Auto Park Brake
The electric park brake can be programmed
to be applied automatically whenever the
vehicle is at a standstill and the automatic
transmission is placed in PARK, or with a
manual transmission, whenever the ignition
is turned “OFF”. Auto Park Brake is enabled
and disabled by customer selection through
the Customer Programmable Features
section of the Uconnect Settings.
Any single auto park brake application can
be bypassed by pushing the EPB switch to
the release position while the transmission is
placed in PARK.
WARNING!
Never use the PARK position as a substi-
tute for the parking brake. Always apply
the parking brake fully when exiting the
vehicle to guard against vehicle move-
ment and possible injury or damage.
When exiting the vehicle, always make
sure the ignition is in the OFF mode,
remove the key fob from the vehicle, and
lock your vehicle.
Never leave children alone in a vehicle,
or with access to an unlocked vehicle.
Allowing children to be in a vehicle unat -
tended is dangerous for a number of
reasons. A child or others could be seri -
ously or fatally injured. Children should
be warned not to touch the parking
brake, brake pedal or the transmission
gear selector.
Do not leave the key fob in or near the
vehicle, (or in a location accessible to
children), and do not leave the ignition
in the ACC or ON/RUN mode. A child
could operate power windows, other
controls, or move the vehicle.
Be sure the parking brake is fully disen -
gaged before driving; failure to do so can
lead to brake failure and a collision.
Always fully apply the parking brake
when leaving your vehicle, or it may roll
and cause damage or injury. Also be
certain to leave the transmission in
PARK. Failure to do so may allow the
vehicle to roll and cause damage or
injury.
Driving the vehicle with the parking brake
engaged, or repeated use of the parking
brake to slow the vehicle may cause
serious damage to the brake system.
WARNING! (Continued) CAUTION!
If the Brake System Warning Light remains
on with the parking brake released, a
brake system malfunction is indicated.
Have the brake system serviced by an
authorized dealer immediately.
2020_JEEP_CHEROKEE_UG_RHD_UK.book Page 142
Page 160 of 332
STARTING AND OPERATING
158
Conditions That Force An Application Of The
Electric Park Brake While In Autostop Mode:
The driver door is open and brake pedal
released.
The driver door is open and the driver seat
belt is unbuckled.
The engine hood has been opened.
A Stop/Start system error occurs.
If the Electric Park Brake is applied with the
engine off, the engine may require a manual
restart and the electric park brake may
require a manual release (depress brake
pedal and push Electric Park Brake switch).
Refer to “Instrument Cluster Display” in
“Getting To Know Your Instrument Panel” in
your Owner’s Manual for further information.
To Manually Turn Off The Stop/Start
System
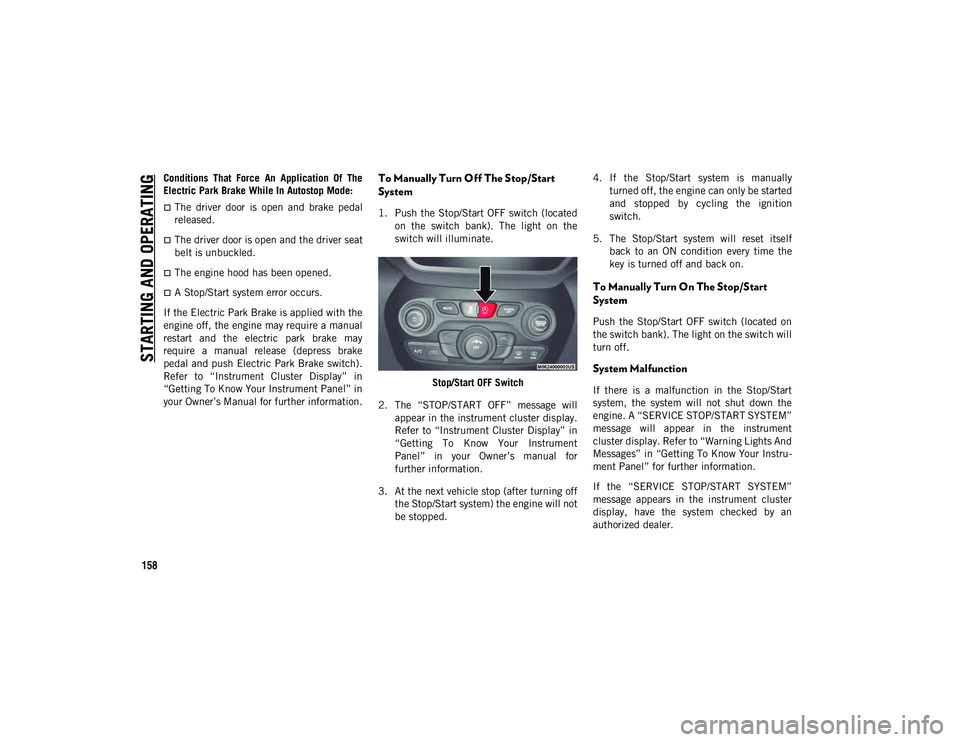
1. Push the Stop/Start OFF switch (located on the switch bank). The light on the
switch will illuminate.
Stop/Start OFF Switch
2. The “STOP/START OFF” message will appear in the instrument cluster display.
Refer to “Instrument Cluster Display” in
“Getting To Know Your Instrument
Panel” in your Owner’s manual for
further information.
3. At the next vehicle stop (after turning off the Stop/Start system) the engine will not
be stopped. 4. If the Stop/Start system is manually
turned off, the engine can only be started
and stopped by cycling the ignition
switch.
5. The Stop/Start system will reset itself back to an ON condition every time the
key is turned off and back on.
To Manually Turn On The Stop/Start
System
Push the Stop/Start OFF switch (located on
the switch bank). The light on the switch will
turn off.
System Malfunction
If there is a malfunction in the Stop/Start
system, the system will not shut down the
engine. A “SERVICE STOP/START SYSTEM”
message will appear in the instrument
cluster display. Refer to “Warning Lights And
Messages” in “Getting To Know Your Instru -
ment Panel” for further information.
If the “SERVICE STOP/START SYSTEM”
message appears in the instrument cluster
display, have the system checked by an
authorized dealer.
2020_JEEP_CHEROKEE_UG_RHD_UK.book Page 158
Page 167 of 332
165
Enabling And Disabling ParkSense
ParkSense can be enabled and disabled with
the ParkSense switch located below the
Uconnect display.When the ParkSense switch is
pushed to disable the system, the
instrument cluster will display the
“PARKSENSE OFF” message for
approximately five seconds. When the gear
selector is moved to REVERSE and the
system is disabled, the instrument cluster
display will display the “PARKSENSE OFF”
message for as long as the vehicle is in
REVERSE.
Refer to “Instrument Cluster Display” in
“Getting To Know Your Instrument Panel” in
your Owner’s Manual for further information.
The ParkSense switch LED will be on when
ParkSense is disabled or requires service.
The ParkSense switch LED will be off when
the system is enabled. If the ParkSense
switch is pushed, and the system requires
service, the ParkSense switch LED will blink
momentarily, and then the LED will be on.
ParkSense System Usage Precautions
NOTE:
Ensure that the rear bumper is free of
snow, ice, mud, dirt and debris to keep the
ParkSense system operating properly.
Jackhammers, large trucks, and other
vibrations could affect the performance of
ParkSense.
When you turn ParkSense off, the instru -
ment cluster will display “PARKSENSE
OFF.” Furthermore, once you turn Park-
Sense off, it remains off until you turn it
on again, even if you cycle the ignition.
When you move the gear selector to the
REVERSE position and ParkSense is
turned off, the instrument cluster display
will display “PARKSENSE OFF” message
for as long as the vehicle is in REVERSE.
ParkSense, when on, will reduce the
volume of the radio when it is sounding a
tone.
Clean the ParkSense sensors regularly,
taking care not to scratch or damage them.
The sensors must not be covered with ice,
snow, slush, mud, dirt or debris. Failure to
do so can result in the system not working
properly. The ParkSense system might not
detect an obstacle behind the fascia/
bumper, or it could provide a false indica-
tion that an obstacle is behind the fascia/
bumper.
Use the ParkSense switch to turn the
ParkSense system off if objects such as
bicycle carriers, trailer hitches, etc. are
placed within 12 inches (30 cm) from the
rear fascia/bumper. Failure to do so can
result in the system misinterpreting a
close object as a sensor problem, causing
the “PARKSENSE UNAVAILABLE
SERVICE REQUIRED” message to be
displayed in the instrument cluster
display.
ParkSense should be disabled when the
liftgate is in the open position and the
vehicle is in REVERSE. An open liftgate
could provide a false indication that an
obstacle is behind the vehicle.
2020_JEEP_CHEROKEE_UG_RHD_UK.book Page 165
Page 169 of 332
167
ParkSense Sensors
The four ParkSense sensors, located in the
rear fascia/bumper, monitor the area behind
the vehicle that is within the sensors’ field of
view. The sensors can detect obstacles from
approximately 12 inches (30 cm) up to
79 inches (200 cm) from the rear fascia/
bumper in the horizontal direction,
depending on the location, type and orienta-
tion of the obstacle.
NOTE:
Vehicles equipped with Active Park Assist
will have six sensors in the rear fascia/
bumper.
The six ParkSense sensors, located in the
front fascia/bumper, monitor the area in
front of the vehicle that is within the sensors’
field of view. The sensors can detect obsta -
cles from approximately 12 inches (30 cm)
up to 47 inches (120 cm) from the front
fascia/bumper in the horizontal direction,
depending on the location, type and orienta -
tion of the obstacle. When an object is detected within 79 inches
(200 cm) behind the rear bumper while the
vehicle is in REVERSE, a warning will appear
in the instrument cluster display. In addition
a chime will sound (when Sound and Display
is selected from the Customer Programmable
Features section of the Uconnect System
screen). As the vehicle moves closer to the
object, the chime rate will change from
single 1/2 second tone (for rear only), to slow
(for rear only), to fast, to continuous.
Enabling And Disabling ParkSense
ParkSense can be enabled and disabled with
the ParkSense switch located below the
Uconnect display.
When the ParkSense switch is
pushed to disable the system, the
instrument cluster will display the
“PARKSENSE OFF” message for
approximately five seconds. When the gear
selector is moved to REVERSE and the
system is disabled, the instrument cluster
display will display the “PARKSENSE OFF”
message for as long as the vehicle is in
REVERSE. Refer to “Instrument Cluster Display” in
“Getting To Know Your Instrument Panel” in
the Owner’s Manual for further information.
NOTE:
When ParkSense is disabled and the gear
selector is moved to the DRIVE position, no
warning message will be displayed.
The ParkSense switch LED will be on when
ParkSense is disabled or requires service.
The ParkSense switch LED will be off when
the system is enabled. If the ParkSense
switch is pushed, and the system requires
service, the ParkSense switch LED will blink
momentarily, and then the LED will be on.
2020_JEEP_CHEROKEE_UG_RHD_UK.book Page 167
Page 185 of 332
183
BULB REPLACEMENT
Replacement Bulbs
Interior Bulbs
Bulb Name Bulb Number
Cargo Lamp TL212–2
Overhead Console Lamp PLW214–2A
Reading Lamp WL212–2
Exterior Bulbs
Bulb Name Bulb Number
Low Beam/High Beam Headlamps LED (Serviced at an authorized dealer)
Front Park/Daytime Running Lamps LED (Serviced at an authorized dealer)
Front Turn Signal Lamps LED (Serviced at an authorized dealer)
Front Fog Lamps LED (Serviced at an authorized dealer)
Rear Tail/Stop Lamps LED (Serviced at an authorized dealer)
Rear Turn Signal Lamps LED (Serviced at an authorized dealer)
Center High Mounted Stop Lamp (CHMSL) LED (Serviced at an authorized dealer)
Back-Up Lamps LED (Serviced at an authorized dealer)
License Plate Lamp LED (Serviced at an authorized dealer)
Rear Fog Lamps LED (Serviced at an authorized dealer)
2020_JEEP_CHEROKEE_UG_RHD_UK.book Page 183
Page 186 of 332
IN CASE OF EMERGENCY
184
(Continued)
Replacing Exterior Bulbs
LED Bulb Service
Your vehicle may be equipped with LED
lamps, please see an authorized dealer for
service.
FUSES
General Information
The fuses protect electrical systems against
excessive current.
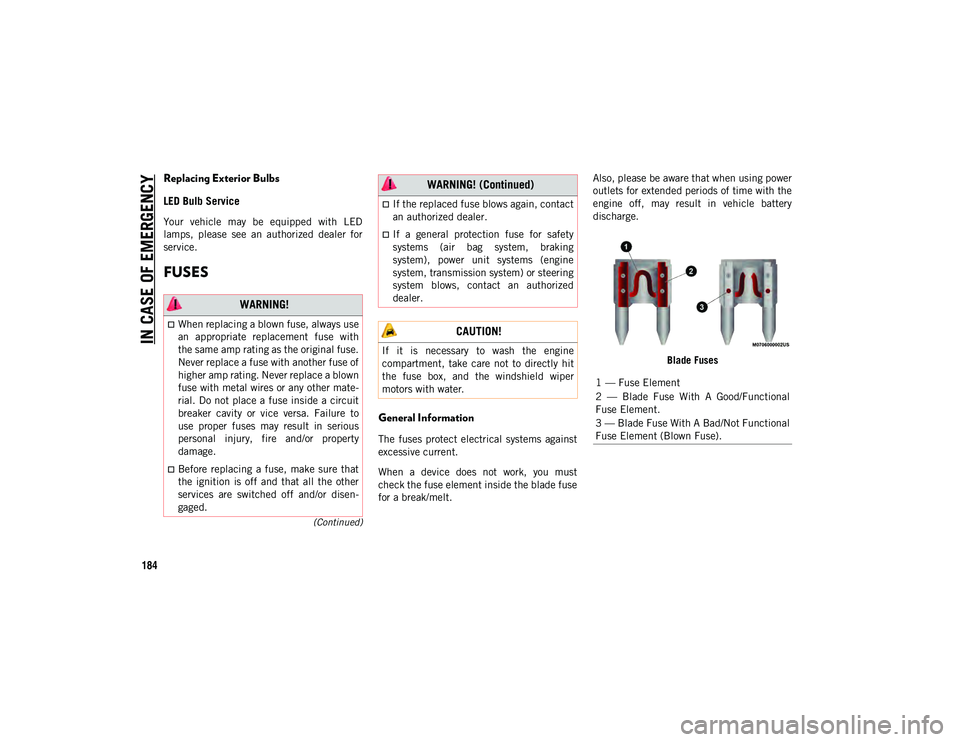
When a device does not work, you must
check the fuse element inside the blade fuse
for a break/melt.Also, please be aware that when using power
outlets for extended periods of time with the
engine off, may result in vehicle battery
discharge.
Blade Fuses
WARNING!
When replacing a blown fuse, always use
an appropriate replacement fuse with
the same amp rating as the original fuse.
Never replace a fuse with another fuse of
higher amp rating. Never replace a blown
fuse with metal wires or any other mate-
rial. Do not place a fuse inside a circuit
breaker cavity or vice versa. Failure to
use proper fuses may result in serious
personal injury, fire and/or property
damage.
Before replacing a fuse, make sure that
the ignition is off and that all the other
services are switched off and/or disen -
gaged.
If the replaced fuse blows again, contact
an authorized dealer.
If a general protection fuse for safety
systems (air bag system, braking
system), power unit systems (engine
system, transmission system) or steering
system blows, contact an authorized
dealer.
CAUTION!
If it is necessary to wash the engine
compartment, take care not to directly hit
the fuse box, and the windshield wiper
motors with water.
WARNING! (Continued)
1 — Fuse Element
2 — Blade Fuse With A Good/Functional
Fuse Element.
3 — Blade Fuse With A Bad/Not Functional
Fuse Element (Blown Fuse).
2020_JEEP_CHEROKEE_UG_RHD_UK.book Page 184
Page 187 of 332
185
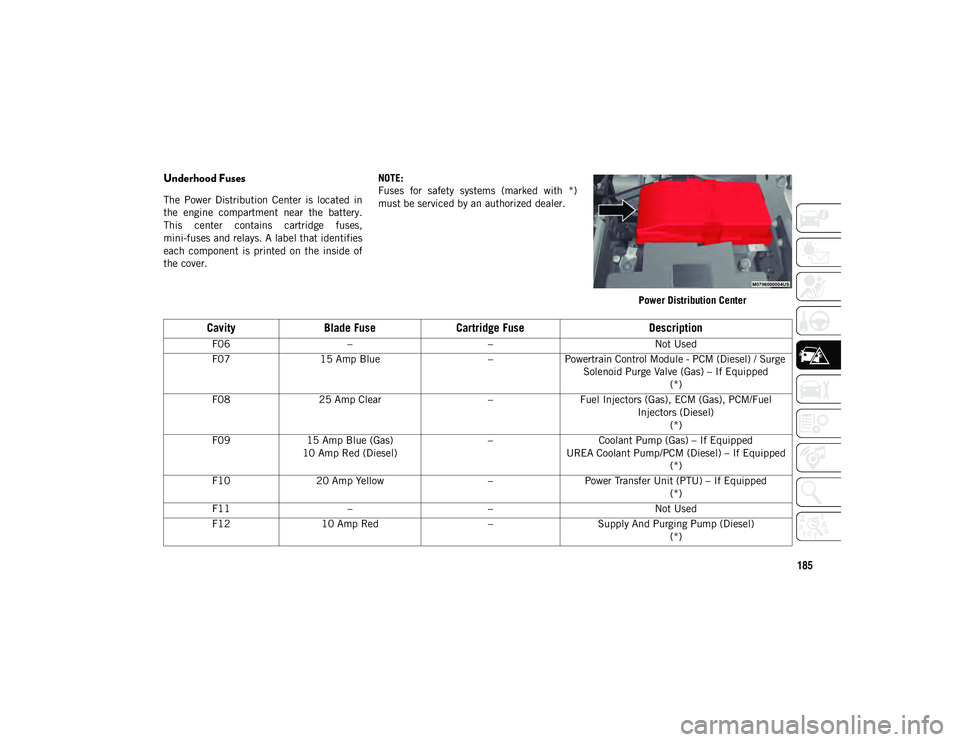
Underhood Fuses
The Power Distribution Center is located in
the engine compartment near the battery.
This center contains cartridge fuses,
mini-fuses and relays. A label that identifies
each component is printed on the inside of
the cover.NOTE:
Fuses for safety systems (marked with *)
must be serviced by an authorized dealer.
Power Distribution Center
CavityBlade Fuse Cartridge Fuse Description
F06– – Not Used
F07 15 Amp Blue –Powertrain Control Module - PCM (Diesel) / Surge
Solenoid Purge Valve (Gas) – If Equipped (*)
F08 25 Amp Clear –Fuel Injectors (Gas), ECM (Gas), PCM/Fuel
Injectors (Diesel)(*)
F09 15 Amp Blue (Gas)
10 Amp Red (Diesel) –
Coolant Pump (Gas) – If Equipped
UREA Coolant Pump/PCM (Diesel) – If Equipped (*)
F10 20 Amp Yellow –Power Transfer Unit (PTU) – If Equipped
(*)
F11 – – Not Used
F12 10 Amp Red –Supply And Purging Pump (Diesel)
(*)
2020_JEEP_CHEROKEE_UG_RHD_UK.book Page 185
Page 196 of 332
IN CASE OF EMERGENCY
194
JACKING AND TIRE
CHANGING Jack Location/Spare Tire Stowage
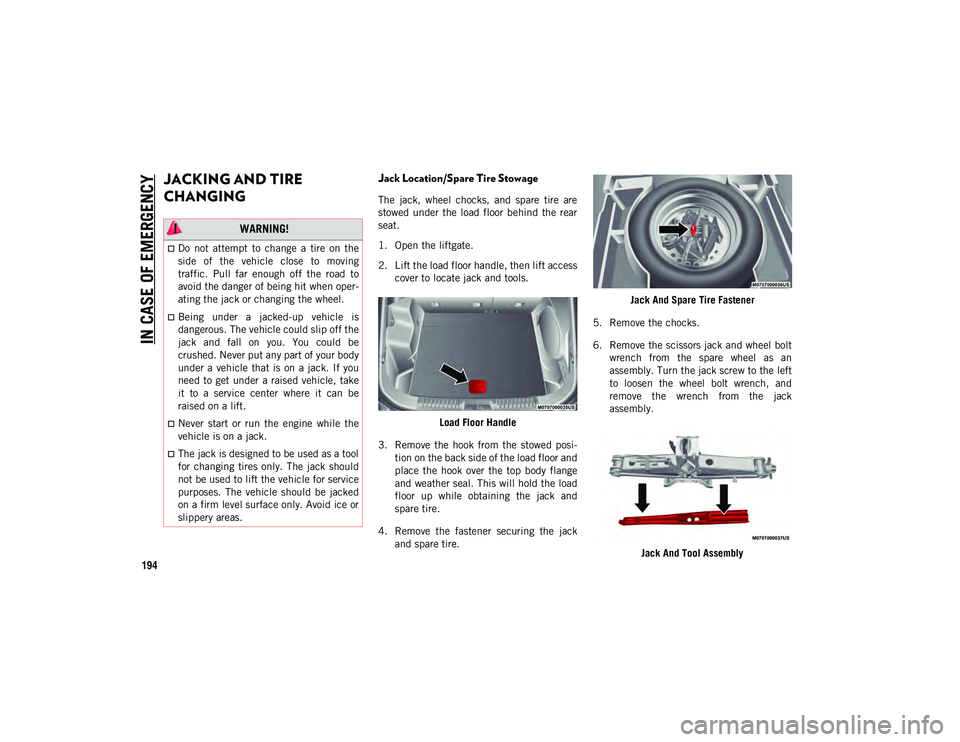
The jack, wheel chocks, and spare tire are
stowed under the load floor behind the rear
seat.
1. Open the liftgate.
2. Lift the load floor handle, then lift accesscover to locate jack and tools.
Load Floor Handle
3. Remove the hook from the stowed posi -
tion on the back side of the load floor and
place the hook over the top body flange
and weather seal. This will hold the load
floor up while obtaining the jack and
spare tire.
4. Remove the fastener securing the jack and spare tire. Jack And Spare Tire Fastener
5. Remove the chocks.
6. Remove the scissors jack and wheel bolt wrench from the spare wheel as an
assembly. Turn the jack screw to the left
to loosen the wheel bolt wrench, and
remove the wrench from the jack
assembly.
Jack And Tool Assembly
WARNING!
Do not attempt to change a tire on the
side of the vehicle close to moving
traffic. Pull far enough off the road to
avoid the danger of being hit when oper -
ating the jack or changing the wheel.
Being under a jacked-up vehicle is
dangerous. The vehicle could slip off the
jack and fall on you. You could be
crushed. Never put any part of your body
under a vehicle that is on a jack. If you
need to get under a raised vehicle, take
it to a service center where it can be
raised on a lift.
Never start or run the engine while the
vehicle is on a jack.
The jack is designed to be used as a tool
for changing tires only. The jack should
not be used to lift the vehicle for service
purposes. The vehicle should be jacked
on a firm level surface only. Avoid ice or
slippery areas.
2020_JEEP_CHEROKEE_UG_RHD_UK.book Page 194