lights JEEP CHEROKEE 2020 Owner handbook (in English)
[x] Cancel search | Manufacturer: JEEP, Model Year: 2020, Model line: CHEROKEE, Model: JEEP CHEROKEE 2020Pages: 332, PDF Size: 8.87 MB
Page 4 of 332
2
HOW TO USE THIS MANUAL
HOW TO USE THIS MANUAL
Essential Information
Consult the Table of Contents to determine
which section contains the information you
desire.
Since the specification of your vehicle
depends on the items of equipment ordered,
certain descriptions and illustrations may
differ from your vehicle's equipment.
The detailed Index at the back of this
Owner's Manual contains a complete listing
of all subjects.
Symbols
Some vehicle components have colored
labels whose symbols indicate precautions to
be observed when using this component.
Refer to “Warning Lights and Messages” in
“Getting To Know Your Instrument Panel”
for further information on the symbols used
in your vehicle.
ROLLOVER WARNING
Utility vehicles have a significantly higher
rollover rate than other types of vehicles.
This vehicle has a higher ground clearance
and a higher center of gravity than many
passenger vehicles. It is capable of
performing better in a wide variety of off-road
applications. Driven in an unsafe manner, all
vehicles can go out of control. Because of the
higher center of gravity, if this vehicle is out
of control it may roll over when some other
vehicles may not.
Do not attempt sharp turns, abrupt maneu-
vers, or other unsafe driving actions that can
cause loss of vehicle control. Failure to
operate this vehicle safely may result in a
collision, rollover of the vehicle, and severe
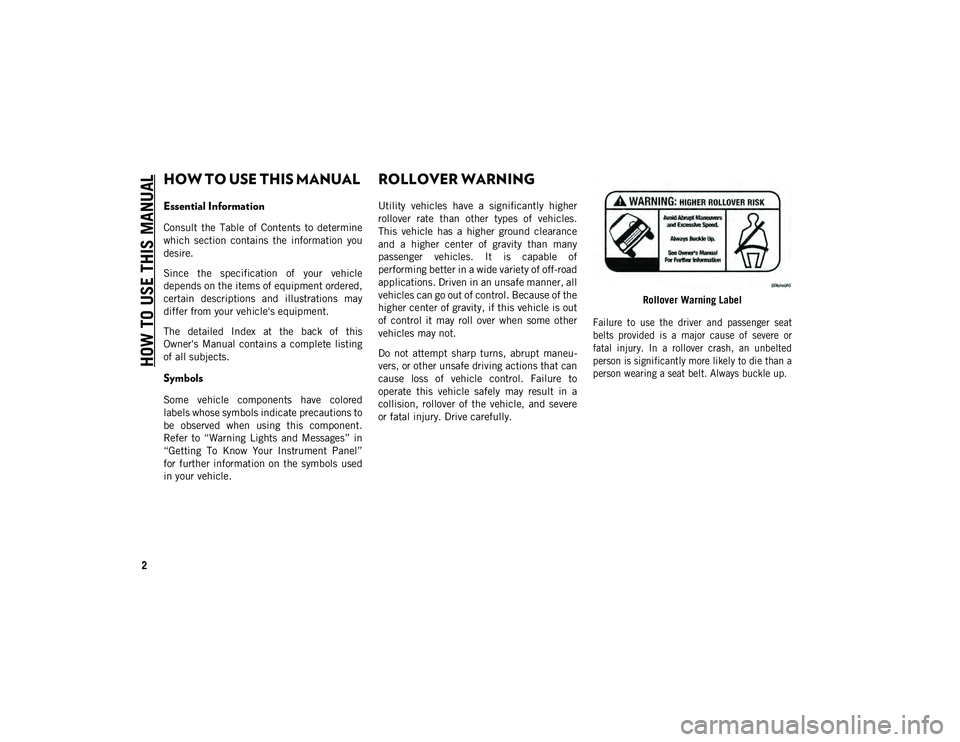
or fatal injury. Drive carefully. Rollover Warning Label
Failure to use the driver and passenger seat
belts provided is a major cause of severe or
fatal injury. In a rollover crash, an unbelted
person is significantly more likely to die than a
person wearing a seat belt. Always buckle up.
2020_JEEP_CHEROKEE_UG_RHD_UK.book Page 2
Page 8 of 332
6
WELCOME FROM FCA
HOW TO FIND YOUR OWNER’S MANUAL
ONLINE ................................................... 1
HOW TO USE THIS MANUAL
HOW TO USE THIS MANUAL ..................... 2
Essential Information ........................ 2
Symbols .......................................... 2
ROLLOVER WARNING ................................ 2
IMPORTANT NOTICE ................................. 3
WARNINGS AND CAUTIONS ...................... 4
VEHICLE MODIFICATIONS/ALTERATIONS .... 4
GETTING TO KNOW YOUR VEHICLE
KEYS .................................................... 13
Key Fob ......................................... 13
IGNITION SWITCH .................................. 15
Ignition Node Module (IGNM) —
If Equipped.................................... 15 Keyless Enter-N-Go (Ignition) —
If Equipped.................................... 15
REMOTE STARTING SYSTEM —
IF EQUIPPED .......................................... 17
How To Use Remote Start ............... 17
To Enter Remote Start Mode............ 17
VEHICLE SECURITY ALARM —
IF EQUIPPED ..........................................18
To Arm The System ....................... 18
To Disarm The System ................... 18
DOORS ................................................. 19
Keyless Enter-N-Go —
Passive Entry ................................ 19 Child-Protection Door Lock System —
Rear Doors .................................... 22
SEATS ..................................................22
Driver Memory Seat —
If Equipped ................................... 23 Heated Seats ................................. 24
Front Ventilated Seats —
If Equipped .................................. 25
HEAD RESTRAINTS ................................ 26
Reactive Head Restraints —
Front Seats .................................... 26 Rear Head Restraints...................... 27
STEERING WHEEL .................................. 28
Tilt/Telescoping Steering Column ..... 28
Heated Steering Wheel —
If Equipped .................................. 28
MIRRORS .............................................29
Power Folding Mirrors —
If Equipped ................................... 29
EXTERIOR LIGHTS ..................................30
Multifunction Lever ........................30
Headlight Switch ............................30
Daytime Running Lights (DRLs) —
If Equipped ....................................30 High/Low Beam Switch....................31
Automatic High Beam Headlamp
Control — If Equipped ...................31 Flash-To-Pass .................................31
Automatic Headlights —
If Equipped ...................................31 Parking Lights ................................31
Headlights On With Wipers (Available
With Automatic Headlights Only) ......31 Adaptive Bi-Xenon High Intensity
Discharge Headlights —
If Equipped ....................................32 Headlight Time Delay ......................32
Lights-On Reminder .......................32
Front And Rear Fog Lights —
If Equipped ....................................32 Turn Signals ...................................33
Automatic Headlight Leveling —
HID Headlights Only .......................33 Battery Saver ..................................33
2020_JEEP_CHEROKEE_UG_RHD_UK.book Page 6
Page 9 of 332
7
WINDSHIELD WIPERS AND WASHERS ..... 34
Windshield Wiper Operation............. 34
Rain Sensing Wipers —
If Equipped ................................... 35 Rear Window Wiper/Washer ............. 36
CLIMATE CONTROLS............................... 36
Automatic Climate Control
Overview ........................................ 37 Climate Control Functions ............... 45
Automatic Temperature
Control (ATC) ................................ 45 Operating Tips ............................... 46
WINDOWS ............................................ 47
Power Window Controls ................... 47
Auto-Up Feature With Anti-Pinch
Protection ..................................... 48 Window Lockout Switch .................. 48
POWER SUNROOF WITH POWER SHADE —
IF EQUIPPED ......................................... 49
Opening Sunroof ............................ 49
Venting Sunroof.............................. 50
Closing Sunroof .............................. 50
Wind Buffeting .............................. 50
Opening Power Shade ..................... 50
Closing Power Shade....................... 51
Pinch Protect Feature ..................... 51
Sunroof Maintenance ...................... 51
Ignition Off Operation ..................... 51
HOOD ....................................................52
Opening The Hood ......................... 52
Closing The Hood ........................... 52
LIFTGATE...............................................53
Opening ........................................ 53
Closing .......................................... 53
Hands-Free Liftgate —
If Equipped .................................. 54
INTERNAL EQUIPMENT ........................... 55
Power Outlets ............................... 55
Power Inverter — If Equipped ........ 56
ROOF LUGGAGE RACK — IF EQUIPPED ....57
ENVIRONMENTAL PROTECTION
SYSTEMS — IF EQUIPPED ...................... 58
GETTING TO KNOW YOUR INSTRUMENT
PANEL
INSTRUMENT CLUSTER DISPLAY ............ 59
Instrument Cluster Display Location
And Controls .................................. 59 Oil Change Indicator System —
If Equipped .................................. 60 Gear Shift Indicator (GSI) —
If Equipped ................................... 60 Instrument Cluster Display Selectable
Items ............................................ 61 Diesel Displays .............................. 61
Diesel Particulate Filter (DPF)
Messages ..................................... 61 Fuel System Messages .................... 62
WARNING LIGHTS AND MESSAGES ..........64
Red Warning Lights .........................64
Yellow Warning Lights .....................67
Yellow Indicator Lights ....................71
Green Indicator Lights .....................72
White Indicator Lights .....................73
Blue Indicator Lights .......................74
ONBOARD DIAGNOSTIC SYSTEM —
OBD II ..................................................74
Onboard Diagnostic System (OBD II)
Cybersecurity..................................75
SAFETY
SAFETY FEATURES .................................76
Anti-Lock Brake System (ABS) ........76
Electronic Brake Control (EBC)
System .........................................77
AUXILIARY DRIVING SYSTEMS ................87
Blind Spot Monitoring (BSM) —
If Equipped ....................................87 Forward Collision Warning (FCW) With
Mitigation — If Equipped ................90 Tire Pressure Monitoring
System (TPMS)...............................93
2020_JEEP_CHEROKEE_UG_RHD_UK.book Page 7
Page 16 of 332
GETTING TO KNOW YOUR VEHICLE
14
In this situation, a back up method can be
used to operate the ignition switch. Put the
nose side (side opposite of the emergency
key) of the key fob against the START/STOP
ignition button and push to operate the igni-
tion switch.
NOTE:
Improper disposal of key fob batteries may
be harmful to the environment. Please see an
authorized dealer for proper battery disposal.
To Unlock The Doors And Liftgate
Push and release the unlock button on the
key fob once to unlock the driver's door or
twice within five seconds to unlock all doors
and the liftgate.
All doors can be programmed to unlock on
the first push of the unlock button. Refer to
“Uconnect Settings” in “Multimedia” in the
Owner’s Manual for further information.
NOTE:
If the vehicle is unlocked using the interior
door panel, and no door is opened within 60
seconds, the vehicle will re-lock and if
equipped, the security alarm will arm. To
change the current setting, refer to "Ucon -
nect Settings" in "Multimedia" in the Owner’s
Manual for further information. This feature lets you program the system to
unlock either the driver's door or all doors on
the first push of the unlock button on the key
fob. To change the current setting, refer to
“Uconnect Settings” in “Multimedia” in the
Owner’s Manual for further information.
NOTE:
If the vehicle is equipped with Passive Entry,
refer to “Keyless Enter-N-Go — Passive
Entry” located in “Doors” in this chapter for
further information.To Lock The Doors And Liftgate
Push and release the lock button on the key
fob to lock all doors and liftgate.
The turn signal lights will flash and the horn
will chirp to acknowledge the signal. Refer to
“Uconnect Settings” located in “Multi
-
media” in the Owner’s Manual for further
programmable information.
If the vehicle is equipped with Passive Entry,
refer to “Keyless Enter-N-Go — Passive
Entry” located in “Doors” in this chapter for
further information. Vehicles Equipped With Keyless Enter-N-Go —
Passive Entry
If one or more doors are open, or the liftgate
is open, the doors will lock. The doors will
unlock again automatically if the key fob is
left inside the passenger compartment,
otherwise the doors will stay locked.
Request For Additional Key Fobs
NOTE:
Only key fobs that are programmed to the
vehicle electronics can be used to start and
operate the vehicle. Once a key fob is
programmed to a vehicle, it cannot be
programmed to any other vehicle.
WARNING!
Always remove the key fobs from the
vehicle and lock all doors when leaving
the vehicle unattended.
For vehicles equipped with Keyless
Enter-N-Go — Ignition, always remember to
place the ignition in the OFF mode.
2020_JEEP_CHEROKEE_UG_RHD_UK.book Page 14
Page 19 of 332
17
REMOTE STARTING
SYSTEM — IF EQUIPPED
Push the remote start button on the key fob
twice within five seconds. Pushing the
remote start button a third time shuts the
engine off.
To drive the vehicle, push the START/STOP igni-
tion button to cycle the ignition to ON/RUN.
NOTE:
With remote start, the engine will only run
for 15 minutes (timeout) unless the igni -
tion is placed in the ON/RUN position.
The vehicle must be manually started with
the key fob after two consecutive time-
outs.
How To Use Remote Start
Push the remote start button on the key fob
twice within five seconds. Pushing the
remote start button a third time shuts the
engine off.
To drive the vehicle, push the unlock button,
insert the key in the ignition and turn to the
ON/RUN position. All of the following conditions must be met
before the engine will remote start:
Gear selector in PARK
Doors closed
Hood closed
Liftgate closed
Hazard switch off
Brake switch inactive (brake pedal not
pushed)
Battery at an acceptable charge level
Check engine light shall not be present
System not disabled from previous remote
start event
Vehicle alarm system indicator flashing
Ignition in STOP/OFF position
Fuel level meets minimum requirement
Vehicle security alarm is not signaling an
intrusion
To Enter Remote Start Mode
Push and release the remote start button on
the key fob twice within five seconds. The
vehicle doors will lock, the parking lights will
flash, and the horn will chirp twice (if
programmed). Then, the engine will start,
and the vehicle will remain in the Remote
Start mode for a 15 minute cycle.
NOTE:
If an engine fault is present or fuel level is
low, the vehicle will start and then shut
down in 10 seconds.
The park lamps will turn on and remain on
during Remote Start mode.
WARNING!
Do not start or run an engine in a closed
garage or confined area. Exhaust gas
contains Carbon Monoxide (CO) which is
odorless and colorless. Carbon Monoxide
is poisonous and can cause serious
injury or death when inhaled.
Keep key fobs away from children. Oper
-
ation of the Remote Start System,
windows, door locks or other controls
could cause serious injury or death.
2020_JEEP_CHEROKEE_UG_RHD_UK.book Page 17
Page 21 of 332
19
The Vehicle Security Alarm is designed to
protect your vehicle. However, you can create
conditions where the system will give you a
false alarm. If one of the previously
described arming sequences has occurred,
the Vehicle Security Alarm will arm, regard-
less of whether you are in the vehicle or not.
If you remain in the vehicle and open a door,
the alarm will sound. If this occurs, disarm
the Vehicle Security Alarm.
If the Vehicle Security Alarm is armed and
the battery becomes disconnected, the
Vehicle Security Alarm will remain armed
when the battery is reconnected; the exterior
lights will flash, and the horn will sound. If
this occurs, disarm the Vehicle Security
Alarm.
DOORS
Keyless Enter-N-Go — Passive Entry
The Passive Entry system is an enhancement
to the vehicle’s Remote Keyless Entry system
and a feature of Keyless Enter-N-Go —
Passive Entry. This feature allows you to lock
and unlock the vehicle’s door(s) and fuel
door without having to push the key fob lock
or unlock buttons. NOTE:
Passive Entry may be programmed on/off;
refer to “Uconnect Settings” in “Multi
-
media” in the Owner’s Manual for further
information.
If wearing gloves on your hands, or if it has
been raining/snowing on the Passive Entry
door handle, the unlock sensitivity can be
affected, resulting in a slower response
time.
If the vehicle is unlocked by Passive Entry
and no door is opened within 60 seconds,
the vehicle will re-lock and if equipped
will arm the security alarm.
The key fob may not be able to be detected
by the vehicle Passive Entry system if it is
located next to a mobile phone, laptop, or
other electronic device; these devices may
block the key fob's wireless signal and
prevent the Passive Entry handle from
locking/unlocking the vehicle.
Passive Entry activates illuminated
approach for the time set by the customer
(0, 30, 60, or 90 seconds), and flashes
the turn signal lights. Refer to “Uconnect
Settings” in “Multimedia in the Owner’s
Manual for further information. To Unlock From The Driver's Side
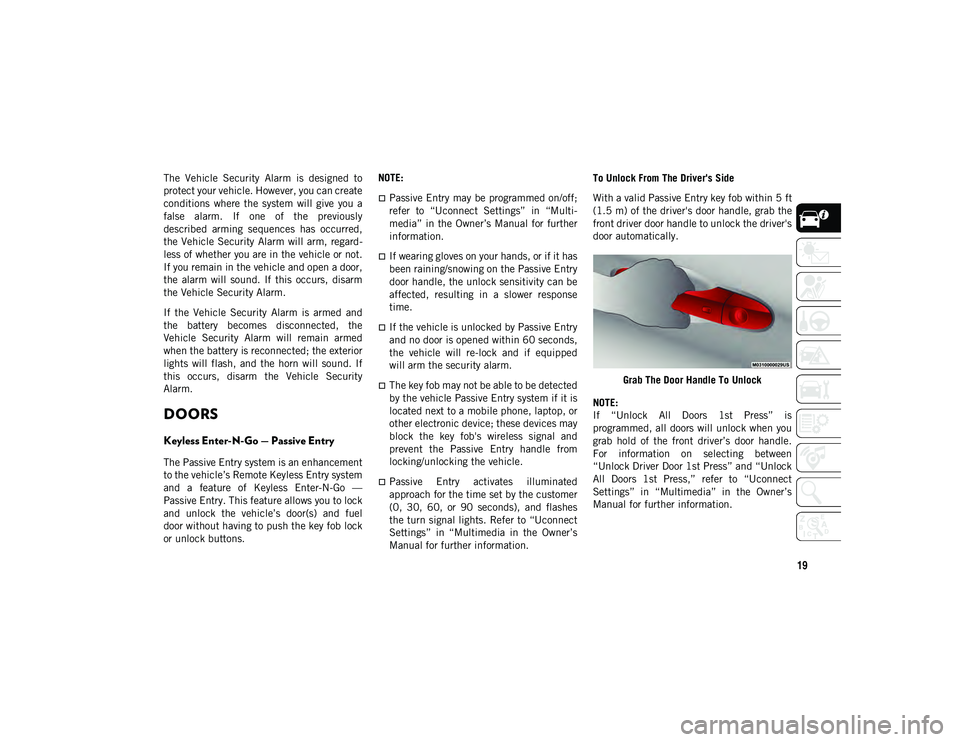
With a valid Passive Entry key fob within 5 ft
(1.5 m) of the driver's door handle, grab the
front driver door handle to unlock the driver's
door automatically.
Grab The Door Handle To Unlock
NOTE:
If “Unlock All Doors 1st Press” is
programmed, all doors will unlock when you
grab hold of the front driver’s door handle.
For information on selecting between
“Unlock Driver Door 1st Press” and “Unlock
All Doors 1st Press,” refer to “Uconnect
Settings” in “Multimedia” in the Owner’s
Manual for further information.
2020_JEEP_CHEROKEE_UG_RHD_UK.book Page 19
Page 27 of 332
25
Front Heated Seats — If Equipped
If your vehicle is equipped with front heated
seats, the control buttons are located within
the Uconnect system. You can gain access to
the control buttons through the climate
screen or the controls screen.
Press the heated seat button once to
turn the HI setting on.
Press the heated seat button a second
time to turn the LO setting on.
Press the heated seat button a third
time to turn the heating elements off.
The level of heat selected will stay on until
changed by the operator.
NOTE:
The engine must be running for the heated
seats to operate.
Vehicles Equipped With Remote Start
On models that are equipped with remote start,
the driver’s heated seat can be programmed to
come on during a remote start.
This feature can be programmed through the
Uconnect system. Refer to “Uconnect Settings”
in “Multimedia” in the Owner's Manual.
Rear Heated Seats — If Equipped
On some models, the two outboard rear seats
are equipped with heated seats. The heated
seat switches for these seats are located on
the rear of the center console.
There are two heated seat switches that allow
the rear passengers to operate the seats
independently. Amber indicator lights in
each switch indicate the level of heat in use. Two indicator lights will illuminate for HI,
one for LO and none for off.
Push the heated seat button once to
turn the HI setting on.
Push the heated seat button a second
time to turn the LO setting on.
Push the heated seat button a third
time to turn the heating elements off.
NOTE:
Once a heat setting is selected, heat will
be felt within two to five minutes.
The engine must be running for the heated
seats to operate.
When the HI-level setting is selected, the
heater will provide a boosted heat level
during the first four minutes of operation.
Then, the heat output will drop to the normal
HI-level. The level of heat selected will stay
on until changed by the operator.
Front Ventilated Seats — If Equipped
If your vehicle is equipped with ventilated
seats, the seat cushion and seat back will
have fans that draw the air from the
passenger compartment and move air
through fine perforations in the seat cover to
WARNING!
Persons who are unable to feel pain to
the skin because of advanced age,
chronic illness, diabetes, spinal cord
injury, medication, alcohol use, exhaus-
tion or other physical condition must
exercise care when using the seat heater.
It may cause burns even at low tempera-
tures, especially if used for long periods
of time.
Do not place anything on the seat or
seatback that insulates against heat,
such as a blanket or cushion. This may
cause the seat heater to overheat. Sitting
in a seat that has been overheated could
cause serious burns due to the increased
surface temperature of the seat.
2020_JEEP_CHEROKEE_UG_RHD_UK.book Page 25
Page 32 of 332
GETTING TO KNOW YOUR VEHICLE
30
EXTERIOR LIGHTS
Multifunction Lever
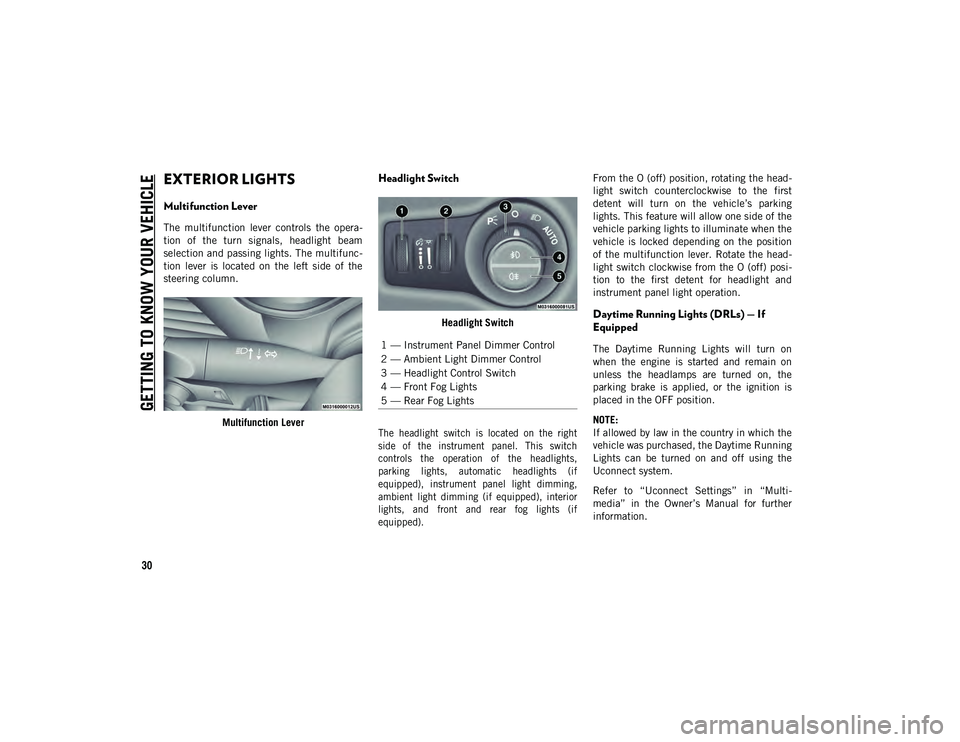
The multifunction lever controls the opera-
tion of the turn signals, headlight beam
selection and passing lights. The multifunc -
tion lever is located on the left side of the
steering column.
Multifunction Lever
Headlight Switch
Headlight Switch
The headlight switch is located on the right
side of the instrument panel. This switch
controls the operation of the headlights,
parking lights, automatic headlights (if
equipped), instrument panel light dimming,
ambient light dimming (if equipped), interior
lights, and front and rear fog lights (if
equipped).
From the O (off) position, rotating the head
-
light switch counterclockwise to the first
detent will turn on the vehicle’s parking
lights. This feature will allow one side of the
vehicle parking lights to illuminate when the
vehicle is locked depending on the position
of the multifunction lever. Rotate the head -
light switch clockwise from the O (off) posi -
tion to the first detent for headlight and
instrument panel light operation.Daytime Running Lights (DRLs) — If
Equipped
The Daytime Running Lights will turn on
when the engine is started and remain on
unless the headlamps are turned on, the
parking brake is applied, or the ignition is
placed in the OFF position.
NOTE:
If allowed by law in the country in which the
vehicle was purchased, the Daytime Running
Lights can be turned on and off using the
Uconnect system.
Refer to “Uconnect Settings” in “Multi -
media” in the Owner’s Manual for further
information.1 — Instrument Panel Dimmer Control
2 — Ambient Light Dimmer Control
3 — Headlight Control Switch
4 — Front Fog Lights
5 — Rear Fog Lights
2020_JEEP_CHEROKEE_UG_RHD_UK.book Page 30
Page 33 of 332
31
High/Low Beam Switch
Push the multifunction lever, located on the
left side of the steering wheel, away from you
to switch the headlights to high beam. Pull
the multifunction lever toward you to switch
the headlights back to low beam.
Automatic High Beam Headlamp Control —
If Equipped
The Automatic High Beam Headlamp Control
system provides increased forward lighting at
night by automating high beam control
through the use of a digital camera mounted
on the windshield. This camera detects
vehicle specific light and automatically
switches from high beams to low beams until
the approaching vehicle is out of view.
NOTE:
The multifunction lever must be in the
high beam position in order to activate the
Automatic High Beams.
The Automatic High Beam Headlamp
Control can be turned on or off using the
Uconnect System. Refer to “Uconnect
Settings” in “Multimedia” in your Owner’s
Manual for further information.When set to AUTO, the system automatically
turns the headlights on or off based on
ambient light levels.
Flash-To-Pass
You can signal another vehicle with your
headlights by lightly pulling the multifunc
-
tion lever toward you. This will cause the
high beam headlights to turn on, and remain
on, until the lever is released.
Automatic Headlights — If Equipped
This system automatically turns the head -
lights on or off according to ambient light
levels. To turn the system on, rotate the
headlight switch clockwise to the last detent
(AUTO position) for automatic headlight
operation. When the system is on, the head -
light time delay feature is also on. This
means the headlights will stay on for up to
90 seconds after the ignition is placed in the
OFF position. To turn the automatic system
off, move the headlight switch out of the
AUTO position.
NOTE:
The engine must be running before the head -
lights will come on in the automatic mode.
Parking Lights
To operate the parking lights, the ignition
must be in the OFF position. Turn the head -
light switch to the “P” position. Then move
the multifunction lever up or down to turn on
the left or right side parking lights.
Headlights On With Wipers (Available
With Automatic Headlights Only)
When this feature is active, the headlights
will turn on after the wipers are turned on if
the headlight switch is placed in the AUTO
position and programmable feature is set to
ON. In addition, the headlights will turn off
when the wipers are turned off if they were
turned on by this feature.
NOTE:
The Headlights On with Wipers feature can
be turned on or off using the Uconnect
System.
Refer to “Uconnect Settings” in “Multi -
media” in the Owner’s Manual for further
information.
2020_JEEP_CHEROKEE_UG_RHD_UK.book Page 31
Page 34 of 332
GETTING TO KNOW YOUR VEHICLE
32
Adaptive Bi-Xenon High Intensity
Discharge Headlights — If Equipped
This system automatically swivels the head-
light beam pattern horizontally to provide
increased illumination in the direction the
vehicle is steering.
NOTE:
Each time the Adaptive Headlight system is
turned on, the headlights will initialize by
performing a brief sequence of rotations.
The Adaptive Headlight System is active
only when the vehicle is moving forward.
The Adaptive Headlight system can be
turned on or off using the Uconnect System,
refer to “Uconnect Settings” in “Multi -
media” in the Owner’s Manual for further
information.
Headlight Time Delay
This feature provides the safety of headlight illu -
mination for up to 90 seconds (programmable)
when leaving your vehicle in an unlit area.
To activate the delay feature, place the igni -
tion in the OFF position while the headlights
are still on. Then, turn off the headlights
within 45 seconds. The delay interval begins
when the headlight switch is turned off. NOTE:
The headlight delay feature is automatically
activated if the customer leaves the head
-
light switch in the AUTO position while the
ignition is placed in the OFF position.
If you turn the headlights or parking lights
on, or place the ignition in ACC or RUN, the
system will cancel the delay.
If you turn the headlights off before the igni -
tion, they will turn off in the normal manner.
NOTE:
The lights must be turned off within 45
seconds of placing the ignition in the OFF
position to activate this feature.
The headlight delay time is programmable
using the Uconnect System, refer to “Uconnect
Settings” in “Multimedia” in the Owner’s
Manual for further information.
Lights-On Reminder
If the headlights or parking lights are on after
the ignition is placed in the OFF position, a
chime will sound to alert the driver when the
driver's door is opened.
Front And Rear Fog Lights — If Equipped
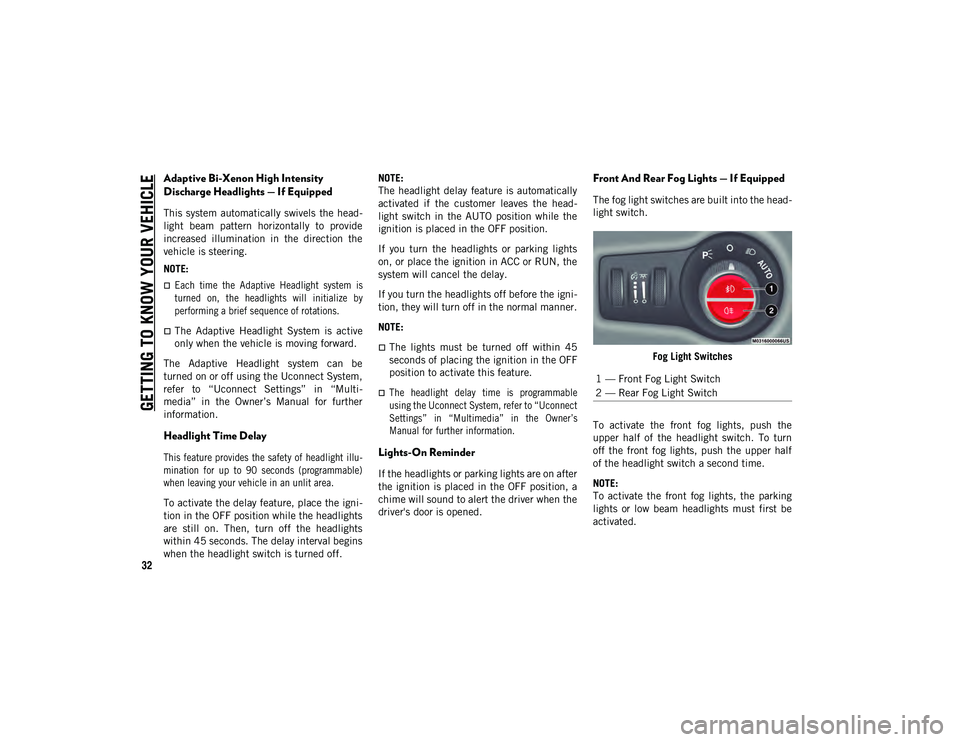
The fog light switches are built into the head -
light switch.
Fog Light Switches
To activate the front fog lights, push the
upper half of the headlight switch. To turn
off the front fog lights, push the upper half
of the headlight switch a second time.
NOTE:
To activate the front fog lights, the parking
lights or low beam headlights must first be
activated. 1 — Front Fog Light Switch
2 — Rear Fog Light Switch
2020_JEEP_CHEROKEE_UG_RHD_UK.book Page 32