ECO mode JEEP CHEROKEE 2021 Owner handbook (in English)
[x] Cancel search | Manufacturer: JEEP, Model Year: 2021, Model line: CHEROKEE, Model: JEEP CHEROKEE 2021Pages: 332, PDF Size: 8.87 MB
Page 10 of 332
8
OCCUPANT RESTRAINT SYSTEMS .......... 98
Occupant Restraint Systems
Features ....................................... 98 Important Safety Precautions ........... 98
Seat Belt Systems ......................... 99
Supplemental Restraint
Systems (SRS) ............................. 108 Child Restraints — Carrying Children
Safely.......................................... 118 Transporting Pets ........................ 134
SAFETY TIPS ...................................... 134
Transporting Passengers ................ 134
Exhaust Gas ................................. 135
Safety Checks You Should Make
Inside The Vehicle ....................... 135 Periodic Safety Checks You Should
Make Outside The Vehicle ............. 137
STARTING AND OPERATING
STARTING THE ENGINE ........................ 138
Normal Starting —
Gasoline Engine ........................... 138 Normal Starting — Diesel Engine ... 139
ENGINE BREAK-IN
RECOMMENDATIONS ............................ 140PARKING BRAKE .................................. 141
Electric Park Brake (EPB) ............. 141
MANUAL TRANSMISSION —
IF EQUIPPED .......................................143
Shifting ....................................... 143
Downshifting ............................... 144
AUTOMATIC TRANSMISSION —
IF EQUIPPED ........................................146
Key Ignition Park Interlock ............ 147
Brake/Transmission Shift Interlock
System ........................................ 147 Nine-Speed Automatic
Transmission ............................... 147 Gear Ranges ................................ 148
FOUR-WHEEL DRIVE OPERATION ...........150
1-Speed Four-Wheel Drive (4X4) —
If Equipped ................................. 150 2-Speed Four-Wheel Drive (4x4) —
If Equipped ................................. 150 Shift Positions ............................. 151
Shifting Procedures ...................... 151
Rear Electronic Locker (E-Locker)
System — If Equipped.................. 152
SELEC-TERRAIN ...................................153
Description .................................. 153
STOP/START SYSTEM...........................154
Automatic Mode ...........................154
Possible Reasons The Engine Does
Not Autostop ................................154 To Start The Engine While In
Autostop Mode .............................155 To Manually Turn Off The Stop/Start
System ........................................156 To Manually Turn On The Stop/Start
System ........................................156
STOP/START SYSTEM — DIESEL MODELS
ONLY...................................................156
Automatic Mode ...........................156
Possible Reasons The Engine Does
Not Autostop ................................157 To Start The Engine While In
Autostop Mode .............................157 To Manually Turn Off The Stop/Start
System ........................................158 To Manually Turn On The Stop/Start
System ........................................158 System Malfunction ......................158
ACTIVE SPEED LIMITER —
IF EQUIPPED ........................................159
Activation.....................................159
Exceeding The Set Speed ..............159
Deactivation .................................159
2020_JEEP_CHEROKEE_UG_RHD_UK.book Page 8
Page 12 of 332
10
IF YOUR ENGINE OVERHEATS ............... 212
GEAR SELECTOR OVERRIDE .................. 213FREEING A STUCK VEHICLE .................. 214TOWING A DISABLED VEHICLE ............. 215
Without The Key Fob .................... 216
Front-Wheel Drive (FWD) Models .... 216
4x4 Models .................................. 216
Recovery Strap — If Equipped ....... 217
ENHANCED ACCIDENT RESPONSE
SYSTEM (EARS) .................................. 217
EVENT DATA RECORDER (EDR) .............. 217
SERVICING AND MAINTENANCE
SCHEDULED SERVICING ....................... 218
Scheduled Servicing —
Gasoline Engine .......................... 218 Scheduled Servicing —
Diesel Engine ............................... 224
ENGINE COMPARTMENT ....................... 229
2.0L Engine ................................ 229
2.4L Engine ................................ 230
3.2L Engine ................................ 231
2.2L Diesel Engine ...................... 232
Checking Oil Level ........................ 233
Cooling System ............................ 234
Adding Washer Fluid .................... 234
Brake System .............................. 234 Manual Transmission —
If Equipped ................................. 236 Automatic Transmission —
If Equipped ................................. 236 Maintenance-Free Battery ............ 236
Pressure Washing ......................... 237
DEALER SERVICE ................................237
Windshield Wiper Blades ............. 237
RAISING THE VEHICLE ..........................241
TIRES .................................................241
Tires — General Information ........ 241
Tire Types ................................... 246
Spare Tires — If Equipped ........... 246
Wheel And Wheel Trim Care ......... 248
Tire Chains And Traction
Devices ...................................... 249 Tire Rotation Recommendations .... 250
STORING THE VEHICLE .........................251BODYWORK .........................................252
Preserving The Bodywork .............. 252
INTERIORS .........................................253
Seats And Fabric Parts ................. 253
Plastic And Coated Parts............... 254
Leather Parts ............................... 254
Glass Surfaces ............................ 254
TECHNICAL SPECIFICATIONS
VEHICLE IDENTIFICATION NUMBER........255BRAKE SYSTEM ...................................255
WHEEL AND TIRE TORQUE
SPECIFICATIONS ..................................256
Torque Specifications ....................256
WHEELS ..............................................256
WEIGHTS.............................................256
FUEL REQUIREMENTS —
GASOLINE ENGINES ..............................257
2.0L Engine .................................257
2.4L And 3.2L Engines .................257
Materials Added To Fuel ................257
Fuel Icon Identification Compliant
To EN16942 ................................257
FUEL REQUIREMENTS —
DIESEL ENGINE ....................................259
Fuel Icon Identification Compliant
To EN16942 ................................259
FLUID CAPACITIES ..............................261
FLUIDS AND LUBRICANTS .....................262
Engine .........................................262
Chassis ........................................265
FUEL CONSUMPTION AND
CO
2 EMISSIONS ..................................266
MOPAR ACCESSORIES .........................266
Authentic Accessories By Mopar .....266
2020_JEEP_CHEROKEE_UG_RHD_UK.book Page 10
Page 16 of 332
GETTING TO KNOW YOUR VEHICLE
14
In this situation, a back up method can be
used to operate the ignition switch. Put the
nose side (side opposite of the emergency
key) of the key fob against the START/STOP
ignition button and push to operate the igni-
tion switch.
NOTE:
Improper disposal of key fob batteries may
be harmful to the environment. Please see an
authorized dealer for proper battery disposal.
To Unlock The Doors And Liftgate
Push and release the unlock button on the
key fob once to unlock the driver's door or
twice within five seconds to unlock all doors
and the liftgate.
All doors can be programmed to unlock on
the first push of the unlock button. Refer to
“Uconnect Settings” in “Multimedia” in the
Owner’s Manual for further information.
NOTE:
If the vehicle is unlocked using the interior
door panel, and no door is opened within 60
seconds, the vehicle will re-lock and if
equipped, the security alarm will arm. To
change the current setting, refer to "Ucon -
nect Settings" in "Multimedia" in the Owner’s
Manual for further information. This feature lets you program the system to
unlock either the driver's door or all doors on
the first push of the unlock button on the key
fob. To change the current setting, refer to
“Uconnect Settings” in “Multimedia” in the
Owner’s Manual for further information.
NOTE:
If the vehicle is equipped with Passive Entry,
refer to “Keyless Enter-N-Go — Passive
Entry” located in “Doors” in this chapter for
further information.To Lock The Doors And Liftgate
Push and release the lock button on the key
fob to lock all doors and liftgate.
The turn signal lights will flash and the horn
will chirp to acknowledge the signal. Refer to
“Uconnect Settings” located in “Multi
-
media” in the Owner’s Manual for further
programmable information.
If the vehicle is equipped with Passive Entry,
refer to “Keyless Enter-N-Go — Passive
Entry” located in “Doors” in this chapter for
further information. Vehicles Equipped With Keyless Enter-N-Go —
Passive Entry
If one or more doors are open, or the liftgate
is open, the doors will lock. The doors will
unlock again automatically if the key fob is
left inside the passenger compartment,
otherwise the doors will stay locked.
Request For Additional Key Fobs
NOTE:
Only key fobs that are programmed to the
vehicle electronics can be used to start and
operate the vehicle. Once a key fob is
programmed to a vehicle, it cannot be
programmed to any other vehicle.
WARNING!
Always remove the key fobs from the
vehicle and lock all doors when leaving
the vehicle unattended.
For vehicles equipped with Keyless
Enter-N-Go — Ignition, always remember to
place the ignition in the OFF mode.
2020_JEEP_CHEROKEE_UG_RHD_UK.book Page 14
Page 19 of 332
17
REMOTE STARTING
SYSTEM — IF EQUIPPED
Push the remote start button on the key fob
twice within five seconds. Pushing the
remote start button a third time shuts the
engine off.
To drive the vehicle, push the START/STOP igni-
tion button to cycle the ignition to ON/RUN.
NOTE:
With remote start, the engine will only run
for 15 minutes (timeout) unless the igni -
tion is placed in the ON/RUN position.
The vehicle must be manually started with
the key fob after two consecutive time-
outs.
How To Use Remote Start
Push the remote start button on the key fob
twice within five seconds. Pushing the
remote start button a third time shuts the
engine off.
To drive the vehicle, push the unlock button,
insert the key in the ignition and turn to the
ON/RUN position. All of the following conditions must be met
before the engine will remote start:
Gear selector in PARK
Doors closed
Hood closed
Liftgate closed
Hazard switch off
Brake switch inactive (brake pedal not
pushed)
Battery at an acceptable charge level
Check engine light shall not be present
System not disabled from previous remote
start event
Vehicle alarm system indicator flashing
Ignition in STOP/OFF position
Fuel level meets minimum requirement
Vehicle security alarm is not signaling an
intrusion
To Enter Remote Start Mode
Push and release the remote start button on
the key fob twice within five seconds. The
vehicle doors will lock, the parking lights will
flash, and the horn will chirp twice (if
programmed). Then, the engine will start,
and the vehicle will remain in the Remote
Start mode for a 15 minute cycle.
NOTE:
If an engine fault is present or fuel level is
low, the vehicle will start and then shut
down in 10 seconds.
The park lamps will turn on and remain on
during Remote Start mode.
WARNING!
Do not start or run an engine in a closed
garage or confined area. Exhaust gas
contains Carbon Monoxide (CO) which is
odorless and colorless. Carbon Monoxide
is poisonous and can cause serious
injury or death when inhaled.
Keep key fobs away from children. Oper
-
ation of the Remote Start System,
windows, door locks or other controls
could cause serious injury or death.
2020_JEEP_CHEROKEE_UG_RHD_UK.book Page 17
Page 26 of 332
GETTING TO KNOW YOUR VEHICLE
24
3. Push and release the set (S) button onthe memory switch, then within five
seconds push and release the button
labeled (1) or (2) accordingly. “Memory
Profile Set” (1 or 2) will display in the
instrument cluster display.
4. Push and release the lock button on the key fob within 10 seconds.
NOTE:
Your key fob can be unlinked to your memory
settings by pushing the set (S) button,
followed by pushing the unlock button on the
key fob within 10 seconds.
Memory Position Recall
To recall the memory settings for driver one,
push memory button (1) or the unlock button
on the key fob linked to memory position 1.
To recall the memory settings for driver two,
push memory button (2) or the unlock button
on the key fob linked to memory position 2.
A recall can be cancelled by pushing any of the
memory buttons (S, 1, or 2) during a recall.
When a recall is cancelled, the driver seat will
stop moving. A delay of one second will occur
before another recall can be selected.
Easy Entry/Exit Seat — If Equipped
This feature provides automatic driver seat
positioning to enhance driver mobility when
entering and exiting the vehicle.
The distance the driver seat moves depends
on where you have the driver seat positioned
when you place the vehicle’s ignition in the
OFF position.
Each stored memory setting will have an
associated Easy Entry and Easy Exit position.
NOTE:
The Easy Entry/Exit feature is not enabled
when the vehicle is delivered from the
factory. The Easy Entry/Exit feature is
enabled (or later disabled) through the
programmable features in the Uconnect
system.
Refer to “Uconnect Settings” in “Multi -
media” in the Owner’s Manual for further
information.
Heated Seats
On some models, the front and rear seats
may be equipped with heaters located in the
seat cushions and seat backs.
WARNING!
Persons who are unable to feel pain to
the skin because of advanced age,
chronic illness, diabetes, spinal cord
injury, medication, alcohol use, exhaus-
tion or other physical condition must
exercise care when using the seat heater.
It may cause burns even at low tempera-
tures, especially if used for long periods
of time.
Do not place anything on the seat or
seatback that insulates against heat,
such as a blanket or cushion. This may
cause the seat heater to overheat. Sitting
in a seat that has been overheated could
cause serious burns due to the increased
surface temperature of the seat.
2020_JEEP_CHEROKEE_UG_RHD_UK.book Page 24
Page 27 of 332
25
Front Heated Seats — If Equipped
If your vehicle is equipped with front heated
seats, the control buttons are located within
the Uconnect system. You can gain access to
the control buttons through the climate
screen or the controls screen.
Press the heated seat button once to
turn the HI setting on.
Press the heated seat button a second
time to turn the LO setting on.
Press the heated seat button a third
time to turn the heating elements off.
The level of heat selected will stay on until
changed by the operator.
NOTE:
The engine must be running for the heated
seats to operate.
Vehicles Equipped With Remote Start
On models that are equipped with remote start,
the driver’s heated seat can be programmed to
come on during a remote start.
This feature can be programmed through the
Uconnect system. Refer to “Uconnect Settings”
in “Multimedia” in the Owner's Manual.
Rear Heated Seats — If Equipped
On some models, the two outboard rear seats
are equipped with heated seats. The heated
seat switches for these seats are located on
the rear of the center console.
There are two heated seat switches that allow
the rear passengers to operate the seats
independently. Amber indicator lights in
each switch indicate the level of heat in use. Two indicator lights will illuminate for HI,
one for LO and none for off.
Push the heated seat button once to
turn the HI setting on.
Push the heated seat button a second
time to turn the LO setting on.
Push the heated seat button a third
time to turn the heating elements off.
NOTE:
Once a heat setting is selected, heat will
be felt within two to five minutes.
The engine must be running for the heated
seats to operate.
When the HI-level setting is selected, the
heater will provide a boosted heat level
during the first four minutes of operation.
Then, the heat output will drop to the normal
HI-level. The level of heat selected will stay
on until changed by the operator.
Front Ventilated Seats — If Equipped
If your vehicle is equipped with ventilated
seats, the seat cushion and seat back will
have fans that draw the air from the
passenger compartment and move air
through fine perforations in the seat cover to
WARNING!
Persons who are unable to feel pain to
the skin because of advanced age,
chronic illness, diabetes, spinal cord
injury, medication, alcohol use, exhaus-
tion or other physical condition must
exercise care when using the seat heater.
It may cause burns even at low tempera-
tures, especially if used for long periods
of time.
Do not place anything on the seat or
seatback that insulates against heat,
such as a blanket or cushion. This may
cause the seat heater to overheat. Sitting
in a seat that has been overheated could
cause serious burns due to the increased
surface temperature of the seat.
2020_JEEP_CHEROKEE_UG_RHD_UK.book Page 25
Page 28 of 332
GETTING TO KNOW YOUR VEHICLE
26
help keep the driver and front passenger
cooler in higher ambient temperatures. The
fans operate at two speeds, HI and LO.
The front ventilated seats control buttons are
located within the Uconnect system. You can
gain access to the control buttons through
the climate screen or the controls screen.
Press the ventilated seat button once to
choose HI.
Press the ventilated seat button a
second time to choose LO.
Press the ventilated seat button a third
time to turn the ventilated seat off.
NOTE:
The engine must be running for the venti -
lated seats to operate.
Vehicles Equipped With Remote Start
On models that are equipped with remote
start, the driver’s ventilated seat can be
programmed to come on during a remote
start.
This feature can be programmed through the
Uconnect system. Refer to “Uconnect
Settings” in “Multimedia” in the Owner's
Manual.
HEAD RESTRAINTS
Head restraints are designed to reduce the
risk of injury by restricting head movement in
the event of a rear impact. Head restraints
should be adjusted so that the top of the
head restraint is located above the top of
your ear.
NOTE:
Do not reverse the head restraints (making
the rear of the head restraint face forward) in
an attempt to gain additional clearance to
the back of your head.
Reactive Head Restraints — Front Seats
The front driver and passenger seats are
equipped with Reactive Head Restraints
(RHR). In the event of a rear impact, the
RHRs will automatically extend forward
minimizing the gap between the back of the
occupant’s head and the RHR.
The RHRs will automatically return to their
normal position following a rear impact. If
the RHRs do not return to their normal posi -
tion, see your authorized dealer immediately.
To raise the head restraint, pull upward on
the head restraint. To lower the head
restraint, push the adjustment button,
located at the base of the head restraint, and
push downward on the head restraint.
NOTE:
To remove the head restraint, raise it as far
as it can go. Then, push the release button
and the adjustment button at the base of
each post while pulling the head restraint up.
Seatback angle may need to be adjusted to
fully remove the head restraint. To reinstall
the head restraint, put the head restraint
posts into the holes and push downward.
Then adjust the head restraint to the appro -
priate height.
WARNING!
All occupants, including the driver,
should not operate a vehicle or sit in a
vehicle’s seat until the head restraints
are placed in their proper positions in
order to minimize the risk of neck injury
in the event of a crash.
Head restraints should never be adjusted
while the vehicle is in motion. Driving a
vehicle with the head restraints improp -
erly adjusted or removed could cause
serious injury or death in the event of a
collision.
2020_JEEP_CHEROKEE_UG_RHD_UK.book Page 26
Page 31 of 332
29
The heated steering wheel control button is
located within the Uconnect system. You can
gain access to the control button through the
climate screen or the controls screen.
Press the heated steering wheel button
once to turn the heating element on.
Press the heated steering wheel button
a second time to turn the heating element
off.
NOTE:
The engine must be running for the heated
steering wheel to operate.
Vehicles Equipped With Remote Start
On models that are equipped with remote
start, the heated steering wheel can be
programmed to come on during a remote
start through the Uconnect system. Refer to
“Uconnect Settings” in “Multimedia” in the
Owner’s Manual for further information.
MIRRORS
Power Folding Mirrors — If Equipped
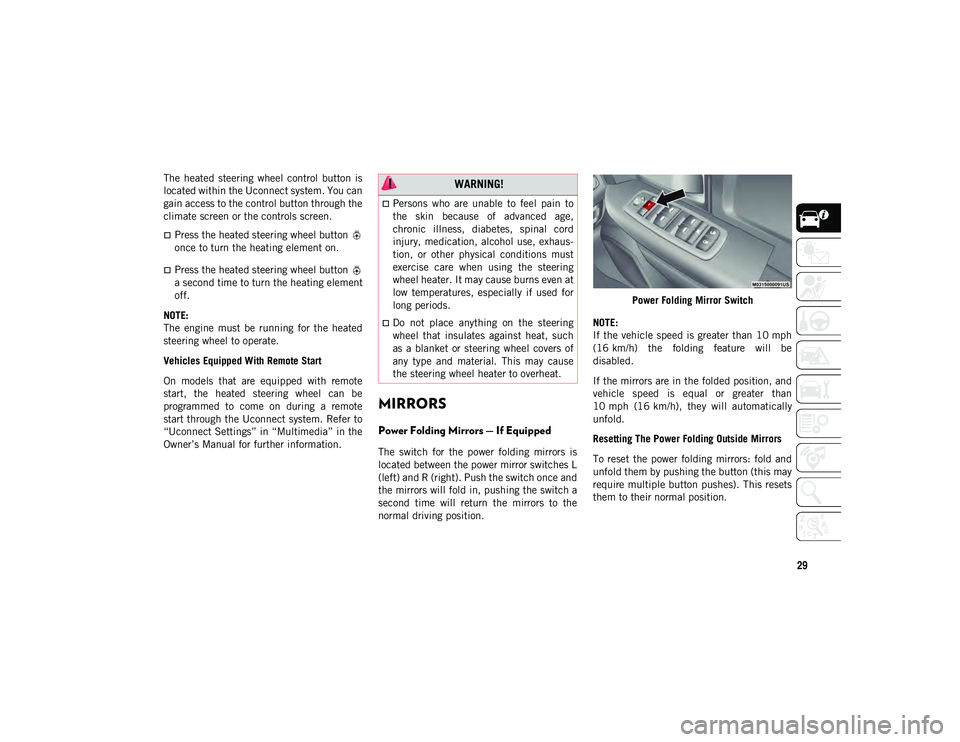
The switch for the power folding mirrors is
located between the power mirror switches L
(left) and R (right). Push the switch once and
the mirrors will fold in, pushing the switch a
second time will return the mirrors to the
normal driving position. Power Folding Mirror Switch
NOTE:
If the vehicle speed is greater than 10 mph
(16 km/h) the folding feature will be
disabled.
If the mirrors are in the folded position, and
vehicle speed is equal or greater than
10 mph (16 km/h), they will automatically
unfold.
Resetting The Power Folding Outside Mirrors
To reset the power folding mirrors: fold and
unfold them by pushing the button (this may
require multiple button pushes). This resets
them to their normal position.
WARNING!
Persons who are unable to feel pain to
the skin because of advanced age,
chronic illness, diabetes, spinal cord
injury, medication, alcohol use, exhaus-
tion, or other physical conditions must
exercise care when using the steering
wheel heater. It may cause burns even at
low temperatures, especially if used for
long periods.
Do not place anything on the steering
wheel that insulates against heat, such
as a blanket or steering wheel covers of
any type and material. This may cause
the steering wheel heater to overheat.
2020_JEEP_CHEROKEE_UG_RHD_UK.book Page 29
Page 33 of 332
31
High/Low Beam Switch
Push the multifunction lever, located on the
left side of the steering wheel, away from you
to switch the headlights to high beam. Pull
the multifunction lever toward you to switch
the headlights back to low beam.
Automatic High Beam Headlamp Control —
If Equipped
The Automatic High Beam Headlamp Control
system provides increased forward lighting at
night by automating high beam control
through the use of a digital camera mounted
on the windshield. This camera detects
vehicle specific light and automatically
switches from high beams to low beams until
the approaching vehicle is out of view.
NOTE:
The multifunction lever must be in the
high beam position in order to activate the
Automatic High Beams.
The Automatic High Beam Headlamp
Control can be turned on or off using the
Uconnect System. Refer to “Uconnect
Settings” in “Multimedia” in your Owner’s
Manual for further information.When set to AUTO, the system automatically
turns the headlights on or off based on
ambient light levels.
Flash-To-Pass
You can signal another vehicle with your
headlights by lightly pulling the multifunc
-
tion lever toward you. This will cause the
high beam headlights to turn on, and remain
on, until the lever is released.
Automatic Headlights — If Equipped
This system automatically turns the head -
lights on or off according to ambient light
levels. To turn the system on, rotate the
headlight switch clockwise to the last detent
(AUTO position) for automatic headlight
operation. When the system is on, the head -
light time delay feature is also on. This
means the headlights will stay on for up to
90 seconds after the ignition is placed in the
OFF position. To turn the automatic system
off, move the headlight switch out of the
AUTO position.
NOTE:
The engine must be running before the head -
lights will come on in the automatic mode.
Parking Lights
To operate the parking lights, the ignition
must be in the OFF position. Turn the head -
light switch to the “P” position. Then move
the multifunction lever up or down to turn on
the left or right side parking lights.
Headlights On With Wipers (Available
With Automatic Headlights Only)
When this feature is active, the headlights
will turn on after the wipers are turned on if
the headlight switch is placed in the AUTO
position and programmable feature is set to
ON. In addition, the headlights will turn off
when the wipers are turned off if they were
turned on by this feature.
NOTE:
The Headlights On with Wipers feature can
be turned on or off using the Uconnect
System.
Refer to “Uconnect Settings” in “Multi -
media” in the Owner’s Manual for further
information.
2020_JEEP_CHEROKEE_UG_RHD_UK.book Page 31
Page 35 of 332
33
To activate the rear fog lights, push the lower
half of the headlight switch. To turn off the
rear fog lights, push the lower half of the
headlight switch a second time.
NOTE:
To turn on the rear fog lights, the low beam
headlights or front fog lights must first be
active. If the vehicle is only equipped with
rear fog lights, only a single button will be
available in the center of the headlight
switch. Push once to turn the rear fog lights
on, and a second time to turn them off.
An indicator light in the instrument cluster illu-
minates when the fog lights are turned on.
Turn Signals
Move the multifunction lever up or down and
the arrows on each side of the instrument
cluster display will flash to show proper oper -
ation of the front and rear turn signal lights.
NOTE:
If either light remains on and does not
flash, or there is a very fast flash rate,
check for a defective LED turn signal in
the headlamp. Please see an authorized
dealer for service.
When the Daytime Running Lights are on
and a turn signal is activated, the Daytime
Running Lamp will turn off on the side of
the vehicle in which the turn signal is
flashing. The Daytime Running Lamp will
turn back on when the turn signal is
turned off.
Automatic Headlight Leveling — HID
Headlights Only
This feature prevents the headlights from
interfering with the vision of oncoming
drivers. Headlight leveling automatically
adjusts the height of the headlight beam in
reaction to changes in vehicle pitch.
Battery Saver
To protect the life of your vehicle’s battery,
load shedding is provided for both the inte -
rior and exterior lights.
If the ignition is OFF and any door is left ajar
for 10 minutes or the dimmer control is
rotated all the way up to the dome on posi -
tion for 10 minutes, the interior lights will
automatically turn off. NOTE:
Battery saver mode is canceled if the ignition
is ON.
If the headlights remain on while the ignition
is placed in the OFF position, the exterior
lights will automatically turn off after eight
minutes. If the headlights are turned on and
left on for eight minutes while the ignition is
OFF, the exterior lights will automatically
turn off.
NOTE:
The battery saver mode is canceled if the
ignition is OFF and the headlamp switch is in
the park lamp position. The parking lamps
will remain on and drain the vehicle's
battery.
2020_JEEP_CHEROKEE_UG_RHD_UK.book Page 33