display JEEP CHEROKEE 2023 Repair Manual
[x] Cancel search | Manufacturer: JEEP, Model Year: 2023, Model line: CHEROKEE, Model: JEEP CHEROKEE 2023Pages: 276, PDF Size: 12.55 MB
Page 138 of 276
136MULTIMEDIA
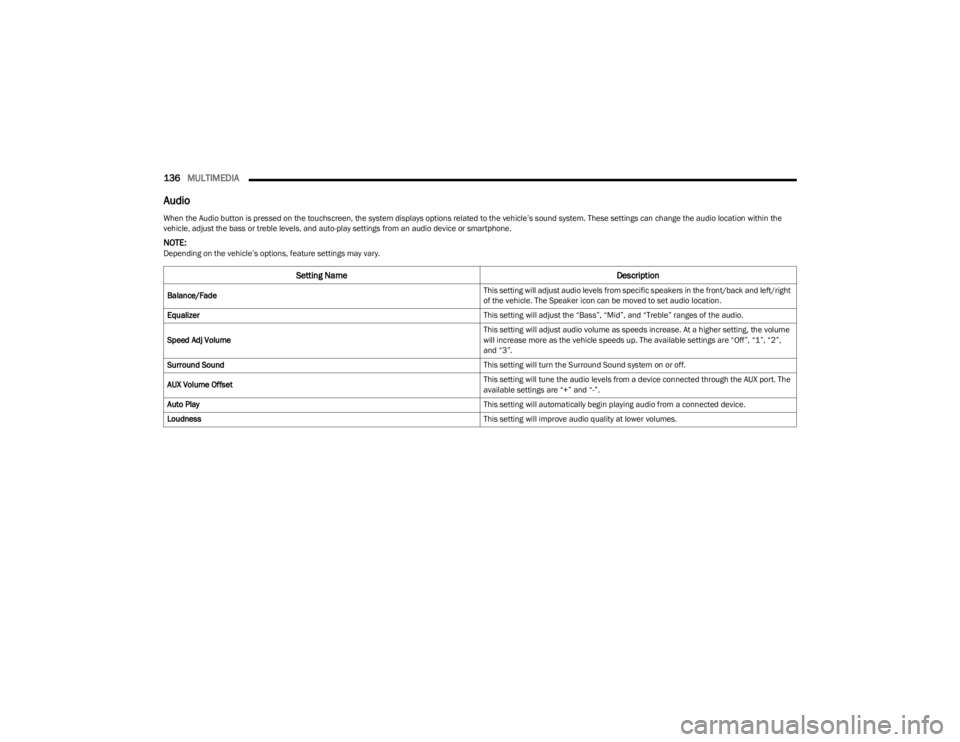
Audio
When the Audio button is pressed on the touchscreen, the system displays options related to the vehicle’s sound system. These settings can change the audio location within the
vehicle, adjust the bass or treble levels, and auto-play settings from an audio device or smartphone.
NOTE:Depending on the vehicle’s options, feature settings may vary.
Setting Name Description
Balance/Fade This setting will adjust audio levels from specific speakers in the front/back and left/right
of the vehicle. The Speaker icon can be moved to set audio location.
Equalizer This setting will adjust the “Bass”, “Mid”, and “Treble” ranges of the audio.
Speed Adj Volume This setting will adjust audio volume as speeds increase. At a higher setting, the volume
will increase more as the vehicle speeds up. The available settings are “Off”, “1”, “2”,
and “3”.
Surround Sound This setting will turn the Surround Sound system on or off.
AUX Volume Offset This setting will tune the audio levels from a device connected through the AUX port. The
available settings are “+” and “-”.
Auto Play This setting will automatically begin playing audio from a connected device.
Loudness This setting will improve audio quality at lower volumes.
23_KL_OM_EN_USC_t.book Page 136
Page 139 of 276
MULTIMEDIA137
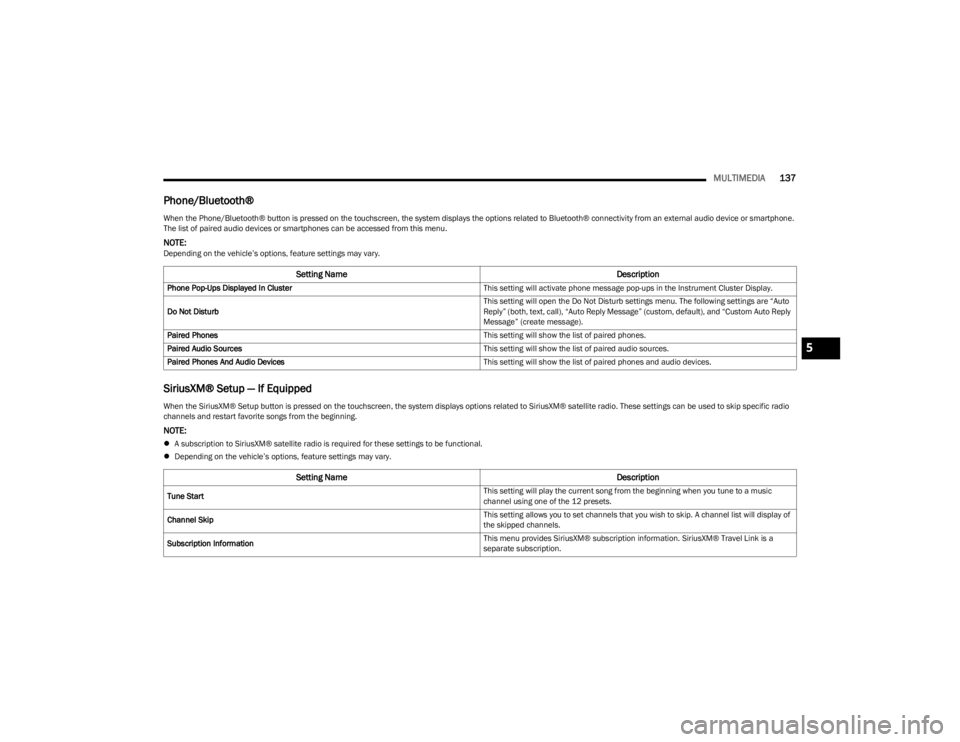
Phone/Bluetooth®
SiriusXM® Setup — If Equipped
When the Phone/Bluetooth® button is pressed on the touchscreen, the system displays the options related to Bluetooth® connectivity from an external audio device or smartphone.
The list of paired audio devices or smartphones can be accessed from this menu.
NOTE:Depending on the vehicle’s options, feature settings may vary.
Setting Name Description
Phone Pop-Ups Displayed In Cluster This setting will activate phone message pop-ups in the Instrument Cluster Display.
Do Not Disturb This setting will open the Do Not Disturb settings menu. The following settings are “Auto
Reply” (both, text, call), “Auto Reply Message” (custom, default), and “Custom Auto Reply
Message” (create message).
Paired Phones This setting will show the list of paired phones.
Paired Audio Sources This setting will show the list of paired audio sources.
Paired Phones And Audio Devices This setting will show the list of paired phones and audio devices.
When the SiriusXM® Setup button is pressed on the touchscreen, the system displays options related to SiriusXM® satellite radio. These settings can be used to skip specific radio
channels and restart favorite songs from the beginning.
NOTE:
A subscription to SiriusXM® satellite radio is required for these settings to be functional.
Depending on the vehicle’s options, feature settings may vary.
Setting Name Description
Tune Start This setting will play the current song from the beginning when you tune to a music
channel using one of the 12 presets.
Channel Skip This setting allows you to set channels that you wish to skip. A channel list will display of
the skipped channels.
Subscription Information This menu provides SiriusXM® subscription information. SiriusXM® Travel Link is a
separate subscription.
5
23_KL_OM_EN_USC_t.book Page 137
Page 140 of 276
138MULTIMEDIA
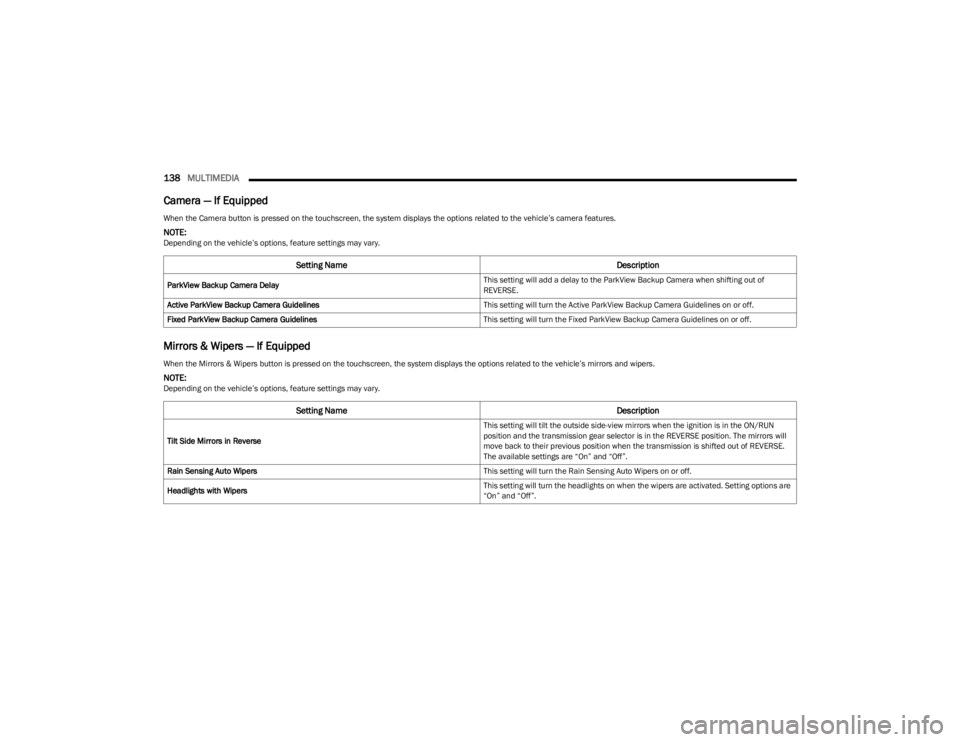
Camera — If Equipped
Mirrors & Wipers — If Equipped
When the Camera button is pressed on the touchscreen, the system displays the options related to the vehicle’s camera features.
NOTE:Depending on the vehicle’s options, feature settings may vary.
Setting Name Description
ParkView Backup Camera Delay This setting will add a delay to the ParkView Backup Camera when shifting out of
REVERSE.
Active ParkView Backup Camera Guidelines This setting will turn the Active ParkView Backup Camera Guidelines on or off.
Fixed ParkView Backup Camera Guidelines This setting will turn the Fixed ParkView Backup Camera Guidelines on or off.
When the Mirrors & Wipers button is pressed on the touchscreen, the system displays the options related to the vehicle’s mirrors and wipers.
NOTE:Depending on the vehicle’s options, feature settings may vary.
Setting NameDescription
Tilt Side Mirrors in Reverse This setting will tilt the outside side-view mirrors when the ignition is in the ON/RUN
position and the transmission gear selector is in the REVERSE position. The mirrors will
move back to their previous position when the transmission is shifted out of REVERSE.
The available settings are “On” and “Off”.
Rain Sensing Auto Wipers This setting will turn the Rain Sensing Auto Wipers on or off.
Headlights with Wipers This setting will turn the headlights on when the wipers are activated. Setting options are
“On” and “Off”.
23_KL_OM_EN_USC_t.book Page 138
Page 141 of 276
MULTIMEDIA139
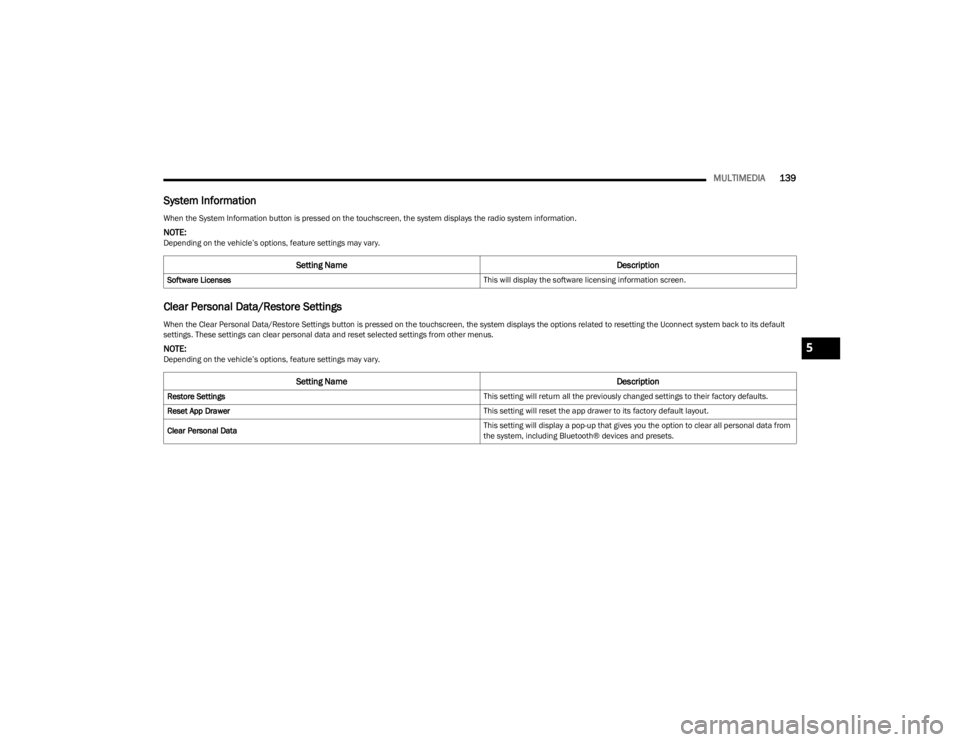
System Information
Clear Personal Data/Restore Settings
When the System Information button is pressed on the touchscreen, the system displays the radio system information.
NOTE:Depending on the vehicle’s options, feature settings may vary.
Setting Name Description
Software Licenses This will display the software licensing information screen.
When the Clear Personal Data/Restore Settings button is pressed on the touchscreen, the system displays the options related to resetting the Uconnect system back to its default
settings. These settings can clear personal data and reset selected settings from other menus.
NOTE:Depending on the vehicle’s options, feature settings may vary.
Setting NameDescription
Restore Settings This setting will return all the previously changed settings to their factory defaults.
Reset App Drawer This setting will reset the app drawer to its factory default layout.
Clear Personal Data This setting will display a pop-up that gives you the option to clear all personal data from
the system, including Bluetooth® devices and presets.
5
23_KL_OM_EN_USC_t.book Page 139
Page 143 of 276
MULTIMEDIA141
OFF-ROAD PAGES — IF EQUIPPED
Your vehicle may be equipped with Off-Road Pages, which
displays vehicle information related to the drivetrain,
transfer case, and coolant/oil gauges.
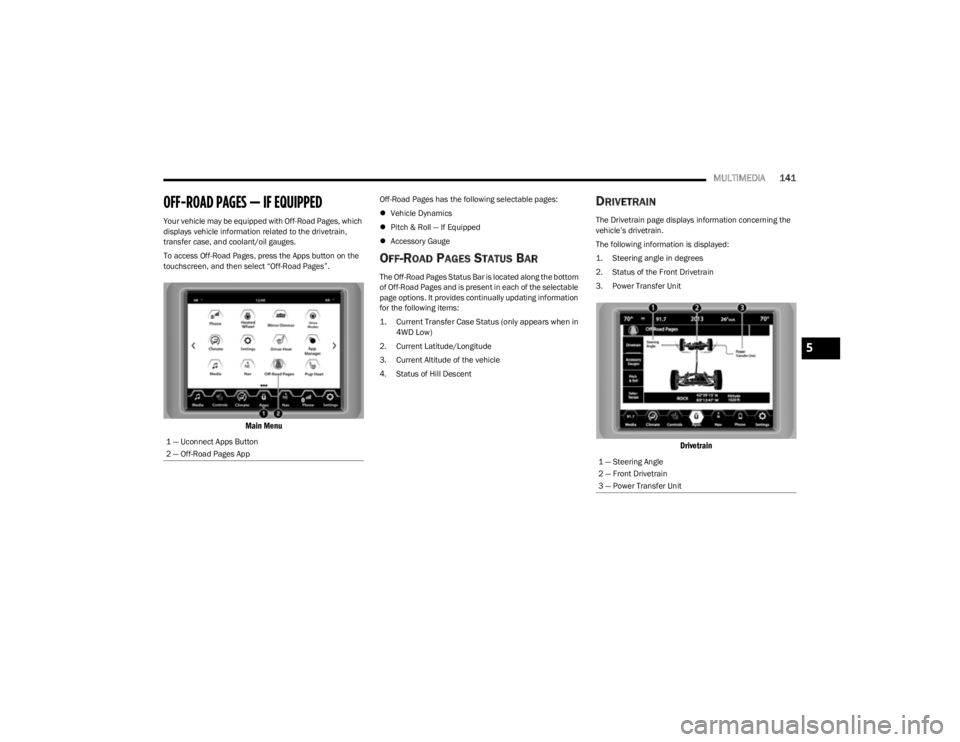
To access Off-Road Pages, press the Apps button on the
touchscreen, and then select “Off-Road Pages”.
Main Menu
Off-Road Pages has the following selectable pages:
Vehicle Dynamics
Pitch & Roll — If Equipped
Accessory Gauge
OFF-ROAD PAGES STATUS BAR
The Off-Road Pages Status Bar is located along the bottom
of Off-Road Pages and is present in each of the selectable
page options. It provides continually updating information
for the following items:
1. Current Transfer Case Status (only appears when in
4WD Low)
2. Current Latitude/Longitude
3. Current Altitude of the vehicle
4. Status of Hill Descent
DRIVETRAIN
The Drivetrain page displays information concerning the
vehicle’s drivetrain.
The following information is displayed:
1. Steering angle in degrees
2. Status of the Front Drivetrain
3. Power Transfer Unit
Drivetrain
1 — Uconnect Apps Button
2 — Off-Road Pages App
1 — Steering Angle
2 — Front Drivetrain
3 — Power Transfer Unit
5
23_KL_OM_EN_USC_t.book Page 141
Page 144 of 276

142MULTIMEDIA
PITCH & ROLL
The Pitch & Roll page displays the vehicle’s current pitch
(angle up and down) and roll (angle side to side) in
degrees. The Pitch & Roll gauges provide a visualization of
the current vehicle angle.
Pitch & Roll Menu
ACCESSORY GAUGES
The Accessory Gauges page displays the current status of
the vehicle’s Coolant Temperature, Oil Temperature,
Transmission Temperature, and Battery Voltage.
Accessory Gauges Menu
SELEC-TERRAIN — IF EQUIPPED
The Selec-Terrain page displays the current Selec-Terrain
mode through a high resolution image. The vehicle must
be in the ON/RUN position to display Selec-Terrain
information.
The selectable modes are as follows:
Auto — Default
Snow
Sand
Mud
Rock — Vehicle Must Be In 4WD Low
NOTE:While in the Selec-Terrain pages, the Off-Road Pages
Status Bar will also display the current Selec-Terrain
mode.
Current Selec-Terrain Mode
1 — Current Pitch
2 — Current Roll
23_KL_OM_EN_USC_t.book Page 142
Page 148 of 276
146SAFETY
(Continued)
Full Off — If Equipped
This mode is intended for off-highway or off-road use only
and should not be used on any public roadways. In this
mode, TCS and ESC features are turned off. To enter the
“Full Off” mode, push and hold the ESC OFF button for five
seconds while the vehicle is stopped with the engine
running. After five seconds, a chime will sound, the ESC
OFF Indicator Light will illuminate, and the ESC OFF
message will display in the instrument cluster. To turn ESC
on again, momentarily push the ESC OFF button.
NOTE:System may switch from ESC “Full Off” to “Partial Off”
mode when vehicle exceeds a predetermined speed.
When the vehicle speed slows below the predetermined
speed the system will return to ESC “Full Off”.
ESC modes may also be affected by drive modes (if
equipped).ESC Activation/Malfunction Indicator Light
And ESC OFF Indicator Light
The ESC Activation/Malfunction Indicator Light
in the instrument cluster will come on when the
ignition is placed in the ON/RUN mode. It
should turn off with the engine running. If the
ESC Activation/Malfunction Indicator Light comes on
continuously with the engine running, a malfunction has
been detected in the ESC system. If this light remains on
after several ignition cycles, and the vehicle has been
driven several miles (kilometers) at speeds greater than
30 mph (48 km/h), see an authorized dealer as soon as possible to have the problem diagnosed and corrected.
The ESC Activation/Malfunction Indicator Light starts to
flash as soon as the tires lose traction and the ESC system
becomes active. The ESC Activation/Malfunction Indicator
Light also flashes when TCS is active. If the ESC
Activation/Malfunction Indicator Light begins to flash
during acceleration, ease up on the accelerator and apply
as little throttle as possible. Be sure to adapt your speed
and driving to the prevailing road conditions. The ESC OFF Indicator Light indicates that the
Electronic Stability Control (ESC) is in a reduced
mode.
NOTE:
The ESC Activation/Malfunction Indicator Light and the
ESC OFF Indicator Light come on momentarily each
time the ignition is placed in the ON position.
Each time the ignition is placed in the ON position, the
ESC system will be on even if it was turned off previ -
ously.
The ESC system will make buzzing or clicking sounds
when it is active. This is normal; the sounds will stop
when ESC becomes inactive following the maneuver
that caused the ESC activation.
Hill Descent Control (HDC) — If Equipped
HDC is intended for low speed off-road driving while in
4WD Low. HDC maintains vehicle speed while descending
hills during various driving situations. HDC controls vehicle
speed by actively controlling the brakes.
HDC Has Three States:
1. Off (feature is not enabled and will not activate).
2. Enabled (feature is enabled and ready but activation
conditions are not met, or driver is actively overriding
with brake or throttle application).
3. Active (feature is enabled and actively controlling vehicle speed).WARNING!
In the ESC “Full Off” mode, the engine torque reduc -
tion and stability features are disabled. Therefore,
enhanced vehicle stability offered by the ESC system
is unavailable. In an emergency evasive maneuver,
the ESC system will not engage to assist in main -
taining stability. ESC “Full Off” mode is intended for
off-highway or off-road use only.
The Electronic Stability Control (ESC) cannot prevent
the natural laws of physics from acting on the
vehicle, nor can it increase the traction afforded by
prevailing road conditions. ESC cannot prevent all
accidents, including those resulting from excessive
speed in turns, driving on very slippery surfaces, or
hydroplaning. ESC also cannot prevent collisions.
WARNING!
23_KL_OM_EN_USC_t.book Page 146
Page 150 of 276
148SAFETY
Hill Start Assist (HSA)
HSA is designed to mitigate roll back from a complete stop
while on an incline. If the driver releases the brake while
stopped on an incline, HSA will continue to hold the brake
pressure for a short period. If the driver does not apply the
throttle before this time expires, the system will release
brake pressure and the vehicle will roll down the hill as
normal.
The following conditions must be met in order for HSA to
activate:
The feature must be enabled.
The vehicle must be stopped.
The parking brake must be off.
The driver door must be closed.
The vehicle must be on a sufficient grade.
The gear selection must match vehicle uphill direction
(i.e., vehicle facing uphill is in forward gear; vehicle
backing uphill is in REVERSE gear).
HSA will work in REVERSE gear and all forward gears.
The system will not activate if the transmission is in
PARK or NEUTRAL.
Disabling And Enabling HSA
This feature can be turned on or turned off. To change the
current setting, proceed as follows:
If disabling HSA using your instrument cluster display
Úpage 63
If disabling HSA using Uconnect Settings
Úpage 126
Towing With HSA
HSA will also provide assistance to mitigate roll back while
towing a trailer.
Rain Brake Support (RBS)
RBS may improve braking performance in wet conditions.
It will periodically apply a small amount of brake pressure
to remove any water buildup on the front brake rotors. It
functions when the windshield wipers are in LO or HI
speed. When RBS is active, there is no notification to the
driver and no driver interaction is required.
WARNING!
There may be situations where the Hill Start Assist
(HSA) will not activate and slight rolling may occur, such
as on minor hills or with a loaded vehicle, or while pull -
ing a trailer. HSA is not a substitute for active driving
involvement. It is always the driver’s responsibility to be
attentive to distance to other vehicles, people, and
objects, and most importantly brake operation to
ensure safe operation of the vehicle under all road con -
ditions. Your complete attention is always required
while driving to maintain safe control of your vehicle.
Failure to follow these warnings can result in a collision
or serious personal injury.
WARNING!
If you use a trailer brake controller with your trailer,
the trailer brakes may be activated and deactivated
with the brake switch. If so, there may not be enough
brake pressure to hold both the vehicle and the
trailer on a hill when the brake pedal is released. In
order to avoid rolling down an incline while resuming
acceleration, manually activate the trailer brake or
apply more vehicle brake pressure prior to releasing
the brake pedal.
HSA is not a parking brake. Always apply the parking
brake fully when exiting your vehicle. Also, be certain
to place the transmission in PARK (P).
Failure to follow these warnings can result in a colli -
sion or serious personal injury.
23_KL_OM_EN_USC_t.book Page 148
Page 156 of 276
154SAFETY
FORWARD COLLISION WARNING (FCW)
W
ITH MITIGATION — IF EQUIPPED
FCW with Mitigation provides the driver with audible
warnings, visual warnings (within the instrument cluster
display), and may apply a haptic warning to warn the driver
when it detects a potential frontal collision. The warnings
are intended to provide the driver with enough time to
react, avoid or mitigate the potential collision.
NOTE:FCW monitors the information from the forward looking
sensors as well as the Electronic Brake Controller (EBC), to
calculate the probability of a forward collision. When the
system determines that a forward collision is probable, the
driver will be provided with audible and visual warnings
and may provide a haptic warning in the form of a brake
jerk.
If the driver does not take action based upon these
progressive warnings, then the system will provide a
limited level of active braking to help slow the vehicle and
mitigate the potential forward collision. If the driver reacts
to the warnings by braking and the system determines
that the driver intends to avoid the collision by braking but
has not applied sufficient brake force, the system will
compensate and provide additional brake force as
required.
If a Forward Collision Warning with Mitigation event begins
at a speed below 32 mph (52 km/h), the system may
provide the maximum braking possible to mitigate the
potential forward collision. If the Forward Collision
Warning with Mitigation event stops the vehicle
completely, the system will hold the vehicle at standstill for
two seconds and then release the brakes.
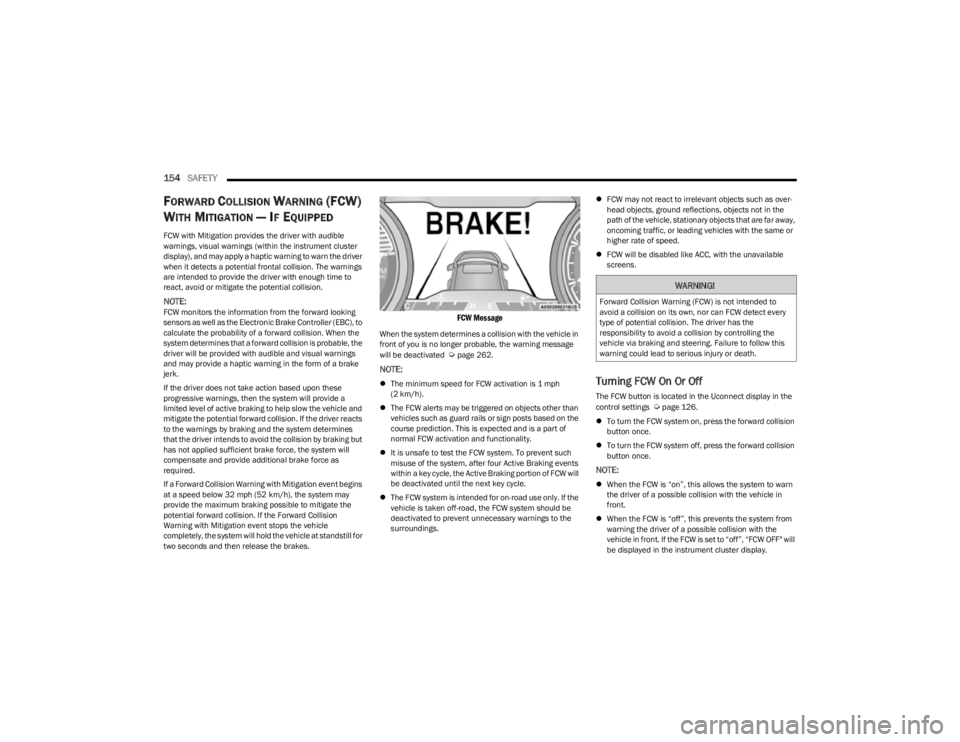
FCW Message
When the system determines a collision with the vehicle in
front of you is no longer probable, the warning message
will be deactivated
Úpage 262.
NOTE:
The minimum speed for FCW activation is 1 mph
(2 km/h).
The FCW alerts may be triggered on objects other than
vehicles such as guard rails or sign posts based on the
course prediction. This is expected and is a part of
normal FCW activation and functionality.
It is unsafe to test the FCW system. To prevent such
misuse of the system, after four Active Braking events
within a key cycle, the Active Braking portion of FCW will
be deactivated until the next key cycle.
The FCW system is intended for on-road use only. If the
vehicle is taken off-road, the FCW system should be
deactivated to prevent unnecessary warnings to the
surroundings.
FCW may not react to irrelevant objects such as over -
head objects, ground reflections, objects not in the
path of the vehicle, stationary objects that are far away,
oncoming traffic, or leading vehicles with the same or
higher rate of speed.
FCW will be disabled like ACC, with the unavailable
screens.Turning FCW On Or Off
The FCW button is located in the Uconnect display in the
control settings Úpage 126.
To turn the FCW system on, press the forward collision
button once.
To turn the FCW system off, press the forward collision
button once.
NOTE:
When the FCW is “on”, this allows the system to warn
the driver of a possible collision with the vehicle in
front.
When the FCW is “off”, this prevents the system from
warning the driver of a possible collision with the
vehicle in front. If the FCW is set to “off”, “FCW OFF" will
be displayed in the instrument cluster display.
WARNING!
Forward Collision Warning (FCW) is not intended to
avoid a collision on its own, nor can FCW detect every
type of potential collision. The driver has the
responsibility to avoid a collision by controlling the
vehicle via braking and steering. Failure to follow this
warning could lead to serious injury or death.
23_KL_OM_EN_USC_t.book Page 154
Page 157 of 276
SAFETY155
When FCW status is set to “Only Warning”, this
prevents the system from providing limited active
braking, or additional brake support if the driver is not
braking adequately in the event of a potential frontal
collision.
When FCW status is set to “Warning and Braking”, this
allows the system to warn the driver of a possible colli -
sion with the vehicle in front using audible/visual warn -
ings and it applies autonomous braking.
The system will retain the last setting selected by the
driver after ignition shutdown.
FCW Braking Status And Sensitivity
The FCW Sensitivity and Active Braking status are
programmable through the Uconnect system
Ú
page 126.
Far
When the sensitivity of FCW is set to the “Far”
setting and the system status is “Only Warning”,
this allows the system to warn the driver of a
possible more distant collision with the vehicle in
front using audible/visual warnings.
More cautious drivers that do not mind frequent
warnings may prefer this setting.
NOTE:The “Far” setting may result in a greater number of FCW
possible collision warnings experienced.
Medium
When the sensitivity of FCW is set to the “Medium”
setting and the system status is “Only Warning”,
this allows the system to warn the driver of a
possible collision with the vehicle in front using
audible/visual warnings.
Near
When the sensitivity of FCW is set to the “Near”
setting and the system status is “Only Warning”,
this allows the system to warn the driver of a
possible closer collision with the vehicle in front
using audible/visual warnings.
This setting provides less reaction time than the
“Far” and “Medium” settings, which allows for a
more dynamic driving experience.
More dynamic or aggressive drivers that want to
avoid frequent warnings may prefer this setting.
NOTE:The “Near” setting may result in a lesser number of FCW
possible collision warnings experienced.
FCW Limited Warning
If the instrument cluster display reads “ACC/FCW Limited
Functionality” or “ACC/FCW Limited Functionality Clean
Front Windshield” momentarily, there may be a condition
that limits FCW functionality. Although the vehicle is still
drivable under normal conditions, the active braking may
not be fully available. Once the condition that limited the
system performance is no longer present, the system will
return to its full performance state. If the problem persists,
see an authorized dealer.
Service FCW Warning
If the system turns off, and the instrument cluster display
reads:
ACC/FCW Unavailable Service Required
Cruise/FCW Unavailable Service Required This indicates there is an internal system fault. Although
the vehicle is still driveable under normal conditions, have
the system checked by an authorized dealer.
TIRE PRESSURE MONITORING SYSTEM
(TPMS)
The TPMS will warn the driver of a low tire pressure based
on the vehicle recommended cold placard pressure.
The tire pressure will vary with temperature by
approximately 1 psi (7 kPa) for every 12°F (6.5°C). This
means that when the outside temperature decreases, the
tire pressure will decrease. Tire pressure should always be
set based on cold inflation tire pressure. This is defined as
the tire pressure after the vehicle has not been driven for
at least three hours, or driven less than 1 mile (1.6 km)
after a three hour period. The cold tire inflation pressure
must not exceed the maximum inflation pressure molded
into the tire sidewall. The tire pressure will also increase
as the vehicle is driven. This is normal and there should be
no adjustment for this increased pressure.
See
Úpage 235 on how to properly inflate the vehicle’s
tires.
The TPMS will warn the driver of a low tire pressure if the
tire pressure falls below the low-pressure warning limit for
any reason, including low temperature effects and natural
pressure loss through the tire.
6
23_KL_OM_EN_USC_t.book Page 155