ECU JEEP CHEROKEE TRAILHAWK 2018 Owners Manual
[x] Cancel search | Manufacturer: JEEP, Model Year: 2018, Model line: CHEROKEE TRAILHAWK, Model: JEEP CHEROKEE TRAILHAWK 2018Pages: 580, PDF Size: 5.68 MB
Page 32 of 580
WARNING!
•Do not start or run an engine in a closed garage or
confined area. Exhaust gas contains Carbon Monox-
ide (CO) which is odorless and colorless. Carbon
Monoxide is poisonous and can cause serious injury
or death when inhaled.
• Keep key fobs away from children. Operation of the
Remote Start System, windows, door locks or other
controls could cause serious injury or death.
Remote Start Abort Message On The Instrument
Cluster Display
The following messages will display in the instrument
cluster display if the vehicle fails to remote start or exits
remote start prematurely:
• Remote Start Aborted — Door Open
• Remote Start Aborted — Hood Open
• Remote Start Aborted — Fuel Low
• Remote Start Aborted — Liftgate Open
• Remote Start Disabled — Start Vehicle To Reset
• Remote Start Aborted — Too Cold
• Remote Start Aborted — Time Expired The message will stay active until the ignition is turned to
the ON/RUN position.
To Enter Remote Start Mode
Push and release the remote start button on the key fob
twice within five seconds. The vehicle doors will lock, the
parking lights will flash, and the horn will chirp twice (if
programmed). Then, the engine will start, and the vehicle
will remain in the Remote Start mode for a 15-minute cycle.
NOTE:
•
If an engine fault is present or fuel level is low, the
vehicle will start and then shut down in 10 seconds.
• The park lamps will turn on and remain on during
Remote Start mode.
• For security, power window and power sunroof opera-
tion (if equipped) are disabled when the vehicle is in the
Remote Start mode.
• The engine can be started two consecutive times with
the key fob. However, the ignition must be cycled by
pushing the START/STOP button twice (or the ignition
switch must be cycled to the ON/RUN position) before
you can repeat the start sequence for a third cycle.
30 GETTING TO KNOW YOUR VEHICLE
Page 38 of 580
WARNING!
•For personal security and safety in the event of a
collision, lock the vehicle doors before you drive as
well as when you park and exit the vehicle.
• When exiting the vehicle, always remove the key fob
from the vehicle and lock your vehicle. If equipped
with Keyless Enter-N-Go — Ignition, always make
sure the keyless ignition node is in “OFF” mode,
remove the key fob from the vehicle and lock the
vehicle. Unsupervised use of vehicle equipment may
cause severe personal injuries or death.
•
Never leave children alone in a vehicle, or with access
to an unlocked vehicle. Allowing children to be in a
vehicle unattended is dangerous for a number of
reasons. A child or others could be seriously or fatally
injured. Children should be warned not to touch the
parking brake, brake pedal or the gear selector.
• Do not leave the key fob in or near the vehicle, or in
a location accessible to children, and do not leave the
ignition of a vehicle equipped with Keyless Enter-
N-Go — Ignition the ACC or ON/RUN mode. A child
could operate power windows, other controls, or
move the vehicle.
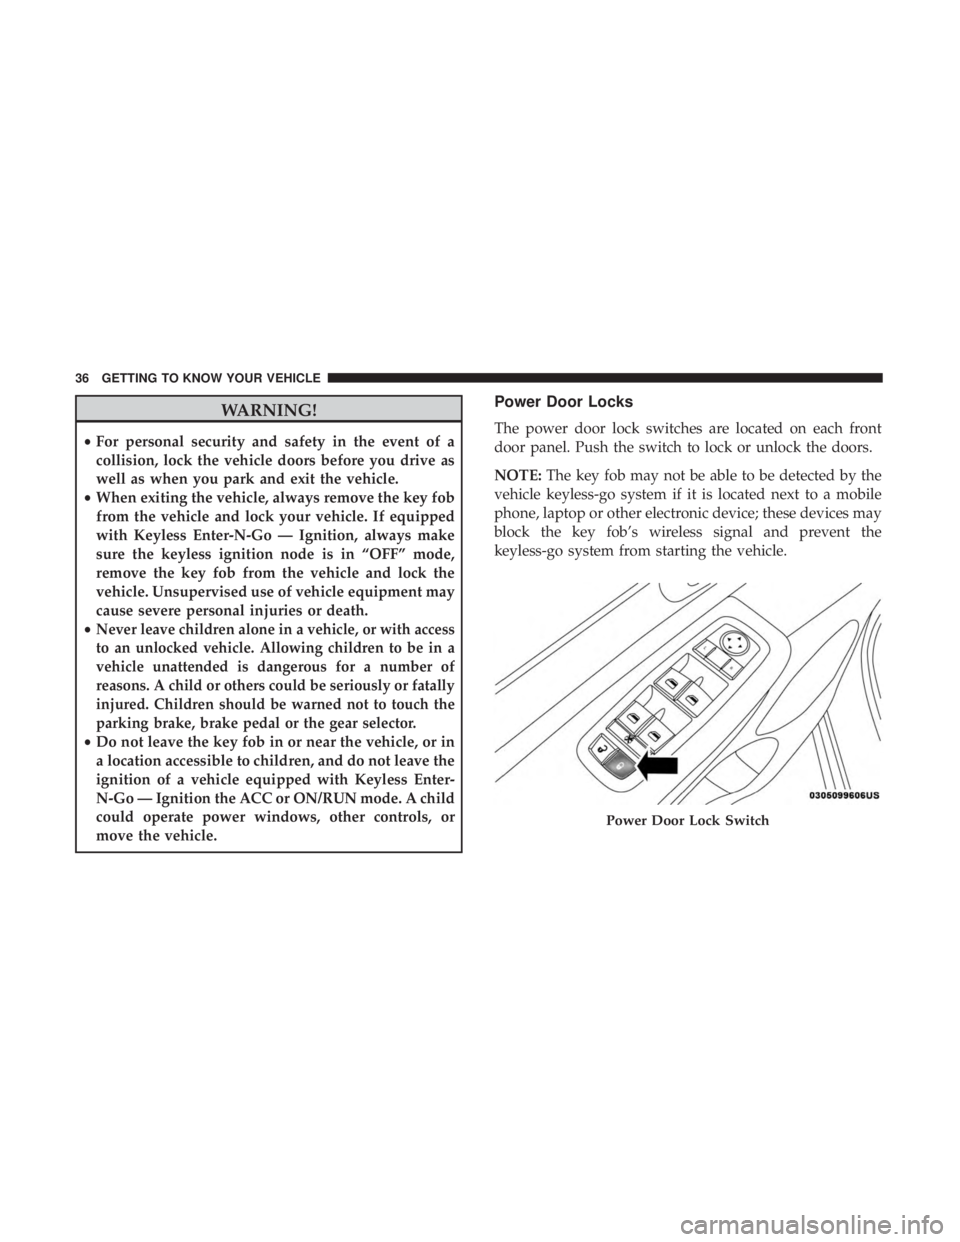
Power Door Locks
The power door lock switches are located on each front
door panel. Push the switch to lock or unlock the doors.
NOTE: The key fob may not be able to be detected by the
vehicle keyless-go system if it is located next to a mobile
phone, laptop or other electronic device; these devices may
block the key fob’s wireless signal and prevent the
keyless-go system from starting the vehicle.
Page 98 of 580
WARNING!(Continued)
children, can become entrapped by the power sun-
roof while operating the power sunroof switch. Such
entrapment may result in serious injury or death.
• In a collision, there is a greater risk of being thrown
from a vehicle with an open sunroof. You could also
be seriously injured or killed. Always fasten your
seat belt properly and make sure all passengers are
also properly secured.
• Do not allow small children to operate the sunroof.
Never allow your fingers, other body parts, or any
object, to project through the sunroof opening. In-
jury may result.
Opening Sunroof
Express
A comfort stop position and full open position are the
programmed automatic stops for the sunroof open posi-
tions. The comfort stop position has been optimized to
minimize wind buffeting.
Push the switch rearward and release it within one-half
second. The sunroof will open automatically to the comfort
stop position (if the sunshade is in the closed position when the operation is initiated the sunshade will automati-
cally open to the half open position prior to the sunroof
opening). Push the switch rearward and release it again,
the sunroof will open to the full open position and auto-
matically stop. This is called “Express Open”. During
Express Open operation, any movement of the sunroof
switch will stop the sunroof.
Manual Mode
A comfort stop position is a programmed automatic stop
for the sunroof open position. The comfort stop position
has been optimized to minimize wind buffeting.
To open the sunroof, push and hold the switch rearward.
The sunroof will stop automatically at the comfort stop
position (if the sunshade is in the closed position when the
operation is initiated the sunshade will automatically open
to the half open position prior to the sunroof opening).
Push and hold the switch rearward again, the sunroof will
open to the full open position and automatically stop. Any
release of the switch will stop the movement. The sunroof
and sunshade will remain in a partially opened condition
until the switch is pushed and held rearward again.
96 GETTING TO KNOW YOUR VEHICLE
Page 104 of 580
Closing
Grasp the liftgate closing handle and initiate lowering the
liftgate. Release the handle when the liftgate takes over the
closing effort.
To Lock The Liftgate
With a valid Passive Entry key fob within 5 ft (1.5 m) of the
liftgate, pushing the Keyless Enter-N-Go — Passive Entry
lock button located to the left of the outside handle release
will lock the vehicle.
The power liftgate may be closed by pushing the button,
located in the upper left trim in the liftgate opening.
Pushing button will only close the liftgate. This button
cannot be used to open the liftgate.
NOTE:The liftgate unlock feature is built into the elec-
tronic liftgate release.
Cargo Area Features
Cargo Load Floor
The cargo load floor system has a load capacity of 400 lbs
(181 kg). To provide additional storage area, each rear seat can be
folded flat. This allows for extended cargo space and still
maintains some rear seating room. Refer to “Seats” in this
section for further information.
Cargo Extension Panels
Cargo extension panels can be folded and unfolded. When
the rear seats are moved to the more forward positions and
the rear seat backs are folded down, the extension panels
(2) can be unfolded manually by hand. The extension
panels can be used to extend the load floor to the rear seats
and/or hide the gap between the load floor and rear seats
or to assist in loading large items into the cargo area.
Cargo Tie-Down Hooks And Loops
The tie-downs located on the cargo area floor should be
used to secure loads safely when the vehicle is moving.
Cargo tie-down loops are located on the trim panels.
Page 119 of 580
ROOF LUGGAGE RACK — IF EQUIPPED
The load carried on the roof, when equipped with a
luggage rack, must not exceed 150 lbs (68 kg), and it should
be uniformly distributed over the cargo area.
Crossbars should always be used whenever cargo is placed
on the roof rack. Check the straps frequently to be sure that
the load remains securely attached.
NOTE:Crossbars can be purchased at your authorized
dealer through Mopar parts.
External racks do not increase the total load carrying
capacity of the vehicle. Be sure that the total occupant and
luggage load inside the vehicle, plus the load on the
luggage rack, do not exceed the maximum vehicle load
capacity.
Page 217 of 580
•How far (if at all) the driver was depressing the accel-
erator and/or brake pedal; and,
• How fast the vehicle was traveling.
These data can help provide a better understanding of the
circumstances in which crashes and injuries occur.
NOTE: EDR data are recorded by your vehicle only if a
non-trivial crash situation occurs; no data are recorded by
the EDR under normal driving conditions and no personal
data (e.g., name, gender, age, and crash location) are
recorded. However, other parties, such as law enforcement,
could combine the EDR data with the type of personally
identifying data routinely acquired during a crash investi-
gation.
To read data recorded by an EDR, special equipment is
required, and access to the vehicle or the EDR is needed. In
addition to the vehicle manufacturer, other parties, such as
law enforcement, that have the special equipment, can read
the information if they have access to the vehicle or the
EDR.Child Restraints
Everyone in your vehicle needs to be buckled up at all
times, including babies and children. Every state in the
United States, and every Canadian province, requires that
small children ride in proper restraint systems. This is the
law, and you can be prosecuted for ignoring it.
Children 12 years or younger should ride properly buckled
up in a rear seat, if available. According to crash statistics,
children are safer when properly restrained in the rear
seats rather than in the front.
Page 229 of 580
How To Stow An Unused Switchable-ALR (ALR)
Seat Belt:
When using the LATCH attaching system to install a child
restraint, stow all ALR seat belts that are not being used by
other occupants or being used to secure child restraints.
An unused belt could injure a child if they play with it and
accidentally lock the seat belt retractor. Before installing a
child restraint using the LATCH system, buckle the seat
belt behind the child restraint and out of the child’s reach.
If the buckled seat belt interferes with the child restraint
installation, instead of buckling it behind the child re-
straint, route the seat belt through the child restraint belt
path and then buckle it. Do not lock the seat belt. Remind
all children in the vehicle that the seat belts are not toys and
that they should not play with them.
Page 232 of 580
Installing A Child Restraint With A Switchable
Automatic Locking Retractor (ALR):
Child restraint systems are designed to be secured in
vehicle seats by lap belts or the lap belt portion of a
lap/shoulder belt.
Page 238 of 580
WARNING!(Continued)
•If the vehicle carpet has been removed and re-
installed, always properly attach carpet to the floor
and check the floor mat fasteners are secure to the
vehicle carpet. Fully depress each pedal to check for
interference with the accelerator, brake, or clutch
pedals then re-install the floor mats.
• It is recommended to only use mild soap and water
to clean your floor mats. After cleaning, always check
your floor mat has been properly installed and is
secured to your vehicle using the floor mat fasteners
by lightly pulling mat.
Periodic Safety Checks You Should Make Outside
The Vehicle
Tires
Examine tires for excessive tread wear and uneven wear
patterns. Check for stones, nails, glass, or other objects
lodged in the tread or sidewall. Inspect the tread for cuts
and cracks. Inspect sidewalls for cuts, cracks, and bulges.
Check the wheel nuts for tightness. Check the tires (includ-
ing spare) for proper cold inflation pressure.
Lights
Have someone observe the operation of brake lights and
exterior lights while you work the controls. Check turn
signal and high beam indicator lights on the instrument
panel.
Door Latches
Check for proper closing, latching, and locking.
Fluid Leaks
Check area under the vehicle after overnight parking for
fuel, coolant, oil, or other fluid leaks. Also, if gasoline
fumes are detected or if fuel, or brake fluid leaks are
suspected. The cause should be located and corrected
immediately.
236 SAFETY
Page 245 of 580
WARNING!(Continued)
can be dangerous if done improperly. Refer to “Jump
Starting Procedure” in “In Case Of Emergency” for
further information.
After Starting
The idle speed is controlled automatically, and it will
decrease as the engine warms up.
ENGINE BLOCK HEATER — IF EQUIPPED
The engine block heater warms the engine and permits
quicker starts in cold weather.
Connect the cord to a 110-115 Volt AC electrical outlet with
a grounded, three-wire extension cord.
For ambient temperatures below 0°F (-18°C), the engine
block heater is recommended. For ambient temperatures
below -20°F (-29°C), the engine block heater is required.
The engine block heater cord is routed under the hood,
behind to the driver ’s side headlamp. Follow the steps
below to properly use the engine block heater:
1. Locate the engine block heater cord (behind the driver ’s
side headlamp). 2. Undo the Velcro strap that secures the heater cord in
place.
3. Pull the cord to the front of the vehicle and plug it into a grounded, three-wire extension cord.
4. After the vehicle is running, reattach the cord to the Velcro strap and properly stow away behind the driver ’s
side headlamp.
NOTE:
• The engine block heater cord is a factory installed
option. If your vehicle is not equipped, heater cords are
available from an authorized Mopar dealer.
• The engine block heater will require 110 Volts AC and
6.5 Amps to activate the heater element.
• The engine block heater must be plugged in at least one
hour to have an adequate warming effect on the engine.