gas JEEP CHEROKEE TRAILHAWK 2019 Owners Manual
[x] Cancel search | Manufacturer: JEEP, Model Year: 2019, Model line: CHEROKEE TRAILHAWK, Model: JEEP CHEROKEE TRAILHAWK 2019Pages: 638, PDF Size: 6.16 MB
Page 33 of 638
WARNING!
•Do not start or run an engine in a closed garage or
confined area. Exhaust gas contains Carbon Monox-
ide (CO) which is odorless and colorless. Carbon
Monoxide is poisonous and can cause serious injury
or death when inhaled.
• Keep key fobs away from children. Operation of the
Remote Start System, windows, door locks or other
controls could cause serious injury or death.
Remote Start Abort Message On The Instrument
Cluster Display
The following messages will display in the instrument
cluster display if the vehicle fails to remote start or exits
remote start prematurely:
• Remote Start Aborted — Door Open
• Remote Start Aborted — Hood Open
• Remote Start Aborted — Fuel Low
• Remote Start Aborted — Liftgate Open
• Remote Start Disabled — Start Vehicle To Reset
• Remote Start Aborted — Too Cold •
Remote Start Aborted — Time Expired
The message will stay active until the ignition is turned to
the ON/RUN position.
To Enter Remote Start Mode
Push and release the remote start button on the key fob
twice within five seconds. The vehicle doors will lock, the
parking lights will flash, and the horn will chirp twice (if
programmed). Then, the engine will start, and the vehicle
will remain in the Remote Start mode for a 15-minute cycle.
NOTE:
• If an engine fault is present or fuel level is low, the
vehicle will start and then shut down in 10 seconds.
• The park lamps will turn on and remain on during
Remote Start mode.
• For security, power window and power sunroof opera-
tion (if equipped) are disabled when the vehicle is in the
Remote Start mode.
• The engine can be started two consecutive times with
the key fob. However, the ignition must be cycled by
pushing the START/STOP button twice (or the ignition
switch must be cycled to the ON/RUN position) before
you can repeat the start sequence for a third cycle.
3
GETTING TO KNOW YOUR VEHICLE 31
Page 112 of 638
WARNING!
Driving with the liftgate open can allow poisonous
exhaust gases into your vehicle. You and your passen-
gers could be injured by these fumes. Keep the liftgate
closed when you are operating the vehicle.
Closing
There are several different ways to close the liftgate:
•Manually by grasping the liftgate closing handle and
initiating lowering of the liftgate. Release the handle
when the liftgate takes over the closing effort.
• Key Fob
• Hands-Free
• Liftgate Instrument Panel Button
• Power Liftgate Button On The Pillar In The Cargo Area
To Lock The Liftgate
With a valid Passive Entry key fob within 5 ft (1.5 m) of the
liftgate, pushing the Keyless Enter-N-Go — Passive Entry
lock/push button located to the left of the back-up camera
will lock the vehicle only. The power liftgate may be closed by pushing the button,
located in the upper left trim in the liftgate opening.
Pushing the button will only close the liftgate. This button
cannot be used to open the liftgate.
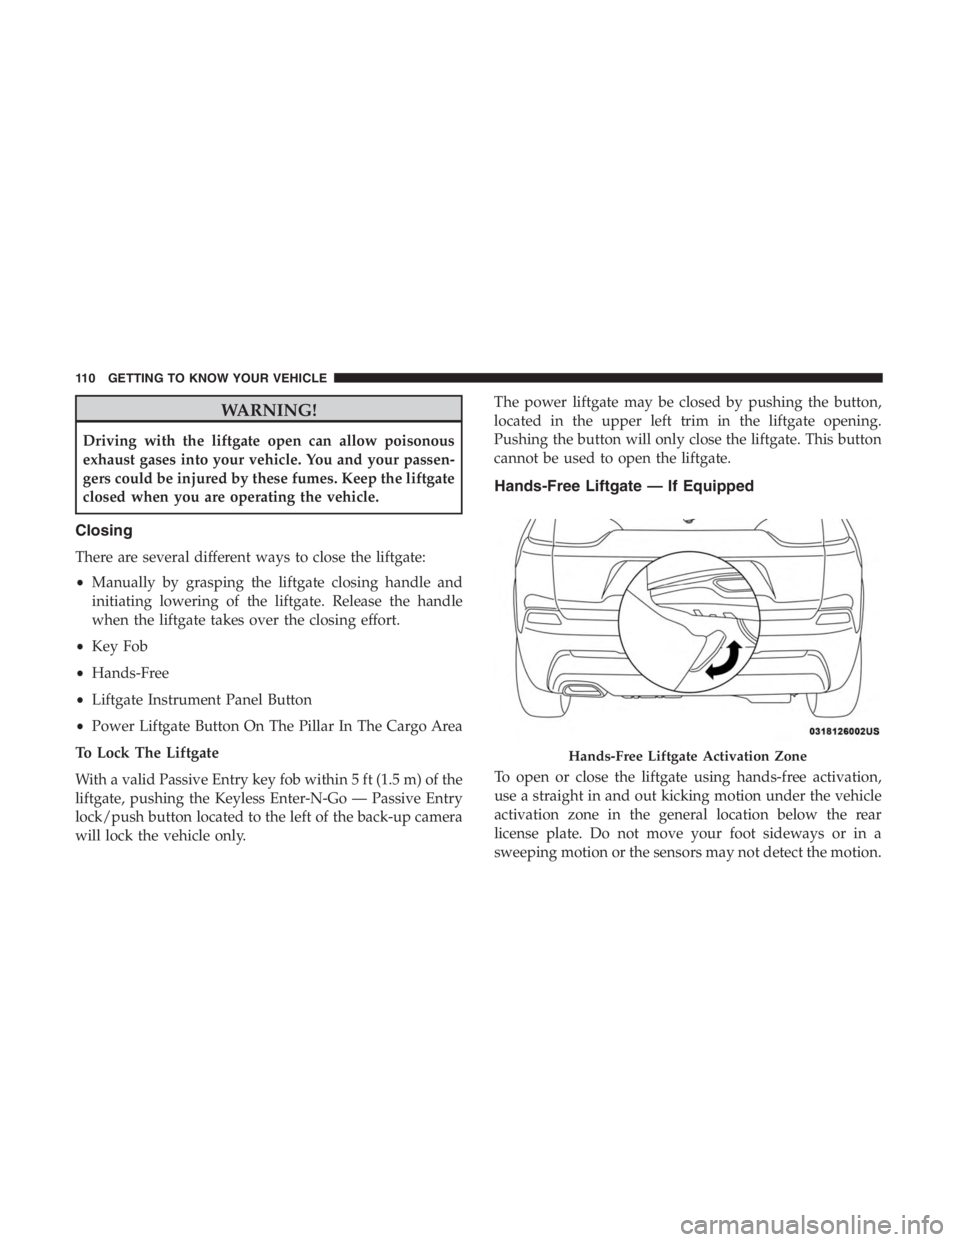
Hands-Free Liftgate — If Equipped
To open or close the liftgate using hands-free activation,
use a straight in and out kicking motion under the vehicle
activation zone in the general location below the rear
license plate. Do not move your foot sideways or in a
sweeping motion or the sensors may not detect the motion.
Page 114 of 638
WARNING!
•Driving with the liftgate open can allow poisonous
exhaust gases into your vehicle. You and your pas-
sengers could be injured by these fumes. Keep the
liftgate closed when you are operating the vehicle.
• If you are required to drive with the liftgate open,
make sure that all windows are closed, and the
climate control blower switch is set at high speed. Do
not use the recirculation mode.
Gas props support the liftgate in the open position. How-
ever, because the gas pressure drops with temperature, it
may be necessary to assist the props when opening the
liftgate in cold weather.
NOTE: Allow the power system to open the liftgate.
Manually pushing or pulling the liftgate may activate the
liftgate obstacle detection feature and stop the power
operation or reverse its direction.
Page 214 of 638
WARNING!(Continued)
any such objects could cause harm if the vehicle is in
a collision severe enough to cause the air bag to
inflate.
• Do not put anything on or around the air bag covers
or attempt to open them manually. You may damage
the air bags and you could be injured because the air
bags may no longer be functional. The protective
covers for the air bag cushions are designed to open
only when the air bags are inflating.
• Relying on the air bags alone could lead to more
severe injuries in a collision. The air bags work with
your seat belt to restrain you properly. In some
collisions, air bags won’t deploy at all. Always wear
your seat belts even though you have air bags.
Front Air Bag Operation
Front Air Bags are designed to provide additional protec-
tion by supplementing the seat belts. Front air bags are not
expected to reduce the risk of injury in rear, side, or
rollover collisions. The front air bags will not deploy in all
frontal collisions, including some that may produce sub-
stantial vehicle damage — for example, some pole colli-
sions, truck underrides, and angle offset collisions. On the other hand, depending on the type and location of
impact, front air bags may deploy in crashes with little
vehicle front-end damage but that produce a severe initial
deceleration.
Because air bag sensors measure vehicle deceleration over
time, vehicle speed and damage by themselves are not
good indicators of whether or not an air bag should have
deployed.
Seat belts are necessary for your protection in all collisions,
and also are needed to help keep you in position, away
from an inflating air bag.
When the ORC detects a collision requiring the front air
bags, it signals the inflator units. A large quantity of
non-toxic gas is generated to inflate the front air bags.
The steering wheel hub trim cover and the upper passen-
ger side of the instrument panel separate and fold out of
the way as the air bags inflate to their full size. The front air
bags fully inflate in less time than it takes to blink your
eyes. The front air bags then quickly deflate while helping
to restrain the driver and front passenger.
212 SAFETY
Page 227 of 638
quickly. However, if you haven’t healed significantly
within a few days, or if you have any blistering, see your
doctor immediately.
•
As the air bags deflate, you may see some smoke-like
particles. The particles are a normal by-product of the
process that generates the non-toxic gas used for air bag
inflation. These airborne particles may irritate the skin,
eyes, nose, or throat. If you have skin or eye irritation,
rinse the area with cool water. For nose or throat irritation,
move to fresh air. If the irritation continues, see your
doctor. If these particles settle on your clothing, follow the
garment manufacturer ’s instructions for cleaning.
Do not drive your vehicle after the air bags have deployed.
If you are involved in another collision, the air bags will
not be in place to protect you.
Page 253 of 638
WARNING!(Continued)
•If the vehicle carpet has been removed and re-
installed, always properly attach carpet to the floor
and check the floor mat fasteners are secure to the
vehicle carpet. Fully depress each pedal to check for
interference with the accelerator, brake, or clutch
pedals then re-install the floor mats.
• It is recommended to only use mild soap and water
to clean your floor mats. After cleaning, always check
your floor mat has been properly installed and is
secured to your vehicle using the floor mat fasteners
by lightly pulling mat.
Periodic Safety Checks You Should Make Outside
The Vehicle
Tires
Examine tires for excessive tread wear and uneven wear
patterns. Check for stones, nails, glass, or other objects
lodged in the tread or sidewall. Inspect the tread for cuts
and cracks. Inspect sidewalls for cuts, cracks, and bulges.
Check the wheel nuts for tightness. Check the tires (includ-
ing spare) for proper cold inflation pressure.
Lights
Have someone observe the operation of brake lights and
exterior lights while you work the controls. Check turn
signal and high beam indicator lights on the instrument
panel.
Door Latches
Check for proper closing, latching, and locking.
Fluid Leaks
Check area under the vehicle after overnight parking for
fuel, coolant, oil, or other fluid leaks. Also, if gasoline
fumes are detected or if fuel, or brake fluid leaks are
suspected. The cause should be located and corrected
immediately.
5
SAFETY 251
Page 368 of 638
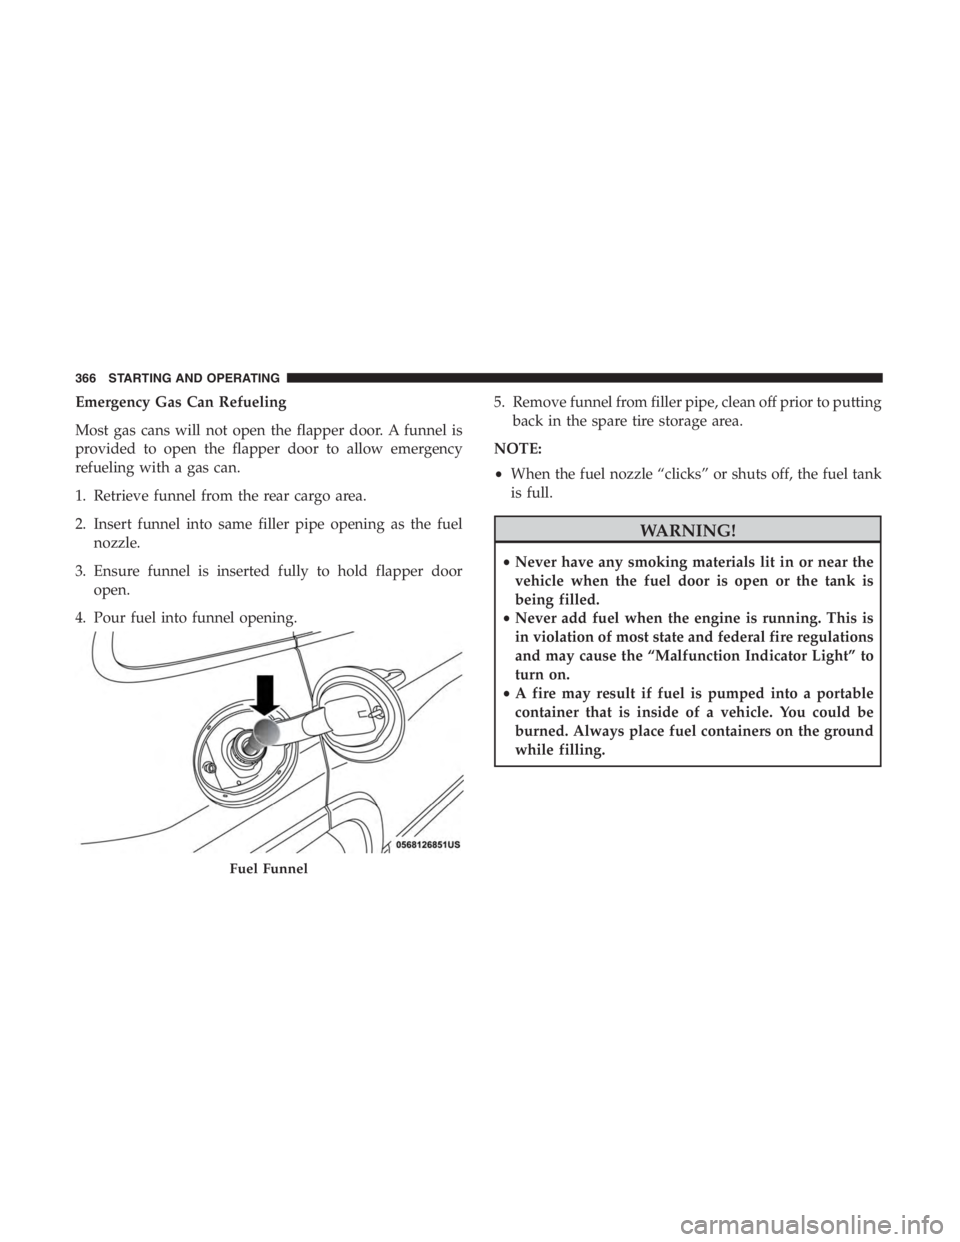
Emergency Gas Can Refueling
Most gas cans will not open the flapper door. A funnel is
provided to open the flapper door to allow emergency
refueling with a gas can.
1. Retrieve funnel from the rear cargo area.
2. Insert funnel into same filler pipe opening as the fuelnozzle.
3. Ensure funnel is inserted fully to hold flapper door open.
4. Pour fuel into funnel opening. 5. Remove funnel from filler pipe, clean off prior to putting
back in the spare tire storage area.
NOTE:
• When the fuel nozzle “clicks” or shuts off, the fuel tank
is full.
Fuel Funnel
366 STARTING AND OPERATING
Page 440 of 638
WARNING!
•Take care to avoid the radiator cooling fan whenever
the hood is raised. It can start anytime the ignition
switch is ON. You can be injured by moving fan
blades.
• Remove any metal jewelry such as rings, watch
bands and bracelets that could make an inadvertent
electrical contact. You could be seriously injured.
• Batteries contain sulfuric acid that can burn your
skin or eyes and generate hydrogen gas which is
flammable and explosive. Keep open flames or
sparks away from the battery.
1. Apply the parking brake, shift the automatic transmis- sion into PARK and turn the ignition OFF.
2. Turn off the heater, radio, and all unnecessary electrical accessories.
3. If using another vehicle to jump start the battery, park the vehicle within the jumper cables reach, apply the
parking brake and make sure the ignition is OFF.
CAUTION!
Failure to follow these procedures could result in
damage to the charging system of the booster vehicle
or the discharged vehicle.
Connecting The Jumper Cables
1. Connect the positive (+)end of the jumper cable to the
positive (+)post of the discharged vehicle.
438 IN CASE OF EMERGENCY
Page 467 of 638
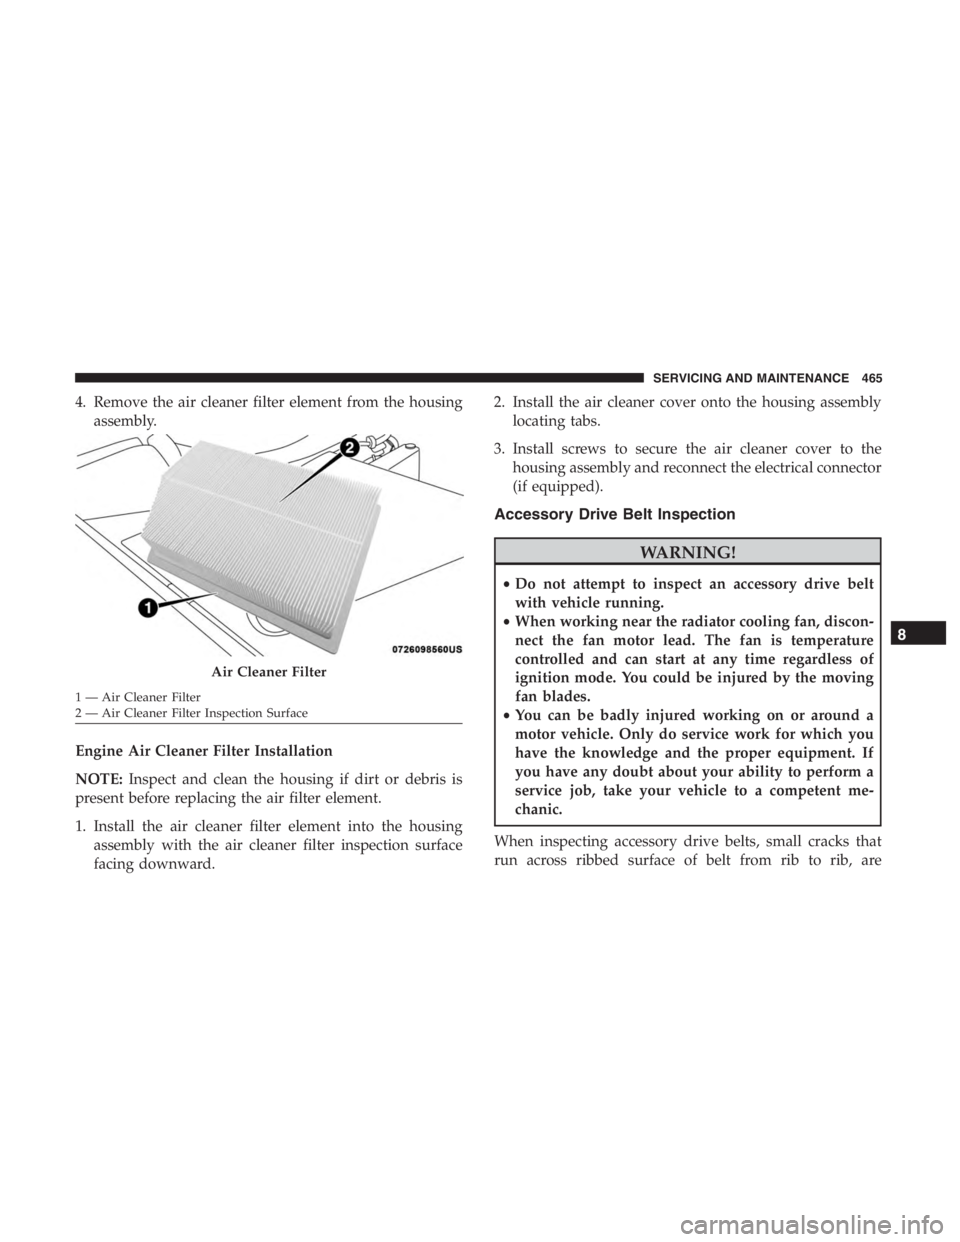
4. Remove the air cleaner filter element from the housingassembly.
Engine Air Cleaner Filter Installation
NOTE: Inspect and clean the housing if dirt or debris is
present before replacing the air filter element.
1. Install the air cleaner filter element into the housing assembly with the air cleaner filter inspection surface
facing downward. 2. Install the air cleaner cover onto the housing assembly
locating tabs.
3. Install screws to secure the air cleaner cover to the housing assembly and reconnect the electrical connector
(if equipped).
Accessory Drive Belt Inspection
Page 478 of 638
have an authorized technician inspect the complete ex-
haust system and adjacent body areas for broken, dam-
aged, deteriorated, or mispositioned parts. Open seams or
loose connections could permit exhaust fumes to seep into
the passenger compartment. In addition, have the exhaust
system inspected each time the vehicle is raised for lubri-
cation or oil change. Replace as required.CAUTION!
•The catalytic converter requires the use of unleaded
fuel only. Leaded gasoline will destroy the effective-
ness of the catalyst as an emissions control device
and may seriously reduce engine performance and
cause serious damage to the engine.
• Damage to the catalytic converter can result if your
vehicle is not kept in proper operating condition. In
the event of engine malfunction, particularly involv-
ing engine misfire or other apparent loss of perfor-
mance, have your vehicle serviced promptly. Contin-
ued operation of your vehicle with a severe
malfunction could cause the converter to overheat,
resulting in possible damage to the converter and
vehicle.
Under normal operating conditions, the catalytic converter
will not require maintenance. However, it is important to
keep the engine properly tuned to assure proper catalyst
operation and prevent possible catalyst damage.
NOTE: Intentional tampering with emissions control sys-
tems can result in civil penalties being assessed against
you.
476 SERVICING AND MAINTENANCE