check engine light JEEP CJ 1953 Manual PDF
[x] Cancel search | Manufacturer: JEEP, Model Year: 1953, Model line: CJ, Model: JEEP CJ 1953Pages: 376, PDF Size: 19.96 MB
Page 220 of 376
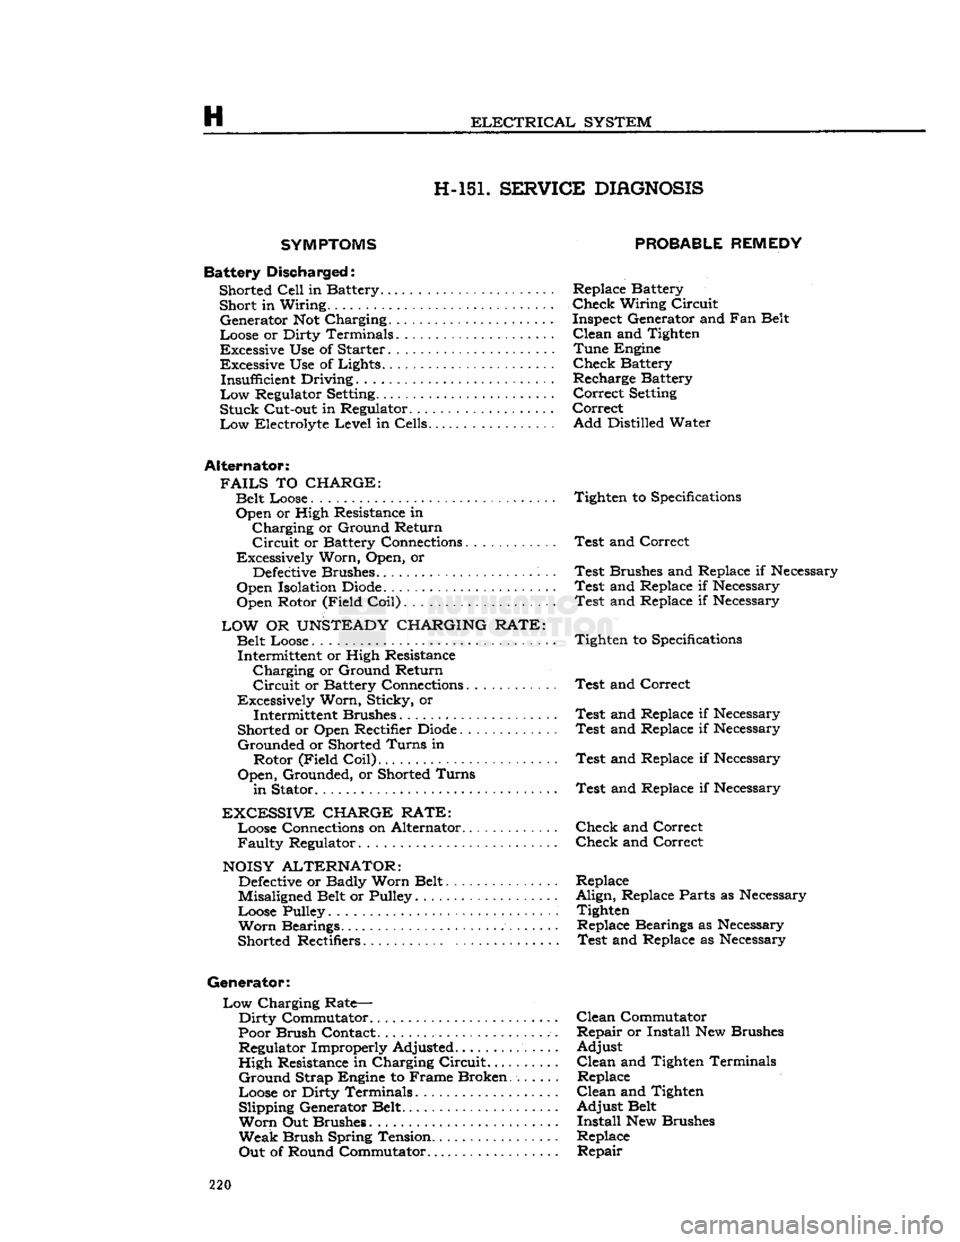
H
ELECTRICAL
SYSTEM H-15L SERVICE
DIAGNOSIS
SYMPTOMS
Battery
Discha
rged: Shorted
Cell
in Battery......... Short in Wiring..
•
Generator Not Charging ,
Loose or Dirty Terminals
Excessive Use of Starter Excessive Use of Lights...... Insufficient Driving.........
Low
Regulator
Setting.......
Stuck
Cut-out in Regulator. ..
Low
Electrolyte
Level
in Cells
Alternator:
FAILS
TO
CHARGE:
Belt Loose Open or High Resistance in
Charging
or Ground Return
Circuit
or Battery Connections............
Excessively Worn, Open, or
Defective
Brushes.
Open Isolation
Diode.
Open Rotor (Field
Coil)
LOW
OR
UNSTEADY
CHARGING RATE:
Belt Loose.... Intermittent or High Resistance
Charging
or Ground Return
Circuit
or Battery Connections
Excessively Worn, Sticky, or Intermittent Brushes
Shorted or Open Rectifier
Diode
Grounded
or Shorted
Turns
in Rotor (Field
Coil)
Open,
Grounded, or Shorted
Turns
in
Stator
EXCESSIVE
CHARGE RATE:
Loose Connections on Alternator...........
Faulty
Regulator
NOISY
ALTERNATOR:
Defective
or Badly Worn Belt
Misaligned Belt or Pulley
Loose Pulley
Worn
Bearings.
Shorted Rectifiers
Generator:
Low
Charging Rate—
Dirty
Commutator
Poor Brush Contact.
................
Regulator Improperly Adjusted.......
High
Resistance in Charging
Circuit...
Ground
Strap Engine to Frame Broken
Loose or Dirty Terminals Slipping Generator Belt
Worn
Out Brushes
Weak
Brush Spring Tension..........
Out
of Round Commutator
PROBABLE REMEDY
Replace Battery
Check
Wiring
Circuit
Inspect Generator and Fan Belt
Clean
and Tighten
Tune
Engine
Check
Battery
Recharge Battery
Correct
Setting
Correct
Add
Distilled Water
Tighten to
Specifications
Test
and Correct
Test
Brushes and Replace if Necessary
Test
and Replace if Necessary
Test
and Replace if Necessary
Tighten to
Specifications
Test
and Correct
Test
and Replace if Necessary
Test
and Replace if Necessary
Test
and Replace if Necessary
Test
and Replace if Necessary
Check
and Correct
Check
and Correct
Replace
Align,
Replace Parts as Necessary Tighten Replace Bearings as Necessary
Test
and Replace as Necessary
Clean
Commutator
Repair
or Install New Brushes
Adjust
Clean
and Tighten Terminals Replace
Clean
and Tighten
Adjust
Belt
Install
New Brushes
Replace
Repair
220
Page 221 of 376
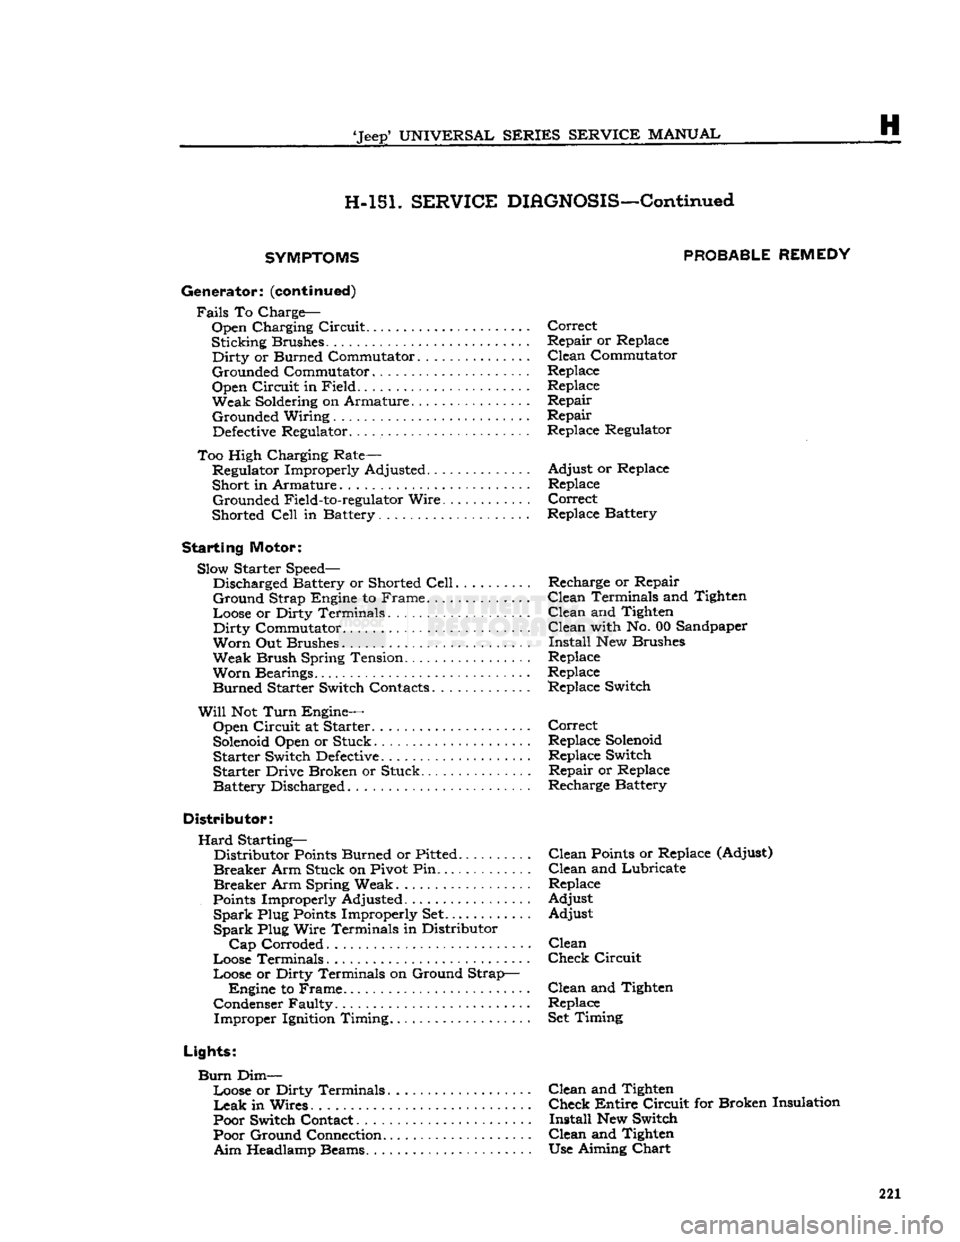
'Jeep*
UNIVERSAL
SERIES SERVICE
MANUAL
H
H-151.
SERVICE
DIAGNOSIS—Continued
SYMPTOMS PROBABLE
REMEDY
Generator:
(continued)
Fails
To Charge-Open Charging Circuit Correct
Sticking Brushes Repair or Replace
Dirty
or Burned Commutator ... Clean Commutator
Grounded Commutator Replace
Open Circuit in Field Replace
Weak Soldering on Armature. . . Repair Grounded Wiring Repair
Defective
Regulator. .. Replace Regulator
Too High Charging Rate— Regulator Improperly Adjusted Adjust or Replace
Short in Armature Replace Grounded Field-to-regulator Wire Correct
Shorted
Cell
in Battery... Replace Battery
Starting
Motor: Slow Starter Speed— Discharged Battery or Shorted
Cell
Recharge or Repair
Ground
Strap Engine to Frame. Clean Terminals and Tighten
Loose or Dirty Terminals Clean and Tighten
Dirty
Commutator Clean with No. 00 Sandpaper
Worn
Out Brushes Install New Brushes
Weak Brush Spring Tension Replace
Worn
Bearings Replace Burned Starter Switch Contacts Replace Switch
Will
Not
Turn
Engine— Open Circuit at Starter Correct
Solenoid
Open or Stuck Replace
Solenoid
Starter Switch
Defective
Replace Switch
Starter Drive Broken or Stuck. Repair or Replace
Battery Discharged Recharge Battery
Distributor:
Hard
Starting— Distributor
Points
Burned or Pitted Clean
Points
or Replace (Adjust)
Breaker
Arm Stuck on Pivot Pin...... . ... . . . Clean and Lubricate
Breaker
Arm Spring Weak Replace
Points
Improperly Adjusted Adjust
Spark
Plug
Points
Improperly Set Adjust
Spark
Plug Wire Terminals in Distributor
Cap
Corroded Clean
Loose Terminals Check Circuit
Loose or Dirty Terminals on Ground Strap— Engine to Frame. Clean and Tighten
Condenser Faulty Replace Improper Ignition Timing Set Timing
Lights:
Burn
Dim— Loose or Dirty Terminals....... ........ Clean and Tighten
Leak
in Wires. Check Entire Circuit for Broken Insulation
Poor Switch Contact Install New Switch Poor Ground Connection Clean and Tighten
Aim
Headlamp Beams. Use Aiming
Chart
221
Page 230 of 376
CLUTCH
is deeply scored or grooved, the part should be
replaced.
b. Inspect driven plate for wear or damage to fac
ings,
loose
rivets, broken or
loose
torsion springs,
and
flattened cushion springs. If facings are worn
near
rivets or are oily, replace the plate assembly.
A
slight amount of oil on clutch facings
will
cause
clutch
grab and chatter; excessive oil on facings
will
cause slippage. It is not practical to remove
oil
with solvents or by buffing since oil
will
con
tinue to bleed from facing material when hot. If
oil
is found on driven plate facings, examine trans
mission drainback hole, pilot bushing,
engine
rear
main
bearing and other points of possible oil leakage. Test the fit of driven plate hub on trans
mission main drive gear for an easy sliding fit.
c. Inspect clutch release bearing for scoring or ex cessive wear on front contact face. Test for rough
ness
of balls and races by pressing and turning
front race slowly. Inspect main drive gear pilot
bushing in crankshaft. Replace bushing if it is rough or worn. Regardless of whether the old plate
or
a new plate is to be installed, check the plate
for runout. Slide the driven plate, front side first,
over the transmission main drive gear shaft so that
it
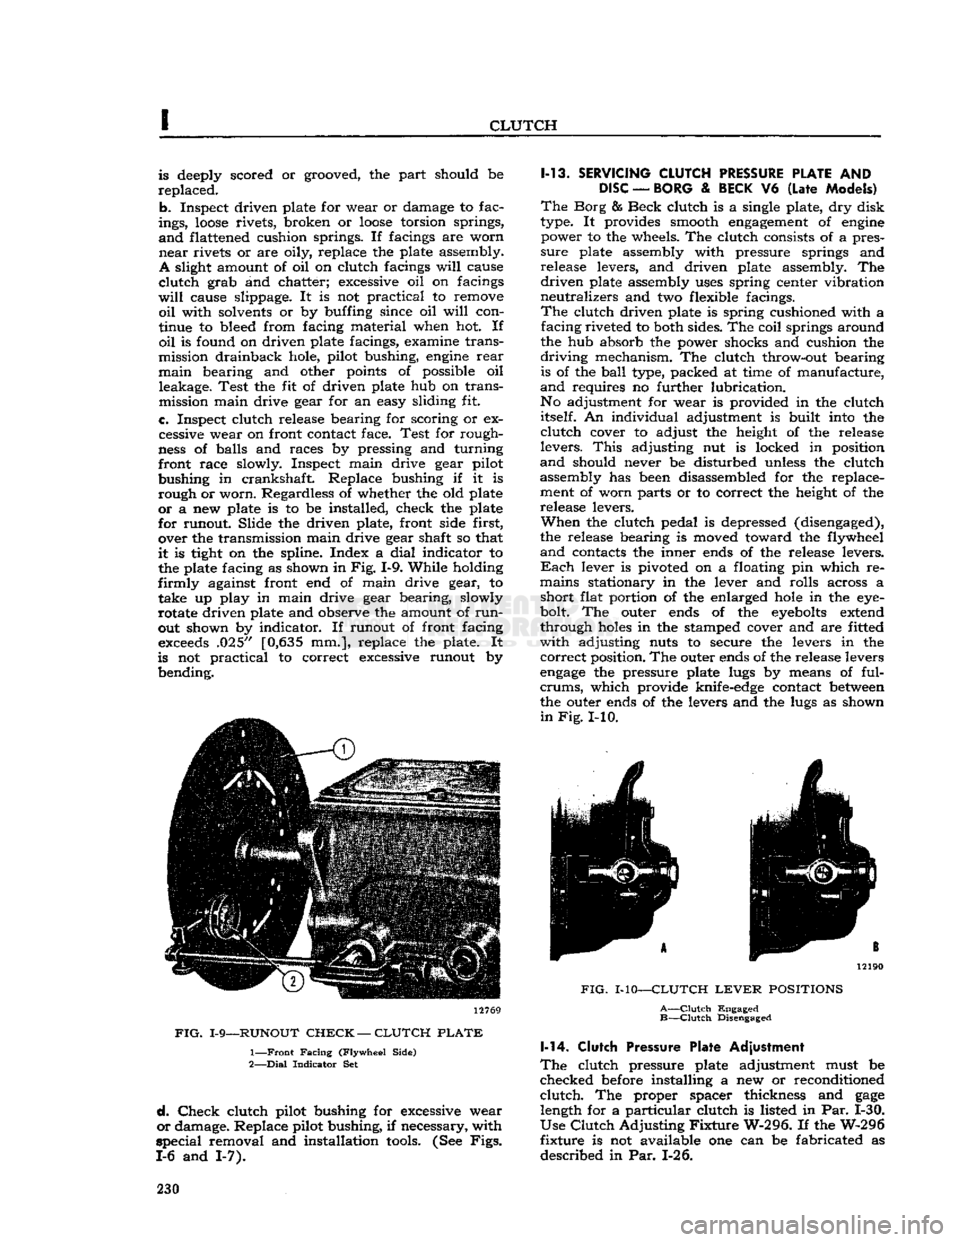
is tight on the spline. Index a
dial
indicator to the plate facing as shown in
Fig.
1-9. While holding
firmly
against front end of main drive gear, to take up play in main drive gear bearing, slowly
rotate driven plate and observe the amount of
run
out shown by indicator. If runout of front facing
exceeds
.025" [0,635 mm.], replace the plate. It
is not practical to correct excessive runout by bending. 12769
FIG.
1-9—RUNOUT
CHECK
—
CLUTCH
PLATE
1—
Front
Facing
(Flywheel
Side)
2—
Dial
Indicator
Set
d.
Check
clutch pilot bushing for excessive wear
or
damage. Replace pilot bushing, if necessary, with
special
removal and installation
tools.
(See
Figs.
1-6 and 1-7). 1-13.
SERVICING
CLUTCH
PRESSURE
PLATE
AND
DISC
—
BORG
&
BECK
V6
(Late
Models)
The
Borg & Beck clutch is a single plate, dry disk
type. It provides smooth
engagement
of
engine
power to the wheels. The clutch consists of a pres
sure
plate assembly with pressure springs and
release levers, and driven plate assembly. The
driven
plate assembly
uses
spring center vibration
neutralizes and two flexible facings.
The
clutch driven plate is spring cushioned with a facing riveted to both sides. The coil springs around
the hub absorb the power shocks and cushion the
driving
mechanism. The clutch throw-out bearing is of the
ball
type, packed at time of manufacture,
and
requires no further lubrication.
No adjustment for wear is provided in the clutch itself. An individual adjustment is built into the
clutch
cover to adjust the height of the release
levers.
This
adjusting nut is locked in position
and
should never be disturbed unless the clutch assembly has been disassembled for the replace
ment of worn parts or to correct the height of the release levers.
When
the clutch pedal is depressed (disengaged),
the release bearing is moved toward the flywheel
and
contacts the inner ends of the release levers.
Each
lever is pivoted on a floating pin which re
mains stationary in the lever and rolls across a short flat portion of the enlarged
hole
in the eye-
bolt. The outer ends of the
eyebolts
extend
through
holes
in the stamped cover and are fitted
with
adjusting nuts to secure the levers in the
correct
position. The outer ends of the release levers
engage
the pressure plate lugs by means of ful-
crums,
which provide knife-edge contact
between
the outer ends of the levers and the lugs as shown
in
Fig.
I-10. 12190
FIG.
MO—CLUTCH
LEVER
POSITIONS
A—Clutch
Engaged
B—Clutch
Disengaged 1-14.
Clutch
Pressure Plate Adjustment
The
clutch pressure plate adjustment must be
checked before installing a new or reconditioned
clutch.
The proper spacer thickness and
gage
length for a particular clutch is listed in Par. 1-30.
Use
Clutch
Adjusting
Fixture
W-296. If the W-296
fixture is not available one can be fabricated as
described in Par. 1-26. 230
Page 232 of 376
CLUTCH
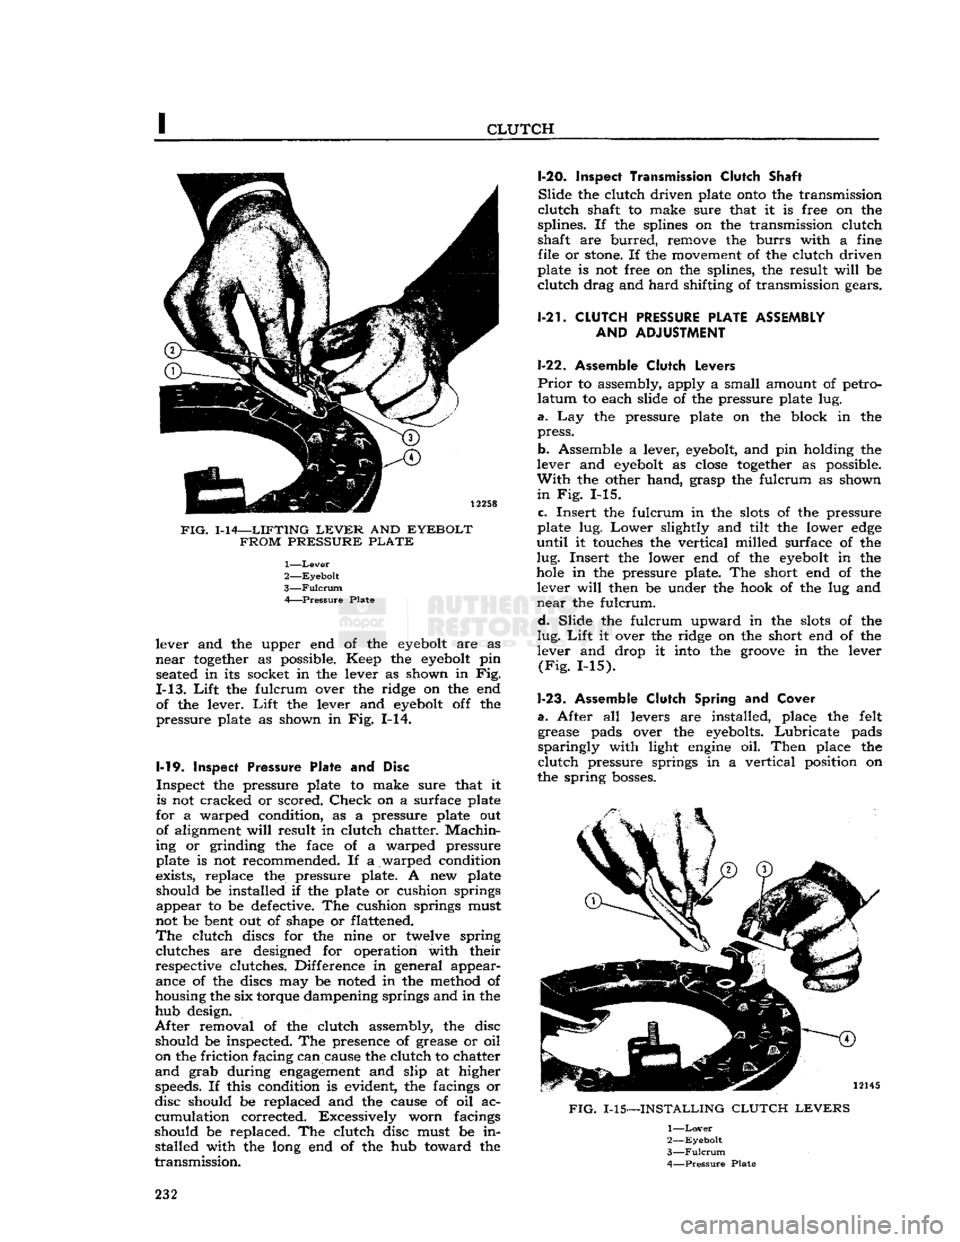
FIG.
1-14—LIFTING
LEVER
AND
EYEBOLT FROM PRESSURE PLATE
1—
Lever
2—
Eyebolt
3—
Fulcrum
A Pressure Plate
lever and the upper end of the
eyebolt
are as
near
together
as possible. Keep the
eyebolt
pin seated in its socket in the lever as shown in Fig.
1-13.
Lift
the fulcrum over the ridge on the end of the lever.
Lift
the lever and
eyebolt
off the
pressure plate as shown in Fig. 1-14.
1-19.
Inspect
Pressure Plate and Disc
Inspect the pressure plate to make sure that it is not cracked or scored.
Check
on a surface plate
for a warped condition, as a pressure plate out of alignment
will
result in clutch chatter.
Machin
ing or grinding the face of a warped pressure
plate is not recommended. If a warped condition
exists, replace the pressure plate. A new plate
should be installed if the plate or cushion springs appear to be defective. The cushion springs must
not be bent out of shape or flattened.
The
clutch discs for the nine or twelve spring clutches are designed for operation with their
respective clutches. Difference in general appear ance of the discs may be noted in the method of
housing the six torque dampening springs and in the
hub design.
After
removal of the clutch assembly, the disc should be inspected. The presence of grease or oil
on the friction facing can cause the clutch to chatter
and
grab during
engagement
and slip at higher speeds. If this condition is evident, the facings or
disc should be replaced and the cause of oil ac
cumulation corrected. Excessively worn facings
should be replaced. The clutch disc must be in stalled with the long end of the hub toward the
transmission.
1-20.
Inspect Transmission Clutch
Shaft
Slide
the clutch driven plate
onto
the transmission
clutch
shaft to make sure that it is free on the
splines. If the splines on the transmission clutch
shaft are
burred,
remove the
burrs
with a fine file or
stone.
If the movement of the clutch driven
plate is not free on the splines, the result
will
be
clutch
drag and
hard
shifting of transmission gears.
1-21.
CLUTCH
PRESSURE
PLATE ASSEMBLY AND
ADJUSTMENT
1-22. Assemble
Clutch
Levers
Prior
to assembly, apply a small amount of petro
latum
to each slide of the pressure plate lug.
a.
Lay the pressure plate on the block in the
press.
b. Assemble a lever,
eyebolt,
and pin holding the
lever and
eyebolt
as
close
together
as possible.
With
the other hand, grasp the fulcrum as shown
in
Fig. 1-15.
c.
Insert the fulcrum in the
slots
of the pressure
plate lug.
Lower
slightly and tilt the lower
edge
until
it touches the vertical milled surface of the
lug.
Insert the lower end of the
eyebolt
in the
hole
in the pressure plate. The short end of the lever
will
then be under the hook of the lug and
near
the fulcrum.
d.
Slide the fulcrum upward in the
slots
of the
lug.
Lift
it over the ridge on the short end of the
lever and drop it into the
groove
in the lever
(Fig.
1-15).
1-23.
Assemble
Clutch
Spring and
Cover
a.
After all levers are installed, place the felt grease pads over the eyebolts.
Lubricate
pads
sparingly
with light
engine
oil.
Then
place the
clutch
pressure springs in a vertical position on
the spring
bosses.
FIG.
1-15—INSTALLING
CLUTCH LEVERS
1—
Lover
2—
Eyebolt
3—
Fulcrum
4—
Pressure
Plate
232
Page 240 of 376
THREE-SPEED
TRANSMISSION
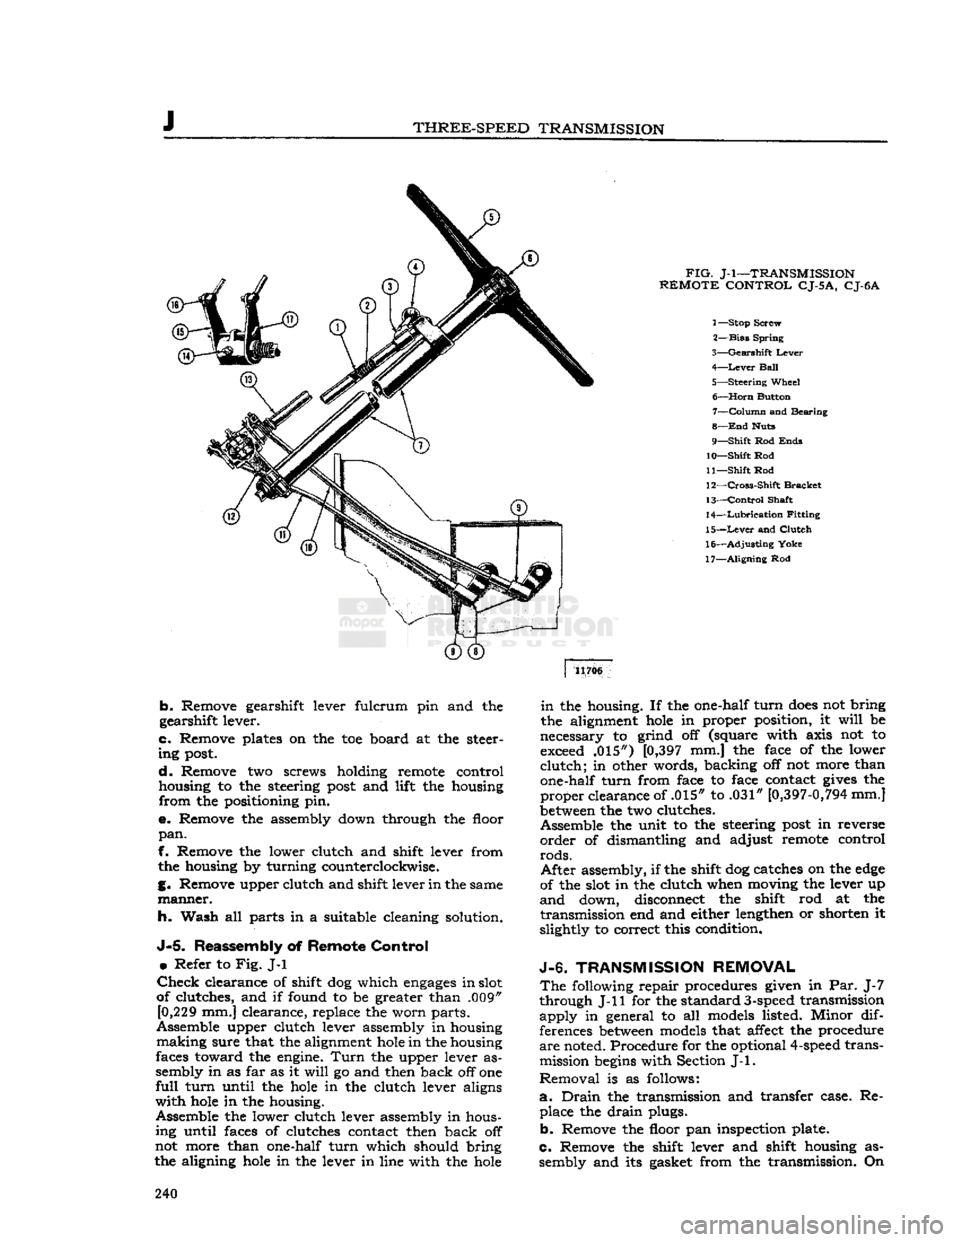
FIG.
J-l—TRANSMISSION
REMOTE
CONTROL
CJ-5
A,
CJ-6A
1— Stop Screw
2—
Bias
Spring
3—
Gearshift
Lever
4—
Lever
Ball
5—
Steering
Wheel 6—
Horn
Button 7—
Column
and Bearing
8—
End
Huts
9—
Shift
Rod
Ends
10—
Shift
Rod
11—
Shift
Rod
12—
Cross-Shift
Bracket
13—
Control
Shaft
14—
Lubrication
Fitting
15—
Lever
and
Clutch
16—
Adjusting
Yoke
17—
Aligning
Rod 11706
b.
Remove gearshift lever fulcrum pin and the
gearshift lever.
c.
Remove plates on the toe board at the steer
ing
post.
d.
Remove two screws holding remote control
housing to the steering
post
and lift the housing
from
the positioning pin.
e.
Remove the assembly down through the floor
pan.
f. Remove the lower clutch and shift lever from the housing by turning counterclockwise.
g. Remove upper clutch and shift lever in the same
manner.
h. Wash all parts in a suitable cleaning solution.
J-5.
Reassembly of
Remote
Control
•
Refer to
Fig.
J-l
Check
clearance of shift dog which
engages
in slot
of clutches, and if found to be greater than .009" [0,229 mm.] clearance, replace the worn parts.
Assemble upper clutch lever assembly in housing
making
sure that the alignment
hole
in the housing
faces toward the engine.
Turn
the upper lever as
sembly in as far as it
will
go and then back off one
full
turn
until the
hole
in the clutch lever aligns
with
hole
in the housing.
Assemble the lower clutch lever assembly in hous ing until faces of clutches contact then back off
not more than one-half
turn
which should bring
the aligning
hole
in the lever in line with the
hole
in
the housing. If the one-half
turn
does
not bring
the alignment
hole
in proper position, it
will
be
necessary to grind off (square with axis not to exceed .015") [0,397 mm.] the face of the lower
clutch;
in other words, backing off not more than
one-half
turn
from face to face contact
gives
the
proper
clearance of .015" to .031"
[0,397-0,794
mm.]
between
the two clutches.
Assemble the unit to the steering
post
in reverse
order
of dismantling and adjust remote control
rods.
After
assembly, if the shift dog catches on the
edge
of the slot in the clutch when moving the lever up
and
down, disconnect the shift rod at the
transmission
end and either lengthen or shorten it
slightly to correct this condition.
J-6.
TRANSMISSION
REMOVAL
The
following repair procedures given in Par. J-7
through J-ll for the standard
3-speed
transmission
apply
in general to all models listed. Minor dif
ferences
between
models that affect the procedure
are
noted. Procedure for the optional
4-speed
transmission
begins
with Section
J-l.
Removal
is as follows:
a.
Drain
the transmission and transfer case. Re place the
drain
plugs.
b.
Remove the floor pan inspection plate.
c.
Remove the shift lever and shift housing as sembly and its gasket from the transmission. On 240
Page 276 of 376
L
PROPELLER
SHAFTS
AND
UNIVERSAL JOINTS
move
the snap rings, pinch the ends
together
with
a
pair
of pliers. If the rings do not readily snap
out of the groove, tap the end of the bearing lightly
which
will
relieve pressure against the rings.
After
removing the snap rings, press on the end of
one bearing until the
opposite
bearing is pushed
from
the yoke arm.
Turn
the joint over and press
the first bearing back out of that arm by pressing
on the
exposed
end of the
journal
shaft. Use a
soft
ground drift with a flat face about [0,8 mm.]
smaller
in diameter than the
hole
in the yoke arm
and
drive it out, otherwise there is danger of damaging the bearing.
Repeat
this operation for the other two bearings,
then lift out
journal
assembly by sliding it to one
side.
L-4.
Snap
Ring
Type Assembly
Wash
all parts in cleaning solvent and inspect the
parte
after cleaning. Replace any parts that indicate
extensive
wear.
It is advisable to install new gaskets
on the
journal
assembly regardless of the condition of the old gaskets. Make certain that the grease
channel
in each
journal
trunnion is open.
Pack
the bearing
cones
one-third
full
of lubricant
and
install the rollers.
Draw
the bearings into the end yoke arm and seat
them firmly against the bearing shoulders. Hold
the bearings in a vertical position to prevent the
needles
from dropping out until the joint is as sembled. If the joint binds when assembled, tap
the arms lightly to relieve any pressure on the bear
ings at the end of the
journal.
L-5.
U-Bolt
Type Disassembly
Removal
of the attaching "U"-bolt releases one set
of bearing races. Slide the propeller shaft into the
yoke flange to remove them using care not to
lose
the rollers.
After
the removal of the one set of bearing races,
release the other set by removing the snap rings
in
the
sleeve
yoke by pinching the ends
together
with
a
pair
of pliers. Should the rings
fail
to snap
readily
from the groove, tap the end of the bearing
lightly,
which
will
relieve the pressure against them.
Press
on the end of one bearing, until the
opposite
bearing
is pushed out of the yoke arm.
Turn
the
universal
joint over and press the first bearing out
by pressing on the
exposed
end of the
journal
as
sembly. Use a
soft
ground drift with a flat face about
\{i
[0,8 mm.] smaller in diameter than the
hole
in the yoke
arm
and drive out the bearing.
Lift
the
journal
out by sliding to one side.
Clean
all
parts
and check for wear.
L-6.
U-Bolt Type Assembly
Wash
all parts in cleaning solvent and inspect the
parts
after cleaning. Replace any parts that indicate
extensive
wear.
It is advisable to install new gaskets
on the
journal
assembly regardless of the condition
of the old gaskets. Make certain that the grease
channel
in each
journal
trunnion is open.
Pack
the bearing
cones
one-third
full
of lubricant
and
install the rollers.
Draw
the bearings into the end yoke arm and seat
them firmly against the bearing shoulders. Hold the
bearings in a vertical position to prevent the
needles
from dropping out until the joint is as
sembled. If the joint binds when assembled, tap the arms lightly to relieve any pressure on the
bearings at the end of the
journal.
Tighten the
U-bolts equally. U-bolt torque wrench reading is 15 to 20 lb-ft. [2,07 a 2,76 kg-m.].
When
installing the assembly in the vehicle be sure
that the arrows on the propeller shaft and yoke
sleeve
are in alignment as shown in Fig. L-2, or
that the unmarked joints are aligned with the yokes in the same parallel plane.
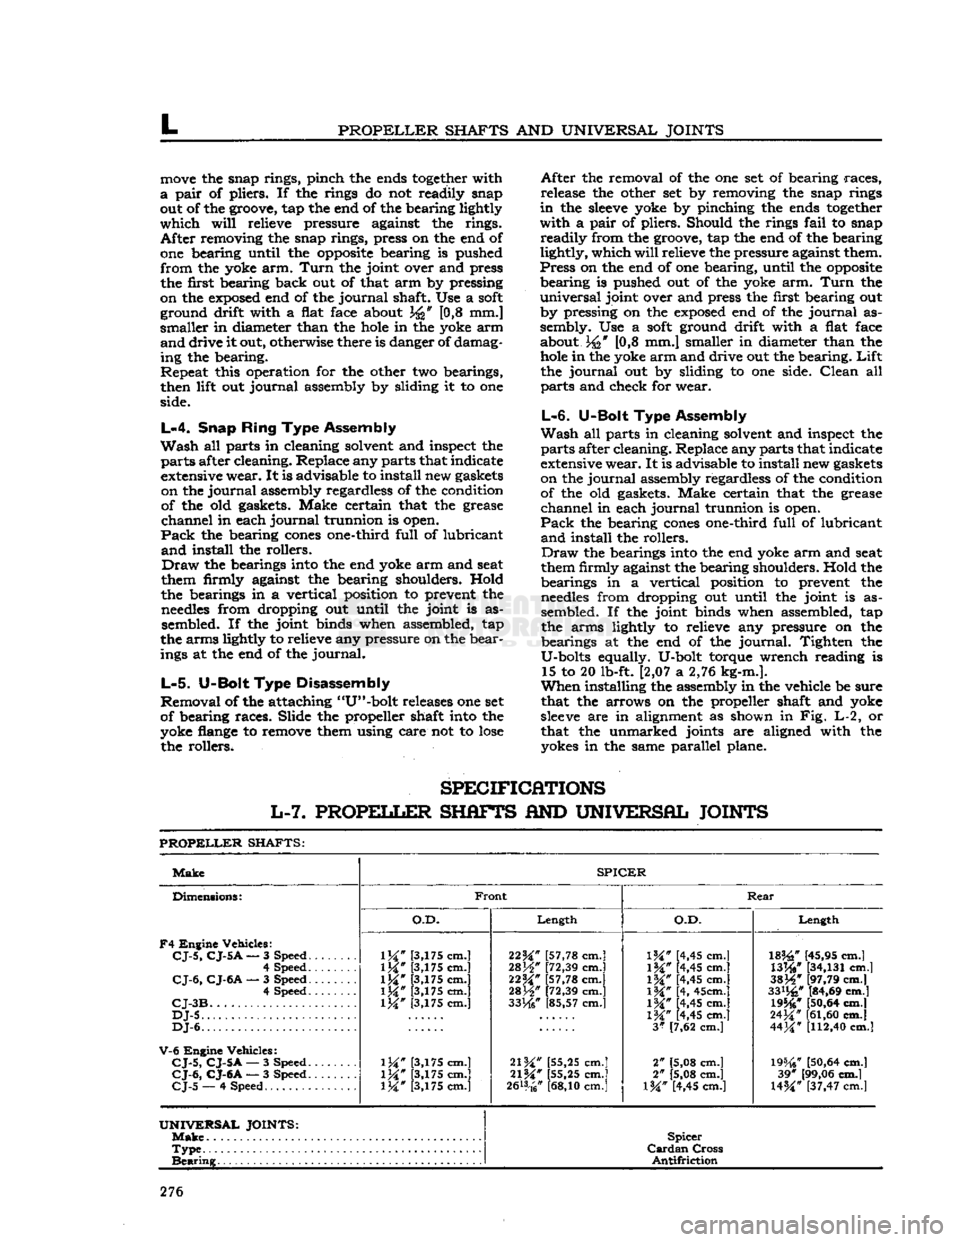
SPECIFICATIONS
L-7.
PROPELLER
SHAFTS
AND
UNIVERSAL JOINTS
PROPELLER
SHAFTS:
Make
SPICER
Dimensions:
F4
Engine Vehicles:
CJ-5,
CJ-5
A
— 3 Speed.
......
4 Speed
CJ-6,
CJ-6A
— 3 Speed 4 Speed
CJ-3B
DJ-5
DJ-6.
V-6
Engine Vehicles:
CJ-5,
CJ-5A
— 3 Speed.
CJ-6,
CJ-6A
— 3 Speed.
CJ-5
— 4 Speed
Front
Rear
Dimensions:
F4
Engine Vehicles:
CJ-5,
CJ-5
A
— 3 Speed.
......
4 Speed
CJ-6,
CJ-6A
— 3 Speed 4 Speed
CJ-3B
DJ-5
DJ-6.
V-6
Engine Vehicles:
CJ-5,
CJ-5A
— 3 Speed.
CJ-6,
CJ-6A
— 3 Speed.
CJ-5
— 4 Speed
O.D.
Length
O.D.
Length
Dimensions:
F4
Engine Vehicles:
CJ-5,
CJ-5
A
— 3 Speed.
......
4 Speed
CJ-6,
CJ-6A
— 3 Speed 4 Speed
CJ-3B
DJ-5
DJ-6.
V-6
Engine Vehicles:
CJ-5,
CJ-5A
— 3 Speed.
CJ-6,
CJ-6A
— 3 Speed.
CJ-5
— 4 Speed
1M"
[3,175 cm.]
1M*
[3,175 cm.]
\W
[3,175 cm.]
1M*
[3,175 cm.] [3,175 cm.]
\W
[3,175 cm.]
\W
[3,175 cm.] [3,175 cm.] 22^" [57,78 cm.]
28H"
[72,39 cm.]
22M*
[57,78 cm.]
mW
[72,39 cm.]
33He"
[85,57 cm.]
21W
[55,25 cm.]
21%"
[55,25 cm.]
2&*
cm.]
IK"
[4,45 cm.]
1M#
[4,45 cm.]
\%"
[4,45 cm.]
\%"
[4, 45cm.]
IW
[4,45 cm.]
1M*
[4,45 cm.]
3*
[7,62 cm.]
2" [5,08 cm.]
2" [5,08 cm.]
l%" [4,45 cm.]
182£"
[45,95 cm.]
WW
[34,131
cm.]
3SJ4*
[97,79 cm.]
33%"
[84,69 cm.] 19546*
[50,64
cm.]
24^"
[61,60
cm.]
44M*
[112,40
cm.]
19%?
[50,64
cm.] 39* [99,06 cm.]
U%"
[37,47 cm.l
UNIVERSAL
JOINTS:
Make
Spicer
Cardan
Cross
Antifriction
Type
Spicer
Cardan
Cross
Antifriction
Bearing
Spicer
Cardan
Cross
Antifriction
276
Page 361 of 376
'Jeep*
UNIVERSAL
SERIES
SERVICE
MANUAL
U
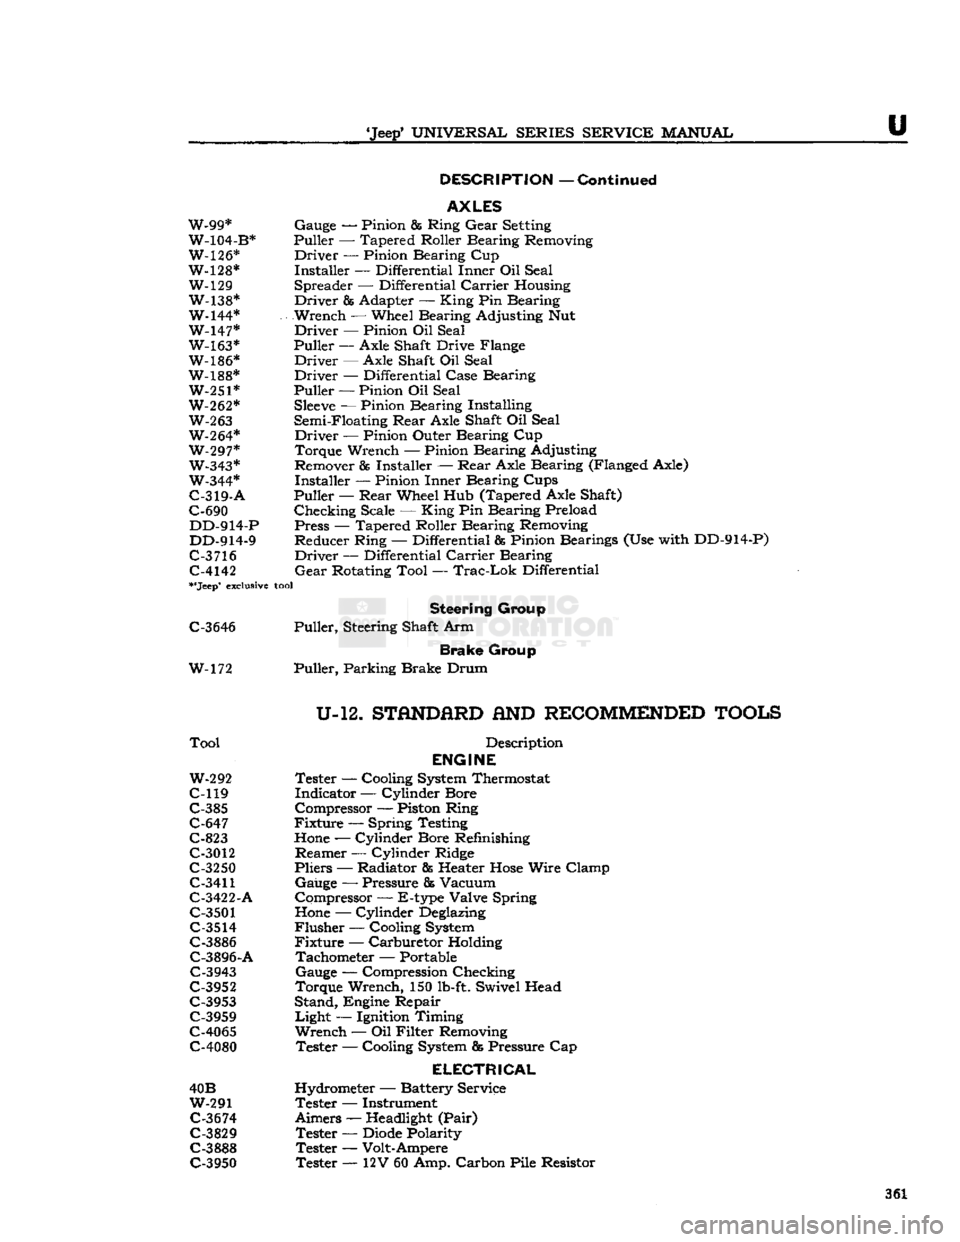
DESCRIPTION
—
Continued
AXLES
W-99* Gauge — Pinion & Ring
Gear
Setting
W-104-B* Puller — Tapered Roller Bearing Removing
W-126* Driver — Pinion Bearing Cup
W-128* Installer — Differential Inner Oil Seal W-129 Spreader — Differential
Carrier
Housing
W-138* Driver & Adapter —
King
Pin Bearing
W-144* Wrench — Wheel Bearing Adjusting Nut W-147* Driver — Pinion Oil Seal W-163* Puller
—-
Axle Shaft Drive Flange
W-186* Driver — Axle Shaft Oil Seal
W-188* Driver — Differential Case Bearing W-251* Puller — Pinion Oil Seal
W-262*
Sleeve
— Pinion Bearing Installing
W-263
Semi-Floating
Rear
Axle Shaft Oil Seal W-264* Driver — Pinion Outer Bearing Cup
W-297* Torque Wrench — Pinion Bearing Adjusting W-343* Remover
85
Installer —
Rear
Axle Bearing (Flanged Axle)
W-344* Installer — Pinion Inner Bearing Cups
C-319-A
Puller —
Rear
Wheel Hub (Tapered Axle Shaft)
C-690 Checking Scale —
King
Pin Bearing Preload DD-914-P Press — Tapered Roller Bearing Removing
DD-914-9 Reducer Ring — Differential & Pinion Bearings (Use with DD-914-P)
C-3
716 Driver — Differential
Carrier
Bearing C-4142
Gear
Rotating Tool —
Trac-Lok
Differential
**Jeep*
exclusive
tool
Steering
Group
C-3646 Puller, Steering Shaft Arm
Brake
Group
W-172 Puller, Parking Brake Drum
U-12.
STflNDfiRD
AND
RECOMMENDED
TOOLS
Tool
Description
ENGINE
W-292
Tester — Cooling
System
Thermostat
C-119 Indicator — Cylinder Bore C-385 Compressor — Piston Ring
C-647 Fixture — Spring Testing
C-823
Hone
— Cylinder Bore Refinishing
C-3012 Reamer — Cylinder Ridge
C-3250 Pliers — Radiator fis Heater
Hose
Wire Clamp
C-3411
Gauge — Pressure & Vacuum
C-3422-A Compressor — E-type Valve Spring
C-3501
Hone
— Cylinder
Deglazing
C-3514
Flusher — Cooling
System
C-3886 Fixture — Carburetor Holding C-3896-A Tachometer — Portable
C-3943 Gauge — Compression Checking
C-3952 Torque Wrench, 150
lb-ft.
Swivel Head C-3953 Stand, Engine Repair
C-3959 Light — Ignition Timing
C-4065 Wrench — Oil Filter Removing
C-4080 Tester — Cooling
System
fig
Pressure Cap
ELECTRICAL
40B Hydrometer — Battery Service
W-291 Tester — Instrument
C-3674
Aimers —
Headlight
(Pair)
C-3829 Tester —
Diode
Polarity
C-3888 Tester — Volt-Ampere C-3950 Tester — 12V 60 Amp. Carbon Pile Resistor 361
Page 371 of 376
'Jeep'
UNIVERSAL
SERIES SERVICE
MANUAL
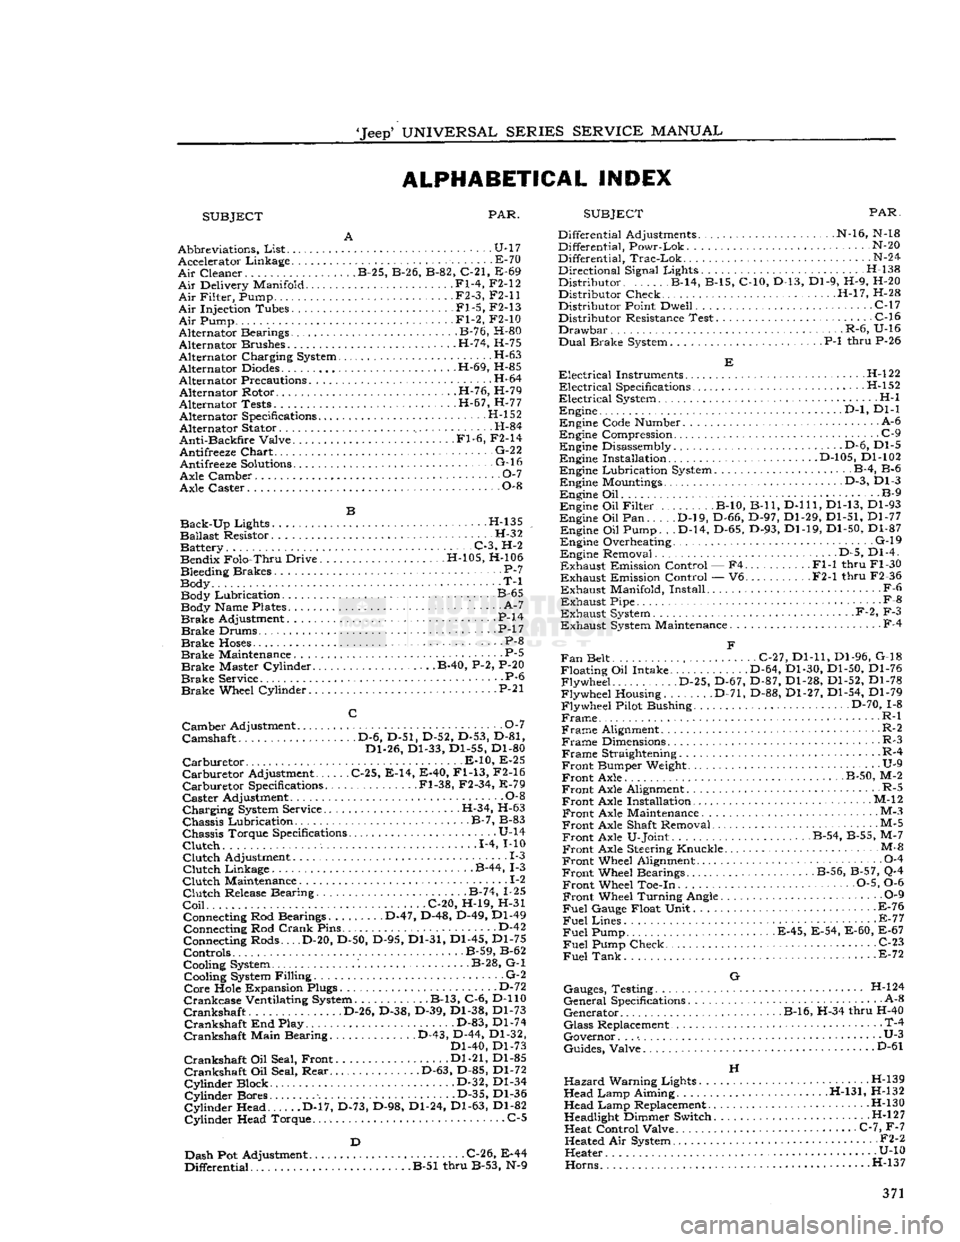
ALPHABETICAL INDEX
SUBJECT PAR.
SUBJECT
PAR.
Abbreviations,
List
U-17 Accelerator Linkage E-70
Air
Cleaner B-25, B-26, B-82, C-21, E-69
Air
Delivery Manifold Fl-4, F2-12
Air
Filter, Pump • F2-3, F2-11
Air
Injection Tubes Fl-5, F2-13
Air
Pump Fl-2, F2-10
Alternator Bearings B-76, H-80
Alternator Brushes H-74, H-75
Alternator Charging System •
•
H-63
Alternator
Diodes
H-69, H-85
Alternator Precautions H-64 Alternator Rotor H-76, H-79
Alternator Tests H-67, H-77 Alternator Specifications H-l 52
Alternator Stator H-84
Anti-Backfire
Valve Fl-6, F2-14
Antifreeze
Chart
• G-22 Antifreeze
Solutions
- G-16
Axle Camber O-l
Axle Caster 0-8
Back-Up
Lights H-135
Ballast
Resistor. H-32 Battery C-3, H-2 Bendix Folo-Thru Drive H-105, H-106
Bleeding Brakes P-7
Body T-l Body Lubrication. B-65 Body Name Plates ' A-7
Brake
Adjustment P-14
Brake
Drums. • .P-17
Brake
Hoses
P-8
Brake
Maintenance . P-5
Brake
Master Cylinder B-40, P-2, P-20
Brake
Service P-6
Brake
Wheel Cylinder • P-21
Camber
Adjustment 0-7
Camshaft D-6, D-51, D-52, D-53, D-81, Dl-26, Dl-33, Dl-55, Dl-80
Carburetor
E-10, E-25
Carburetor
Adjustment C-25, E-14, E-40,
Fl-13,
F2-16
Carburetor
Specifications .Fl-38, F2-34, E-79
Caster
Adjustment 0-8
Charging
System Service. .H-34, H-63
Chassis
Lubrication B-7, B-83
Chassis
Torque Specifications U-14
Clutch
1-4, MO
Clutch
Adjustment 1-3
Clutch
Linkage B-44, 1-3
Clutch
Maintenance .. 1-2
Clutch
Release Bearing B-74, 1-25
Coil
C-20, H-19, H-31 Connecting Rod Bearings D-47, D-48, D-49, Dl-49 Connecting Rod
Crank
Pins D-42
Connecting Rods... .D-20, D-50, D-95, Dl-31, Dl-45, Dl-75
Controls B-59, B-62
Cooling System B-28, G-l Cooling System Filling G-2
Core
Hole Expansion Plugs D-72
Crankcase
Ventilating System B-13, C-6, D-110
Crankshaft
D-26, D-38, D-39, Dl-38, Dl-73
Crankshaft
End Play. D-83, Dl-74
Crankshaft
Main Bearing D-43, D-44, Dl-32, Dl-40, Dl-73
Crankshaft
Oil Seal, Front Dl-21, Dl-85
Crankshaft
Oil Seal, Rear D-63, D-85, Dl-72
Cylinder
Block D-32, Dl-34
Cylinder
Bores D-35, Dl-36
Cylinder
Head D-17, D-73, D-98, Dl-24, Dl-63, Dl-82
Cylinder
Head Torque. C-5
Dash Pot Adjustment C-26, E-44
Differential B-51 thru B-53, N-9 Differential Adjustments N-16, N-18
Differential, Powr-Lok N-20
Differential,
Trac-Lok
N-24
Directional Signal Lights. . H-138
Distributor B-14, B-15, C-10, D-13, Dl-9, H-9, H-20 Distributor Check H-l7, H-28
Distributor Point Dwell C-17 Distributor Resistance Test C-16
Drawbar
.R-6, U-16
Dual
Brake System P-l thru P-26
Electrical
Instruments H-l22
Electrical
Specifications .H-l52
Electrical
System H-l Engine .
..D-l,
Dl-1
Engine Code Number A-6
Engine Compression .
.
C-9 Engine Disassembly . • .D-6, Dl-5 Engine Installation D-105, Dl-102
Engine Lubrication System B-4, B-6 Engine Mountings D-3, Dl-3
Engine Oil B-9
Engine Oil Filter B-10, B-ll,
D-lll,
Dl-13, Dl-93
Engine Oil Pan D-l9, D-66, D-97, Dl-29, Dl-51, Dl-77 Engine Oil Pump. . .D-14, D-65, D-93, Dl-19, Dl-50, Dl-87
Engine Overheating. G-l9 Engine Removal D-5, Dl-4.
Exhaust
Emission Control — F4 Fl-1 thru Fl-30
Exhaust
Emission Control — V6 F2-1 thru F2-36
Exhaust
Manifold, Install F-6
Exhaust
Pipe -
•
F-8
Exhaust
System F-2, F-3
Exhaust
System Maintenance F-4
Fan
Belt C-27, Dl-11, Dl-96, G-18
Floating Oil Intake. D-64, Dl-30, Dl-50, Dl-76 Flywheel D-25, D-67, D-87, Dl-28, Dl-52, Dl-78
Flywheel Housing. D-71, D-88, Dl-27, Dl-54, Dl-79
Flywheel Pilot Bushing D-70, 1-8
Frame
R-l
Frame
Alignment. R-2
Frame
Dimensions R-3
Frame
Straightening R-4
Front
Bumper Weight. • U-9
Front
Axle B-50, M-2
Front
Axle Alignment R-5
Front
Axle Installation • M-12
Front
Axle Maintenance M-3
Front
Axle Shaft Removal M-5
Front
Axle U-Joint B-54, B-55, M-7
Front
Axle Steering Knuckle M-&
Front
Wheel Alignment 0-4
Front
Wheel Bearings B-56, B-57, Q-4
Front
Wheel Toe-in 0-5, 0-6
Front
Wheel Turning Angle 0-9
Fuel
Gauge Float Unit F-76
Fuel
Lines - E-77
Fuel
Pump E-45, E-54, E-60, E-67
Fuel
Pump Check C-23
Fuel
Tank
E-72
G
Gauges, Testing H-l24
General
Specifications A-8
Generator B-16, H-34 thru H-40
Glass
Replacement • T-4
Governor. . .
•.
• U-3
Guides, Valve D"61
H
Hazard
Warning Lights H-139
Head Lamp Aiming H-131, H-132 Head Lamp Replacement H-130
Headlight Dimmer Switch H-l
2
7
Heat Control Valve C-7, F-7 Heated Air System • •
•
F2-2
Heater U-10
Horns.....
....H-137 371
Page 372 of 376
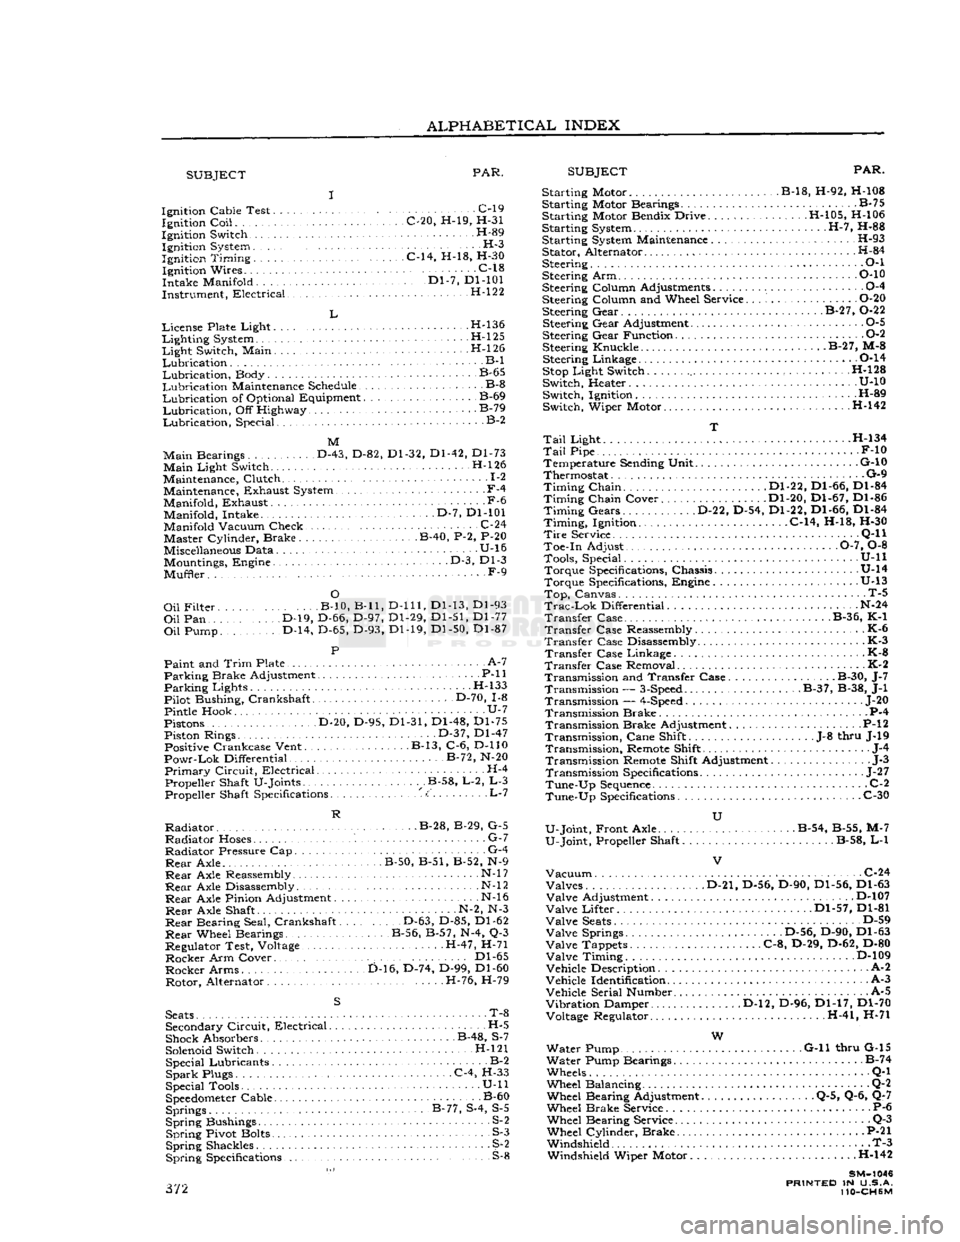
ALPHABETICAL
INDEX
SUBJECT
PAR.
SUBJECT
PAR.
Ignition Cable Test C-l9 Ignition
Coil
C-20, H-19, H-31
Ignition Switch H-89 Ignition System H-3
Ignition
Timing
C-14, H-18, H-30 Ignition Wires C-18
Intake Manifold '." Dl-7, Dl-101
Instrument, Electrical H-122
L
License Plate Light H-l36
Lighting
System H-l25
Light
Switch, Main . H-l 26
Lubrication
B-l
Lubrication,
Body B-65
Lubrication
Maintenance Schedule B-8
Lubrication
of Optional Equipment B-69
Lubrication,
Off Highway B-79
Lubrication,
Special. B-2
M
Main
Bearings D-43, D-82, Dl-32, Dl-42, Dl-73
Main
Light Switch. H-l26
Maintenance, Clutch 1-2 Maintenance, Exhaust System.,
-
F-4
Manifold, Exhaust -F-6 Manifold, Intake D-7, Dl-101
Manifold Vacuum Check. .C-24 Master Cylinder, Brake B-40, P-2, P-20
Miscellaneous Data U-16 Mountings, Engine • • •
-
D-3, Dl-3
Muffler. F-9
O
Oil
Filter B-10, B-ll,
D-lll,
Dl-13, Dl-93
Oil
Pan D-19, D-66, D-97, Dl-29, Dl-51, Dl-77
Oil
Pump. D-14, D-65, D-93, Dl-19, Dl-50, Dl-87
P
Paint and
Trim
Plate • • A-7
Parking
Brake Adjustment P-ll
Parking
Lights H-133
Pilot Bushing, Crankshaft D-70, 1-8
Pintle Hook U-7
Pistons D-20, D-95, Dl-31, Dl-48, Dl-75 Piston Rings. • • •
•
D-37, Dl-47 Positive Crankcase Vent. B-13, C-6, D-110
Powr-Lok
Differential B-72, N-20
Primary
Circuit,
Electrical H-4 Propeller Shaft U-Joints .B-58, L-2, L-3 Propeller Shaft Specifications <:' L-7
R
Radiator
B-28, B-29, G-5
Radiator
Hoses. G-7
Radiator
Pressure Cap G-4
Rear
Axle. B-50, B-51, B-52, N-9
Rear
Axle Reassembly • N-l
7
Rear
Axle Disassembly N-l
2
Rear
Axle Pinion Adjustment N-l6
Rear
Axle Shaft N-2, N-3
Rear
Bearing Seal, Crankshaft D-63, D-85, Dl-62
Rear
Wheel Bearings B-56, B-57, N-4, Q-3
Regulator Test, Voltage H-47, H-71
Rocker
Arm Cover.. . Dl-65
Rocker
Arms D-16, D-74, D-99, Dl-60 Rotor, Alternator H-76, H-79
S
Seats
• T-8 Secondary
Circuit,
Electrical H-5
Shock Absorbers B-48, S-7
Solenoid Switch. H-l21 Special Lubricants B-2
Spark
Plugs C-4, H-33
Special Tools • U-ll
Speedometer
Cable B-60 Springs B-77, S-4, S-5
Spring
Bushings S-2
Spring
Pivot Bolts S-3
Spring
Shackles S^2
Spring
Specifications S-8 372 Starting Motor B-18, H-92, H-108
Starting Motor Bearings B-75
Starting Motor Bendix Drive H-105, H-106
Starting System H-7, H-88
Starting System Maintenance H-93 Stator, Alternator H-84
Steering • • •
•
O-l
Steering Arm P-10
Steering Column Adjustments 0-4
Steering Column and Wheel Service O-20 Steering Gear. . B-27, 0-22
Steering Gear Adjustment 0-5
Steering Gear Function 0-2
Steering Knuckle. B-27, M-8 Steering Linkage 0-14
Stop
Light Switch H-128
Switch, Heater U-10 Switch, Ignition H-89
Switch, Wiper Motor H-142
T
Tail
Light . H-134
Tail
Pipe F-10 Temperature Sending Unit G-10
Thermostat G-9
Timing
Chain Dl-22, Dl-66, Dl-84
Timing
Chain Cover Dl-20, Dl-67, Dl-86
Timing
Gears D-22, D-54, Dl-22, Dl-66, Dl-84
Timing,
Ignition. C-14, H-18, H-30
Tire
Service . •
•
Q-l
1
Toe-in Adjust 0-7, 0-8 Tools, Special. . .
........
U-ll Torque Specifications, Chassis U-14
Torque Specifications, Engine .U-13
Top,
Canvas. T-5
Trac-Lok
Differential N-24
Transfer
Case B-36, K-1
Transfer
Case Reassembly K-6
Transfer
Case Disassembly K-3
Transfer
Case Linkage - K-8
Transfer
Case Removal K-2 Transmission and Transfer Case. B-30, J-7 Transmission —
3-Speed
B-37, B-38, J-l
Transmission —
4-Speed
... J-20
Transmission Brake P-4 Transmission Brake Adjustment P-l
2
Transmission,
Cane Shift .J-8 thru J-19
Transmission,
Remote Shift J-4
Transmission Remote Shift Adjustment J-3
Transmission Specifications
-
J-27
Tune-Up
Sequence
C-2
Tune-Up
Specifications C-30
U
U-Joint, Front Axle . . B-54, B-55, M-7
U-Joint, Propeller Shaft B-58, L-l
Vacuum
C-24 Valves D-21, D-56, D-90, Dl-56, Dl-63
Valve
Adjustment D-107
Valve
Lifter Dl-57, Dl-81
Valve
Seats
D-59
Valve
Springs .D-56, D-90, Dl-63
Valve
Tappets C-8, D-29, D-62, D-80
Valve
Timing D-109
Vehicle Description A-2
Vehicle Identification A-3
Vehicle Serial Number. A-5
Vibration
Damper D-l2, D-96, Dl-17, Dl-70 Voltage Regulator. H-41, H-71
W
Water Pump G-ll thru G-15
Water Pump Bearings B-74
Wheels Q-l
Wheel Balancing Q-2 Wheel Bearing Adjustment Q-5, Q-6, Q-7
Wheel Brake Service P-6 Wheel Bearing Service Q-3
Wheel Cylinder, Brake P-21 Windshield T-3 Windshield Wiper Motor . .H-142
SM-1046
PRINTED
IN U.S.A.
110-CH6M